使用 Spring AMQP 操作 RabbitMQ
RabbitMQ 采用 Erlang 语言开发,同时具有高可用性、高可靠性、消息低延迟,支持的多种开发语言的等优点,是当前比较流行的综合性最好的消息队列。当然有些杠精肯定会拿 RocketMQ 和 Kafka 等消息队列的相关性能跟 RabbitMQ 进行对比说事儿,这里不进行评价,你们这些杠精开心就好,说服一个人没有意义,把技术学到手,能够解决工作中的实际问题才是最重要的。
RabbitMQ 的官网地址:https://www.rabbitmq.com
AMQP 全称 Advanced Message Queuing Protocol(高级消息队列协议),是用于在应用程序之间传递业务消息的开放标准。该协议与语言和平台无关,很符合微服务中独立性的要求。Spring AMQP 是基于 AMQP 协议定义的一套 API 规范,提供了模板来发送和接收消息。默认情况下是基于 RabbitMQ 实现,能够使用 SpringBoot 进行自动装配,大大简化了程序代码的开发。
Spring AMQP 的官网地址:https://spring.io/projects/spring-amqp
本篇博客的 Demo 使用 Spring AMQP 操作 RabbitMQ,在博客最后提供源代码下载。
一、安装部署 RabbitMQ
之前的博客已经介绍了 Docker,为了简化安装过程,因此这里采用 Docker 安装启动 RabbitMQ
我安装 Docker 的虚拟机是 CentOS7,IP 地址是 192.168.216.128
在写本篇博客时,RabbitMQ 的官网上最新版本是 3.12 ,因此使用 Docker 安装的命令如下:
# 反斜杠(\)表示命令换行,因此命令太长,因此换行编写命令比较方便查看
docker run \
    -e RABBITMQ_DEFAULT_USER=jobs \
    -e RABBITMQ_DEFAULT_PASS=qwert \
    --name mq \
    --hostname mq \
    -p 15672:15672 \
    -p 5672:5672  \
    -d rabbitmq:3.12-management
e 表示环境变量,RABBITMQ_DEFAULT_USER 表示默认用户名,RABBITMQ_DEFAULT_PASS 表示默认密码
hostname 表示主机名(这个很重要,因为 RabbitMQ 使用主机名来命名节点,当进行集群部署时用以区分每个节点,当然我们现在先使用单节点部署 RabbitMQ)。
p 表示宿主机映射 Docker 容器内部的端口,这里映射出 2 个端口(如果你防火墙没关闭的话,需要开放这 2 个端口),其中 5672 是程序连接发送和接收消息的端口,15672 是可视化界面的访问端口。
rabbitmq:3.12-management 是当前最新版本的 Docker 镜像名称。
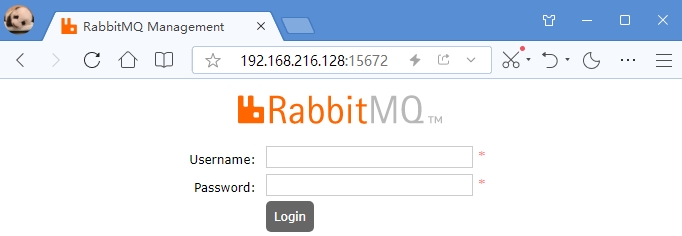
以上操作都完成后,打开浏览器访问 http://192.168.216.128:15672,即可访问到可视化界面:

然后输入用户名 jobs ,密码 qwert 即可登录进去。可以查看到 RabbitMQ 的客户端连接、Exchange 交换机、Queue 队列、VirtualHost 虚拟主机等信息,可以直接进行可视化界面操作,有关 RabbitMQ 的相关概念介绍,这里不做过多介绍。
二、搭建工程
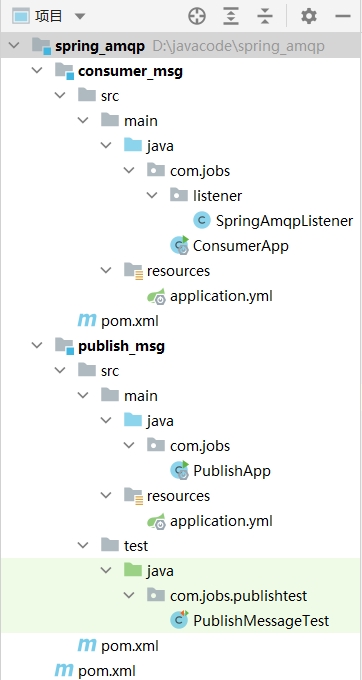
搭建一个父工程,包含 2 个 SpringBoot 子工程,分别用来发送和接收消息。

publish_msg 是发送消息的项目工程,其发送代码都是在测试类 PublishMessageTest 中编写。
consumer_msg 是接收消息的项目工程,其接收代码都是在 SpringAmqpListener 类中编写。
publish_msg 和 consumer_msg 中的 pom 文件由于需要使用相同的依赖,因此这两个工程的 pom 中没有引入任何依赖,它们所使用的依赖都是在父工程的 pom 中引入的,父工程的完成 pom 文件内容如下:
<?xml version="1.0" encoding="UTF-8"?>
<project xmlns="http://maven.apache.org/POM/4.0.0"
         xmlns:xsi="http://www.w3.org/2001/XMLSchema-instance"
         xsi:schemaLocation="http://maven.apache.org/POM/4.0.0
         http://maven.apache.org/xsd/maven-4.0.0.xsd">
    <modelVersion>4.0.0</modelVersion>

    <groupId>com.jobs</groupId>
    <artifactId>spring_amqp</artifactId>
    <version>v1.0</version>
    <modules>
        <module>publish_msg</module>
        <module>consumer_msg</module>
    </modules>
    <packaging>pom</packaging>

    <parent>
        <groupId>org.springframework.boot</groupId>
        <artifactId>spring-boot-starter-parent</artifactId>
        <version>2.4.5</version>
        <relativePath/>
    </parent>

    <properties>
        <maven.compiler.source>8</maven.compiler.source>
        <maven.compiler.target>8</maven.compiler.target>
    </properties>

    <dependencies>
        <!--在此主要使用 lombok 自带的 log 方法-->
        <dependency>
            <groupId>org.projectlombok</groupId>
            <artifactId>lombok</artifactId>
        </dependency>
        <!--Spring AMQP 消息队列依赖-->
        <dependency>
            <groupId>org.springframework.boot</groupId>
            <artifactId>spring-boot-starter-amqp</artifactId>
        </dependency>
        <!--引入单元测试依赖-->
        <dependency>
            <groupId>org.springframework.boot</groupId>
            <artifactId>spring-boot-starter-test</artifactId>
        </dependency>
        <!--发送和接收消息,默认使用 jdk 的序列化进行消息转换,
        引入该依赖,是为了配置消息转换使用 json 格式-->
        <dependency>
            <groupId>com.fasterxml.jackson.core</groupId>
            <artifactId>jackson-databind</artifactId>
        </dependency>
    </dependencies>
</project>
三、消息接收者
之所以先介绍消息接收者,是因为在消息接收者代码中,能够通过注解声明出 Exchange 交换机和 Queue 队列,默认情况下是持久化的,因此只要先启动一次消费者程序,在 RabbitMQ 中就能够永久存储 Exchange 和 Queue ,后续就无所谓发送者和消费者的启动顺序了。首先我们先在 application.yml 中配置好 RabittMQ 的连接信息:
spring:
  rabbitmq:
    host: 192.168.216.128
    port: 5672
    username: jobs
    password: qwert
    virtual-host: /
    listener:
      simple:
        # 每次取 1 条消息进行消费,消费成功后再去取下一条消息
        # 防止多个消费者被均匀分配消息,让消费能力强的消费者能够获取更多的消息
        prefetch: 1
这里需要特别说明的是:最好配置上 prefetch,并且给予一个合理的值。如果不配置的话,当有多个消费者时,消费同一个消息队列时,不管消费者所在的机器性能如何,都会得到均匀数量的消息分配,这显然不是我们所期望的。我们肯定期望性能好的机器上的消费者能够多消费一些消息,因此配置上 prefetch 后,每个消费者都会先取出一定数量的消息消费完成后,再去获取下一批消息,这样就能够实现根据机器性能分配消息了。
下面列出 RabbitMQ 的 5 种消息队列的监听程序代码:
package com.jobs.listener;

import org.springframework.amqp.core.ExchangeTypes;
import org.springframework.amqp.rabbit.annotation.Exchange;
import org.springframework.amqp.rabbit.annotation.Queue;
import org.springframework.amqp.rabbit.annotation.QueueBinding;
import org.springframework.amqp.rabbit.annotation.RabbitListener;
import org.springframework.stereotype.Component;

import java.util.Map;

@Component
public class SpringAmqpListener {

    /* SimpleQueue 接收消息代码 */
    @RabbitListener(queuesToDeclare = @Queue(name = "simple.queue"))
    public void simpleQueuelistener(String msg) {
        System.out.println("接收到simple.queue的消息:" + msg);
    }

    //-------------------------

    /* WorkQueue 接收消息代码,这里写了 2 个监听程序,用以模拟 2 个消费者 */

    @RabbitListener(queuesToDeclare = @Queue(name = "work.queue"))
    public void workQueueListener1(String msg) {
        System.out.println("listener【1】接收到work.queue消息:" + msg);
    }

    @RabbitListener(queuesToDeclare = {@Queue(name = "work.queue")})
    public void workQueueListener2(String msg) {
        System.out.println("listener【2】接收到work.queue消息:" + msg);
    }

    //-------------------------

    /* fanout 接收消息代码,这里写了 2 个监听程序,用以模拟 2 个消费者 */

    @RabbitListener(bindings = @QueueBinding(
            value = @Queue(name = "fanout.queue1"),
            exchange = @Exchange(name = "jobs.fanout", type = ExchangeTypes.FANOUT)
    ))
    public void listenerFanoutQueue1(String msg) {
        System.out.println("接收到fanout.queue【1】消息:" + msg);
    }

    @RabbitListener(bindings = @QueueBinding(
            value = @Queue(name = "fanout.queue2"),
            exchange = @Exchange(name = "jobs.fanout", type = ExchangeTypes.FANOUT)
    ))
    public void listenerFanoutQueue2(String msg) {
        System.out.println("接收到fanout.queue【2】消息:" + msg);
    }

    //-------------------------

    /* direct 接收消息代码,这里写了 2 个监听程序,用以模拟 2 个消费者 */

    @RabbitListener(bindings = @QueueBinding(
            value = @Queue(name = "direct.queue1"),
            exchange = @Exchange(name = "jobs.direct", type = ExchangeTypes.DIRECT),
            key = {"big", "middle"}
    ))
    public void listenerDirectQueue1(String msg) {
        System.out.println("接收到direct.queue【1】消息:" + msg);
    }

    @RabbitListener(bindings = @QueueBinding(
            value = @Queue(name = "direct.queue2"),
            exchange = @Exchange(name = "jobs.direct", type = ExchangeTypes.DIRECT),
            key = {"small", "middle"}
    ))
    public void listenerDirectQueue2(String msg) {
        System.out.println("接收到direct.queue【2】消息:" + msg);
    }

    //-------------------------

    /* toppic 接收消息代码,这里写了 2 个监听程序,用以模拟 2 个消费者
       toppic 表达式中的占位符:# 表示一个或多个单词,* 表示一个单词 */

    @RabbitListener(bindings = @QueueBinding(
            value = @Queue(name = "topic.queue1"),
            exchange = @Exchange(name = "jobs.topic", type = ExchangeTypes.TOPIC),
            key = "china.#"
    ))
    public void listenerTopicQueue1(String msg) {
        System.out.println("接收到topic.queue【1】消息:" + msg);
    }

    @RabbitListener(bindings = @QueueBinding(
            value = @Queue(name = "topic.queue2"),
            exchange = @Exchange(name = "jobs.topic", type = ExchangeTypes.TOPIC),
            key = "#.news"
    ))
    public void listenerTopicQueue2(String msg) {
        System.out.println("接收到topic.queue【2】消息:" + msg);
    }

    //-------------------------

    /* 自定义接收消息代码,接收自定义对象的消息,通过配置消息转换,使用 Json 格式进行传输 */
    @RabbitListener(queuesToDeclare = @Queue(name = "object.queue"))
    public void listenerObjectQueue(Map<String, Object> msg) {
        System.out.println("接收到object.queue的消息:" + msg);
    }
}
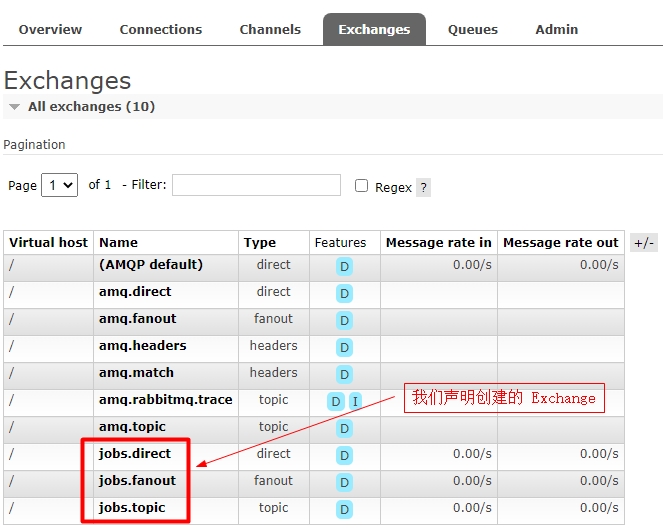
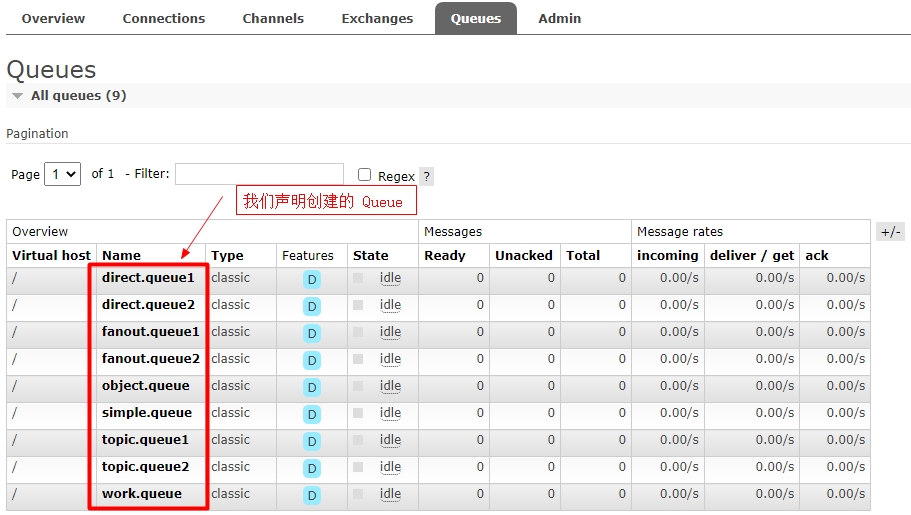
启动消费者 SpringBoot 程序,就可以在可视化界面中,看到声明的 Exchange 和 Queue 了:


四、消息发送者
首先在 application.yml 中配置好 RabbitMQ 的连接信息:
spring:
  rabbitmq:
    host: 192.168.216.128
    port: 5672
    username: jobs
    password: qwert
    virtual-host: /
我们在测试类 PublishMessageTest 中编写为各种类型消息队列发送消息的代码:
package com.jobs.publishtest;

import org.junit.jupiter.api.Test;
import org.springframework.amqp.rabbit.core.RabbitTemplate;
import org.springframework.beans.factory.annotation.Autowired;
import org.springframework.boot.test.context.SpringBootTest;

import java.util.HashMap;
import java.util.Map;

@SpringBootTest
public class PublishMessageTest {

    @Autowired
    private RabbitTemplate rabbitTemplate;

    //给 SimpleQueue 类型的消息队列发送消息
    @Test
    public void SendMsgToSimpleQueue() {
        String queueName = "simple.queue";
        String message = "hello,simple.queue";
        rabbitTemplate.convertAndSend(queueName, message);
    }

    //给 WorkQueue 类型的消息队列发送消息,
    //WorkQueue 实际上也是 SimpleQueue 类型的消息队列,只不过有多个消费者来接收消息而已
    @Test
    public void SendMessageWorkQueue() {
        String queueName = "work.queue";
        String message = "hello,work.queue__";
        for (int i = 1; i <= 20; i++) {
            rabbitTemplate.convertAndSend(queueName, message + i);
        }
    }

    //给 Fanout 类型的消息队列发送消息
    @Test
    public void sendFanoutExchange() {
        String exchangeName = "jobs.fanout";
        String message = "打雷了,下雨了,快来收衣服了";
        rabbitTemplate.convertAndSend(exchangeName, "", message);
    }

    //给 Direct 类型的消息队列发送消息
    @Test
    public void sendDirectExchange() {
        String exchangeName = "jobs.direct";
        String message1 = "hello,big";
        rabbitTemplate.convertAndSend(exchangeName, "big", message1);
        String message2 = "hello,middle";
        rabbitTemplate.convertAndSend(exchangeName, "middle", message2);
        String message3 = "hello,small";
        rabbitTemplate.convertAndSend(exchangeName, "small", message3);
    }

    //给 Topic 类型的消息队列发送消息
    @Test
    public void sendTopicExchange() {
        String exchangeName = "jobs.topic";
        String message1 = "hello,usa新闻";
        rabbitTemplate.convertAndSend(exchangeName, "usa.news", message1);
        String message2 = "hello,china新闻";
        rabbitTemplate.convertAndSend(exchangeName, "china.news", message2);
    }

    //发送自定义对象类型消息,这里的 object.queue 实际上是 SimpleQueue 类型的消息队列
    @Test
    public void sendObjectMessage() {
        Map<String, Object> map = new HashMap<>();
        map.put("name", "乔豆豆");
        map.put("age", 39);
        rabbitTemplate.convertAndSend("object.queue", map);
    }
}
最后我们启动消费者 SpringBoot 程序后,依次运行发送者 SpringBoot 程序中的测试类中的方法,查看控制台打印的内容验证运行成果。以上就是使用 Spring AMQP 操作 RabbitMQ 实现 5 种消息队列的消息发送和接收的程序代码,有兴趣的话可以上网查询一下使用原生 api 方法操作 RabbitMQ 的代码进行对比一下,可以发现 Spring AMQP 的代码要简单很多,非常容易。
本篇博客的 Demo 源代码下载地址:https://files.cnblogs.com/files/blogs/699532/spring_amqp.zip


 浙公网安备 33010602011771号