SpringCloud 使用 Turbine 聚合监控 Hystrix 健康状态
Hystrix 的降级熔断只是被迫的折中方案,并不是我们所期望的结果,我们还是期望系统能够永远健康运行。绝大多数情况下,一个系统有很多微服务组成,高峰期很可能个别微服务会发生降级熔断,我们必须能够通过监控才行,这样才能快速发现并解决问题。
Hystrix 是 Netflix 的产品,其提供的仪表盘监控功能,仅仅监控一个微服务的健康状态,这显然不能满足我们的需求。于是 Netflix 推出了 Turbine 聚合监控组件,可以收集并监控多个微服务的健康状态,非常简单且实用。
本篇博客在上一篇博客的 Demo 的基础上,介绍如何搭建 Turbine 进行监控【客户端消费者】和【服务端提供者】的健康状态,在本篇博客的最后会提供源代码的下载。
一、搭建 Turbine 监控工程
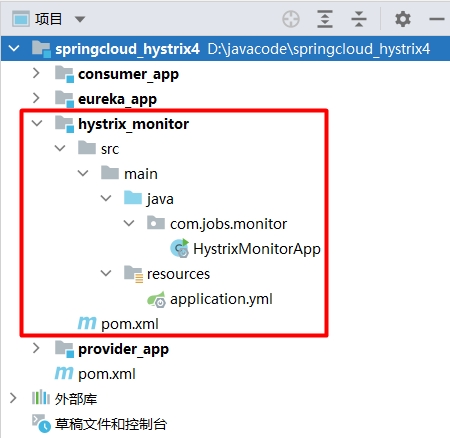
采用 Maven 搭建 springcloud_hystrix4 父工程,下面包含 4 个子工程:

对于 eureka_app、cusumer_app、provider_app 这 3 个工程,直接从上篇博客的 Demo 中复制过来。本篇博客重点介绍红框中的 hystrix_monitor 工程,也就是我们要搭建的 Turbine 监控工程,用于监控 consumer_app 和 provider_app 的健康运行状态。
从上图中 hystrix_monitor 搭建后的工程结构可以发现,对于 Turbine 的搭建非常简单,主要是通过以下步骤实现:
1 在 pom 文件中引入 Turbine 的相关依赖
<?xml version="1.0" encoding="UTF-8"?> <project xmlns="http://maven.apache.org/POM/4.0.0" xmlns:xsi="http://www.w3.org/2001/XMLSchema-instance" xsi:schemaLocation="http://maven.apache.org/POM/4.0.0 http://maven.apache.org/xsd/maven-4.0.0.xsd"> <parent> <artifactId>springcloud_hystrix4</artifactId> <groupId>com.jobs</groupId> <version>1.0-SNAPSHOT</version> </parent> <modelVersion>4.0.0</modelVersion> <artifactId>hystrix_monitor</artifactId> <properties> <project.build.sourceEncoding>UTF-8</project.build.sourceEncoding> <project.reporting.outputEncoding>UTF-8</project.reporting.outputEncoding> <java.version>1.8</java.version> </properties> <dependencies> <!--hystrix 仪表盘--> <dependency> <groupId>org.springframework.cloud</groupId> <artifactId>spring-cloud-starter-netflix-hystrix-dashboard</artifactId> </dependency> <!--turbine 依赖包--> <dependency> <groupId>org.springframework.cloud</groupId> <artifactId>spring-cloud-starter-netflix-turbine</artifactId> </dependency> <!--springboot 信息监控依赖包--> <dependency> <groupId>org.springframework.boot</groupId> <artifactId>spring-boot-starter-actuator</artifactId> </dependency> <!--eureka 客户端依赖--> <dependency> <groupId>org.springframework.cloud</groupId> <artifactId>spring-cloud-starter-netflix-eureka-client</artifactId> </dependency> </dependencies> </project>
2 添加 application.yml 配置文件,对 Turbine 进行配置
server: port: 8769 eureka: instance: # 配置主机名 hostname: hystix-monitor # 显示 ip 地址,代替显示主机名 prefer-ip-address: true # 所注册服务实例名称的显示形式 instance-id: ${eureka.instance.hostname}:${server.port} # 每隔 3 秒发一次心跳包 lease-renewal-interval-in-seconds: 3 # 如果 15 秒没有发送心跳包,就让 eureka 把自己从服务列表中移除 lease-expiration-duration-in-seconds: 15 client: serviceUrl: defaultZone: http://localhost:8761/eureka spring: application: name: hystrix-monitor turbine: combine-host-port: true # 配置要监控的服务名称列表(多个服务之间用英文逗号分隔) app-config: consumer-App,provider-App cluster-name-expression: "'default'" aggregator: cluster-config: default # 让 hystrix 的仪表盘允许收集所有的监控数据流 hystrix: dashboard: proxy-stream-allow-list: "*"
3 创建启动类,添加两个注解(@EnableHystrixDashboard 和 @EnableTurbine)
package com.jobs.monitor; import org.springframework.boot.SpringApplication; import org.springframework.boot.autoconfigure.SpringBootApplication; import org.springframework.cloud.netflix.hystrix.dashboard.EnableHystrixDashboard; import org.springframework.cloud.netflix.turbine.EnableTurbine; //开启 hystrix 仪表盘监控显示功能 @EnableHystrixDashboard //开启 turbine 聚合 hystrix 仪表盘监控显示功能 @EnableTurbine @SpringBootApplication public class HystrixMonitorApp { public static void main(String[] args) { SpringApplication.run(HystrixMonitorApp.class, args); } }
OK ,我们已经完成了 hystrix_monitor 工程的搭建,实现了对 consumer-App 和 provider-App 的监控。
二、消费者和提供者的改造
对于 consumer-App(客户端消费者)和 provider-App(服务端提供者)需要修改以下几个地方:
1 在 pom 文件中导入相关的依赖包(如果遇到个别重复的依赖包的话,可以不用导入)
<!--springboot 信息监控依赖包--> <dependency> <groupId>org.springframework.boot</groupId> <artifactId>spring-boot-starter-actuator</artifactId> </dependency> <!--hystrix 依赖包--> <dependency> <groupId>org.springframework.cloud</groupId> <artifactId>spring-cloud-starter-netflix-hystrix</artifactId> </dependency> <!--hystrix 仪表盘依赖包--> <dependency> <groupId>org.springframework.cloud</groupId> <artifactId>spring-cloud-starter-netflix-hystrix-dashboard</artifactId> </dependency>
2 注册 hystrix 监控数据获取的 servlet 的 bean 对象(本博客 Demo 中将其跟启动类放在了一起)
3 在启动类上添加 @EnableHystrixDashboard 注解
以服务提供者为例,下面仅列出 provider-App 启动类的代码:
package com.jobs.provider; import com.netflix.hystrix.contrib.metrics.eventstream.HystrixMetricsStreamServlet; import org.springframework.boot.SpringApplication; import org.springframework.boot.autoconfigure.SpringBootApplication; import org.springframework.boot.web.servlet.ServletRegistrationBean; import org.springframework.cloud.netflix.hystrix.EnableHystrix; import org.springframework.cloud.netflix.hystrix.dashboard.EnableHystrixDashboard; import org.springframework.context.annotation.Bean; //启用 hystrix 仪表盘监控显示功能 @EnableHystrixDashboard @EnableHystrix @SpringBootApplication public class ProviderApp { public static void main(String[] args) { SpringApplication.run(ProviderApp.class, args); } //注册 hystrix 监控数据获取的 servlet 的 bean 对象 @Bean public ServletRegistrationBean getServlet() { HystrixMetricsStreamServlet streamServlet = new HystrixMetricsStreamServlet(); ServletRegistrationBean registrationBean = new ServletRegistrationBean(streamServlet); registrationBean.setLoadOnStartup(1); registrationBean.addUrlMappings("/actuator/hystrix.stream"); registrationBean.setName("HystrixMetricsStreamServlet"); return registrationBean; } }
OK,通过以上 3 个步骤,就完成了对【客户端消费者】和【服务端提供者】的改造。
三、验证搭建成果
启动 eureka_app、cusumer_app、provider_app、hystrix_monitor 这 4 个 SpringBoot 程序。
首先访问 eureka 注册中心,localhost:8761 发现 hystrix-monitor 已经注册成功

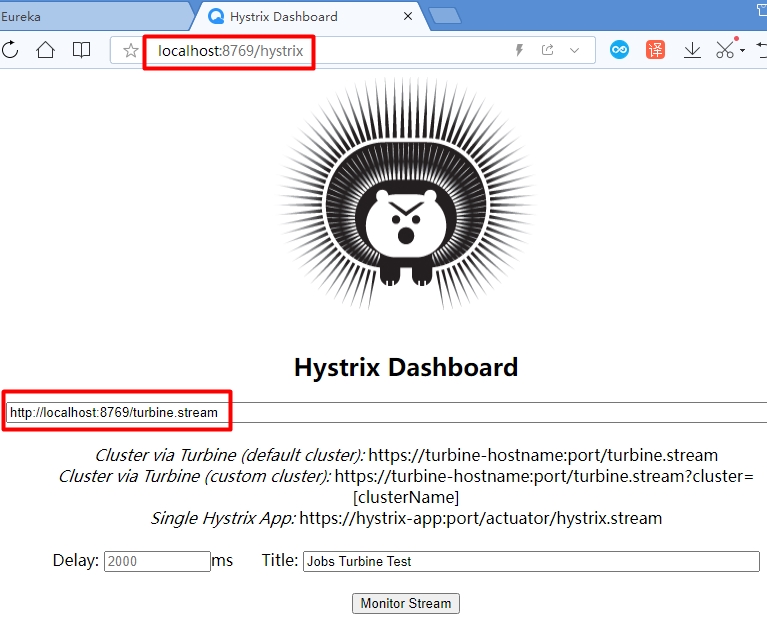
我们对于 hystrix_monitor 的 Turbine 搭建的端口号是 8769,所以访问 localhost:8769/hystrix 打开 Turbine 页面

在界面中输入监控的 url 地址 http://localhost:8769/turbine.stream
延迟时间默认为 2000 ms ,这里就不修改了,然后填写上 Title,这里填写为 Jobs Turbine Test
然后点击 Monitor Stream 进入监控页面,你可以频繁请求【服务端】和【客户端】提供的接口,来查看监控界面
服务端提供了 2 个接口:
- localhost:8200/provider/test1/{id} 接口,每次调用都会正常运行,不会发生服务端降级
- localhost:8200/provider/test1/{id} 接口,当 id 为 1 时故意代码运行抛出异常,所以在服务端会产生降级,达到熔断条件后就会熔断,熔断期间调用此接口,id 传入非 1 的值,仍然会返回降级结果,直到熔断结束后才会返回正常结果
客户端提供了 2 个接口,用于验证服务提供者的熔断效果:
- localhost:8100/consumer/test1/{id} 接口,每次都能够正常调用成功,不会因为其它接口发生熔断而导致自己无法调用。
- localhost:8100/consumer/test2/{id} 接口,调用服务端接口时,当传入 id 为 1 时,服务端返回降级结果,此时不停的进行调用,当服务熔断掉后,此时 id 值传入非 1 的参数值时,也会返回服务端降级结果,直到熔断结束后才会返回正常结果。

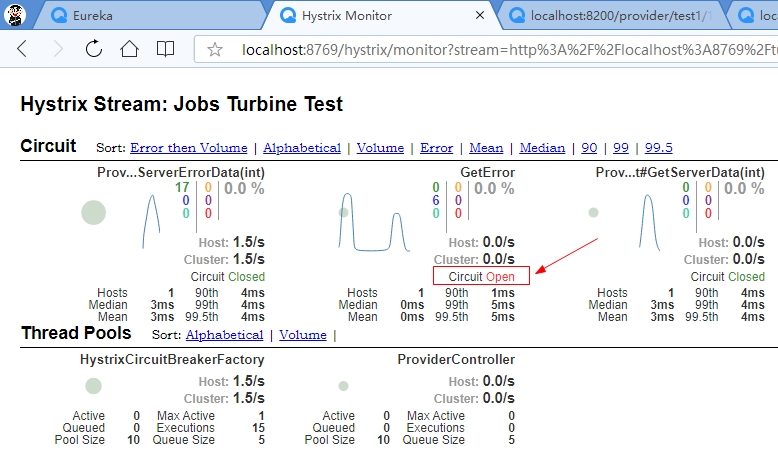
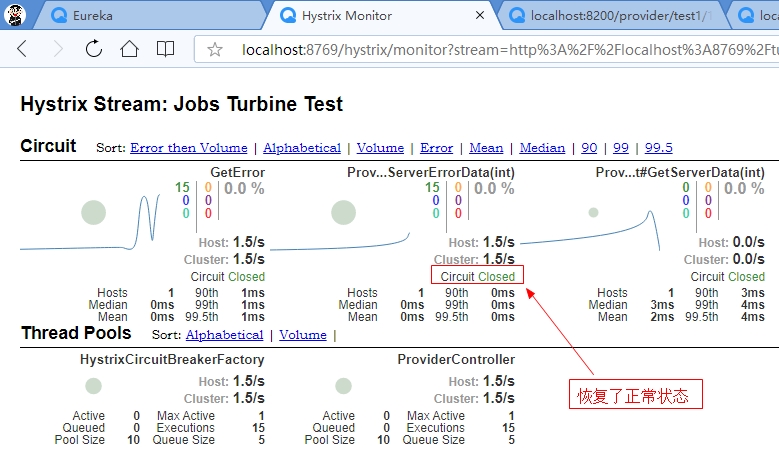
如上图所示:当降级次数太多,满足熔断条件时,接口的 Circuit 状态变为 Open,熔断结束后,再次请求如果成功,接口的状态就会恢复到正常状态。

有关 Turbine 聚合监控的界面上各个信息很好理解,大家可以详细研究一下,相信很容易就能够研究清楚。
上面的图,只是部分截图,想要看到完整的界面,大家就亲手搭建一下吧,正好借此机会提升一下自身能力。
OK,有关 Turbine 工程搭建,用于对多个微服务进行 Hystrix 降级熔断的监控,已经介绍完毕。
本篇博客的源代码地址:https://files.cnblogs.com/files/blogs/699532/springcloud_hystrix4.zip


【推荐】国内首个AI IDE,深度理解中文开发场景,立即下载体验Trae
【推荐】编程新体验,更懂你的AI,立即体验豆包MarsCode编程助手
【推荐】抖音旗下AI助手豆包,你的智能百科全书,全免费不限次数
【推荐】轻量又高性能的 SSH 工具 IShell:AI 加持,快人一步
· winform 绘制太阳,地球,月球 运作规律
· 震惊!C++程序真的从main开始吗?99%的程序员都答错了
· AI与.NET技术实操系列(五):向量存储与相似性搜索在 .NET 中的实现
· 超详细:普通电脑也行Windows部署deepseek R1训练数据并当服务器共享给他人
· 【硬核科普】Trae如何「偷看」你的代码?零基础破解AI编程运行原理