SpringCloud 使用 OpenFeign 声明式服务调用
Feign 组件最初由 Netflix 公司提供,由于不支持 SpringMVC 注解,所以 SpringCloud 对其封装并进行支持,因此产生了 OpenFeign 组件。Feign 是一个声明式的 REST 客户端,它采用基于接口的注解方式,具有代码简洁、使用方便的优势。
本篇博客仍然使用最新的 SpringCloud 版本 2021.0.3 进行 Demo 制作和演示。在客户端调用服务端接口时,对比 OpenFeign 和 RestTemplate 两种实现方式,在本篇博客的最后会提供源代码的下载。
一、搭建工程
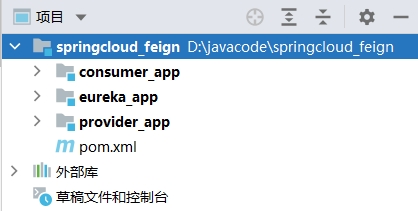
采用 Maven 搭建 springcloud_feign 父工程,下面包含 3 个子工程:

对于 springcloud_feign 父工程 pom 文件内容如下所示:
<?xml version="1.0" encoding="UTF-8"?>
<project xmlns="http://maven.apache.org/POM/4.0.0"
         xmlns:xsi="http://www.w3.org/2001/XMLSchema-instance"
         xsi:schemaLocation="http://maven.apache.org/POM/4.0.0
         http://maven.apache.org/xsd/maven-4.0.0.xsd">
    <modelVersion>4.0.0</modelVersion>

    <groupId>com.jobs</groupId>
    <artifactId>springcloud_feign</artifactId>
    <packaging>pom</packaging>
    <version>1.0-SNAPSHOT</version>
    <modules>
        <module>eureka_app</module>
        <module>provider_app</module>
        <module>consumer_app</module>
    </modules>

    <properties>
        <project.build.sourceEncoding>UTF-8</project.build.sourceEncoding>
        <project.reporting.outputEncoding>UTF-8</project.reporting.outputEncoding>
        <java.version>1.8</java.version>
    </properties>

    <!--spring boot-->
    <parent>
        <groupId>org.springframework.boot</groupId>
        <artifactId>spring-boot-starter-parent</artifactId>
        <version>2.6.11</version>
        <relativePath/>
    </parent>

    <!--Spring Cloud-->
    <dependencyManagement>
        <dependencies>
            <dependency>
                <groupId>org.springframework.cloud</groupId>
                <artifactId>spring-cloud-dependencies</artifactId>
                <version>2021.0.3</version>
                <type>pom</type>
                <scope>import</scope>
            </dependency>
        </dependencies>
    </dependencyManagement>
</project>
注意:这里使用 SpringBoot 的版本是 2.6.11 ,使用的 SpringCloud 版本是 2021.0.3
有关【Eureka 注册中心】和【服务提供者】的搭建过程,这里就省略了,跟上篇博客一模一样。
二、消费者的搭建
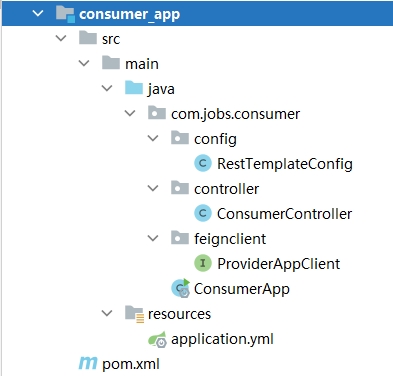
本篇博客的服务消费者搭建的结果如下所示:

在 pom 文件中除了要引入 spring-cloud-starter-netflix-eureka-client 的依赖之外,
还需要引入 spring-cloud-starter-openfeign 的依赖,如下所示:
<?xml version="1.0" encoding="UTF-8"?>
<project xmlns="http://maven.apache.org/POM/4.0.0"
         xmlns:xsi="http://www.w3.org/2001/XMLSchema-instance"
         xsi:schemaLocation="http://maven.apache.org/POM/4.0.0
         http://maven.apache.org/xsd/maven-4.0.0.xsd">
    <parent>
        <artifactId>springcloud_feign</artifactId>
        <groupId>com.jobs</groupId>
        <version>1.0-SNAPSHOT</version>
    </parent>
    <modelVersion>4.0.0</modelVersion>

    <artifactId>consumer_app</artifactId>

    <dependencies>
        <!--spring boot web-->
        <dependency>
            <groupId>org.springframework.boot</groupId>
            <artifactId>spring-boot-starter-web</artifactId>
        </dependency>

        <!--eureka-client-->
        <dependency>
            <groupId>org.springframework.cloud</groupId>
            <artifactId>spring-cloud-starter-netflix-eureka-client</artifactId>
        </dependency>

        <!--引入 openfeign 的依赖-->
        <dependency>
            <groupId>org.springframework.cloud</groupId>
            <artifactId>spring-cloud-starter-openfeign</artifactId>
        </dependency>
    </dependencies>
</project>
由于 SpringCloud 从 2020.0.1 版本后,移除了 Ribbon 组件,所以 openfeign 也不再依赖 Ribbon
要想使用 openfeign 声明式调用,需要经历如下 4 个步骤:
(1)在 SpringBoot 的启动类上,增加 @EnableFeignClients 注解
package com.jobs.consumer;

import org.springframework.boot.SpringApplication;
import org.springframework.boot.autoconfigure.SpringBootApplication;
import org.springframework.cloud.openfeign.EnableFeignClients;

//启用 Feign 客户端功能
@EnableFeignClients
@SpringBootApplication
public class ConsumerApp {
    public static void main(String[] args) {
        SpringApplication.run(ConsumerApp.class,args);
    }
}
(2)定义 feign 声明式接口,添加注解 @FeignClient,设置 value 值为【服务提供者的】应用名称
(3)定义接口方法,方法的参数列表和返回值,需要跟服务提供者保持一致,方法名称无所谓
package com.jobs.consumer.feignclient;

import org.springframework.cloud.openfeign.FeignClient;
import org.springframework.web.bind.annotation.PathVariable;
import org.springframework.web.bind.annotation.RequestMapping;

import java.util.Map;

@FeignClient("PROVIDER-APP")
public interface ProviderAppClient {
    @RequestMapping("/provider/getdata/{id}")
    Map GetProviderData(@PathVariable("id") int id);
}
(4)在调用服务接口的地方,注入该 feign 接口对象,调用接口方法完成远程调用
package com.jobs.consumer.controller;

import com.jobs.consumer.feignclient.ProviderAppClient;
import org.springframework.beans.factory.annotation.Autowired;
import org.springframework.web.bind.annotation.PathVariable;
import org.springframework.web.bind.annotation.RequestMapping;
import org.springframework.web.bind.annotation.RestController;
import org.springframework.web.client.RestTemplate;

import java.util.Map;

@RequestMapping("/consumer")
@RestController
public class ConsumerController {

    @Autowired
    private RestTemplate restTemplate;

    //注入该 feign 接口对象
    @Autowired
    private ProviderAppClient providerAppClient;

    @RequestMapping("/getdata1/{id}")
    public Map GetData1(@PathVariable("id") int id) {

        //采用 restTemplate 调用 PROVIDER-APP 的接口
        String url = "http://PROVIDER-APP/provider/getdata/" + id;
        Map result = restTemplate.getForObject(url, Map.class);
        result.put("remark","采用 restTemplate 调用返回的结果");
        return result;
    }

    @RequestMapping("/getdata2/{id}")
    public Map GetData2(@PathVariable("id") int id) {

        //采用 feign 的接口中的方法,实现对 PROVIDER-APP 服务接口的调用
        Map result = providerAppClient.GetProviderData(id);
        result.put("remark","采用 feign 声明式接口调用返回的结果");
        return result;
    }
}
以上代码,同时列出 RestTemplate 和 feign 接口的方式调用服务提供者的接口,进行对比,后者代码简洁很多。
三、Feign 的客户端超时配置
在服务消费者的 application.yml 配置文件中,可以对 feign 客户端调用服务端接口的超时,进行默认配置,也可以分别针对每个服务提供者进行独立的超时配置,下面列出服务消费者的配置文件内容,具体如下所示:
server:
  port: 8100

eureka:
  instance:
    # 配置主机名
    hostname: consumer-service
    # 显示 ip 地址,代替显示主机名
    prefer-ip-address: true
    # 所注册服务实例名称的显示形式
    instance-id: ${eureka.instance.hostname}:${server.port}
    # 每隔 3 秒发一次心跳包
    lease-renewal-interval-in-seconds: 3
    # 如果 15 秒没有发送心跳包,就让 eureka 把自己从服务列表中移除
    lease-expiration-duration-in-seconds: 15
  client:
    service-url:
      # 将当前 springboot 服务注册到 eureka 中
      defaultZone: http://localhost:8761/eureka
    # 是否将自己的路径注册到 eureka 上
    register-with-eureka: true
    # 是否需要从 eureka 中抓取路径
    fetch-registry: true

# consumer 使用的 application 名称
spring:
  application:
    name: consumer-App

# 这里可以设置 feign 客户端连接和获取接口数据的超时时间
feign:
  client:
    config:
      # 通过 default 可以设置 feign 默认超时时间
      default:
        # 连接超时时间(毫秒)
        ConnectTimeout: 1000
        # 等待业务处理返回结果的超时时间(毫秒)
        ReadTimeout: 1000
      # 这里可以针对具体的【服务提供者】应用名称下的所有接口,设置超时时间
      PROVIDER-APP:
        ConnectTimeout: 1000
        ReadTimeout: 3000
在上面的配置文件内容的最下面,
通过 default 下的 ConnectTimeout 和 ReadTimeout 进行默认连接超时时间和默认业务处理等待超时时间的配置。
由于本篇博客的 Demo 只有一个服务提供者 PROVIDER-APP ,所以单独针对其也进行了客户端访问超时配置。
在服务提供者 PROVIDER-APP 提供的接口中,增加 Sleep 代码,可以进行相关的测试验证。
package com.jobs.provider.controller;

import org.springframework.beans.factory.annotation.Autowired;
import org.springframework.core.env.Environment;
import org.springframework.web.bind.annotation.PathVariable;
import org.springframework.web.bind.annotation.RequestMapping;
import org.springframework.web.bind.annotation.RestController;

import java.util.HashMap;
import java.util.Map;
import java.util.UUID;

@RequestMapping("/provider")
@RestController
public class ProviderController {

    @Autowired
    private Environment env;

    @RequestMapping("/getdata/{id}")
    public Map GetData(@PathVariable("id") int id) {

        //在此模拟耗时处理过程,测试验证 feign 客户端超时访问的配置
        try {
            Thread.sleep(2000);
        } catch (InterruptedException e) {
            e.printStackTrace();
        }

        //获取当前服务提供者的 hostname 和 port
        String providerName = env.getProperty("eureka.instance.hostname")
                + ":" + env.getProperty("server.port");

        Map result = new HashMap();
        result.put("status", 0);
        result.put("msg", "success");
        result.put("provider", providerName);
        result.put("get_id_value", id);
        result.put("version", UUID.randomUUID().toString());

        return result;
    }
}
Ok,到此为止,有关 SpringCloud 使用 OpenFeign 声明式服务调用,已经介绍完毕。本篇博客的 Demo 经过详细测试无误,博客中只介绍了 openfeign 实现的重要细节,省略了与之前博客相同的一些细节,详细请下载查看 Demo 源代码。
本篇博客代码的源代码下载地址:https://files.cnblogs.com/files/blogs/699532/springcloud_feign.zip


