SpringCloud 使用 Ribbon 实现客户端负载均衡
SpringCloud 在 2020.0.1 版本之前,服务的消费者在引入 spring-cloud-starter-netflix-eureka-client 的依赖后(该依赖内置了 Ribbon 依赖),就可以使用 Ribbon 客户端负载均衡了。Ribbon 支持 10 种客户端负载均衡策略,使用起来很方便。
本篇博客基于上篇博客的 Demo 进行简单改造,服务消费者调用服务提供者的接口,采用Ribbon 进行客户端负载均衡,总体过程非常简单。在本篇博客的最后会提供 Demo 源代码的下载。
一、搭建工程
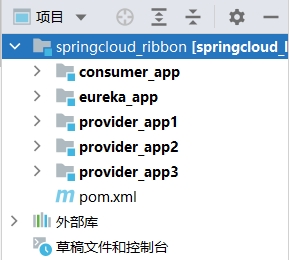
与上一篇博客的 Demo 基本相同,采用 Maven 搭建 springcloud_ribbon 父工程,下面包含 5 个子工程:
- 1 个 Eureka 注册中心
- 1 个 Consumer 服务消费者
- 3 个 Provider 服务提供者
搭建后的效果如下图所示:

对于 springcloud_ribbon 父工程 pom 文件内容如下所示:
<?xml version="1.0" encoding="UTF-8"?>
<project xmlns="http://maven.apache.org/POM/4.0.0"
         xmlns:xsi="http://www.w3.org/2001/XMLSchema-instance"
         xsi:schemaLocation="http://maven.apache.org/POM/4.0.0
         http://maven.apache.org/xsd/maven-4.0.0.xsd">
    <modelVersion>4.0.0</modelVersion>

    <groupId>com.jobs</groupId>
    <artifactId>springcloud_ribbon</artifactId>
    <packaging>pom</packaging>
    <version>1.0-SNAPSHOT</version>
    <modules>
        <module>eureka_app</module>
        <module>provider_app1</module>
        <module>provider_app2</module>
        <module>provider_app3</module>
        <module>consumer_app</module>
    </modules>

    <properties>
        <project.build.sourceEncoding>UTF-8</project.build.sourceEncoding>
        <project.reporting.outputEncoding>UTF-8</project.reporting.outputEncoding>
        <java.version>1.8</java.version>
    </properties>

    <!--spring boot-->
    <parent>
        <groupId>org.springframework.boot</groupId>
        <artifactId>spring-boot-starter-parent</artifactId>
        <version>2.3.12.RELEASE</version>
    </parent>

    <!--Spring Cloud-->
    <dependencyManagement>
        <dependencies>
            <dependency>
                <groupId>org.springframework.cloud</groupId>
                <artifactId>spring-cloud-dependencies</artifactId>
                <version>Hoxton.SR12</version>
                <type>pom</type>
                <scope>import</scope>
            </dependency>
        </dependencies>
    </dependencyManagement>
</project>
注意:这里使用 SpringBoot 的版本是 2.3.12.RELEASE ,使用的 SpringCloud 版本是 Hoxton.SR12
有关【Eureka 注册中心】和【服务提供者】的搭建过程,这里就省略了,跟上篇博客一模一样。
二、服务消费者搭建
本篇博客的服务消费者搭建的结果如下所示:

在 pom 文件中引入 spring-cloud-starter-netflix-eureka-client 的依赖,如下所示:
<?xml version="1.0" encoding="UTF-8"?>
<project xmlns="http://maven.apache.org/POM/4.0.0"
         xmlns:xsi="http://www.w3.org/2001/XMLSchema-instance"
         xsi:schemaLocation="http://maven.apache.org/POM/4.0.0
         http://maven.apache.org/xsd/maven-4.0.0.xsd">
    <parent>
        <artifactId>springcloud_ribbon</artifactId>
        <groupId>com.jobs</groupId>
        <version>1.0-SNAPSHOT</version>
    </parent>
    <modelVersion>4.0.0</modelVersion>

    <artifactId>consumer_app</artifactId>

    <dependencies>
        <!--spring boot web-->
        <dependency>
            <groupId>org.springframework.boot</groupId>
            <artifactId>spring-boot-starter-web</artifactId>
        </dependency>

        <!--eureka-client-->
        <dependency>
            <groupId>org.springframework.cloud</groupId>
            <artifactId>spring-cloud-starter-netflix-eureka-client</artifactId>
        </dependency>
    </dependencies>
</project>
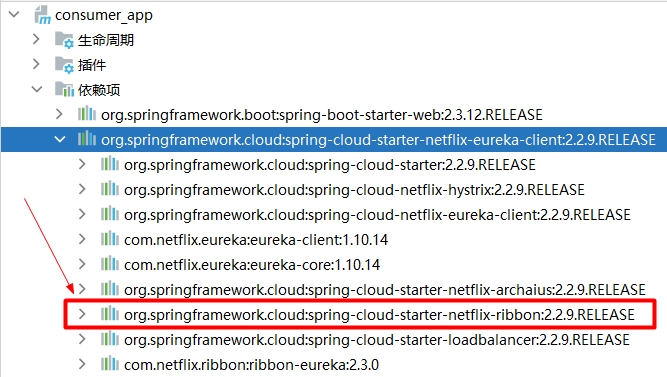
查看 spring-cloud-starter-netflix-eureka-client 下所包含的 jar 包结构,可以发现其包含了 ribbon 的 jar 包依赖。

下面列出 application.yml 的内容,跟上一篇博客完全一样。
server:
  port: 8100

eureka:
  instance:
    # 配置主机名
    hostname: consumer-service
    # 显示 ip 地址,代替显示主机名
    prefer-ip-address: true
    # 所注册服务实例名称的显示形式
    instance-id: ${eureka.instance.hostname}:${server.port}
    # 每隔 3 秒发一次心跳包
    lease-renewal-interval-in-seconds: 3
    # 如果 15 秒没有发送心跳包,就让 eureka 把自己从服务列表中移除
    lease-expiration-duration-in-seconds: 15
  client:
    service-url:
      # 将当前 springboot 服务注册到 eureka 中
      defaultZone: http://eureka-server:8761/eureka
    # 是否将自己的路径注册到 eureka 上
    register-with-eureka: true
    # 是否需要从 eureka 中抓取路径
    fetch-registry: true

# consumer 使用的 application 名称
spring:
  application:
    name: consumer-App
只需要在 RestTemplate 的 Bean 对象上增加 @LoadBalanced 注解,即可实现 ribbon 客户端负载均衡的默认策略:轮询。
package com.jobs.consumer.config;

import org.springframework.cloud.client.loadbalancer.LoadBalanced;
import org.springframework.context.annotation.Bean;
import org.springframework.context.annotation.Configuration;
import org.springframework.web.client.RestTemplate;

@Configuration
public class RestTemplateConfig {

    @LoadBalanced
    @Bean
    public RestTemplate restTemplate() {

        return new RestTemplate();
    }
}
然后使用 RestTemplate 调用服务提供者的接口时,使用服务提供者的 application 名称,从注册中心获取服务提供者集群的所有服务地址,自动在本地通过负载均衡的算法,决定要调用那一个服务地址。
需要注意的是:服务提供者的名称最好从 Eureka 注册中心界面中复制,这么不容易出错。
下面列出服务消费者调用服务提供者接口的代码
package com.jobs.consumer.controller;

import org.springframework.beans.factory.annotation.Autowired;
import org.springframework.web.bind.annotation.PathVariable;
import org.springframework.web.bind.annotation.RequestMapping;
import org.springframework.web.bind.annotation.RestController;
import org.springframework.web.client.RestTemplate;

import java.util.Map;

@RequestMapping("/consumer")
@RestController
public class ConsumerController {

    @Autowired
    private RestTemplate restTemplate;

    @RequestMapping("/getdata/{id}")
    public Map GetData(@PathVariable("id") int id) {

        //使用服务在 eureka 上注册的 application 名称代替 ip 和端口号
        String url = "http://PROVIDER-APP/provider/getdata/" + id;
        Map result = restTemplate.getForObject(url, Map.class);
        return result;
    }
}
注意:上面采用 PROVIDER-APP 代替了服务提供者的 ip 和 端口,PROVIDER-APP 是从注册中心界面中复制过来的。
到此为止,服务的消费者采用轮询的客户端负载均衡方式,调用服务提供者接口的代码示例,已经搭建完毕,可以进行测试验证。
三、使用其它负载均衡策略
只需要通过 2 个步骤即可实现:
首先需要定义一个配置类,提供一个方法用于将系统内置的负载均衡算法对象加载到 Spring 容器中。
package com.jobs.consumer.config;

import com.netflix.loadbalancer.IRule;
import com.netflix.loadbalancer.RandomRule;
import org.springframework.context.annotation.Bean;
import org.springframework.context.annotation.Configuration;

@Configuration
public class LoadBalanceRule {

    @Bean
    public IRule rule(){
        /*
            需要注意:SpringCloud 在 2010.0.1 版本之前,集成了 Ribbon。
            在 2010.0.1 版本之后,使用 LoadBalance 替代了 Ribbon。

            当前使用的 SpringCloud 版本为 Hoxton.SR12 ,可以使用 Ribbon。

            Ribbon 提供了 10 种客户端负载均衡策略,
            如果不配置的话,默认采用轮询策略

            常用的有 7 种,如下所示:
            随机 :RandomRule
            轮询 :RoundRobinRule
            最小并发:BestAvailableRule
            可用性过滤:AvailabilityFilteringRule
            最小响应时间:WeightedResponseTimeRule
            失败后轮询重试:RetryRule
            性能可用性:ZoneAvoidanceRule
         */

        //此处采用的负载均衡策略为随机
        return new RandomRule();
    }
}
然后在服务消费者的 SpringBoot 启动类上,@RibbonClient 或 @RibbonClients 注解,针对不同的服务提供者,配置不同的客户端负载均衡策略。由于本 Demo 只有一个 PROVIDER-APP 服务提供者,因此使用 @RibbonClient 进行配置。
package com.jobs.consumer;

import com.jobs.consumer.config.LoadBalanceRule;
import org.springframework.boot.SpringApplication;
import org.springframework.boot.autoconfigure.SpringBootApplication;
import org.springframework.cloud.netflix.ribbon.RibbonClient;

/*
在这里可以通过 @RibbonClient 和 @RibbonClients 两个注解,
针对不同的服务提供者,配置不同的客户端负载均衡策略。
本 Demo 只有一个 PROVIDER-APP 服务提供者,因此只配置了一个服务,配置为随机策略。
如果针对具体的服务提供者,不配置负载均衡策略的话,默认采用轮询策略。
*/
@RibbonClient(name = "PROVIDER-APP",configuration = LoadBalanceRule.class)
@SpringBootApplication
public class ConsumerApp {
    public static void main(String[] args) {
        SpringApplication.run(ConsumerApp.class,args);
    }
}
经过以上配置后,重启消费者程序后,再调用 PROVIDER-APP 所提供的接口时,采用的就是随机的客户端负载均衡策略。
OK,到此为止,有关 SpringCloud 使用 Ribbon 实现客户端负载均衡的实现方式,已经介绍完毕。
本篇博客的源代码下载地址为:https://files.cnblogs.com/files/blogs/699532/springcloud_ribbon.zip


 浙公网安备 33010602011771号