SpringBoot 采用纯注解和 XML 两种方式使用 Mybatis
之前发布过一篇有关 Spring 采用纯注解整合 MyBatis 和 Junit 的博客,这次也拿来跟 SpringBoot 进行对比。
之前发布的博客地址为:https://www.cnblogs.com/studyjobs/p/16031344.html
本篇博客将采用 SpringBoot 实现与之相同的功能,两者使用 Mybatis 操作 Mysql 的代码完全相同,但是 SpringBoot 相较于 Spring 而言,简化了 jar 包导入和 Mybatis 配置的细节,大大提高了开发效率。
本篇博客的 SpringBoot 工程包含两个 Demo,分别展示 SpringBoot 采用纯注解和采集用 XML 两种方式使用 Mybatis 操作 Mysql,在本篇博客的最后会提供 Demo 源代码的下载。
一、搭建工程
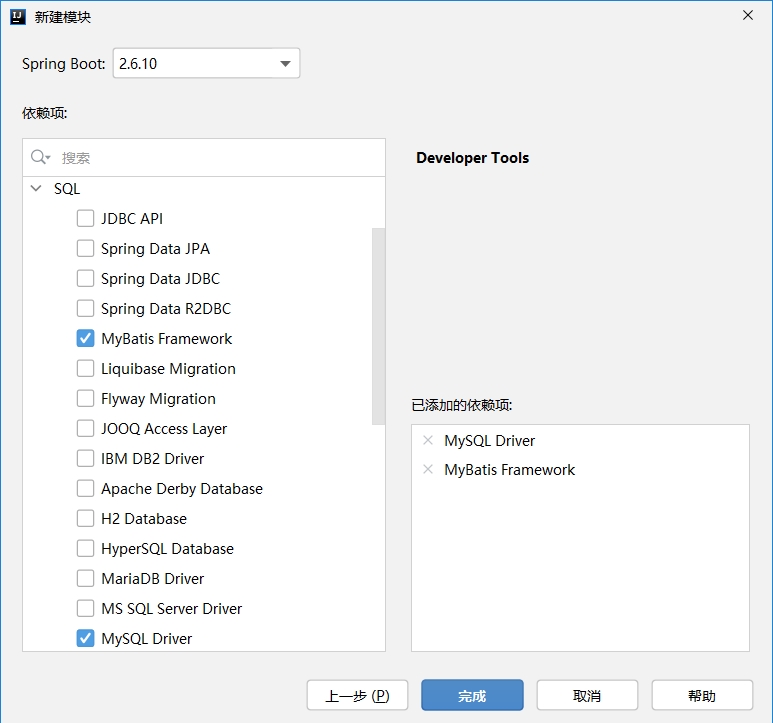
具体搭建细节已经演示好多次了,这里就不多说了,只列出勾选的依赖项:
本博客的 Demo 搭建后的最终结构如下所示:
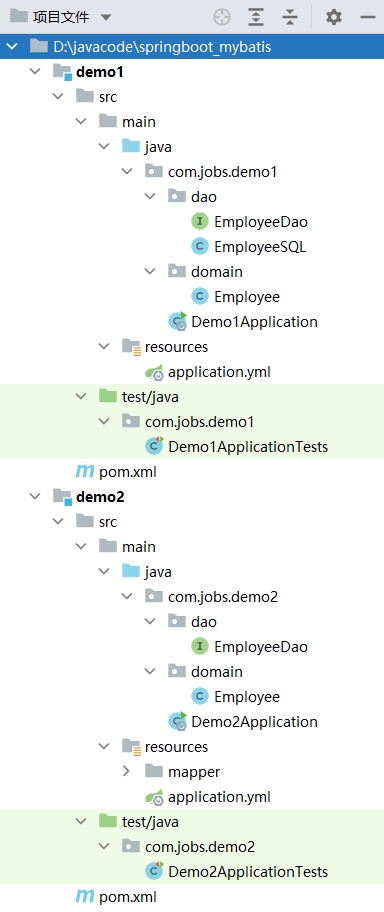
本篇博客的工程包含两个 demo 示例,其中 demo1 采用纯注解实现,demo2 采用 XML 文件实现。
两个 demo 需要用的数据库的 sql 脚本如下:
CREATE DATABASE IF NOT EXISTS `testdb`;
USE `testdb`;

CREATE TABLE IF NOT EXISTS `employee` (
  `e_id` int(11) NOT NULL AUTO_INCREMENT,
  `e_name` varchar(50) DEFAULT NULL,
  `e_salary` int(11) DEFAULT NULL,
  PRIMARY KEY (`e_id`)
) ENGINE=InnoDB AUTO_INCREMENT=103 DEFAULT CHARSET=utf8;

INSERT INTO `employee` (`e_id`, `e_name`, `e_salary`) VALUES
	(1, '侯胖胖', 25000),
	(2, '杨磅磅', 23000),
	(3, '李吨吨', 33000),
	(4, '任肥肥', 35000),
	(5, '乔豆豆', 32000),
	(6, '任天蓬', 38000),
	(7, '任政富', 40000);
两个 demo 都会使用到实体类 Employee ,具体内容如下:
public class Employee {

    private Integer id;
    private String name;
    private Integer salary;

    public Employee() {
    }

    public Employee(Integer id, String name, Integer salary) {
        this.id = id;
        this.name = name;
        this.salary = salary;
    }

    public Integer getId() {
        return id;
    }

    //这里省略了 get 和 set 方法

    @Override
    public String toString() {
        return "Employee{" +
                "id=" + id +
                ", name='" + name + '\'' +
                ", salary=" + salary +
                '}';
    }
}
二、纯注解实现
demo1 采用纯注解实现方式,非常简单方便,我本人比较喜欢这种方式。
其配置文件 application.yml 内容如下:
spring:
  datasource:
    driver-class-name: com.mysql.cj.jdbc.Driver
    url: jdbc:mysql://localhost:3306/testdb?useSSL=false
    username: root
    password: 123456
纯注解的实现方式,直接在 Dao 接口中的每个方法上通过注解编写 SQL 语句即可。
下面列出 EmployeeDao 的具体细节:
package com.jobs.demo1.dao;

import com.jobs.demo1.domain.Employee;
import org.apache.ibatis.annotations.*;

import java.util.List;

@Mapper
public interface EmployeeDao {

    //添加员工
    @ResultMap("employee_map")
    @Insert("insert into employee(e_id,e_name,e_salary) values(#{id},#{name},#{salary})")
    Integer add(Employee emp);

    //修改员工信息
    @ResultMap("employee_map")
    @Update("update employee set e_name=#{name},e_salary=#{salary} where e_id=#{id}")
    Integer update(Employee emp);

    //查询出所有员工,按照id升序排列
    @Results(id = "employee_map", value = {
            @Result(column = "e_id", property = "id"),
            @Result(column = "e_name", property = "name"),
            @Result(column = "e_salary", property = "salary")})
    @Select("select e_id,e_name,e_salary from employee order by e_id")
    List<Employee> selectAll();

    //根据条件,查询员工
    //这里故意让传递的参数名称不一样,只要使用 @Parm 进行规范即可
    @ResultMap("employee_map")
    @SelectProvider(type = com.jobs.demo1.dao.EmployeeSQL.class, method = "getSelectByConditionSQL")
    List<Employee> selectByCondition(@Param("ename") String aaa,
                                     @Param("salaryStart") Integer bbb,
                                     @Param("salaryEnd") Integer ccc);

    //传入一个或多个id,删除指定的员工
    //这里故意让传递的参数名称不一样,只要使用 @Parm 进行规范即可
    @DeleteProvider(type = com.jobs.demo1.dao.EmployeeSQL.class, method = "getDeleteByIdsSQL")
    Integer deleteByIds(@Param("empids") Integer... empids);
}
由于 selectByCondition 分条件查询、deleteByIds 通过一个或多个 id 删除,这两个方法的 SQL 语句比较复杂,不适合在注解上直接编写,因此可以创建一个新的 EmployeeSQL 类,在其内部编写相关的方法来返回所需要的 SQL 语句,EmployeeSQL 类的具体内容如下:
package com.jobs.demo1.dao;

import org.apache.commons.lang3.StringUtils;
import org.apache.ibatis.annotations.Param;

public class EmployeeSQL {

    //这里故意让传递的参数名称不一样,只要使用 @Parm 进行规范即可
    //尽量使用 @Parm 中的参数名称,这样可以防止 SQL 注入攻击
    public String getSelectByConditionSQL(@Param("ename") String xxx,
                                          @Param("salaryStart") Integer yyy,
                                          @Param("salaryEnd") Integer zzz) {
        StringBuilder sql = new StringBuilder();
        sql.append(" select e_id,e_name,e_salary from employee where 1=1");

        if (StringUtils.isNotBlank(xxx)) {
            sql.append(" and (e_name like CONCAT('%',#{ename},'%'))");
        }
        if (yyy != null) {
            sql.append(" and e_salary >= #{salaryStart}");
        }
        if (zzz != null) {
            sql.append(" and e_salary <= #{salaryEnd}");
        }

        sql.append(" order by e_id");
        return sql.toString();
    }

    //这里故意让传递的参数名称不一样
    //如果不需要防止 sql 注入攻击的话,使用普通参数即可
    public String getDeleteByIdsSQL(@Param("empids") Integer... ppp) {
        StringBuilder sql = new StringBuilder();
        sql.append("delete from employee");

        if (ppp != null && ppp.length > 0) {
            String idsql = StringUtils.join(ppp, ",");
            sql.append(" where e_id in (").append(idsql).append(")");
        } else {
            sql.append(" where 1=2");
        }

        return sql.toString();
    }
}
最后在测试类中编写测试方法进行验证结果:
package com.jobs.demo1;

import com.jobs.demo1.dao.EmployeeDao;
import com.jobs.demo1.domain.Employee;
import org.junit.jupiter.api.Test;
import org.springframework.beans.factory.annotation.Autowired;
import org.springframework.boot.test.context.SpringBootTest;

import java.util.List;

@SpringBootTest
class Demo1ApplicationTests {

    @Autowired
    private EmployeeDao employeeDao;

    //添加三个新员工信息
    @Test
    public void add() {
        Employee emp1 = new Employee(100, "候菲特", 50000);
        Integer result1 = employeeDao.add(emp1);
        System.out.println(result1);

        Employee emp2 = new Employee(101, "任盖茨", 60000);
        Integer result2 = employeeDao.add(emp2);
        System.out.println(result2);

        Employee emp3 = new Employee(102, "李政富", 70000);
        Integer result3 = employeeDao.add(emp3);
        System.out.println(result3);
    }

    //修改一名员工的信息
    @Test
    public void update() {
        Employee emp = new Employee(100, "任首富", 80000);
        Integer result = employeeDao.update(emp);
        System.out.println(result);
    }

    //查询所有员工
    @Test
    public void selectAll() {
        List<Employee> emplist = employeeDao.selectAll();
        System.out.println(emplist);
    }

    //根据相关条件查询筛选员工
    @Test
    public void selectByCondition() {
        String name = "任";
        int start = 30000;
        int end = 60000;
        List<Employee> emplist = employeeDao.selectByCondition(name, start, end);
        System.out.println(emplist);
    }

    //删除指定id的一个或多个员工
    @Test
    public void deleteByIds() {
        Integer result = employeeDao.deleteByIds(100, 101, 102);
        System.out.println(result);
    }
}
二、XML 配置实现
demo 采用 XML 配置 SQL 语句的实现方式,因此 EmployeeDao 只需要定义方法即可:
package com.jobs.demo2.dao;

import com.jobs.demo2.domain.Employee;
import org.apache.ibatis.annotations.*;

import java.util.List;

@Mapper
public interface EmployeeDao {

    //添加员工
    Integer add(Employee emp);

    //修改员工信息
    Integer update(Employee emp);

    //查询出所有员工,按照id升序排列
    List<Employee> selectAll();

    //根据条件,查询员工
    List<Employee> selectByCondition(String ename,
                                     Integer salaryStart,
                                     Integer salaryEnd);

    //传入一个或多个id,删除指定的员工
    Integer deleteByIds(Integer... empids);
}
在本篇博客中,Dao 接口对应的编写 SQL 的 XML 文件,都放在了 resources 下的 mapper 文件夹下。
上面的 EmployeeDao 对应的 EmployeeMapper.xml 文件内容如下:
<?xml version="1.0" encoding="UTF-8" ?>
<!DOCTYPE mapper PUBLIC "-//mybatis.org//DTD Mapper 3.0//EN"
"http://mybatis.org/dtd/mybatis-3-mapper.dtd">

<!--namespace 名称空间,必须配置为 Dao 接口的全限定名-->
<mapper namespace="com.jobs.demo2.dao.EmployeeDao">

    <!--由于【数据库字段】与【bean实体类字段】不一致,
	因此这里需要配置【数据库字段】和【bean实体类字段】的对应关系-->
    <resultMap id="employee_map" type="employee">
        <id column="e_id" property="id"/>
        <result column="e_name" property="name"/>
        <result column="e_salary" property="salary"/>
    </resultMap>

    <!--配置公用的 SQL 语句,方面下面进行引用-->
    <sql id="select">SELECT e_id, e_name, e_salary
                     FROM employee</sql>

    <!--添加员工-->
    <insert id="add" parameterType="employee">
        insert into employee(e_id, e_name, e_salary)
        values (#{id}, #{name}, #{salary})
    </insert>

    <!--修改员工信息-->
    <update id="update" parameterType="employee">
        update employee
        set e_name=#{name},
            e_salary=#{salary}
        where e_id = #{id}
    </update>

    <!--查询出所有员工,按照id升序排列-->
    <select id="selectAll" resultMap="employee_map">
        <!--引用上面配置的公用 SQL 语句-->
        <include refid="select"/>
        order by e_id;
    </select>

    <!--根据条件查询员工,按照id升序排列-->
    <select id="selectByCondition" resultMap="employee_map">
        <include refid="select"/>
        <where>
            <!--根据条件,动态拼接SQL语句-->
            <if test="ename != null">
                e_name like CONCAT('%',#{ename},'%')
            </if>
            <if test="salaryStart != null">
                <!--在 xml 文件中由于包含大于或小于号,所以最好使用 CDATA 进行包裹-->
                <![CDATA[ and e_salary >= #{salaryStart} ]]>
            </if>
            <if test="salaryEnd != null">
                <!--在 xml 文件中由于包含大于或小于号,所以最好使用 CDATA 进行包裹-->
                <![CDATA[ and e_salary <= #{salaryEnd} ]]>
            </if>
        </where>
        order by e_id
    </select>

    <!--传入一个或多个id,删除指定的员工-->
    <delete id="deleteByIds" parameterType="list">
        DELETE FROM employee
        <if test="empids != null and empids.length > 0">
            <where>
                <!--通过循环拼接 SQL 语句-->
                <foreach collection="array" open="e_id IN (" close=")" item="id" separator=",">
                    #{id}
                </foreach>
            </where>
        </if>
        <if test="(empids == null) or (empids.length == 0)">
            <where>1=2</where>
        </if>
    </delete>
</mapper>
然后在 application.yml 配置文件中,需要配置 mybatis 的对应的别名,以及 mapper 的 xml 文件的路径:
spring:
  datasource:
    driver-class-name: com.mysql.cj.jdbc.Driver
    url: jdbc:mysql://localhost:3306/testdb?useSSL=false
    username: root
    password: 123456
mybatis:
  # 设置编写 sql 语句的 mapper 文件的路径
  mapper-locations: classpath:mapper/*Mapper.xml
  # 将所有实体类设置为别名,这样在 mapper 文件中就可以简写了
  type-aliases-package: com.jobs.demo2.domain
最后在测试类中编写测试方法进行验证结果:
package com.jobs.demo2;

import com.jobs.demo2.dao.EmployeeDao;
import com.jobs.demo2.domain.Employee;
import org.junit.jupiter.api.Test;
import org.springframework.beans.factory.annotation.Autowired;
import org.springframework.boot.test.context.SpringBootTest;

import java.util.List;

@SpringBootTest
class Demo2ApplicationTests {

    @Autowired
    private EmployeeDao employeeDao;

    //添加三个新员工信息
    @Test
    public void add() {
        Employee emp1 = new Employee(100, "候菲特", 50000);
        Integer result1 = employeeDao.add(emp1);
        System.out.println(result1);

        Employee emp2 = new Employee(101, "任盖茨", 60000);
        Integer result2 = employeeDao.add(emp2);
        System.out.println(result2);

        Employee emp3 = new Employee(102, "李政富", 70000);
        Integer result3 = employeeDao.add(emp3);
        System.out.println(result3);
    }

    //修改一名员工的信息
    @Test
    public void update() {
        Employee emp = new Employee(100, "任首富", 80000);
        Integer result = employeeDao.update(emp);
        System.out.println(result);
    }

    //查询所有员工
    @Test
    public void selectAll() {
        List<Employee> emplist = employeeDao.selectAll();
        System.out.println(emplist);
    }

    //根据相关条件查询筛选员工
    @Test
    public void selectByCondition() {
        String name = "任";
        int start = 30000;
        int end = 60000;
        List<Employee> emplist = employeeDao.selectByCondition(name, start, end);
        System.out.println(emplist);
    }

    //删除指定id的一个或多个员工
    @Test
    public void deleteByIds() {
        Integer result = employeeDao.deleteByIds(100, 101, 102);
        System.out.println(result);
    }
}
到此为止,有关 SpringBoot 采用纯注解和XML两种方式使用 Mybatis 操作 Mysql 已经介绍完毕,两个 demo 程序都已经测试无误,可以发现 SpringBoot 相比 Spring 而言要简单很多, 主要是少了很多繁琐的配置操作,大大提高了开发效率。
本篇博客 Demo 的下载地址为:https://files.cnblogs.com/files/blogs/699532/springboot_mybatis.zip

 浙公网安备 33010602011771号