SpringBoot 使用 RedisTemplate 操作 Redis
之前发布过一篇有关 Spring 使用 RedisTemplate 操作 Redis 的博客,正好可以拿来跟 SpringBoot 进行对比。
之前发布的博客地址为:https://www.cnblogs.com/studyjobs/p/16084948.html
本篇博客将采用 SpringBoot 实现与之相同的功能,两者使用 RedisTemplate 操作 Redis 的代码完全相同,主要是 SpringBoot 相较于 Spring 而言,大大简化了 jar 包导入和 Redis 配置的细节,从而提高极大的提高了开发效率。
在本篇博客最后会提供 Demo 源代码的下载。
一、搭建工程
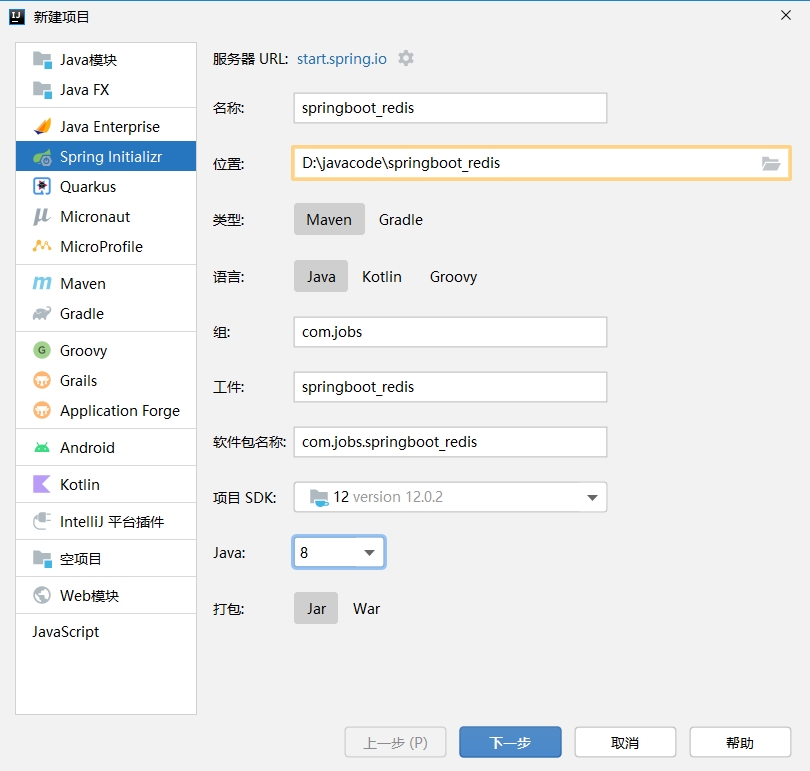
新建一个 SpringBoot 项目,选择 Spring Initializr 选项,注意需要联网。
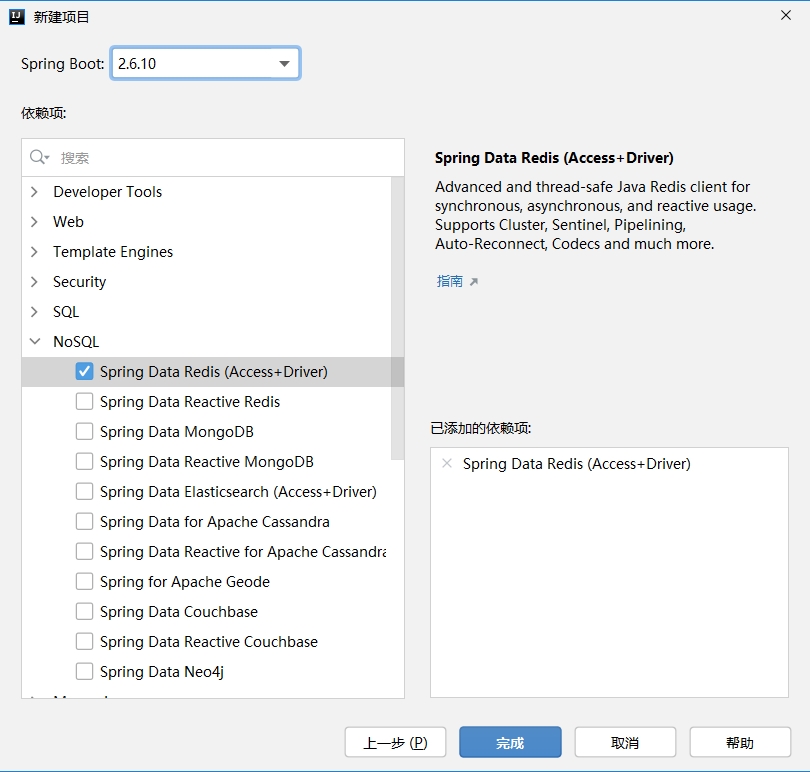
然后勾选 NoSQL 下面选择 Spring Data Redis (Access+Driver)
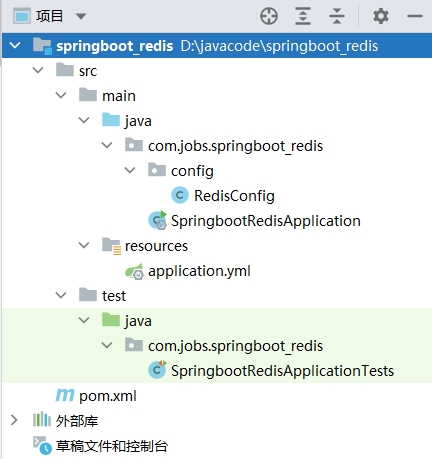
本博客的 Demo 搭建后的最终结构如下所示:
SpringBoot 项目创建完成后,其 pom 文件内容如下:
<?xml version="1.0" encoding="UTF-8"?>
<project xmlns="http://maven.apache.org/POM/4.0.0"
         xmlns:xsi="http://www.w3.org/2001/XMLSchema-instance"
         xsi:schemaLocation="http://maven.apache.org/POM/4.0.0
         https://maven.apache.org/xsd/maven-4.0.0.xsd">
    <modelVersion>4.0.0</modelVersion>
    <parent>
        <groupId>org.springframework.boot</groupId>
        <artifactId>spring-boot-starter-parent</artifactId>
        <version>2.6.10</version>
        <relativePath/>
    </parent>
    <groupId>com.jobs</groupId>
    <artifactId>springboot_redis</artifactId>
    <version>0.0.1-SNAPSHOT</version>
    <name>springboot_redis</name>
    <description>Demo project for Spring Boot</description>
    <properties>
        <java.version>1.8</java.version>
    </properties>

    <dependencies>
        <!--导入了 SpringBoot 有关 Redis 的起步依赖-->
        <dependency>
            <groupId>org.springframework.boot</groupId>
            <artifactId>spring-boot-starter-data-redis</artifactId>
        </dependency>

        <dependency>
            <groupId>org.springframework.boot</groupId>
            <artifactId>spring-boot-starter-test</artifactId>
            <scope>test</scope>
        </dependency>
    </dependencies>

    <build>
        <plugins>
            <plugin>
                <groupId>org.springframework.boot</groupId>
                <artifactId>spring-boot-maven-plugin</artifactId>
            </plugin>
        </plugins>
    </build>
</project>
我们可以发现,对于 Springboot 来说,只需要导入 spring-boot-starter-data-redis 这个起步依赖即可。
如果你连接的是本机的 Redis 服务,并且端口也是默认的 6379 端口的话,那么不需要进行任何配置,现在就可以使用了 RedisTemplate 操作 Redis 了。如果你想对 Redis 的连接参数进行相关的配置的话,可以在 application.yml 中进行修改,有关 Redis 的配置项在键盘录入时会有智能提示,使用起来非常方便,下面列出 application.yml 配置文件中对 Redis 的常用配置项:
# 在没有进行配置的情况下,
# SpringBoot默认连接本机 6379 端口的 Redis
# 你可以对以下配置项的默认值进行修改,具体配置项的含义,一目了然
spring:
  redis:
    host: localhost
    port: 6379
#   password: 123456
    jedis:
      pool:
        max-active: 8
        max-idle: 5
        max-wait: 3000
        min-idle: 1
二、代码细节
我们先对 RedisTemplate 进行一下配置,对于 key 和 value 的序列化,不使用默认的 JdkSerializationRedisSerializer ,使用 StringRedisSerializer ,因为这样比较容易在客户端工具中查看 key 和 value 的值。
package com.jobs.springboot_redis.config;

import org.springframework.context.annotation.Bean;
import org.springframework.context.annotation.Configuration;
import org.springframework.data.redis.connection.RedisConnectionFactory;
import org.springframework.data.redis.core.RedisTemplate;
import org.springframework.data.redis.serializer.StringRedisSerializer;

@Configuration
public class RedisConfig {

    @Bean
    public RedisTemplate<String, Object> redisTemplate(RedisConnectionFactory connectionFactory) {

        RedisTemplate<String, Object> redisTemplate = new RedisTemplate<>();

        //默认的Key序列化器为:JdkSerializationRedisSerializer
        redisTemplate.setKeySerializer(new StringRedisSerializer());
        redisTemplate.setHashKeySerializer(new StringRedisSerializer());
        redisTemplate.setValueSerializer(new StringRedisSerializer());
        redisTemplate.setHashValueSerializer(new StringRedisSerializer());
        redisTemplate.setConnectionFactory(connectionFactory);
        redisTemplate.setEnableTransactionSupport(true);

        return redisTemplate;
    }
}
然后在 SpringbootRedisApplicationTests 测试类中编写使用 RedisTemplate 操作 Redis 的代码。
package com.jobs.springboot_redis;

import org.junit.jupiter.api.Test;
import org.springframework.beans.factory.annotation.Autowired;
import org.springframework.boot.test.context.SpringBootTest;
import org.springframework.data.redis.core.RedisTemplate;

import java.util.HashMap;
import java.util.Map;
import java.util.Set;

//对于 SpringBoot 高版本测试类,下面的注解可以省略
//@RunWith(SpringRunner.class)

//由于【当前的测试类】与【SpringBoot的启动类】处于相同的包下面
//所以对于 @SpringBootTest 注解,不需要指定 classes 配置值
//@SpringBootTest(classes=SpringbootRedisApplication.class)

@SpringBootTest
class SpringbootRedisApplicationTests {

    @Autowired
    private RedisTemplate redisTemplate;

    //测试字符串 String 数据类型
    @Test
    public void testString() {

        //设置
        redisTemplate.opsForValue().set("name", "候胖胖");
        redisTemplate.opsForValue().set("age", "40");

        //获取
        String name = redisTemplate.opsForValue().get("name").toString();
        String age = redisTemplate.opsForValue().get("age").toString();

        System.out.println("name:" + name + ",age:" + age);
    }

    //测试列表 List 数据类型
    @Test
    public void testList() {

        //redis 的 list 可以作为队列使用
        //从列表右边添加数据
        redisTemplate.opsForList().rightPush("fat", "任肥肥");
        redisTemplate.opsForList().rightPush("fat", "侯胖胖");
        redisTemplate.opsForList().rightPush("fat", "李墩墩");

        //获取列表的容量大小
        long fatCount = redisTemplate.opsForList().size("fat");
        System.out.println("列表数量:" + fatCount);

        //从左侧逐个取数据
        for (int i = 0; i < fatCount; i++) {
            String fatMan = redisTemplate.opsForList().leftPop("fat").toString();
            System.out.println(fatMan);
        }
    }

    //测试散列 Hash 数据类型
    @Test
    public void testHash() {

        //redis 的 hash 比较适合存储对象数据
        Map<String, String> user1 = new HashMap<>();
        user1.put("name", "侯胖胖");
        user1.put("age", "40");
        user1.put("kg", "80");

        Map<String, String> user2 = new HashMap<>();
        user2.put("name", "任肥肥");
        user2.put("age", "38");
        user2.put("kg", "90");

        redisTemplate.opsForHash().putAll("user1", user1);
        redisTemplate.opsForHash().putAll("user2", user2);

        //修改第一个用户的年龄
        redisTemplate.opsForHash().put("user1", "age", "45");
        //修改第二个用户的体重
        redisTemplate.opsForHash().put("user2", "kg", "100");

        //获取两个对象的属性值
        Map<String, String> user111 = redisTemplate.opsForHash().entries("user1");
        Map<String, String> user222 = redisTemplate.opsForHash().entries("user2");
        System.out.println(user111);
        System.out.println(user222);
    }

    //测试集合 Set 数据类型
    @Test
    public void testSet() {

        //redis 的 set 跟 java 的 set 使用方式一样,重复的元素只保留一个
        redisTemplate.opsForSet().add("aaa", "a", "b", "c", "x", "y", "z", "a", "x");
        redisTemplate.opsForSet().add("bbb", "b", "c", "d", "e", "f", "y", "b", "e");

        //获取交集
        Set<String> sinter = redisTemplate.opsForSet().intersect("aaa", "bbb");
        System.out.println("交集:" + sinter);

        //获取并集
        Set<String> sunion = redisTemplate.opsForSet().union("aaa", "bbb");
        System.out.println("并集:" + sunion);

        //获取 aaa 相对于 bbb 的差集(存在于 aaa 但不存在与 bbb 的元素)
        Set<String> sdiff = redisTemplate.opsForSet().difference("aaa", "bbb");
        System.out.println("aaa 相对于 bbb 的差集:" + sdiff);
    }

    //测试有序集合 Sorted Set (ZSet) 数据类型
    @Test
    public void testZset() {

        //redis 的 zSet 比较适合做排行榜

        //粉丝投票
        redisTemplate.opsForZSet().add("vote", "侯胖胖", 10d);
        redisTemplate.opsForZSet().add("vote", "李墩墩", 7d);
        redisTemplate.opsForZSet().add("vote", "任肥肥", 6d);
        redisTemplate.opsForZSet().add("vote", "乔豆豆", 12d);
        redisTemplate.opsForZSet().add("vote", "杨重重", 8d);

        //修改任肥肥的投票数
        redisTemplate.opsForZSet().add("vote", "任肥肥", 9d);

        //zSet 默认是按照分值的升序排列
        Set<String> vote1 = redisTemplate.opsForZSet().range("vote", 0, -1);
        System.out.println("投票数量升序排列:" + vote1);

        //获取粉丝投票数量最多的前三个人
        Set<String> vote2 = redisTemplate.opsForZSet().reverseRange("vote", 0, 2);
        System.out.println("投票数量倒序前 3 个人:" + vote2);
    }
}
由于测试类与 SpringBoot 启动类在同一个包下面,因此使用 @SpringBootTest 注解不需要指定 classes 对应的启动类。
到此为止,已经介绍完毕有关 SpringBoot 使用 RedisTemplate 操作 Redis 的相关内容。最后分别运行一下以上测试类中的每个测试方法,对代码执行结果进行以下验证即可。综合对比 Spring 使用 RedisTemplate 操作 Redis 可以发现:SpringBoot 实现相同的功能,能够大大简化了 jar 包导入和配置内容,提高开发效率。
本篇博客的源代码地址为:https://files.cnblogs.com/files/blogs/699532/springboot_redis.zip

 浙公网安备 33010602011771号