利用workerman构建一个客服系统(2)
前言
从上一小结中我们快速入门了workerman中的GatewayWorker的初步使用.接下来我们继续深入的使用GatewayWorker.
长连接绑定用户id实现实现一对一客服聊天
背景
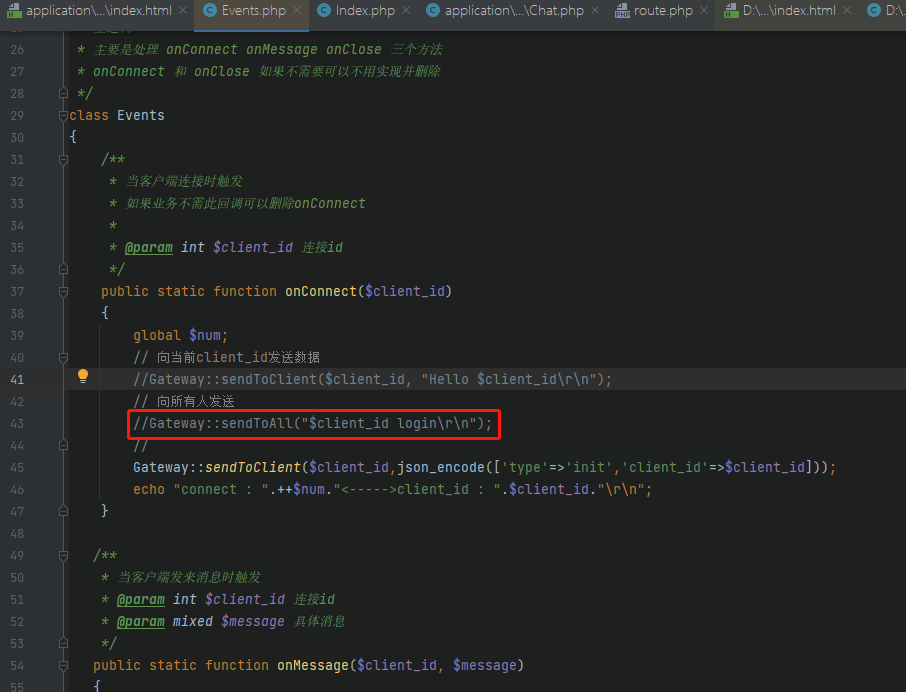
我们从下载的Event源代码中会看到Gateway::sendToAll("$client_id login\r\n");这样一行代码,这行代码的意思是向所有人发送当前用户已登录的消息通知,但是这样是不太符合现实需求的.我们如何实现一对一发送消息给指定用户,而不需要向所有用户发送消息
实现思路
1.首先改在GateWayWoker下的Event源码
- 首先注释掉该行代码
Gateway::sendToAll("$client_id login\r\n");,即红框的代码
- 改造
Gateway::sendToClient($client_id, "Hello $client_id\r\n");该行代码的返回的消息信息,改造为Gateway::sendToClient($client_id,json_encode(['type'=>'init','client_id'=>$client_id]));
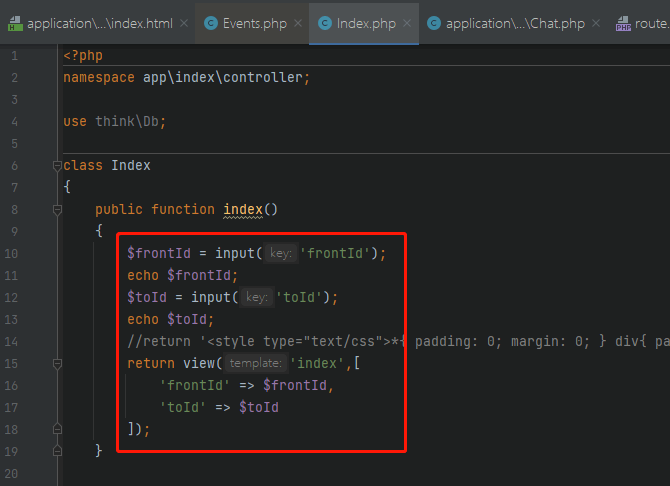
2.再改造Index控制器下的index方法,如下图红框所示
3.在改造下Index/view/index页面中的JS代码,主要websocket链接初始化的部分
//获取发送人ID
var frontId = {$frontId};
//获取接收人ID
var toId = {$toId};
//创建websocket
var ws = new WebSocket('ws://127.0.0.1:8282');
//消息处理
ws.onmessage = function (e) {
	//将消息转换为JSON数组
	var message = eval("(" + e.data + ")")
	//打印
	console.log(message);
	console.log(e);
	//判断消息内容
	switch (message.type) {
		//类型初始化
		case 'init':
			//发送绑定信息
			var data = '{"client_id":"' + message.client_id + '","frontId":"' + frontId + '","type":"bind"}';
			//发送
			ws.send(data)
			return;
		//消息类型为text
		case 'text':
			//判断消息接收人ID是否一致.一致时,将消息展示到左侧
			if (toId === message.frontId){
				$(".chat-content").append('<div class="chat-text section-left flex"><span class="char-img" style="background-image: url(http://chat.test/static/img/123.jpg)"></span><span class="text"><i class="icon icon-sanjiao4 t-32"></i>'+message.data+'</span></div>')
			}
			return;
	}
}
4.继续改造Event类中的onMessage方法
/**
 * 当客户端发来消息时触发
 * @param int $client_id 连接id
 * @param mixed $message 具体消息
 */
 public static function onMessage($client_id, $message)
 {
	if (empty($message)){
		return;
	}
	$data = [];
	if (!empty($message)){
		$data = json_decode($message,true);
	}
	if (isset($data['type']) && !empty($data['type'])){
		switch ($data['type']){
			case 'bind':
				//把client_id绑定到发送消息者ID,防止用户退出或者其他误操作时,client_id变更
				Gateway::bindUid($data['client_id'],$data['frontId']);
				return;
			case "say":
				$newDate = [
					'id'=>$client_id,
					'frontId'=>$data['frontId'],
					'toId'=>$data['toId'],
					'date' => date('Y-m-d H:i:s'),
					'data' => nl2br(htmlspecialchars($data['data'])),
					'type' => 'text',
				];
				//将消息发送给消息接收人
				Gateway::sendToUid($data['toId'],json_encode($newDate,JSON_UNESCAPED_UNICODE));
				return;
		}
		return;
	}
	return;
}
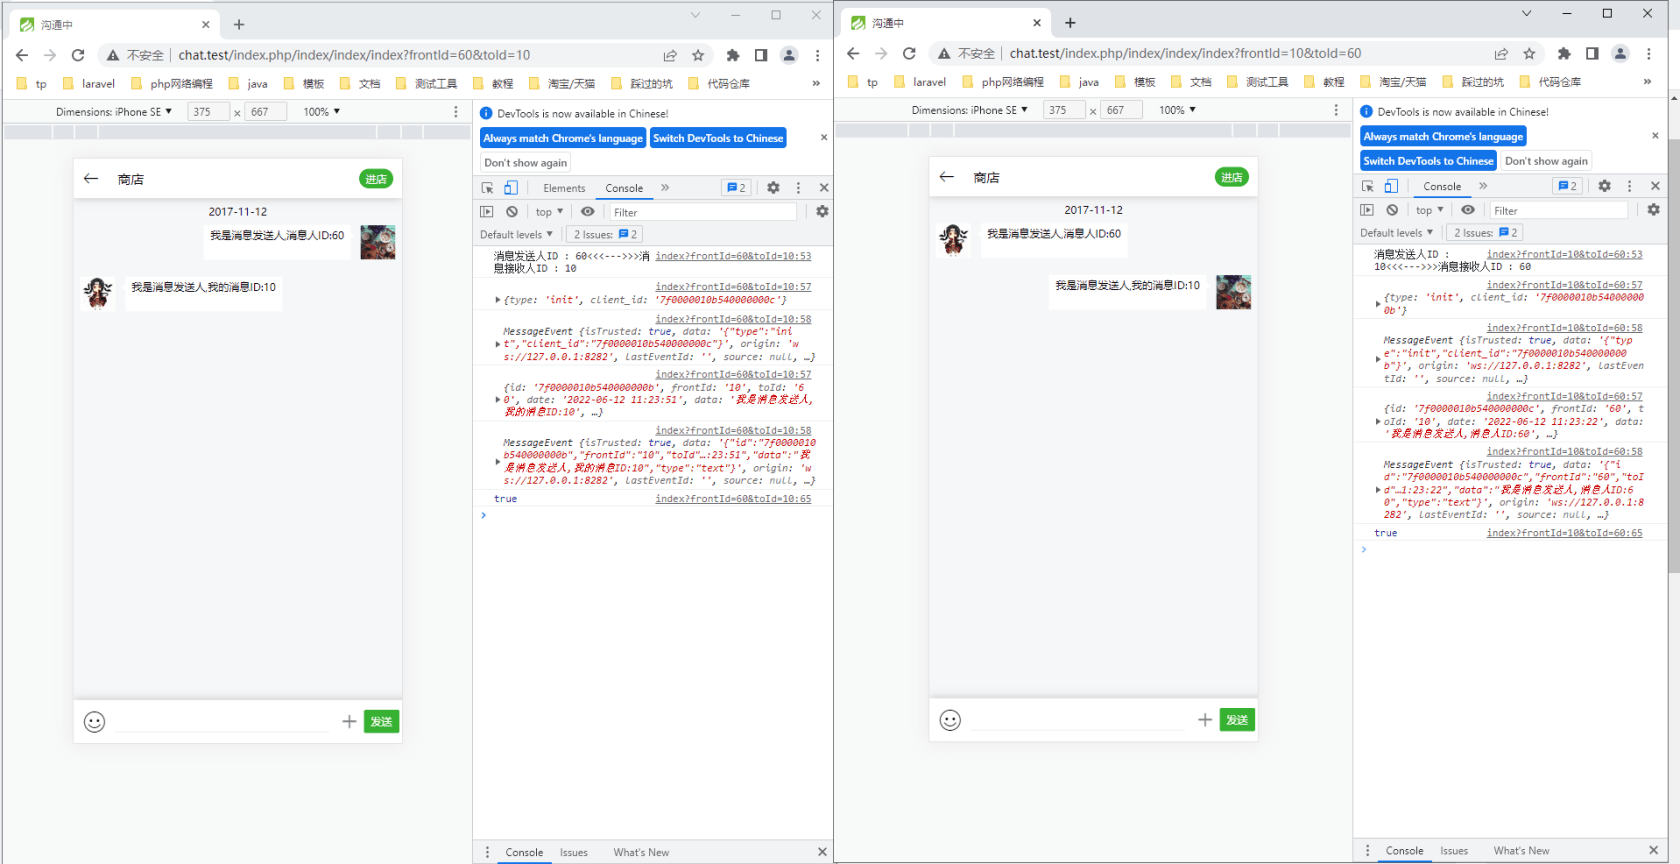
5.验证
GetawayWorker下的文本消息聊天记录持久化
背景
我们刚才已经实现了一对一的消息发送。但是存在一个问题,就是发送出去的消息,消息接收者能不能接收到发来的消息?发出去消息能存下来?
实现思路
1.改造Event类中的onMessage方法
/**
 * 当客户端发来消息时触发
 * @param int $client_id 连接id
 * @param mixed $message 具体消息
 */
 public static function onMessage($client_id, $message)
 {
	if (empty($message)){
		return;
	}
	$data = [];
	if (!empty($message)){
		$data = json_decode($message,true);
	}
	if (isset($data['type']) && !empty($data['type'])){
		switch ($data['type']){
			case 'bind':
				//把client_id绑定到发送消息者ID,防止用户退出或者其他误操作时,client_id变更
				Gateway::bindUid($data['client_id'],$data['frontId']);
				return;
			case "say":
				$newDate = [
					'id'=>$client_id,
					'frontId'=>$data['frontId'],
					'toId'=>$data['toId'],
					'date' => date('Y-m-d H:i:s'),
					'data' => nl2br(htmlspecialchars($data['data'])),
					'type' => 'text',
				];
				//判断消息接收人是否在线
				if (Gateway::isUidOnline($data['toId'])){
					// 向指定人发送
					Gateway::sendToUid($data['toId'],json_encode($newDate,JSON_UNESCAPED_UNICODE));
					//是否阅读
					$newDate['is_read'] = 1;
				}else{
					$newDate['is_read'] = 0;
				}
				//将消息存下来
				$newDate['type'] = 'save';
				//向指定人发送
				Gateway::sendToUid($data['frontId'],json_encode($newDate,JSON_UNESCAPED_UNICODE));
				return;
		}
		return;
	}
	return;
}
2.创建表
用户表
CREATE TABLE `chat_user` (
  `id` int(10) NOT NULL AUTO_INCREMENT COMMENT '自增ID',
  `mpid` int(10) NOT NULL COMMENT '公众号标识',
  `openid` varchar(255) NOT NULL COMMENT 'openid',
  `nickname` varchar(50) CHARACTER SET utf8mb4 DEFAULT NULL COMMENT '昵称',
  `headimgurl` varchar(255) DEFAULT NULL COMMENT '头像',
  `sex` tinyint(1) DEFAULT NULL COMMENT '性别',
  `subscribe` tinyint(1) NOT NULL DEFAULT '0' COMMENT '是否关注',
  `subscribe_time` int(10) DEFAULT NULL COMMENT '关注时间',
  `unsubscribe_time` int(10) DEFAULT NULL COMMENT '取消关注时间',
  `relname` varchar(50) DEFAULT NULL COMMENT '真实姓名',
  `signature` text COMMENT '个性签名',
  `mobile` varchar(15) DEFAULT NULL COMMENT '手机号',
  `is_bind` tinyint(1) NOT NULL DEFAULT '0' COMMENT '是否绑定',
  `language` varchar(50) DEFAULT NULL COMMENT '使用语言',
  `country` varchar(50) DEFAULT NULL COMMENT '国家',
  `province` varchar(50) CHARACTER SET utf8mb4 DEFAULT NULL COMMENT '省',
  `city` varchar(50) DEFAULT NULL COMMENT '城市',
  `remark` varchar(50) DEFAULT NULL COMMENT '备注',
  `group_id` int(10) DEFAULT '0' COMMENT '分组ID',
  `groupid` int(11) NOT NULL DEFAULT '0' COMMENT '公众号分组标识',
  `tagid_list` varchar(255) DEFAULT NULL COMMENT '标签',
  `score` int(10) DEFAULT '0' COMMENT '积分',
  `money` decimal(10,2) DEFAULT '0.00' COMMENT '金钱',
  `latitude` varchar(50) DEFAULT NULL COMMENT '纬度',
  `longitude` varchar(50) DEFAULT NULL COMMENT '经度',
  `location_precision` varchar(50) DEFAULT NULL COMMENT '精度',
  `type` int(11) NOT NULL DEFAULT '0' COMMENT '0:公众号粉丝1:注册会员',
  `unionid` varchar(160) DEFAULT NULL COMMENT 'unionid字段',
  `password` varchar(64) DEFAULT NULL COMMENT '密码',
  `last_time` int(10) DEFAULT '586969200' COMMENT '最后交互时间',
  `parentid` int(10) DEFAULT '1' COMMENT '非扫码用户默认都是1',
  `isfenxiao` int(8) DEFAULT '0' COMMENT '是否为分销,默认为0,1,2,3,分别为1,2,3级分销',
  `totle_earn` decimal(8,2) DEFAULT '0.00' COMMENT '挣钱总额',
  `balance` decimal(8,2) DEFAULT '0.00' COMMENT '分销挣的剩余未提现额',
  `fenxiao_leavel` int(8) DEFAULT '2' COMMENT '分销等级',
  PRIMARY KEY (`id`)
) ENGINE=InnoDB AUTO_INCREMENT=90 DEFAULT CHARSET=utf8 COMMENT='公众号粉丝表';
用户表数据:
INSERT INTO `chat_user` VALUES ('85', '1', 'oYxpK0bPptICGQd3YP_1s7jfDTmE', 'Love violet life', 'http://www.hwqugou.cn/img/555.jpg', '1', '1', '1517280919', '1517280912', null, null, null, '0', 'zh_CN', '中国', '江西', '赣州', '', '0', '0', '[]', '0', '0.00', null, null, null, '0', null, null, '1517478028', '1', '0', '26.00', '26.00', '2');
INSERT INTO `chat_user` VALUES ('86', '1', 'oYxpK0W2u3Sbbp-wevdQtCuviDVM', '大美如斯', 'http://www.hwqugou.cn/img/444.png', '2', '1', '1507261446', null, null, null, null, '0', 'zh_CN', '中国', '河南', '焦作', '', '0', '0', '[]', '0', '0.00', null, null, null, '0', null, null, '586969200', '1', '0', '0.00', '0.00', '2');
INSERT INTO `chat_user` VALUES ('87', '1', 'oYxpK0RsvcwgS9DtmIOuyb_BgJbo', '大金', 'http://www.hwqugou.cn/img/333.jpg', '1', '1', '1508920878', null, null, null, null, '0', 'zh_CN', '中国', '河南', '商丘', '', '0', '0', '[]', '0', '0.00', null, null, null, '0', null, null, '586969200', '1', '0', '0.00', '0.00', '2');
INSERT INTO `chat_user` VALUES ('88', '1', 'oYxpK0VnHjESafUHzRpstS8mMwlE', '悦悦', 'http://www.hwqugou.cn/img/222.jpg', '2', '1', '1512281210', null, null, null, null, '0', 'zh_CN', '中国', '福建', '福州', '', '0', '0', '[]', '0', '0.00', null, null, null, '0', null, null, '586969200', '1', '0', '0.00', '0.00', '2');
INSERT INTO `chat_user` VALUES ('89', '1', 'oYxpK0fJVYveWC_nAd7CBwcvYZ3Q', '雨薇', 'http://www.hwqugou.cn/img/111.jpg', '2', '1', '1506320564', null, null, null, null, '0', 'zh_CN', '', '', '', '', '0', '0', '[]', '0', '0.00', null, null, null, '0', null, null, '586969200', '1', '0', '0.00', '0.00', '2');
消息表
CREATE TABLE `chat_communication` (
  `id` int(8) unsigned NOT NULL AUTO_INCREMENT,
  `fromid` int(5) NOT NULL,
  `fromname` varchar(50) NOT NULL,
  `toid` int(5) NOT NULL,
  `toname` varchar(50) NOT NULL,
  `content` text NOT NULL,
  `time` int(10) NOT NULL,
  `shopid` int(5) DEFAULT NULL,
  `isread` tinyint(2) DEFAULT '0',
  `type` tinyint(2) DEFAULT '1' COMMENT '1是普通文本,2是图片',
  PRIMARY KEY (`id`)
) ENGINE=InnoDB AUTO_INCREMENT=30 DEFAULT CHARSET=utf8;
3.修改数据库配置config/database.php
return [
    // 数据库类型
    'type'            => 'mysql',
    // 服务器地址
    'hostname'        => '127.0.0.1',
    // 数据库名
    'database'        => 'chat',
    // 用户名
    'username'        => 'root',
    // 密码
    'password'        => '123456',
    // 端口
    'hostport'        => '3306',
    // 连接dsn
    'dsn'             => '',
    // 数据库连接参数
    'params'          => [],
    // 数据库编码默认采用utf8
    'charset'         => 'utf8',
    // 数据库表前缀
    'prefix'          => 'chat_',
    // 数据库调试模式
    'debug'           => true,
    // 数据库部署方式:0 集中式(单一服务器),1 分布式(主从服务器)
    'deploy'          => 0,
    // 数据库读写是否分离 主从式有效
    'rw_separate'     => false,
    // 读写分离后 主服务器数量
    'master_num'      => 1,
    // 指定从服务器序号
    'slave_no'        => '',
    // 自动读取主库数据
    'read_master'     => false,
    // 是否严格检查字段是否存在
    'fields_strict'   => true,
    // 数据集返回类型
    'resultset_type'  => 'array',
    // 自动写入时间戳字段
    'auto_timestamp'  => false,
    // 时间字段取出后的默认时间格式
    'datetime_format' => 'Y-m-d H:i:s',
    // 是否需要进行SQL性能分析
    'sql_explain'     => false,
    // Builder类
    'builder'         => '',
    // Query类
    'query'           => '\\think\\db\\Query',
    // 是否需要断线重连
    'break_reconnect' => false,
    // 断线标识字符串
    'break_match_str' => [],
];
4.新增存储消息接口
namespace app\api\controller;

use think\Controller;
use think\Db;
use think\facade\Request;

class Chat extends Controller
{

    /**
     *文本消息的数据持久化
     */
    public function saveMessage(){
        if(Request::instance()->isAjax()){
            $message = input("post.");

            $datas['fromid']=$message['fromid'];
            $datas['fromname']= $this->getName($datas['fromid']);
            $datas['toid']=$message['toid'];
            $datas['toname']= $this->getName($datas['toid']);
            $datas['content']=$message['data'];
            $datas['time']=$message['time'];
            $datas['isread']=$message['isread'];
            $datas['type'] = 1;
            Db::name("communication")->insert($datas);
        }
    }

    /**
     * 根据用户id返回用户姓名
     */
    public function getName($uid){

        $userinfo = Db::name("user")->where('id',$uid)->field('nickname')->find();

        return $userinfo['nickname'];
    }
5.新增路由,在route/route.php
Route::post('api/save/message','api/Chat/saveMessage');
5.在改造下Index/view/index页面中的JS代码,主要websocket链接初始化的部分
ws.onmessage = function (e) {
	var message = eval("(" + e.data + ")")
	switch (message.type) {
		case 'save':
			saveMessage(message);
			return;
	}
}
function saveMessage(data){
	$.post(
		"{:url('api/save/message')}",
		data,
		function (e){
		},'json'
	)
}
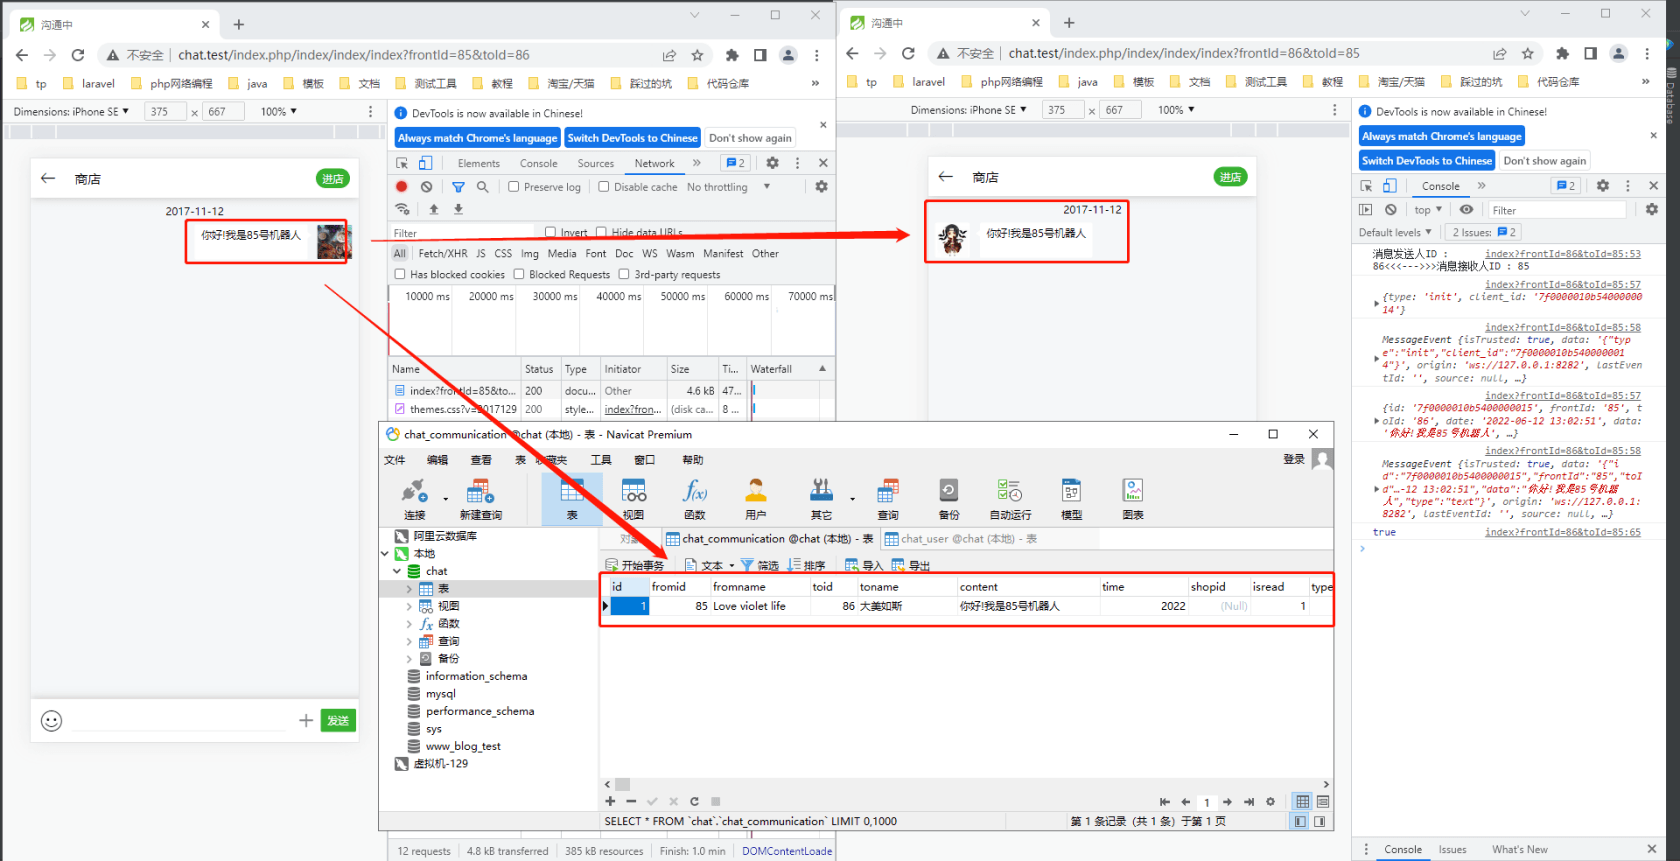
6.验证
长连接下聊天页面展示项目中用户头像和对方昵称
背景
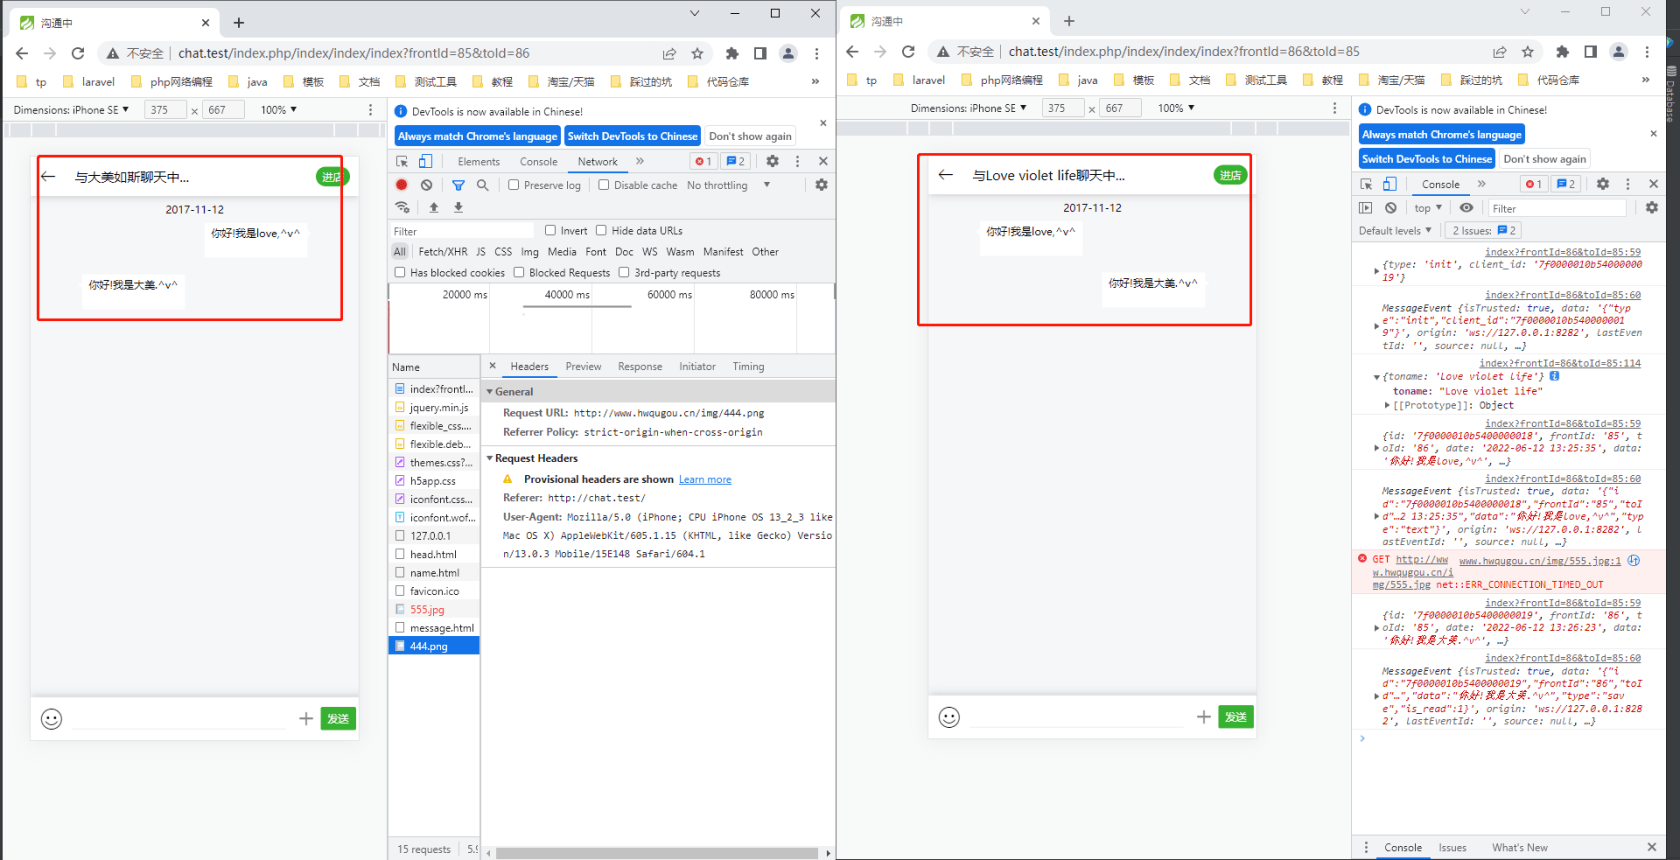
从上一小节中我们知道怎么才能将消息持久化,这一小节中我们需要展示自己的聊天头像,昵称和要聊天的头像,昵称
实现思路
1.在Chat类下最近获取昵称和头像的方法
/**
 * 根据用户id获取聊天双方的头像信息;
 */
public function getHead(){
	if(Request::instance()->isAjax()){
		$fromid = input('fromid');
		$toid = input('toid');
		$frominfo = Db::name('user')->where('id',$fromid)->field('headimgurl')->find();
		$toinfo = Db::name('user')->where('id',$toid)->field('headimgurl')->find();
		return [
			'from_head'=>$frominfo['headimgurl'],
			'to_head'=>$toinfo['headimgurl']
		];
	}
}
/**
 * 根据用户id返回用户姓名;
 */
public function accordUidGetName(){
	if(Request::instance()->isAjax()){
		$uid = input('uid');
		$toinfo = Db::name('user')->where('id',$uid)->field('nickname')->find();
		return ["toname"=>$toinfo['nickname']];
	}
}
2.创建路由
Route::post('api/get/head','api/Chat/getHead');
Route::post('api/get/name','api/Chat/accordUidGetName');
3.改造聊天页面的js,主要是在初始化时加载
var from_head = '';
var  to_head = '';
var  to_name = '';
var ws = new WebSocket('ws://127.0.0.1:8282');
//消息处理
ws.onmessage = function (e) {
	var message = eval("(" + e.data + ")")
	switch (message.type) {
		case 'init':
			var data = '{"client_id":"' + message.client_id + '","frontId":"' + frontId + '","type":"bind"}';
			ws.send(data)
			get_head(frontId,toId);
			get_name(toId);
			return;
		case 'text':
			if (parseInt(toId) === parseInt(message.frontId)){
				$(".chat-content").append('<div class="chat-text section-left flex"><span class="char-img" style="background-image: url('+to_head+')"></span><span class="text"><i class="icon icon-sanjiao4 t-32"></i>'+message.data+'</span></div>')
			}
			return;
	}
}
//发送消息
$(".send-btn").click(function () {
	var content = $(".send-input").val();
	var data = '{"data":"' + content + '","type":"say","frontId":"'+frontId+'","toId":"'+toId+'"}';
	$(".chat-content").append('<div class="chat-text section-right flex"><span class="text"><i class="icon icon-sanjiao3 t-32"></i>'+content+'</span><span class="char-img" style="background-image: url('+from_head+')"></span></div>')
	ws.send(data)
	$(".send-input").val(null)
});
//获取头像和昵称
function get_head(fromid,toid){
	$.post(
		"{:url('api/get/head')}",
		{"fromid":fromid,"toid":toid},
		function(e){
			from_head = e.from_head;
			to_head = e.to_head;
		},'json'
	);
}
//获取聊天人的昵称
function get_name(toid){
	$.post(
		"{:url('api/get/name')}",
		{"uid":toid},
		function(e){
			to_name = e.toname;
			$(".shop-titlte").text("与"+to_name+"聊天中...");
			console.log(e);
		},'json'
	);
}
4.验证
长连接下聊天页面之聊天记录初始化
背景
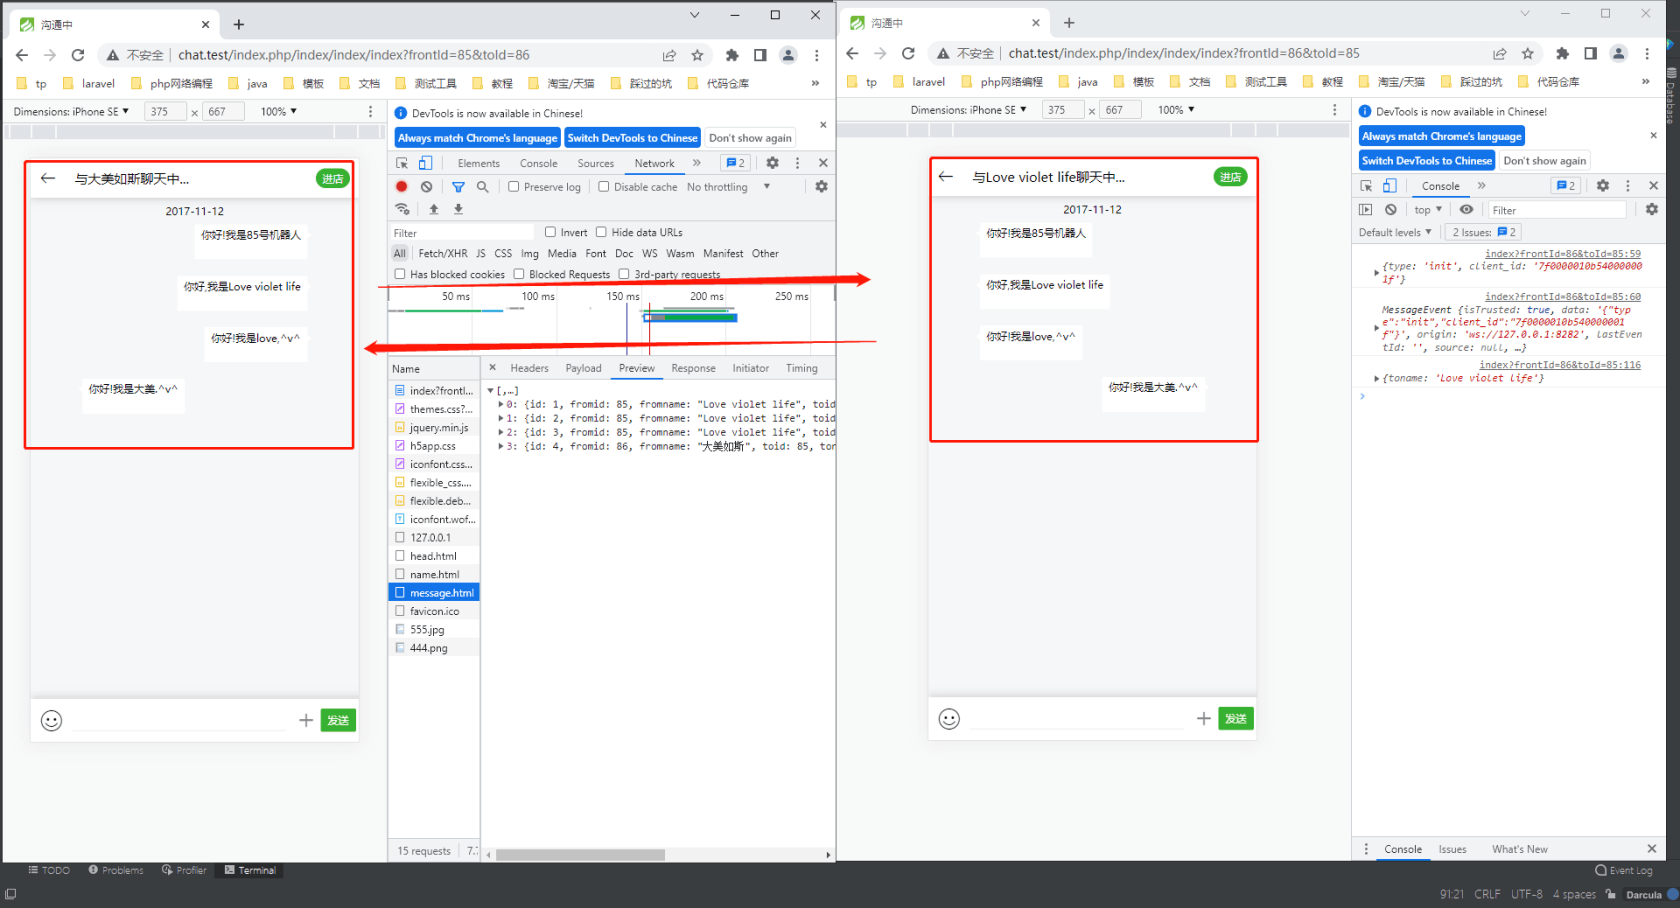
我们从前面几个小节中学习到了如何将消息存储下来.也知道了如何获取聊天双方的头像和昵称.但是有个问题就是如何获取聊天双方的聊天记录呢?
实现思路
1.在Chat类追加获取消息记录方法
/**
 * 页面加载返回聊天记录
 */
public function load(){
	if (Request::instance()->isAjax()) {
		$fromid = input('fromid');
		$toid = input('toid');
		$count = Db::name('communication')
                ->whereOr('fromid',$fromid)
                ->whereOr('fromid',$toid)
                ->whereOr('toid',$fromid)
                ->whereOr('toid',$toid)
                ->count('id');
		if ($count >= 10) {
			 $message = Db::name('communication')
                    ->whereOr('fromid',$fromid)
                    ->whereOr('fromid',$toid)
                    ->whereOr('toid',$fromid)
                    ->whereOr('toid',$toid)
                    ->limit($count - 10, 10)->order('id')->select();
		} else {
			$message = Db::name('communication') ->whereOr('fromid',$fromid)
                    ->whereOr('fromid',$toid)
                    ->whereOr('toid',$fromid)
                    ->whereOr('toid',$toid)
                    ->order('id')->select();
		}
		return $message;
	}
}
2.追加路由
Route::post('api/get/message','api/Chat/load');
3.在聊天页面的js中追加获取消息记录方法
ws.onmessage = function (e) {
	var message = eval("(" + e.data + ")")
	switch (message.type) {
		case 'init':
		var data = '{"client_id":"' + message.client_id + '","frontId":"' + frontId + '","type":"bind"}';
		ws.send(data)
		message_load()
		return;
	}
}
function message_load() {
	$.post(
		"{:url('api/get/message')}",
		{"fromid": frontId, "toid": toId},
		function (e) {
			$.each(e, function (index, content) {
			if (frontId == content.fromid) {
				$(".chat-content").append('<div class="chat-text section-right flex"><span class="text"><i class="icon icon-sanjiao3 t-32"></i>' + content.content + '</span> <span class="char-img" style="background-image: url(' + from_head + ')"></span> </div>');
			} else {
				$(".chat-content").append(' <div class="chat-text section-left flex"><span class="char-img" style="background-image: url(' + to_head + ')"></span> <span class="text"><i class="icon icon-sanjiao4 t-32"></i>' + content.content + '</span> </div>');
			}
		})
		}, 'json'
	);
}
4.验证
小结
到此我们学习workerman就暂时告一段落了,想要继续深入了解就一定要看官方文档.


 浙公网安备 33010602011771号