OpenStack Grizzly详细安装指导
一、环境介绍:
| 控制节点 | eth0 (10.10.10.51), eth1 (192.168.100.51) |
| 网络节点 | eth0 (10.10.10.52), eth1 (10.20.20.52), eth2 (192.168.100.52) |
| 计算节点 | eth0 (10.10.10.53), eth1 (10.20.20.53) |
说明1: 使用 dpkg -s <packagename> to 确保 grizzly packages (version : 2013.1)
说明2: 你可以添加比较多的计算节点,下面是网络结构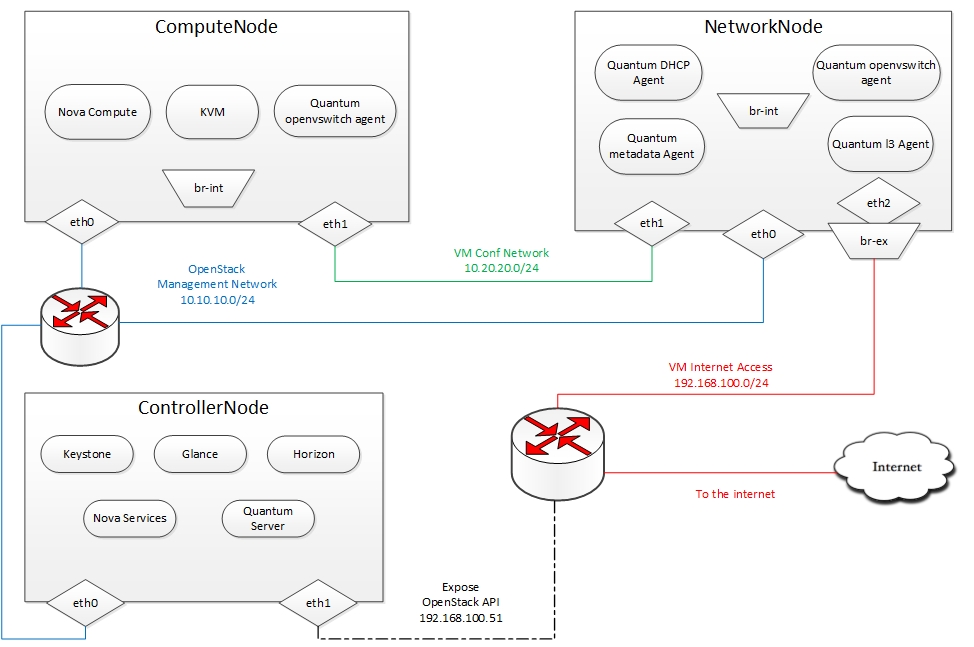
二、控制节点
2.1. Ubuntu准备
安装64位 Ubuntu 12.04 或则13.04 Server ,切换sudo模式
- sudo su
添加 Grizzly 源 [Only for Ubuntu 12.04]:
- apt-get install -y ubuntu-cloud-keyring
- echo deb http://ubuntu-cloud.archive.canonical.com/ubuntu precise-updates/grizzly main >> /etc/apt/sources.list.d/grizzly.list
对于上面命令不了解,可参考
安装openstack过程中:如何添加源,echo,<<分别代表什么意思?
更新系统:
- apt-get update -y
- apt-get upgrade -y
- apt-get dist-upgrade -y
2.2. 网络配置
只有一个网卡接入互联网
- #For Exposing OpenStack API over the internet
- auto eth1
- iface eth1 inet static
- address 192.168.100.51
- netmask 255.255.255.0
- gateway 192.168.100.1
- dns-nameservers 8.8.8.8
- #Not internet connected(used for OpenStack management)
- auto eth0
- iface eth0 inet static
- address 10.10.10.51
- netmask 255.255.255.0
重新启动网络
- service networking restart
2.3. MySQL & RabbitMQ安装
安装 MySQL:
- apt-get install -y mysql-server python-mysqldb
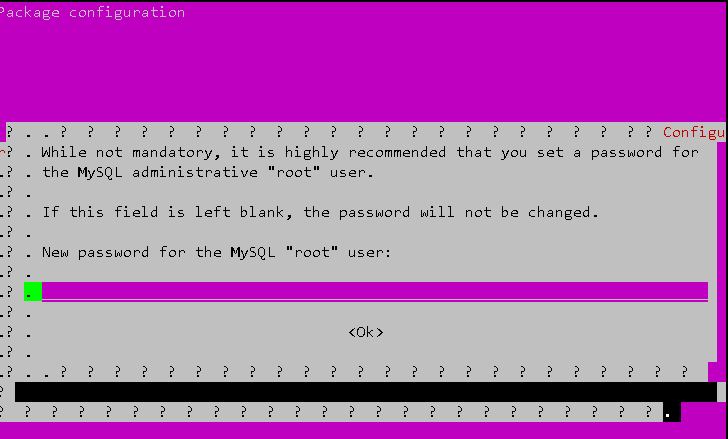
出现这个界面是输入MySQL的密码
配置mysql
- sed -i 's/127.0.0.1/0.0.0.0/g' /etc/mysql/my.cnf
- service mysql restart
对于上面命令不了解可以参考下面内容:
安装openstack过程中:sed命令的作用是什么
学习openstack之linux mysql 操作命令汇总
2.4. RabbitMQ
安装 RabbitMQ:
- apt-get install -y rabbitmq-server
安装 NTP service:
- apt-get install -y ntp
创建数据库:
- mysql -u root -p
- #Keystone
- CREATE DATABASE keystone;
- GRANT ALL ON keystone.* TO 'keystoneUser'@'%' IDENTIFIED BY 'keystonePass';
- #Glance
- CREATE DATABASE glance;
- GRANT ALL ON glance.* TO 'glanceUser'@'%' IDENTIFIED BY 'glancePass';
- #Quantum
- CREATE DATABASE quantum;
- GRANT ALL ON quantum.* TO 'quantumUser'@'%' IDENTIFIED BY 'quantumPass';
- #Nova
- CREATE DATABASE nova;
- GRANT ALL ON nova.* TO 'novaUser'@'%' IDENTIFIED BY 'novaPass';
- #Cinder
- CREATE DATABASE cinder;
- GRANT ALL ON cinder.* TO 'cinderUser'@'%' IDENTIFIED BY 'cinderPass';
- quit;
对于上面命令不了解可以参考下面内容:
安装openstack过程中:RabbitMQ与NTP是什么
学习openstack之linux mysql 操作命令汇总
2.5. 其他
安装其它服务:
- apt-get install -y vlan bridge-utils
启动 IP_Forwarding:
- sed -i 's/#net.ipv4.ip_forward=1/net.ipv4.ip_forward=1/' /etc/sysctl.conf
- # To save you from rebooting, perform the following
- sysctl net.ipv4.ip_forward=1
2.6. Keystone
安装Keystone
- apt-get install -y keystone
在文件 /etc/keystone/keystone.conf 中添加如下语句
- connection = mysql://keystoneUser:keystonePass@10.10.10.51/keystone
上面的配置可能大家的理解不一样这里给出图示:
上面connection注释掉,替换为上面链接如下图所示
重新启动Keystone,同步数据库
- service keystone restart
- keystone-manage db_sync
下载keystone_basic.sh,keystone_endpoints_basic.sh并执行脚本
- #Modify the **HOST_IP** and **EXT_HOST_IP** variables before executing the scripts
- wget https://raw.github.com/mseknibilel/OpenStack-Grizzly-Install-Guide/OVS_MultiNode/KeystoneScripts/keystone_basic.sh
- wget https://raw.github.com/mseknibilel/OpenStack-Grizzly-Install-Guide/OVS_MultiNode/KeystoneScripts/keystone_endpoints_basic.sh
- chmod +x keystone_basic.sh
- chmod +x keystone_endpoints_basic.sh
- ./keystone_basic.sh
- ./keystone_endpoints_basic.sh
注释与说明:
查看脚本keystone_basic.sh内容: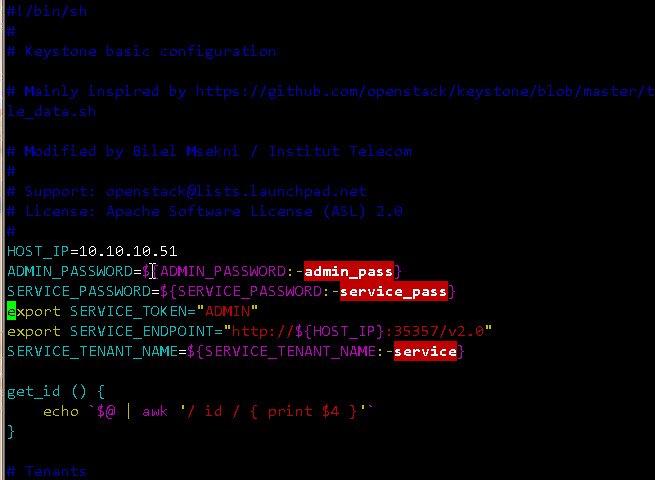
上面ip为控制节点的ip
查看脚本keystone_endpoints_basic.sh内容: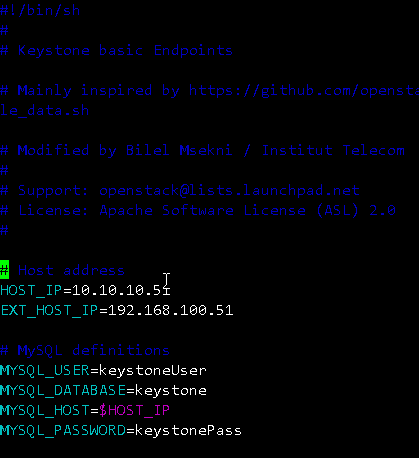
上面HOST_IP分别为控制节点的eth0,eth1两个网卡ip。
当脚本./keystone_basic.sh执行时,没有任何输出说明脚本执行成功。
执行./keystone_endpoints_basic.sh脚本时,会看到如下输出:
创建证书,后面不会遇到麻烦:(其实这里是环境变量的配置,我们在后面的操作中,就不需要每次都输入用户名密码等)
- nano creds
- #Paste the following:
- export OS_TENANT_NAME=admin
- export OS_USERNAME=admin
- export OS_PASSWORD=admin_pass
- export OS_AUTH_URL="http://192.168.100.51:5000/v2.0/"
- # Load it:
- source creds
使用CLI命令,测试使用安装成功
- keystone user-list
2.7. Glance
安装Glance
- apt-get install -y glance
更新/etc/glance/glance-api-paste.ini 文件
- [filter:authtoken]
- paste.filter_factory = keystoneclient.middleware.auth_token:filter_factory
- delay_auth_decision = true
- auth_host = 10.10.10.51
- auth_port = 35357
- auth_protocol = http
- admin_tenant_name = service
- admin_user = glance
- admin_password = service_pass
注释与说明:
即使找到上面[filter:authtoken],然后把相关内容进行粘帖。
替换为如下:
更新 /etc/glance/glance-registry-paste.ini文件
- [filter:authtoken]
- paste.filter_factory = keystoneclient.middleware.auth_token:filter_factory
- auth_host = 10.10.10.51
- auth_port = 35357
- auth_protocol = http
- admin_tenant_name = service
- admin_user = glance
- admin_password = service_pass
- [paste_deploy]
- flavor = keystone
操作同上,也是内容的替换。
替换/etc/glance/glance-api.conf文件
- sql_connection = mysql://glanceUser:glancePass@10.10.10.51/glance
注释与说明:
同样是将原先sql_connection注释掉,替换为sql_connection = mysql://glanceUser:glancePass@10.10.10.51/glance
更新 /etc/glance/glance-registry.conf:
- sql_connection = mysql://glanceUser:glancePass@10.10.10.51/glance
- [paste_deploy]
- flavor = keystone
到这里我们是否找到一个规律就是无论是替换还是新增加内容,我们只要找到相关标签即可。如果有内容即替换,无内容则添加。
重启glance-api 与 glance-registry services:
- service glance-api restart; service glance-registry restart
同步 glance 数据库:
- glance-manage db_sync
导入img
- glance image-create --name myFirstImage --is-public true --container-format bare --disk-format qcow2 --location http://download.cirros-cloud.net/0.3.1/cirros-0.3.1-x86_64-disk.img
测试安装是否成功
- glance image-list
我们看到下图,说明安装成功
2.8. Quantum 安装Quantum
- apt-get install -y quantum-server
更新 the OVS plugin configuration 文件 /etc/quantum/plugins/openvswitch/ovs_quantum_plugin.ini:
- #Under the database section
- [DATABASE]
- sql_connection = mysql://quantumUser:quantumPass@10.10.10.51/quantum
- #Under the OVS section
- [OVS]
- tenant_network_type = gre
- tunnel_id_ranges = 1:1000
- enable_tunneling = True
- #Firewall driver for realizing quantum security group function
- [SECURITYGROUP]
- firewall_driver = quantum.agent.linux.iptables_firewall.OVSHybridIptablesFirewallDriver
注释与说明:
我们看到上面链接替换为sql_connection = mysql://quantumUser:quantumPass@10.10.10.51/quantum即可。下面操作同理
编辑 /etc/quantum/api-paste.ini
- [filter:authtoken]
- paste.filter_factory = keystoneclient.middleware.auth_token:filter_factory
- auth_host = 10.10.10.51
- auth_port = 35357
- auth_protocol = http
- admin_tenant_name = service
- admin_user = quantum
- admin_password = service_pass
更新 /etc/quantum/quantum.conf:
- [keystone_authtoken]
- auth_host = 10.10.10.51
- auth_port = 35357
- auth_protocol = http
- admin_tenant_name = service
- admin_user = quantum
- admin_password = service_pass
- signing_dir = /var/lib/quantum/keystone-signing
重启 quantum server:
- service quantum-server restart
2.9. Nova
安装 nova 组件
- apt-get install -y nova-api nova-cert novnc nova-consoleauth nova-scheduler nova-novncproxy nova-doc nova-conductor
修改/etc/nova/api-paste.ini 中authtoken 部分
- [filter:authtoken]
- paste.filter_factory = keystoneclient.middleware.auth_token:filter_factory
- auth_host = 10.10.10.51
- auth_port = 35357
- auth_protocol = http
- admin_tenant_name = service
- admin_user = nova
- admin_password = service_pass
- signing_dirname = /tmp/keystone-signing-nova
- # Workaround for https://bugs.launchpad.net/nova/+bug/1154809
- auth_version = v2.0
修改 the /etc/nova/nova.conf:
- [DEFAULT]
- logdir=/var/log/nova
- state_path=/var/lib/nova
- lock_path=/run/lock/nova
- verbose=True
- api_paste_config=/etc/nova/api-paste.ini
- compute_scheduler_driver=nova.scheduler.simple.SimpleScheduler
- rabbit_host=10.10.10.51
- nova_url=http://10.10.10.51:8774/v1.1/
- sql_connection=mysql://novaUser:novaPass@10.10.10.51/nova
- root_helper=sudo nova-rootwrap /etc/nova/rootwrap.conf
- # Auth
- use_deprecated_auth=false
- auth_strategy=keystone
- # Imaging service
- glance_api_servers=10.10.10.51:9292
- image_service=nova.image.glance.GlanceImageService
- # Vnc configuration
- novnc_enabled=true
- novncproxy_base_url=http://192.168.100.51:6080/vnc_auto.html
- novncproxy_port=6080
- vncserver_proxyclient_address=10.10.10.51
- vncserver_listen=0.0.0.0
- # Network settings
- network_api_class=nova.network.quantumv2.api.API
- quantum_url=http://10.10.10.51:9696
- quantum_auth_strategy=keystone
- quantum_admin_tenant_name=service
- quantum_admin_username=quantum
- quantum_admin_password=service_pass
- quantum_admin_auth_url=http://10.10.10.51:35357/v2.0
- libvirt_vif_driver=nova.virt.libvirt.vif.LibvirtHybridOVSBridgeDriver
- linuxnet_interface_driver=nova.network.linux_net.LinuxOVSInterfaceDriver
- #If you want Quantum + Nova Security groups
- firewall_driver=nova.virt.firewall.NoopFirewallDriver
- security_group_api=quantum
- #If you want Nova Security groups only, comment the two lines above and uncomment line -1-.
- #-1-firewall_driver=nova.virt.libvirt.firewall.IptablesFirewallDriver
- #Metadata
- service_quantum_metadata_proxy = True
- quantum_metadata_proxy_shared_secret = helloOpenStack
- # Compute #
- compute_driver=libvirt.LibvirtDriver
- # Cinder #
- volume_api_class=nova.volume.cinder.API
- osapi_volume_listen_port=5900
同步数据库:
- nova-manage db sync
重启与nova有关的所有服务:
- cd /etc/init.d/; for i in $( ls nova-* ); do sudo service $i restart; done
对于上面命令不了解,可以查看:
安装openstack过程中:Linux for循环的作用是什么?
检查安装是否成功
- nova-manage service list
当我们看到下图时候,说明安装成功
2.10. Cinder安装所需要的 packages:
- apt-get install -y cinder-api cinder-scheduler cinder-volume iscsitarget open-iscsi iscsitarget-dkms
对于上面命令新手可能会不理解,含义是分别安装
cinder-api ,cinder-scheduler,cinder-volume等包。详细可查看
新手安装openstack之命令apt-get install -y vlan bridge-utils的作用是什么
配置iSCSI
- sed -i 's/false/true/g' /etc/default/iscsitarget
上面命令的含义是在文件iscsitarget中新的一行插入s/false/true/g
详细可查看安装openstack过程中:sed命令的作用是什么
为保证生效,重启服务:
- service iscsitarget start
- service open-iscsi start
配置 /etc/cinder/api-paste.ini
- [filter:authtoken]
- paste.filter_factory = keystoneclient.middleware.auth_token:filter_factory
- service_protocol = http
- service_host = 192.168.100.51
- service_port = 5000
- auth_host = 10.10.10.51
- auth_port = 35357
- auth_protocol = http
- admin_tenant_name = service
- admin_user = cinder
- admin_password = service_pass
- signing_dir = /var/lib/cinder
编辑 /etc/cinder/cinder.conf 文件
- [DEFAULT]
- rootwrap_config=/etc/cinder/rootwrap.conf
- sql_connection = mysql://cinderUser:cinderPass@10.10.10.51/cinder
- api_paste_config = /etc/cinder/api-paste.ini
- iscsi_helper=ietadm
- volume_name_template = volume-%s
- volume_group = cinder-volumes
- verbose = True
- auth_strategy = keystone
- iscsi_ip_address=10.10.10.51
同步数据库
- cinder-manage db sync
创建一个卷组命名为cinder-volumes:
- dd if=/dev/zero of=cinder-volumes bs=1 count=0 seek=2G
- losetup /dev/loop2 cinder-volumes
- fdisk /dev/loop2
- #Type in the followings:
- n
- p
- 1
- ENTER
- ENTER
- t
- 8e
- w
注释与说明:首先执行
第一步:
第二步:
第三部:执行fdisk /dev/loop2会有相应命令输入,
只要按照下面命令输入就可以。
- n
- p
- 1
- ENTER
- ENTER
- t
- 8e
- w
创建物理卷和卷组:
- pvcreate /dev/loop2
- vgcreate cinder-volumes /dev/loop2
创建成功如下图:
注意: 重启后卷组不会自动挂载 (点击`这个点此`_ 设置在重启后自动挂载)
重启cinder 服务:
- cd /etc/init.d/; for i in $( ls cinder-* ); do sudo service $i restart; done
查看cinder服务状态
- cd /etc/init.d/; for i in $( ls cinder-* ); do sudo service $i status; done
看到下图所示:
2.11. Horizon
安装Horizon
- apt-get install -y openstack-dashboard memcached
可以删掉默认的ubuntu的them
- dpkg --purge openstack-dashboard-ubuntu-theme
重启Apache和memcached服务:
- service apache2 restart; service memcached restart
这时候可以打开 http://192.168.100.51/horizon.
登录用户名:admin
密码:admin_pass
3. 网络节点
准备节点
安装 64位 Ubuntu 12.04 or 13.04 Server, 切换sudo 模式:
- sudo su
添加Grizzly库(适用于 Ubuntu 12.04):
- apt-get install -y ubuntu-cloud-keyring
- echo deb http://ubuntu-cloud.archive.canonical.com/ubuntu precise-updates/grizzly main >> /etc/apt/sources.list.d/grizzly.list
更新系统:
- apt-get update -y
- apt-get upgrade -y
- apt-get dist-upgrade -y
安装 ntp 服务:
- apt-get install -y ntp
配置NTP保持与控制节点时间同步:
- #Comment the ubuntu NTP servers
- sed -i 's/server 0.ubuntu.pool.ntp.org/#server 0.ubuntu.pool.ntp.org/g' /etc/ntp.conf
- sed -i 's/server 1.ubuntu.pool.ntp.org/#server 1.ubuntu.pool.ntp.org/g' /etc/ntp.conf
- sed -i 's/server 2.ubuntu.pool.ntp.org/#server 2.ubuntu.pool.ntp.org/g' /etc/ntp.conf
- sed -i 's/server 3.ubuntu.pool.ntp.org/#server 3.ubuntu.pool.ntp.org/g' /etc/ntp.conf
- #Set the network node to follow up your conroller node
- sed -i 's/server ntp.ubuntu.com/server 10.10.10.51/g' /etc/ntp.conf
- service ntp restart
安装vlan 与网桥配置工具bridge-utils
- apt-get install -y vlan bridge-utils
启动 IP_Forwarding:
- sed -i 's/#net.ipv4.ip_forward=1/net.ipv4.ip_forward=1/' /etc/sysctl.conf
- # To save you from rebooting, perform the following
- sysctl net.ipv4.ip_forward=1
3.2.网络配置
3 网卡配置如下:
- # OpenStack management
- auto eth0
- iface eth0 inet static
- address 10.10.10.52
- netmask 255.255.255.0
- # VM Configuration
- auto eth1
- iface eth1 inet static
- address 10.20.20.52
- netmask 255.255.255.0
- # VM internet Access
- auto eth2
- iface eth2 inet static
- address 192.168.100.52
- netmask 255.255.255.0
3.3 OpenVSwitch (Part1)
安装 openVSwitch:
- apt-get install -y openvswitch-switch openvswitch-datapath-dkms
添加 bridges:
- #br-int will be used for VM integration
- ovs-vsctl add-br br-int
- #br-ex is used to make to VM accessible from the internet
- ovs-vsctl add-br br-ex
3.4. Quantum
安装 Quantum openvswitch 代理, l3 代理 and dhcp 代理组件:
- apt-get -y install quantum-plugin-openvswitch-agent quantum-dhcp-agent quantum-l3-agent quantum-metadata-agent
编辑 /etc/quantum/api-paste.ini:
- [filter:authtoken]
- paste.filter_factory = keystoneclient.middleware.auth_token:filter_factory
- auth_host = 10.10.10.51
- auth_port = 35357
- auth_protocol = http
- admin_tenant_name = service
- admin_user = quantum
- admin_password = service_pass
编辑 the OVS plugin 配置文件 /etc/quantum/plugins/openvswitch/ovs_quantum_plugin.ini:
- #Under the database section
- [DATABASE]
- sql_connection = mysql://quantumUser:quantumPass@10.10.10.51/quantum
- #Under the OVS section
- [OVS]
- tenant_network_type = gre
- tunnel_id_ranges = 1:1000
- integration_bridge = br-int
- tunnel_bridge = br-tun
- local_ip = 10.20.20.52
- enable_tunneling = True
- #Firewall driver for realizing quantum security group function
- [SECURITYGROUP]
- firewall_driver = quantum.agent.linux.iptables_firewall.OVSHybridIptablesFirewallDriver
更新/etc/quantum/metadata_agent.ini:
- # The Quantum user information for accessing the Quantum API.
- auth_url = http://10.10.10.51:35357/v2.0
- auth_region = RegionOne
- admin_tenant_name = service
- admin_user = quantum
- admin_password = service_pass
- # IP address used by Nova metadata server
- nova_metadata_ip = 10.10.10.51
- # TCP Port used by Nova metadata server
- nova_metadata_port = 8775
- metadata_proxy_shared_secret = helloOpenStack
更新文件 /etc/quantum/quantum.conf,确保rabbitMQ IP指向了控制节点
- rabbit_host = 10.10.10.51
- #And update the keystone_authtoken section
- [keystone_authtoken]
- auth_host = 10.10.10.51
- auth_port = 35357
- auth_protocol = http
- admin_tenant_name = service
- admin_user = quantum
- admin_password = service_pass
- signing_dir = /var/lib/quantum/keystone-signing
编辑 /etc/sudoers.d/quantum_sudoers
- nano /etc/sudoers.d/quantum_sudoers
- #Modify the quantum user
- quantum ALL=NOPASSWD: ALL
注释与说明:上面配置的作用是quantum用户执行任何命令都不需要密码
重启quantum的所有服务
- cd /etc/init.d/; for i in $( ls quantum-* ); do sudo service $i restart; done
3.4. OpenVSwitch (第二部分)
编辑 eth2 /etc/network/interfaces:
- # VM internet Access
- auto eth2
- iface eth2 inet manual
- up ifconfig $IFACE 0.0.0.0 up
- up ip link set $IFACE promisc on
- down ip link set $IFACE promisc off
- down ifconfig $IFACE down
建立虚拟网桥与物理网口的链接
- #Internet connectivity will be lost after this step but this won't affect OpenStack's work
- ovs-vsctl add-port br-ex eth2
- #If you want to get internet connection back, you can assign the eth2's IP address to the br-ex in the /etc/network/interfaces file.
4.计算节点
4.1. 准备环境
准备节点
安装 64位 Ubuntu 12.04 or 13.04 Server, 切换sudo 模式:
- sudo su
添加Grizzly库(适用于 Ubuntu 12.04):
- apt-get install -y ubuntu-cloud-keyring
- echo deb http://ubuntu-cloud.archive.canonical.com/ubuntu precise-updates/grizzly main >> /etc/apt/sources.list.d/grizzly.list
更新系统:
- apt-get update -y
- apt-get upgrade -y
- apt-get dist-upgrade -y
安装 ntp 服务:
- apt-get install -y ntp
配置NTP保持与控制节点时间同步:
- #Comment the ubuntu NTP servers
- sed -i 's/server 0.ubuntu.pool.ntp.org/#server 0.ubuntu.pool.ntp.org/g' /etc/ntp.conf
- sed -i 's/server 1.ubuntu.pool.ntp.org/#server 1.ubuntu.pool.ntp.org/g' /etc/ntp.conf
- sed -i 's/server 2.ubuntu.pool.ntp.org/#server 2.ubuntu.pool.ntp.org/g' /etc/ntp.conf
- sed -i 's/server 3.ubuntu.pool.ntp.org/#server 3.ubuntu.pool.ntp.org/g' /etc/ntp.conf
- #Set the compute node to follow up your conroller node
- sed -i 's/server ntp.ubuntu.com/server 10.10.10.51/g' /etc/ntp.conf
- service ntp restart
安装vlan 与网桥配置工具bridge-utils
- apt-get install -y vlan bridge-utils
启动 IP_Forwarding:
- sed -i 's/#net.ipv4.ip_forward=1/net.ipv4.ip_forward=1/' /etc/sysctl.conf
4.2.网络配置
- # OpenStack management
- auto eth0
- iface eth0 inet static
- address 10.10.10.53
- netmask 255.255.255.0
- # VM Configuration
- auto eth1
- iface eth1 inet static
- address 10.20.20.53
- netmask 255.255.255.0
4.3 KVM
确保你的硬件支持虚拟化:
- apt-get install -y cpu-checker
- kvm-ok
上面命令分别执行,当我们看到如下信息时,其实可以的。因为虽然不支持加速,但是是可以使用的。
如果上面是好的,我们安装和配置KVM
- apt-get install -y kvm libvirt-bin pm-utils
添加 cgroup_device_acl 数组到文 /etc/libvirt/qemu.conf:
- cgroup_device_acl = [
- "/dev/null", "/dev/full", "/dev/zero",
- "/dev/random", "/dev/urandom",
- "/dev/ptmx", "/dev/kvm", "/dev/kqemu",
- "/dev/rtc", "/dev/hpet","/dev/net/tun"
- ]
如下图所示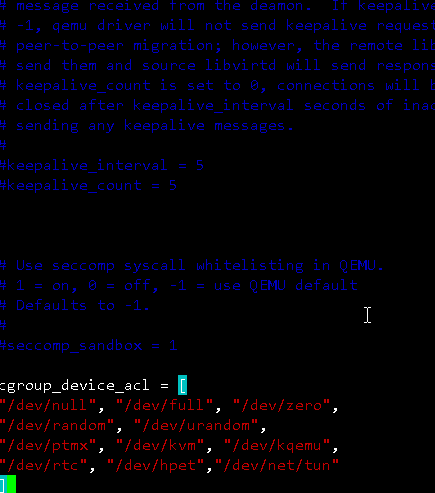
删除virtual bridge(执行下面命令即可)
- virsh net-destroy default
- virsh net-undefine default
更新文件 /etc/libvirt/libvirtd.conf:
- listen_tls = 0
- listen_tcp = 1
- auth_tcp = "none"
注释与说明:
上面可以找到相应的注释,去掉注释即可。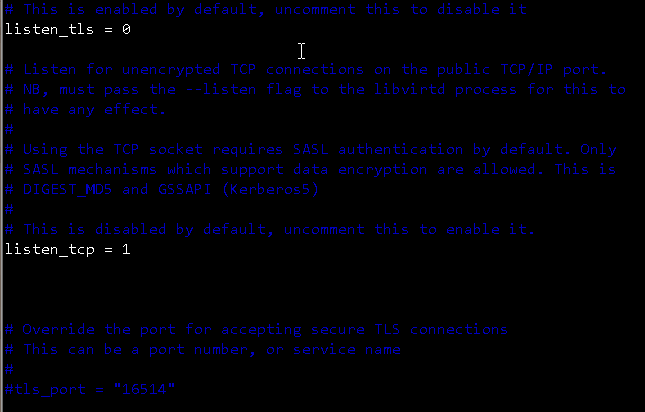
这里面因为注释内容比较多,可以使用查询如下图所示:我们输入/listten_tls回车即可找到相应内容。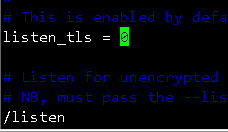
在文件 /etc/init/libvirt-bin.conf中添加 libvirtd_opts 变量:
- env libvirtd_opts="-d -l"
注释与说明:
如下图位置所示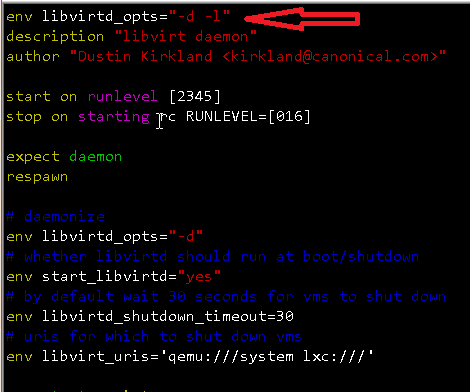
编辑 /etc/default/libvirt-bin 文件
- libvirtd_opts="-d -l"
如下图红色箭头所示,我们只要在libvirtd_opts="-d"中添加-1即可,即为libvirtd_opts="-d -l"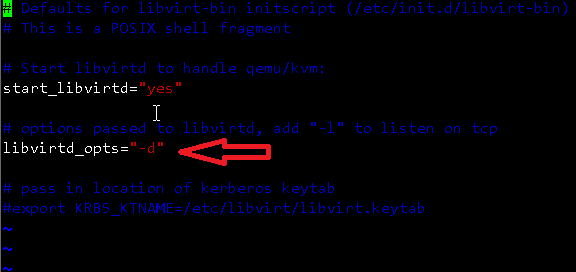
重 libvirt service与 service libvirt-bin:
- service dbus restart && service libvirt-bin restart
看到如下信息:
4.4. OpenVSwitch
安装 openVSwitch:
- apt-get install -y openvswitch-switch openvswitch-datapath-dkms
创建 bridges:
- #br-int will be used for VM integration
- ovs-vsctl add-br br-int
4.5. Quantum
安装 Quantum openvswitch 代理:
- apt-get -y install quantum-plugin-openvswitch-agent
编辑 the OVS plugin配置文件 /etc/quantum/plugins/openvswitch/ovs_quantum_plugin.ini:
- #Under the database section
- [DATABASE]
- sql_connection = mysql://quantumUser:quantumPass@10.10.10.51/quantum
- #Under the OVS section
- [OVS]
- tenant_network_type = gre
- tunnel_id_ranges = 1:1000
- integration_bridge = br-int
- tunnel_bridge = br-tun
- local_ip = 10.20.20.53
- enable_tunneling = True
- #Firewall driver for realizing quantum security group function
- [SECURITYGROUP]
- firewall_driver = quantum.agent.linux.iptables_firewall.OVSHybridIptablesFirewallDriver
注释与说明:
注意上面的文件不能一次性全部复制到文件中,需要找到相应的标签,如下图所示为ovs的配置
确保你的 rabbitMQ IP 在 /etc/quantum/quantum.conf文件中配置指向控制节点:
- rabbit_host = 10.10.10.51
- #And update the keystone_authtoken section
- [keystone_authtoken]
- auth_host = 10.10.10.51
- auth_port = 35357
- auth_protocol = http
- admin_tenant_name = service
- admin_user = quantum
- admin_password = service_pass
- signing_dir = /var/lib/quantum/keystone-signing
注释与说明:
同理上面的内容也是相应的内容放到相应的标签下面。切忌全部复制。
重启服务:
- service quantum-plugin-openvswitch-agent restart
4.6. Nova
安装nova所需要组件:
- apt-get install -y nova-compute-kvm
修改文件 /etc/nova/api-paste.ini authtoken 部分
- [filter:authtoken]
- paste.filter_factory = keystoneclient.middleware.auth_token:filter_factory
- auth_host = 10.10.10.51
- auth_port = 35357
- auth_protocol = http
- admin_tenant_name = service
- admin_user = nova
- admin_password = service_pass
- signing_dirname = /tmp/keystone-signing-nova
- # Workaround for https://bugs.launchpad.net/nova/+bug/1154809
- auth_version = v2.0
编辑文件 /etc/nova/nova-compute.conf
- [DEFAULT]
- libvirt_type=kvm
- libvirt_ovs_bridge=br-int
- libvirt_vif_type=ethernet
- libvirt_vif_driver=nova.virt.libvirt.vif.LibvirtHybridOVSBridgeDriver
- libvirt_use_virtio_for_bridges=True
修改文件 /etc/nova/nova.conf如下:
- [DEFAULT]
- logdir=/var/log/nova
- state_path=/var/lib/nova
- lock_path=/run/lock/nova
- verbose=True
- api_paste_config=/etc/nova/api-paste.ini
- compute_scheduler_driver=nova.scheduler.simple.SimpleScheduler
- rabbit_host=10.10.10.51
- nova_url=http://10.10.10.51:8774/v1.1/
- sql_connection=mysql://novaUser:novaPass@10.10.10.51/nova
- root_helper=sudo nova-rootwrap /etc/nova/rootwrap.conf
- # Auth
- use_deprecated_auth=false
- auth_strategy=keystone
- # Imaging service
- glance_api_servers=10.10.10.51:9292
- image_service=nova.image.glance.GlanceImageService
- # Vnc configuration
- novnc_enabled=true
- novncproxy_base_url=http://192.168.100.51:6080/vnc_auto.html
- novncproxy_port=6080
- vncserver_proxyclient_address=10.10.10.53
- vncserver_listen=0.0.0.0
- # Network settings
- network_api_class=nova.network.quantumv2.api.API
- quantum_url=http://10.10.10.51:9696
- quantum_auth_strategy=keystone
- quantum_admin_tenant_name=service
- quantum_admin_username=quantum
- quantum_admin_password=service_pass
- quantum_admin_auth_url=http://10.10.10.51:35357/v2.0
- libvirt_vif_driver=nova.virt.libvirt.vif.LibvirtHybridOVSBridgeDriver
- linuxnet_interface_driver=nova.network.linux_net.LinuxOVSInterfaceDriver
- #If you want Quantum + Nova Security groups
- firewall_driver=nova.virt.firewall.NoopFirewallDriver
- security_group_api=quantum
- #If you want Nova Security groups only, comment the two lines above and uncomment line -1-.
- #-1-firewall_driver=nova.virt.libvirt.firewall.IptablesFirewallDriver
- #Metadata
- service_quantum_metadata_proxy = True
- quantum_metadata_proxy_shared_secret = helloOpenStack
- # Compute #
- compute_driver=libvirt.LibvirtDriver
- # Cinder #
- volume_api_class=nova.volume.cinder.API
- osapi_volume_listen_port=5900
- cinder_catalog_info=volume:cinder:internalURL
注释与说明:
我们打开文件会看到如下内容:把文件内容清空,添加上面内容即可。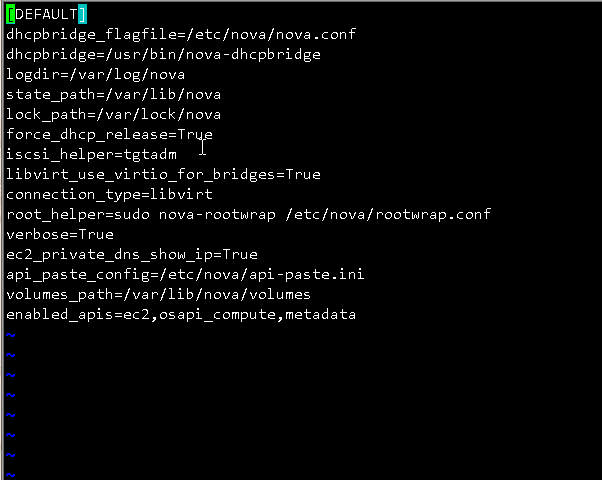
重启 nova所有服务:
- cd /etc/init.d/; for i in $( ls nova-* ); do sudo service $i restart; done
查看是否安装成功:
- nova-manage service list


 浙公网安备 33010602011771号