
Nodejs http + promise
0x1 现有的代码
前一篇文章结束时,我们可以看到,其实还是比较乱的。
现在我们就先用一个Promise开始重构。
0x2 第一个Promise
我们先将函数startDownloadTask中的http.request调用封装入一个Promise中。代码做如下变更:
     var req = http.request(imgSrc, getHttpReqCallback(imgSrc, dirName, index));
     req.on('error', function(e){
       console.log("request " + imgSrc + " error, try again");
       startDownloadTask(imgSrc, dirName, index);
     });
     req.end();
修改为
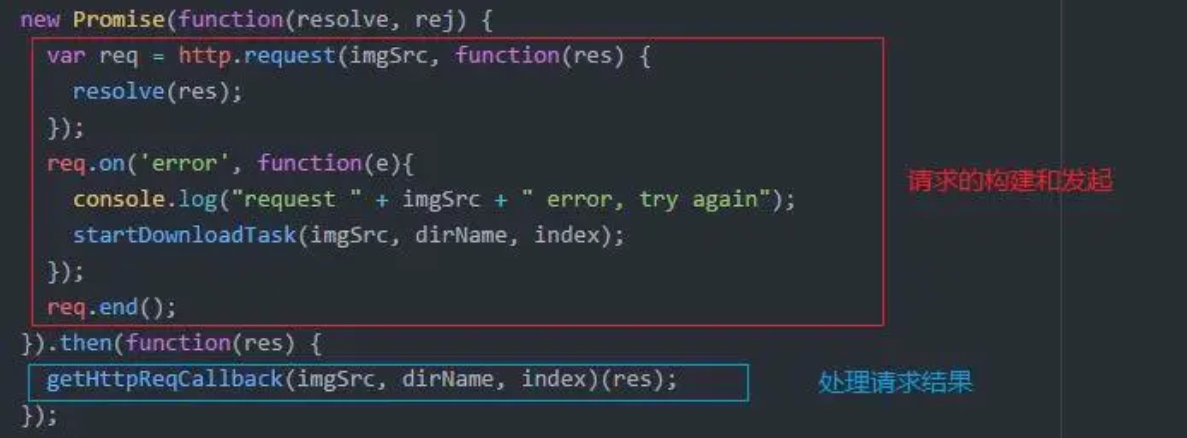
 new Promise(function(resolve, rej) {
   var req = http.request(imgSrc, function(res) {
     resolve(res);
   });
   req.on('error', function(e){
     console.log("request " + imgSrc + " error, try again");
     startDownloadTask(imgSrc, dirName, index);
   });
   req.end();
 }).then(function(res) {
   getHttpReqCallback(imgSrc, dirName, index)(res);
 });
可以看到,对http.request的调用被放到了Promise的主体里面,而http.request的回调放到了Promise的then函数里。相比Nodejs的原生异步代码结构:

Promise封装后的结构更贴近同步代码的思维模式。
这个效果有多赞,不用我多说了吧。
接下来我们将构建Promise的代码摘出来封装成一个函数startRequest
function startRequest(imgSrc) {
  return new Promise(function(resolve, rej) {
    var req = http.request(imgSrc, function(res) {
      resolve(res);
    });
    req.on('error', function(e){
      console.log("request " + imgSrc + " error, try again");
      startDownloadTask(imgSrc, dirName, index);
    });
    req.end();
  })
}
这个函数中,请求的Promise构建出来之后并不立刻去兑现他。而是交给了函数的调用者,自行实现Promise的兑现。
var startDownloadTask = function(imgSrc, dirName, index) {
  console.log("start downloading " + imgSrc);
  startRequest(imgSrc).then(function(res) {
    getHttpReqCallback(imgSrc, dirName, index)(res);
  });

}
于是我们更进一步的实现了请求的发起和请求结果处理之间的解耦。
0x3 第二个Promise
事情到这里也才刚刚进行了一半,因为我们可以看到,getHttpReqCallback这个函数里面也是一大坨一大坨说不清道不明的东西。
function getHttpReqCallback(imgSrc, dirName, index) {
  var fileName = index + "-" + path.basename(imgSrc);
  var callback = function(res) {
    console.log("request: " + imgSrc + " return status: " + res.statusCode);
    var contentLength = parseInt(res.headers['content-length']);
    var fileBuff = [];
    res.on('data', function (chunk) {
      var buffer = new Buffer(chunk);
      fileBuff.push(buffer);
    });
    res.on('end', function() {
      console.log("end downloading " + imgSrc);
      if (isNaN(contentLength)) {
        console.log(imgSrc + " content length error");
        return;
      }
      var totalBuff = Buffer.concat(fileBuff);
      console.log("totalBuff.length = " + totalBuff.length + " " + "contentLength = " + contentLength);
      if (totalBuff.length < contentLength) {
        console.log(imgSrc + " download error, try again");
        startDownloadTask(imgSrc, dirName, index);
        return;
      }
      fs.appendFile(dirName + "/" + fileName, totalBuff, function(err){});
    });
  };

  return callback;
}
这个函数主要做的事情就是读取请求的响应,把消息体写入预先给定的文件里。这里涉及到两个异步过程,上一篇文章中讲到,这两个过程如果处理不好,很容易把文件写崩。好在现在这段代码难看归难看,但是已经能比较好的处理这两件事了。我们现在要着手处理的是代码比较难看的问题。
为了解决这个问题,我们先把函数在它被调用的地方展开,也就是startRequest的then回调里面。
var startDownloadTask = function(imgSrc, dirName, index) {
  console.log("start downloading " + imgSrc);
  startRequest(imgSrc).then(function(res) {
    var fileName = index + "-" + path.basename(imgSrc);
    console.log("request: " + imgSrc + " return status: " + res.statusCode);
    var contentLength = parseInt(res.headers['content-length']);
    var fileBuff = [];
    res.on('data', function (chunk) {
      var buffer = new Buffer(chunk);
      fileBuff.push(buffer);
    });
    res.on('end', function() {
      console.log("end downloading " + imgSrc);
      if (isNaN(contentLength)) {
        console.log(imgSrc + " content length error");
        return;
      }
      var totalBuff = Buffer.concat(fileBuff);
      console.log("totalBuff.length = " + totalBuff.length + " " + "contentLength = " + contentLength);
      if (totalBuff.length < contentLength) {
        console.log(imgSrc + " download error, try again");
        startDownloadTask(imgSrc, dirName, index);
        return;
      }
      fs.appendFile(dirName + "/" + fileName, totalBuff, function(err){});
    });
  });

}
虽然和一般的代码重构的套路相反,但是我们很快会看到为什么要这样做。
接下来我们添加第二个Promise用来处理请求的返回
var startDownloadTask = function(imgSrc, dirName, index) {
  console.log("start downloading " + imgSrc);
  startRequest(imgSrc).then(function(res) {
    console.log("request: " + imgSrc + " return status: " + res.statusCode);
    var contentLength = parseInt(res.headers['content-length']);
    var fileBuff = [];
    return new Promise(function(resolve, rej) {
      res.on('data', function (chunk) {
        var buffer = new Buffer(chunk);
        fileBuff.push(buffer);
      });
      res.on('end', function() {
        resolve({"contentLength": contentLength, "fileBuff": fileBuff})
      });
    });
  }).then(function(data) {
    var contentLength = data.contentLength;
    var fileBuff = data.fileBuff;
    var fileName = index + "-" + path.basename(imgSrc);
    console.log("end downloading " + imgSrc);
    if (isNaN(contentLength)) {
      console.log(imgSrc + " content length error");
      return;
    }
    var totalBuff = Buffer.concat(fileBuff);
    console.log("totalBuff.length = " + totalBuff.length + " " + "contentLength = " + contentLength);
    if (totalBuff.length < contentLength) {
      console.log(imgSrc + " download error, try again");
      startDownloadTask(imgSrc, dirName, index);
      return;
    }
    fs.appendFile(dirName + "/" + fileName, totalBuff, function(err){});
  });

}
尽管还是有点难看,但是结构比之前要清晰一些。对于请求响应的处理,data事件直接在Promise的主体里面搞定,因为要做的事情不是很复杂。而end事件里,我们将重组后的响应消息体和头域中的消息体长度值打包成js对象,发往第二个Promise的兑现里面处理。
接下来将第二个Promise和之前一样,封装进返回Promise的函数,并且将startRequest内联进来
var startDownloadTask = function(imgSrc, dirName, index) {
  function startRequest(imgSrc) {
    return new Promise(function(resolve, rej) {
      var req = http.request(imgSrc, resolve);
      req.on('error', function(e){
        console.log("request " + imgSrc + " error, try again");
        startDownloadTask(imgSrc, dirName, index);
      });
      req.end();
    });
  }

  function solveResponse(res) {
    console.log("request: " + imgSrc + " return status: " + res.statusCode);
    var contentLength = parseInt(res.headers['content-length']);
    var fileBuff = [];
    return new Promise(function(resolve, rej) {
      res.on('data', function (chunk) {
        var buffer = new Buffer(chunk);
        fileBuff.push(buffer);
      });
      res.on('end', function() {
        resolve({"contentLength": contentLength, "fileBuff": fileBuff})
      });
    });
  }

  console.log("start downloading " + imgSrc);
  startRequest(imgSrc).then(solveResponse).then(function(data) {
    var contentLength = data.contentLength;
    var fileBuff = data.fileBuff;
    var fileName = index + "-" + path.basename(imgSrc);
    console.log("end downloading " + imgSrc);
    if (isNaN(contentLength)) {
      console.log(imgSrc + " content length error");
      return;
    }
    var totalBuff = Buffer.concat(fileBuff);
    console.log("totalBuff.length = " + totalBuff.length + " " + "contentLength = " + contentLength);
    if (totalBuff.length < contentLength) {
      console.log(imgSrc + " download error, try again");
      startDownloadTask(imgSrc, dirName, index);
      return;
    }
    fs.appendFile(dirName + "/" + fileName, totalBuff, function(err){});
  });

}
最后将对响应消息体的处理,即第二个Promise的兑现过程也封装进函数
var startDownloadTask = function(imgSrc, dirName, index) {

  function startRequest(imgSrc) {
    return new Promise(function(resolve, rej) {
      var req = http.request(imgSrc, resolve);
      req.on('error', function(e){
        console.log("request " + imgSrc + " error, try again");
        startDownloadTask(imgSrc, dirName, index);
      });
      req.end();
    });
  }

  function solveResponse(res) {
    console.log("request: " + imgSrc + " return status: " + res.statusCode);
    var contentLength = parseInt(res.headers['content-length']);
    var fileBuff = [];
    return new Promise(function(resolve, rej) {
      res.on('data', function (chunk) {
        var buffer = new Buffer(chunk);
        fileBuff.push(buffer);
      });
      res.on('end', function() {
        resolve({"contentLength": contentLength, "fileBuff": fileBuff})
      });
    });
  }

  function solveResData(data) {
    var contentLength = data.contentLength;
    var fileBuff = data.fileBuff;
    var fileName = index + "-" + path.basename(imgSrc);
    console.log("end downloading " + imgSrc);
    if (isNaN(contentLength)) {
      console.log(imgSrc + " content length error");
      return;
    }
    var totalBuff = Buffer.concat(fileBuff);
    console.log("totalBuff.length = " + totalBuff.length + " " + "contentLength = " + contentLength);
    if (totalBuff.length < contentLength) {
      console.log(imgSrc + " download error, try again");
      startDownloadTask(imgSrc, dirName, index);
      return;
    }
    fs.appendFile(dirName + "/" + fileName, totalBuff, function(err){});
  }

  console.log("start downloading " + imgSrc);

  startRequest(imgSrc)
    .then(solveResponse)
    .then(solveResData);

}
最终的结果就是这样,我们有了三个各自独立的函数:startRequest、solveResponse、solveResData,每一个函数各自处理从请求的发起,到接收响应,到保存最终响应结果中的某一个阶段。由于拆成了3个函数,所以每一个函数的结构都不是很复杂难懂。最后通过一组Promise链式调用将3个实际是并发执行的过程用一个看似串联的结构组织起来。
至此大功告成。
完整代码如下:
(function() {
  "use strict";
  const http = require("http");
  const fs = require("fs");
  const path = require("path");

  const urlList = [
    "http://content.battlenet.com.cn/wow/media/wallpapers/patch/fall-of-the-lich-king/fall-of-the-lich-king-1920x1080.jpg",
    "http://content.battlenet.com.cn/wow/media/wallpapers/patch/black-temple/black-temple-1920x1200.jpg",
    "http://content.battlenet.com.cn/wow/media/wallpapers/patch/zandalari/zandalari-1920x1200.jpg",
    "http://content.battlenet.com.cn/wow/media/wallpapers/patch/rage-of-the-firelands/rage-of-the-firelands-1920x1200.jpg",
    "http://content.battlenet.com.cn/wow/media/wallpapers/patch/fury-of-hellfire/fury-of-hellfire-3840x2160.jpg",
  ];

  function getHttpReqCallback(imgSrc, dirName, index) {
    var fileName = index + "-" + path.basename(imgSrc);
    var callback = function(res) {
      console.log("request: " + imgSrc + " return status: " + res.statusCode);
      var contentLength = parseInt(res.headers['content-length']);
      var fileBuff = [];
      res.on('data', function (chunk) {
        var buffer = new Buffer(chunk);
        fileBuff.push(buffer);
      });
      res.on('end', function() {
        console.log("end downloading " + imgSrc);
        if (isNaN(contentLength)) {
          console.log(imgSrc + " content length error");
          return;
        }
        var totalBuff = Buffer.concat(fileBuff);
        console.log("totalBuff.length = " + totalBuff.length + " " + "contentLength = " + contentLength);
        if (totalBuff.length < contentLength) {
          console.log(imgSrc + " download error, try again");
          startDownloadTask(imgSrc, dirName, index);
          return;
        }
        fs.appendFile(dirName + "/" + fileName, totalBuff, function(err){});
      });
    };

    return callback;
  }


  var startDownloadTask = function(imgSrc, dirName, index) {

    function startRequest(imgSrc) {
      return new Promise(function(resolve, rej) {
        var req = http.request(imgSrc, resolve);
        req.on('error', function(e){
          console.log("request " + imgSrc + " error, try again");
          startDownloadTask(imgSrc, dirName, index);
        });
        req.end();
      });
    }

    function solveResponse(res) {
      console.log("request: " + imgSrc + " return status: " + res.statusCode);
      var contentLength = parseInt(res.headers['content-length']);
      var fileBuff = [];
      return new Promise(function(resolve, rej) {
        res.on('data', function (chunk) {
          var buffer = new Buffer(chunk);
          fileBuff.push(buffer);
        });
        res.on('end', function() {
          resolve({"contentLength": contentLength, "fileBuff": fileBuff})
        });
      });
    }

    function solveResData(data) {
      var contentLength = data.contentLength;
      var fileBuff = data.fileBuff;
      var fileName = index + "-" + path.basename(imgSrc);
      console.log("end downloading " + imgSrc);
      if (isNaN(contentLength)) {
        console.log(imgSrc + " content length error");
        return;
      }
      var totalBuff = Buffer.concat(fileBuff);
      console.log("totalBuff.length = " + totalBuff.length + " " + "contentLength = " + contentLength);
      if (totalBuff.length < contentLength) {
        console.log(imgSrc + " download error, try again");
        startDownloadTask(imgSrc, dirName, index);
        return;
      }
      fs.appendFile(dirName + "/" + fileName, totalBuff, function(err){});
    }

    console.log("start downloading " + imgSrc);

    startRequest(imgSrc)
      .then(solveResponse)
      .then(solveResData);

  }

  urlList.forEach(function(item, index, array) {
    startDownloadTask(item, './', index);
  })
})();
0x4 One more thing?
就在我研究怎么在Nodejs中将http api和Promise结合起来用的时候,外面的高手们也在捣鼓差不多的事情,于是有一天我无意间发现了这么个东西
通俗易懂的解释就是,这货就是把网页开发中常用的Ajax用Promise进行封装,思路和我这篇文章中的基本一致。
下面是代码示例:
var myImage = document.querySelector('img');

fetch('flowers.jpg')
  .then(function(response) {
    return response.blob();
  })
  .then(function(myBlob) {
    var objectURL = URL.createObjectURL(myBlob);
    myImage.src = objectURL;
  });
虽然还没有写进正式标准,但是在最新的firefox和chrome上已经实装了。

 浙公网安备 33010602011771号