Openstack之五:部署计算服务neutron控制节点与neutron计算节点
一:neutron介绍

1.1:组件划分:

网络类型:
提供者网络: 虚拟机桥接 到物理机, 并且虚拟机 必须和物理机在同一个网络范围内。
自服务网络:可以自己创建网络, 最终 会通过虚拟路由器 连接 外网
1.2:网络类型之单扁平一网络:
#所有主机都在一个网段之内,当主机数量较多的时候会产生较大的广播数据包,另外也不能提供多种IP地址段:

二、安装部署neutron控制节点
#控制端节点安装文档:https://docs.openstack.org/ocata/zh_CN/install-guide-rdo/neutron-controller-install.html#
# 公共网络官网文档: https://docs.openstack.org/ocata/zh_CN/install-guide-rdo/neutron-controller-install-option1.html
1、先部署数据库
1、登陆数据库,并创建neutron用户,并授权
[root@mysql1 ~]# mysql -uroot -pcentos
Welcome to the MariaDB monitor.  Commands end with ; or \g.
Your MariaDB connection id is 8
Server version: 10.3.10-MariaDB MariaDB Server

Copyright (c) 2000, 2018, Oracle, MariaDB Corporation Ab and others.

Type 'help;' or '\h' for help. Type '\c' to clear the current input statement.

MariaDB [(none)]> CREATE DATABASE neutron;
Query OK, 1 row affected (0.000 sec)

MariaDB [(none)]> GRANT ALL PRIVILEGES ON neutron.* TO 'neutron'@'%' IDENTIFIED BY 'neutron';
Query OK, 0 rows affected (0.000 sec)

MariaDB [(none)]>
2、在控制端使用mysql测试是否能够连接
[root@openstack-1 scripts]# mysql -uroot -pneutron -h192.167.7.106
2、开始在控制端配置
1、在控制端创建一个netron用户
$ openstack user create --domain default --password-prompt neutron

User Password:
Repeat User Password:
+---------------------+----------------------------------+
| Field               | Value                            |
+---------------------+----------------------------------+
| domain_id           | default                          |
| enabled             | True                             |
| id                  | fdb0f541e28141719b6a43c8944bf1fb |
| name                | neutron                          |
| options             | {}                               |
| password_expires_at | None                             |
+---------------------+----------------------------------+
2、添加``admin`` 角色到``neutron`` 用户:
$ openstack role add --project service --user neutron admin
3、创建``neutron``服务实体:
$ openstack service create --name neutron \
  --description "OpenStack Networking" network

+-------------+----------------------------------+
| Field       | Value                            |
+-------------+----------------------------------+
| description | OpenStack Networking             |
| enabled     | True                             |
| id          | f71529314dab4a4d8eca427e701d209e |
| name        | neutron                          |
| type        | network                          |
+-------------+----------------------------------+
4、创建网络服务API端点:
$ openstack endpoint create --region RegionOne \
  network public http://controller:9696             # controller为控制端VIP地址解析hosts的域名

+--------------+----------------------------------+
| Field        | Value                            |
+--------------+----------------------------------+
| enabled      | True                             |
| id           | 85d80a6d02fc4b7683f611d7fc1493a3 |
| interface    | public                           |
| region       | RegionOne                        |
| region_id    | RegionOne                        |
| service_id   | f71529314dab4a4d8eca427e701d209e |
| service_name | neutron                          |
| service_type | network                          |
| url          | http://controller:9696           |
+--------------+----------------------------------+

$ openstack endpoint create --region RegionOne \
  network internal http://controller:9696

+--------------+----------------------------------+
| Field        | Value                            |
+--------------+----------------------------------+
| enabled      | True                             |
| id           | 09753b537ac74422a68d2d791cf3714f |
| interface    | internal                         |
| region       | RegionOne                        |
| region_id    | RegionOne                        |
| service_id   | f71529314dab4a4d8eca427e701d209e |
| service_name | neutron                          |
| service_type | network                          |
| url          | http://controller:9696           |
+--------------+----------------------------------+

$ openstack endpoint create --region RegionOne \
  network admin http://controller:9696

+--------------+----------------------------------+
| Field        | Value                            |
+--------------+----------------------------------+
| enabled      | True                             |
| id           | 1ee14289c9374dffb5db92a5c112fc4e |
| interface    | admin                            |
| region       | RegionOne                        |
| region_id    | RegionOne                        |
| service_id   | f71529314dab4a4d8eca427e701d209e |
| service_name | neutron                          |
| service_type | network                          |
| url          | http://controller:9696           |
+--------------+----------------------------------+
5、查看此时endpoint注册的所有列表
# openstack endpoint list
3、在控制端配置网络选项1:提供者网络
1、安装组件
# yum install openstack-neutron openstack-neutron-ml2 \
  openstack-neutron-linuxbridge ebtables
2、编辑``/etc/neutron/neutron.conf`` 文件并完成如下操作:
在 [database] 部分,配置数据库访问:
[database]
# ...
connection = mysql+pymysql://neutron:NEUTRON_DBPASS@controller/neutron
使用你设置的数据库密码替换 NEUTRON_DBPASS ,将controller改为本地hosts文件解析VIP地址的域名
3、在``[DEFAULT]``部分,启用ML2插件并禁用其他插件:
[DEFAULT]
# ...
core_plugin = ml2
service_plugins =
4、在``[DEFAULT]``部分,配置``RabbitMQ``消息队列访问权限:
[DEFAULT]
# ...
transport_url = rabbit://openstack:RABBIT_PASS@controller
用你在RabbitMQ中为``openstack``选择的密码替换 “RABBIT_PASS”,将controller改为本地hosts文件解析的VIP地址。
5、在 “[DEFAULT]” 和 “[keystone_authtoken]” 部分,配置认证服务访问:
[DEFAULT]
# ...
auth_strategy = keystone

[keystone_authtoken]
# ...
auth_uri = http://controller:5000  #修改为本地hosts解析的VIP域名
auth_url = http://controller:35357
memcached_servers = controller:11211
auth_type = password
project_domain_name = default
user_domain_name = default
project_name = service
username = neutron
password = NEUTRON_PASS  #添加neutron密码
6、在``[DEFAULT]``和``[nova]``部分,配置网络服务来通知计算节点的网络拓扑变化:
[DEFAULT]
# ...
notify_nova_on_port_status_changes = true
notify_nova_on_port_data_changes = true

[nova]
# ...
auth_url = http://controller:35357  #添加本地hosts解析VIP地址的域名
auth_type = password
project_domain_name = default
user_domain_name = default
region_name = RegionOne
project_name = service
username = nova
password = NOVA_PASS #nova的密码
使用你在身份认证服务中设置的``nova`` 用户的密码替换``NOVA_PASS``。
7、在 [oslo_concurrency] 部分,配置锁路径:
[oslo_concurrency]
# ...
lock_path = /var/lib/neutron/tmp
4、在控制端配置 Modular Layer 2 (ML2) 插件
1、ML2插件使用Linuxbridge机制来为实例创建layer-2虚拟网络基础设施
编辑``/etc/neutron/plugins/ml2/ml2_conf.ini``文件并完成以下操作:
在``[ml2]``部分,启用flat和VLAN网络:
[ml2]
# ...
type_drivers = flat,vlan
2、在``[ml2]``部分,禁用私有网络:
[ml2]
# ...
tenant_network_types =
3、在``[ml2]``部分,启用Linuxbridge机制:
[ml2]
# ...
mechanism_drivers = linuxbridge
4、在``[ml2]`` 部分,启用端口安全扩展驱动:
[ml2]
# ...
extension_drivers = port_security
5、在``[ml2_type_flat]``部分,配置公共虚拟网络为flat网络:
[ml2_type_flat]
# ...
flat_networks = linux36 #改为桥接模式
6、在 ``[securitygroup]``部分,启用 ipset 增加安全组的方便性:
[securitygroup]
# ...
enable_ipset = true
5、在控制端配置Linuxbridge代理
Linuxbridge代理为实例建立layer-2虚拟网络并且处理安全组规则。
编辑``/etc/neutron/plugins/ml2/linuxbridge_agent.ini``文件并且完成以下操作:
1、在``[linux_bridge]``部分,将公共虚拟网络和公共物理网络接口对应起来:
[linux_bridge]
physical_interface_mappings = linux36:br0  #修改为上面公共虚拟网络部分的linux36部分
将``PUBLIC_INTERFACE_NAME`` 替换为底层的物理公共网络接口。
2、在``[vxlan]``部分,禁止VXLAN覆盖网络:
[vxlan]
enable_vxlan = false
3、在 ``[securitygroup]``部分,启用安全组并配置 Linux 桥接 iptables 防火墙驱动:
[securitygroup]
# ...
enable_security_group = true
firewall_driver = neutron.agent.linux.iptables_firewall.IptablesFirewallDriver
6、在控制端配置DHCP代理
编辑``/etc/neutron/dhcp_agent.ini``文件并完成下面的操作:
1、在``[DEFAULT]``部分,配置Linuxbridge驱动接口,DHCP驱动并启用隔离元数据,这样在公共网络上的实例就可以通过网络来访问元数据
[DEFAULT]
# ...
interface_driver = linuxbridge
dhcp_driver = neutron.agent.linux.dhcp.Dnsmasq
enable_isolated_metadata = true
7、在控制端配置元数据代理
编辑``/etc/neutron/metadata_agent.ini``文件并完成以下操作:
1、在``[DEFAULT]`` 部分,配置元数据主机以及共享密码:
[DEFAULT]
# ...
nova_metadata_ip = controller  #改为本机hosts解析的VIP地址域名
metadata_proxy_shared_secret = METADATA_SECRET  #自定义密码,一般写为年月日20200106
用你为元数据代理设置的密码替换 METADATA_SECRET。
8、在控制端配置计算服务来使用网络服务
1、编辑``/etc/nova/nova.conf``文件并完成以下操作:
在``[neutron]``部分,配置访问参数,启用元数据代理并设置密码:
[neutron]
# ...
url = http://controller:9696   #改为本地hosts解析的VIP地址域名
auth_url = http://controller:35357
auth_type = password
project_domain_name = default
user_domain_name = default
region_name = RegionOne
project_name = service
username = neutron
password = NEUTRON_PASS  #改为neutron用户密码
service_metadata_proxy = true
metadata_proxy_shared_secret = METADATA_SECRET  #改为修改的年月日的密码
将 NEUTRON_PASS 替换为你在认证服务中为 neutron 用户选择的密码。
使用你为元数据代理设置的密码替换``METADATA_SECRET``
9、在控制端完成安装
1、网络服务初始化脚本需要一个超链接 /etc/neutron/plugin.ini指向ML2插件配置文件/etc/neutron/plugins/ml2/ml2_conf.ini。如果超链接不存在,使用下面的命令创建它:
# ln -s /etc/neutron/plugins/ml2/ml2_conf.ini /etc/neutron/plugin.ini
2、同步数据库:
# su -s /bin/sh -c "neutron-db-manage --config-file /etc/neutron/neutron.conf \
  --config-file /etc/neutron/plugins/ml2/ml2_conf.ini upgrade head" neutron
3、重启计算API 服务:
# systemctl restart openstack-nova-api.service
4、重启服务,并设置为开机启动
# systemctl enable neutron-server.service \
  neutron-linuxbridge-agent.service neutron-dhcp-agent.service \
  neutron-metadata-agent.service
# systemctl restart neutron-server.service \
  neutron-linuxbridge-agent.service neutron-dhcp-agent.service \
  neutron-metadata-agent.service
5、在控制端确认DHCP、linux bridge及metadata都已经注册
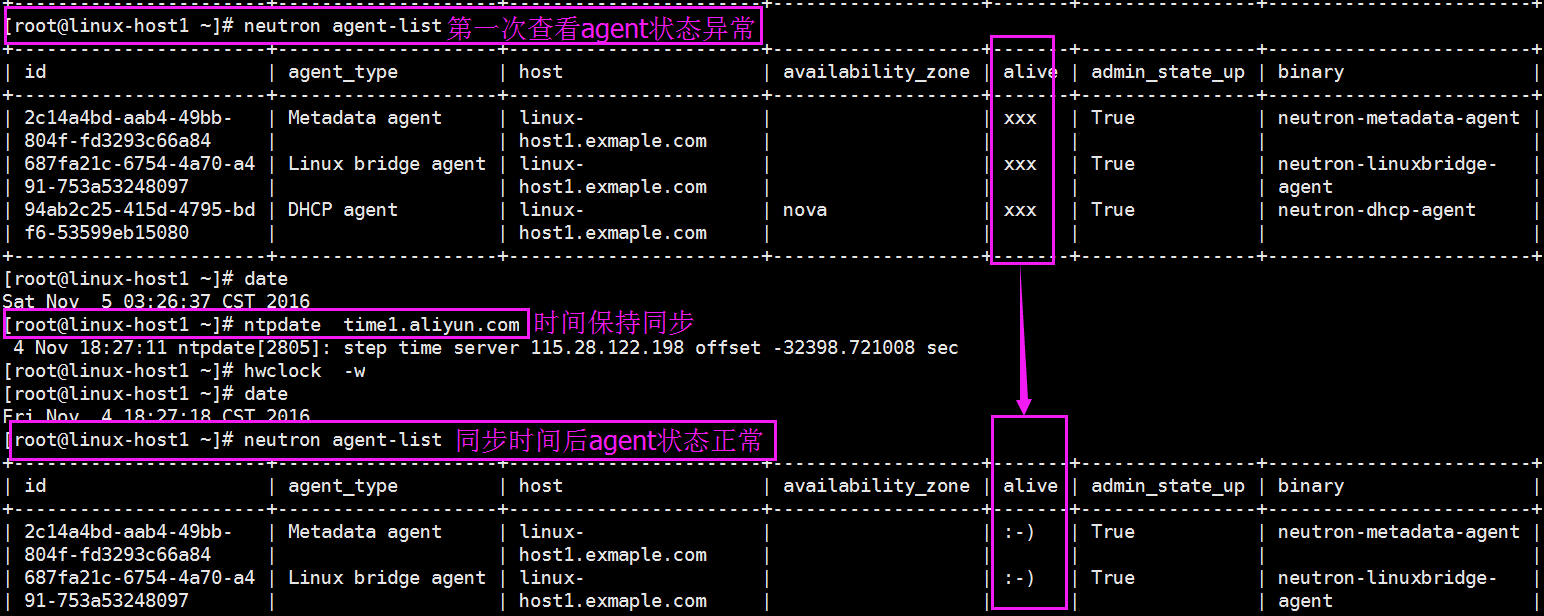
#确认输出结果的alive列是:-),其他输出则不正确需要排错!
[root@linux-host1 ~]# neutron agent-list
+-----------------------+--------------------+-----------------------+-------------------+-------+----------------+------------------------+
| id                    | agent_type         | host                  | availability_zone | alive | admin_state_up | binary                 |
+-----------------------+--------------------+-----------------------+-------------------+-------+----------------+------------------------+
| b64f696c-1fb1-475d-   | Linux bridge agent | linux-                |                   | 🙂   | True           | neutron-linuxbridge-   |
| 87f8-d78ac86ff6da     |                    | host1.exmaple.com     |                   |       |                | agent                  |
| b9002e8d-5565-421e-96 | DHCP agent         | linux-                | nova              | 🙂   | True           | neutron-dhcp-agent     |
| 02-d7ca31cf15ee       |                    | host1.exmaple.com     |                   |       |                |                        |
| bed847ab-4816-4955    | Metadata agent     | linux-                |                   | 🙂   | True           | neutron-metadata-agent |
| -9b4d-56fcb1c02b89    |                    | host1.exmaple.com     |                   |       |                |                        |
+-----------------------+--------------------+-----------------------+-------------------+-------+----------------+------------------------+

附加时间不一致导致的错误:
三、在haproxy服务器配置haproxy服务
将新加的端口配置到haproxy调度器上,vim /etc/haproxy/haproxy.cfg
listen openstack_neutron_port_9696
    bind 192.168.7.248:9696
    mode tcp
    log global
    server 192.168.7.100 192.168.7.100:9696 check inter 3000 fall 3 rise 5
    server 192.168.7.101 192.168.7.101:9696 check inter 3000 fall 3 rise 5 backup
重启haproxy服务
# systemctl restartt haproxy
四、安装部署neutron计算节点(都在计算节点服务器上部署)
#控制端节点安装文档:https://docs.openstack.org/ocata/zh_CN/install-guide-rdo/neutron-compute-install.html#
# 公共网络官网文档: https://docs.openstack.org/ocata/zh_CN/install-guide-rdo/neutron-compute-install-option1.html
1、安装包组
1、安装包组
# yum install openstack-neutron-linuxbridge ebtables ipset -y
2、配置通用组件
编辑``/etc/neutron/neutron.conf`` 文件并完成如下操作:
在``[database]`` 部分,注释所有``connection`` 项,因为计算节点不直接访问数据库。
1、在``[DEFAULT]``部分,配置``RabbitMQ``消息队列访问权限:
[DEFAULT]
# ...
transport_url = rabbit://openstack:RABBIT_PASS@controller
用你在RabbitMQ中为``openstack``选择的密码替换 “RABBIT_PASS”,controller修改为本地hosts解析的VIP域名。
2、在 “[DEFAULT]” 和 “[keystone_authtoken]” 部分,配置认证服务访问:
[DEFAULT]
# ...
auth_strategy = keystone

[keystone_authtoken]
# ...
auth_uri = http://controller:5000
auth_url = http://controller:35357
memcached_servers = controller:11211
auth_type = password
project_domain_name = default
user_domain_name = default
project_name = service
username = neutron
password = NEUTRON_PASS
将 NEUTRON_PASS 替换为你在认证服务中为 neutron 用户选择的密码,将controller修改为本地hosts解析的VIP域名。
3、在 [oslo_concurrency] 部分,配置锁路径:
[oslo_concurrency]
# ...
lock_path = /var/lib/neutron/tmp
3、配置Linuxbridge代理
编辑``/etc/neutron/plugins/ml2/linuxbridge_agent.ini``文件并且完成以下操作:
1、在``[linux_bridge]``部分,将公共虚拟网络和公共物理网络接口对应起来:
[linux_bridge]
physical_interface_mappings = linux36:br0  #名称必须和控制端一致
2、在``[vxlan]``部分,禁止VXLAN覆盖网络:
[vxlan]
enable_vxlan = false
3、在 ``[securitygroup]``部分,启用安全组并配置 Linux 桥接 iptables 防火墙驱动:
[securitygroup]
# ...
enable_security_group = true
firewall_driver = neutron.agent.linux.iptables_firewall.IptablesFirewallDriver
4、配置计算服务来使用网络服务
编辑``/etc/nova/nova.conf``文件并完成下面的操作:
在``[neutron]`` 部分,配置访问参数:
[neutron]
# ...
url = http://controller:9696
auth_url = http://controller:35357
auth_type = password
project_domain_name = default
user_domain_name = default
region_name = RegionOne
project_name = service
username = neutron
password = NEUTRON_PASS
将 NEUTRON_PASS 替换为你在认证服务中为 neutron 用户选择的密码,controller修改为本地hosts的VIP解析的域名。
在计算机节点启动服务
1、在计算机节点重启计算服务:
# systemctl restart openstack-nova-compute.service
2、在计算机节点启动Linuxbridge代理并配置它开机自启动:
# systemctl enable neutron-linuxbridge-agent.service
# systemctl start neutron-linuxbridge-agent.service
3、添加的安全组比较麻烦,每次都需要进行手动打开指定的出入口,因此可以关闭
vim  /etc/neutron/plugins/ml2/linuxbridge_agent.ini
enable_security_group = false                    #禁止安全组

systemctl restart neutron-linuxbridge-agent.service  #修改完之后重启neutron服务
在控制端进行验证
1、在neutron控制节点验证neutron agent是否自动注册,如果未注册则检查时间是否一致、是否有防火墙等:
[root@linux-host1 ~]# neutron agent--list
+--------------------------------------+--------------------+-------------------------+-------------------+-------+----------------+---------------------------+
| id                                   | agent_type         | host                    | availability_zone | alive | admin_state_up | binary                    |
+--------------------------------------+--------------------+-------------------------+-------------------+-------+----------------+---------------------------+
| 186e9f05-8f47-4311-8c4c-8b9ca041d2e3 | Linux bridge agent | linux-host2.exmaple.com |                   | 🙂   | True           | neutron-linuxbridge-agent |
| 2c14a4bd-aab4-49bb-804f-fd3293c66a84 | Metadata agent     | linux-host1.exmaple.com |                   | 🙂   | True           | neutron-metadata-agent    |
| 687fa21c-6754-4a70-a491-753a53248097 | Linux bridge agent | linux-host1.exmaple.com |                   | 🙂   | True           | neutron-linuxbridge-agent |
| 94ab2c25-415d-4795-bdf6-53599eb15080 | DHCP agent         | linux-host1.exmaple.com | nova              | 🙂   | True           | neutron-dhcp-agent        |
+--------------------------------------+--------------------+-------------------------+-------------------+-------+----------------+---------------------------+


 浙公网安备 33010602011771号