架构WEB十一-Nginx十一-常见问题
Nginx常见问题
MarkdownHTML
11·Nginx常见问题
- 11·Nginx常见问题
- [Nginx多Server优先级](file:///F:/老男孩视频/nginx常见问题/Nginx常见问题.html#title-1)
- [Nginx禁止IP直接访问](file:///F:/老男孩视频/nginx常见问题/Nginx常见问题.html#p)
- [Nginx包含文件Include](file:///F:/老男孩视频/nginx常见问题/Nginx常见问题.html#title-2)
- [Nginx路径root与alias](file:///F:/老男孩视频/nginx常见问题/Nginx常见问题.html#title-3)
- [Nginx try_file路径匹配](file:///F:/老男孩视频/nginx常见问题/Nginx常见问题.html#title-4)
- [Nginx调整上传文件大小](file:///F:/老男孩视频/nginx常见问题/Nginx常见问题.html#title-5)
- [Nginx优雅显示错误页面](file:///F:/老男孩视频/nginx常见问题/Nginx常见问题.html#title-6)
-李振亚
-笔者QQ:593528156
-笔者微信:18301162995
-多年互联网运维工作经验,曾负责过大规模集群架构自动化运维管理工作。
-擅长Web集群架构与自动化运维,熟练使用DevOps工具
-曾就职于大型互联网公司网际快车、北京建筑设计研究院、电信运营商和北京某大型上市公司担任运维经理
Nginx多Server优先级
在开始处理一个http请求时,nginx会取出header头部中的Host变量,与nginx.conf中的每个server_name进行匹配,以此决定到底由哪一个server来处理这个请求,但nginx配置多个相同的server_name,会导致server_name出现优先级访问冲突。
准备nginx对应的配置文件
[root@web01 ~]#  cat > /etc/nginx/conf.d/server1.conf << EOF
server {
    listen 80;
    server_name localhost test1.com;

    location / {
        root /code/test1;
        index index.html;
    }
}
EOF
[root@web01 ~]#  cat > /etc/nginx/conf.d/server2.conf << EOF
server {
    listen 80;
    server_name localhost test2.com;

    location / {
        root /code/test2;
        index index.html;
    }
}
EOF
[root@web01 ~]#  cat > /etc/nginx/conf.d/server3.conf << EOF
server {
    listen 80;
    server_name localhost test3.com;

    location / {
        root /code/test3;
        index index.html;
    }
}
EOF
准备站点目录
[root@web01 conf.d]# mkdir /code/test{1..3}
[root@web01 conf.d]# echo test1 > /code/test1/index.html
[root@web01 conf.d]# echo test2 > /code/test2/index.html
[root@web01 conf.d]# echo test3 > /code/test3/index.html
检查语法提示冲突,忽略并重启
[root@web01 conf.d]# nginx -t
nginx: [warn] conflicting server name "localhost" on 0.0.0.0:80, ignored
nginx: [warn] conflicting server name "localhost" on 0.0.0.0:80, ignored
nginx: the configuration file /etc/nginx/nginx.conf syntax is ok
nginx: configuration file /etc/nginx/nginx.conf test is successful
[root@web01 conf.d]# nginx -s reload
nginx: [warn] conflicting server name "localhost" on 0.0.0.0:80, ignored
nginx: [warn] conflicting server name "localhost" on 0.0.0.0:80, ignored
浏览器访问测试
#根据ip访问
#1. 用户第一次访问,读取server1.conf配置返回结果
[root@web01 ~]# curl 10.0.0.7
test1
#2. 此时将server1.conf修改为server4.conf重启nginx
[root@web01 conf.d]# mv server1.conf server4.conf
[root@web01 ~]# nginx -s reload
#3. 再次访问时,读取server2.conf配置返回结果
[root@web01 ~]# curl 10.0.0.7
test2
多Server_name优先级总结
在开始处理一个HTTP请求时,Nginx会读取header(请求头)中的host,与每个server中的server_name进行匹配,来决定用哪一个server标签来完成处理这个请求,有可能一个Host与多个server中的server_name都匹配,这个时候就会根据匹配优先级来选择实际处理的server。优先级匹配结果如下:
1.首先选择所有的字符串完全匹配的server_name。(完全匹配)
2.选择通配符在前面的server_name,如.oldboy.com www.oldboy.com
3.选择通配符在后面的server_name,如oldboy. oldboy.com oldboy.cn
4.最后选择使用正则表达式匹配的server_name
5.如果全部都没有匹配到,那么将选择在listen配置项后加入[default_server]的server块
6.如果没写,那么就找到匹配listen端口的第一个Server块的配置文件
注意:当出现多个相同的server_name情况下,配置文件排序优先使用则会被调用,所以建议配置相同端口,不同域名,这样不会出现域名访问冲突。
[root@web01 conf.d]# vim server3.conf
server {
listen 80;
server_name *.com;
location / {
default_type text/html;
return 200 "匹配到的是* 通配符匹配";
}
}
server {
listen 80;
server_name oldboy.*;
location / {
default_type text/html;
return 200 "匹配到的是* 通配符在后面";
}
}
server {
default_type text/html;
listen 80;
server_name test.oldboy.com;
location / {
default_type text/html;
return 200 "完全匹配";
}
}

[root@web01 conf.d]# cat server3.conf
server {
listen 80;
server_name *.com;
location / {
default_type text/html;
return 200 "匹配到的是* 通配符匹配";
}
}
server {
listen 80;
server_name oldboy.*;
location / {
default_type text/html;
return 200 "匹配到的是* 通配符在后面";
}
}
server {
default_type text/html;
listen 80 default_server;
location / {
default_type text/html;
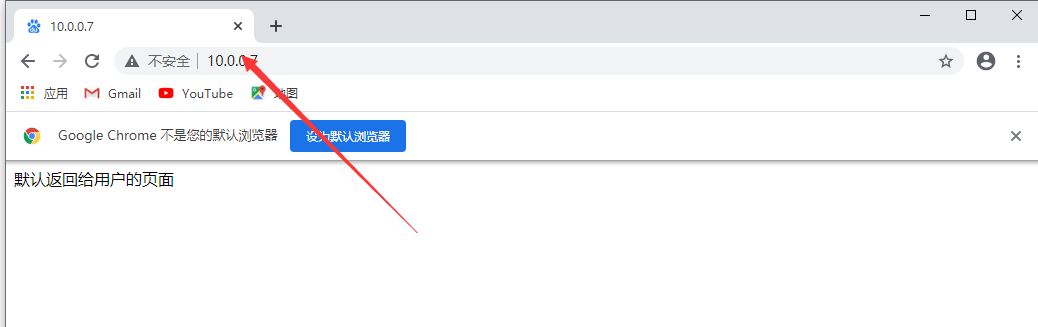
return 200 "默认返回给用户的页面";
}
}
[root@web01 conf.d]# cat server3.conf
server {
        listen 80;
        server_name *.com;
 location / {
default_type text/html;
return 200 "匹配到的是* 通配符匹配";
     }
}

server {
        listen 80;
        server_name oldboy.*;
 location / {
default_type text/html;
return 200 "匹配到的是* 通配符在后面";
     }
}

server {
 default_type text/html;
    listen 80 default_server;
    location / {
    charset utf-8,gbk;
default_type text/html;
        return 200 "默认返回给用户的页面";
    }
}

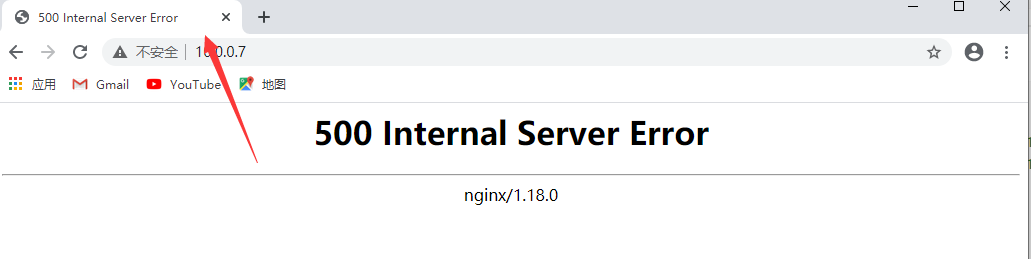
Nginx禁止IP直接访问
当用户通过访问IP或者未知域名访问你得网站的时候,你希望禁止显示任何有效内容,可以给他返回500,目前国内很多机房都要求网站关闭空主机头,防止未备案的域名指向过来造成麻烦
Nginx禁止IP访问
[root@web01 ~]# cat > /etc/nginx/conf.d/server3.conf << EOF
server {
    listen 80 default_server;           #默认优先返回;
    server_name _;                      #空主机头或者IP;
    return 500;                         #直接返回500错误;
}
EOF
[root@web01 ~]#systemctl restart nginx
引流的方式将访问的IP直接跳转主站域名
[root@web01 ~]# cat > /etc/nginx/conf.d/server3.conf << EOF
server {
    listen 80 default_server;
    server_name _;
    return 302 https://www.oldboyedu.com;
}
EOF
[root@web01 ~]#systemctl restart nginx

Nginx包含文件Include
一台服务器配置多个网站,如果配置都写在nginx.conf主配置文件中,会导致nginx.conf主配置文件变得非常庞大而且可读性非常的差。那么后期的维护就变得麻烦。 假设现在希望快速的关闭一个站点,该怎么办?
** 1.如果是写在nginx.conf中,则需要手动注释,比较麻烦
2.如果是include的方式,那么仅需修改配置文件的扩展名,即可完成注释 Include包含的作用是为了简化主配置文件,便于人类可读。**
inlcude /etc/nginx/online/*.conf #线上使用的配置
/etc/nginx/offline #保留配置,不启用(下次使用在移动到online中)
Nginx路径root与alias
root与alias路径匹配主要区别在于nginx如何解释location后面的uri,这会使两者分别以不同的方式将请求映射到服务器文件上,alias是一个目录别名的定义,root则是最上层目录的定义。
root的处理结果是:root路径+location路径alias的处理结果是:使用alias定义的路径
使用root时,用户访问http://image.com/picture/1.jpg时,实际上Nginx会到/code/picture/目录下找1.jpg文件
[root@web01 ~]# cat > /etc/nginx/conf.d/image.conf << EOF
server {
    listen 80;
    server_name image.com;
    location /picture {
        root /code;
    }
}
EOF
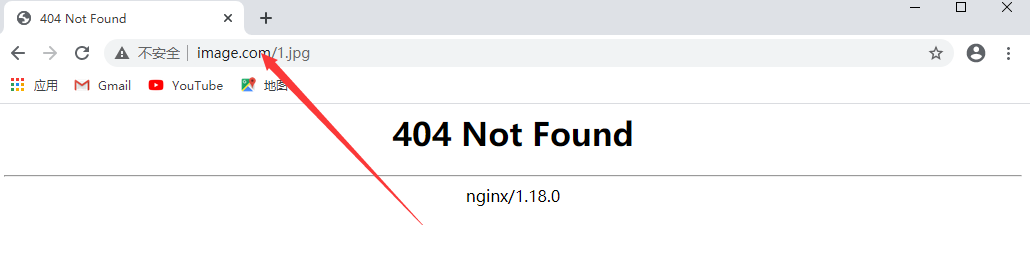

使用alias时,用户访问http://image.com/picture/1.jpg时,实际上Nginx会到/code/目录下找1.jpg文件
[root@web01 ~]# cat > /etc/nginx/conf.d/image.conf << EOF
server {
    listen 80;
    server_name image.com;
root /code;
    location /test {
        root /code;
    }
}
EOF

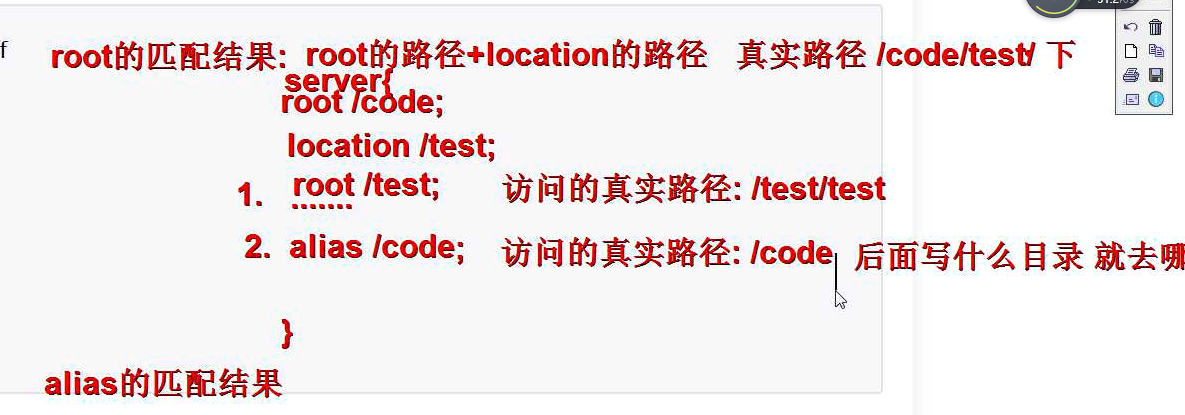
root/test        访问的真实路径:/test/test
alias/code;      访问的真实路径:/code   后面写什么目录    就去哪儿
线上配置
server {
    listen 80;
    server_name image.com;

    location / {
        root /code;
    }

    location ~* ^.*\.(png|jpg|gif)$ {
        alias /code/images/;
    }
}
Nginx try_file路径匹配
nginx的try_file路径匹配,Nginx会按顺序检查文件及目录是否存在(根据 root 和 alias 指令设置的参数构造完整的文件路径),并用找到的第一个文件提供服务。在元素名后面添加斜杠 / 表示这个是目录。如果文件和目录都不存在,Nginx会执行内部重定向,跳转到命令的最后一个 uri 参数定义的 URI 中。
Nginx try_file配置实例1
#1. 配置nginx
[root@web01 ~]#vim /etc/nginx/conf.d/try.conf
server {
listen 80;
server_name try.oldboy.com;
root /code;
index index.html;
location / {
try_files $uri $uri/ /404.html; #$uri调用try.oldboy.com/index.html
#$uri/调用 try.oldboy.com/index.html/index.html(try.oldboy.com/index.html/ 目录)
}
}
#查找/code/index.html
#2. 创建实例目录与文件
[root@web01 conf.d]# echo test...uri/ > /code/test/index.html
[root@web01 conf.d]# echo 404..... > /code/404.html
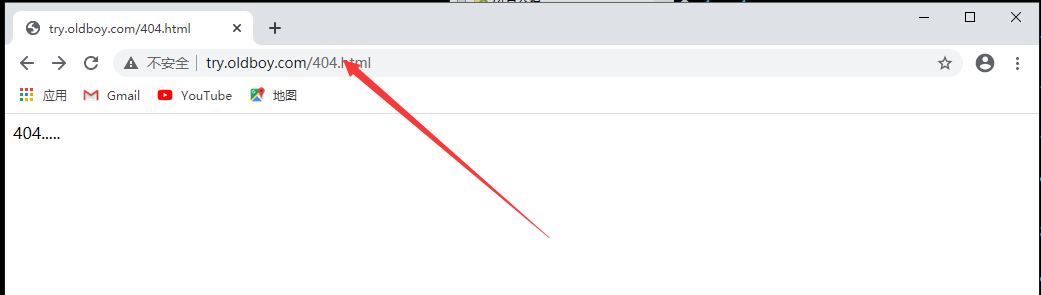
#3. 尝试访问try.oldboy.com
[root@web01 ~]# curl try.oldboy.com
404.....
#由于访问的是try.oldboy.com,而$uri取得是域名后面我们写的内容,它找不到,所以返回后面的内容,即404.html
#4. 尝试访问try.oldboy.com/index.html
[root@web01 ~]# curl try.oldboy.com/index.html
try11111
#由于访问的是try.oldboy.com/index.html,而$uri取到了index.html所以返回/code/index.html的内容
#5. 修改配置为
location / {
try_files $uri $uri/ /404.html;
}
#6. 再次尝试访问try.oldboy.com
[root@web01 ~]#curl try.oldboy.com
try11111
#我们访问的是try.oldboy.com,而$uri我们没有写任何内容,于是他访问的便是“空/”,即匹配到/code/index.html
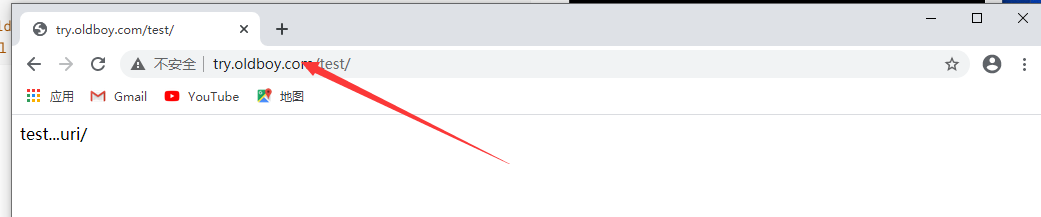
举例:
location /images/ {
        try_files $uri $uri/ /404.html;
}
用户请求try.oldboy.com/images/image1.gif,Nginx 会首先通过用于这个 location,在本地目录中查找这个文件。如果“image1.gif”文件不存在,Nginx 会查找“image1.gif/”目录,即“try.oldboy.com/images/image1.gif/”,如果都不存在,会重定向到“/404.html”
Nginx try_file配置实例2
#1. 配置nginx
[root@web01 ~]# vim /etc/nginx/conf.d/try.conf
server {
listen 80;
server_name try.oldboy.com;
root /code;
index index.html;
location / {
try_files $uri $uri/ @java; #当$uri和$uri/都匹配不到时,由后端的java来进行处理,名字可自定义,但一定要加@
}
location @java {
proxy_pass http://172.16.1.8:8080; #配置后端tomcat
}
}
#2. 配置后端tomcat
[root@web02 ~]# cd /usr/share/tomcat/webapps/ROOT
[root@web02 ROOT]# echo 'i am tomcat' > index.html
[root@web02 ROOT]# systemctl start tomcat
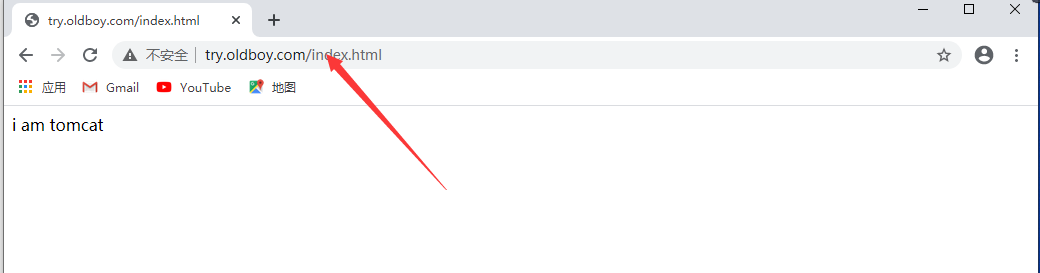
#3. 把文件都挪走
[root@web01 ~]#cd /etc/code
[root@web01 code]# mv index.html index1.html /tmp/
#4. 测试访问
[root@web01 code]# curl http://try.oldboy.com/index.html
i am tomcat
Nginx调整上传文件大小
在nginx使用上传文件的过程中,通常需要设置保存大小限制,避免出现413 Request Entity Too Large
nginx上传文件大小限制配置语法
Syntax:  client_max_body_size size;
Default: client_max_body_size 1m;
Context: http, server, location
nginx上传文件大小限制配置示例
#也可以放入http层,全局生效
server {
    listen 80;
    server_name _;
    client_max_body_size 200m;
}
Nginx优雅显示错误页面
error_page错误日志
第一种配置情况(跳转网络地址)
#error_page配置的是http这种的网络地址
[root@web01 ~]# cat > /etc/nginx/conf.d/error.conf << EOF
server {
    listen  80;
    server_name  www.old.com;
    root /code;
    #error_page  404  http://www.baidu.com;

    location / {
        index index.html;
        error_page  404  http://www.baidu.com;
    }
}
EOF
第二种配置情况(跳转本地地址)
[root@web01 ~]# cat > /etc/nginx/conf.d/error.conf << EOF
server {
    listen 80;
    server_name error.old.com;
    root /code;

    location / {
        index index.html;
    }

    #error_page  403 404  /404.jpg;

    error_page 403 404 /404.html;
    location = /404.html {
        root /code;
        index index.html;
    }
}
EOF

 浙公网安备 33010602011771号