Cobbler批量部署安装Linux系统
一:系统安装过程
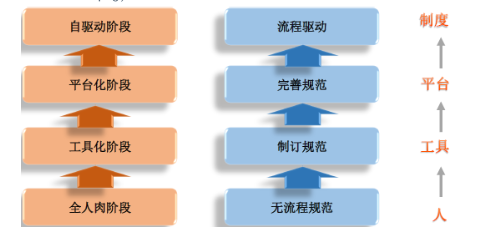
1.1运维自动化发展历程及技术应用
 1)Preboot Excution Environment 预启动执行环境
 2)Intel公司研发
 3)基于Client/Server的网络模式,支持远程主机通过网络从远端服务器下载映像,并由此支持通过网络启动操作系统
 4)PXE可以引导和安装Windows,linux等多种操作系统
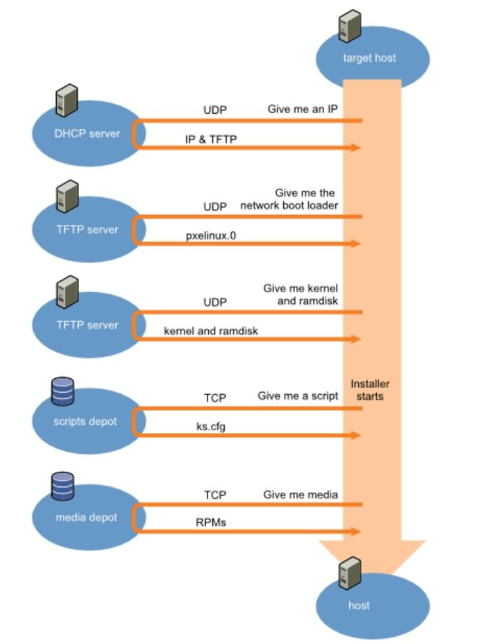
PXE工作原理
-
Client向PXE Server上的DHCP发送IP地址请求消息,DHCP检测Client是否合法(主要是检测Client的网卡MAC地址),如果合法则返回Client的IP地址,同时将启动文件pxelinux.0的位置信息一并传送给Client
-
Client向PXE Server上的TFTP发送获取pxelinux.0请求消息,TFTP接收到消息之后再向Client发送pxelinux.0大小信息,试探Client是否满意,当TFTP收到Client发回的同意大小信息之后,正式向Client发送pxelinux.0 Client执行接收到的pxelinux.0文件
-
Client向TFTP Server发送针对本机的配置信息文件(在TFTP 服务的pxelinux.cfg目录下),TFTP将配置文件发回Client,继而Client根据配置文件执行后续操作。
-
Client向TFTP发送Linux内核请求信息,TFTP接收到消息之后将内核文件发送给Client
-
Client向TFTP发送根文件请求信息,TFTP接收到消息之后返回Linux根文件系统
-
Client启动Linux内核
-
Client下载安装源文件,读取自动化安装脚本
操作系统安装的流程
 1)通用流程:首先,bios启动,选择操作系统的启动(安装)模式(此时,内存是空白的),然后根据相关的安装模式,寻找操作系统的引导程序(不同的模式,对应不同的引导程序当然也对应着不同的引导程序存在的位置),引导程序加载文件系统初始化(initrd)程序和内核初始镜像(vmlinuz),完成操作系统安装前的初始化;接着,操作系统开始安装相关的系统和应用程序。
 2)硬盘安装的流程:bios启动——MBR寻找grub——grub程序读取menu.list等配置文件,找到内核启动镜像和相关初始化程序,安装(或者启动)。
 3)PXE(Pre-boot Execution Environment)是由Intel设计,可以使计算机通过网络启动的协议。协议分为client和server两端,PXE client在网卡的ROM中,当计算机启动时,BIOS把PXE client调入内存执行,并显示出命令菜单,经用户选择后,PXE client将放置在远端的操作系统通过网络下载到本地运行。
 4)pxe网络安装的流程:bios启动——pxe client中的程序进入内存,显示命令菜单——此程序开始寻找网络引导程序(bootstrap文件,这个文件的名字随着发行版的不同而不同,在centos中,它是pxelinux.0)——引导程序读取配置文件pxelinux.cfg,
 获得系统初始化的相关文件信息——系统启动,开始进行安装。
PXE自动化安装CentOS 7
实验:基于centos7的PXE自动化安装centos7,6
环境:
两台主机
一台PXE,DHCP,HTTPD,TFTP服务器(一个网卡,一个主机),一台测试机(一个网卡,仅主机)
1.yum install httpd tftp-server dhcp syslinux
systemctl start httpd tftp
2.准备yum源
mkdir /var/www/html/centos{6,7}/os/x86_64 -pv
mount /dev/sr0 /var/www/html/centos/7/os/x86_64/
mount /dev/sr1 /var/www/html/centos/6/os/x86_64/
mkdir /var/www/html/ksdir
安装前准备:关闭防火墙和SELINUX,DHCP服务器静态IP
安装软件包
 yum install tftp-server -y# 安装服务端TFTP包
 yum install dhcp   -y     # 安装dhcp
 yum install  http  -y     # 安装http
centos7启动tftp服务:
 [root@centos7~]#systemctl start tftp     # 启动tftp
 [root@centos7~]#systemctl enable tftp
 [root@centos7~]#ss -nultp|grep 69
 users:(("rpc.statd",pid=6655,fd=10))
 udp UNCONN 0 0 :::69                     # tftp默认端口是69
centos6启动tftp服务:
 [root@centos6~]#chkconfig tftp on      # 启动tftp,下次默认开机启动
 [root@centos6~]#service xinetd start
 Starting xinetd:
TFTP从服务器上上传下载文件功能,下载时需要知道对方的文件名,下载下来的文件会在/var/lib/tftpboot目录里(tftp获取文件部分):
 [root@centos6data]#cp /etc/fstab /var/lib/tftpboot/f1  # 将服务器的文件放在/var/lib/tfpboot/目录下,起名叫f1
 [root@centos6~]#tftp 10.0.0.200   # 通过连接tftp服务在/var/lib/tftpboot/目录下下载必要的文件
 tftp> status
 tftp> get f1   # 在tftp服务上下载文件
 tftp> q        # 按q可以退出
安装http服务:
 [root@centos7~]# yum install httpd -y 安装完http服务后
 [root@centos7~]# systemctl start httpd  启动http服务
 [root@centos7~]# systemctl enable httpd  启动http服务,默认下次开启启动
创建网页版yum源 :
基于httpd服务的yum源仓库[root@centos7-2 ~]# yum install autofs -y # 安装autofs [root@centos7-2 ~]# systemctl start autofs # 启动autofs [root@centos7-2 ~]# systemctl enable autofs # 下次开机启动autofs [root@centos7-2 yum.repos.d]#mkdir -p /etc/yum.repos.d/bak/ [root@centos7-2 yum.repos.d]#mv /etc/yum.repos.d/ /etc/yum.repos.d/bak/ yum repolist ls /var/cache/yum/x86_64/7/ yum clean all yum repolist ls /var/cache/yum/x86_64/7/ rm -rf /var/cache/yum/* [root@centos7-2 yum.repos.d]#vim base.repo 开始创建yum仓库 [base] baseurl=http://10.0.0.200/CentOS/$releasever/os/$basearch gpgcheck= 0 enable=1 [root@centos7-2 yum.repos.d]#yum install httpd -y 安装httpd服务 [root@centos7-2 yum.repos.d]#systemctl start httpd 启动httpd服务 [root@centos7-2 yum.repos.d]#mkdir -pv /var/www/html/centos/{6,7}/os/x86_64/ 新建一个类似光盘的路径目录 ###访问10.0.0.200/centos [root@centos7 html]# mount /dev/sr0 /var/www/html/centos/7/os/x86_64/ mount: /dev/sr0 is write-protected, mounting read-only [root@centos7 7]#cd /var/www/html/centos/7 [root@centos7 7]#rz ###访问10.0.0.200/centos/7 刷新页面 [root@centos7~]#mkdir -pv /var/www/html/centos/{6,7}/os/x86_64/ 创建一个centos6/7的文件 [root@centos7html]#mount /dev/sr0 /var/www/html/centos/7/os/x86_64/ 将光盘挂载到cnetos7文件夹下 mount: /dev/sr0 is write-protected, mounting read-only 将应答文件放到http服务上: yum install system-config-kickstart -y #默认的配置文件 cat anaconda-ks.cfg #version=DEVEL # System authorization information auth --enableshadow --passalgo=sha512 # Use CDROM installation media cdrom # Use graphical install graphical # Run the Setup Agent on first boot firstboot --enable ignoredisk --only-use=sda # Keyboard layouts keyboard --vckeymap=us --xlayouts='us' # System language lang en_US.UTF-8 --addsupport=zh_CN.UTF-8 # Network information network --bootproto=static --device=ens33 --gateway=10.0.0.2 --ip=10.0.0.200 --nameserver=223.5.5.5 --netmask=255.255.255.0 --ipv6=auto --activate network --hostname=centos7 # Root password rootpw --iscrypted $6$7RQzNtx4jTL6TtKf$PzkdcXkthlpw0vOcJsyrPqCilwHlJdPlREVRT3RoR0SWD/.ut7vIZ3nljWmjYxPttD8ikJlltH5PpqvFt2llI0 # System services services --disabled="chronyd" # System timezone timezone Asia/Shanghai --isUtc --nontp # System bootloader configuration bootloader --location=mbr --boot-drive=sda # Partition clearing information clearpart --none --initlabel # Disk partitioning information part swap --fstype="swap" --ondisk=sda --size=1024 part /boot --fstype="xfs" --ondisk=sda --size=200 part / --fstype="xfs" --ondisk=sda --size=80695 %packages @compat-libraries @core @debugging @development @system-admin-tools %end %addon com_redhat_kdump --disable --reserve-mb='auto' %end %anaconda pwpolicy root --minlen=6 --minquality=1 --notstrict --nochanges --notempty pwpolicy user --minlen=6 --minquality=1 --notstrict --nochanges --emptyok pwpolicy luks --minlen=6 --minquality=1 --notstrict --nochanges --notempty %end [root@centos7~]#mkdir /var/www/html/ksdir 新建了一个应答文件夹 [root@centos7~]#cp anaconda-ks.cfg /var/www/html/ksdir/ks7_mini.cfg 将现有的家目录文件anaconda-ks.cfg文件复制到ksdir文件夹下面,起名叫ks7_mini.cfg [root@centos7ksdir]#vim ks7_mini.cfg 修改里边的应答文件信息 #version=DEVEL # Use CDROM installation media url --url=http://10.0.0.200/centos/7/os/x86_64/ #将网页挂载的光盘路径写上 # Use graphical install text #文本格式安装 # Run the Setup Agent on first boot firstboot --enable ignoredisk --only-use=sda # Keyboard layouts keyboard --vckeymap=us --xlayouts='us' # System language lang en_US.UTF-8 # Network information network --bootproto=dhcp --device=ens33 --ipv6=auto --activate network --hostname=centos7 # Root password rootpw --iscrypted $6$zQd4v6GjKalpnj.h$uutceFNO9vO0H2mJoBQYgpW5iNUrmKNHWulIKrSFfPJtpu4f.llg6rm9veeswxYrFXOpXV5M9MPqMBv/DGjdj. # System services firewall --disabled #防火墙关掉 selinux --disabled #selinux关掉 # System timezone timezone Asia/Shanghai --isUtc --nontp user --name=liu --password=$6$LlHE.xyYU4ZoUsbV$nBtUpJjkXmMa1lQFNoNhOs0AuVaOecBttShTt3wNrUncYh.JLfnBIIfMJtOu0Cnkemt1Wr76sHCEiHrD.yKxE1 --iscrypted --gecos="liu" # X Window System configuration information # System bootloader configuration bootloader --location=mbr --boot-drive=sda # Partition clearing information clearpart --all --initlabel #磁盘全部格式化 zerombr #mbr磁盘清空 reboot #安装完重启 # Disk partitioning information part /boot --fstype="xfs" --ondisk=sda --size=1024 part / --fstype="xfs" --ondisk=sda --size=102400 part swap --fstype="swap" --ondisk=sda --size=3072 part /data --fstype="xfs" --ondisk=sda --size=51200 %packages @^minimal autofs %end [root@centos7ksdir]#ll total 4 -rw------- 1 root root 1906 Oct 30 20:19 ks7_mini.cfg #由于应答文件在root模式下有读权限,需要全部加读权限 [root@centos7ksdir]#chmod +r ks7_mini.cfg #将应答文件加读权限 [root@centos7~]#mkdir /var/www/html/ksdir [root@centos7~]#cp anaconda-ks.cfg /var/www/html/ksdir/ks7_mini.cfg [root@centos7ksdir]#vim ks7_mini.cfg #version=DEVEL # Use CDROM installation media url --url=http://10.0.0.200/centos/7/os/x86_64/ # Use graphical install text # Run the Setup Agent on first boot firstboot --enable ignoredisk --only-use=sda # Keyboard layouts keyboard --vckeymap=us --xlayouts='us' # System language lang en_US.UTF-8 # Network information network --bootproto=dhcp --device=eth0 --ipv6=auto --activate network --hostname=centos7 # Root password rootpw --iscrypted $6$7RQzNtx4jTL6TtKf$PzkdcXkthlpw0vOcJsyrPqCilwHlJdPlREVRT3RoR0SWD/.ut7vIZ3nljWmjYxPttD8ikJlltH5PpqvFt2llI0 # System services firewall --disabled selinux --disabled # System timezone timezone Asia/Shanghai --isUtc --nontp #ssh-keygen #ssh-copy-id 127.0.0.1 #cat /root/.ssh/authorized_keys #ssh-rsa AAAAB3NzaC1yc2EAAAADAQABAAABAQC03UIO8ux8f0h4u1RXwKbUHq+rnhgJqSa/Bid9M9vv/EYzbxwHdDYdF+nqkt1cfxLzZ37HYpi80DREcBcaIWtfS/ZDyrlRQzSqUpBT70VMNvCTxFVWv2dWl8cBENAGyuVtMI8r0m56+ktFoILk/4uMiakAOw9ba8mGzQBhpTx0AnviKplGuaO6de7fmgzaA0awSYCH1Z0Tc7WJwyo7IoBSnENllr1dAGzPTUOrniEMPklEKcAIi4ZLYaDFVl9ErolVGT+eaYtcVqLriv7RcuWB7bo0Vf1zwGoH7gJFHif0LslTOzts4EtxdnK6j1QjSZXBYEroUs7pJYNFbhs/clFz root@centos7 配置图形界面 #user --name=liu --password=$6$LlHE.xyYU4ZoUsbV$nBtUpJjkXmMa1lQFNoNhOs0AuVaOecBttShTt3wNrUncYh.JLfnBIIfMJtOu0Cnkemt1Wr76sHCEiHrD.yKxE1 --iscrypted --gecos="liu" # X Window System configuration information # System bootloader configuration bootloader --location=mbr --boot-drive=sda # Partition clearing information clearpart --all --initlabel zerombr reboot # Disk partitioning information part /boot --fstype="xfs" --ondisk=sda --size=1024 part / --fstype="xfs" --ondisk=sda --size=102400 part swap --fstype="swap" --ondisk=sda --size=3072 part /data --fstype="xfs" --ondisk=sda --size=51200 %packages @^minimal autofs %end [root@centos7ksdir]#ll total 4 -rw------- 1 root root 1906 Oct 30 20:19 ks7_mini.cfg [root@centos7ksdir]#chmod +r ks7_mini.cfg安装和配置DHCP服务
[root@centos7~]#yum install dhcp -y 安装dhcp服务<br> [root@centos7~]#vim /etc/dhcp/dhcpd.conf 配置dhcp服务 # dhcpd.conf # # Sample configuration file for ISC dhcpd # # option definitions common to all supported networks... option domain-name "example.org"; option domain-name-servers ns1.example.org, ns2.example.org; default-lease-time 86400; max-lease-time 864000; # Use this to enble / disable dynamic dns updates globally. #ddns-update-style none; # If this DHCP server is the official DHCP server for the local # network, the authoritative directive should be uncommented. #authoritative; # Use this to send dhcp log messages to a different log file (you also # have to hack syslog.conf to complete the redirection). log-facility local7; # No service will be given on this subnet, but declaring it helps the # DHCP server to understand the network topology. subnet 10.0.0.0 netmask 255.255.255.0 { 声明当前的IP地址段和子网掩码 range 10.0.0.10 10.0.0.200; 设置地址池:192.168.34.10-200 option routers 10.0.0.1; 设置当前的网关地址 option domain-name-servers 8.8.8.8; 设置DNS next-server 10.0.0.200; 指明引导所在的服务主机的IP地址 filename "pxelinux.0"; 指明引导文件名称 } # This is a very basic subnet declaration. [root@centos7~]#systemctl enable dhcpd 配置好dhcp服务后,启动dhcp服务,默认下次开机启动 [root@centos7~]#yum install dhcp -y 安装dhcp服务<br> [root@centos7~]#vim /etc/dhcp/dhcpd.conf 配置dhcp服务 # dhcpd.conf # # Sample configuration file for ISC dhcpd # # option definitions common to all supported networks... option domain-name "example.org"; option domain-name-servers ns1.example.org, ns2.example.org; default-lease-time 86400; max-lease-time 864000; # Use this to enble / disable dynamic dns updates globally. #ddns-update-style none; # If this DHCP server is the official DHCP server for the local # network, the authoritative directive should be uncommented. #authoritative; # Use this to send dhcp log messages to a different log file (you also # have to hack syslog.conf to complete the redirection). log-facility local7; # No service will be given on this subnet, but declaring it helps the # DHCP server to understand the network topology. subnet 10.0.0.0 netmask 255.255.255.0 { range 10.0.0.10 10.0.0.200; option routers 10.0.0.1; option domain-name-servers 114.114.114.114,180.76.76.76; next-server 10.0.0.200; filename "pxelinux.0"; } # This is a very basic subnet declaration. [root@centos7~]#systemctl enable dhcpd 配置好dhcp服务后,启动dhcp服务,默认下次开机启动
安装syslinux 里边有pxelinux.0包文件**
[root@centos7~]#yum install syslinux -y 安装syslinux包
syslinux配置文件相关的安装包:
 [root@centos7~]#rpm -ql syslinux
 /usr/share/syslinux/menu.c32   开机启动的蓝色背景
 /usr/share/syslinux/pxelinux.0  pxelinux.0包位置
 [root@centos7~]#mkdir /var/lib/tftpboot/pxelinux.cfg  创建一个pxelinux.cfg相关文件夹
 [root@centos7~]#cp /usr/share/syslinux/{menu.c32,pxelinux.0}  /var/lib/tftpboot   将syslinux下的两个配置文件放到tftpboot目录下,其中menu.c32 开机时作为蓝色背景。
 [root@centos7~]#cp /misc/cd/isolinux/{vmlinuz,initrd.img} /var/lib/tftpboot     将光盘下的内核启动文件vmlinuz和initrd.img文件放到tftpboot目录下
 [root@centos7~]#cd /var/lib/tftpboot
 [root@centos7tftpboot]#cp /misc/cd/isolinux/isolinux.cfg  /var/lib/tftpboot/pxelinux.cfg/default
将isolinux.cfg文件复制到pxelinux.cfg文件夹下,起名叫default,作为启动菜单。
 [root@centos7tftpboot]#tree  查看已经创建的文件信息,一个文件都不能少
 .
 ├── initrd.img
 ├── menu.c32
 ├── pxelinux.0
 ├── pxelinux.cfg
 │   └── default
 └── vmlinuz
修改pxelinux.cfg下的default配置文件的信息:
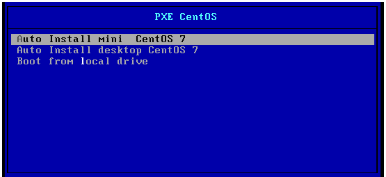
 [root@centos7tftpboot]#vim /var/lib/tftpboot/pxelinux.cfg/default   修改配置文件信息
 default menu.c32  开机蓝色背景
 timeout 10   超时时长改为10秒
 menu title PXE CentOS 开机显示的抬头信息
 label mini      #最小化安装名称
 menu label ^Auto Install mini CentOS 7  #自动化安装名称
 kernel vmlinuz
 append initrd=initrd.img ks=http://192.168.34.101/ksdir/ks7_mini.cfg   #写入引导文件路径
 label desktop   #备用的桌面安装
 menu label ^Auto Install desktop CentOS 7  #书写相关备用桌面格式
 kernel vmlinuz
 append initrd=initrd.img ks=http://192.168.34.105/ksdir/ks7_mini.cfg
 label local
 menu default   #默认的本地安装
 menu label Boot from ^local drive
 localboot 0xffff
在新开一台机器开始安装系统,将网卡模式设置为仅主机模式,将VMnet1对勾去掉,保证与服务端的网卡在一个网卡上:

开机通过ARP广播开始寻找同一网卡的配置文件信息,进而找到以上写入的相关配置文件,实现自动化安装:
注意:centos7系统的内存尽量设置1.2G以上,否则会提示内存空间不足,导致无法安装。
centos6系统安装过程:
准备工作:
[root@centos6~]#chkconfig tftp on   启动tftp服务
 [root@centos6~]#service xinetd start
 Starting xinetd:
 [root@centos6~]#service httpd start  启动http服务
 Starting httpd:
将光盘挂载到网页上:
 [root@centos6html]#mkdir -pv centos/6/os/x86_64   新建文件夹
 mkdir: created directory `centos'
 mkdir: created directory `centos/6'
 mkdir: created directory `centos/6/os'
 mkdir: created directory `centos/6/os/x86_64'
 [root@centos6html]#mount /dev/sr0 /var/www/html/centos/6/os/x86_64  将新建的文件挂载到网页上
 mount: block device /dev/sr0 is write-protected, mounting read-only
制作应答文件:
 [root@centos6tftpboot]#cp /root/anaconda-ks.cfg   ks6_mini.cfg   将系统中自带的文件复制一份到/var/lib/tftpboot目录下
 [root@centos6tftpboot]#vim ks6_mini.cfg   修改当前的应答文件信息
 url --url=http://192.168.34.105/centos/6/os/x86_64  指定挂载光盘路径
 lang en_US.UTF-8
 keyboard us
 text   #以文本形式安装
 reboot  #安装完重启
 network --onboot yes --device eth0 --bootproto dhcp --noipv6
 rootpw --iscrypted $6$6pdd/ulLIO5IoQ2u$EKDznPOR19rWTeBjVVTYGay3PbNd3t0v9.Ae.jOsxP9i3T8khOMhDxDwTzfa9E3gqirD7qD3Pw6qK1QKf2pDE0
 firewall --disabled  #关闭防火墙
 authconfig --enableshadow --passalgo=sha512
 selinux --disabled  关闭selinux
 timezone Asia/Shanghai
 bootloader --location=mbr --driveorder=sda --append="crashkernel=auto rhgb quiet"
 # The following is the partition information you requested
 # Note that any partitions you deleted are not expressed
 # here so unless you clear all partitions first, this is
 # not guaranteed to work
 clearpart --all  #格式化磁盘
 zerombr  #情况mbr分区

 part /boot --fstype=ext4 --size=1024    #boot分区
 part / --fstype=ext4 --size=100000      #根分区
 part /data --fstype=ext4 --size=50000    #data分区
 part swap --size=2048   #swap 分区
 %packages
 @core    #只安装核包
 %end
 [root@centos7tftpboot]#ksvalidator /var/www/html/ksdir/ks7_desktop.cfg   #检测
 [root@centos7tftpboot]#chmod +r ks6_mini.cfg #因为应答文件只有root有读权限,将全部属组都加有读权限
安装dhcp服务,并修改相关配置信息:
 [root@centos6~]#yum install dhcp  安装dhcp服务<br>[root@centos6html]#vim /etc/dhcp/dhcpd.conf  修改dhcp配置信息
 default-lease-time 84600; 申请默认租期
 max-lease-time 86400; 最大申请租期
 # Use this to enble / disable dynamic dns updates globally.
 #ddns-update-style none;
 # If this DHCP server is the official DHCP server for the local
 # network, the authoritative directive should be uncommented.
 #authoritative;
 # Use this to send dhcp log messages to a different log file (you also
 # have to hack syslog.conf to complete the redirection).
 log-facility local7;
 # No service will be given on this subnet, but declaring it helps the
 # DHCP server to understand the network topology.
 subnet 192.168.34.0 netmask 255.255.255.0 {  声明地址段和子网掩码
 range 192.168.34.10 192.168.34.200;          设置地址池:192.168.34.10-200
 option domain-name-servers 8.8.8.8;          设置NDS
 next-server 192.168.34.105;                  指明引导服务主机所在的IP地址
 filename "pxelinux.0";                       指明引导的文件名称
 }<br><br>[root@centos6html]#service dhcpd start 重新启动dhcp服务
将相关的配置文件放在/var/lib/tftpboot目录下:
 [root@centos6html]#cd /var/lib/tftpboot
 [root@centos6tftpboot]#mkdir pxelinux.cfg
 [root@centos6tftpboot]#yum install syslinux-nonlinux
 [root@centos6tftpboot]#cp /misc/cd/isolinux/{initrd.img,boot.msg,vmlinuz,splash.jpg,vesamenu.c32} .
 [root@centos6tftpboot]#cp /misc/cd/isolinux//isolinux.cfg  pxelinux.cfg/default
修改当前pxelinux.cfg下面的default配置文件信息:
 [root@centos6tftpboot]#vim pxelinux.cfg/default
 default vesamenu.c32
 #prompt 1
 timeout 100  超时时长修改至10s
 label linux
 menu label ^Auto Install Mini centos 6 system  修改为自动安装
 menu default
 kernel vmlinuz
 append initrd=initrd.img ks=http://192.168.34.105/ksdir/ks6_mini.cfg  指定当前的应答文件路径
 label local
 menu default  设置一个默认安装
 menu label Boot from ^local drive
 localboot 0xffff
至此,相关的配置文件设置完成,打开一个新的虚拟机进行安装系统,将网卡默认设置成仅主机模式,将vmnet1的DHCP功能关掉,开机后按esc,选择网卡启动安装,开始安装系统,结束。
-
选择网卡启动,然后按F10保存,就会自动重启,新装的主机就会通过广播获取DHCP相关的安装配置信息,就会启动进行安装,至此,cnetos6安装结束。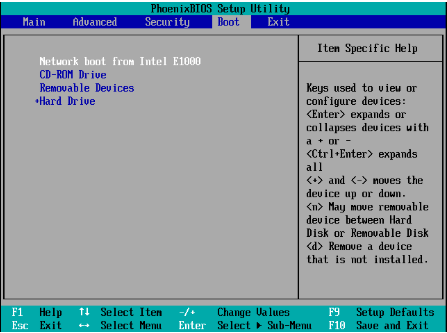
在centos7基于PXE安装centos6/7系统实验:(此安装适用于BIOS模式安装)
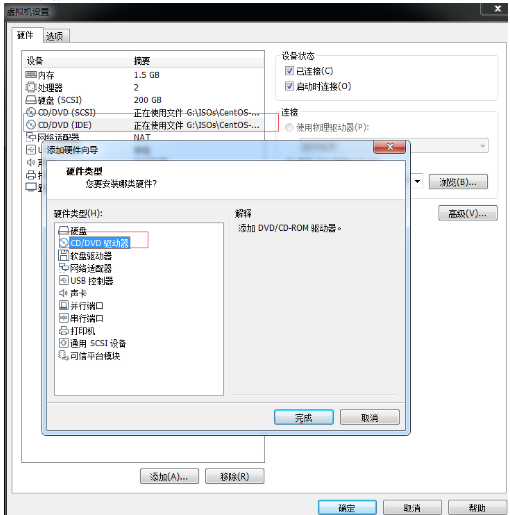
在centos7上新加一块ISO镜像:
-
准备工作:
启动三个服务:
 [root@centos7tftpboot]#systemctl start dhcpd
 [root@centos7tftpboot]#systemctl start tftp
 [root@centos7tftpboot]#systemctl start httpd
挂载光盘:
 [root@centos7~]#mkdir /var/www/html/centos/{6,7}/os/x86_64
 [root@centos7~]#mount /dev/sr0 /var/www/html/centos/7/os/x86_64/
 [root@centos7~]#mount /dev/sr1 /var/www/html/centos/6/os/x86_64/
复制centos7之前制作的应答文件或者( 也可以复制家目录的anaconda-ks.cfg里的相关应答文件 )和内核启动文件
 [root@centos7ksdir]#cp /root/anaconda-ks.cfg  ks7_mini.cfg
 [root@centos7ksdir]#scp /root/anaconda-sks.cfg  /var/www/html/ksdir/ks6_mini.cfg
 将centos6的默认应答文件复制到centos7目录里,命令为ks6_mini.cfg,然后对其稍加修改即可。
 [root@centos7ksdir]#ll
 total 8
 -rw-r--r-- 1 root root 1400 Oct 31 09:21 ks6_mini.cfg
 -rw-r--r-- 1 root root 1400 Oct 30 20:29 ks7_mini.cfg
 [root@centos7tftpboot]#mkdir linux{6,7}
 [root@centos7tftpboot]#mv vmlinuz initrd.img linux7/
将本地的内核启动文件复制在新建的linux7下
 [root@centos7tftpboot]#cp /var/www/html/centos/6/os/x86_64/isolinux/{vmlinuz,initrd.img}  linux6/  将挂载的iso光盘的启动文件复制到新建的linux6下
 [root@centos7tftpboot]#cp /usr/share/syslinux/{menu.c32,pxelinux.0}
 [root@centos7tftpboot]#cp /misc/cd/isolinux/isolinux.cfg /var/lib/tftpboot/pxelinux.cfg  将启动菜单复制到pxelinu.cfg目录下
 [root@centos7tftpboot]#tree
 .
 ├── linux6
 │   ├── initrd.img
 │   └── vmlinuz
 ├── linux7
 │   ├── initrd.img
 │   └── vmlinuz
 ├── menu.c32
 ├── pxelinux.0
 └── pxelinux.cfg
  └── default  修改此配置文件信息
修改引导文件信息:
 vim pxelinux.cfg/default
 default menu.c32
 timeout 100
 menu title PXE Insall CentOS
 label mini7
 menu label ^Auto Install mini7 CentOS 7   修改启动显示的信息
 kernel linux7/vmlinuz     由于新建了linux7,启动文件路径在此目录下,需要指定启动文件在linux7下面
 append initrd=linux7/initrd.img ks=http://192.168.34.101/ksdir/ks7_mini.cfg  指定应答文件路径
 label mini6
 menu label ^Auto Install mini6 CentOS 6   修改显示的信息
 kernel linux6/vmlinuz      由于新建了一个linux6,启动文件路径在此目录下,因此需要添加linux6路径指定应答文件
 append initrd=linux6/initrd.img ks=http://192.168.34.101/ksdir/ks6_mini.cfg  指定应答文件路径
 label local
 menu default
 menu label Boot from ^local drive
 localboot 0xffff
修改centos6的应答文件内容:
 [root@centos7tftpboot]#vim /var/www/html/ksdir/ks6_mini.cfg
 url  --url=http://192.168.34.101/centos/6/os/x86_64  指定centos6光盘挂载路径
 text  以文本方式安装
 # System services
 firewall --disabled 防火墙关掉
 selinux --disabled  selinux关掉
 # System timezone
 timezone Asia/Shanghai --isUtc --nontp
 user --name=liu --password=$6$LlHE.xyYU4ZoUsbV$nBtUpJjkXmMa1lQFNoNhOs0AuVaOecBttShTt3wNrUncYh.JLfnBIIfMJtOu0Cnkemt1Wr76sHCEiHrD.yKxE1 --iscrypted --gecos="liu"
 # X Window System configuration information
 #xconfig --startxonboot
 # System bootloader configuration
 bootloader --location=mbr --boot-drive=sda
 # Partition clearing information
 clearpart --all --initlabel  格式化磁盘
 zerombr   清空mbr磁盘
 reboot     重启
 # Disk partitioning information
 part /boot --fstype="xfs" --ondisk=sda --size=1024
 part / --fstype="xfs" --ondisk=sda --size=102400
 part swap --fstype="swap" --ondisk=sda --size=3072
 part /data --fstype="xfs" --ondisk=sda --size=51200


 %post
 mkdir /etc/yum.repos.d/bak
 mv /etc/yum.repos.d/*.repo  /etc/yum.repos.d/bak
 cat > /etc/yum.repos.d/base.repo << EOF
 [base]
 basurl=http://192.168.34.100/centos/6/os/x86_64
 gpgckeck=0
 EOF
 useradd wang
 echo centos |passwd --stdin wang

 mkdir /root/.ssh   生产公钥脚本
 cat > /root/.ssh/authorized.keys << EOF  将已经安装好的centos6的id_rsa.pub公钥信息写入。
 ssh-rsa AAAAB3NzaC1yc2EAAAABIwAAAQEA5hEv1/BQLBftA/tK5h+cF+zop59zMlpsMpXdaww8j3zktwSywDHhJI1cpWHS+rbUD1BKnapSL3Lfvi7o03rFAauAECgFjrJkAHX53Q1eh2ORfMpScaSPQ78CALSQ3pWN6Elgs6xwAAIc2MUXyoG5TTOJ0PSekzKrTww5xHuNsitXgrKfD2dBIAWFk7vwekk4kvRLBT3rbG19fYc0cTv9u+b6+Xi8EhpwR+v4BAN3eE+CFvEIsZDrp0ul566B9NZBBUBe8EJkr+H/dPRA4PR5Hctyhd27uE9hQ70QzBGBuhrL+NKxi3hRTWuLWoSUs3pP99x9km02FjzDDVOHWS7MVQ== root@centos6.10.localdomain
 EOF
 chmod 700 /root/.ssh
 chmod 600 /root/.ssh/authorized.keys
 %end
 @
  Mi^ni
 %packages
 @core  安装内核包
 %end
修改centos7的应答文件配置信息:
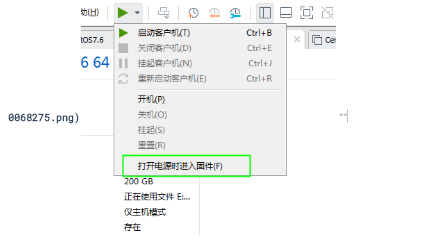
 [root@centos7tftpboot]#vim /var/www/html/ksdir/ks7_mini.cfg
 url --url=http://192.168.34.101/centos/7/os/x86_64/  指定centos7挂载光盘路径
 # Use graphical install
 text   文本方式安装
 # Run the Setup Agent on first boot
 firstboot --enable
 ignoredisk --only-use=sda
 # Keyboard layouts
 keyboard --vckeymap=us --xlayouts='us'
 # System language
 lang en_US.UTF-8

 # Network information
 network --bootproto=dhcp --device=ens33 --ipv6=auto --activate
 network --hostname=centos7.localdomain

 # Root password
 rootpw --iscrypted $6$zQd4v6GjKalpnj.h$uutceFNO9vO0H2mJoBQYgpW5iNUrmKNHWulIKrSFfPJtpu4f.llg6rm9veeswxYrFXOpXV5M9MPqMBv/DGjdj.
 # System services
 firewall --disabled  关闭防火墙
 selinux --disabled   关闭selinux
 # System timezone
 timezone Asia/Shanghai --isUtc --nontp
 user --name=liu --password=$6$LlHE.xyYU4ZoUsbV$nBtUpJjkXmMa1lQFNoNhOs0AuVaOecBttShTt3wNrUncYh.JLfnBIIfMJtOu0Cnkemt1Wr76sHCEiHrD.yKxE1 --iscrypted --gecos="liu"
 # X Window System configuration information
 #xconfig --startxonboot
 # System bootloader configuration
 bootloader --location=mbr --boot-drive=sda
 # Partition clearing information
 clearpart --all --initlabel  清空磁盘分区
 zerombr   清空mbr磁盘
 reboot  重启
 # Disk partitioning information
 part /boot --fstype="xfs" --ondisk=sda --size=1024
 part / --fstype="xfs" --ondisk=sda --size=102400
 part swap --fstype="swap" --ondisk=sda --size=3072
 part /data --fstype="xfs" --ondisk=sda --size=51200

 %post
 mkdir /etc/yum.repos.d/bak
 mv /etc/yum.repos.d/*.repo  /etc/yum.repos.d/bak
 cat > /etc/yum.repos.d/base.repo << EOF
 [base]
 basurl=http://192.168.34.100/centos/6/os/x86_64
 gpgckeck=0
 EOF
 useradd wang
 echo centos |passwd --stdin wang

 mkdir /root/.ssh   生产公钥脚本
 cat > /root/.ssh/authorized.keys << EOF  将已经安装好的centos6的id_rsa.pub公钥信息写入。
 ssh-rsa AAAAB3NzaC1yc2EAAAABIwAAAQEA5hEv1/BQLBftA/tK5h+cF+zop59zMlpsMpXdaww8j3zktwSywDHhJI1cpWHS+rbUD1BKnapSL3Lfvi7o03rFAauAECgFjrJkAHX53Q1eh2ORfMpScaSPQ78CALSQ3pWN6Elgs6xwAAIc2MUXyoG5TTOJ0PSekzKrTww5xHuNsitXgrKfD2dBIAWFk7vwekk4kvRLBT3rbG19fYc0cTv9u+b6+Xi8EhpwR+v4BAN3eE+CFvEIsZDrp0ul566B9NZBBUBe8EJkr+H/dPRA4PR5Hctyhd27uE9hQ70QzBGBuhrL+NKxi3hRTWuLWoSUs3pP99x9km02FjzDDVOHWS7MVQ== root@centos6.10.localdomain
 EOF
 chmod 700 /root/.ssh
 chmod 600 /root/.ssh/authorized.keys

 %end

 %packages
 @core  安装最小的核包
 %end
上面的相关配置文件已经全部做完,现在可以打开一个主机,将网卡设置为仅主机模式,开机后按esc,设置为Network boot from Intel E1000引导进入,进不了这个界面可以在开机界面设置“打开电源时进入固件”,修改boot界面进入:

按+将网卡设置第一项启动,然后按F10保存就会重启,下来新安装的主机就会通过DHCP获取相关信息安装系统:

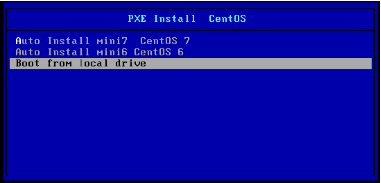
显示要安装的界面,选择上面两个任意一个,对应的安装centos6/7的系统,选择后等待安装结束。

 浙公网安备 33010602011771号