代码上线持续集成
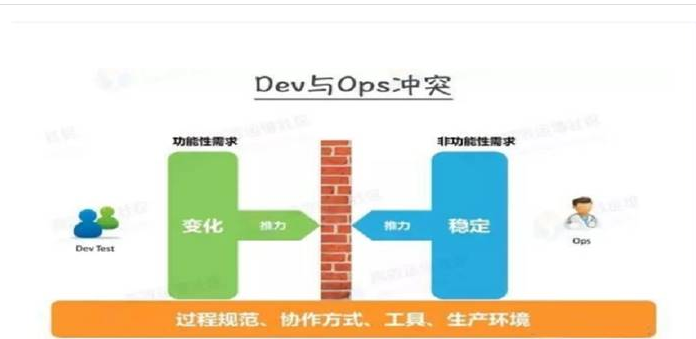
DevOps(Development和Operations的组合词)是一组过程、方法与系统的统称,用于促进开发(应用程序/软件工程)、技术运营和质量保障(QA)部门之间的沟通、协作与整合。
提高产品质量
1 自动化测试
2 持续集成
3 代码质量管理工具
4 程序员鼓励师
既然这么好?为什么有些公司没有
设计架构规划‐代码的存储‐构建‐测试、预生产、部署、监控
服务器准备:
服务器 虚拟机 纯干净的系统
| 主机名 | 配置 | |
|---|---|---|
| 10.0.0.200 | git | 1核2G 20G硬盘 |
| 10.0.0.201 | jenkins | 1核1G 20G硬盘 |
| 10.0.0.202 | nexus | 1核2G 20G硬盘 |
| 10.0.0.203 | sonar | 1核2G 20G硬盘 |
| 10.0.0.7 | web |
Git版本控制系统
1.版本控制系统简介
随时可恢复到任何一个历史状态 多人协作开发
vcs version control system
 版本控制系统是一种记录一个或若干个文件内容变化,以便将来查阅特定版本内容情况的系统
 记录文件的所有历史变化
 随时可恢复到任何一个历史状态
 多人协作开发
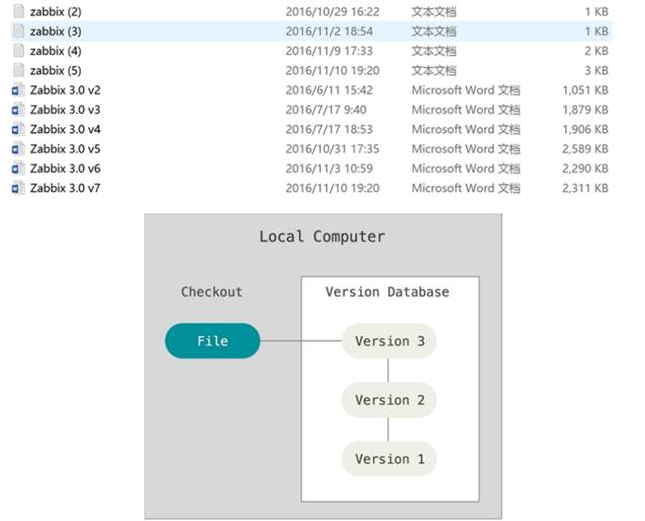
常见版本管理工具
SVN
集中式的版本控制系统,只有一个中央数据仓库,如果中央数据仓库挂了或者不可访问,所有的使用者无法使用SVN,无 法进行提交或备份文件。

系统环境准备
 [root@git‐git~]# cat /etc/redhat‐release #查看系统版本
 CentOS Linux release 7.6.1810 (Core)
 [root@git‐git ~]# uname ‐r #查看内核版本
 3.10.0-957.el7.x86_64
 [root@git‐git ~]# getenforce #确认Selinux关闭状态
 Disabled
 [root@git‐git ~]# systemctl stop firewalld #关闭防火墙
Git安装部署
 Gitlab服务的安装文档:https://about.gitlab.com/install/
 环境要求:https://docs.gitlab.com/ee/install/requirements.html
 国外安装包下载地址:https://packages.gitlab.com/gitlab/gitlab-ce
 rpm包国内下载地址:[https://mirrors.tuna.tsinghua.edu.cn/gitlab-ce/yum/]
 已经下载了两种不同后缀的gitlab安装包,注意:不要下载最新版本的,最新版本可能存在bug问题,11.11.5,中的5就是修改5次的版本安装gitlab的虚拟机配置要求:内存4G,处理器双核。
 以下是安装过程自动删除的目录:
 /etc/gitlab      # 配置文件目录
 /run/gitlab      # 运行pid目录
 /opt/gitlab      # 安装目录
 /var/opt/gitlab  # 数据目录
 /var/log/gitlab  # 日志目录
 配置gitlab文件:/etc/gitlab/gitlab.rb
 external_url 'http://192.168.7.100' # 需要访问的IP地址,或者解析的域名也可以。

 gitlab_rails['smtp_enable'] = true
 gitlab_rails['smtp_address'] = "smtp.qq.com"
 gitlab_rails['smtp_port'] = 465
 gitlab_rails['smtp_user_name'] = "2543843664qq.com" # 设置开发的邮箱地址,防止忘记密码需要修改密码
 gitlab_rails['smtp_password'] = "xxx" # 授权码
 gitlab_rails['smtp_domain'] = "qq.com"
 gitlab_rails['smtp_authentication'] = :login
 gitlab_rails['smtp_enable_starttls_auto'] = true
 gitlab_rails['smtp_tls'] = true
 gitlab_rails['gitlab_email_from'] = "2543843664@qq.com"
 user["git_user_email"] = "2543843664@qq.com"  # 配置公司邮箱
 [root@git‐git ~]# yum install git  -y
 # 安装Git
 [root@git ~]# git config
 ‐‐global 使用全局配置文件
 ‐‐system 使用系统级配置文件
 ‐‐local 使用版本库级配置文件
 [root@git‐git ~]# git config --global user.name “lizhenya”
 # 配置git使用用户
 [root@git‐git ~]# git config --global user.email “lizhenya@mail.com”
 # 配置git使用邮箱
 [root@git‐git ~]# git config --global color.ui true
 # 语法高亮
 [root@git‐git ~]# git config --list
 user.name=oldboy
 user.email=oldboy@mail.com
 color.ui=true
 [root@git ~]# cat .git/config
 [user]
 name = lizhenya
 email = lizhenya@qq.com
 [color]
 ui = true
git初始化
初始化工作目录、对已存在的目录或者对已存在的目录都可进行初始化
 mkdir git_data
 cd git_data/
# 初始化
git init
# 查看工作区状态
git status
隐藏目录.git下文件介绍:
 branches # 分支目录
 config # 定义项目特有的配置选项
 description # 仅供git web程序使用
 HEAD # 指示当前的分支
 hooks # 包含git钩子文件
 info # 包含一个全局排除文件(exclude文件)
 objects # 存放所有数据内容,有info和pack两个子文件夹
 refs # 存放指向数据(分支)的提交对象的指针
 index # 保存暂存区信息,在执行git init的时候,这个文件还没有
Git常规使用
git基础命令
[root@git git_data]# git status
# 位于分支 master
# 初始提交
无文件要提交(创建/拷贝文件并使用 "git add" 建立跟踪)
创建文件
 [root@git git_data]# touch a b c
 [root@git git_data]# git status
 # (使用 "git add <file>..." 以包含要提交的内容)
 # a
 # b
 # c
 提交为空,但是存在尚未跟踪的文件(使用 "git add" 建立跟踪)
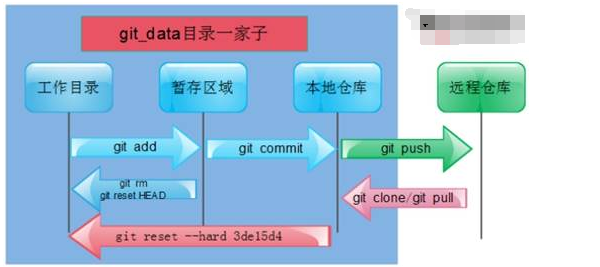
提交到暂存区
 [root@git git_data]# git add a
 [root@git git_data]# git status
 [root@git git_data]# ll .git/
 总用量 20
 drwxr‐xr‐x 2 root root 6 8月 23 05:44 branches
 ‐rw‐r‐‐r‐‐ 1 root root 92 8月 23 05:44 config
 ‐rw‐r‐‐r‐‐ 1 root root 73 8月 23 05:44 description
 ‐rw‐r‐‐r‐‐ 1 root root 23 8月 23 05:44 HEAD
 drwxr‐xr‐x 2 root root 4096 8月 23 05:44 hooks
 ‐rw‐r‐‐r‐‐ 1 root root 96 8月 23 07:06 index # git add a 把文件提交到了暂存区
 drwxr‐xr‐x 2 root root 20 8月 23 05:44 info
 drwxr‐xr‐x 5 root root 37 8月 23 07:06 objects
 drwxr‐xr‐x 4 root root 29 8月 23 05:44 refs
 [root@git git_data]# git add . # 使用git add . 或者* 添加目录中所有改动过的文件
 [root@git git_data]# git status
 # 位于分支 master
 # 初始提交
 # 要提交的变更:
 # (使用 "git rm ‐‐cached <file>..." 撤出暂存区)
 # 新文件: a
 # 新文件: b
 # 新文件: c
 [root@git git_data]# git rm ‐‐cached c
 rm 'c'
 [root@git git_data]# ll
 总用量 0
 ‐rw‐r‐‐r‐‐ 1 root root 0 8月 23 07:05 a
 ‐rw‐r‐‐r‐‐ 1 root root 0 8月 23 07:05 b
 ‐rw‐r‐‐r‐‐ 1 root root 0 8月 23 07:05 c
 [root@git git_data]# git status
 # 位于分支 master
 # 初始提交
 # 要提交的变更:
 # (使用 "git rm ‐‐cached <file>..." 撤出暂存区)
 # 新文件: a
 # 新文件: b
 # 未跟踪的文件:
 # (使用 "git add <file>..." 以包含要提交的内容)
 # c
删除文件
1.先从暂存区撤回到工作区、然后直接删除文件
 git rm ‐‐cached c
 rm ‐f c
2.直接从暂存区域同工作区域一同删除文件命令
git rm ‐f b
提交到本地仓库
 [root@git git_data]# git commit -m "commit newfile a"
 [master(根提交) 034cb75] commit newfile a
  2 files changed, 0 insertions(+), 0 deletions(-)
  create mode 100644 a
  create mode 100644 b
 [root@git git_data]# git status
 # 位于分支 master
 # 未跟踪的文件:
 #   (使用 "git add <file>..." 以包含要提交的内容)
 #
 #   c
 提交为空,但是存在尚未跟踪的文件(使用 "git add" 建立跟踪)
 # 提交到暂存区过, 再修改, 使用 -a 参数可以直接提交到本地仓库
 [root@git git_data]# echo bbb > a
 [root@git git_data]# git commit -am "commit modified a"
 [master 73240fc] commit modified a
  1 file changed, 1 insertion(+), 1 deletion(-)
修改文件名称两种方法
 [root@git git_data]# mv a a.txt
 [root@git git_data]# git status
 # 位于分支 master
 # 尚未暂存以备提交的变更:
 # (使用 "git add/rm <file>..." 更新要提交的内容)
 # (使用 "git checkout ‐‐ <file>..." 丢弃工作区的改动)
 #
 # 删除: a
 #
 # 未跟踪的文件:
 # (使用 "git add <file>..." 以包含要提交的内容)
 #
 # a.txt
 修改尚未加入提交(使用 "git add" 和/或 "git commit ‐a")
1.从暂存区删除a文件,再重新提交a.txt文件
 [root@git git_data]# git rm --cached a
 rm 'a'
 [root@git git_data]# git status
 # 位于分支 master
 # 要提交的变更:
 #   (使用 "git reset HEAD <file>..." 撤出暂存区)
 #
 #   删除:a
 #
 # 未跟踪的文件:
 #   (使用 "git add <file>..." 以包含要提交的内容)
 #
 #   a.txt
 [root@git git_data]# git add a.txt
 [root@git git_data]# git status
 # 位于分支 master
 # 要提交的变更:
 #   (使用 "git reset HEAD <file>..." 撤出暂存区)
 #
 #   重命名:    a -> a.txt  # 识别到a和a.txt相同为重命名
 #
 [root@git git_data]# git commit -m "commit mv a a.txt"
 [master 62832d4] commit mv a a.txt
  1 file changed, 0 insertions(+), 0 deletions(-)
  rename a => a.txt (100%)
2.直接用git命令重命名
 [root@git git_data]# git mv a.txt a # 同时修改工作区域和暂存区域的文件名称
 [root@git git_data]# git status
 # 位于分支 master
 # 要提交的变更:
 #   (使用 "git reset HEAD <file>..." 撤出暂存区)
 #
 #   重命名: a.txt -> a
 #
 [root@git git_data]# git commit -m "commit mv a.txt a"
 [master 47b2c38] commit mv a.txt a
  1 file changed, 0 insertions(+), 0 deletions(-)
  rename a.txt => a (100%)
查看
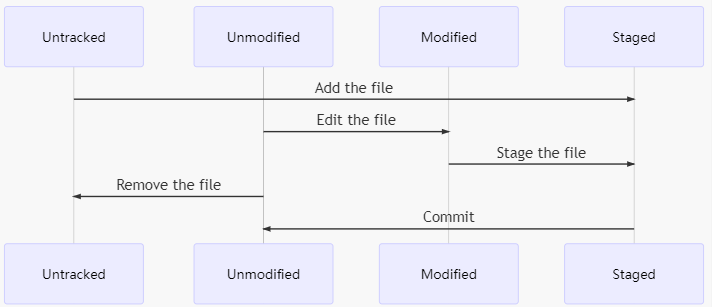
 git status 只能查看区域状态的不同,不能查看文件内容的变化。
 git diff 查看内容的不同
 [root@git git_data]# echo aaa > a
 # 默认比较本地工作目录和暂存区文件的不同
 [root@git git_data]# git diff a
 diff --git a/a b/a
 index e69de29..72943a1 100644
 --- a/a
 +++ b/a
 @@ -0,0 +1 @@
 +aaa
 # 提交a文件到暂存区域,再用git diff比较是相同的
 [root@git git_data]# git add a
 [root@git git_data]# git diff a
 # 比较暂存区和本地仓库文件的不同
 [root@git git_data]# git diff --cached a
 diff --git a/a b/a
 index e69de29..72943a1 100644
 --- a/a
 +++ b/a
 @@ -0,0 +1 @@
 +aaa
 # 提交后在比对则暂存区和本地仓库内容相同
 [root@git git_data]# git commit -m "modified a"
 [master 6826ad1] modified a
  1 file changed, 1 insertion(+)
 [root@git git_data]# git diff --cached a
镜像和日志
[root@git git_data]# git commit # 相当于虚拟机的镜像,任何操作都被做了一次快照,可恢复到任意一个位置
# 位于分支 master
无文件要提交,干净的工作区
[root@git git_data]# git log # 查看当前版本前历史的git commit快照操作
commit 73240fc8e1202f480fc2461be360148399c7dfe1 # 哈希唯一标识的字符串
Author: wuqi <wuqi@qq.com> # 作者个人信息
Date: Fri Oct 23 10:35:49 2020 +0800 # 时间
commit modified a # -m 个人写的提交描述信息
commit 6826ad197467d19b8a76f2d96f5ead6b12c7e779
Author: wuqi <wuqi@qq.com>
Date: Fri Oct 23 10:28:57 2020 +0800
modified a
commit 47b2c381e2fcbdd4fa6893a368940ca7de7dc491
Author: wuqi <wuqi@qq.com>
Date: Fri Oct 23 10:26:12 2020 +0800
commit mv a.txt a
commit 62832d4a4602b7027054b3938e219981c6c05099
Author: wuqi <wuqi@qq.com>
Date: Fri Oct 23 10:25:02 2020 +0800
commit mv a a.txt
commit e187945735c774e0e041cced9c96647be8ad6cc0
Author: wuqi <wuqi@qq.com>
Date: Fri Oct 23 10:22:25 2020 +0800
commit deleted b
commit 034cb75378760cdd0f1c4a03561277f3d3b69622
Author: wuqi <wuqi@qq.com>
Date: Fri Oct 23 10:15:02 2020 +0800
commit newfile a
[root@git git_data]# git log --oneline # 一行简单的显示所有commit信息
73240fc commit modified a
6826ad1 modified a
47b2c38 commit mv a.txt a
62832d4 commit mv a a.txt
e187945 commit deleted b
034cb75 commit newfile a
[root@git git_data]# git log --oneline --decorate # 显示当前的指针位置
73240fc (HEAD, master) commit modified a
6826ad1 modified a
47b2c38 commit mv a.txt a
62832d4 commit mv a a.txt
e187945 commit deleted b
034cb75 commit newfile a
[root@git git_data]# git log -1 # 只显示最近一条提交日志的内容
commit 73240fc8e1202f480fc2461be360148399c7dfe1
Author: wuqi <wuqi@qq.com>
Date: Fri Oct 23 10:35:49 2020 +0800
commit modified a
[root@git git_data]# git log -p # 显示所有提交日志的详细改动信息
commit 73240fc8e1202f480fc2461be360148399c7dfe1
Author: wuqi <wuqi@qq.com>
Date: Fri Oct 23 10:35:49 2020 +0800
commit modified a
diff --git a/a b/a
index 72943a1..f761ec1 100644
--- a/a
+++ b/a
@@ -1 +1 @@
-aaa
+bbb
commit 6826ad197467d19b8a76f2d96f5ead6b12c7e779
:
-
恢复历史数据
1.只更改了本地目录
 [root@git git_data]# echo "333" >> a # 添加新内容
 [root@git git_data]# git status
 # 位于分支 master
 # 尚未暂存以备提交的变更:
 # (使用 "git add <file>..." 更新要提交的内容)
 # (使用 "git checkout -- <file>..." 丢弃工作区的改动) # 覆盖工作区的改动
 #
 # 修改: a
 修改尚未加入提交(使用 "git add" 和/或 "git commit -a")
 [root@git git_data]# git checkout -- a # 从暂存区覆盖本地工作目录
 [root@git git_data]# git status
 # 位于分支 master
 无文件要提交,干净的工作区
 [root@git git_data]# cat a
 aaa
 2.修改了本地目录且同时提交到了暂存区
 [root@git git_data]# echo ccc >> a # 添加新内容
 [root@git git_data]# git add . # 提交到暂存区
 [root@git git_data]# git diff --cached # 比对暂存区和本地仓库的内容
 diff --git a/a b/a
 index 72943a1..959479a 100644
 --- a/a
 +++ b/a
 @@ -1 +1,2 @@
 aaa
 +ccc
 [root@git git_data]# git status
 # 位于分支 master
 # 要提交的变更:
 # (使用 "git reset HEAD <file>..." 撤出暂存区)
 #
 # 修改: a
 [root@git git_data]# git reset HEAD a # 本地仓库覆盖暂存区域
 重置后撤出暂存区的变更:
 M a
 [root@git git_data]# git diff a
 diff --git a/a b/a
 index 72943a1..959479a 100644
 --- a/a
 +++ b/a
 @@ -1 +1,2 @@
 aaa
 +ccc
 [root@git git_data]# git diff --cached a
3.修改了工作目录且同时提交到了暂存区和本地仓库
 [root@git git_data]# echo bbb >> a # 添加新内容
 [root@git git_data]# git commit -m "add bbb"
 [root@git git_data]# echo ccc >> a
 [root@git git_data]# git commit -am "add ccc"
 # 这时候发现改错代码了,想还原某一次提交的文件快照
 [root@git git_data]# git log --oneline
 59ba2a9 add ccc
 dbead4c add bbb
 4c57a60 modified a
 5692532 rename a.txt a
 7adfca0 commit a.txt
 b4017a8 commit a
 `Git服务程序中有一个叫做HEAD的版本指针,当用户申请还原数据时,其实就是将HEAD指针指向到某个特定的提交版本,但是因为Git是分布式版本控制系统,为了避免历史记录冲突,故使用了SHA-1计算出十六进制的哈希字串来区分每个提交版本,另外默认的HEAD版本指针会指向到最近一次提交的版本记录`
 [root@git git_data]# git reset --hard 4c57a60
 HEAD 现在位于 4c57a60 modified a
 `刚刚的操作实际上就是改变了一下HEAD版本指针的位置,就是你将HEAD指针放在那里,那么你的当前工作版本就会定位在那里,要想把内容再还原到最新提交的版本,先看查看下提交版本号`
 # 打开发现回退错了,应该回退到bbb版本
 [root@git git_data]# cat a
 aaa
 # 这时候查看log没有commit bbb的历史了
 [root@git git_data]# git log --oneline
 4c57a60 modified a
 5692532 rename a.txt a
 7adfca0 commit a.txt
 b4017a8 commit a
 `怎么搞得?竟然没有了add bbb这个提交版本记录?`
 `原因很简单,因为我们当前的工作版本是历史的一个提交点,这个历史提交点还没有发生过add bbb 更新记录,所以当然就看不到了,要是想"还原到未来"的历史更新点,可以用git reflog命令来查看所有的历史记录:`
 # 使用git reflog 可查看总历史内容
 [root@git git_data]# git reflog
 4c57a60 HEAD@{0}: reset: moving to 4c57a60
 59ba2a9 HEAD@{1}: commit: add ccc
 dbead4c HEAD@{2}: commit: add bbb
 4c57a60 HEAD@{3}: commit: modified a
 5692532 HEAD@{4}: commit: rename a.txt a
 7adfca0 HEAD@{5}: commit: commit a.txt
 b4017a8 HEAD@{6}: commit (initial): commit a
 # 然后使用reset回到bbb的版本内容下
 [root@git git_data]# git reset --hard dbead4c
 HEAD 现在位于 dbead4c add bbb
 [root@git git_data]# cat a
 aaa
 bbb
git分支
 分支即是平行空间,假设你在为某个手机系统研发拍照功能,代码已经完成了80%,但如果将这不完整的代码直接
 提交到git仓库中,又有可能影响到其他人的工作,此时我们便可以在该软件的项目之上创建一个名叫”拍照功
 能”的分支,这种分支只会属于你自己,而其他人看不到,等代码编写完成后再与原来的项目主分支合并下即可,这
 样即能保证代码不丢失,又不影响其他人的工作。
 一般在实际的项目开发中,我们要尽量保证master分支是非常稳定的,仅用于发布新版本,平时不要随便直接修
 改里面的数据文件,而工作的时候则可以新建不同的工作分支,等到工作完成后在合并到master分支上面,所以团
 队的合作分支看起来会像上面图那样。`
 [root@git git_data]# git log --oneline --decorate
 dbead4c (HEAD, master) add bbb # 默认分支指向你最后一次的提交 HEAD头、指针
 4c57a60 modified a
 5692532 rename a.txt a
 7adfca0 commit a.txt
 b4017a8 commit a
 [root@git git_data]# git branch testing # 新建testing分支
 [root@git git_data]# git branch
 * master # *号在哪里就说明当前在哪个分支上入下图所示
 testing
 [root@git git_data]# git log --oneline --decorate # 通过命令查看分支指向
 dbead4c (HEAD, testing, master) add bbb
 4c57a60 modified a
 5692532 rename a.txt a
 7adfca0 commit a.txt
 b4017a8 commit a
 [root@git git_data]# git checkout testing # 切换到testing分支、对应的HEAD指针也指向了testing
 切换到分支 'testing'
 [root@git git_data]# git branch
 master
 * testing
 [root@git git_data]# touch test
 [root@git git_data]# git add .
 [root@git git_data]# git commit -m "commit test"
 [root@git git_data]# git checkout master # 切换到master分支后指针指向到了master
 切换到分支 'master'
 [root@git git_data]# git branch
 * master
 testing
 [root@git git_data]# ll # 正常情况下是没有test文件的、保证master分支是线上环境的
 总用量 4
 ‐rw‐r‐‐r‐‐ 1 root root 8 8月 23 08:42 a
 [root@git git_data]# touch master
 [root@git git_data]# git add .
 [root@git git_data]# git commit -m "commit master"
git合并分支
[root@git git_data]# git merge testing # 提示输入描述信息 相当于git的‐m参数
 [root@gitlab git_data]# git log --oneline --decorate
 3a833b7 (HEAD, master) add bbb
 35a3622 (tag: v1.0) merge testing to master
 ce3d185 modified a on testing branch
 8407d43 modified a master
 a4f2bdb Merge branch 'testing'
 4bfb168 commit master
 642b101 commit test
 64bd30b add ccc
 01ae74c modified a
 aba8ecc b-->b.txt
 e2988b1 commit a
 a1ec177 add ccc
 2f27dae newfile a
git冲突合并
相同文件相同行被不同分支修改,并提交到各自的本地仓库后,再合并分支时会发生合并冲突。
自动合并失败,不冲突的文件已经合并,冲突的文件自动标识到文件里,需要手动更改要保留的代码,然后再进行提交,这样就是最新的分支,可以直接删除其他的分支。
 [root@git git_data]# echo "master" >> a
 [root@git git_data]# git commit -am "modified a master"
 [root@git git_data]# git checkout testing
 切换到分支 'testing'
 [root@git git_data]# git branch
 master
 testing
 [root@git git_data]# cat a
 aaa
 bbb
 [root@git git_data]# echo "testing" >>a
 [root@git git_data]# git commit -am "modified a on testing branch"
 [root@git git_data]# git checkout master
 [root@git git_data]# git merge testing
 [root@git git_data]# cat a # 冲突的文件自动标识到文件里,手动更改冲突要保留的代码
 [root@git git_data]# git commit -am "merge testing to master" # 进行提交即可
 [root@git git_data]# git log --oneline --decorate
 bba413d (HEAD, master) merge testing to master
 34d7a55 (testing) modified a on testing branch
 ec1a424 modified a master
 3258705 Merge branch 'testing'
 f5ae1d8 commit master
 ad4f25a commit test
 删除分支‐d参数
 [root@git git_data]# git branch -d testing
 已删除分支 testing(曾为 34d7a55)。
 [root@git git_data]# git branch
 master
git标签使用
标签也是指向了一次commit提交,是一个里程碑式的标签,回滚打标签直接加标签号,不需要加唯一字符串,不好记
# 默认给当前指定标签 -a 指定标签名字 -m 指定说明文字
[root@git git_data]# git tag -a v1.0 -m "aaa bbb master tesing version v1.0"
[root@git git_data]# git tag
[root@git git_data]# git tag -a v2.0 dbead4c -m "add bbb version v2.0"
 [root@git git_data]# git tag
 v1.0
 v2.0
 [root@git git_data]# git show v1.0
 tag v1.0
 Tagger: wuqi <wuqi@qq.com>
 Date:   Mon Oct 26 09:53:35 2020 +0800
 [root@git git_data]# git reset --hard v2.0
 HEAD 现在位于 dbead4c add bbb
 [root@git git_data]# ll
 总用量 4
 -rw-r--r-- 1 root root 8 8月 23 11:26 a
 -rw-r--r-- 1 root root 0 8月 23 11:25 b
[root@git git_data]# git tag -d v2.0
git push -u origin v1.0
git push -u origin --tags
git push -u origin :refs/tags/v1.0
git命令总结
 git init                # 初始化仓库
 git status              # 查看仓库的状态信息
 git add  file           # 将新的文件提交到暂存区
 git rm --cached file    # 删除暂存的内容
 git commit -m "newfile a" # 提交暂存区的内容到本地仓库
 git commit -am "modifiled b.txt ->>cccc" # 如果仓库中已经存在当前文件 修改文件后 不需要提交到暂存区直接可以提交到本地仓库
 git checkout --b        # 将暂存区的文件覆盖工作目录
 git rm -f b             # 同时删除工作区域和暂存区域的内容
 git mv b b.txt          # 修改名称
 git diff                # 默认比较的是工作目录和暂存区
 git diff --cached       # 比对的是暂存区和本地仓库
 git add .               # 提交工作目录所有的文件到暂存区
 git log                 # 查看当前版本下历史的所有commit提交
 git log --oneline       # 一行显示所有的commit提交
 git log --oneline --decorate    # 查看当前的指针位置
 git log -1              # 显示最近的1条commit
 git log -p              # 显示所有改动过的内容详细信息
 git reflog              # 查看所有的历史提交
 git reset --hard 哈希值  # 回滚到某个版本
 git branch              # 查看当前的所有分支
 git checkout dev        # 切换到dev分支
 git merge    dev        # 把dev的新的文件合并到master分支  第一次merge可能出现vim对话框 -m 填写描述信息 保存退出即可
 git checkout -b dev     # 创建并切换到dev分支
 git tag                 # 查看当前所有的tag版本
 git tag -a -m           # 为当前的版本创建tag
 git tag -a 哈希值 -m     # 针对某个版本创建tag
 git show v1.0           # 查看v1.0的详细信息
 git tag -d v1.0         # 删除tag
github使用
 Github顾名思义是一个Git版本库的托管服务,是目前全球最大的软件仓库,拥有上百万的开发者用户,也是软件
 开发和寻找资源的最佳途径,Github不仅可以托管各种Git版本仓库,还拥有了更美观的Web界面,您的代码文件可
 以被任何人克隆,使得开发者为开源项贡献代码变得更加容易,当然也可以付费购买私有库,这样高性价比的私有
 库真的是帮助到了很多团队和企业
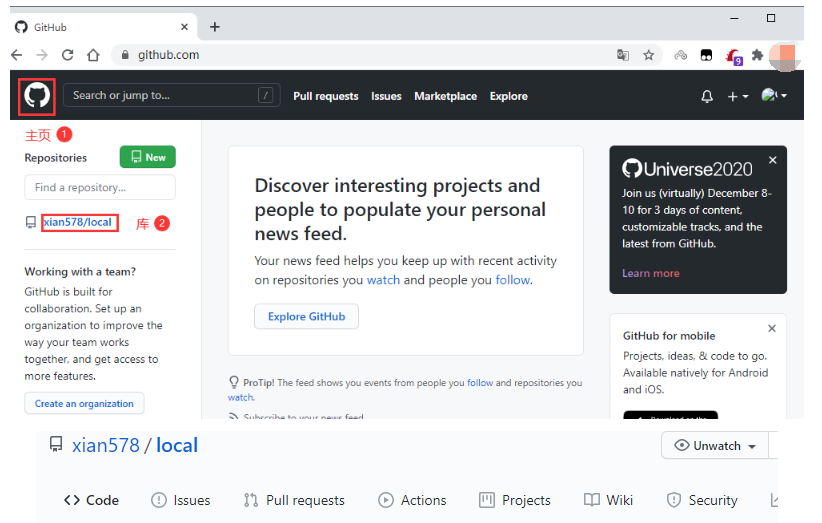
 1、注册用户 # 课前注册好用户
 2、配置ssh‐key
 3、创建项目
 4、克隆项目到本地
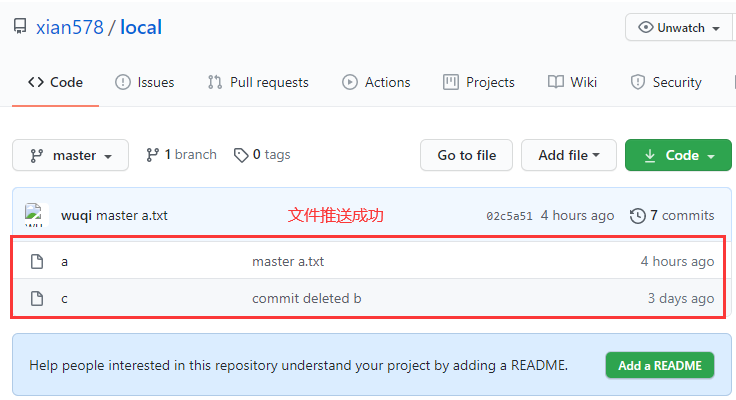
 5、推送新代码到github
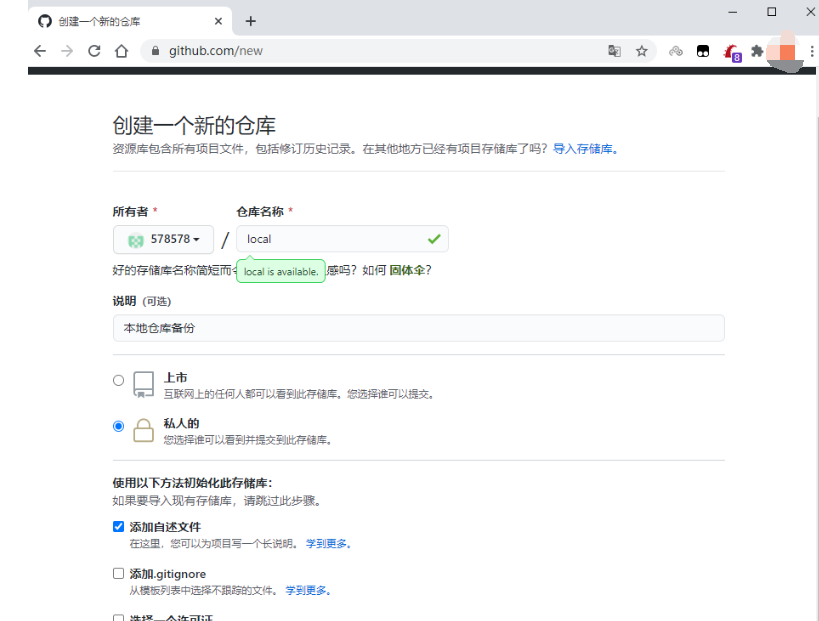
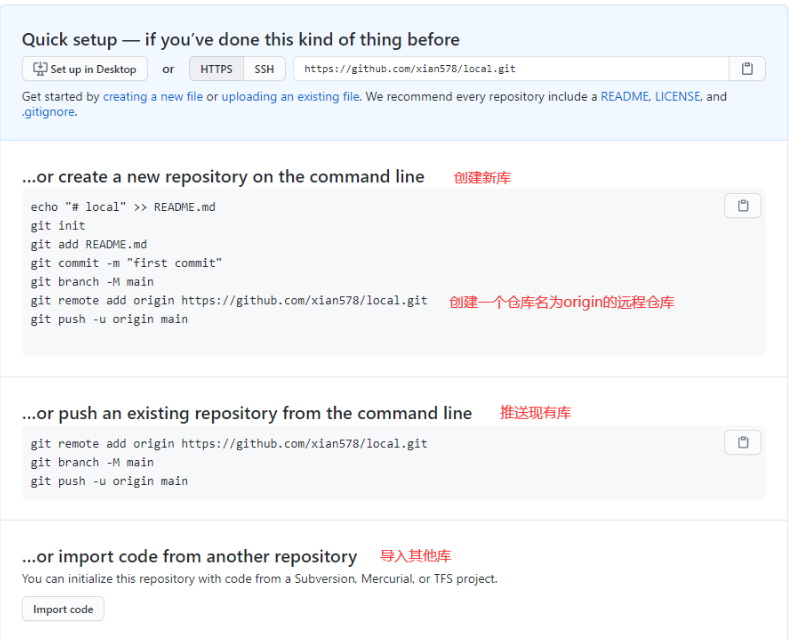
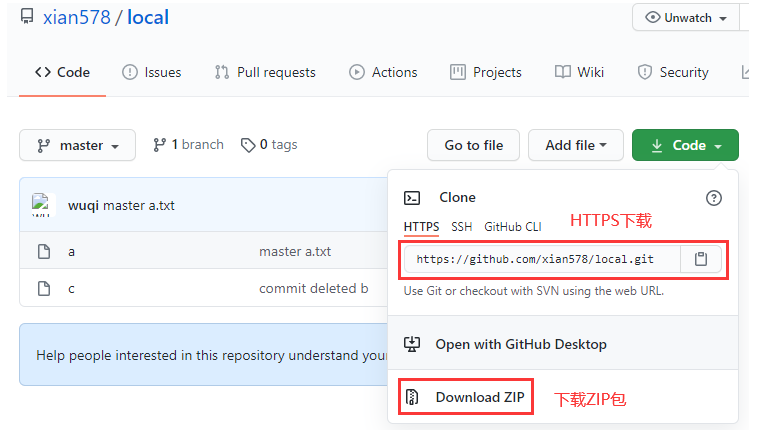
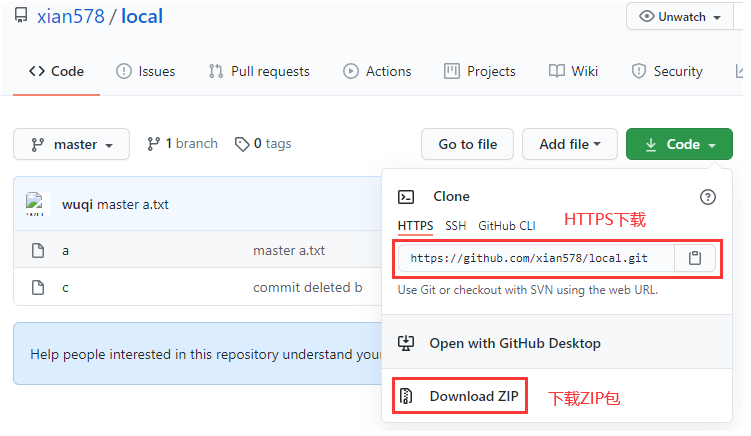
克隆http
-
命令行创建新的存储库
 快速设置
 如果您之前已经做过这种事情
 在桌面上设置
 echo "# local" >> README.md
 git init
 git add README.md
 git commit -m "first commit"
 git branch -M main
 # 添加远程仓库名称origin 地址https://github.com/xian578/local.git
 git remote add origin https://github.com/xian578/local.git
 git push -u origin main
命令行推送现有存储库
 git remote add origin https://github.com/xian578/local.git
 git branch -M main
 git push -u origin main
另一个存储库导入代码
您可以使用Subversion,Mercurial或TFS项目中的代码初始化此存储库。
克隆SSH
 [root@gitlab git_data]# git remote add origin git@github.com:xiaohui-0316/git_data.git
 [root@gitlab ~]# ssh-keygen -t rsa
 [root@gitlab ~]# cat .ssh/id_rsa.pub
 ssh-rsa AAAAB3NzaC1yc2EAAAADAQA
BAAABAQDQCww4JA7khfqhA/v2vlJbA+BVNMiJtfXx2hdE7J9
qQbLr62NOxj5FUjGRZvt4vn6sRcI+YqYKQJR+1MA4uKhYwS1f
Bmmnb8bRijs+PhnOEkyCYYhKSbpy8Wy7maoZ7vEo7iAfhf9VJE4wuh
xB2GAv1tuEzSHHIXbEOLcv2DzDHn9/uJIaWhV6lET3o0I/gSSdd3AtlF5OBAs
FQBhiM8tP2YCaF/PZSqG5cAPJ2qGZ594qMQ0wA58x1e/X8YtGBcRJQG8bXU34Z/m+l
CAeQAcpc+Xzr6rKTmrGhh0ALE7tZtp0sr6c8EQtnj1IdflIZzWN8CVfdkg
GlaLvQCZ4S48n root@gitlab
 [root@git git_test]# git push ‐u origin master
 [root@git git_data]# cd /root/git_data/
 [root@gitlab tmp]# git clone git@github.com:xiaohui-0316/git_data                 #下载
HTTP协议
https://github.com/用户名/local.git
SSH协议
git@github.com:用户名/local.git
需要主机
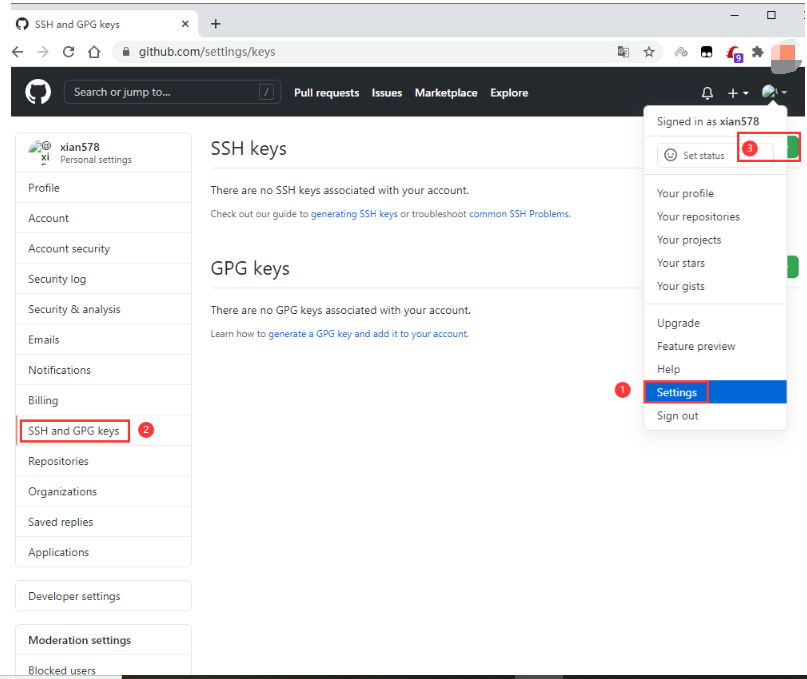
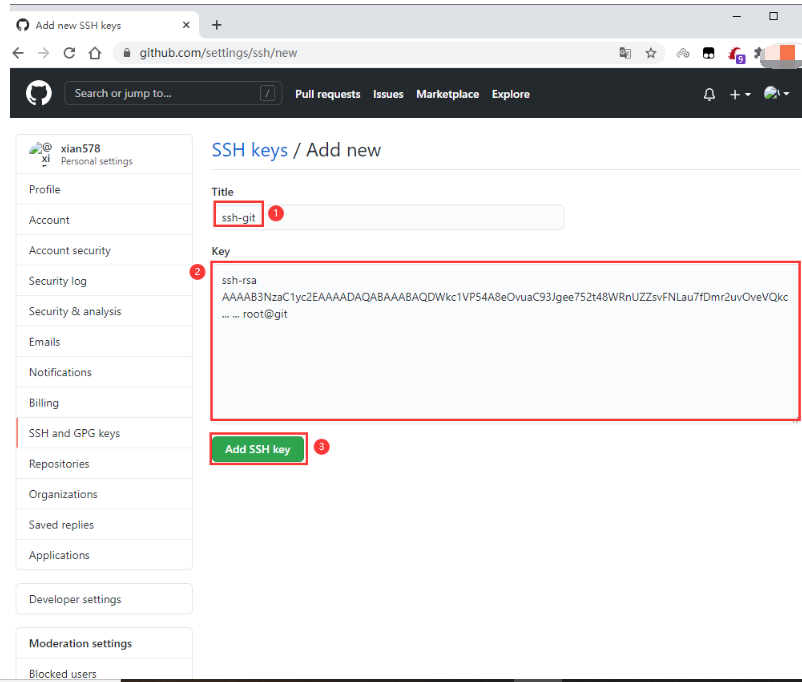
生成密钥对
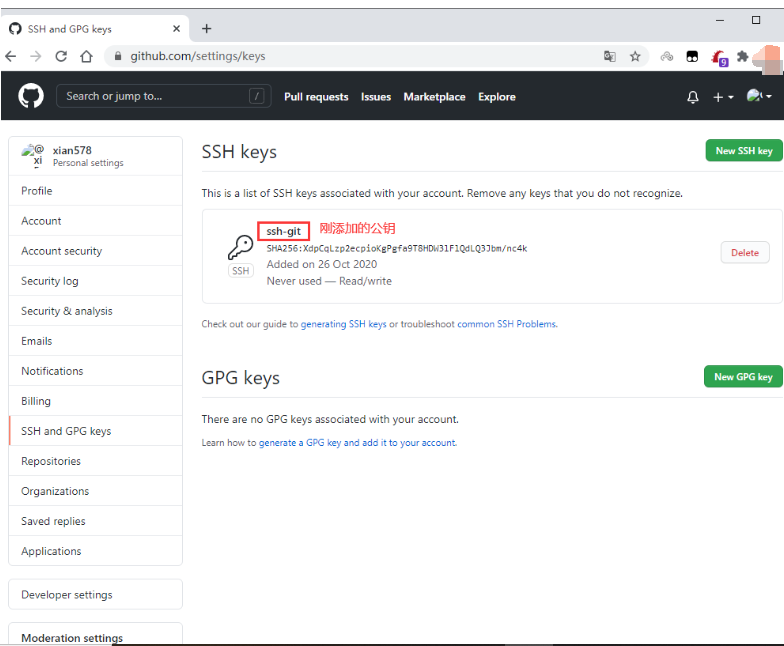
推送公钥到Github
通过创建新文件或上载现有文件来开始使用。我们建议每个存储库都包括 README, LICENSE和.gitignore。
将公钥添加到你的github账户中
命令行创建新的存储库
 echo "# local" >> README.md
 git init
 git add README.md
 git commit -m "first commit"
 # 添加远程仓库名称origin 地址git@github.com:xiaohui-0316/git_data.git
 git remote add origin git@github.com:xiaohui-0316/git_data.git
 git push -u origin master

 # 推送本地仓库master分支到远程仓库origin
 [root@git git_data]# git push -u origin master
 Warning: Permanently added the RSA host key for IP address '192.30.255.113' to the list of known hosts.
 Counting objects: 17, done.
 Compressing objects: 100% (13/13), done.
 Writing objects: 100% (17/17), 1.36 KiB | 0 bytes/s, done.
 Total 17 (delta 0), reused 0 (delta 0)
 To git@github.com:xian578/local.git
  * [new branch]      master -> master
 分支 master 设置为跟踪来自 origin 的远程分支 master。
克隆HTTPS到本地
 cd /tmp/
 git clone https://github.com/xiaohui-0316/git_data.git
 注意:
 低版本的系统存在版本问题提示
 fatal: unable to access 'https://github.com/oldboylzy/oldboy.git/': Peer reports
 incompatible or unsupported protocol version
升级版本即可
yum update -y nss curl libcurl
[root@git tmp]# cd git_data.git/
# 创建文件
[root@git local]# touch d
# 提交到暂存区
[root@git local]# git add .
# 提交到本地仓库
[root@git local]# git commit -m "add d"
# 修改配置文件为SSH协议
[root@git local]# sed -i '/url/c url = git@github.com:xiaohui-0316/git_data.git'.git/config
# 提交到远程仓库
 [root@git local]# git push -u origin master
 [root@git local]# cd /root/git_data/
# 拉取远程仓库最新代码
[root@git git_data]# git pull
# 查看当前设置的远程仓库名
 [root@git local]# git remote
 origin
# 移除远程仓库origin
[root@git git_data]# git remote remove origin
gitlab安装
GitLab简介
 GitLab 是一个用于仓库管理系统的开源项目。使用Git作为代码管理工具,并在此基础上搭建起来的web服务。可
 通过Web界面进行访问公开的或者私人项目。它拥有与Github类似的功能,能够浏览源代码,管理缺陷和注释。可
 以管理团队对仓库的访问,它非常易于浏览提交过的版本并提供一个文件历史库。团队成员可以利用内置的简单聊
 天程序(Wall)进行交流。它还提供一个代码片段收集功能可以轻松实现代码复用。
 常用的网站:
 官网:https://about.gitlab.com/
 国内镜像:https://mirrors.tuna.tsinghua.edu.cn/gitlab‐ce/yum/
安装环境:
1、 CentOS 6或者7
2、 2G内存(实验)生产(至少4G)
3、 安装包:gitlab-ce-10.2.2-ce
4、 禁用防火墙,关闭selinux
https://about.gitlab.com/installation/#centos-7 # git官网
手动安装说明
安装依赖
yum install -y curl policycoreutils-python openssh-server
防火墙配置
 firewall-cmd --permanent --add-service=http
 firewall-cmd --permanent --add-service=https
 systemctl reload firewalld
下载软件包
官方源:
国内镜像:
wget -O /opt/gitlab-ce-10.2.2-ce.0.el7.x86_64.rpm https://mirrors.tuna.tsinghua.edu.cn/gitlab-ce/yum/el7/gitlab-ce-10.2.2-ce.0.el7.x86_64.rpm
# 或者提前下好
cd /opt && rz -bye gitlab-ce-10.2.2-ce.0.el7.x86_64.rpm
安装软件包
rpm -ivh /opt/gitlab-ce-10.2.2-ce.0.el7.x86_64.rpm
配置
更改url地址为本机IP地址
sed -i "/^external_url.*/c external_url 'http://10.0.0.200'" /etc/gitlab/gitlab.rb
# 重新配置 请等待一段时间
gitlab-ctl reconfigure
浏览器访问登录
首次访问时,您将被重定向到密码重置屏幕。更改您的管理员帐户的密码,您将被重定向回登录屏幕。使用默认帐户的用户名root登录。
目录
 /opt/gitlab/                     # 程序安装目录
 /opt/gitlab/bin/               # 二进制文件目录
 /var/opt/gitlab                # 数据目录
 /var/opt/gitlab/git-dfata  # 存放仓库数据
 /var/log/gitlab/              # 存放服务日志
命令
 gitlab-ctl status             # 查看目前gitlab所有服务运维状态
 gitlab-ctl stop               # 停止gitlab服务
 gitlab-ctl stop nginx      # 单独停止某个服务
 gitlab-ctl start              # 启动gitlab服务
 gitlab-ctl tail                # 查看所有服务的日志
Gitlab服务构成
 nginx:静态web服务器
 gitlab-workhorse: 轻量级的反向代理服务器
 logrotate:日志文件管理工具
 postgresql:数据库
 redis:缓存数据库
 sidekiq:用于在后台执行队列任务(异步执行)。(Ruby)
 unicorn:An HTTP server for Rack applications,GitLab Rails应用是托管在这个服务器上面的。(Ruby Web Server,主要使用Ruby编写)
汉化
1、下载汉化补丁
[root@git ~]# git clone https://gitlab.com/xhang/gitlab.git
2、查看全部分支版本
[root@git ~]# cd gitlab && git branch -a
3、对比版本、生成补丁包
[root@git gitlab]# git diff remotes/origin/10-2-stable remotes/origin/10-2-stable-zh > ../10.2.2-zh.diff
4、停止服务器
[root@git gitlab]# gitlab-ctl stop
5、打补丁
[root@git gitlab]# patch -d /opt/gitlab/embedded/service/gitlab-rails -p1 < ../10.2.2-zh.diff
6、启动服务器和重新配置
 [root@git gitlab]# gitlab-ctl start
 [root@git gitlab]# gitlab-ctl reconfigure
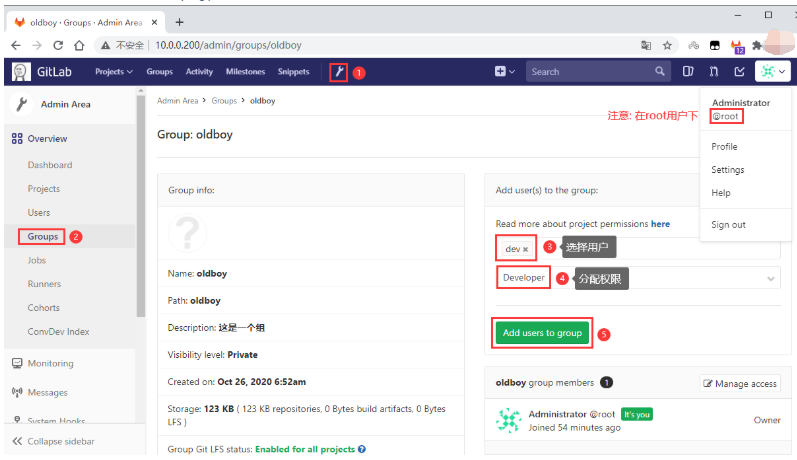
Gitlab使用
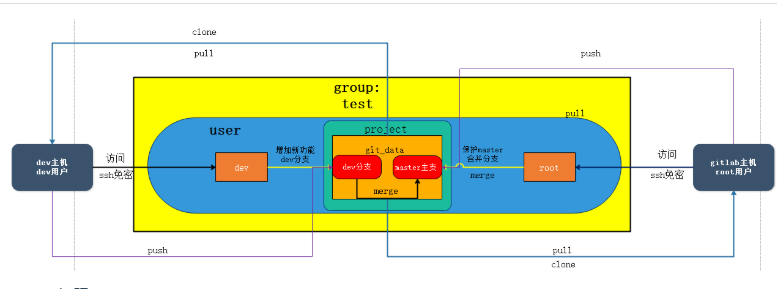
OSS权限控制
给组分配项目管理权限
用户属于组, 拥有组的项目管理权限
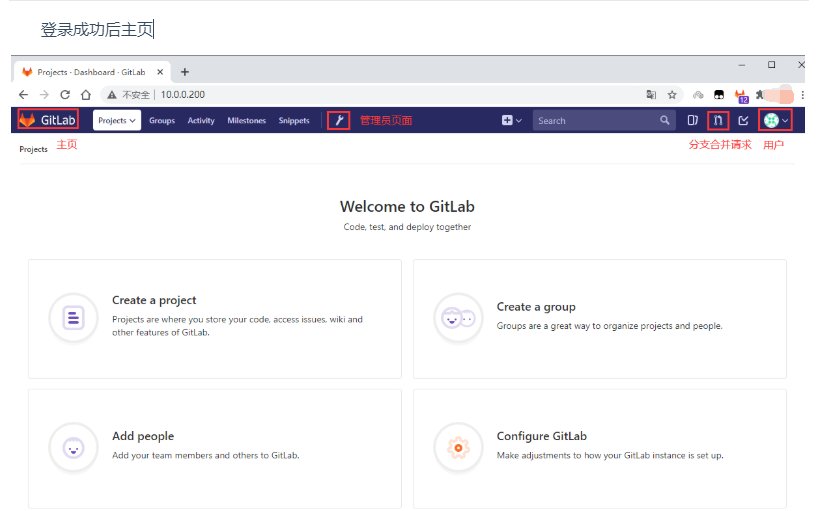
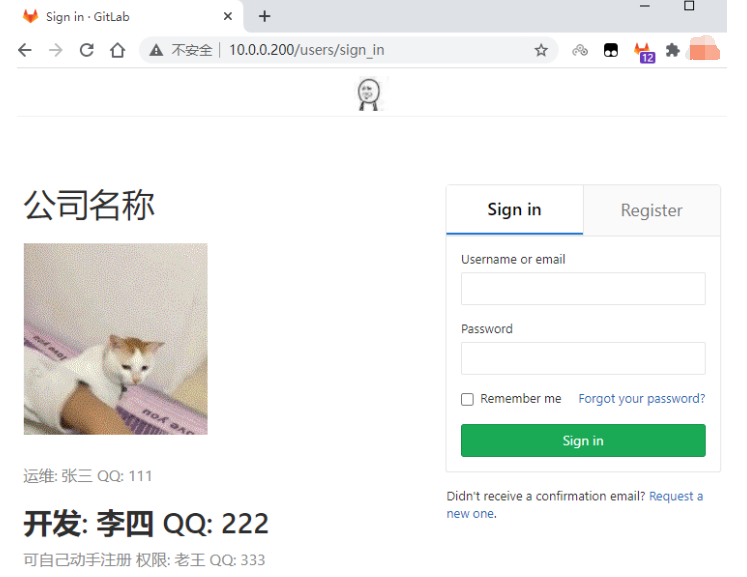
登录成功后主页
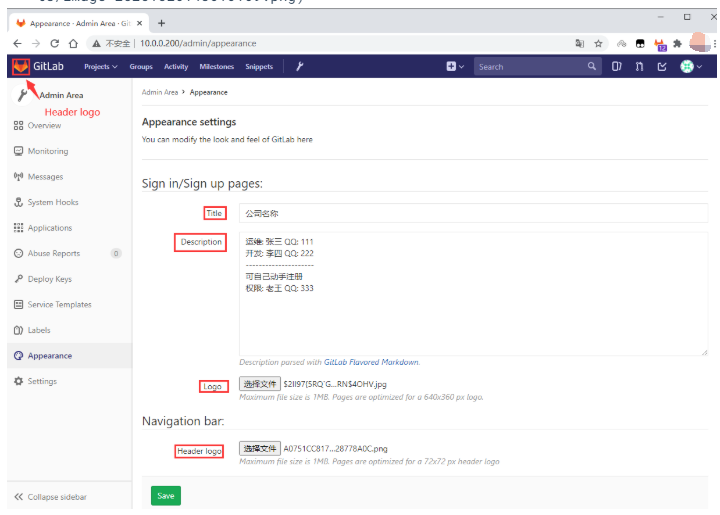
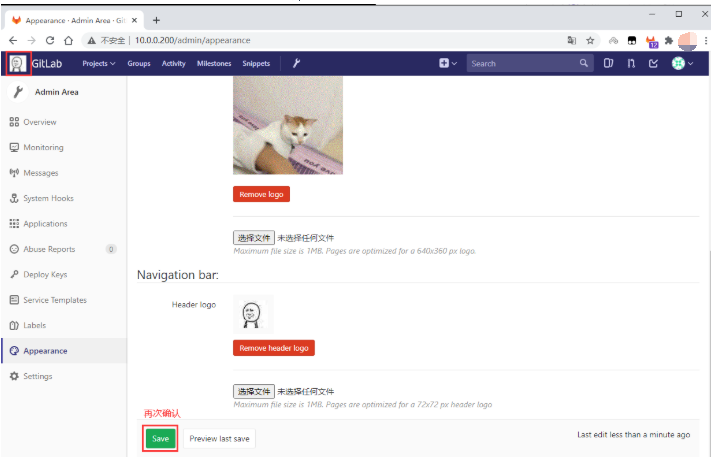
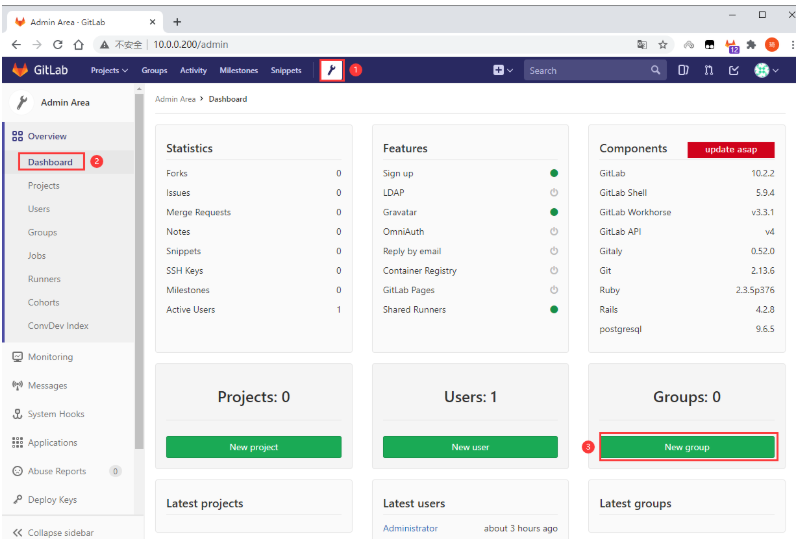
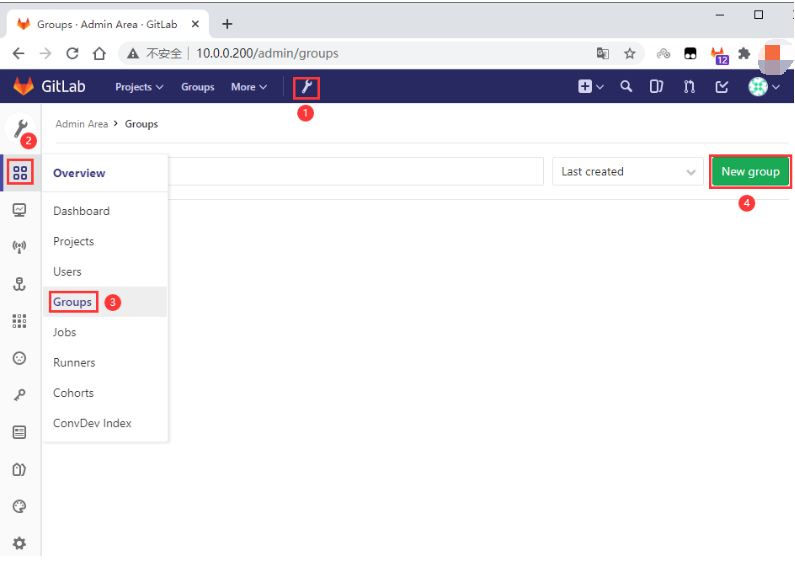
创建组(四个路径)
管理区域-项目-创建组
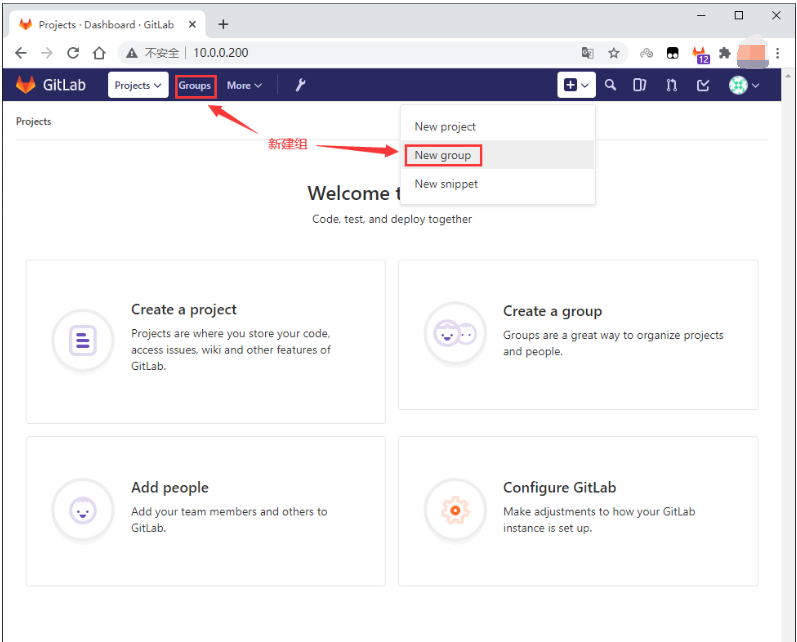
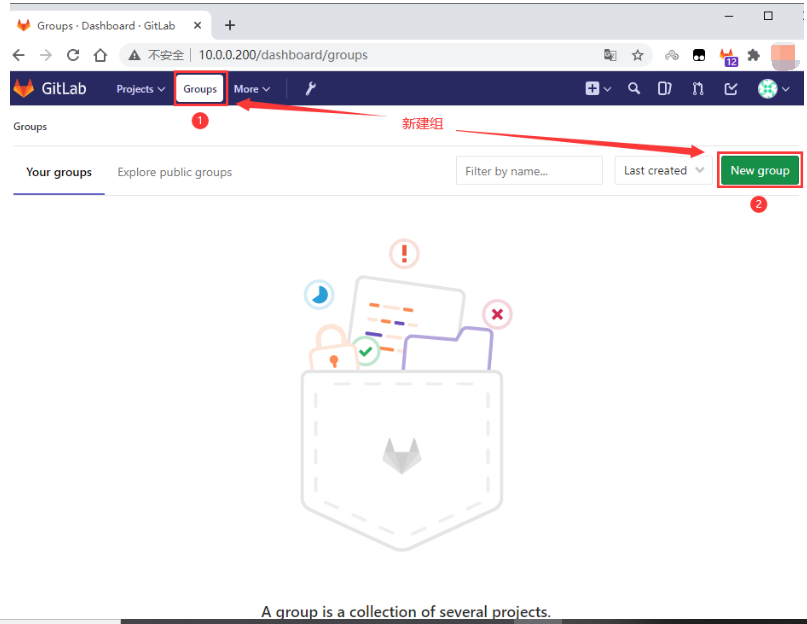
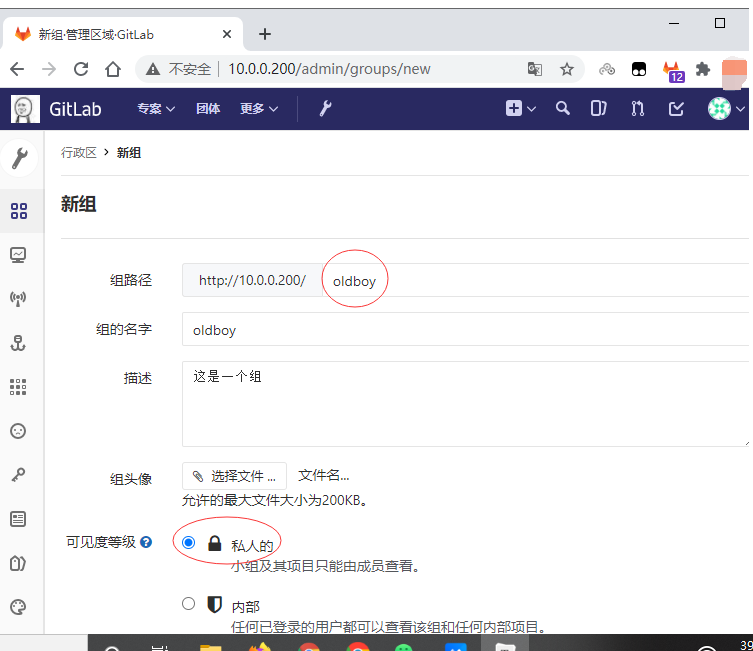
设置组名称、描述、可见度等创建群组
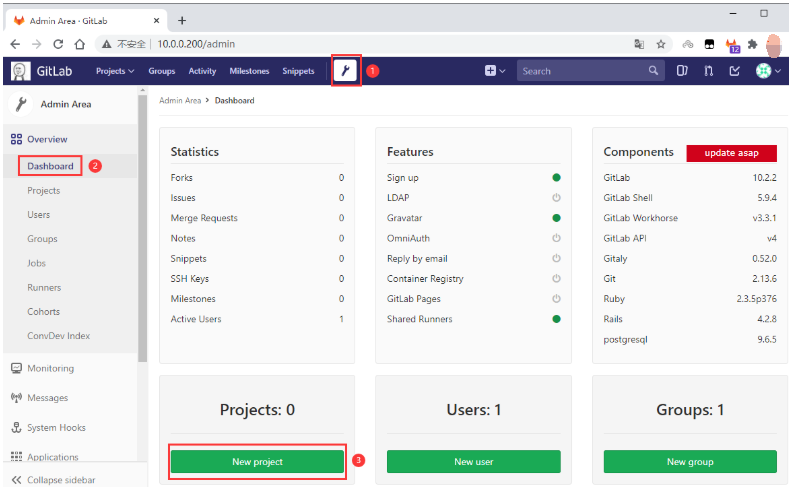
创建项目(仓库)
管理区域-创建项目
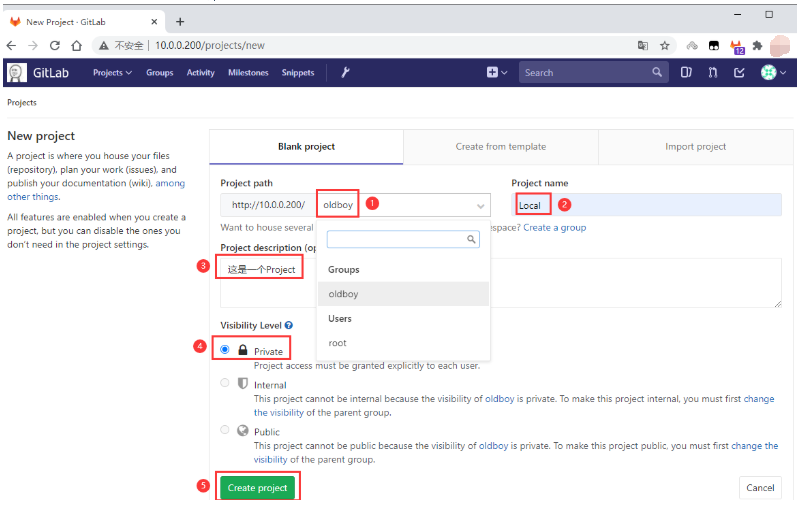
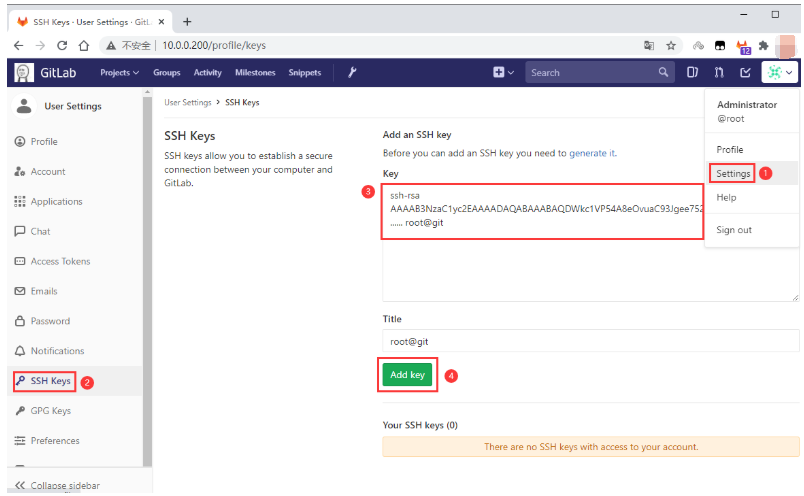
配置SSH免密登录
# 创建密钥对
 ssh-keygen
 cat ~/.ssh/id_rsa.pub
 ssh-rsa AAAAB3NzaC1yc2EAAAADAQABAAABAQDQCww4
JA7khfqhA/v2vlJbA+BVNMiJtfXx2hdE7J9qQbLr62NO
xj5FUjGRZvt4vn6sRcI+YqYKQJR+1MA4uKhYwS1fBm
mnb8bRijs+PhnOEkyCYYhKSbpy8Wy7maoZ7vEo7
iAfhf9VJE4wuhxB2GA
v1tuEzSHHIXbEOLcv2DzDHn9/uJIaWhV6lET3o0I/gSSdd3AtlF5OBAsFQBhiM8tP2YCaF/PZSqG5cAPJ2qGZ594qMQ0
wA58x1e/X8YtGBcRJQG8bXU34Z/m+lCAeQAcpc+Xzr6rKTmrGhh0ALE7tZtp0sr6c8EQtnj1IdflIZzWN8CVfdkgGlaLvQCZ4S48n root@gitlab
将公钥添加到你的gitlab账户中
命令行指令
Git全局设置
 git config --global user.name "Administrator"
 git config --global user.email "admin@example.com"
创建一个新的仓库
 git clone git@10.0.0.200:oldboy/Local.git
 cd Local
 touch README.md
 git add README.md
 git commit -m "add README"
 git push -u origin master
现有资料夹
 cd existing_folder
 git init
 git remote add origin git@10.0.0.200:oldboy/Local.git
 git add .
 git commit -m "Initial commit"
 git push -u origin master
注意: 如果SSH不使用默认22端口时
 cat > ~/.ssh/config <<EOF
 ## gitlab
 Port 12345
 EOF
现有的Git存储库
 cd existing_repo
 git remote rename origin old-origin
 git remote add origin git@10.0.0.200:oldboy/Local.git
 git push -u origin --all
 git push -u origin --tags
创建用户
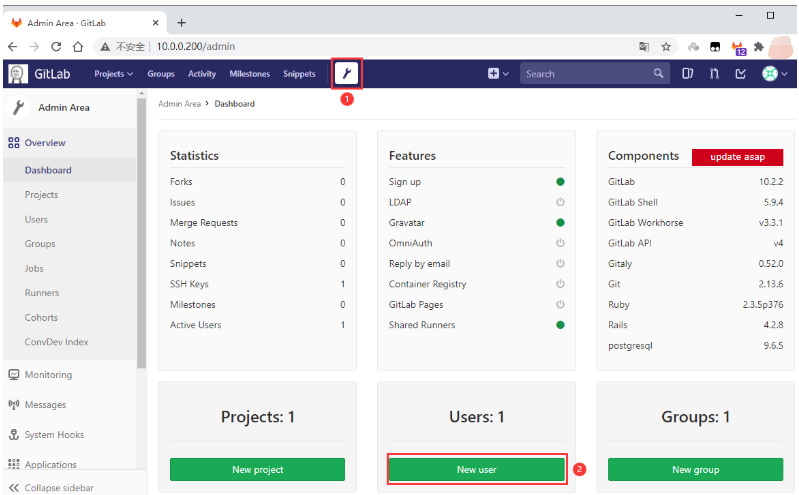
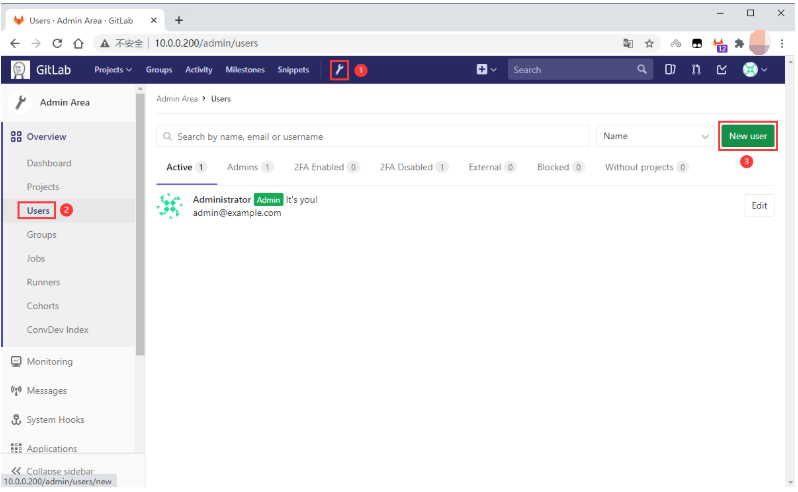
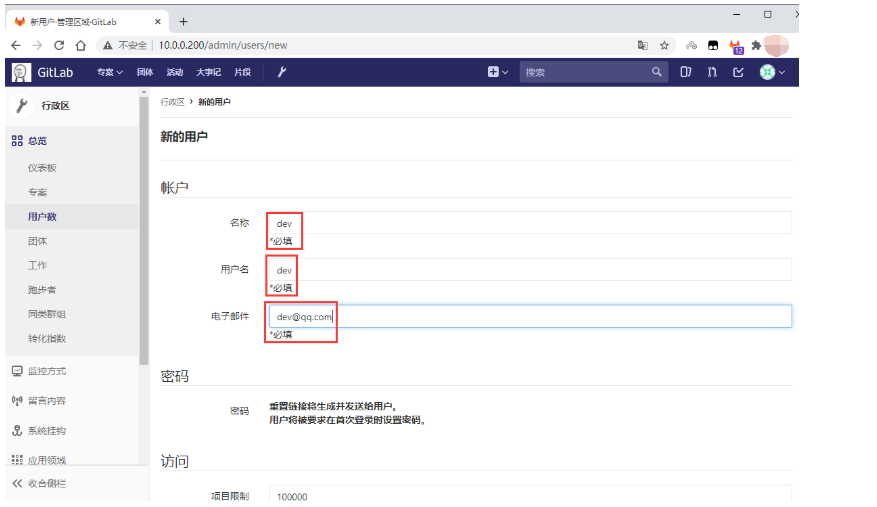
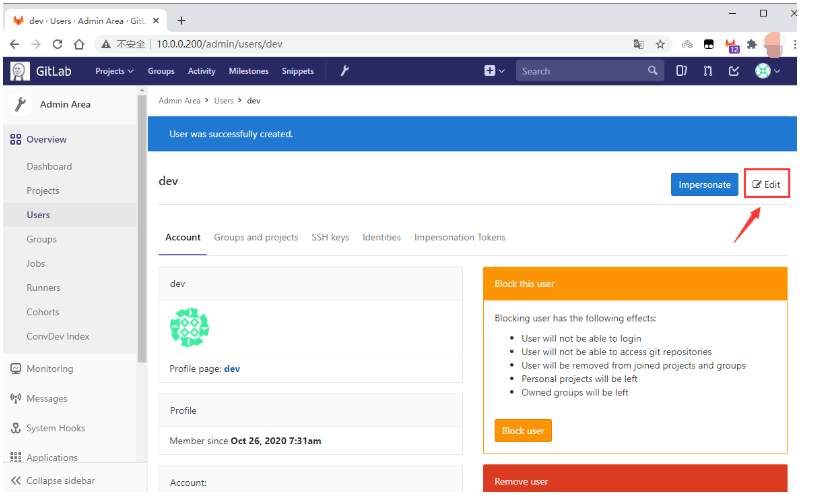
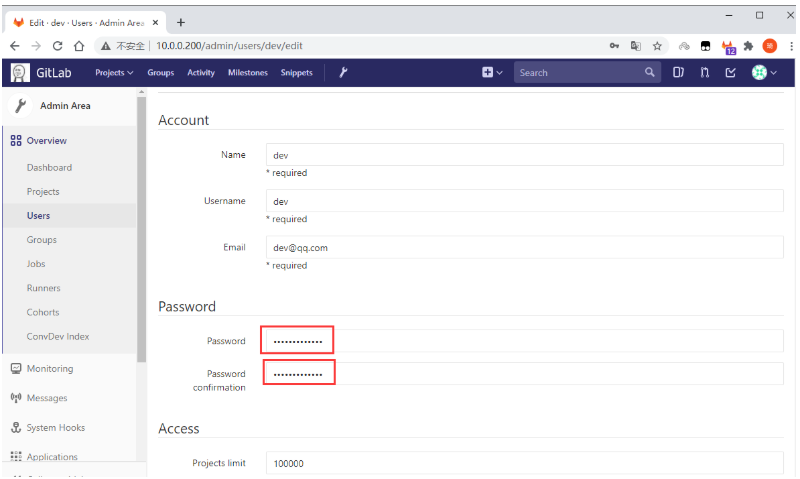
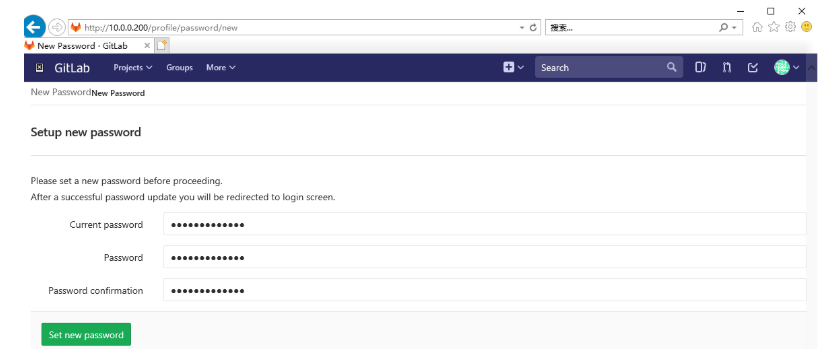
新用户第一次登录需要修改密码
dev用户登陆登录成功后只能看到空的仓库
添加用户入组
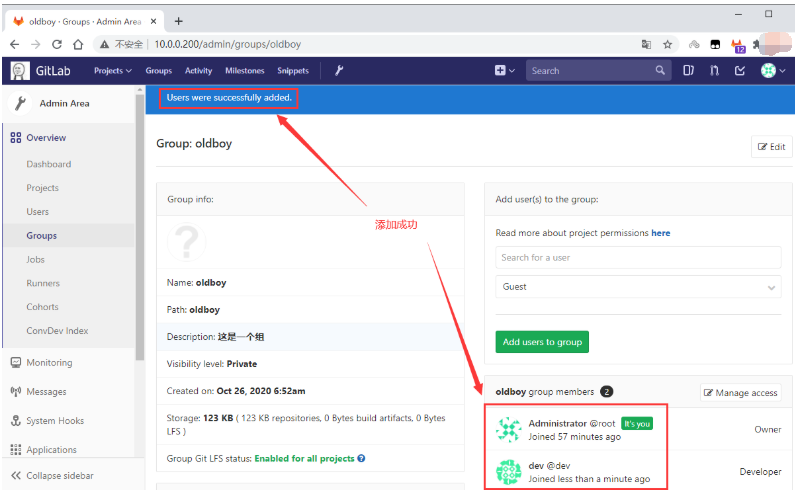
注意: 新用户新主机需要配置SSH免密登录和命令行指令全局配置走一遍, 最后克隆仓库到本地, 进入仓库目录
git checkout -b dev
touch dev
git add .
git commit -m "add dev"
git push -u origin dev
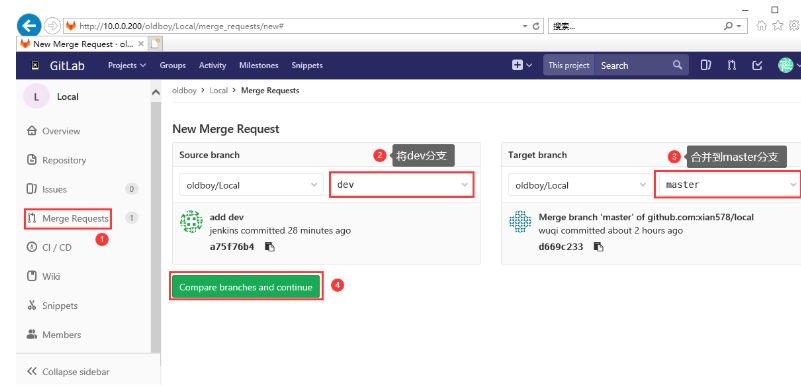
合并dev分支到master主分支
第一次, 进入仓库或者在仓库里刷新仓库页面, 右上角有蓝色的创建合并分支请求链接
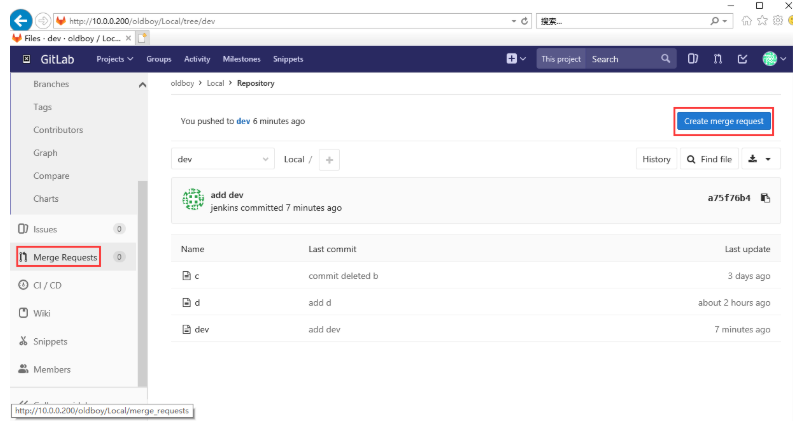
以后. 在左侧边栏的合并分支请求中
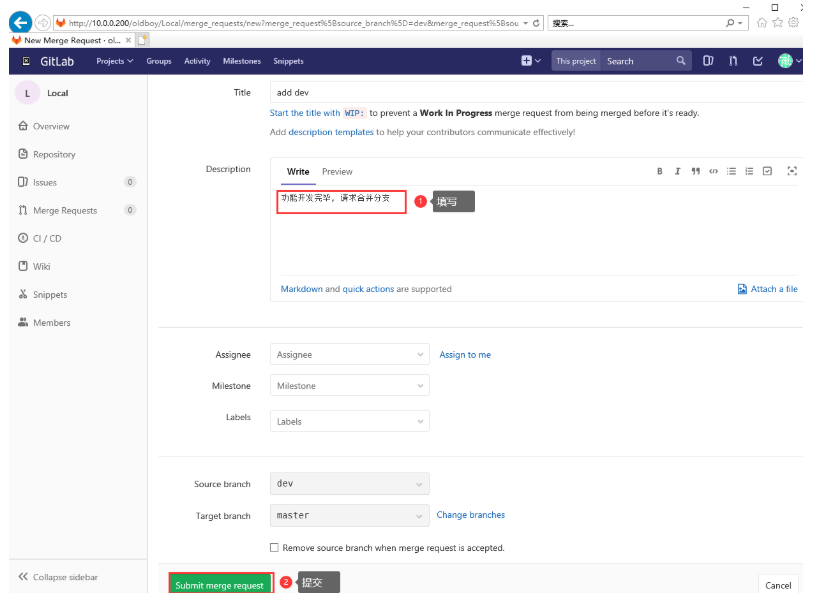
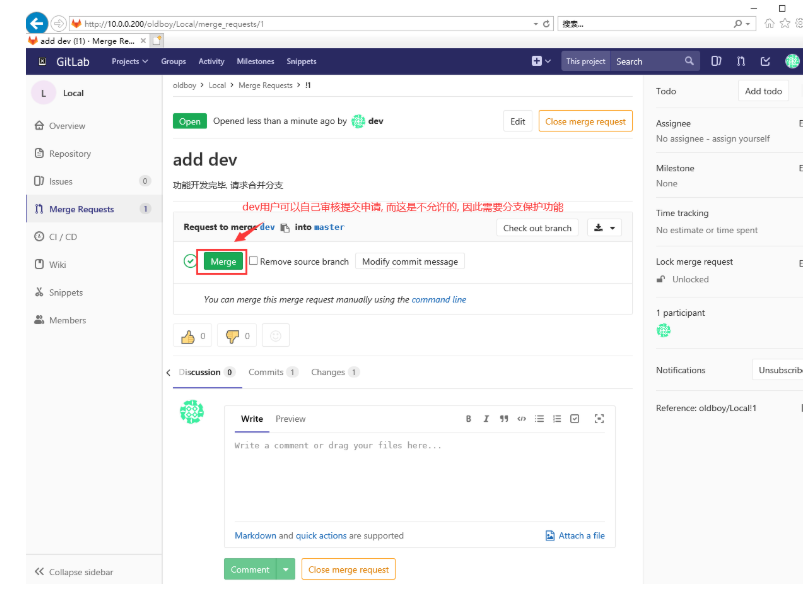
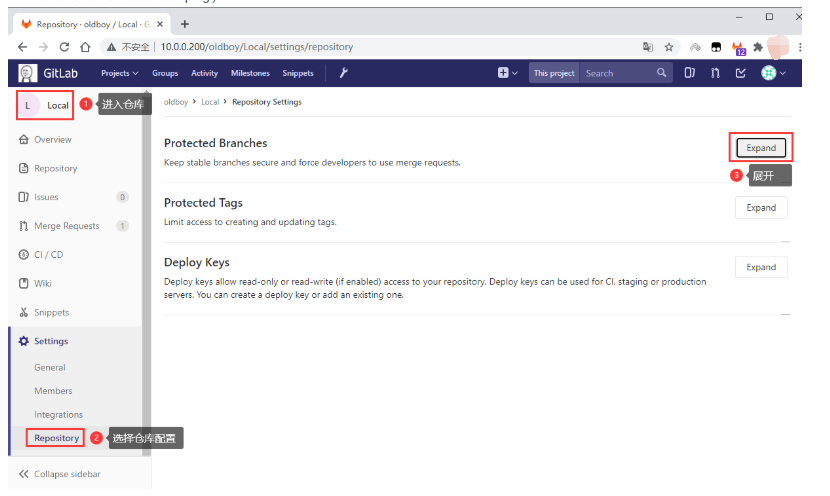
dev用户可以自己审核分支合并请求, 这是不允许的. 因此需要保护分支
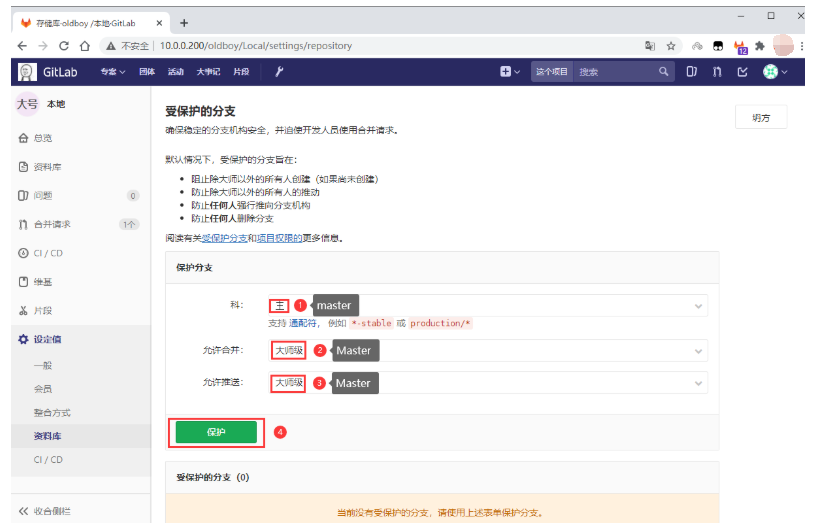
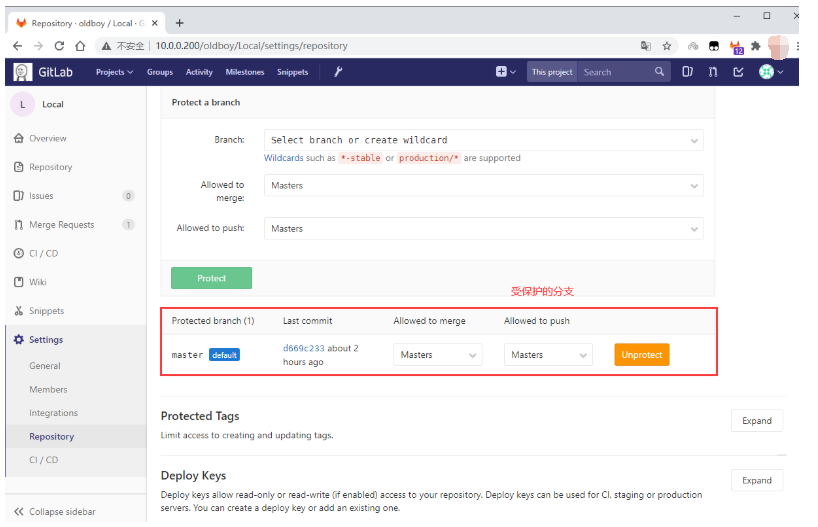
此时合并dev分支再推送到master显示拒绝
 [root@jenkins Local]# git checkout master
 [root@jenkins Local]# git merge dev
 更新 d669c23..a75f76b
 Fast-forward
  dev | 0
  1 file changed, 0 insertions(+), 0 deletions(-)
  create mode 100644 dev
 [root@jenkins Local]# git push -u origin master
 Total 0 (delta 0), reused 0 (delta 0)
 remote: GitLab: You are not allowed to push code to protected branches on this project.
 To git@10.0.0.200:oldboy/Local.git
  ! [remote rejected] master -> master (pre-receive hook declined)
 error: 无法推送一些引用到 'git@10.0.0.200:oldboy/Local.git'
dev用户也不能审核分支合并请求, 只有root用户能审核
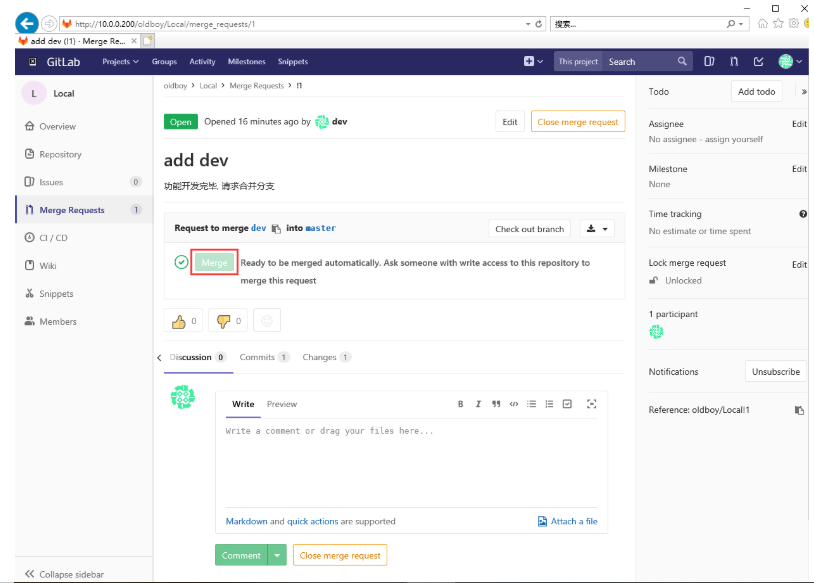
分支保护是针对项目的, 新增项目需要新增分支保护
合并后在gitlab服务端master上没有dev、要先进行pull
[root@git git_data]# git pull
Gitlab备份
对gitlab进行备份将会创建一个包含所有库和附件的归档文件。
对备份的恢复只能恢复到与备份时的gitlab相同的版本。
将gitlab迁移到另一台服务器上的最佳方法就是通过备份和还原。
gitlab提供了一个简单的命令行来备份整个gitlab,并且能灵活的满足需求。
备份文件将保存在配置文件中定义的
backup_path中,文件名为TIMESTAMP_gitlab_backup.tar,
TIMESTAMP为备份时的时间戳。TIMESTAMP的格式为:EPOCH_YYYY_MM_DD_Gitlab-version。如果自定义备份目录需要赋予git权限
配置前提:
 [root@gitlab ~]#cat >> /etc/gitlab/gitlab.rb <<EOF
 gitlab_rails['backup_path'] = '/data/backup/gitlab'
 # 备份保留的时间(以秒为单位,这个是七天默认值)
 gitlab_rails['backup_keep_time'] = 604800
 EOF
 [root@gitlab ~]#mkdir -p /data/backup/gitlab
 [root@gitlab ~]#chown -R git.git /data/backup/gitlab
 [root@gitlab ~]#gitlab-ctl reconfigure
执行:gitlab-rake gitlab:backup:create生成一次备份。
在备份gitlab数据前,停止两个服务,不能全部停止gitlab服务,否则无法实现备份
 [root@gitlab ~]# gitlab-ctl  stop unicorn
 ok: down: unicorn: 1s, normally up
 [root@gitlab ~]# gitlab-ctl stop sidekiq
 ok: down: sidekiq: 0s, normally up
 GitLab备份
     对gitlab进行备份将会创建一个包含所有库和附件的归档文件。对备份的恢复只能恢复到与备份时的gitlab相同的版本。将gitlab迁移到另一台服务器上的最佳方法就是通过备份和还原。
 gitlab提供了一个简单的命令行来备份整个gitlab,并且能灵活的满足需求。
 备份文件将保存在配置文件中定义的backup_path中,文件名为TIMESTAMP_gitlab_backup.tar,TIMESTAMP为备份时的时间戳。TIMESTAMP的格式为:EPOCH_YYYY_MM_DD_Gitlab-version。
 1、手动备份
 执行:gitlab-rake gitlab:backup:create生成一次备份。
 [root@gitlab ~]# gitlab-rake gitlab:backup:create
 Dumping database ...
 Dumping PostgreSQL database gitlabhq_production ... [DONE]
 done
 Dumping repositories ...
  * web-site/frontend ... [DONE]
  * web-site/frontend.wiki ...  [SKIPPED]
  * web-site/backend ... [SKIPPED]
  * web-site/backend.wiki ...  [SKIPPED]
  * devops/accout ... [DONE]
  * devops/accout.wiki ...  [SKIPPED]
  * devops/user ... [DONE]
  * devops/user.wiki ...  [SKIPPED]
  * web-site/accout ... [DONE]
  * web-site/accout.wiki ...  [SKIPPED]
 done
 Dumping uploads ...
 done
 Dumping builds ...
 done
 Dumping artifacts ...
 done
 Dumping pages ...
 done
 Dumping lfs objects ...
 done
 Dumping container registry images ...
 [DISABLED]
 Creating backup archive: 1512811475_2017_12_09_10.2.2_gitlab_backup.tar ... done
 Uploading backup archive to remote storage  ... skipped
 Deleting tmp directories ... done
 done
 done
 done
 done
 done
 done
 done
 Deleting old backups ... skipping
 [root@gitlab ~]# ll /data/gitlab/backups/
 total 272
 -rw------- 1 git git 276480 Dec  9 17:24 1512811475_2017_12_09_10.2.2_gitlab_backup.tar
 2、定时备份
 在定时任务里添加:
[root@gitlab ~]#crontab -e
 0 2 * * * /opt/gitlab/bin/gitlab-rake gitlab:backup:create CRON=1
 环境变量CRON=1的作用是如果没有任何错误发生时, 抑制备份脚本的所有进度输出。
 3、恢复
 只能还原到与备份文件相同的gitlab版本。
 执行恢复操作时,需要gitlab处于运行状态,备份文件位于gitlab_rails['backup_path']。
 [root@gitlab ~]# ll /data/gitlab/backups/
 total 272
 -rw------- 1 git git 276480 Dec  9 17:24 1512811475_2017_12_09_10.2.2_gitlab_backup.tar
停止连接到数据库的进程(也就是停止数据写入服务),但是保持GitLab是运行的。
 [root@gitlab ~]# gitlab-ctl stop unicorn
 [root@gitlab ~]# gitlab-ctl stop sidekiq
 ok: down: sidekiq: 0s, normally up
 确认:
 [root@node2 ~]# gitlab-ctl status
 run: gitaly: (pid 1497) 0s; run: log: (pid 540) 0s
 run: gitlab-monitor: (pid 1507) 0s; run: log: (pid 543) 0s
 run: gitlab-workhorse: (pid 1517) 0s; run: log: (pid 508) 0s
 run: logrotate: (pid 14405) 1564s; run: log: (pid 510) 0s
 run: nginx: (pid 1532) 0s; run: log: (pid 507) 0s
 run: node-exporter: (pid 1538) 0s; run: log: (pid 525) 0s
 run: postgres-exporter: (pid 1543) 0s; run: log: (pid 530) 0s
 run: postgresql: (pid 1551) 0s; run: log: (pid 492) 0s
 run: prometheus: (pid 1559) 0s; run: log: (pid 535) 0s
 run: redis: (pid 1567) 0s; run: log: (pid 491) 0s
 run: redis-exporter: (pid 1572) 0s; run: log: (pid 547) 0s
 down: sidekiq: 121s, normally up; run: log: (pid 500) 0s
 down: unicorn: 133s, normally up; run: log: (pid 502) 0s
接下我们进行恢复,指定时间戳你要从那个备份恢复:
[root@node2 ~]# gitlab-rake gitlab:backup:restore BACKUP=1604003121_2020_10_30_10.2.2 Unpacking backup ... done Before restoring the database, we will remove all existing tables to avoid future upgrade problems. Be aware that if you have custom tables in the GitLab database these tables and all data will be removed. Do you want to continue (yes/no)? 将移除我们自建的表。回答yes Restoring uploads ... done Restoring builds ... done Restoring artifacts ... done Restoring pages ... done Restoring lfs objects ... done This will rebuild an authorized_keys file. You will lose any data stored in authorized_keys file. Do you want to continue (yes/no)? 将移除所有的认证Key。回答yes .... Deleting tmp directories ... done done done done done done done done
完成后重启GitLab服务
 [root@node2 ~]# gitlab-ctl restart
 ok: run: gitaly: (pid 18194) 0s
 ok: run: gitlab-monitor: (pid 18204) 0s
 ok: run: gitlab-workhorse: (pid 18209) 1s
 ok: run: logrotate: (pid 18224) 0s
 ok: run: nginx: (pid 18231) 1s
 ok: run: node-exporter: (pid 18237) 0s
 ok: run: postgres-exporter: (pid 18242) 0s
 ok: run: postgresql: (pid 18314) 0s
 ok: run: prometheus: (pid 18317) 1s
 ok: run: redis: (pid 18326) 0s
 ok: run: redis-exporter: (pid 18330) 0s
 ok: run: sidekiq: (pid 18345) 0s
 ok: run: unicorn: (pid 18354) 0s

