使用腾讯云Kubernetes部署SpringBoot项目
使用流程

创建集群
创建 Serverless 类型的kubernetes集群(更加简单),不需要集群管理费用,但创建容器还是收费的。
创建容器
要确保当前账号有充足的余额

在创建过程中,主要选择镜像,可以从自己的镜像仓库(需要先将自己的SpringBoot项目创建docker镜像并推送到远程仓库),或者 Docker 公共仓库来选择。

通过对应的IP来访问
连接集群
安装 Kubectl 工具
这是 k8s 提供的客户端操作工具
curl -LO https://storage.googleapis.com/kubernetes-release/release/v1.22.5/bin/linux/amd64/kubectl
根据实际需求,将命令行中的 “v1.22.5” 替换成业务所需的 Kubectl 版本。客户端的 Kubectl 与服务端的 Kubernetes 的最高版本需保持一致,可以在基本信息的“集群信息”模块里查看 Kubernetes 版本。
chmod +x ./kubectl
sudo mv ./kubectl /usr/local/bin/kubectl
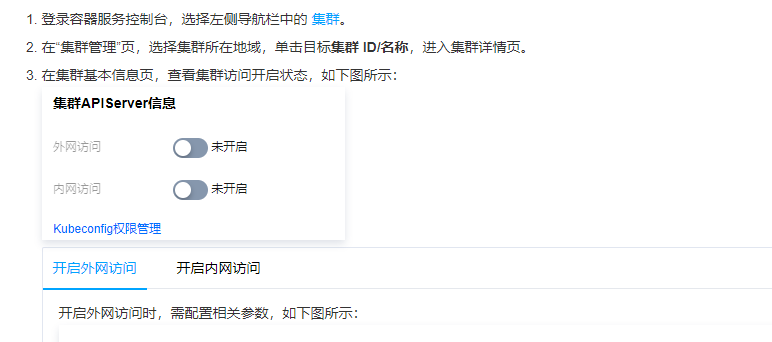
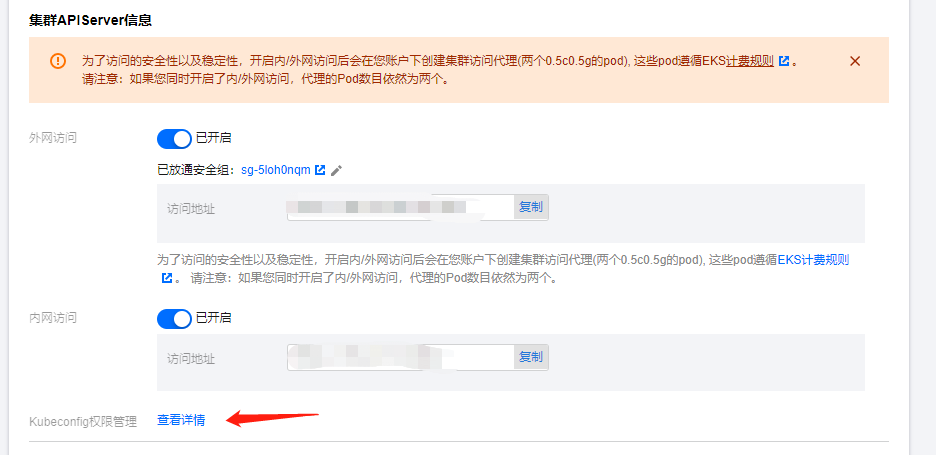
开启集群访问

获取 KubeConfig

配置 KubeConfig 并访问 Kubernetes 集群
如果 ~/.kube/config 文件内容为空,可直接复制已获取的 Kubeconfig 访问凭证内容并粘贴入 ~/.kube/config 中。若客户端无 ~/.kube/config 文件,可直接创建。
完成 Kubeconfig 配置后,依次执行以下命令查看并切换 context 以访问本集群。
kubectl config get-contexts
kubectl config use-context xxxx
kubectl get node
如果无法连接请查看是否已经开启公网访问或内网访问入口,并确保访问客户端在指定的网络环境内。
部署Springboot项目
使用springboot项目镜像创建Deployment,容器启动会报错
User "system:serviceaccount:pro:default" cannot get resource
应该是用户权限的问题,但具体解决方法未知。
解决上面用户权限的问题
securityContext: {} # 原有的
serviceAccount: config-reader
serviceAccountName: config-reader
在创建的Deployment的yaml文件中添加此配置,表示使用此serviceAccount,和springboot项目中的username一致。
apiVersion: rbac.authorization.k8s.io/v1
kind: ClusterRole
metadata:
  creationTimestamp: "2023-01-06T06:38:11Z"
  labels:
    cloud.tencent.com/tke-rbac-generated: "true"
  managedFields:
  - apiVersion: rbac.authorization.k8s.io/v1
    fieldsType: FieldsV1
    fieldsV1:
      f:metadata:
        f:labels:
          .: {}
          f:cloud.tencent.com/tke-rbac-generated: {}
      f:rules: {}
    manager: dashboard
    operation: Update
    time: "2023-01-06T06:38:11Z"
  name: config-reader
  selfLink: /apis/rbac.authorization.k8s.io/v1/clusterroles/config-reader
  uid: 76e0ba7c-4b1b-4f5b-9a74-219d2e8c1eb2
rules:
- apiGroups:
  - '*'
  resources:
  - 'configmaps'
  verbs:
  - '*'
创建一个集群角色config-reader,拥有configmaps的所有权限
apiVersion: rbac.authorization.k8s.io/v1
kind: ClusterRoleBinding
metadata:
  creationTimestamp: "2023-01-06T06:29:45Z"
  managedFields:
  - apiVersion: rbac.authorization.k8s.io/v1
    fieldsType: FieldsV1
    fieldsV1:
      f:roleRef: {}
      f:subjects: {}
    manager: nightsWatch
    operation: Update
    time: "2023-01-06T06:29:45Z"
  name: config-reader
  selfLink: /apis/rbac.authorization.k8s.io/v1/clusterrolebindings/config-reader
  uid: fd03faac-254b-4228-94b8-1bae50627671
roleRef:
  apiGroup: rbac.authorization.k8s.io
  kind: ClusterRole
  name: config-reader
subjects:
- kind: ServiceAccount
  name: config-reader
  namespace: pro
创建用户和角色的关联关系,将ServiceAccount和ClusterRole关联。这样config-reader这个用户就拥有了configmaps的权限。

此时通过Service提供的对外IP就可以访问了 (http://xxx:8080/k8s2/test)。
项目关系
- spring-k8s01: 供客户端调用,内部使用feign框架来调用spring-k8s02的接口
- spring-k8s02: 供spring-k8s01调用
调用方法:服务名:port,k8s会自动获取到对应的容器(内部通过 ingress 做负载均衡)。
项目配置
maven依赖
<dependency>
    <groupId>org.springframework.cloud</groupId>
    <artifactId>spring-cloud-starter-kubernetes-all</artifactId>
    <version>1.1.7.RELEASE</version>
</dependency>
spring配置
spring:
  application:
    name: k8s
  profiles:
    active: pro
  main:
    allow-bean-definition-overriding: true
  cloud:
    kubernetes:
      discovery:
        all-namespaces: false
        service-name: ${spring.application.name}
      config:
        enabled: true
        namespace: ${spring.profiles.active}
        sources:
          - name: k8s-config
      reload:
        enabled: true
        monitoring-config-maps: true
        monitoring-secrets: true
        strategy: RESTART_CONTEXT
        mode: EVENT
      client:
        namespace: ${spring.profiles.active}
        username: config-reader
    loadbalancer:
      ribbon:
        enabled: true
主要是 username,要和腾讯云k8s 中的账号对应上。
总结
耗费了大量时间(2天左右)和大量钱财(几十块钱),终于将springboot项目在k8s环境运行起来了,😃😃😃。


 浙公网安备 33010602011771号