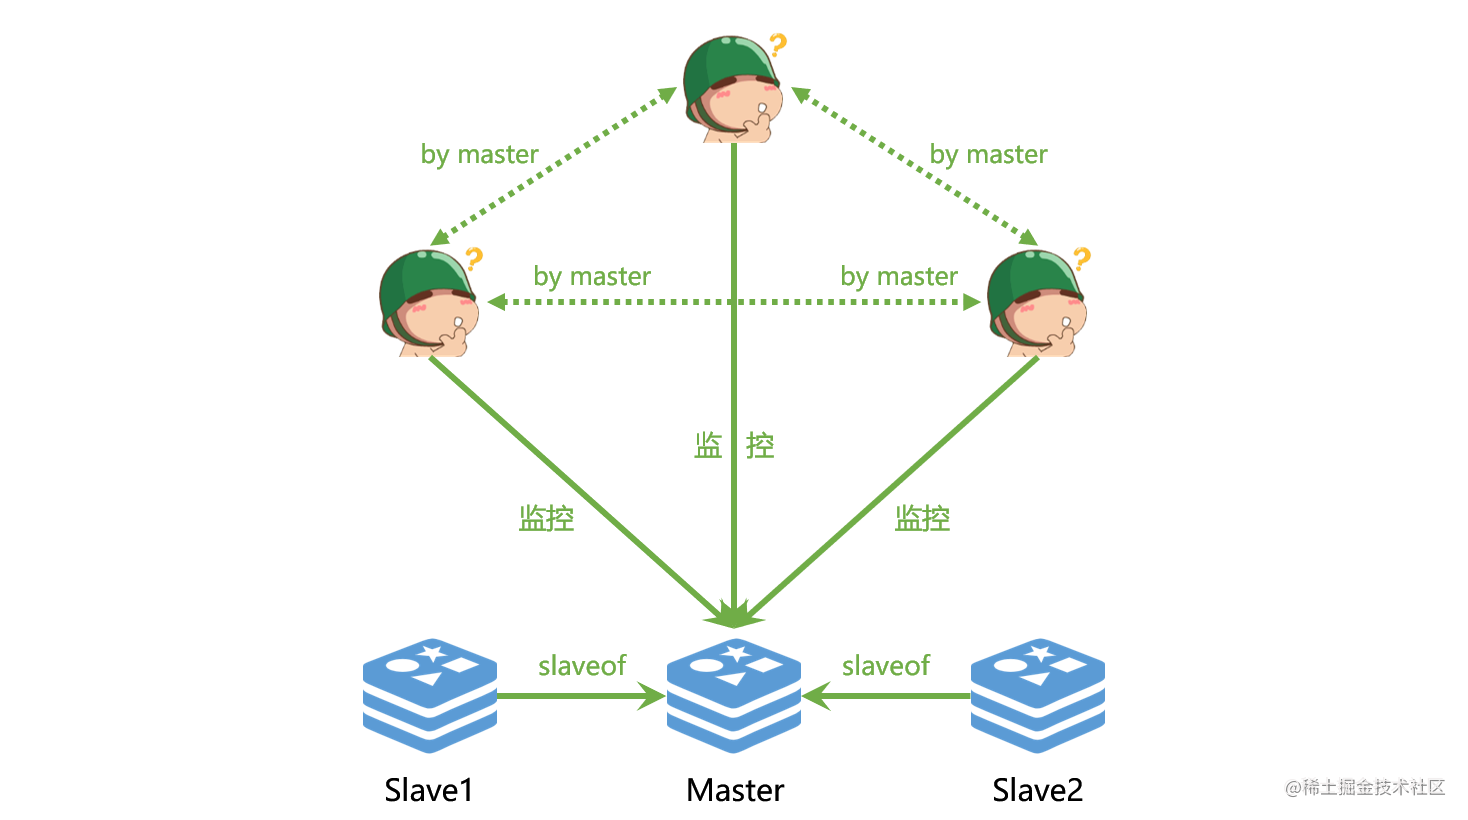
Redis搭建哨兵模式架构
使用Docker安装
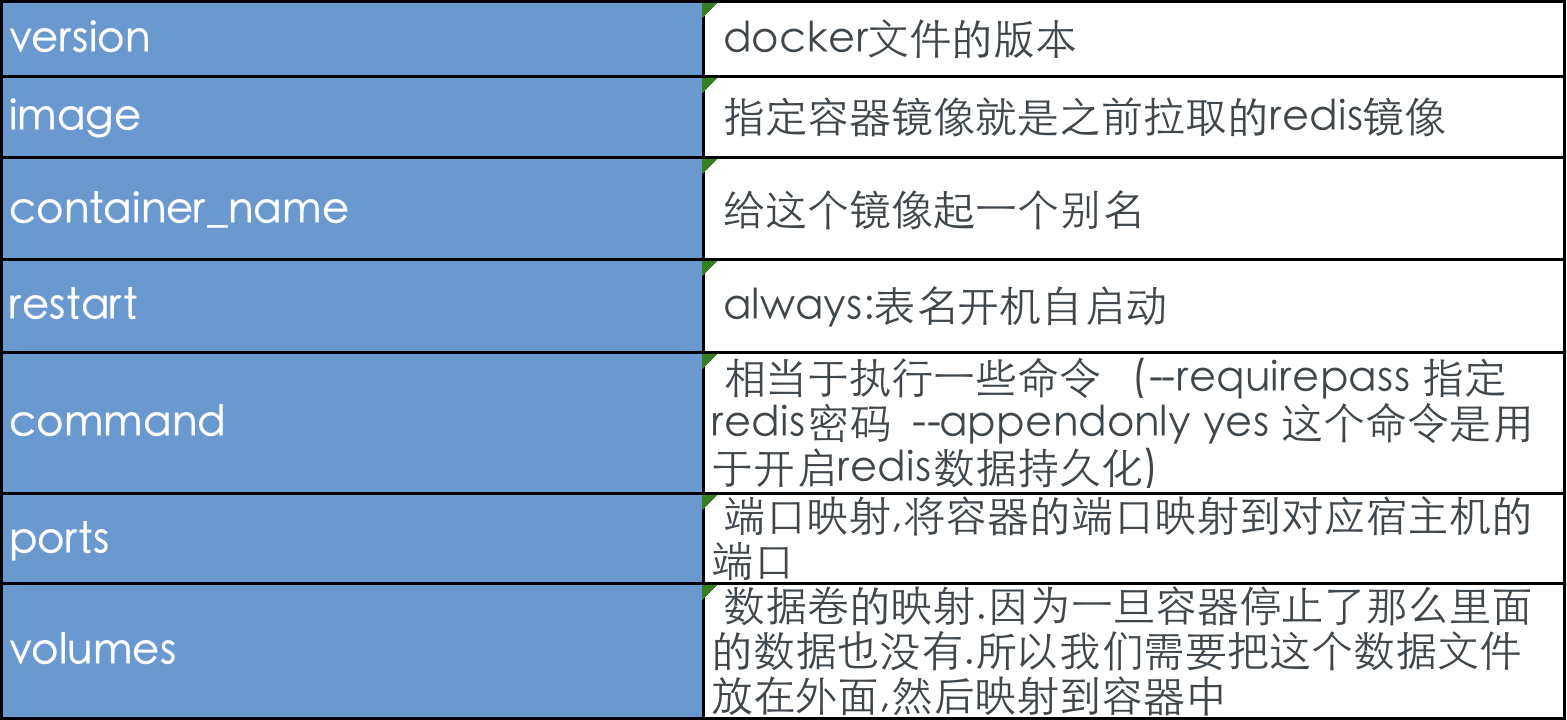
因为配置太复杂,所以这里我们使用 docker compose 来一键部署
不使用内部网络搭建
编写redis主从docker-compose.yml
复制version: '3'
services:
  master:
    image: redis
    container_name: redis-master
    restart: always
    command: redis-server --requirepass test123  --appendonly yes
    ports:
      - 6390:6379
    volumes:
      - /root/test_redis/master_slave/data1:/data
  slave1:
    image: redis
    container_name: redis-slave1
    restart: always
    command: redis-server --slaveof ${your_ip} 6390  --requirepass test123 --masterauth test123  --appendonly yes
    ports:
      - 6391:6379
    volumes:
      - /root/test_redis/master_slave/data2:/data
  slave2:
    image: redis
    container_name: redis-slave2
    restart: always
    command: redis-server --slaveof ${your_ip} 6390  --requirepass test123 --masterauth test123  --appendonly yes
    ports:
      - 6392:6379
    volumes:
      - /root/test_redis/master_slave/data3:/data
配置主机密码为 test123 并开启AOF,端口号为6390

启动Redis主从
复制docker-compose up -d
编写哨兵docker-compose.yml
复制version: '3'
services:
  sentinel1:
    image: redis
    container_name: redis-sentinel1
    restart: always
    ports:
      - 26379:26379
    command: redis-sentinel /usr/local/etc/redis/sentinel.conf
    volumes:
      - /root/test_redis/sentinel/sentinel1.conf:/usr/local/etc/redis/sentinel.conf
  sentinel2:
    image: redis
    container_name: redis-sentinel2
    restart: always
    ports:
    - 26380:26379
    command: redis-sentinel /usr/local/etc/redis/sentinel.conf
    volumes:
      - /root/test_redis/sentinel/sentinel2.conf:/usr/local/etc/redis/sentinel.conf
  sentinel3:
    image: redis
    container_name: redis-sentinel3
    ports:
      - 26381:26379
    command: redis-sentinel /usr/local/etc/redis/sentinel.conf
    volumes:
      - /root/test_redis/sentinel/sentinel3.conf:/usr/local/etc/redis/sentinel.conf
注意,两个docker-compose.yml文件必须位于不同的目录下,也要打开防火墙的端口 26379,26380,26381。
编写哨兵sentinel.conf
复制# 自定义集群名,其中 master_host 为 redis-master 的 ip,6379 为 redis-master 的端口,2 为最小投票数(因为有 3 台 Sentinel 所以可以设置成 2)
port 26379
dir /tmp
sentinel monitor mymaster ${master_host} 6390 2
sentinel down-after-milliseconds mymaster 30000
sentinel parallel-syncs mymaster 1
sentinel auth-pass mymaster test123
sentinel failover-timeout mymaster 180000
sentinel deny-scripts-reconfig yes
将上述文件拷贝3份分别命名为sentinel1.conf、sentinel2.conf、sentinel3.conf,与docker-compose.yml中的配置文件对应。
启动哨兵
复制docker-compose up -d
查看容器,可以看到哨兵和主从redis都起来了

关掉master节点
复制docker stop redis-master
出现的问题
master节点停掉之后,哨兵并没有将另外的slave节点提升为master,结合网上资料,可能是因为没有使用同一个网络,所以哨兵和master/slave节点不能进行通信。
使用内部网络搭建

配置docker-compose.yml文件
复制version: "3"

networks:
  redis-replication:
    driver: bridge
    ipam:
      config:
        - subnet: 172.25.0.0/24

services:
  master:
    image: redis
    container_name: redis-master
    ports:
      - "6380:6379"
    volumes:
      - "/root/test_redis/sentinel_with_network/redis1.conf:/etc/redis.conf"
      - "/root/test_redis/sentinel_with_network/data1:/data"
    command: ["redis-server", "/etc/redis.conf"]
    restart: always
    networks:
      redis-replication:
        ipv4_address: 172.25.0.101

  slave1:
    image: redis
    container_name: redis-slave1
    ports:
      - "6381:6379"
    volumes:
      - "/root/test_redis/sentinel_with_network/redis2.conf:/etc/redis.conf"
      - "/root/test_redis/sentinel_with_network/data2:/data"
    command: ["redis-server", "/etc/redis.conf"]
    restart: always
    networks:
      redis-replication:
        ipv4_address: 172.25.0.102

  slave2:
    image: redis
    container_name: redis-slave2
    ports:
      - "6382:6379"
    volumes:
      - "/root/test_redis/sentinel_with_network/redis3.conf:/etc/redis.conf"
      - "/root/test_redis/sentinel_with_network/data3:/data"
    command: ["redis-server", "/etc/redis.conf"]
    restart: always
    networks:
      redis-replication:
        ipv4_address: 172.25.0.103

  sentinel1:
    image: redis
    container_name: redis-sentinel1
    ports:
      - "26380:26379"
    volumes:
      - "/root/test_redis/sentinel_with_network/sentinel1.conf:/etc/sentinel.conf"
    command: ["/bin/bash", "-c", "cp /etc/sentinel.conf /sentinel.conf && redis-sentinel /sentinel.conf"]
    restart: always
    networks:
      redis-replication:
        ipv4_address: 172.25.0.201

  sentinel2:
    image: redis
    container_name: redis-sentinel2
    ports:
      - "26381:26379"
    volumes:
      - "/root/test_redis/sentinel_with_network/sentinel2.conf:/etc/sentinel.conf"
    command: ["/bin/bash", "-c", "cp /etc/sentinel.conf /sentinel.conf && redis-sentinel /sentinel.conf"]
    restart: always
    networks:
      redis-replication:
        ipv4_address: 172.25.0.202

  sentinel3:
    image: redis
    container_name: redis-sentinel3
    ports:
      - "26382:26379"
    volumes:
      - "/root/test_redis/sentinel_with_network/sentinel3.conf:/etc/sentinel.conf"
    command: ["/bin/bash", "-c", "cp /etc/sentinel.conf /sentinel.conf && redis-sentinel /sentinel.conf"]
    restart: always
    networks:
      redis-replication:
        ipv4_address: 172.25.0.203
配置 redis.conf 文件
- Master:
复制port 6379
pidfile /var/run/redis_6379.pid
protected-mode no
timeout 0
tcp-keepalive 300
loglevel notice
requirepass szz123
masterauth szz123
################################# REPLICATION #################################
slave-serve-stale-data yes
slave-read-only yes
repl-diskless-sync no
repl-diskless-sync-delay 5
repl-disable-tcp-nodelay no

##################################### RDB #####################################
dbfilename dump.rdb
save 900 1
save 300 10
save 60 10000
stop-writes-on-bgsave-error yes
rdbcompression yes
rdbchecksum yes
dir ./

##################################### AOF #####################################
appendonly yes
appendfilename "appendonly.aof"
appendfsync everysec
no-appendfsync-on-rewrite no
aof-load-truncated yes
aof-use-rdb-preamble no
由于在切换master的时候,原本的master可能变成slave,故也需要在原本的master上配置masterauth
- Slave1:
在 REPLICATION 中添加 slaveof 设置即可:
复制slaveof 172.25.0.101 6379
- Slave2:
复制slaveof 172.25.0.101 6379
redis1.conf,redis2.conf,redis3.conf
配置 sentinel.conf 文件
三个哨兵文件夹都配置一份
复制# 所有哨兵端口都一致,因为使用 Docker 桥接网络映射
port 26379

# 哨兵设置,所有哨兵皆一致,都指向 Master
sentinel monitor mymaster 172.25.0.101 6379 2
sentinel auth-pass mymaster test123
sentinel parallel-syncs mymaster 1
sentinel down-after-milliseconds mymaster 30000
sentinel failover-timeout mymaster 180000

bind 0.0.0.0
protected-mode no
daemonize no
pidfile /var/run/redis-sentinel.pid
logfile ""
dir /tmp
sentinel1.conf,sentinel2.conf,sentinel3.conf 内容都一样
启动服务
复制docker-compose up -d
查看主从配置是否正常
Master 的输出:

查看各哨兵是否正常
Sentinel1:

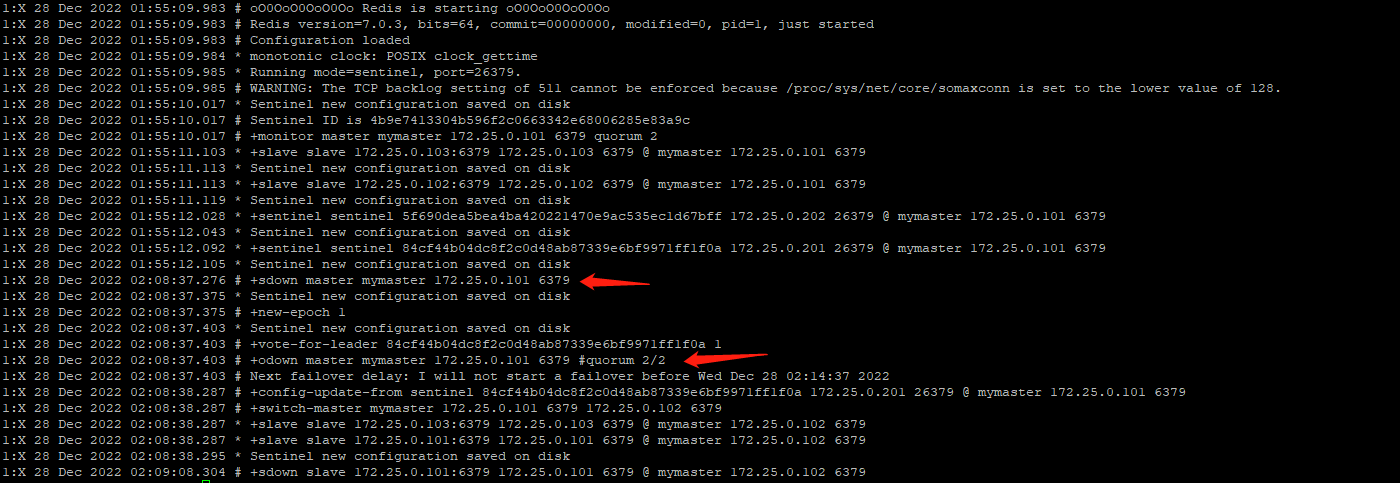
可以看到 +monitor 配置、两次 +sentinel 记录和两次 +slave 记录,且各连接的 ip 和 port 信息都正确,此哨兵正常运行。Sentinel2 和 Sentinel3 也是同样的输出。
验证哨兵
Master宕机
主动停止 Master 容器,等待配置的失活判定时间过后,看哨兵是否识别并选举新的 Master:
复制docker stop redis-master
此时 Sentinel1 输出

- 哨兵 sdown 主观判断 Master 失活,接着所有哨兵 odown 客观判断 Master 失活。此时 +new-epoch 1 进入第一轮选举。
- 接着 +selected-slave slave 172.25.0.102:6379 选举出 102,即 Slave2 作为新的 Master,再 +promoted-slave 推举 Slave2 为新的 Master。
- 最终依旧会去看 101 是否回来了,+sdown slave 172.25.0.101:6379 172.25.0.101 6379 @ mymaster 172.25.0.102 6379 发现 101 还没上线。
登录 slave2 查看
复制info replication
结果可以看到确实已经变成了master,且有一个slave
原 Master 重新上线
查看哨兵反应:

发现 -sdown slave 172.25.0.101:6379,即把 101 Slave(原 Master)的 down 状态取消掉。
再次查看 slave2
复制info replication
已经有了两个slave,至此,关于哨兵模式的配置终于搞定了。
参考
【Redis】docker compose 部署哨兵集群模式-重要
5分钟实现用docker搭建Redis集群模式和哨兵模式
使用Docker-Compose搭建高可用redis哨兵集群-主要是桥接网络
Docker Compose-菜鸟教程


【推荐】国内首个AI IDE,深度理解中文开发场景,立即下载体验Trae
【推荐】编程新体验,更懂你的AI,立即体验豆包MarsCode编程助手
【推荐】抖音旗下AI助手豆包,你的智能百科全书,全免费不限次数
【推荐】轻量又高性能的 SSH 工具 IShell:AI 加持,快人一步
· 震惊!C++程序真的从main开始吗?99%的程序员都答错了
· 【硬核科普】Trae如何「偷看」你的代码?零基础破解AI编程运行原理
· 单元测试从入门到精通
· 上周热点回顾(3.3-3.9)
· winform 绘制太阳,地球,月球 运作规律