SpringBoot学习专题
SpringBoot
一、简介
Java企业级应用->J2EE->spring->springboot过程;
Springboot核心思想:约定大于配置
SpringBoot的优点:
- 为所有Spring开发者更快的入门
- 开箱即用,提供各种默认配置来简化项目配置
- 内嵌式容器简化Web项目
- 没有冗余代码生成和XML配置的要求
二、第一个SpringBoot程序
官方:提供了体格快速生成的网站!IDEA集成了这个网站!
- 可以在官方直接下载后,导入idea开发!
- 直接使用idea创建一个springboot项目(一般开发直接在IDEA中创建)
1.新建一个SpringInitializr项目
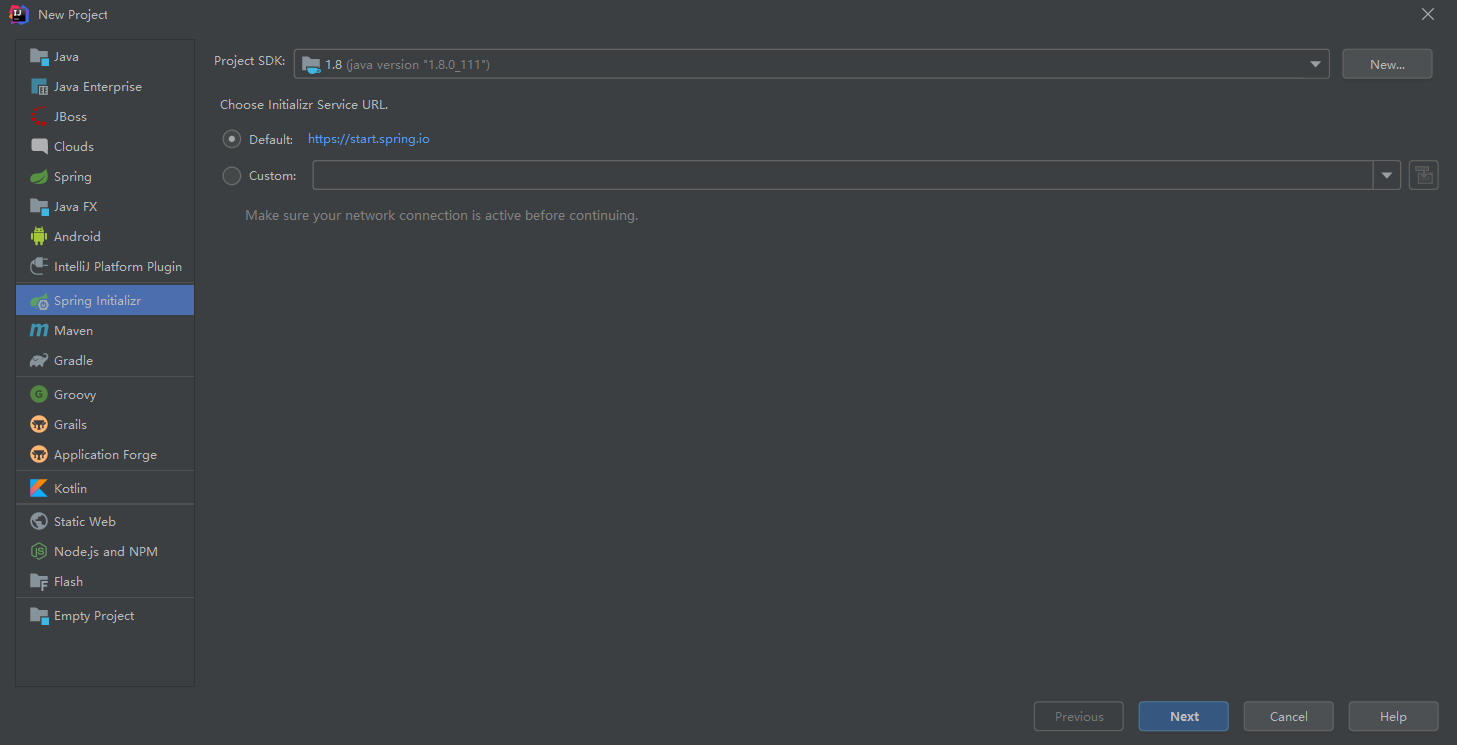
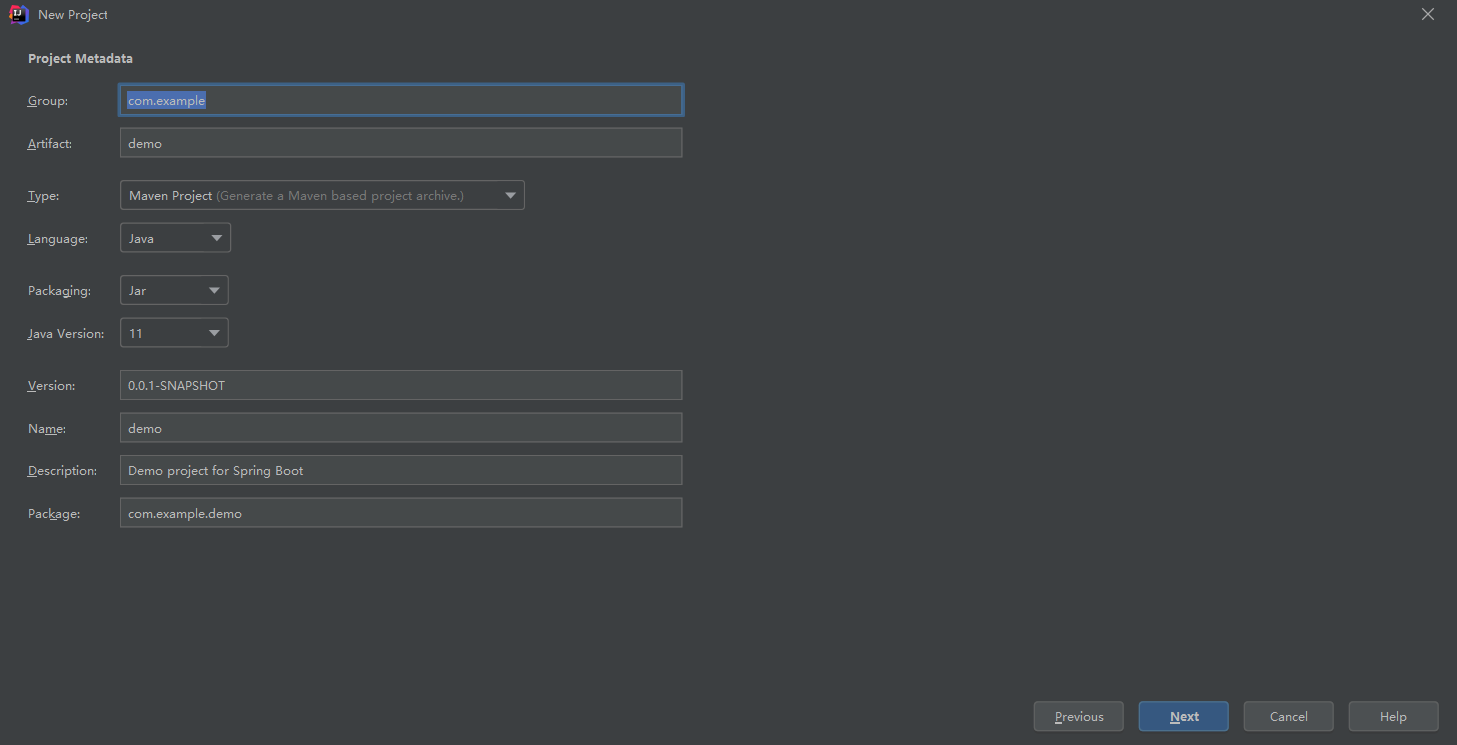
2.选择和修改项目demo的名字和版本等相关信息
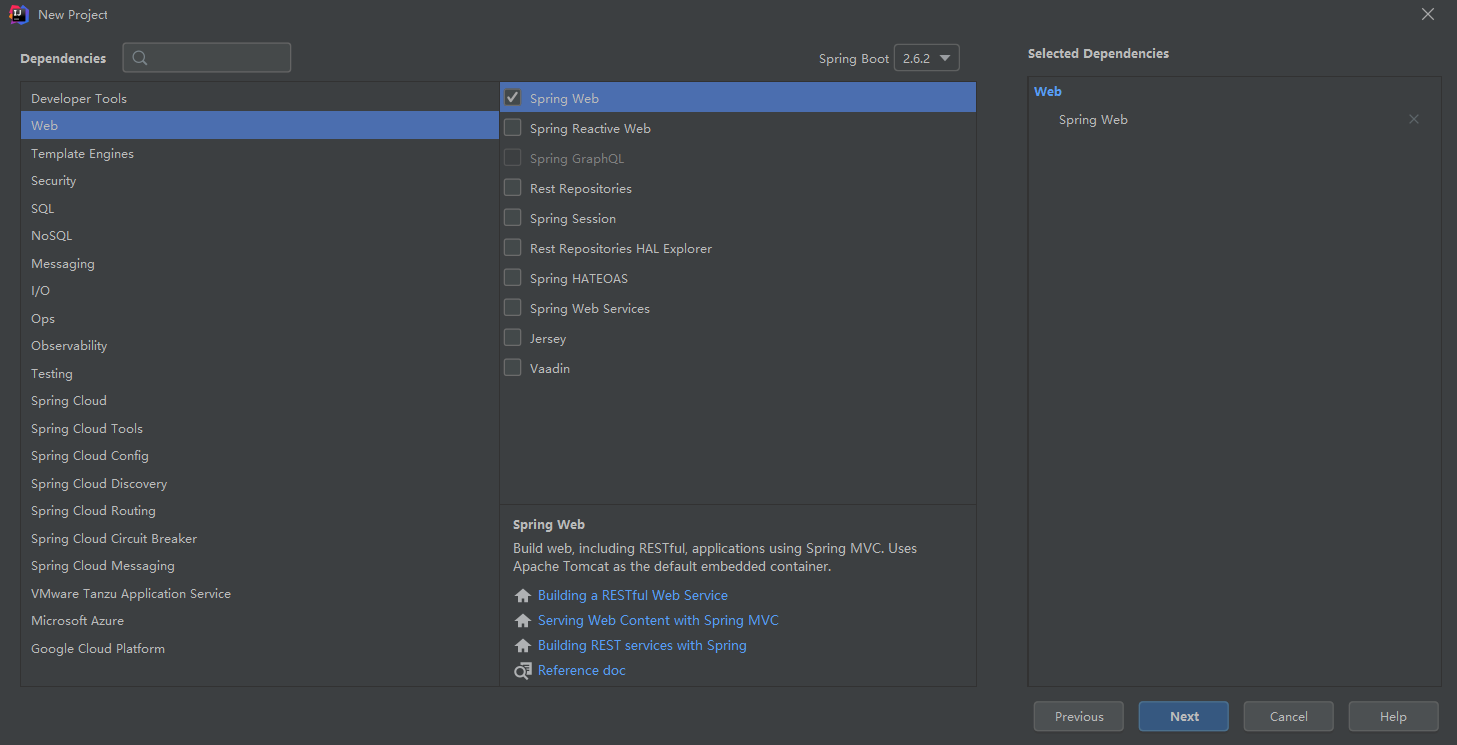
3.选择SpringWeb项目类型
4.项目初始化完成之后,在项目同级目录下创建Controller
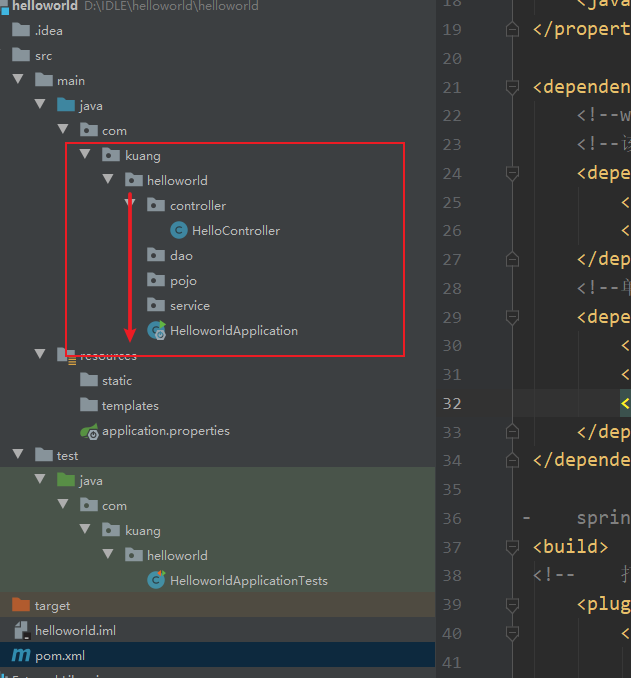
5.编写对应的Controller类,然后启动项目测试
@RestController
public class HelloController {
//   接口: http://localhost:8080/hello
    @RequestMapping("/hello")
    public String hello(){
//        调用业务,接收前端参数
        return "Hello World";

    }
}
三、原理
1、HelloworldApplication.java
//本身就是一个Spring的组件 @Component
//自动装配:原理!!!
//程序应用的主入口
@SpringBootApplication
public class HelloworldApplication {
// SpringApplication
   public static void main(String[] args) {
      SpringApplication.run(HelloworldApplication.class, args);
   }

}
2、pom.xml
<?xml version="1.0" encoding="UTF-8"?>
<project xmlns="http://maven.apache.org/POM/4.0.0" xmlns:xsi="http://www.w3.org/2001/XMLSchema-instance"
   xsi:schemaLocation="http://maven.apache.org/POM/4.0.0 https://maven.apache.org/xsd/maven-4.0.0.xsd">
   <modelVersion>4.0.0</modelVersion>
<!--有一个父项目 -->
   <parent>
      <groupId>org.springframework.boot</groupId>
      <artifactId>spring-boot-starter-parent</artifactId>
      <version>2.6.2</version>
      <relativePath/> <!-- lookup parent from repository -->
   </parent>
   <groupId>com.kuang</groupId>
   <artifactId>helloworld</artifactId>
   <version>0.0.1-SNAPSHOT</version>
   <name>helloworld</name>
   <description>Demo project for Spring Boot</description>
   <properties>
      <java.version>1.8</java.version>
   </properties>

   <dependencies>
      <!--web依赖,tomcat,DispacherServlet,xml-->
      <!--该依赖包含了SpringMVC-->
      <dependency>
         <groupId>org.springframework.boot</groupId>
         <artifactId>spring-boot-starter-web</artifactId>
      </dependency>
      <!--单元测试-->
      <dependency>
         <groupId>org.springframework.boot</groupId>
         <artifactId>spring-boot-starter-test</artifactId>
         <scope>test</scope>
      </dependency>
   </dependencies>

<!--   spring-boot-starter  所有的SpringBoot依赖都是以这个开头的-->
   <build>
   <!--   打jar包插件    -->
      <plugins>
         <plugin>
            <groupId>org.springframework.boot</groupId>
            <artifactId>spring-boot-maven-plugin</artifactId>
         </plugin>
      </plugins>
   </build>

</project>
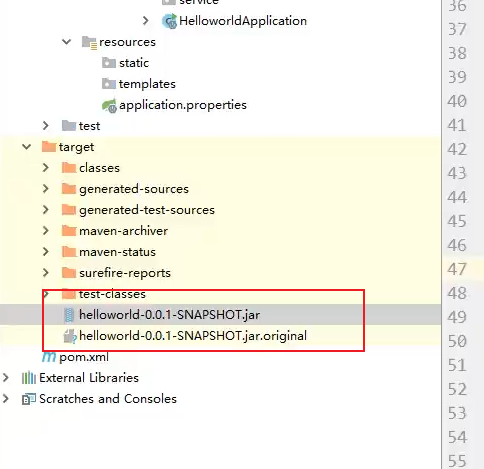
项目打包
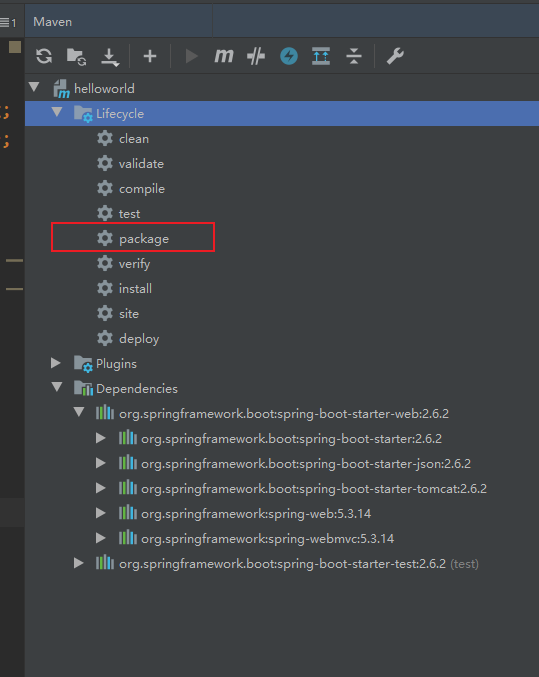
打包完成之后,会在Target下中生成一个对应的jar包
如果要使用jar包运行环境,可以通过在改jar包的目录下,打开PowerShell窗口(Shit+鼠标右键)
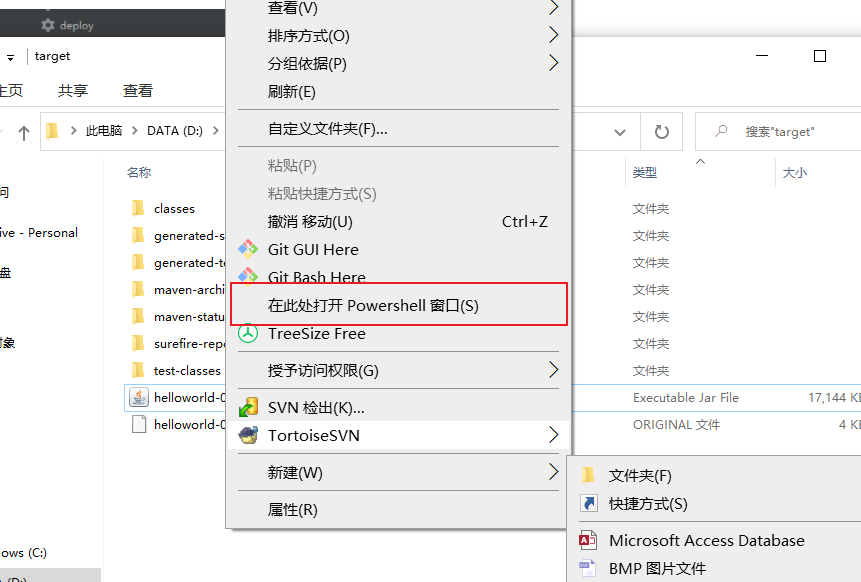
进入窗口后 输入jar -jar 项目名+Tab键,就可以运行了
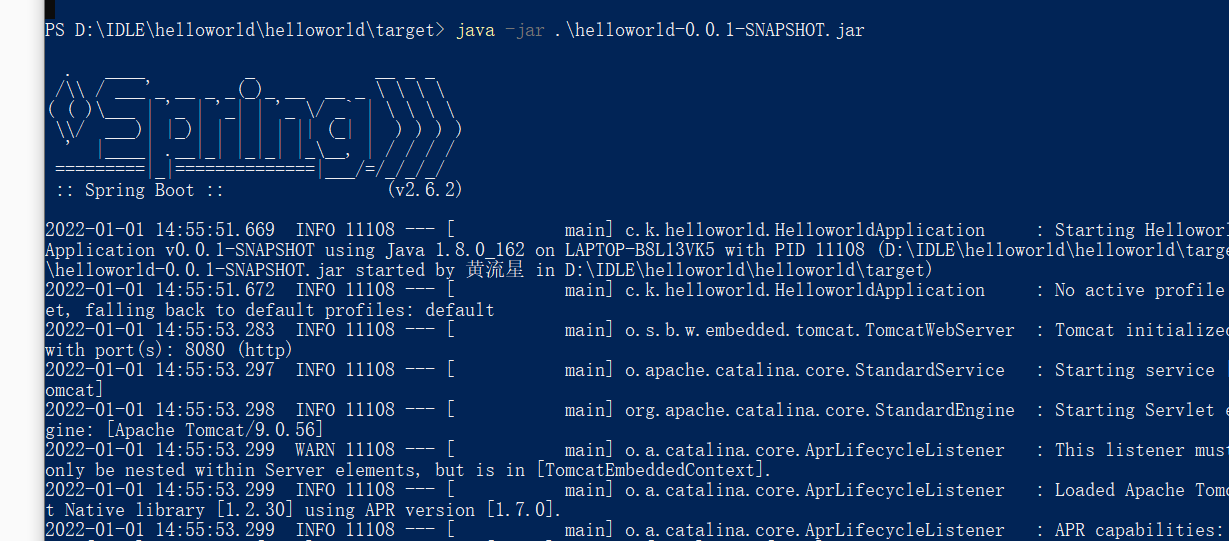
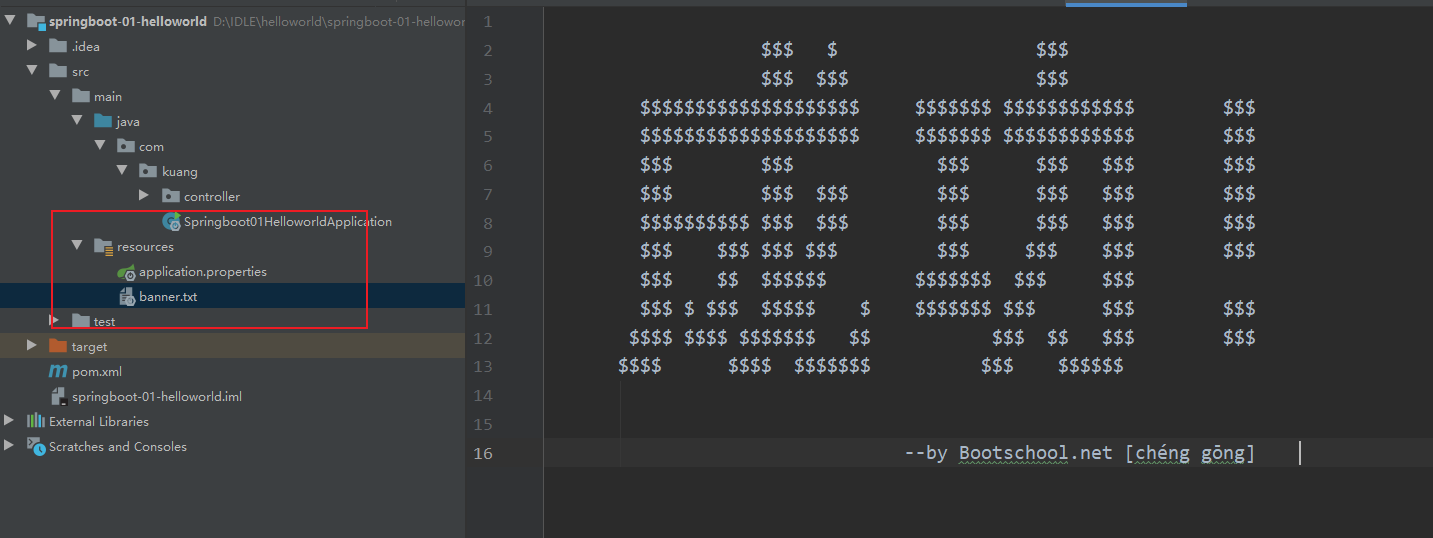
彩蛋
springboot banner
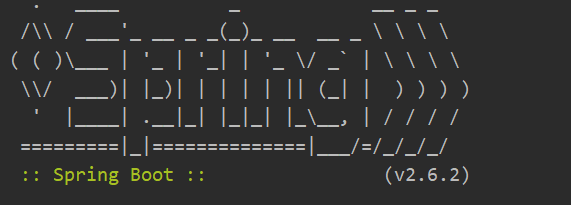
可以通过网站生成自己喜欢的图标,代替 https://www.bootschool.net/ascii-art
把他以txt的文件格式放到resource目录下
四、SpringBoot自动装配原理
1、pom.xml
-
<artifactId>spring-boot-starter-parent</artifactId> 核心依赖在父工程中
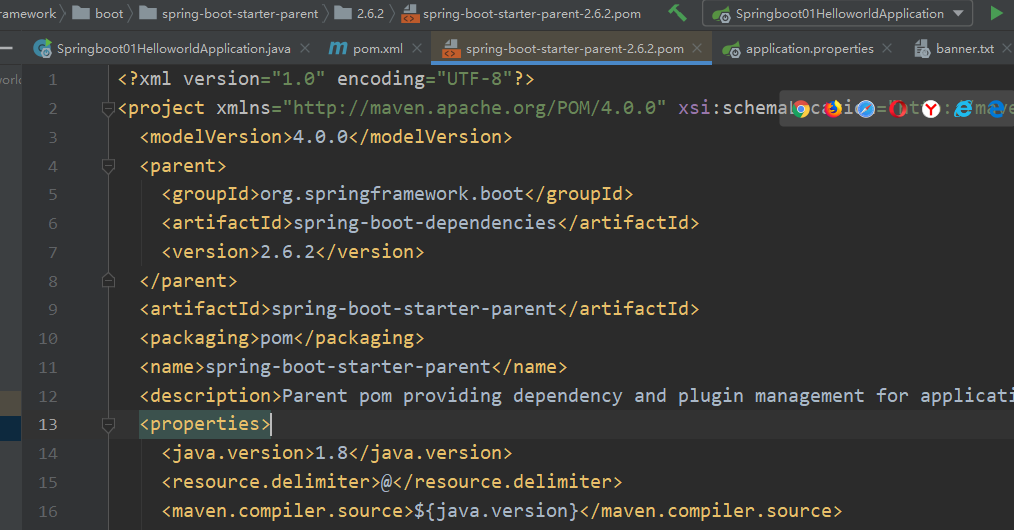
- 在引入一些Springboot依赖的时候,不需要指定版本,因为在仓库中有该依赖的版本
2、启动器
<dependency>
    <groupId>org.springframework.boot</groupId>
    <artifactId>spring-boot-starter</artifactId>
</dependency>
- 说白了就是springboot的启动场景;
- 比如spring-boot-starter-web,工程就会帮我们自动导入web环境所有的依赖!
- springboot会将所有的功能场景,又变成一个个的启动器
- 我们需要什么功能,就只需找到对应的启动器就可以了
starter
3、主程序
//@SpringBootApplication:标注这个类是一个springboot的应用
@SpringBootApplication
public class Springboot01HelloworldApplication {
//    将springboot应用启动
    public static void main(String[] args) {
        SpringApplication.run(Springboot01HelloworldApplication.class, args);
    }

}
4、注解
@SpringBootConfiguration:springboot的配置
	@Configuration :springboot配置类
	@Component	:说明是spring的组件

@EnableAutoConfiguration:自动配置
	@AutoConfigurationPackage:自动配置包
		@Import(AutoConfigurationPackages.Registrar.class):自动装配 包注册
	@Import(AutoConfigurationImportSelector.class):自动导入选择

//获取所有的配置
List<String> configurations = getCandidateConfigurations(annotationMetadata,attributes);
获取候选的配置
	protected List<String> getCandidateConfigurations(AnnotationMetadata metadata, AnnotationAttributes attributes) {
		List<String> configurations = SpringFactoriesLoader.loadFactoryNames(getSpringFactoriesLoaderFactoryClass(),
				getBeanClassLoader());
		Assert.notEmpty(configurations, "No auto configuration classes found in META-INF/spring.factories. If you "
				+ "are using a custom packaging, make sure that file is correct.");
		return configurations;
	}
META-INF/spring.factories :自动配置的核心文件
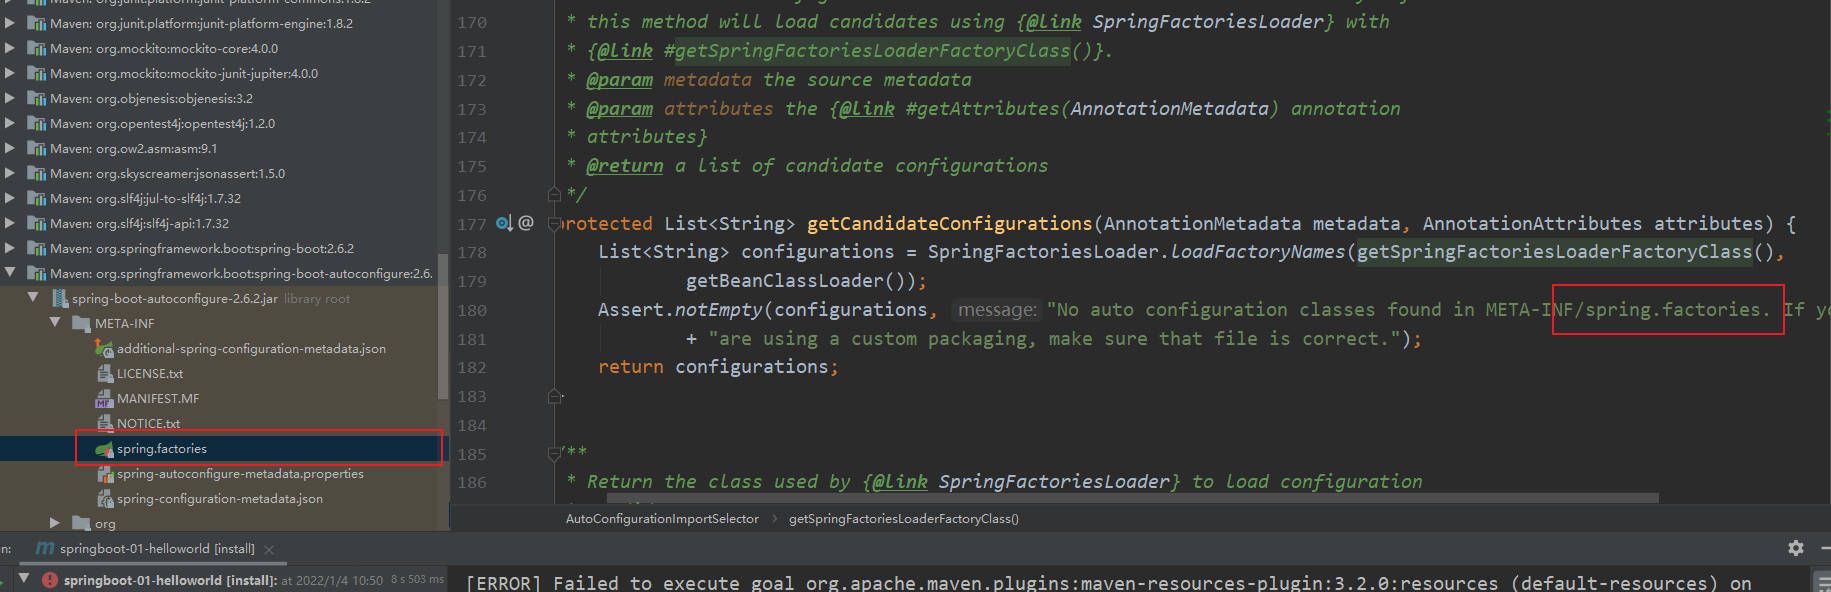
结论
springboot所有自动配置都是在启动的时候扫描并加载:spring.factories所有的自动装配类都在这里面,但是不一定生效,要判断条件是否成立,只要导入了对应的starter,就有对应的启动器了,有了启动器,我们自动装配就会生效,然后配置成功!
- springboot在启动的时候,从类路径下/META-INF/spring.factories获取指定的值;
- 将这些自动配置的类导入容器,自动配置就会生效,帮我进行自动配置!
- 以前我们需要自动配置的东西,现在springboot帮我们做了!
- 整个JavaEE,解决方案和自动装配的东西都在spring-boot-autoconfigure-2.6.2.jar这个包下
- 它会把所有需要导入的组件,以类名的方式返回,这些组件就会被添加到容器;
- 容器中也会存在非常多的xxxAutoConfiguration的文件(@Bean),就是这些类的容器中导入了这个场景需要的组件;并自动配置,@Configuration,JavaConfig!
- 有了自动配置类,免去了我们手动编写配置文件的工作!
5、主启动类怎么运行
SpringApplication.run
这个类主要做了以下四件事情:
1.推断应用的类型是普通的项目还是web项目
2.查找并加载所有可用的初始化器,设置到initializers属性中
3.找出所有的应用程序监听器,设置到listeners属性中
4.推断并设置main方法的定义类,找到运行的主类
6、配置文件能写什么
在我们这配置文件中能配置的东西,都存在一个固有的规律
xxxAutoConfiguration:默认值 xxxProperties和配置文件绑定,我们就可以使用自定义的配置了!
一句话总结 :根据当前不同的条件判断,决定这个配置类是否生效!
- 一但这个配置类生效;这个配置类就会给容器中添加各种组件;
- 这些组件的属性是从对应的properties类中获取的,这些类里面的每一个属性又是和配置文件绑定的;
- 所有在配置文件中能配置的属性都是在xxxxProperties类中封装着;
- 配置文件能配置什么就可以参照某个功能对应的这个属性类
自动装配
springboot到底帮我们配置了什么?我们能不能进行修改?能修改哪些东西?能不能拓展?
- xxxxAutoConfiguration..向容器中自动配置组件
- xxxxProperties:自动配置类,装配配置文件中自定义的一些内容!
测试
#查看自动配置类是否生效,可以通过debug: true 查看
debug: true
五、yaml配置注入
1、概述
SpringBoot使用一个全局的配置文件,配置文件名称是固定的
-
application.properties
- 语法结构:key = value
-
application.yaml
- 语法结构:key:空格value
配置文件的作用:修改Springboot自动配置的默认值,因为SpringBoot在底层都给我们自动配置好了;
YAML概述
YAML 是"YAML Ain't a Markup Language" (YAML不是一种标记语言)的递归缩写。在开发的这种语言时,YAML的意思其实是:"Yet Another Markup Language"(仍是一种标记语言)
这种语言以数据作为中心,而不是以标记语言为重点!
以前的配置文件,大多数都是使用xml来配置;不如一个简单的端口配置,我么来对比下yaml和xml
传统xml配置
<server>
    <port>8081</port>
</server>
yaml配置:
server:
	port: 8081
2、yaml内部语法注意
yaml基础语法
说明:语法要求严格!
1、空格不能省略
2、以缩进来控制层级关系,只要是左边对齐的一列数据都是同一个层级的。
3、属性和值的大小写都是十分敏感的。
字面量:普通的值 [ 数字,布尔值,字符串 ]
字面量直接写在后面就可以 , 字符串默认不用加上双引号或者单引号;
k: v
注意:
-
“ ” 双引号,不会转义字符串里面的特殊字符 , 特殊字符会作为本身想表示的意思;
比如 :name: "kuang \n shen" 输出 :kuang 换行 shen
-
'' 单引号,会转义特殊字符 , 特殊字符最终会变成和普通字符一样输出
比如 :name: ‘kuang \n shen’ 输出 :kuang \n shen
3、注入配置文件
yaml可以注入到我们的配置文件中,yaml可以给我们的实体类赋值,它的强大之处在于,它可以给我们的实体类直接注入匹配值!
yaml 注入配置文件
@ConfigurationProperties(prefix = "person") 指向我们的person;
1、在Springboot项目中resources目录下新建一个文件application.yaml
2、编写实体类Dog、Person
@Data
@Component
@ConfigurationProperties(prefix = "person")
@有参
@无参
public class Person {
    private String name;
    private Integer age;
    private Boolean happy;
    private Date birth;
    private Map<String,Object> maps;
    private List<Object> lists;
    private Dog dog;
}

@Data
@Component
public class Dog}

    private String name;
    private Integer age;
}
3、使用yaml配置实现属性注入实体类中
person:
  name: liuxing
  age: 3
  happy: false
  birth: 2022/01/01
  maps: {k1: v1,k2: v2}
  lists:
    - code
    - music
    - girl
  dog:
    name: 旺财
    age: 3
4、测试
@SpringBootTest
class Springboot02ConfigApplicationTests {

    @Autowired
    private Dog dog;
    @Autowired
    private Person person;

    @Test
    void contextLoads() {
        System.out.println(dog);
        System.out.println(person);
    }

}
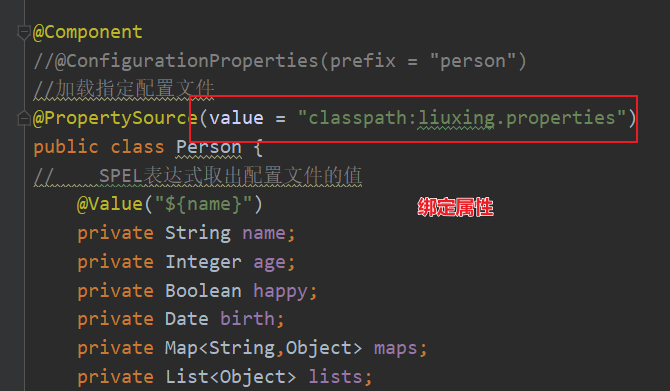
通过properties加载指定实体类的属性
1.resour目录下新建一个person.properties文件
name=liuxing
2.在代码中指定加载person.properties文件
对比小结:
@Value这个使用起来并不友好!我们需要为每个属性单独注解赋值,比较麻烦!
| @ConfigurationProperties | @Value | |
|---|---|---|
| 功能 | 批量注入配置文件中的属性 | 一个个指定 |
| 松散绑定(松散语法) | 支持 | 不支持 |
| SpEL | 不支持 | 支持 |
| JSR303数据校验 | 支持 | 不支持 |
| 复杂类型封装 | 支持 | 不支持 |
1、@ConfigurationProperties只需要写一次即可,@Value则需要每个字段都添加
2、松散绑定:不如我们yml中写的last-name,这个和lastName是一样的,-后面跟着字母默认是大写,这就是松散绑定
3、JSR303数据校验,这个就是我们可以在字段时增加一层过滤验证,可以保证数据的合法性
4、复杂类型封装,yml中可以封装对象,使用value就不支持
结论:
- 配置yml和配置properties都可以获取到值,强烈推荐yml!
- 如果我们在某个业务中,只需要获取配置文件中的某个值,可以使用一下@Value;
- 如果说,我们专门编写一个JavaBean来和配置文件进行一一映射,就直接@@ConfigurationProperties,不要犹豫!!
六、JSR303校验以及多环境切换
1、JSR303校验

Springboot中可以用@validated来校验数据
首先要导入validator的依赖
<!-- https://mvnrepository.com/artifact/org.springframework.boot/spring-boot-starter-validation -->
<dependency>
    <groupId>org.springframework.boot</groupId>
    <artifactId>spring-boot-starter-validation</artifactId>
    <version>2.3.5.RELEASE</version>
</dependency>
然后在要校验数据的配置上加上@Validated ,message可以更改提示信息
@Component //注册bean
@ConfigurationProperties(prefix = "person")
@Validated  //数据校验
public class Person {
    @Email(message="邮箱格式错误") //name必须是邮箱格式
    private String name;
    }
2、多环境切换
多环境切换
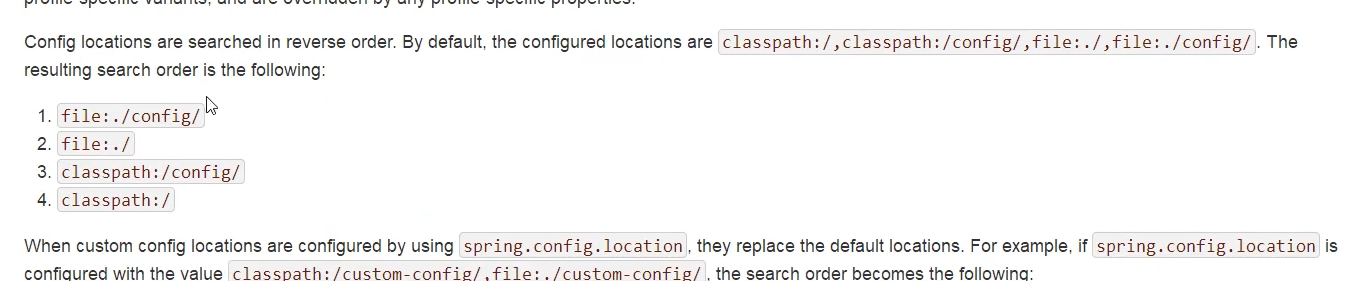
application.yaml可以放在图片上述的4个位置,优先级依次递减
application.properties
在classpath:/config/新建三个环境 application.properties、application-dev.properties、
application-test.properties
在application.properties中使用spring.profiles.active-后面的名字从而选择环境
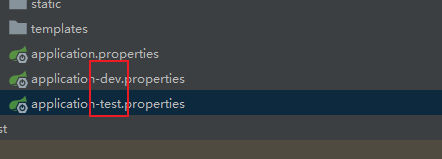
#springboot的多环境配置,可以选择激活哪一个配置文件
spring.profiles.active=test
application-dev.properties
server.port=8081
application-test.properties
server.port=8082
application.yaml
server:
  port: 8081
spring:
  profiles:
    active: dev
#选择激活下面环境之一
---
server:
  port: 8082
spring:
  profiles: dev
---
server:
  port: 8083
spring:
  profiles: test.
yaml相比于properties的优势在于集合文档,不需要创建过多的properties
七、SpringBoot Web开发
1、静态资源映射规则
SpringBoot中,SpringMVC的web配置都在 WebMvcAutoConfiguration 这个配置类里面;
我们可以去看看 WebMvcAutoConfigurationAdapter 中有很多配置方法;
有一个方法:addResourceHandlers 添加资源处理
@Override
public void addResourceHandlers(ResourceHandlerRegistry registry) {
   if (!this.resourceProperties.isAddMappings()) {
      logger.debug("Default resource handling disabled");
      return;
   }
   addResourceHandler(registry, "/webjars/**", "classpath:/META-INF/resources/webjars/");
   addResourceHandler(registry, this.mvcProperties.getStaticPathPattern(), (registration) -> {
      registration.addResourceLocations(this.resourceProperties.getStaticLocations());
      if (this.servletContext != null) {
         ServletContextResource resource = new ServletContextResource(this.servletContext, SERVLET_LOCATION);
         registration.addResourceLocations(resource);
      }
   });
      // 静态资源配置
    String staticPathPattern = this.mvcProperties.getStaticPathPattern();
    if (!registry.hasMappingForPattern(staticPathPattern)) {     				      customizeResourceHandlerRegistration(registry.addResourceHandler(staticPathPattern)
                                             .addResourceLocations(getResourceLocations(this.resourceProperties.getStaticLocations()))                       .setCachePeriod(getSeconds(cachePeriod)).setCacheControl(cacheControl));
    }
}
比如所有的 /webjars/** , 都需要去 classpath:/META-INF/resources/webjars/ 找对应的资源;
webjars
Webjars本质就是以jar包的方式引入我们的静态资源,我们以前要导入一个静态资源文件,直接导入即可,参考https://www.webjars.org 通过导入jQuery对应版本的依赖即可!
<dependency>
	<groupId>org.webjars</groupId>
	<artifactId>jquery</artifactId>
	<version>3.4.1</version>
</dependency>
webjars结构目录
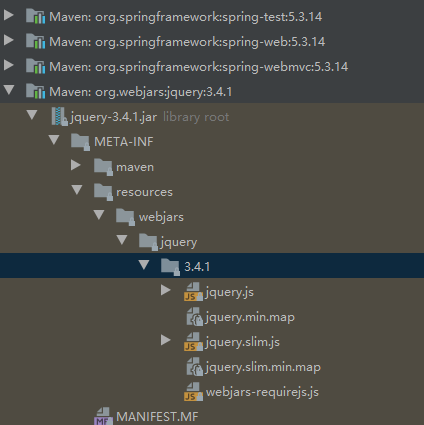
访问:只要是静态资源,SpringBoot就会去对应的路径寻找资源,我们这里访问:http://localhost:8080/webjars/jquery/3.4.1/jquery.js
静态资源映射规则
项目中要是使用自己的静态资源该怎么导入?
我们去找staticPathPattern发现第二种映射规则 :/** , 访问当前的项目任意资源,它会去找 resourceProperties 这个类,我们可以点进去看一下分析:
// 进入方法public String[] getStaticLocations() { return this.staticLocations;}
public static class Resources {

   private static final String[] CLASSPATH_RESOURCE_LOCATIONS = { "classpath:/META-INF/resources/",
         "classpath:/resources/", "classpath:/static/", "classpath:/public/" };

   /**
    * Locations of static resources. Defaults to classpath:[/META-INF/resources/,
    * /resources/, /static/, /public/].
    */
   private String[] staticLocations = CLASSPATH_RESOURCE_LOCATIONS;

   /**
    * Whether to enable default resource handling.
    */
ResourceProperties 可以设置和我们静态资源有关的参数;这里面指向了它会去寻找资源的文件夹,即上面数组的内容。
所以得出结论,以下四个目录存放的静态资源可以被我们识别:
"classpath:/METAINF/resources/"
"classpath:/resources/"
"classpath:/static/"
"classpath:/public/"
可以在resources根目录下新建对应的文件夹,都可以存放我们的静态文件;
比如我们访问 http://localhost:8080/1.js , 他就会去这些文件夹中寻找对应的静态资源文件;
总结
1、在springboot,我们可以使用以下方式处理静态资源
- webjars
localhost:8080/webjars/ - public , static , /**, resources
localhost:8080/
2.优先级:resource> static(默认) > public
2、首页处理
向下看源码!可以看到一个欢迎页的映射,就是我们的首页!
@Bean
public WelcomePageHandlerMapping welcomePageHandlerMapping(ApplicationContext applicationContext,
      FormattingConversionService mvcConversionService, ResourceUrlProvider mvcResourceUrlProvider) {
   WelcomePageHandlerMapping welcomePageHandlerMapping = new WelcomePageHandlerMapping(
         new TemplateAvailabilityProviders(applicationContext), applicationContext, getWelcomePage(),
         this.mvcProperties.getStaticPathPattern());
   welcomePageHandlerMapping.setInterceptors(getInterceptors(mvcConversionService, mvcResourceUrlProvider));
   welcomePageHandlerMapping.setCorsConfigurations(getCorsConfigurations());
   return welcomePageHandlerMapping;
}
private Resource getWelcomePage() {
   for (String location : this.resourceProperties.getStaticLocations()) {
      Resource indexHtml = getIndexHtml(location);
      if (indexHtml != null) {
         return indexHtml;
      }
   }
   ServletContext servletContext = getServletContext();
   if (servletContext != null) {
      return getIndexHtml(new ServletContextResource(servletContext, SERVLET_LOCATION));
   }
   return null;
}
SERVLET_LOCATION最后映射到的还是我们的静态资源的4个地址

这样的话,把index.html放在静态资源下的所有文件夹中,都会被/**映射
3、模板引擎
jsp支持非常强大的功能,包括能写Java代码,但是,Springboot这个项目首先是以jar的方式打包的,而不是war包,而且还使用的是内嵌Tomcat,因此它不支持现在默认的jsp;
不支持jsp,直接使用静态页面的方式,会给开发带来非常大的麻烦,因此使用模板引擎来解决
模板引擎
其实jsp就是一个模板引擎,还有用freemarker,包括Springboot给我们推荐的Thymeleaf
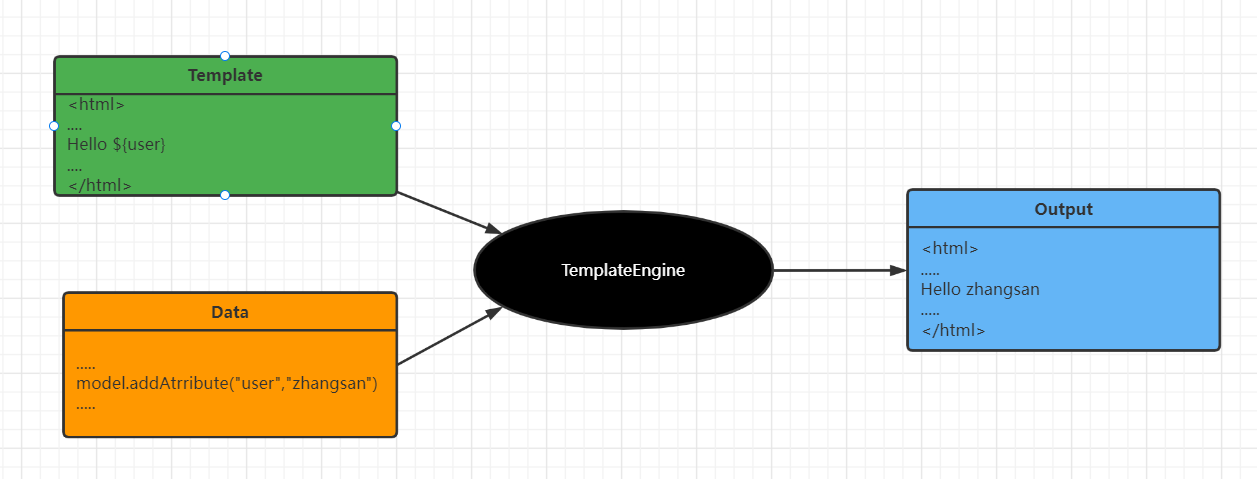
模板引擎的作用就是我们来写一个页面模板,比如有些值,是动态的,我们写一些表达式,而这些值来源于我们后台封装的一些数据。把这个模板和数据交给模板引擎,模板引擎按照我们这个数据帮你把这表达式解析、填充到我们指定的位置,然后把这个数据最终生成一个我们想要的内容给我们写出去,这就是我们这个模板引擎,不管是jsp还是其他的模板引擎,都是这个思想。只不过,就是说不同模板引擎之间,它们可能语法不一样,Thymeleaf模板引擎,这个模板引擎,是一个高级语言的模板引擎,语法更简单,功能强大
模板引擎的使用
1.引入模板引擎的依赖
<!-- https://mvnrepository.com/artifact/org.thymeleaf/thymeleaf -->
<dependency>
    <groupId>org.thymeleaf</groupId>
    <artifactId>thymeleaf-spring5</artifactId>
</dependency>
<dependency>
    <groupId>org.thymeleaf.extras</groupId>
    <artifactId>thymeleaf-extras-java8time</artifactId>
</dependency>
Thymeleaf的自动配置类:ThymeleafProperties
@ConfigurationProperties(prefix = "spring.thymeleaf")
public class ThymeleafProperties {

   private static final Charset DEFAULT_ENCODING = StandardCharsets.UTF_8;

   public static final String DEFAULT_PREFIX = "classpath:/templates/";

   public static final String DEFAULT_SUFFIX = ".html";
通过配置类可以看出,resource下的html要想通过引擎加工,我们可以把.html文件放在template目录下,配置类会帮我们自动添加前缀和后缀
我们接下来创建一个test.html
新建一个Controller类进行跳转
//在templates目录下的所有页面,只能通过controller来跳转!
//这个需要模板引擎的支持,可以通过导入Thymeleaf依赖
@Controller
public class IndexController {
    @RequestMapping("/test")
    public String index(){
        return "test";
    }
}
八、员工管理系统
1.首页配置
注意点:所有静态资源都需要使用thymeleaf接管; url:@{}
2.页面国际化:
- 我们需要配置i18n(internationalization)文件
- 如果需要在项目中定义语言自动切换,我们需要自定义一个
LocaleResolver组件 - 将组件配置到容器中@Bean
- 前端通过#{}取
3.登录+拦截器
4.员工列表展示
-
提取公共页面
th:fragment="topbar"th:replace="~{commons/commons::topbar}"如果要传递参数可以直接使用()传参,接受判断即可
-
列表循环展示
5.员工列表增加
6.员工列表修改
7.员工列表删除
8.员工列表查询
总结:
1.开发web要有自己熟悉的一套模板,后台模板推荐X-admin
2.前端界面:至少自己能够通过前端框架,组合出来一个网站
3.开发出的能够独立运行
九、SpringData
1、整合Druid
2、整合Mybatis
1.整合包
2.配置文件
3.mybatis配置
4.编写sql
5.业务层调dao层
6.controller调用service层
3、SpringSecurity
1.简介
在 Web 开发中,安全一直是非常重要的一个方面。安全虽然属于应用的非功能性需求,但是应该在应用开发的初期就考虑进来。如果在应用开发的后期才考虑安全的问题,就可能陷入一个两难的境地:一方面,应用存在严重的安全漏洞,无法满足用户的要求,并可能造成用户的隐私数据被攻击者窃取;另一方面,应用的基本架构已经确定,要修复安全漏洞,可能需要对系统的架构做出比较重大的调整,因而需要更多的开发时间,影响应用的发布进程。因此,从应用开发的第一天就应该把安全相关的因素考虑进来,并在整个应用的开发过程中。
市面上存在比较有名的:Shiro,Spring Security !
从官网的介绍中可以知道这是一个权限框架。想我们之前做项目是没有使用框架是怎么控制权限的?对于权限 一般会细分为功能权限,访问权限,和菜单权限。代码会写的非常的繁琐,冗余。
2.认识SpringSecurity
Spring Security 是针对Spring项目的安全框架,也是Spring Boot底层安全模块默认的技术选型,他可以实现强大的Web安全控制,对于安全控制,我们仅需要引入 spring-boot-starter-security 模块,进行少量的配置,即可实现强大的安全管理!
记住几个类:
- WebSecurityConfigurerAdapter:自定义Security策略
- AuthenticationManagerBuilder:自定义认证策略
- @EnableWebSecurity:开启WebSecurity模式
Spring Security的两个主要目标是 “认证” 和 “授权”(访问控制)。
“认证”(Authentication)
身份验证是关于验证您的凭据,如用户名/用户ID和密码,以验证您的身份。
身份验证通常通过用户名和密码完成,有时与身份验证因素结合使用。
“授权” (Authorization)
授权发生在系统成功验证您的身份后,最终会授予您访问资源(如信息,文件,数据库,资金,位置,几乎任何内容)的完全权限。
这个概念是通用的,而不是只在Spring Security 中存在。
十、Shiro
1.导入依赖
2.配置文件
3.HelloWorld
//获取当前的用户对象
Subject currentUser = SecurityUtils.getSubject();
//通过当前对象获取session
 Session session = currentUser.getSession();
//判断当前用户是否被认证
if (!currentUser.isAuthenticated())
currentUser.getPrincipal()
//判断用户的角色
currentUser.hasRole("schwartz")
//获得当前用户的权限
//粗粒度
//test a typed permission (not instance-level)
if (currentUser.isPermitted("lightsaber:wield"))
//细粒度
//a (very powerful) Instance Level permission:
if (currentUser.isPermitted("winnebago:drive:eagle5"))
//注销
//all done - log out!
currentUser.logout();
//总结:一个用户对应很多角色,一个角色对应很多权限
springboot中集成shiro
十一、Swagger
学习目标
- 了解Swagger的概念及作用
- 掌握在项目中集成Swagger自动生成API文档
Swagger简介
前后端分离
- 前端-->前端控制层、视图层
- 后端-->后端控制层、服务层、数据访问层
- 前后端通过API进行交互
- 前后端相对独立且松耦合
产生问题
- 前后端集成,前端或者后端无法做到"及时协商,尽早解决",最终导致问题集中爆发
解决方案
- 首先制定一个schema[计划提纲],并实时跟踪最新的API,降低集成风险
Swagger
- 号称世界上最流行的API框架
- Restful Api文档在线自动生成=>API文档与API定义同步更新
- 直接运行,在线测试API
- 支持多种语言(java,PHP等)
1、Springboot集成Swagger
Springboot集成Swagger->springfox,两个jar包
- Springfox-swagger2
- swagger-swagger2
使用Swagger
要求:jdk 1.8 +否则swagger2无法运行
步骤:
1.新建一个Springboot-web项目
2.添加Maven依赖
<!-- https://mvnrepository.com/artifact/io.springfox/springfox-swagger2 -->
<dependency>
   <groupId>io.springfox</groupId>
   <artifactId>springfox-swagger2</artifactId>
   <version>2.9.2</version>
</dependency>
<!-- https://mvnrepository.com/artifact/io.springfox/springfox-swagger-ui -->
<dependency>
   <groupId>io.springfox</groupId>
   <artifactId>springfox-swagger-ui</artifactId>
   <version>2.9.2</version>
</dependency>
3.编写对应的Controller类,测试
@RestController
public class HelloController {
    @RequestMapping(value = "/hello")
    public String hello(){
        return "hello";
    }
}
4.要使用Swagger,我们需要编写一个配置类-SwaggerConfig来配置Swagger
@Configuration
@EnableSwagger2          //开启swagger2
public class SwaggerConfig {

}
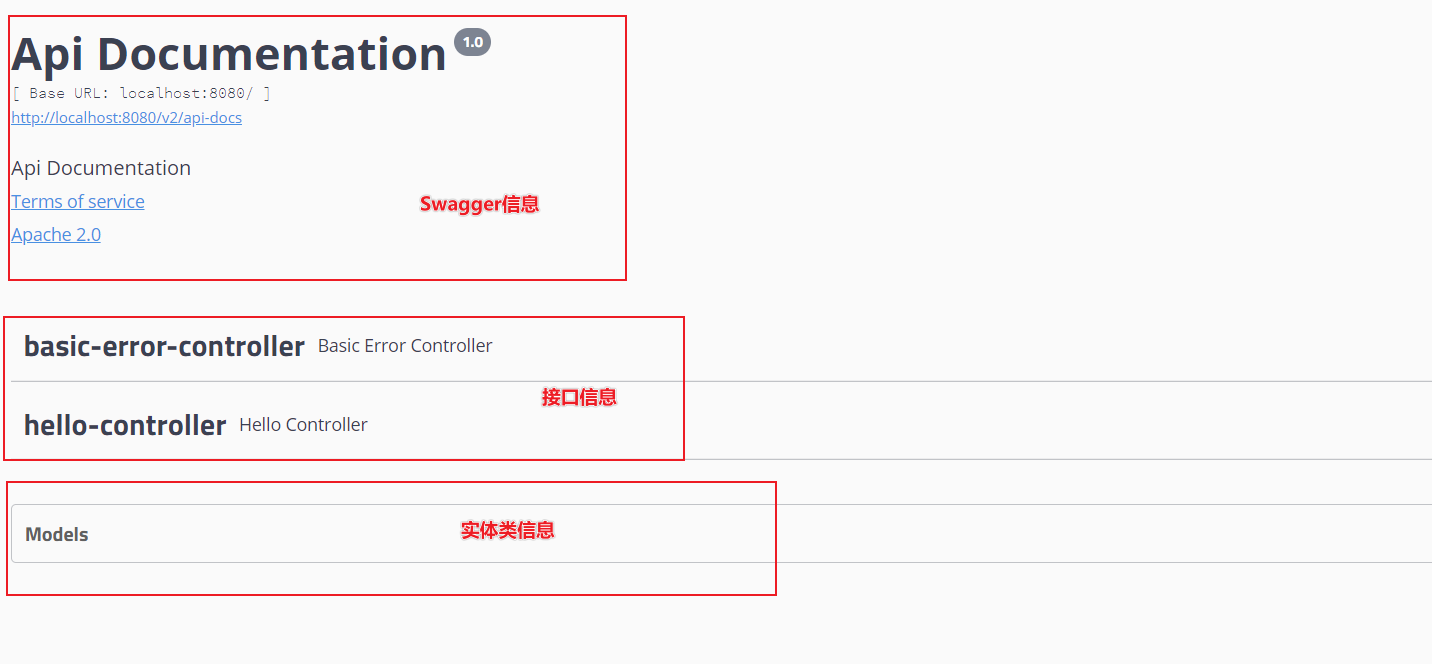
测试地址:http://localhost:8080/swagger-ui.html
注意:当springboot版本过高的时候可以在配置文件中加上
spring.mvc.pathmatch.matching-strategy=ant_path_matcher
2、配置swagger
@Configuration
@EnableSwagger2          //开启swagger2
public class SwaggerConfig {

    //配置了Swagger Docket的Bean实例
    @Bean
    public Docket docket(){
        return new Docket(DocumentationType.SWAGGER_2).apiInfo(apiInfo());
    }

    //配置Swagger信息apiInfo();
    private ApiInfo apiInfo(){

        //作者信息
        Contact contact = new Contact("流星", "http://localhost:8080/swagger", "123456789@qq.com");
        return new ApiInfo(
                "Swagger API文档",
                "加油",
                "v1.0",
                "http://localhost:8080/swagger",
                contact,
                "Apache 2.0",
                "http://www.apache.org/licenses/LICENSE-2.0",
                new ArrayList());

    }

}
3、Swagger配置扫面接口
Docket select()
//配置了Swagger Docket的Bean实例
@Bean
public Docket docket(){
    return new Docket(DocumentationType.SWAGGER_2)
            .apiInfo(apiInfo())
            .select()
            //配置要扫描接口的方式
            //.basePackage指定要扫描的包,.any()扫描全部的包
            // ,.none()都不扫描 ,.withClassAnnotation()扫描类上的注解 ,.withMethodAnnotation()扫描方法上的注解
            .apis(RequestHandlerSelectors.basePackage("com.kuang.swagger.controller"))
            //paths()过滤什么路径
            .paths(PathSelectors.ant("/kuang/**"))
            .build();
}
配置是否成功Swagger
//是否启用Swagger,如果为false则swagger不能再浏览器访问
.enable(false)
问题:实现Swagger在生产环境中使用,在发布的时候不适用?
- 判断是不是生产环境 flag =false
- 注入enable(flag)
 //配置了Swagger Docket的Bean实例
    @Bean
    public Docket docket(Environment environment){
        //设置要显示的swagger环境
        Profiles profiles = Profiles.of("dev","test");
        //获取生产环境
        boolean flag = environment.acceptsProfiles(profiles);
        //通过environment.acceptsProfiles判断处在设定的自己设定的环境当中
        return new Docket(DocumentationType.SWAGGER_2)
                .apiInfo(apiInfo())
                //是否启用Swagger,如果为false则swagger不能再浏览器访问
                .enable(flag)
                .select()
                .apis(RequestHandlerSelectors.basePackage("com.kuang.swagger.controller"))
//                .paths(PathSelectors.ant("/kuang/**"))
                .build();
    }
spring.profiles.active=prod
server.port=8081
server.port=8082
4、配置api文档的分组
.groupName("流星")
问题:如何配置多个分组
实现多个Docket
@Bean
public Docket docket1(){
    return new Docket(DocumentationType.SWAGGER_2).groupName("A");
}
@Bean
public Docket docket2(){
    return new Docket(DocumentationType.SWAGGER_2).groupName("B");
}
@Bean
public Docket docket3(){
    return new Docket(DocumentationType.SWAGGER_2).groupName("C");
}
5、实体类配置(Model)
User
//@Api(注释)
@ApiModel("用户实体类")

public class User {
    @ApiModelProperty("用户名")
    public String username;
    @ApiModelProperty("密码")
    public String password;
    }
controller
package com.kuang.swagger.controller;
import com.kuang.swagger.pojo.User;
import io.swagger.annotations.Api;
import io.swagger.annotations.ApiOperation;
import io.swagger.annotations.ApiParam;
import org.springframework.web.bind.annotation.GetMapping;
import org.springframework.web.bind.annotation.PostMapping;
import org.springframework.web.bind.annotation.RequestMapping;
import org.springframework.web.bind.annotation.RestController;

@Api(tags = "hello控制类" ,value = "流星")
@RestController
public class HelloController {

    @GetMapping(value = "/hello")
    public String hello(){
        return "hello";
    }

    //只要我们的接口中,返回值中存在实体类,它就会被扫描Swagger中
    @PostMapping(value = "/user")
    public User user(){
        return new User();
    }

    //operation接口
    @ApiOperation("hello控制类")
    @GetMapping(value = "/hello2")
    public String hello(@ApiParam("用户名") String username){
        return "hello"+username;
    }

    //operation接口
    @ApiOperation("Post测试")
    @PostMapping(value = "/postt")
    public User postt(@ApiParam("用户名") User user){
        return user;
    }
}
总结:
1.我们可以通过Swagger给一些比较难理解的属性或者接口,增加注释信息
2.接口文档实时更新
3.可以在线测试
【注意点】在正式发布的时候,关闭Swagger!!!,方式接口暴露,同时节省运行的内存;
十二、异步任务
开启线程
@RestController
public class AsyncController {
    @Autowired
    AsyncService asyncService;
    @RequestMapping("/hello")
    public String hello(){
        asyncService.hello();   //停止3秒
        return "ok";
    }
}
@Service
public class AsyncService {
    //通过告诉spring这是个异步的方法,来解决线程异步问题
    @Async
    public void hello(){
        try {
            Thread.sleep(3000);
        } catch (InterruptedException e) {
            e.printStackTrace();
        }
        System.out.println("数据正在处理.....");
    }
}
在主应用中开启异步注解功能
//开启异步注解功能
@EnableAsync
@SpringBootApplication
public class Springboot09TestApplication {

    public static void main(String[] args) {
        SpringApplication.run(Springboot09TestApplication.class, args);
    }

}
十三、邮件发送
1.导入邮件依赖
<dependency>
    <groupId>org.springframework.boot</groupId>
    <artifactId>spring-boot-starter-mail</artifactId>
</dependency>
2.配置邮箱信息
spring.mail.username=904329653@qq.com
spring.mail.password=zovjiegbmcembdfb
spring.mail.host=smtp.qq.com
#开启加密验证
spring.mail.properties.mail.smtp.ssl.enable=true
3.测试类设置对应的信息
@SpringBootTest
class Springboot09TestApplicationTests {
    @Resource
    JavaMailSenderImpl javaMailSender;

    @Test
    void contextLoads() {
//        一个简单的邮件
        SimpleMailMessage mailMessage = new SimpleMailMessage();
        mailMessage.setSubject("流星你好呀");
        mailMessage.setText("努力学习");
        mailMessage.setTo("904329653@qq.com");
        mailMessage.setFrom("904329653@qq.com");

        javaMailSender.send(mailMessage);
    }

    @Test
    void contextLoads2() throws MessagingException {
//        一个复杂的邮件
        MimeMessage mimeMessage = javaMailSender.createMimeMessage();
        //组装!
        MimeMessageHelper helper = new MimeMessageHelper(mimeMessage,true);
        //正文
        helper.setSubject("流星面试");
        helper.setText("<p style='color:red'>加油</p>",true);
        //附件
        helper.addAttachment("1.jpg",new File("C:\\Users\\黄流星\\Desktop\\1.jpg"));
        helper.addAttachment("1.jpg",new File("C:\\Users\\黄流星\\Desktop\\1.jpg"));
        helper.setTo("904329653@qq.com");
        helper.setFrom("904329653@qq.com");

        javaMailSender.send(mimeMessage);
    }

}
十四、定时任务
TaskScheduler(任务调度器)
TaskExecutor(任务执行器)
//开启定时功能的注解
@EnableScheduling
//什么时候执行
@Scheduled

Cron 表达式
@Service
public class ScheduledService {
    //在一个特定的时间执行代码~     Timer
    //cron表达式~      秒 分 时 日 月 周几~
    /*(cron = "50 09 15 * * ?")     每天的15:09:50执行一次
               50 0/5 15,18 * * ?   每天15点和18点,每隔五分钟执行一次
               50 09 10 ? * 1-6     每个月的周一到周六 10.15分执行一次
    * */
    @Scheduled(cron = "0/2 * * * * ?")
    public void hello(){
        System.out.println("hello,你被执行了");
    }

}
//开启任务调度
@EnableScheduling

 浙公网安备 33010602011771号