关于7Z自解压文件拆分,读取条目,复写,合并的功能
目的:实现7Z格式自解压包再不解压的情况下对条目内容读取以及复写。
首先了解7Z格式自解压包。

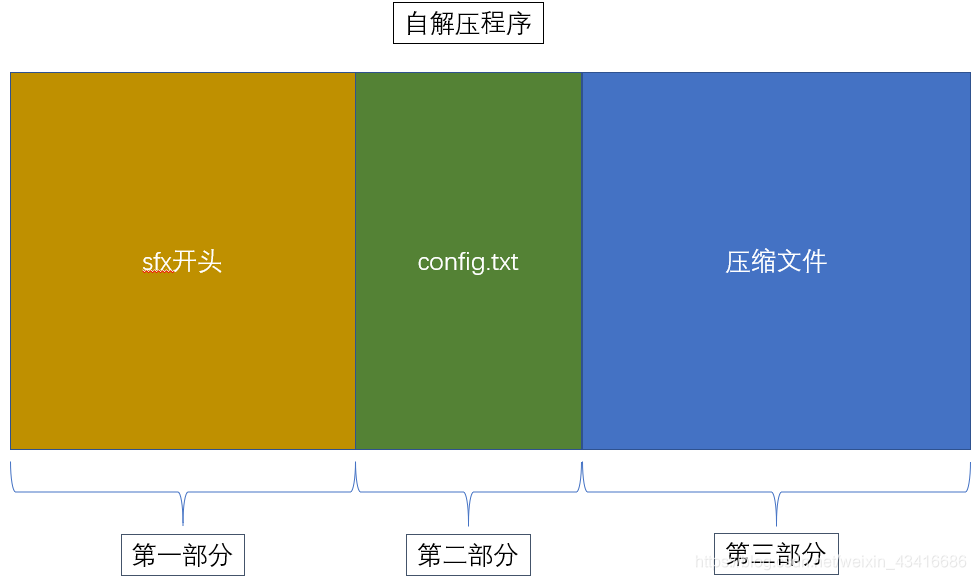
sfx文件通常为二进制文件,用作压缩解压软件的自解压程序模板。其实就是一个exe程序,组成格式如上
主要分为三部分:
- sfx文件打头,这是一个真正的程序,实现了根据config.txt配置信息解压缩尾部的压缩文件,并执行相应的操作
- config.txt文件做相关的配置,比如标题,解压缩位置,解压缩之后执行什么样的操作等
- 压缩文件,这里是真正的数据内容啦
查看config.txt内容,一些配置信息
;!@Install@!UTF-8!

Title="Software 7.00"

BeginPrompt="Do you want to install the Software 7.00?"

RunProgram="7zr.exe b"

;!@InstallEnd@!
经过测试发现,这种自解压包无法通过ZipFile类或者SevenZFile类创建对象,所以java代码无法直接对其进行操作(可以当做普通文件下载)。所以需要先对这类自解压包进行拆分,拿到我们真正需要的压缩文件。

由上面信息可以知道config.txt内容最后一段为";!@InstallEnd@!",所以我们要截取这段字符之后的内容就是我们真正需要处理的压缩包。查找这段字符以及进行包的拆分操作的代码如下:
1、先找到这段字符所在位置pos。(targetFile为我们需要拆分的自解压文件):
    final byte[] encoded = ";!@InstallEnd@!".getBytes("ISO-8859-1");
     final BufferedInputStream bis = new BufferedInputStream(new FileInputStream(targetFile));
  // sfx假定大于124,928
//    bis.skip(124928);
      int b;
      long pos = 0;
      int macth = 0;
      while ((b = bis.read()) != -1) {
         pos++;

         if (encoded[macth] == b) {
            macth++;
         } else {
            macth = 0;
         }
         if (macth == 15) {
            System.out.print(pos);
            break;
         }
      }
      bis.close();
2、然后根据这个pos来拆分文件,前面部分拆分为sfx.tmp,后半部分拆为z7.7z文件:
  //一个字节通道保持当前位置,允许位置被改变。
    		SeekableByteChannel exeSbc = Files.newByteChannel(targetFile.toPath(), StandardOpenOption.READ);

    		final ByteBuffer sfxBf = ByteBuffer.allocate((int) pos);
    		final File sfxFile = new File(downloadPath + SLASH + "sfx.tmp");
    		SeekableByteChannel sfxSbc = Files.newByteChannel(sfxFile.toPath(), StandardOpenOption.CREATE, StandardOpenOption.WRITE);
    		//在该通道的当前位置开始读取字节,然后用实际读取的字节数进行更新。
    		exeSbc.read(sfxBf);
    		/*
    		flip():Buffer有两种模式,写模式和读模式。在写模式下调用flip()之后,Buffer从写模式变成读模式。
    		也就是说调用flip()之后,读/写指针position指到缓冲区头部,并且设置了最多只能读出之前写入的数据长度(而不是整个缓存的容量大小)。
    		 */
    		sfxBf.flip();
    		sfxSbc.write(sfxBf);
    		sfxBf.clear();

    		File z7File = new File(downloadPath + SLASH + "z7.7z");
    		SeekableByteChannel z7Sbc = Files.newByteChannel(z7File.toPath(), StandardOpenOption.CREATE, StandardOpenOption.WRITE);
    		final ByteBuffer z7Bf = ByteBuffer.allocate(1024 * 1024 * 2);
    		int i = 0;
    		while ((i = exeSbc.read(z7Bf)) > 0) {
    			z7Bf.flip();
    			z7Sbc.write(z7Bf);
    			z7Bf.clear();
    		}
    		z7Sbc.close();
    		exeSbc.close();
拆分完文件,然后对7z压缩包进行读取复写操作
3、读取条目,并新建一个文件写入xml内容(targetFile为7z压缩包,SLASH为目录分隔符,downloadPath为文件路径)
try {
   //创建7z压缩包对象.
   SevenZFile zf = new SevenZFile(targetFile);

   //获取压缩包内条目数组.
   Iterable<SevenZArchiveEntry> enumeration = zf.getEntries();

   //遍历条目数组.
   for (SevenZArchiveEntry sevenZArchiveEntry : enumeration) {
      if ("MonitorConfig.config".equals(sevenZArchiveEntry.getName())) {
         //获取当前微服务的信息
         String address = "/necp/mapp/rpa";
         final ServerInfo rpaServerInfo = Mapp.INSTANCE.getServerInfo(address);
         //获取要读取条目的大小
         int size = (int) sevenZArchiveEntry.getSize();
         if (size > 0) {
            //对需要读取的条目创建字符流缓冲区
            BufferedReader br = new BufferedReader(
                  new InputStreamReader(zf.getInputStream(sevenZArchiveEntry)));
            String str = "";
            String strTemp;
            String line;
            //按行读取,并替换掉换行符
            while ((line = br.readLine()) != null) {
               strTemp = line.replaceAll("\t", "");
               str = str + strTemp;
            }
            //把读取的字符串格式转为xml格式,并进行替换内容操作
            SAXReader saxReader = new SAXReader();
            Document document = saxReader.read(new ByteArrayInputStream(str.getBytes("UTF-8")));
            Iterator it = document.getRootElement().elementIterator();
            Element ele;
            Element element;
            while (it.hasNext()) {
               ele = (Element) it.next();
               Iterator iterator = ele.elementIterator();
               while (iterator.hasNext()) {
                  element = (Element) iterator.next();
                  if (element.attribute(0).getValue().equals("host")) {
                     element.attribute(1).setValue(rpaServerInfo.getIpAddress());
                  }
                  if (element.attribute(0).getValue().equals("port")) {
                     element.attribute(1).setValue(rpaServerInfo.getPort() + rpaServerInfo.getContextPath() + SLASH);
                  }
                  if (element.attribute(0).getValue().equals("scheme")) {
                     element.attribute(1).setValue(protocol);
                  }
               }
            }
            OutputFormat format = OutputFormat.createPrettyPrint();
            //创建xml格式的文件,并写入处理过的内容
            XMLWriter writer = new XMLWriter(new FileWriter(downloadPath + SLASH + "MonitorConfig.config"), format);
            writer.write(document);
            writer.close();
         }
      }
   }

} catch (Exception e) {
   e.printStackTrace();
}
4、把新生成的xml内容覆写入7z压缩包(替换原有文件内容)(downloadPath为文件路径,SLASH为系统目录分隔符)
final String targetFile = downloadPath + SLASH + "z7.7z";
final String newFile = downloadPath + SLASH + "temp.7z";
final String configFile = downloadPath + SLASH + "MonitorConfig.config";
final SevenZFile zFile = new SevenZFile(new File(targetFile));
final File newzFile = new File(newFile);
if (!newzFile.exists()) {
   newzFile.createNewFile();
}

final SevenZOutputFile outArchive = new SevenZOutputFile(newzFile);
outArchive.setContentCompression(SevenZMethod.COPY);
// 原始压缩文件处理,把原有文件复制到新建临时7Z压缩包
SevenZArchiveEntry entry;
byte[] buf = new byte[1024 * 1024 * 2];
int len;
while ((entry = zFile.getNextEntry()) != null) {
   if (!entry.isDirectory()) {
      outArchive.putArchiveEntry(entry);
      while ((len = zFile.read(buf)) != -1) {
         outArchive.write(buf, 0, len);
      }
      outArchive.closeArchiveEntry();
   }
}

// 添加或覆盖的文件,相同文件名即覆盖。
final SevenZArchiveEntry xmlEntry = new SevenZArchiveEntry();
xmlEntry.setName("MonitorConfig.config");
outArchive.putArchiveEntry(xmlEntry);
String str = "";
try {
   FileInputStream fileInputStream = new FileInputStream(configFile);
   ByteArrayOutputStream bos = new ByteArrayOutputStream();
   byte[] buffer = new byte[1024];
   int length;
   while ((length = fileInputStream.read(buffer)) != -1) {
      bos.write(buffer, 0, length);
   }
   str = bos.toString();
   bos.close();
   fileInputStream.close();


} catch (Exception e) {
   e.printStackTrace();
}
outArchive.write(str.getBytes());
outArchive.closeArchiveEntry();
outArchive.finish();
outArchive.close();
5、把新建临时7z压缩包和原来拆分的sfx.tmp文件合并成新的exe包(downloadPath为文件路径,SLASH为系统目录分隔符)
//sfx+config + 新的7z文件成exe.
final File robotPathFile = new File(downloadPath);
final File[] files = robotPathFile.listFiles();
//找到原有exe文件
File exeFile = null;
for (File file : files) {
   if (file.getName().toLowerCase().endsWith(".exe")) {
      exeFile = file;
   }
}
//删除exe文件
exeFile.delete();
//新建一个同名空exe文件
if (!exeFile.exists()) {
   exeFile.createNewFile();
}
       //先写入sfx文件
final SeekableByteChannel sbc = Files.newByteChannel(exeFile.toPath(), StandardOpenOption.APPEND);
final ByteBuffer sfxBf = ByteBuffer.wrap(FileUtils.readFileToByteArray(new File(downloadPath + SLASH + "sfx.tmp")));
sbc.write(sfxBf);
//写入新建的临时7z文件
File new7zFile = new File(newFile);
SeekableByteChannel z7Sbc = Files.newByteChannel(new7zFile.toPath(), StandardOpenOption.READ);
final ByteBuffer z7Bf = ByteBuffer.allocate(1024 * 1024 * 2);
int i = 0;
while ((i = z7Sbc.read(z7Bf)) > 0) {
   z7Bf.flip();
   sbc.write(z7Bf);
   z7Bf.clear();
}
z7Sbc.close();
sbc.close();
//删除临时文件.
File file = new File(targetFile);
File sfxFile = new File(downloadPath + SLASH + "sfx.tmp");
file.delete();
newzFile.delete();
sfxFile.delete();
到此就完成了读取7Z自解压包条目,然后修改读取内容再覆写入自解压文件的操作。


 浙公网安备 33010602011771号