CSS盒模型
目录
元素分类
在讲解CSS布局之前,我们需要提前知道一些知识,在CSS中,html中的标签元素大体被分为三种不同的类型:块状元素、内联元素(又叫行内元素)和内联块状元素。
常用的块状元素有:
<div>、<p>、<h1>...<h6>、<ol>、<ul>、<dl>、<table>、<address>、<blockquote> 、<form>
常用的内联元素有:
<a>、<span>、<br>、<i>、<em>、<strong>、<label>、<q>、<var>、<cite>、<code>
常用的内联块状元素有:
<img>、<input>
元素分类--块级元素
什么是块级元素?在html中<div>、 <p>、<h1>、<form>、<ul> 和 <li>就是块级元素。设置display:block就是将元素显示为块级元素。如下代码就是将内联元素a转换为块状元素,从而使a元素具有块状元素特点。
a{display:block;}
块级元素特点:
1、每个块级元素都从新的一行开始,并且其后的元素也另起一行。(真霸道,一个块级元素独占一行)
2、元素的高度、宽度、行高以及顶和底边距都可设置。
3、元素宽度在不设置的情况下,是它本身父容器的100%(和父元素的宽度一致),除非设定一个宽度。
元素分类--内联元素
在html中,<span>、<a>、<label>、 <strong> 和<em>就是典型的内联元素(行内元素)(inline)元素。当然块状元素也可以通过代码display:inline将元素设置为内联元素。如下代码就是将块状元素div转换为内联元素,从而使 div 元素具有内联元素特点。
 div{
     display:inline;
 }

......

<div>我要变成内联元素</div>
内联元素特点:
1、和其他元素都在一行上;
2、元素的高度、宽度及顶部和底部边距不可设置;
3、元素的宽度就是它包含的文字或图片的宽度,不可改变。
小伙伴们你们观查一下右侧代码段,有没有发现一个问题,内联元素之间有一个间距问题,这个问题在本小节的 wiki 中有介绍,感兴趣的小伙伴可以去查看。
元素分类--内联块状元素
内联块状元素(inline-block)就是同时具备内联元素、块状元素的特点,代码display:inline-block就是将元素设置为内联块状元素。(css2.1新增),<img>、<input>标签就是这种内联块状标签。
inline-block 元素特点:
1、和其他元素都在一行上;
2、元素的高度、宽度、行高以及顶和底边距都可设置。
提示:下一小节是用视频动画来讲解css中的盒模型。
盒模型--边框(一)
盒子模型的边框就是围绕着内容及补白的线,这条线你可以设置它的粗细、样式和颜色(边框三个属性)。
如下面代码为 div 来设置边框粗细为 2px、样式为实心的、颜色为红色的边框:
div{
    border:2px  solid  red;
}
上面是 border 代码的缩写形式,可以分开写:
div{
    border-width:2px;
    border-style:solid;
    border-color:red;
}
注意:
1、border-style(边框样式)常见样式有:
dashed(虚线)| dotted(点线)| solid(实线)。
2、border-color(边框颜色)中的颜色可设置为十六进制颜色,如:
border-color:#888;//前面的井号不要忘掉。
3、border-width(边框宽度)中的宽度也可以设置为:
thin | medium | thick(但不是很常用),最常还是用像素(px)。
盒模型--边框(二)
现在有一个问题,如果有想为 p 标签单独设置下边框,而其它三边都不设置边框样式怎么办呢?css 样式中允许只为一个方向的边框设置样式:
div{border-bottom:1px solid red;}
同样可以使用下面代码实现其它三边(上、右、左)边框的设置:
border-top:1px solid red;
border-right:1px solid red;
border-left:1px solid red;
盒模型--宽度和高度
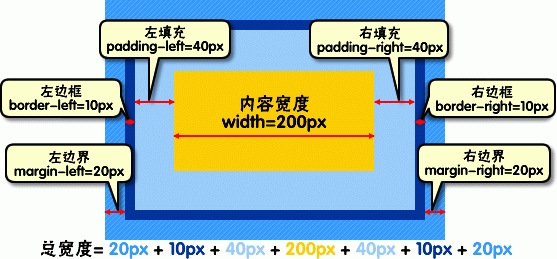
盒模型宽度和高度和我们平常所说的物体的宽度和高度理解是不一样的,css内定义的宽(width)和高(height),指的是填充以里的内容范围。
因此一个元素实际宽度(盒子的宽度)=左边界+左边框+左填充+内容宽度+右填充+右边框+右边界。
元素的高度也是同理。
比如:
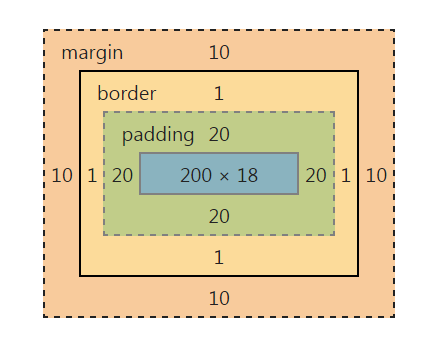
css代码:
div{
    width:200px;
    padding:20px;
    border:1px solid red;
    margin:10px;
}
html代码:
<body>
   <div>文本内容</div>
</body>
元素的实际长度为:10px+1px+20px+200px+20px+1px+10px=262px。在chrome浏览器下可查看元素盒模型,如下图:
盒模型--填充
元素内容与边框之间是可以设置距离的,称之为“填充”。填充也可分为上、右、下、左(顺时针)。如下代码:
div{padding:20px 10px 15px 30px;}
顺序一定不要搞混。可以分开写上面代码:
div{
   padding-top:20px;
   padding-right:10px;
   padding-bottom:15px;
   padding-left:30px;
}
如果上、右、下、左的填充都为10px;可以这么写
div{padding:10px;}
如果上下填充一样为10px,左右一样为20px,可以这么写:
div{padding:10px 20px;}
盒模型--边界
元素与其它元素之间的距离可以使用边界(margin)来设置。边界也是可分为上、右、下、左。如下代码:
div{margin:20px 10px 15px 30px;}
也可以分开写:
div{
   margin-top:20px;
   margin-right:10px;
   margin-bottom:15px;
   margin-left:30px;
}
如果上右下左的边界都为10px;可以这么写:
div{ margin:10px;}
如果上下边界一样为10px,左右一样为20px,可以这么写:
div{ margin:10px 20px;}
总结一下:padding和margin的区别,padding在边框里,margin在边框外。


