MQ系列(二)| RabbitMQ 整合 SpringBoot
RabbitMQ 整合 SpringBoot
概述
-
大多应用中,可通过消息服务中间件来提升系统异步通信、扩展解耦能力、流量削峰 -
消息服务中两个重要概念: 消息代理(`message broker`)和目的地(`destination`) 当消息发送者发送消息以后,将由消息代理接管,消息代理保证消息传递到指定目的地。 -
消息队列主要有两种形式的目的地 1. 队列(`queue`):点对点消息通信(`point-to-point`) 2. 主题(`topic`):发布(`publish`)/订阅(`subscribe`)消息通信
RabbitMQ 架构图

概念
生产者 Producer
生产者是消息的发送方,它将消息发送到 RabbitMQ 的交换器中。
✨消息 Message
- 消息=消息头+消息体,根据routekey发送到指定的交换机 Exchange
- 消息头:含有各种属性 routing-key(路由键)、priority(优先级)、delivery-mode(指出该消息可能需要持久性存储)等。
✨消息代理 Broker
- 消息传递的中间件服务器,负责接收、存储和转发消息,作用类似邮局🏣
- 消息存储+消息路由
- Broker = VHost1+Vhost2+Vhost3+.....
- Virtual Host = Exchange + Queue +Binding
虚拟主机 Virtual Host
-
逻辑分组机制,将不同的用户、队列、交换器等资源隔离开来
-
Virtual 即 VHost
-
默认目录 /
✨交换机 Exchange
- 绑定 routekey接收消息并发送到符合routekey 的 队列
- 常用三种类型
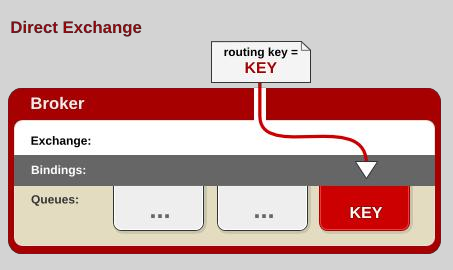
- ✨dirct:Direct Exchange(直连交换器) 【单播】完全匹配路由键的队列
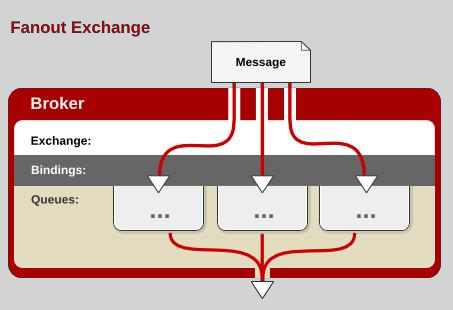
- ✨fanout:Fanout Exchange(扇出交换器)【广播】消息分发所有绑定队列上,不处理路由键
- ✨topic:Topic Exchange(主题交换器)【模式匹配】
#:配置0个或者多个单词*:匹配一个单词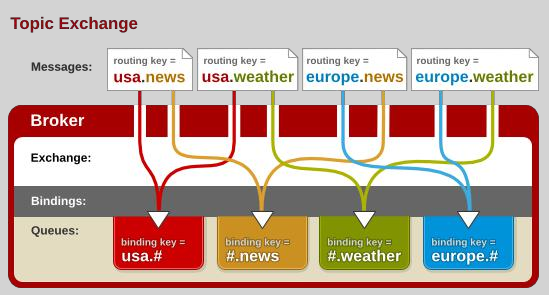
- headers:很少使用
- system:很少使用
- ✨dirct:Direct Exchange(直连交换器) 【单播】完全匹配路由键的队列
✨队列 Queue
- 存储消息的容器,FIFO
- 缓冲消息+持久化
绑定 Binding
- 用于消息队列和交换器之间的关联。
- 一个绑定就是基于路由键将交换器和消息队列连接起来的路由规则,所以可以将交换器理解成一个由绑定构成的路由表。
- Exchange 和Queue的绑定可以是多对多的关系。
连接 Connection
- 网络连接,比如一个TCP连接
信道 Channel
- 信道,多路复用连接中的一条独立的双向数据流通道。信道是建立在真实的TCP连接内的虚拟连接,AMQP 命令都是通过信道发出去的,不管是发布消息、订阅队列还是接收消息,这些动作都是通过信道完成。因为对于操作系统来说建立和销毁 TCP 都是非常昂贵的开销,所以引入了信道的概念,以复用一条 TCP 连接。
消费者 Consumer
消费者是消息的接收方,它从 RabbitMQ 的队列中获取消息并进行处理。
Docker 安装 RMQ
docker run -d --restart=always --name rabbitmq -p 5671:5671 -p 5672:5672 -p 4369:43699-p25672:25672-p 15671:15671 -p 15672:15672 rabbitmq:management
后台页面收发消息
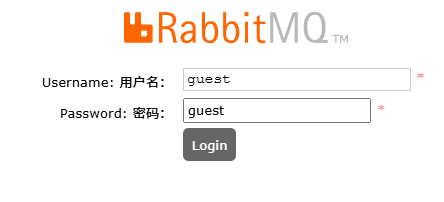
登录页面
登录的用户密码:guest/guest
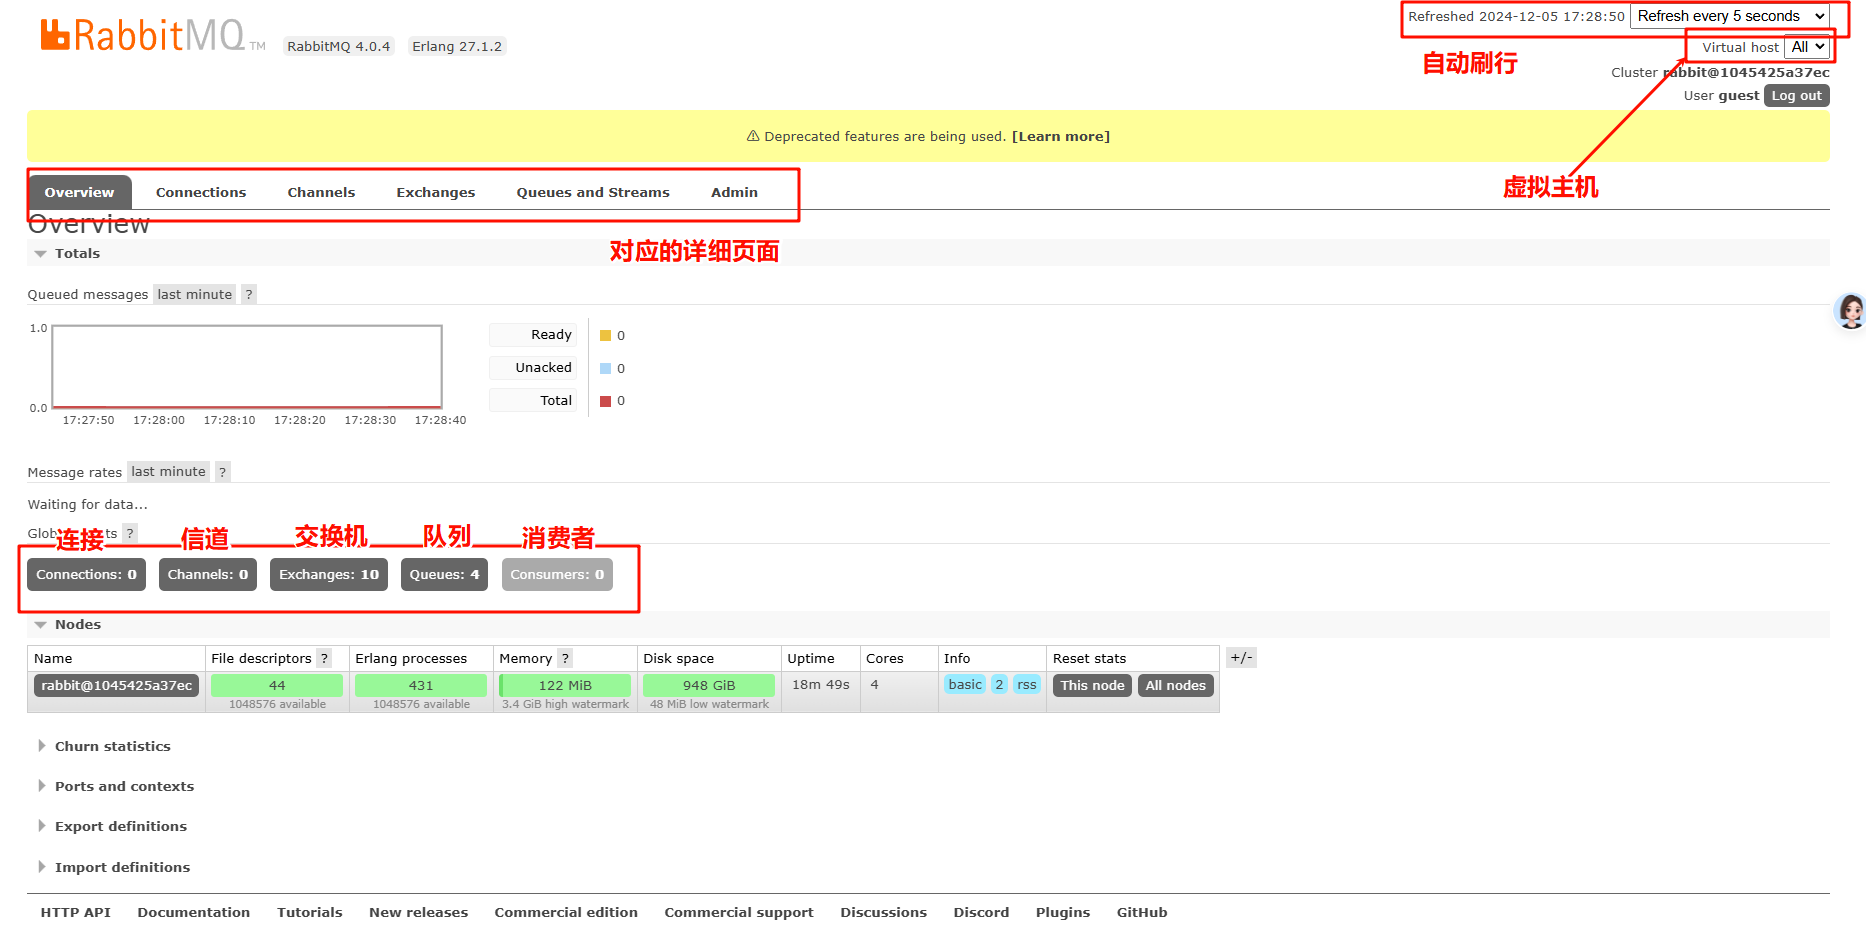
登录后台首页
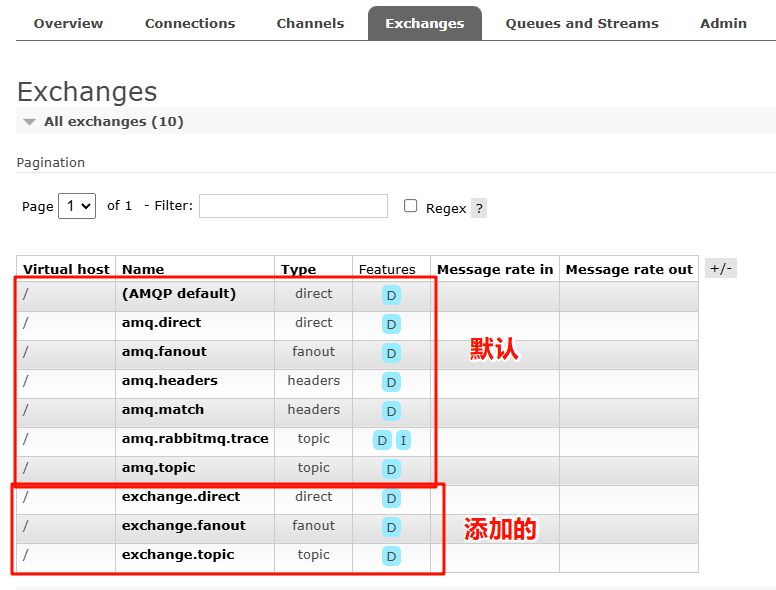
交换机 Exchange页面
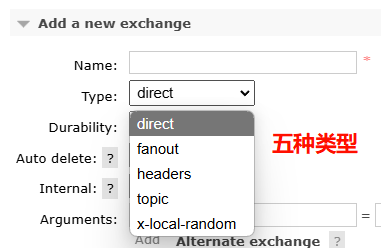
五种交换机类型:direct、fanout、headers、topic、x-local-random
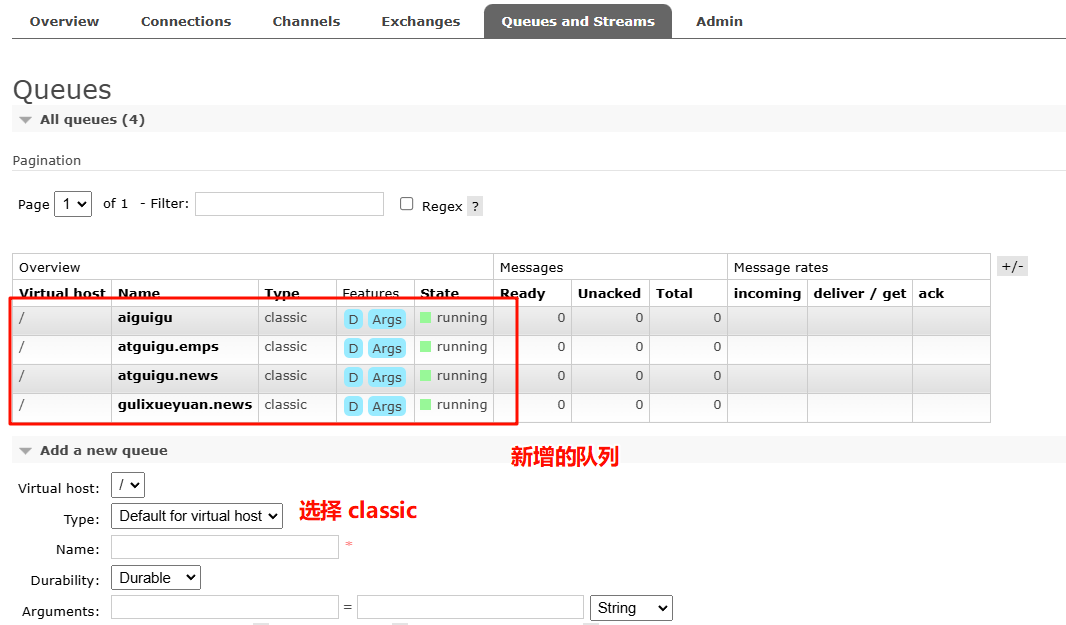
队列页面
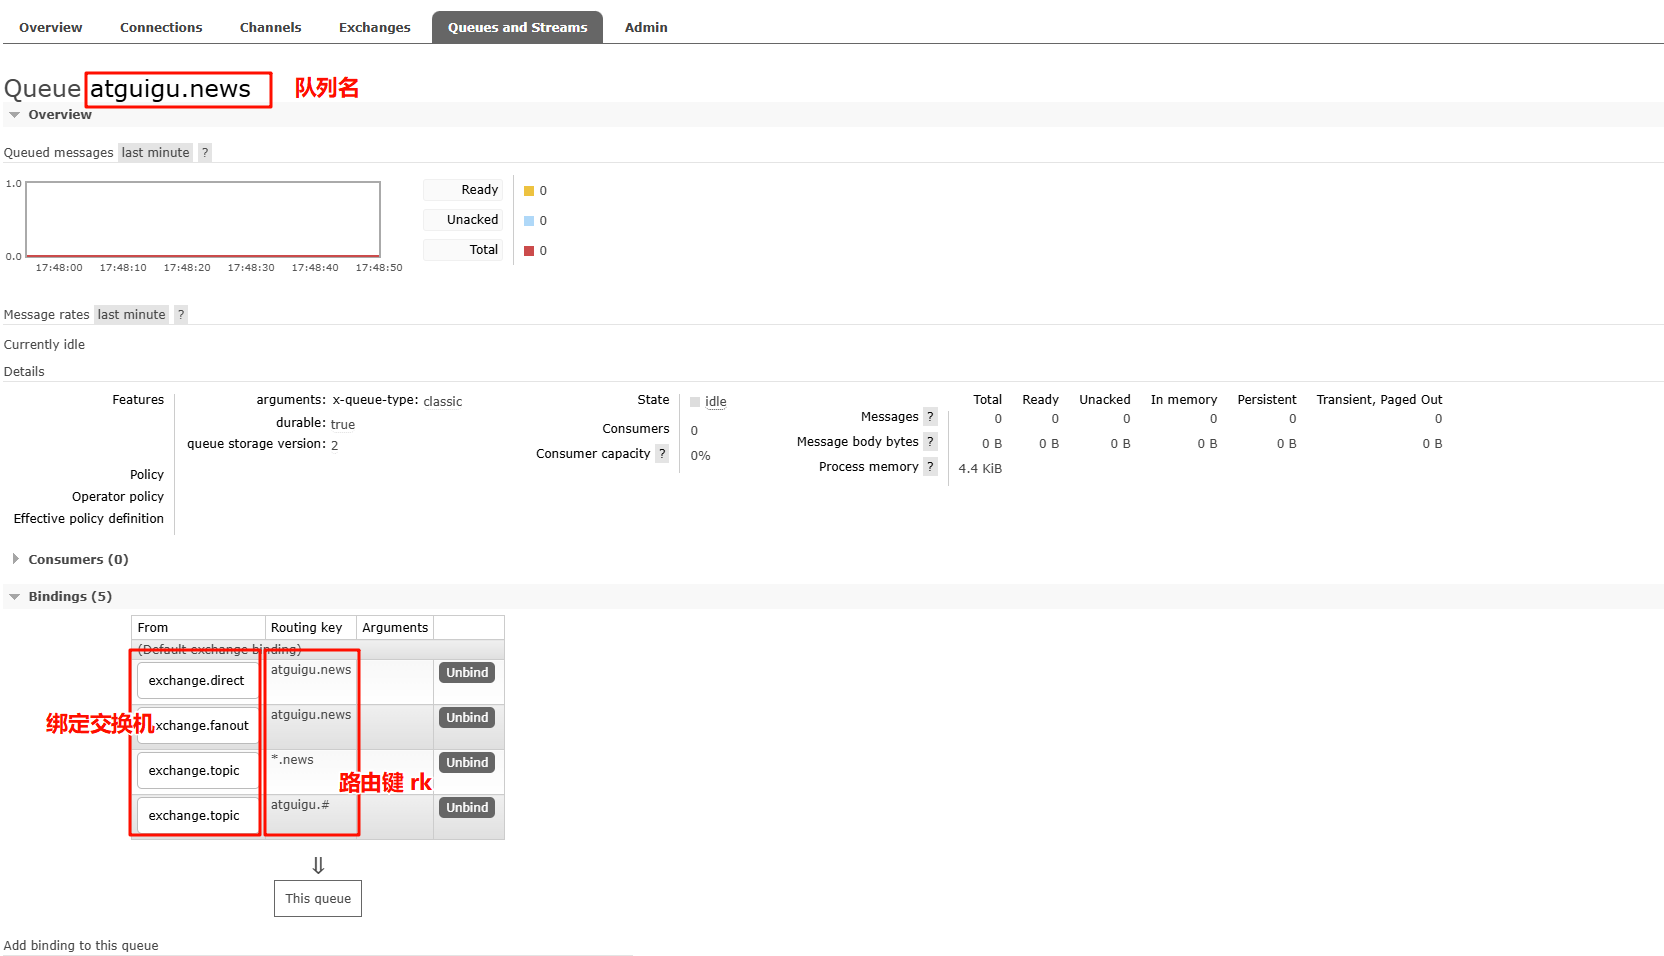
绑定:交换机根据路由键绑定到对应的队列
Virtual Host【Exchange --> binding(route-key) 】--> Queue(route-key)
默认的虚拟主机的路径是 "/",即根目录
交换机和队列绑定
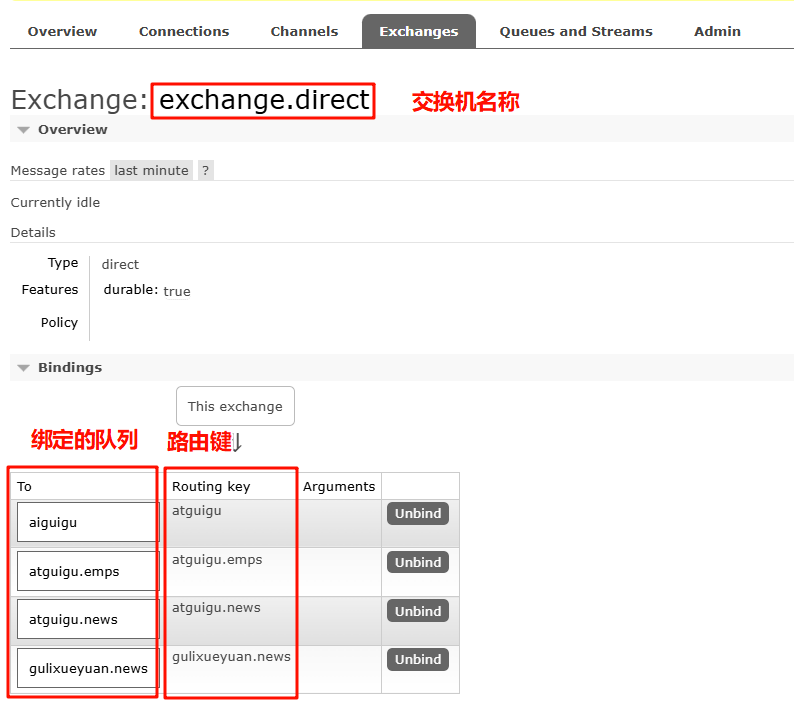
队列和交换机绑定关系
SpringBoot 整合
配置pom 文件
<!--AMQP依赖,包含RabbitMQ--> <dependency> <groupId>org.springframework.boot</groupId> <artifactId>spring-boot-starter-amqp</artifactId> </dependency>
配置application.yaml
server: port: 8081 spring: application: name: rabbitmq-demo rabbitmq: host: localhost port: 5672 username: guest password: guest virtualHost: / # publisher-confirm-type: CORRELATED # publisher-returns: true # listener: # simple: # acknowledge-mode: manual #默认情况下消息消费者是自动确认消息的,如果要手动确认消息则需要修改确认模式为manual # prefetch: 1 # 消费者每次从队列获取的消息数量。此属性当不设置时为:轮询分发,设置为1为:公平分发
测试类中-创建交换机
@Slf4j @SpringBootTest class RabbitmqDemoApplicationTests { @Autowired AmqpAdmin amqpAdmin; @Test public void createExchange() { DirectExchange directExchange = new DirectExchange("hello-java-exchange", true, false); amqpAdmin.declareExchange(directExchange); log.info("Exchange[hello-java-exchange] 创建完成"); } }
成功创建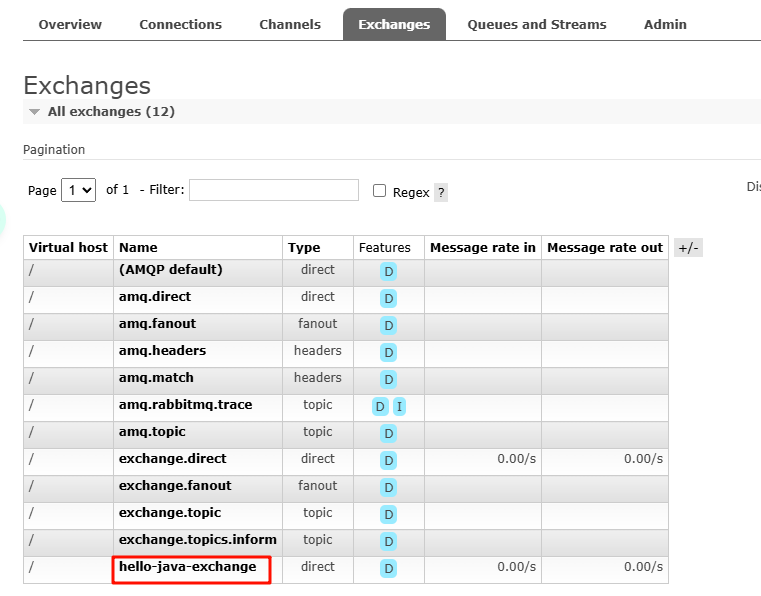
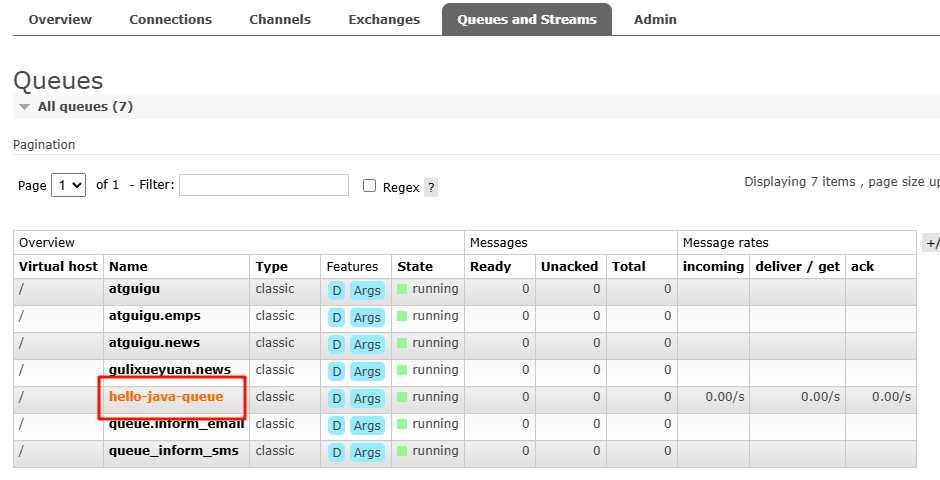
创建队列
@Test public void createQueue() { Queue queue = new Queue("hello-java-queue", true, false, false); amqpAdmin.declareQueue(queue); log.info("Queue[hello-java-queue] 创建完成"); }
执行后成功创建
创建绑定
@Test public void Binding() { Binding binding = new Binding("hello-java-queue", Binding.DestinationType.QUEUE, "hello-java-exchange", "hello-java", null); amqpAdmin.declareBinding(binding); log.info("Binding[hello-java-binding] 创建完成"); }
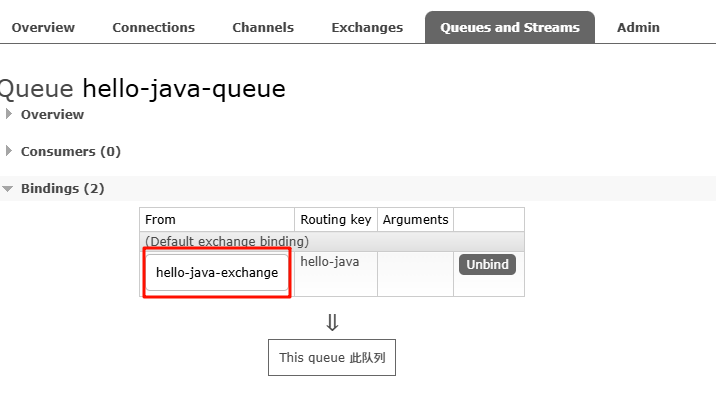
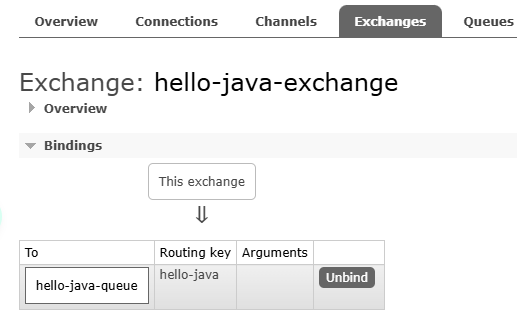
直连交换机【hello-java-exchange】和队列【hello-java-queue】用 routingkey 【hello-java】绑定
队列绑定
交换机绑定
发送消息【JSON消息转换器】
配置 RabbitConfig 序列化 json
根据源码
RabbitAutoConfiguration创建@Bean RabbitTemplate中的消息转换器属性MessageConverter messageConverter = new SimpleMessageConverter();说明了
RabbitMQ自动配置过程中,创建工具类【RabbitTemplate】,其中默认的消息转换器是 【SimpleMessageConverter】,我们来看下【SimpleMessageConverter】源码是如何收发消息的
SimpleMessageConverter创建消息
// 创建消息,默认使用序列化 Serializable类型发送,发送的消息实体需要实现序列化 protected Message createMessage(Object object, MessageProperties messageProperties) throws MessageConversionException { if (object instanceof byte[] bytes) { messageProperties.setContentType("application/octet-stream"); } else if (object instanceof String) { try { bytes = ((String)object).getBytes("UTF-8"); } catch (UnsupportedEncodingException e) { throw new MessageConversionException("failed to convert to Message content", e); } messageProperties.setContentType("text/plain"); messageProperties.setContentEncoding("UTF-8"); } else if (object instanceof Serializable) { try { bytes = SerializationUtils.serialize(object); } catch (IllegalArgumentException e) { throw new MessageConversionException("failed to convert to serialized Message content", e); } messageProperties.setContentType("application/x-java-serialized-object"); } if (bytes != null) { messageProperties.setContentLength((long)bytes.length); return new Message(bytes, messageProperties); } else { String var10002 = this.getClass().getSimpleName(); throw new IllegalArgumentException(var10002 + " only supports String, byte[] and Serializable payloads, received: " + object.getClass().getName()); } }
SimpleMessageConverter消费消息
public Object fromMessage(Message message) throws MessageConversionException { Object content = null; MessageProperties properties = message.getMessageProperties(); if (properties != null) { String contentType = properties.getContentType(); if (contentType != null && contentType.startsWith("text")) { String encoding = properties.getContentEncoding(); if (encoding == null) { encoding = this.defaultCharset; } try { content = new String(message.getBody(), encoding); } catch (UnsupportedEncodingException e) { throw new MessageConversionException("failed to convert text-based Message content", e); } } else if (contentType != null && contentType.equals("application/x-java-serialized-object")) { try { content = SerializationUtils.deserialize(this.createObjectInputStream(new ByteArrayInputStream(message.getBody()))); } catch (IllegalArgumentException | IllegalStateException | IOException e) { throw new MessageConversionException("failed to convert serialized Message content", e); } } } if (content == null) { content = message.getBody(); } return content; }
自定义消息类型转器 MessageConverter
MessageConverter的层次结构
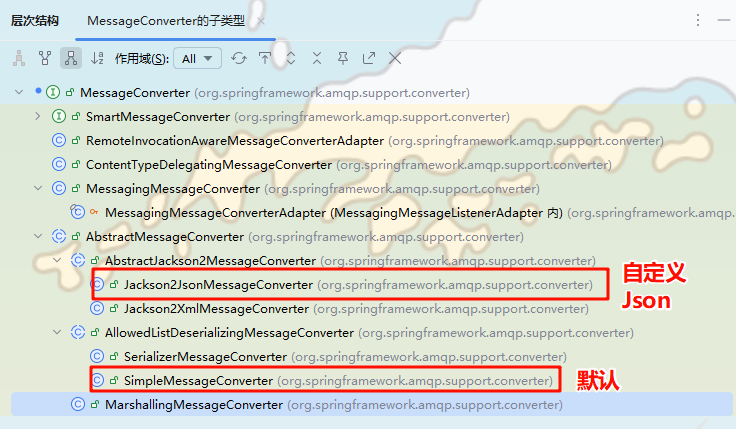
自定义消息类型转换器
import org.springframework.amqp.support.converter.Jackson2JsonMessageConverter; import org.springframework.amqp.support.converter.MessageConverter; import org.springframework.context.annotation.Bean; import org.springframework.context.annotation.Configuration; @Configuration public class RabbitMQConfig { @Bean public MessageConverter jsonMessageConverter() { return new Jackson2JsonMessageConverter(); } }
创建数据:订单退出原因实体对象 注意需要序列化 Serializable
@ToString @Data @Accessors(chain = true) //@TableName("oms_order_return_reason") public class OrderReturnReasonEntity implements Serializable { private static final long serialVersionUID = 1L; private Long id; /** * 退货原因名 */ private String name; /** * 排序 */ private Integer sort; /** * 启用状态 */ private Integer status; /** * create_time */ private Date createTime; }
测试类中发送消息
@Autowired RabbitTemplate rabbitTemplate; @Test public void sendMessage() { OrderReturnReasonEntity data = new OrderReturnReasonEntity(); data.setId(1L) .setCreateTime(new Date()) .setName("测试"); rabbitTemplate.convertAndSend("hello-java-exchange", "hello-java", data); log.info("发送消息: {}", data); }
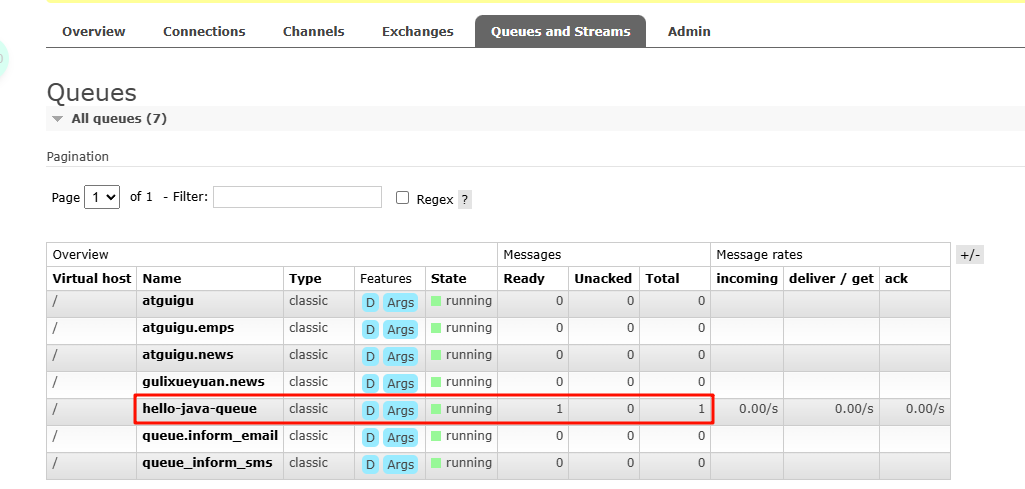
队列收到消息
收到消息对象
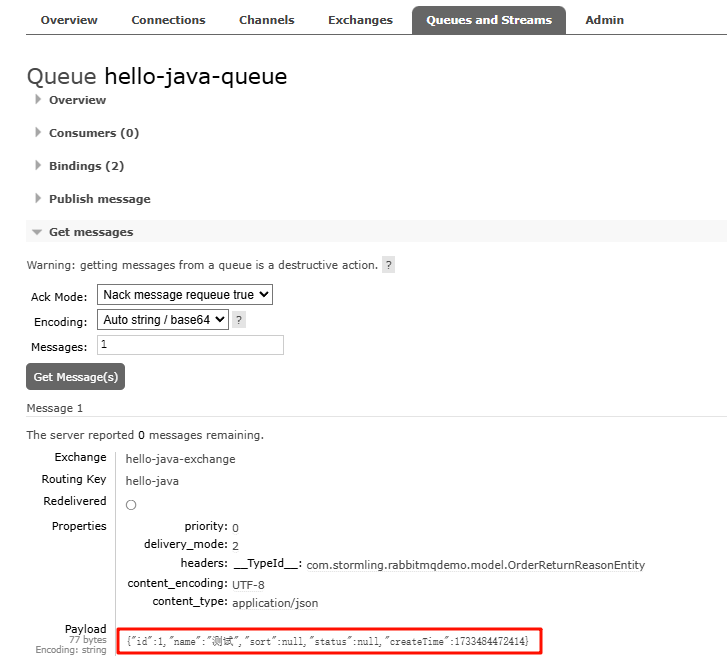
{"id":1,"name":"测试","sort":null,"status":null,"createTime":1733484472414}
接收信息
在启动类上添加 @EnableRabbit 开启 RabbitMQ
@EnableRabbit @SpringBootApplication public class RabbitmqDemoApplication { public static void main(String[] args) { SpringApplication.run(RabbitmqDemoApplication.class, args); } }
在需要接收消息的地方添加方法 @RabbitListerner 、@RabbitHandler
@
RabbitListerner:用在类和方法上并绑定对应的队列@
RabbitHandler:用在方法上,可以接收不同的类型的数据
@RabbitListener(queues = {"hello-java-queue"}) @Component @Slf4j public class OrderMQHandler { @RabbitHandler public void receiveOrderReturnReason(Message message, OrderReturnReasonEntity content, Channel channel) { //消息体 byte[] body = message.getBody(); //消息头配置 MessageProperties messageProperties = message.getMessageProperties(); log.info("消息体内容:{}", content); } @RabbitHandler public void receiverOrder(OrderEntity content) { log.info("接收消息=>Order:{}", content); } }
成功收到OrderReturnReasonEntity对象数据
2024-12-06T22:46:37.495+08:00 INFO 15808 --- [ntContainer#0-3] c.s.rabbitmqdemo.handler.OrderMQHandler : 消息体内容:OrderReturnReasonEntity(id=1, name=测试-0, sort=null, status=null, createTime=Fri Dec 06 22:46:37 CST 2024)
成功收到OrderEntity对象数据
2024-12-06T22:46:37.522+08:00 INFO 15808 --- [ntContainer#0-3] c.s.rabbitmqdemo.handler.OrderMQHandler : 接收消息=>Order:OrderEntity(id=1, memberId=null, orderSn=null, couponId=null, createTime=Fri Dec 06 22:46:37 CST 2024, memberUsername=测试-1, totalAmount=null, payAmount=null, freightAmount=null, promotionAmount=null, integrationAmount=null, couponAmount=null, discountAmount=null, payType=null, sourceType=null, status=null, deliveryCompany=null, deliverySn=null, autoConfirmDay=null, integration=null, growth=null, billType=null, billHeader=null, billContent=null, billReceiverPhone=null, billReceiverEmail=null, receiverName=null, receiverPhone=null, receiverPostCode=null, receiverProvince=null, receiverCity=null, receiverRegion=null, receiverDetailAddress=null, note=null, confirmStatus=null, deleteStatus=null, useIntegration=null, paymentTime=null, deliveryTime=null, receiveTime=null, commentTime=null, modifyTime=null)


· 阿里巴巴 QwQ-32B真的超越了 DeepSeek R-1吗?
· 10年+ .NET Coder 心语 ── 封装的思维:从隐藏、稳定开始理解其本质意义
· 【设计模式】告别冗长if-else语句:使用策略模式优化代码结构
· 字符编码:从基础到乱码解决
· 提示词工程——AI应用必不可少的技术