CentOS7+Nginx 部署 .Net Core Webapi
1-首先你首先要整一台CentOS7云服务器是吧(简单粗暴)
cat /etc/redhat-release 查看当前服务器版本信息

2.1 添加.NET相关
为了安装.NET,需要注册微软签名密钥和添加微软相关的支持。这个操作每台机器只能做一次。
打开命令行,输出以下命令,注册Microsoft需要的依赖环境;:
sudo rpm --import https://packages.microsoft.com/keys/microsoft.asc
sudo sh -c 'echo -e "[packages-microsoft-com-prod]\nname=packages-microsoft-com-prod \nbaseurl=https://packages.microsoft.com/yumrepos/microsoft-rhel7.3-prod\nenabled=1\ngpgcheck=1\ngpgkey=https://packages.microsoft.com/keys/microsoft.asc">/etc/yum.repos.d/dotnetdev.repo'
2.2 安装.NET Core Runtime(其实如果你直接在linux开发程序,是不需要安装SDK的)
①更新可用的安装包:sudo yum update
②安装.NET需要的组件,libunwind和libicu库:sudo yum install libunwind libicu
③安装runtime 命令:sudo yum install aspnetcore-runtime-3.1
④检测是否安装成功 命令:dotnet --info
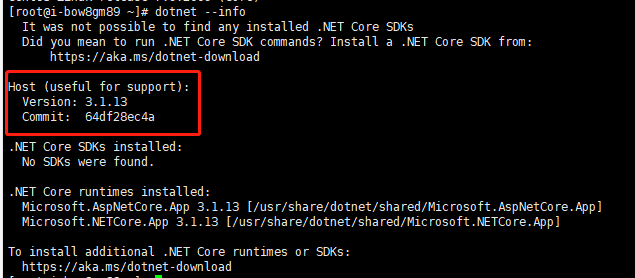
这样子就代表runtime安装成功了.
3.使用VS2019发布Asp.net Core WebApi (这里只是用了Webapi模板程序)
①创建webapi Demo项目
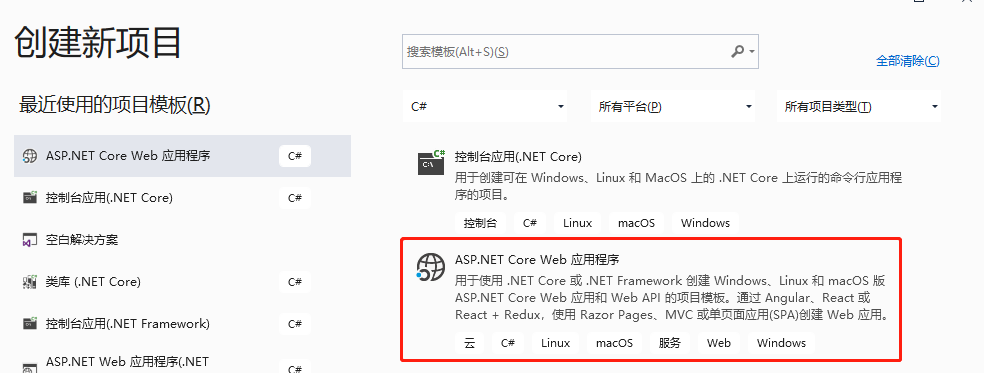
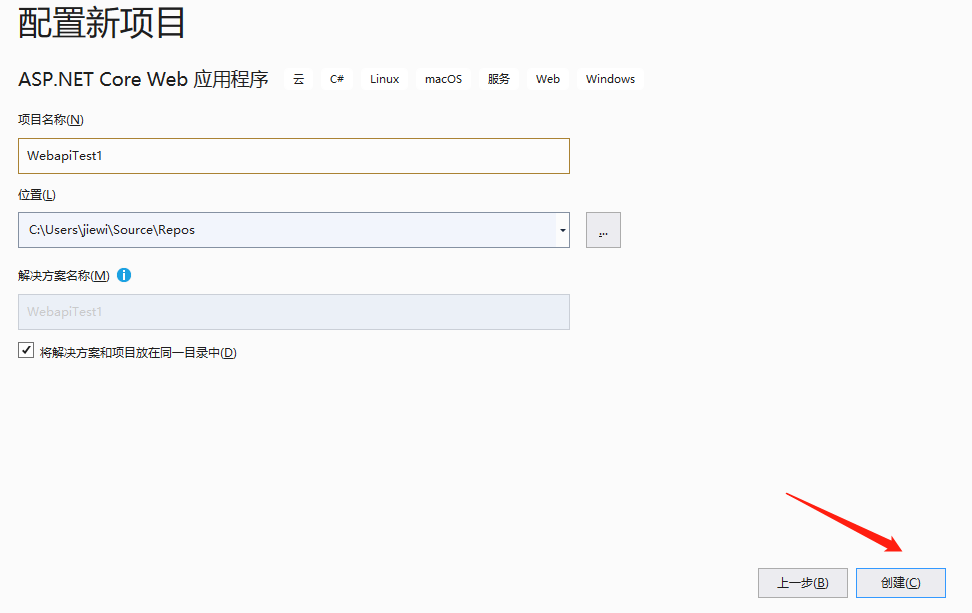
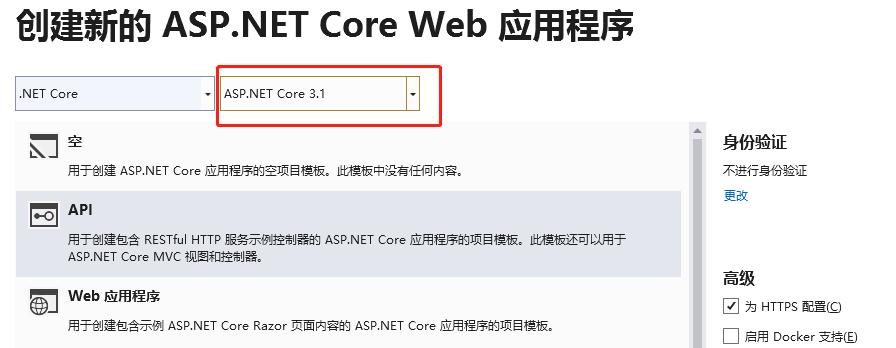
② 发布Webapi 到本地文件夹
项目右键-》发布=》选择发布的文件夹 =》点击发布
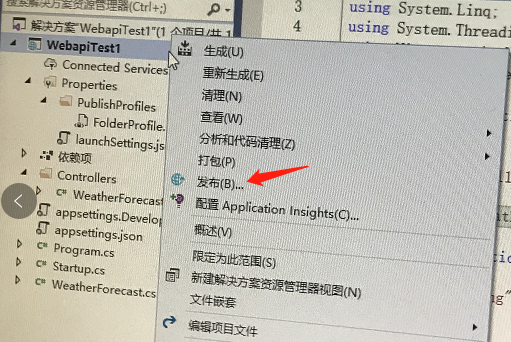
③ 通过ftp工具 并上传到CentOS 自定义的发布文件夹中
备注:我这里是用的 Xshell配套的 xftp上传的(xftp去申请个人版是免费的的)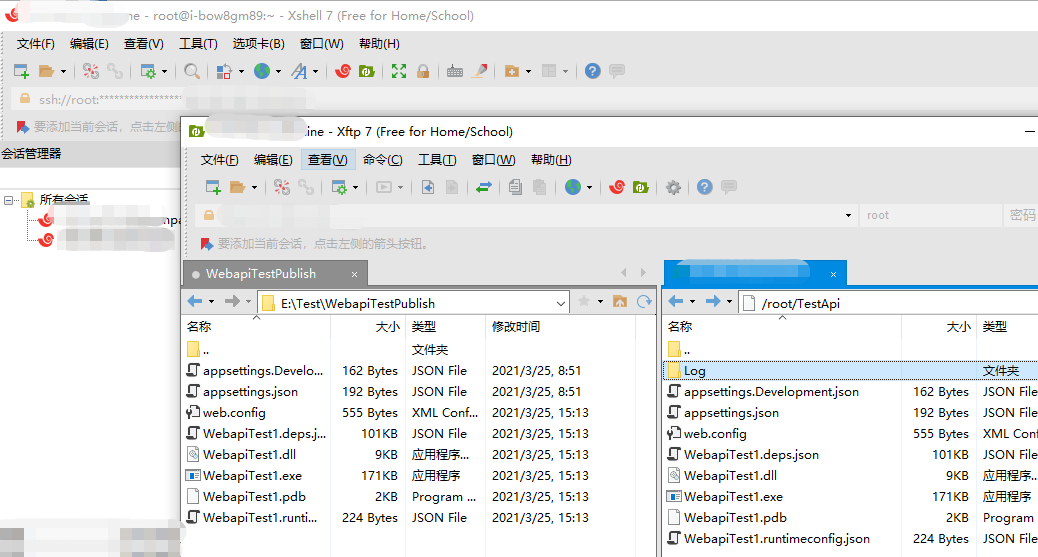
4.配置Nginx代理
(这里nginx代理了80端口,用户访问80端口,nginx转发到服务器内部的5000端口。这样目的是可以防止服务器端口直接暴露出来,相对安全一点)
4.1 准备工作
① yum install epel-release (安装CentOS的 EPEL仓库)
② yum install nginx (安装Nginx)
③ systemctl start nginx (启动Nginx)
④ systemctl enable nginx(默认启动Nginx)
⑤查看firewall 状态, 并启动防火墙:
yum install firewalld (安装)
systemctl status firewalld (查看防火墙状态)
systemctl start firewalld (启动防火墙 执行下面的⑥中命令一定要先开启防火墙)
⑥使用如下命令, 允许HTTP和HTTPS通过防火墙:
firewall-cmd --permanent --zone=public --add-service=http //允许HTTP
firewall-cmd --permanent --zone=public --add-service=https //允许HTTPS
firewall-cmd --reload
firewall-cmd --list-ports //查看开放的端口
⑦在浏览器地址栏输入你服务器的IP地址 如果出现如下路径页面 /usr/share/nginx/html/index.html 代表成功
4.2 修改Nginx的配置文件,并自定义配置文件
① vi /etc/nginx/nginx.conf (编辑nginx默认配置文件) 注释掉server的部分
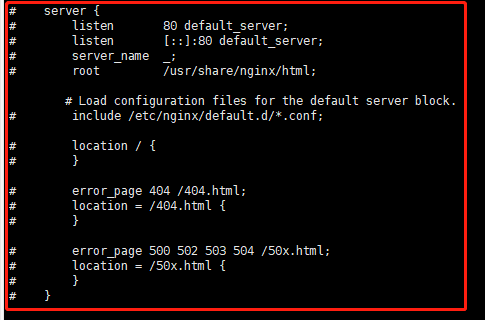
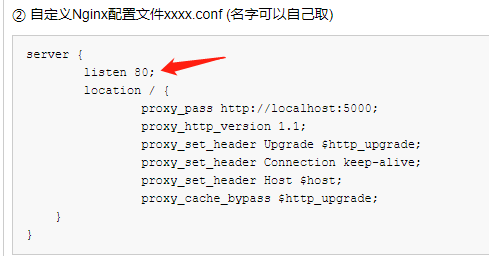
② 自定义Nginx配置文件xxxx.conf (名字可以自己取)
server {
	listen 80;
	location / {
		proxy_pass http://localhost:5000;
		proxy_http_version 1.1;
		proxy_set_header Upgrade $http_upgrade;
		proxy_set_header Connection keep-alive;
		proxy_set_header Host $host;
		proxy_cache_bypass $http_upgrade;
    }
}
保存后上传到 /etc/nginx/conf.d 目录下,然后重启Nginx 命令:nginx –s reload 或者 systemctl reload nginx.service

验证Nginx是否重启成功,命令: systemctl status nginx.service ( 查看nginx状态)

这里总结一下 nginx相关命令:
yum install nginx (安装Nginx)
systemctl start nginx.service / systemctl start nginx (开启nginx )
systemctl status nginx.service (查看nginx状态)
systemctl reload nginx.service (重启nginx)
systemctl stop nginx.service (关闭nginx)
4.3 将Nginx添加到SELinux白名单 (SELinux是Security Enhanced Linux的缩写)
①修改SELINUX状态
vi /etc/selinux/config 将该字段由false改成 enforcing,特别注意改完之后需要重启,我用的是reboot命令

重启完后输入 getenforce 命令,如果显示Enforcing 代表生效

②使用如下命令, 将Nginx添加至SELinux白名单,依次执行以下命令
yum install policycoreutils-python
cat /var/log/audit/audit.log | grep nginx | grep denied | audit2allow -M  mynginx
semodule -i mynginx.pp
③ 进入到 步骤 3-③ 中的文件夹执行命令 dotnet WebapiTest1.dll

你看执行后的结果是不是和我们在VS2019控制台一样的,接下来我们浏览器输入Demo提供的默认api验证一下
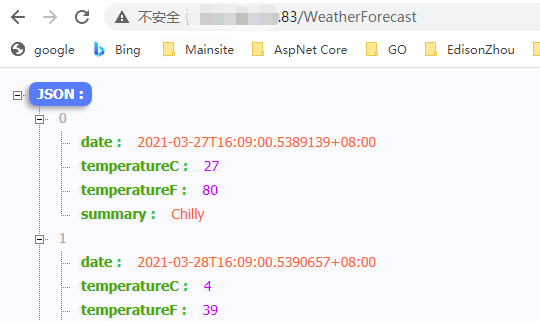
接口地址:http://你的服务器IP:80/WeatherForecast (因为我们在4.2- ②步骤中nginx配置监听端口是80)
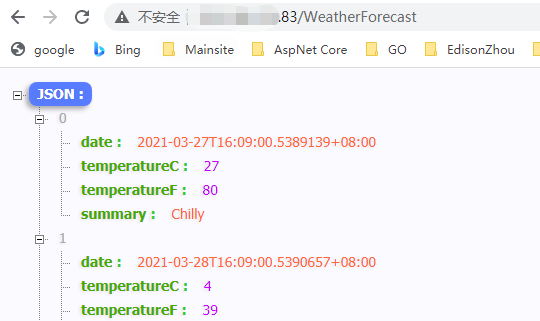
你不是奇怪为啥了浏览器只有ip没有端口号,因为只输入ip的话默认访问80端口。
如果你想要nginx代理别的端口只需要在4.2- ②步骤中改这个端口就行,不过开启了防火墙的话,你可能需要在你云服务器后台加一个下行规则,去开放端口。
还有一个问题要注意:.netcore 默认走的是https即使你输入http也会转成https 所以你得在core的pipeline管道配置中把 https重定向中间件暂时去掉 (Startup的 Configure方法中)
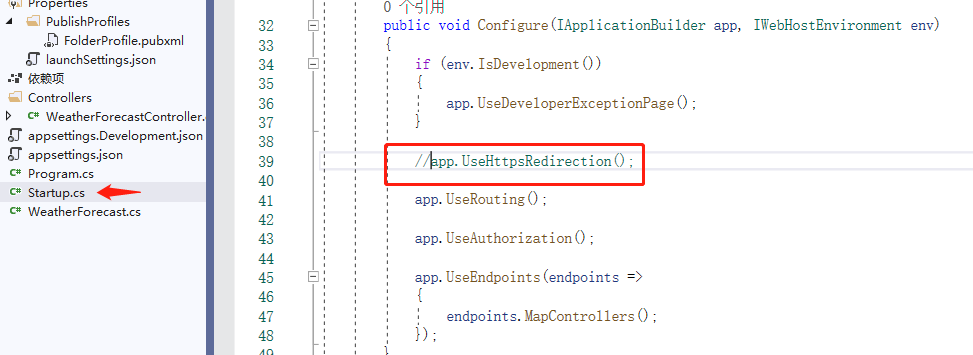
后续如果为了api安全起见公司强制走https 就只能去申请证书了。这一部分我还没验证,只是提供一个思路。
5. 配置守护进程Supervisor
but ! 你有没有发现当我们手动部署时,我们无法在页面进行别的操作。一旦我们命令行工具关闭了,发布的程序就不再访问了。这时候Supervisor就登场了(原理自己百度)
①安装Supervisor,两条命令
yum install python-setuptools

easy_install supervisor
② 配置Supervisor
mkdir /etc/supervisor
echo_supervisord_conf > /etc/supervisor/supervisord.conf (为Supervisor生成默认的配置文件)
vi /etc/supervisor/supervisord.conf (进入文件修改一些配置)
(1)将这三个文件路径修改,原来是在tmp文件夹下由于(tmp文件夹是临时文件夹linux可能会删除掉,不方便我们看一些日志信息)
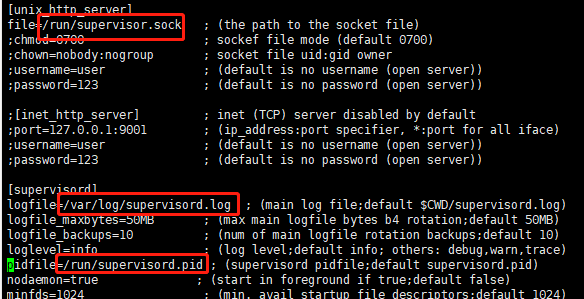
(2)将nodaemon改成true,这一步目的是当我们重启系统时,supervisor也能自启动

(3)这一步的目的是当supervisor启动时会自动加载supervisored.d 文件夹下的所有 ini文件
 (文件最后一行)
③ 新建supervisord.service文件 拷贝至 /usr/lib/systemd/system 路径下
# dservice for systemd (CentOS 7.0+)# by ET-CS (https://github.com/ET-CS)
[Unit]
Description=Process Monitoring and Control Daemon
[Service]
Type=forking
ExecStart=/usr/bin/supervisord -c /etc/supervisor/supervisord.conf
KillMode=process
Restart=on-failure
RestartSec=42s
[Install]
WantedBy=multi-user.target
④ 为我们部署的WebapiTest1添加进程配置文件 WebapiTest1.ini (名字自取)
[program:WebapiTest1]
command=dotnet WebapiTest1.dll --urls http://*:5000 ; 运行程序的命令
directory=/root/TestApi ; 命令执行的目录
autorestart=true ; 程序意外退出是否自动重启
stderr_logfile=/root/TestApi/Log/WebapiTest1.err.log ; 错误日志文件
stdout_logfile=/root/TestApi/Log/WebapiTest1.out.log ; 输出日志文件
environment=ASPNETCORE_ENVIRONMENT=Development ; 进程环境变量
user=root ; 进程执行的用户身份
stopsignal=INT
保存成功后,移动到supervisord.d文件夹。

⑤启动supervisord
systemctl enable supervisord.service

systemctl start supervisord.service  或 supervisord -c /etc/supervisor/supervisord.conf
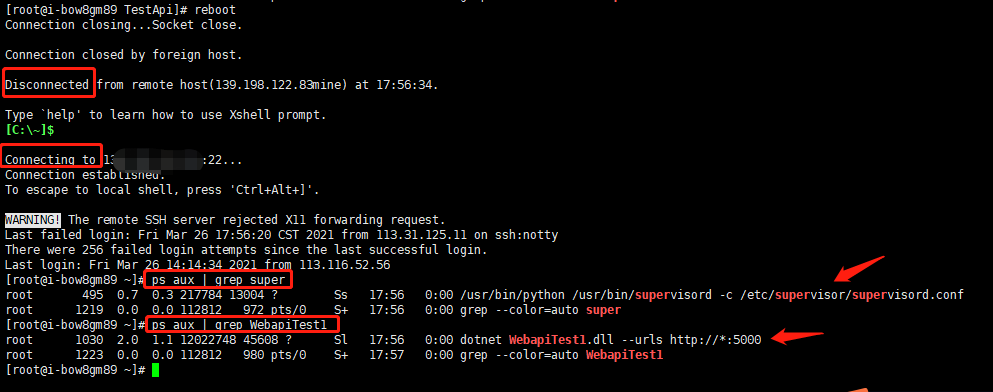
ps aux | grep supervisord / ps aux | grep WebapiTest
执行这两条命令验证,证明启动成功接下来访问接口是否能访问到数据。(如下图所示,接口能访问到数据)


⑥ supervisord 相关命令总结
systemctl status supervisord.service (查看supervisord进程状态)
systemctl enable supervisord.service
systemctl start supervisord.service (启动)
systemctl restart supervisord.service (重启,当我们改了相关配置文件时,重新加载配置)
systemctl stop supervisord.service (关闭)
5. 验证SuperVisor
1-WebapiTest1意外关闭是否能够被Supervisor重新拉起运行 (验证成功)

2-启动重启后能否自启动Supervisor (验证成功)
6. 补充内容
其他linux命令参考:
find / -name supervisor.sock
unlink /run/supervisor.sock
ps aux | grep supervisord 通过进程名查看进程状态
cat /var/log/supervisord.log 查看文件
cat -n /var/log/supervisord.log 行号查看
: > /var/log/supervisord.log 清空文件
kill 2020(pid) 通过pid结束进程
ip端口测试命令:
ping IP / 测试IP、端口:telnet IP Port
参考:
https://blog.csdn.net/tangmou_ren/article/details/83657294
https://my.oschina.net/u/3772973/blog/4626133
https://blog.csdn.net/binggoogle/article/details/53203991
https://blog.csdn.net/u014729212/article/details/101288635
说明: 如果给您带来了误导请在评论区指出,相互交流交互进步。邮箱交流也可以 16620834081@163.com over...


