vue之vuex和router的使用
一、vuex的简介
# vue的插件,增强了vue的功能,
在Vue中实现集中式状态(数据)管理的一个Vue插件,对vue应用中多个组件的共享状态进行集中式的管理(读/写),也是一种组件间通信的方式,且适用于任意组件间通信

# Vuex的使用流程
    -state:存数据的地址
    -actions:服务员,中转站
    -mutations:厨师,真正改state数据的地方

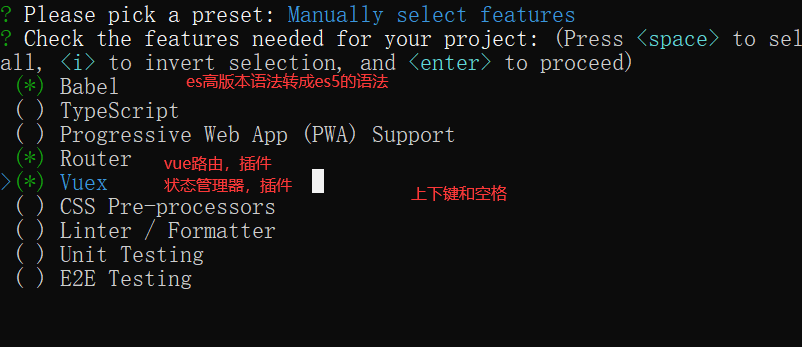
我们只要在创建vue项目的时候选择了Vuex那么就会帮我们自动下载了
如果没有 那么就需要手动下载
cnpm install Vuex
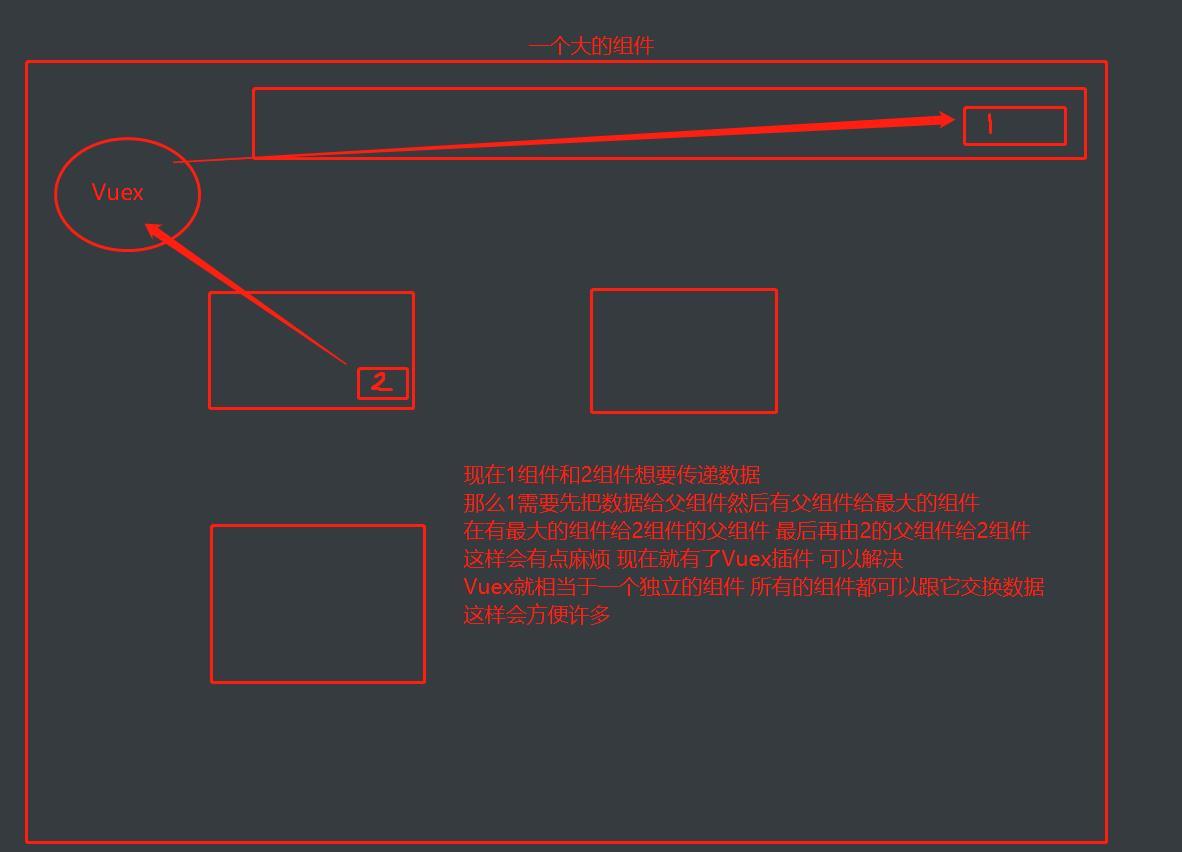
1.Vuex的流程图

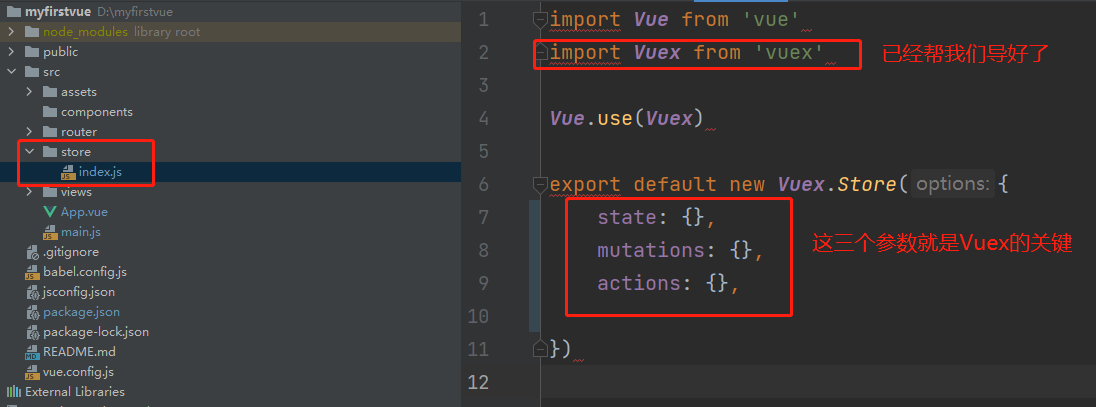
2.代码演示
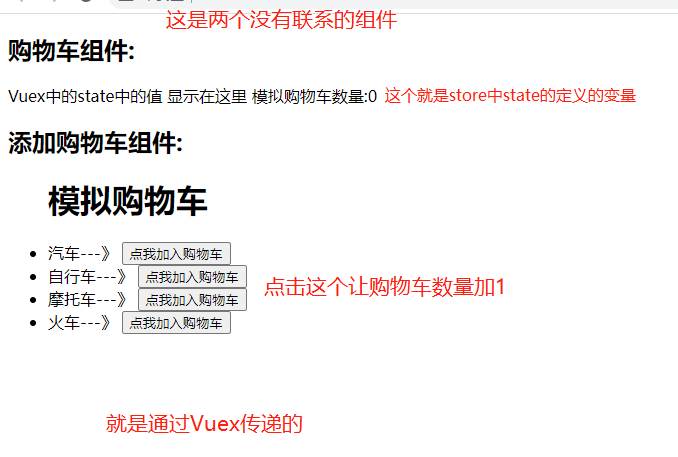
现在我们可以写一个添加购物车
首先我们要写两个组件 一个为购物车组件 一个为添加购物车组件
实现跨组件通信
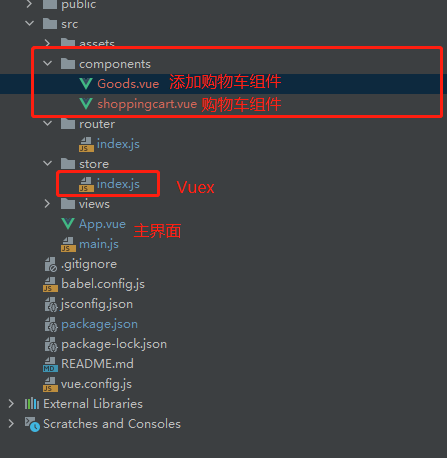
2.1 Goods.vue
<template>
  <div>
    <div>
      <ul>
        <h1>模拟购物车</h1>
        <li>汽车---》
          <button @click="addShoppingCart">点我加入购物车</button>
        </li>
        <li>自行车---》
          <button @click="addShoppingCart">点我加入购物车</button>
        </li>
        <li>摩托车---》
          <button @click="addShoppingCart">点我加入购物车</button>
        </li>
        <li>火车---》
          <button @click="addShoppingCart">点我加入购物车</button>
        </li>
      </ul>
    </div>
  </div>
</template>
<script>
export default {
  name: "Goods",
  methods: {
    addShoppingCart() {
      // 点击事件需要修改state的值 所以需要先执行dispatch函数
      this.$store.dispatch('add', 1)  // 第二个是我们传入的参数
      // 这个时候就会执行actions中的add函数
    }
  }
}
</script>
2.2 shoppingcart.vue
<template>
<div>
    <p>Vuex中的state中的值 显示在这里 模拟购物车数量:{{ $store.state.shoppingNum }}</p>
</div>
</template>
<script>
export default {
  name: "shoppingcart"
}
</script>
2.3 Vuex
import Vue from 'vue'
import Vuex from 'vuex'

Vue.use(Vuex)  // 插件

export default new Vuex.Store({
    state: {
        shoppingNum: 0  // 购物车数量
    },
    mutations: {  // 这个时候就可以修改state的值了
        up(state, num) {
            state.shoppingNum += num
        }
    },
    actions: {
        // 执行dispatch其实就是执行了actions  该对象中可以写多个函数
        add(context, num) {
            // 第一个参数是context 内部有commit和dispatch
            // 调用commit会触发mutations执行
            // 执行dispatch会触发actions中函数的执行
            // 所以这里可以写逻辑代码 就是把用户的token传入到后端看一下该用户有没有权限
            // 有权限在修改 没有就返回  我们就默认可以执行
            context.commit('up', num)  // 这个时候就会触发mutations中的up函数执行
        }
    },
})
2.4 app.vue
<template>
  <div id="app">
    <h2>购物车组件:</h2>
    <shoppingcart></shoppingcart>
    <h2>添加购物车组件:</h2>
    <Goods></Goods>
  </div>
</template>
<script>
import Goods from '@/components/Goods'
import shoppingcart from '@/components/shoppingcart'
export default {
  components: {
    Goods,shoppingcart  // 将子组件注册
  }
}
</script>
2.5 使用步骤
    1 在state中定义变量
    2 在组件中通过this.$store.dispatch('actions中定义的函数'),触发actions中得函数执行
    3 在actions中得函数中,调用 context.commit('mutations中定义的函数')
    4 在mutations中定义的函数实现真正的修改state中得数据
    5 页面中只要使用$store.state.变量,变量变化,页面就变化  实现了组件间通信
    6 注意:
      -在组件中可以直接调用commit触发【mutations中定义的函数】
      -在组件中可以直接修改state中定义变量
注意:
addShoppingCart() {
      this.$store.state.shoppingNum ++ // 其实可以直接改  但是不建议
      this.$store.commit('up', 1)  // 也可以直接调用mutations中的up 也不建议
}
二、Vue-router的使用
# 我们现在开发vue都是单页面开发 那么这肯定是不对的 那么怎么多页面开发呢? 那么就需要router的使用 这样就可以跳转到其他页面

# 官方提供的用来实现SPA 的vue 插件:有了它以后,我们可以写很多页面组件,通过地址栏不同的路径显示不同的页面组件
更多知识点:https://router.vuejs.org/zh/index.html
# 也是一样的 在创建vue项目的时候 只需要选择了 router那么就会帮我们自动创建

# 没有选择的话需要手动下载
cnpm install router
1 使用步骤
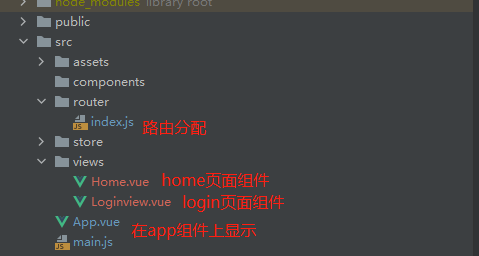
# 1.新建文件夹router/index.js
    在const routes中写路由配置
        const routes = ['路由1','路由2']
# 2 在main.js中使用,已经写好了
        import router from './router'
        new Vue({
            ...
              router,
            ...
            }).$mount('#app')
# 3 只需要写页面组件,配置路由即可
# 4 在App.vue中加入
          <router-view>
                # 配置好了路由 那么就会在这个标签中显示
        </router-view>
# 5 在浏览器访问const routes中配置的路径,就能看到对应的页面组件了
2 代码演示 路由跳转
创建两个组件:home组件 login组件
2.1 home.vue
<template>
  <div>
    <h1>我是首页</h1>
    <router-link :to="path">去登入</router-link>
  </div>
</template>
<script>
export default {
  name: "Home",
  data() {
    return {
      path: 'login'
    }
  },
}
</script>
2.2 login.vue
<template>
  <div>
    <p>用户名:<input type="text" v-model="username"></p>
    <p>密码:<input type="text" v-model="password"></p>
    <p>
      <button>登入</button>
    </p>
  </div>
</template>

<script>
export default {
  name: "Loginview",
  data() {
    return {
      username: '',
      password: ''
    }
  },
}
</script>
2.3 index.js
import Vue from 'vue'
import VueRouter from 'vue-router'
import Loginview from "../views/Loginview";
import Home from "../views/Home"


Vue.use(VueRouter)

const routes = [
    {
        path: '/',  // 首页
        name: 'home',  // 取别名
        component: Home  // home组件的名字
    },
    {
        path: '/login',
        name: 'login',
        component: Loginview
    },
]

const router = new VueRouter({
    mode: 'history',
    base: process.env.BASE_URL,
    routes
})

export default router
2.4 app.vue
<template>
  <div id="app">
       <!--外面写的标签是每个组件都会显示-->
    <router-view>
            <!--以后app.vue其实只要写个router-view标签即可-->
    </router-view>
  </div>
</template>

<script>
export default {
}
</script>
3 路由跳转的多种用法
<!--第一种绑定变量 然后变量绑定 router中的name值-->
<router-link :to="path">登入</router-link>

  data() {
    return {
      path: 'login'  <!--这个login是router中我们自己写的name值-->
    }

<!--第二种写字符串 也是写router中的name值-->
<router-link to="login">登入</router-link>

<!--第三种 绑定事件 使用js跳转-->
<button @click="handleLogin">点我登录</button>

  methods: {
    handleLogin() {
      this.$router.push('login')  <!--这里的login也是router中我们自己写的name值-->
    }
  }
4 携带参数跳转
# 两种情况
    -带在请求地址中以  ?name=lqz&age=19
    -在地址中类似于django的分组  /goods/1/
4.1 第一种
<!--第一种:有两种写法 -->

<!--第一种写法:-->
<router-link to="/login/?name=lqz&age=19">去登录</router-link>  <!--直接在地址后面写-->

组件中接收:
    this.$route.query
      created() {
        console.log(this.$route.query)
      },

<!--第二种写法:-->
    <router-link :to="path">去登录</router-link>
    <!--绑定变量-->
    <script>
    export default {
      name: "Home",
      data() {
        return {
          path: {  // 给path写一个对象
            name: 'login',  // 这里写router中name值
            query: {name: 'lqz', age: 19}  // 往query中写参数
        }
      },
    }
    </script>

组件中接收跟第一种写法是一样的:
    this.$route.query
      created() {
        console.log(this.$route.query)
      },
4.2 第二种
<!--第二种也有两种写法-->

<!--第一种写法-->
<router-link to="/login/1">去登录</router-link>
<!--也是直接在后面加上-->

组件中接收:
this.$route.params.id
<script>
  created() {
    // 方式二:/login/1
    console.log(this.$route.params.id)
  },
</script>

<!--第二种写法-->
<router-link :to="path">去登录</router-link>
<script>
  data() {
    return {
      path: {
        name: 'login',
        params: {id: 'lyf'}  // 直接在params中写上对象
      }
    }
  },
</script>

<!--第二种写法的组件接收 跟第一种写法是一样的-->
this.$route.params.id
<script>
  created() {
    // 方式二:/login/1
    console.log(this.$route.params.id)
  },
</script>

<!--这样就可以根据用户选择的id或则其他来过滤掉一些数据-->
5 路由嵌套
# 就是像这样 goods/list ... 在该标签中还可以继续加点击路由
我们可以在商城下再来几个路由 :goods/list、goods/detail、goods/shopcart 但是如果是嵌套那么必须写在goods路由中的children下
5.1 index.js
const routes = [
    {
        path: '/',
        name: 'home',
        component: Home
    },
    {
        path: '/goods',
        name: 'goods',
        component: Goods,
        children: [  // 在children中编写 goods的子路由
            {
                name: 'list',  // 也是name和path,component
                path: 'list',
                component: GoodList
            },
            {
                name: 'detail',
                path: 'detail',
                component: GoodDetail
            },
            {
                name: 'shoppingcart',
                path: 'shoppingcart',
                component: ShoppingCart
            }
        ]

    },
5.2 goods.vue
<template>
  <div>
    <h1>我是商品</h1>
    <p>
      <router-link to="/goods/detail"><span>详情</span></router-link>
      |
      <router-link to="/goods/list"><span>列表</span></router-link>
      |
      <router-link to="/goods/shoppingcart"><span>购物车</span></router-link>
    </p>

    <router-view>
    <!--在goods组件中在写一个router-view标签 那么goods的子路由就会显示在这个标签中-->
  </router-view>
  </div>
</template>
5.3 总结
# 使用步骤:
    1 router/index.js 相应的路由中
        {
            path: '/goods',
            name: 'goods',
            component: Goods,
            children: [
                {
                    path: 'list',
                    component: GoodList
                },
                {
                    path: 'detail',
                    component: GoodDetail
                }
            ]

        },
     2 必须要在Goods组件中,写<router-view></router-view>
     3 使用router-link标签跳转
     4 只会变更Goods下router-view包裹的位置
6 路由守护
# 就是根据用户的权限来判断用户能不能使用这个路由
6.1 代码演示
# 我们可以根据用户登入的时候把用户信息放入到localStorage然后在用户在点击路由的时候来判断 用户是否有没有这个权限
6.2 home.vue
<!--模拟用户登入成功 然后把用户信息放入到 localStorage-->
<button @click="handleLogin">点我登录</button>
<script>
export default {
  methods: {
    handleLogin() {
      localStorage.setItem('name', 'lqz')  // 放入到localStorage中
    }
  }
}
</script>
6.3 index.js
router.beforeEach((to, from, next) => {  // 前置路由守护  就是路由在访问之前先做判断
// to:去到哪个路由    from:来自哪个路由
    console.log('前置路由守卫', to, from)

    if (to.name == 'shoppingcart') {  // 判断当前用户是不是要去shoppingcart这个路由
        let name = localStorage.getItem('name')
        if (name) {  // 在判断localStorage 中是否有值
            next()  // 有值就跳过
        } else {
            alert('不好意思没有权限')  // 没值就相当于没有权限
        }
    } else {
        next()
    }
})
上面这个是前置守护 还有后置守护
router.afterEach((to,from)=>{
    console.log('后置路由守卫',to,from)  // 后置守护就是进入到了这个路由但是出来的时候可以判断一下
    document.title = to.name
})




【推荐】国内首个AI IDE,深度理解中文开发场景,立即下载体验Trae
【推荐】编程新体验,更懂你的AI,立即体验豆包MarsCode编程助手
【推荐】抖音旗下AI助手豆包,你的智能百科全书,全免费不限次数
【推荐】轻量又高性能的 SSH 工具 IShell:AI 加持,快人一步
· 震惊!C++程序真的从main开始吗?99%的程序员都答错了
· 别再用vector<bool>了!Google高级工程师:这可能是STL最大的设计失误
· 单元测试从入门到精通
· 【硬核科普】Trae如何「偷看」你的代码?零基础破解AI编程运行原理
· 上周热点回顾(3.3-3.9)