Ryu源码之模块功能分析
一:模块间通信机制分析
Ryu是一款非常轻便的SDN控制器,在科研方面得到了广泛的应用。相比其他控制器,受益于Python语言,在Ryu上开发SDN应用的效率要远高于其他控制器。为了解决复杂的业务,有时需要在Ryu上开发多模块来协同工作,从而共同完成复杂的业务。这里只考虑lookup_service_brick获取模块实例对象,从而获取动态实例对象的数据!!!
以:SDN实验---Ryu的应用开发(五)网络拓扑发现为例(TopoDetect.py),作为自定义的app,被加载到一个新的app中(Test.py)
(一)使用lookup_service_brick加载模块实例时,对于我们自己定义的app(需要被加载的),我们需要在类中定义self.name。

(二)源码分析: 查看如何使用self.name
参考:SDN实验---Ryu的源码分析
1.从main入口查找:ryu/cmd/manager.py
from ryu.base.app_manager import AppManager

def main(args=None, prog=None):
    app_lists = CONF.app_lists + CONF.app #从ryu-manager传入的App参数中获取app_list (详细可看参考)---重点:我们需要同时将被加载的类传入

    app_mgr = AppManager.get_instance() #单例对象,管理所有的app
    app_mgr.load_apps(app_lists) #加载所有app:重点
    contexts = app_mgr.create_contexts() #创建上下文
    services = []
    services.extend(app_mgr.instantiate_apps(**contexts)) #重点:实例化app----下一步分析

    webapp = wsgi.start_service(app_mgr)
    if webapp:
        thr = hub.spawn(webapp)
        services.append(thr)

    try:
        hub.joinall(services)
    except KeyboardInterrupt:
        logger.debug("Keyboard Interrupt received. "
                     "Closing RYU application manager...")
    finally:
        app_mgr.close()
2.app_mgr.instantiate_apps实例化app : ryu.base.app_manager
class AppManager(object):

    def load_app(self, name):
        mod = utils.import_module(name)
        clses = inspect.getmembers(mod,
                                   lambda cls: (inspect.isclass(cls) and
                                                issubclass(cls, RyuApp) and
                                                mod.__name__ ==
                                                cls.__module__))
        if clses:
            return clses[0][1]
        return None

    def load_apps(self, app_lists):
        app_lists = [app for app
                     in itertools.chain.from_iterable(app.split(',')
                                                      for app in app_lists)]
        while len(app_lists) > 0:
            app_cls_name = app_lists.pop(0)

            context_modules = [x.__module__ for x in self.contexts_cls.values()]
            if app_cls_name in context_modules:
                continue

            LOG.info('loading app %s', app_cls_name)

            cls = self.load_app(app_cls_name)
            if cls is None:
                continue

            self.applications_cls[app_cls_name] = cls

            services = []
            for key, context_cls in cls.context_iteritems():
                v = self.contexts_cls.setdefault(key, context_cls)
                assert v == context_cls
                context_modules.append(context_cls.__module__)

                if issubclass(context_cls, RyuApp):
                    services.extend(get_dependent_services(context_cls))

            # we can't load an app that will be initiataed for
            # contexts.
            for i in get_dependent_services(cls):
                if i not in context_modules:
                    services.append(i)
            if services:
                app_lists.extend([s for s in set(services)
                                  if s not in app_lists])

    def instantiate_apps(self, *args, **kwargs):
        for app_name, cls in self.applications_cls.items():
            self._instantiate(app_name, cls, *args, **kwargs)

        self._update_bricks()
        self.report_bricks()

        threads = []
        for app in self.applications.values():
            t = app.start()
            if t is not None:
                app.set_main_thread(t)
                threads.append(t)
        return threads

    def _instantiate(self, app_name, cls, *args, **kwargs):
        # for now, only single instance of a given module
        # Do we need to support multiple instances?
        # Yes, maybe for slicing.
        LOG.info('instantiating app %s of %s', app_name, cls.__name__)

        if hasattr(cls, 'OFP_VERSIONS') and cls.OFP_VERSIONS is not None:
            ofproto_protocol.set_app_supported_versions(cls.OFP_VERSIONS)

        if app_name is not None:
            assert app_name not in self.applications
        app = cls(*args, **kwargs) #实例化对象
        register_app(app) #注册app  重点!!!
        assert app.name not in self.applications
        self.applications[app.name] = app
        return app
3.注册App实例对象到服务链中 :ryu.base.app_manager(与2同文件下)
SERVICE_BRICKS = {}


def lookup_service_brick(name):
    return SERVICE_BRICKS.get(name) #重点2:由重点1可以知道,我们最终将app实例保存在了全局字典中,所以我们可以直接使用该方法获取对于实例对象,实现模块之间通信(数据分享)


def _lookup_service_brick_by_ev_cls(ev_cls):
    return _lookup_service_brick_by_mod_name(ev_cls.__module__)


def _lookup_service_brick_by_mod_name(mod_name):
    return lookup_service_brick(mod_name.split('.')[-1])


def register_app(app):
    assert isinstance(app, RyuApp)
    assert app.name not in SERVICE_BRICKS
    SERVICE_BRICKS[app.name] = app  #重点1:将app的name成员作为key,app对象作为value放入全局字典中
    register_instance(app)
完结撒花!!!
(三)实例演示
1.Test.py使用lookup_service_brick函数
from ryu.base import app_manager
from ryu.base.app_manager import lookup_service_brick

from ryu.ofproto import ofproto_v1_3

from ryu.controller import ofp_event
from ryu.controller.handler import MAIN_DISPATCHER,CONFIG_DISPATCHER,DEAD_DISPATCHER,HANDSHAKE_DISPATCHER #只是表示datapath数据路径的状态
from ryu.controller.handler import set_ev_cls

from ryu.topology.switches import Switches
from ryu.topology.switches import LLDPPacket

class Test(app_manager.RyuApp):
    OFP_VERSIONS = [ofproto_v1_3.OFP_VERSION]

    def __init__(self,*args,**kwargs):
        super(Test,self).__init__(*args,**kwargs)
        self.name = "delay"

        self.topology = lookup_service_brick("topology") #注意:我们使用lookup_service_brick加载模块实例时,对于我们自己定义的app,我们需要在类中定义self.name。
        #此外,最重要的是:我们启动本模块DelayDetect时,必须同时启动自定义的模块!!! 比如:ryu-manager ./TopoDetect.py ./DelayDetect.py --verbose --observe-links
        self.switches = lookup_service_brick("switches") #该app是在ryu内部被实例化了,所以我们可以直接加载,同样还有ofp_event也是被实例化,可以直接加载


    @set_ev_cls(ofp_event.EventOFPStateChange,[MAIN_DISPATCHER, DEAD_DISPATCHER])
    def _state_change_handler(self, ev):
        if self.topology == None:
            self.topology = lookup_service_brick("topology")
        print("-----------------------_state_change_handler-----------------------")
        print(self.topology.show_topology())  #调用lookup_service_brick载入的实力对象
2.启动Ryu:需要载入对应的自定义模块
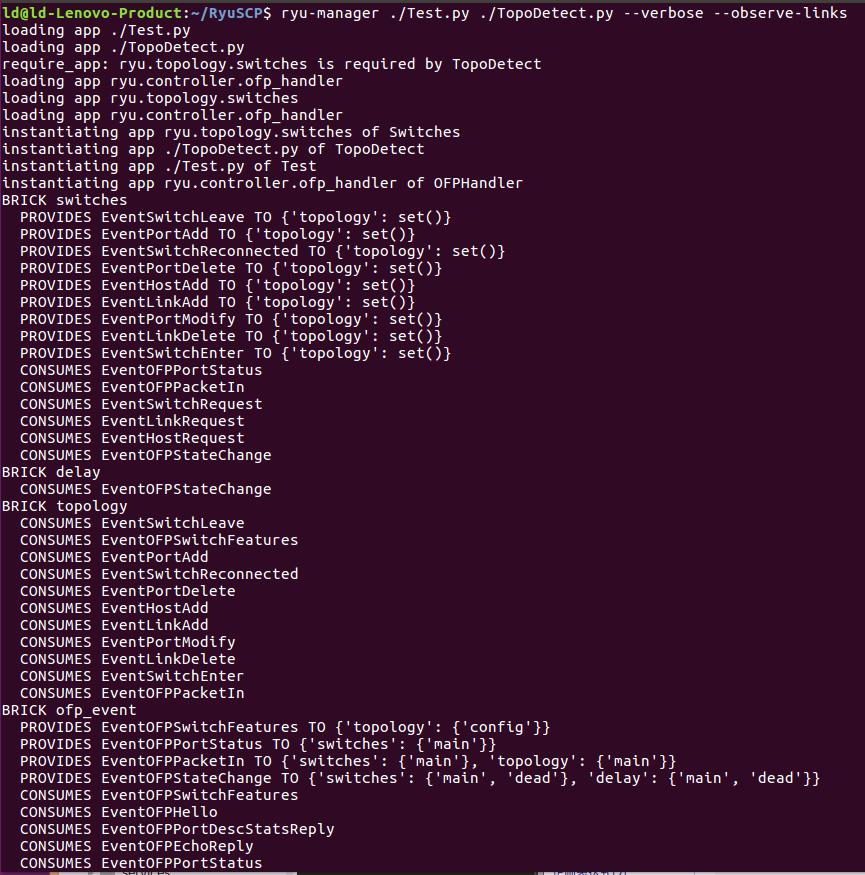
ryu-manager ./Test.py ./TopoDetect.py --verbose --observe-links

查看BRICK name即可发现topology被载入!!

对应数据、方法调用成功!!!
完结撒花!!!

