webpack打包多页面
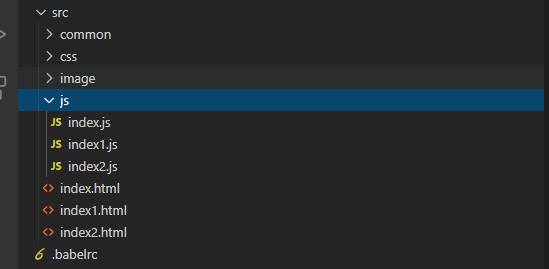
项目结构:

直接上webpack.base.conf.js配置文件:
const webpack = require('webpack');
const path = require('path');
const htmlPlugin = require('html-webpack-plugin'); //生成html模板
const extractTextPlugin = require('extract-text-webpack-plugin'); //分离css从js里
const { CleanWebpackPlugin } = require('clean-webpack-plugin'); //清除打包的
var configReq = require('./config.js'); //读取配置
const CopyWebpackPlugin = require('copy-webpack-plugin');
const HappyPack = require('happypack'); // 多线程打包
const os = require('os');
const happyThreadPool = HappyPack.ThreadPool({ size: os.cpus().length });
var config = {
entry: configReq.entry,
output: {
filename: 'js/[name]-[hash].js',
path: path.resolve(__dirname, '../dist'),
},
module: {
rules: [
//处理es6
{
test: /\.js$/,
exclude: /node_modules/,
loader: 'happypack/loader?id=happyBabel',
},
//对js里引入css,提取到js里
{
test: /\.(css|scss|sass)$/,
use: extractTextPlugin.extract({
fallback: "style-loader", //编译后用什么loader来提取css文件
publicPath: '../', //设置css的图片路径
use: ["css-loader", "sass-loader"]
})
},
//压缩图片
{
test: /\.(png|svg|jpg|gif)$/,
use: [{
loader: 'file-loader',
options: {
outputPath: './image/' //打包后的图片放到img文件夹下
}
}]
},
//打包html的图片
//html中直接使用img标签src加载图片的话,因为没有被依赖,图片将不会被打包。这个loader将解决这个问题
{
test: /\.(htm|html)$/i,
use: ['html-withimg-loader']
},
]
},
plugins: [
new webpack.BannerPlugin('版权所有,翻版必究'),
new CleanWebpackPlugin(),
new extractTextPlugin("css/[name]-[hash].css"), //提取CSS行内样式,转化为link引入
new CopyWebpackPlugin([{
from: path.resolve(__dirname, '../src/assets'),
to: './assets'
}]),
new HappyPack({
//用id来标识 happypack处理那里类文件
id: 'happyBabel',
//如何处理 用法和loader 的配置一样
loaders: [{
loader: 'babel-loader?cacheDirectory=true',
}],
//共享进程池
threadPool: happyThreadPool,
//允许 HappyPack 输出日志
verbose: true,
}),
],
optimization: {
minimizer: [],
//打包公共模块
splitChunks: {
cacheGroups: {
commons: {
chunks: 'initial', //initial表示提取入口文件的公共部分
minChunks: 20, //表示提取公共部分最少的文件数
minSize: 0, //表示提取公共部分最小的大小
name: 'commons' //提取出来的文件命名
}
}
}
}
};
module.exports = config;
//生成模版文件
configReq.htmlConfig.forEach((val, i) => {
var hcoging = {
template: "./src/" + val.name + ".html", //new 一个这个插件的实例,并传入相关的参数
filename: val.name + ".html",
chunks: [val.name, "commons"],
inject: true,
minify: { //压缩HTML文件
removeComments: true, //移除HTML中的注释
removeAttributeQuotes: true, //removeAttrubuteQuotes是去掉属性的双引号。
collapseWhitespace: false //删除空白符与换行符
}
}
config.plugins.push(new htmlPlugin(hcoging));
})
webpack.dev.conf.js配置文件:
//引入webpack-merge插件进行合并
const merge = require('webpack-merge');
//引入webpack.base.conf.js文件
const base = require('./webpack.base.conf');
//引入webpack
const webpack = require('webpack');
//进行合并,将webpack.base.conf.js中的配置合并到这
module.exports = merge(base, {
    //模块参数
    mode: 'development',
    devServer: {
        contentBase: "./dist", //本地服务器所加载的页面所在的目录
        port: "8089", //设置默认监听端口,如果省略,默认为"8080"
        inline: true, //实时刷新
        historyApiFallback: true, //不跳转
        //代理转发接口
        proxy: {
            //把/api/t转发到target,但是转发的是http://xxx/api/t
            //不要/api,用pathRewrite
            '/api': {
                target: 'xxx', //(跨域的地址)
                changeOrigin: true, // target是域名的话,需要这个参数,
                secure: false, // 设置支持https协议的代理
                pathRewrite: {
                    '^/api': ''
                }
            }
        }
    },
    //启用source-map方便调试
    devtool: 'source-map',
    plugins: [
        //定义全局变量
        new webpack.DefinePlugin({
            //这里必须要解析成字符串进行判断,不然将会被识别为一个变量
            DEV: JSON.stringify('dev')
        })
    ]
});
webpack.prod.conf.js配置文件:
const merge = require('webpack-merge');
const base = require('./webpack.base.conf');

const path = require('path');
const OptimizeCSSAssetsPlugin = require('optimize-css-assets-webpack-plugin'); //压缩css
const UglifyJsPlugin = require('uglifyjs-webpack-plugin'); //压缩js
const webpack = require('webpack');

module.exports = merge(base, {
    mode: 'production',
    optimization: {
        minimizer: [
            //压缩CSS代码
            new OptimizeCSSAssetsPlugin({}),
            //压缩js代码
            new UglifyJsPlugin({
                //启用文件缓存
                cache: true,
                //使用多线程并行运行提高构建速度
                parallel: true,
                //使用 SourceMaps 将错误信息的位置映射到模块
                sourceMap: true
            })
        ]
    },
    plugins: [
        //使用插件定义全局变量DEV
        new webpack.DefinePlugin({
            DEV: JSON.stringify('production')
        })
    ]

});
多页面html页面模板文件config.js:
const webpack = require('webpack');
//入口配置 ssdsd
var entry = {
        index: './src/js/index.js',
        index1: './src/js/index1.js',
        index2: './src/js/index2.js',
    }
    //页面配置
var htmlConfig = [{
    name: "index",
}, {
    name: "index1",
}, {
    name: "index2",
}];
module.exports = {
    entry: entry,
    htmlConfig: htmlConfig
}
.babelrc文件
{
    "presets": [
      "@babel/preset-env"
    ]
  }
# jq-webpack
# 多页面(jq)项目用webpack打包
# 需要的插件,直接在页面(html)上引用
# 运行npm run server
# 打包npm run build
# 若要promise,在该页面引用,import "babel-polyfill"; //解决低版本浏览器,不识别promise问题
补充:
写webpack配置的时候,经常存在路径的问题
__dirname是node的内置package,值得是当前文件的绝对路径;
path.resolve也是node的内置package,主要是把to后的参数也转化成绝对路径;
path.resolve(__dirname, '../dist'),


【推荐】国内首个AI IDE,深度理解中文开发场景,立即下载体验Trae
【推荐】编程新体验,更懂你的AI,立即体验豆包MarsCode编程助手
【推荐】抖音旗下AI助手豆包,你的智能百科全书,全免费不限次数
【推荐】轻量又高性能的 SSH 工具 IShell:AI 加持,快人一步
· 基于Microsoft.Extensions.AI核心库实现RAG应用
· Linux系列:如何用heaptrack跟踪.NET程序的非托管内存泄露
· 开发者必知的日志记录最佳实践
· SQL Server 2025 AI相关能力初探
· Linux系列:如何用 C#调用 C方法造成内存泄露
· Manus爆火,是硬核还是营销?
· 终于写完轮子一部分:tcp代理 了,记录一下
· 别再用vector<bool>了!Google高级工程师:这可能是STL最大的设计失误
· 单元测试从入门到精通
· 震惊!C++程序真的从main开始吗?99%的程序员都答错了