
过去很多年,云计算和云原生常被放在一起讨论,甚至被混为一谈。
但在实际工作中,很多运维同学会却身体好到:明明还在用云服务器,但工作方式却已经完全不同了。
1.云计算
在云计算时代,运维的核心工作围绕服务器和资源配置展开:
-
下载安装包
-
修改配置文件
-
启动并维护进程
应用之间的资源配置交换通常依赖于手动配置,例如数据库连接、服务间的网络配置等。资源的管理和调整由运维人员执行,大部分交互是依赖人力操作的。
在这一阶段,人既负责设计,也负责执行,系统本身几乎不具备自我管理能力。
2.云原生
进入云原生时代后,运维不再频繁登录服务器,也不再直接操作进程。
更多时候是在做:
-
通过helm install安装控制器
-
编写YAML声明应用的期望状态
-
由控制器持续执行并自动纠偏应用状态
云原生架构下,应用之间的资源配置交换从手动操作转变为声明式管理。通过YAML文件和控制器来自动化应用资源的配置与管理,不再需要人工干预。平台自动完成从网络配置到存储挂载、服务发现等一系列操作。
3.云原生应用之间的数据交互方式
虽然云原生平台通过自动化简化了应用之间的资源配置和管理,但应用间的实时数据交换和业务逻辑处理仍然依赖于传统的通信协议和机制。
例如通过API、RPC、共享内存、网络等进行数据交换。
在这一阶段,人负责设计,控制器负责执行,而系统本身具备了自我管理能力,但在数据交互方面,云原生并没有消除API或其他传统通信方式的必要,它们依然是业务应用之间的主要交互方式。
如果软件架构微服务,多个服务部署起来难度增大,就需要1个容器编排工具;
- 消息可靠性
- 消息实时性
- 消息顺序性
- 高性能
Etcd 存储集群的数据信息,API-server作为统一入口,任何对etcd数据的操作都必须经过API-server
客户端(Kubelet/Kube-Scheduler/Controller-Manager)通过list-watch监听API-server 中资源(pod/rs/rc 等等)的 create, update 和 delete 事件;
客户端针对事件类型调用相应的事件处理函数
list-watch由2个API动作组成,分别是List和Watch;
list
调用资源的 ist API 罗列需要watch资源类型,基于 HTTP 短链接实现(全量)
watch
调用资源的 watch API 监听资源变更事件,基于 HTTP 长链接实现(增量)
3.informer、go-client和kubebuilder的关系
无论是自定义的,还是K8s内置的Controller都使用list-watch机制与API-server通信;
Informer
Informer是go-client中的1个模块,是实现List-Watch通信机制的模块;
go-client
go-client封装了Informer模块,与Kubernetes API服务器交互。
使用client-go,您可以编写Go语言程序来创建、修改和删除Kubernetes对象,如Pod、Deployment、Service等
kubebuilder
kubebuilder封装go-client功能,是实现Operator的代码框架;

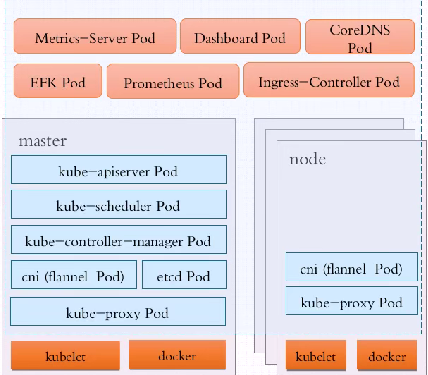
1.Master节点
k8s的控制平面
包含APIServer、Scheduler、ControllerManager三个守护进程;
- APIServer:整个K8s的大脑,对外提供API服务,对k8s内部组件发送指令, 解耦合设计,只有API-Server才能操作etcd数据库。
- Scheduler:帮Pod选择最优的Node节点
- ControllerManager:k8s内部几乎每1种特定资源都有一1种特定的Controller来维护管理,那谁来管理Controller呢?ControllerManager的职责便是把所有的Controller聚合起来统一管理,确保各种Controller的健康运行。
1.1.获取K8S的证书
首先引入SDK支持库。然后将 ~/.kube 的config文件的内容复制到本地目录,保存为文件kubeconfig.yaml,
[root@k8s-m ~]# cp .kube/config kubeconfig.yaml
1.2.Python调用K8s的APIServer


from kubernetes import client, config

config.kube_config.load_kube_config(config_file="./config.txt")
# 获取API的CoreV1Api版本对象
v1 = client.CoreV1Api()

#列出 namespaces信息
# for ns in v1.list_namespace().items:
#     print(ns.metadata.name)

#列出所有的pod信息
ret = v1.list_pod_for_all_namespaces(watch=False)
for i in ret.items:
    print("%s\t%s\t%s\t%s" % (i.spec.node_name, i.status.pod_ip, i.metadata.namespace, i.metadata.name))
2.Node(worker)节点:
K8s的工作平面;
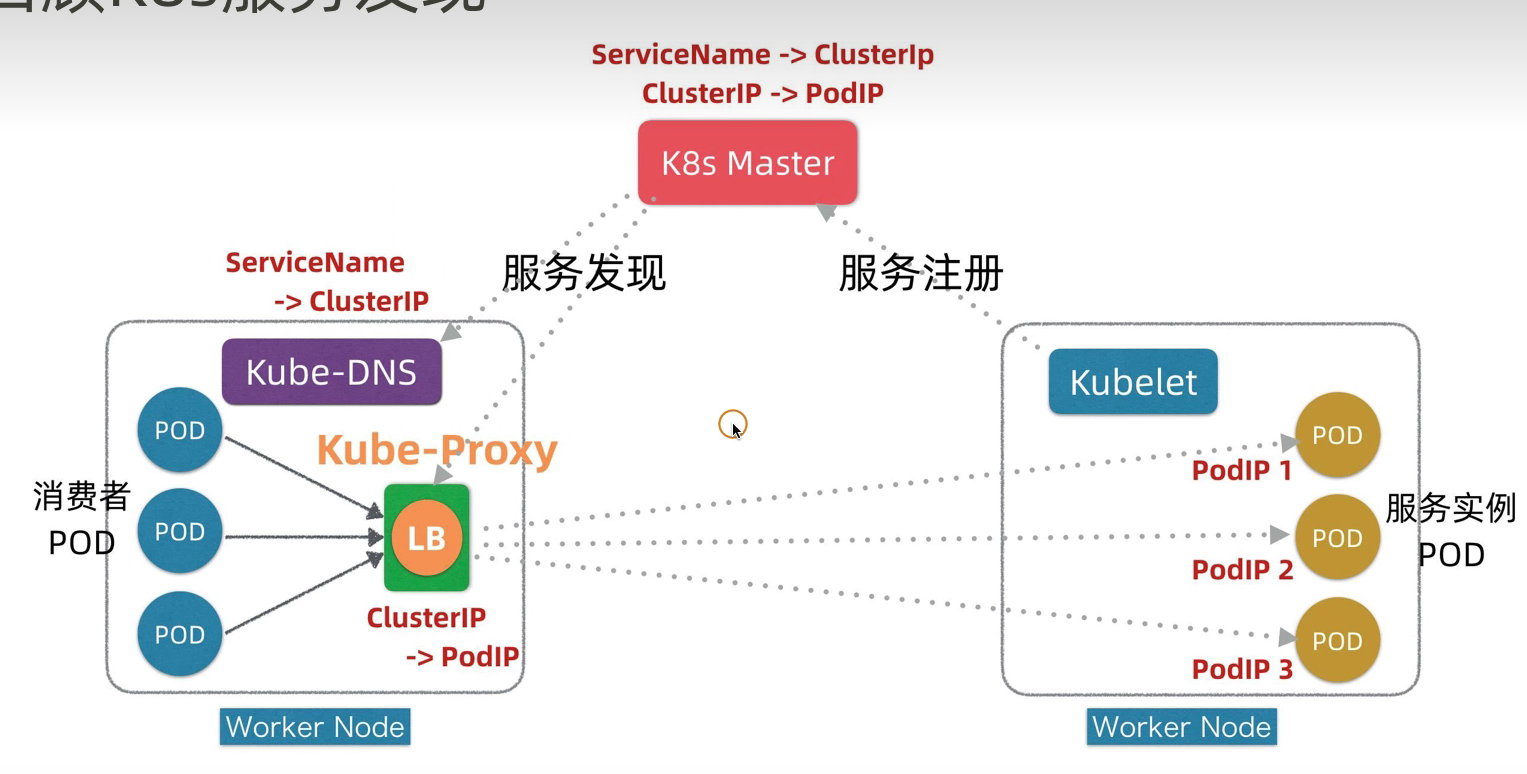
- Kubelet工作在集群的Node节点,Kubelet 监听(Watch)Master节点 (API Server) 的指令,调用容器引擎,在Node节点创建出Pod。
- 容器引擎(docker)接收API-Server的指令,管理容器;
- Kube-proxy:实时Watch着所在节点之上Service的变动,把变动的Service转换为Iptables/IPVS通信规则
控制器就相当于1位7*24小时工作的运维工程师,完全完成运维人员的3大核心职能;
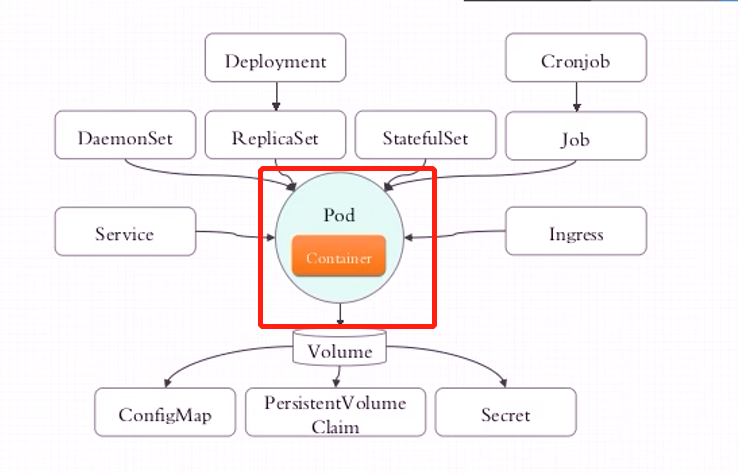
在Kubernetes中,有很多类型的Pod控制器,不同的Pod控制器创建出不同类型的Pod,适用于不同业务部署场景,常见的Pod控制器有下面这些:
- ReplicationController:比较原始的Pod控制器,已经被废弃,由ReplicaSet替代
- ReplicaSet:精确保证副本的数量一直维持在期望值,并支持Pod数量的扩缩容,镜像版本升级
- Deployment:通过控制ReplicaSet控制器来控制Pod版本的滚动升级,实现服务的灰度、金丝雀、蓝绿部署(常用)
- Horizontal Pod Autoscaler:无需用户干涉,根据集群负载情况,自动水平调整Pod的数量,实现削峰填谷
- DaemonSet:在集群中的指定Node上运行且仅运行一个副本,一般用于守护进程类的任务(监控、日志收集服务)
- Job:它创建出来的Pod只要完成任务就立即退出,不需要重启或重建,用于执行1次性任务
- Cronjob:它创建的Pod负责周期性任务控制,不需要持续后台运行(定时任务、数据备份)
- StatefulSet:管理有状态应用
[root@master ~]# kubectl get svc -A
NAMESPACE     NAME            TYPE        CLUSTER-IP      EXTERNAL-IP   PORT(S)                  AGE
default       kubernetes      ClusterIP   10.96.0.1       <none>        443/TCP                  7d3h
default       myapp-service   ClusterIP   10.98.160.120   <none>        80/TCP                   4h2m
kube-system   kube-dns        ClusterIP   10.96.0.10      <none>        53/UDP,53/TCP,9153/TCP   7d3h
[root@master ~]# ipvsadm -Ln
IP Virtual Server version 1.2.1 (size=4096)
Prot LocalAddress:Port Scheduler Flags
  -> RemoteAddress:Port           Forward Weight ActiveConn InActConn
TCP  10.96.0.1:443 rr
  -> 192.168.56.18:6443           Masq    1      0          0
TCP  10.96.0.10:53 rr
  -> 10.244.104.1:53              Masq    1      0          0
  -> 10.244.166.131:53            Masq    1      0          0
TCP  10.96.0.10:9153 rr
  -> 10.244.104.1:9153            Masq    1      0          0
  -> 10.244.166.131:9153          Masq    1      0          0
TCP  10.98.160.120:80 rr
UDP  10.96.0.10:53 rr
  -> 10.244.104.1:53              Masq    1      0          0
  -> 10.244.166.131:53            Masq    1      0          0
Service支持会话粘性(Session Affinity)功能,可以总是把来自同1个客户端请求,调度至1个Pod上;
在k8s集群中,可以创建多个service,由于每个service的IP地址是不同的,端口就可以相同;
[root@master zhanggen]# kubectl get svc
NAME           TYPE        CLUSTER-IP       EXTERNAL-IP   PORT(S)   AGE
kubernetes     ClusterIP   10.96.0.1        <none>        443/TCP   22h
myapp          ClusterIP   10.111.198.253   <none>        80/TCP    19m
nginx-deploy   ClusterIP   10.98.82.22      <none>        80/TCP    14h
如果service的type是nodeport,kube-proxy会在每个node节点生成iptable访问规则, 之后用户就可以通过每1个node的ip地址访问到service。
[root@master zhanggen]# kubectl get svc
NAME           TYPE        CLUSTER-IP       EXTERNAL-IP   PORT(S)   AGE
kubernetes     ClusterIP   10.96.0.1        <none>        443/TCP   22h
myapp          ClusterIP   10.111.198.253   <none>        80/TCP    29m
nginx-deploy   ClusterIP   10.98.82.22      <none>        80/TCP    14h
[root@master zhanggen]# kubectl delete svc/myapp
service "myapp" deleted
[root@master zhanggen]# kubectl create service nodeport myapp --tcp=80:80
service/myapp created
[root@master zhanggen]# kubectl get svc
NAME           TYPE        CLUSTER-IP     EXTERNAL-IP   PORT(S)        AGE
kubernetes     ClusterIP   10.96.0.1      <none>        443/TCP        22h
myapp          NodePort    10.98.226.20   <none>        80:30121/TCP   3s
nginx-deploy   ClusterIP   10.98.82.22    <none>        80/TCP         14h
[root@master zhanggen]# kubectl get nodes
NAME     STATUS   ROLES    AGE   VERSION
master   Ready    master   22h   v1.17.4
node1    Ready    <none>   22h   v1.17.4
node2    Ready    <none>   22h   v1.17.4
[root@master zhanggen]# curl node1:30121
Hello MyApp | Version: v1 | <a href="hostname.html">Pod Name</a>
[root@master zhanggen]# curl node2:30121
Hello MyApp | Version: v1 | <a href="hostname.html">Pod Name</a>
6.1.Service类型
ClusterIP
相当于Service的虚IP不能ping同,虚IP和service名称映射关系为CoreDNS的A记录,用于集群内部访问;
无头service
ClusterIP=None,后端Pod无需Service提供负载均衡服务,由客户端自主选择,或用于Pod之间固定访问(statefulSet类型的pod);
NodePort
在集群中每1个Node节点上对外暴露1个端口 ,客户端可以通过NodeIP:NodePort访问该服务。
LoadBalancer
LoadBalancer类型的Service,本质上是在NodePort类型的Service基础上增加了由云服务商自动创建并管理负载均衡器功能。
LoadBalancer类型的Service = NodePort类型Service+云服务商的负载均衡产品
LoadBalancer可由云厂商提供,也可自建LoadBalancer(MetalLB)
ExternalName
externalName Service是k8s中一个特殊的service类型;
它没有Endpoints也不代理Pods,仅仅是通过DNS的CNAME机制把当前Service域名CNAME到另外1个域名上;
可以提供集群内不同NameSpace或在CoreDNS支持访问外部域名的前提下,指定集群外部的真实域名:
- 比如mysql.db.svc这样的建立在db命名空间内的mysql服务;(跨NameSpace访问)
- 也可以指定http://mysql.example.com这样的外部真实域名;(跨外网访问)
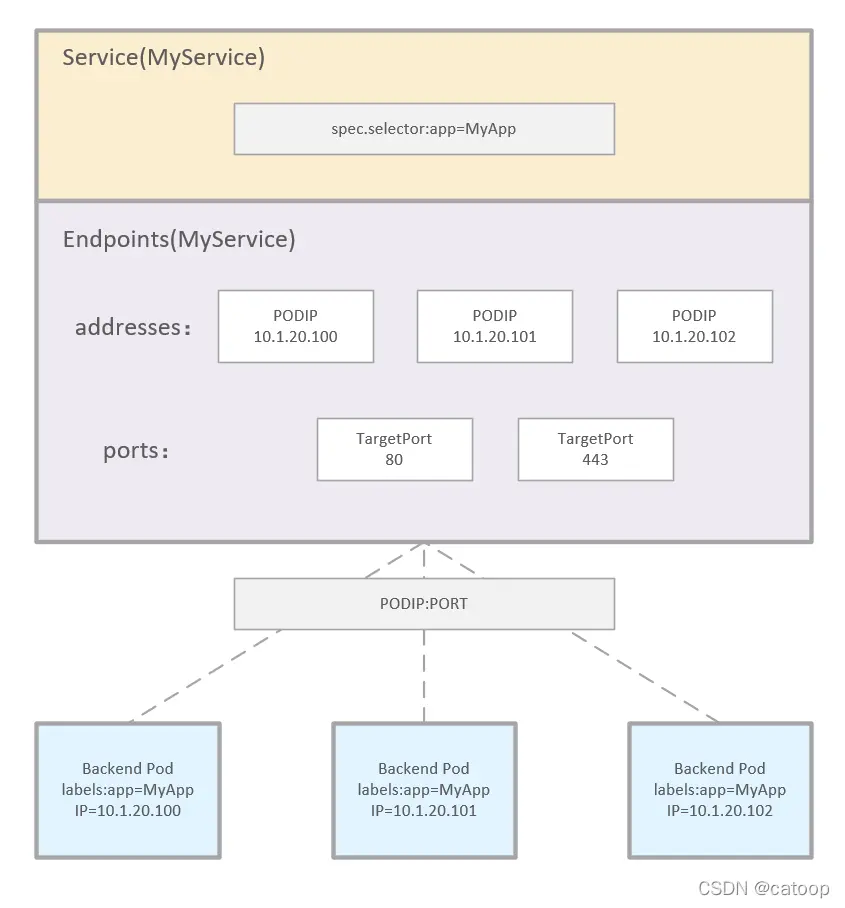
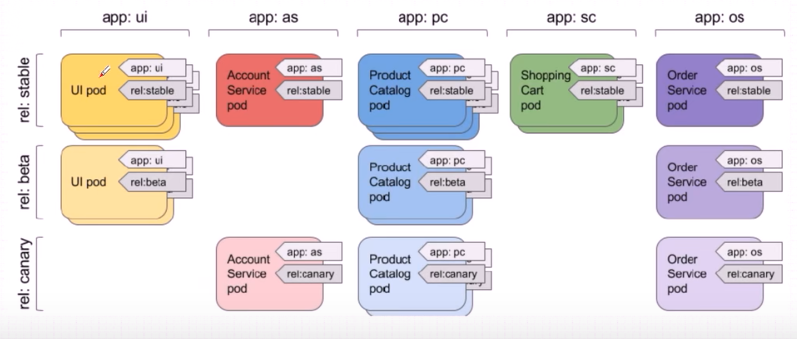
7.LabelSelector
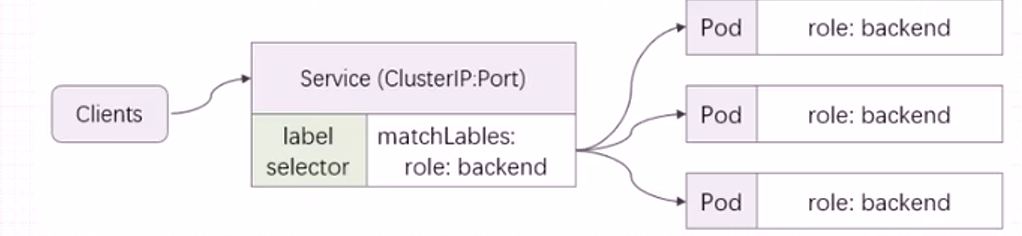
既然Pod是动态的Pod的IP和端口会动态变化,那么Service是如何发现后端Pod的呢?这时就需要DNS进行服务发现,然后再通过标签选择器关联上后端Pod;
- 由于K8s集群中容器是可以动态调整的,所以容器的IP地址会经常发生变化,但Pod标签是固定的, 标签可以标记和分类Pod;
- 在Pod控制器和Service中定义标签选择器,在Pod中定义标签,Pod控制器和Service便可以通过标签选择器,关联管理相关Pod;
8.DNS Addon
如果用户把K8s集群中定义的Service删了,那么客户端如何通过Service反向代理到后端的Pod呢?
在K8s中DNS插件具有服务自动发现和DNS解析2大功能;
一旦k8s集群中的Service资源变更,就会自动更新到Coredns的DNS记录中;
在K8s集群之内,客户端Pod是通过Service的完整名称空间(nginx-deploy.default.svc.cluster.local.)访问服务端Pod的,而不是直接通过ServiceIP地址。
详细过程如下:
客户端要想访问Service,需要先请求Coredns,对完整的Service名称进行解析,Coredns解析出Service域名对应的ServiceIP之后,客户端再去访问该Service对应的ServiceIP;
对于无头Service,Coredns对该完整Service名称进行解析,解析出该Service后台关联的那些Endpoint的IP地址列表。
Pod的DNS策略
在创建Pod时可以指定Pod的DNS策略;
- ClusterFirst:这是默认的DNS策略,意味着当Pod需要进行域名解析时,首先会查询集群内部的CoreDNS服务。通过CoreDNS来做域名解析,表示Pod的/etc/resolv.conf文件被自动配置指向kube-dns服务地址。
- None:使用该策略,Kubernetes会忽略集群的DNS策略。需要您提供dnsConfig字段来指定DNS配置信息,否则Pod可能无法正确解析任何域名。
- Default:Pod直接继承集群节点的域名解析配置。
- ClusterFirstWithHostNet:强制在hostNetwork网络模式下使用ClusterFirst策略(默认使用Default策略)。
那么K8s如何将内部的Service网络暴露给集群外部的客户端呢?
od上;
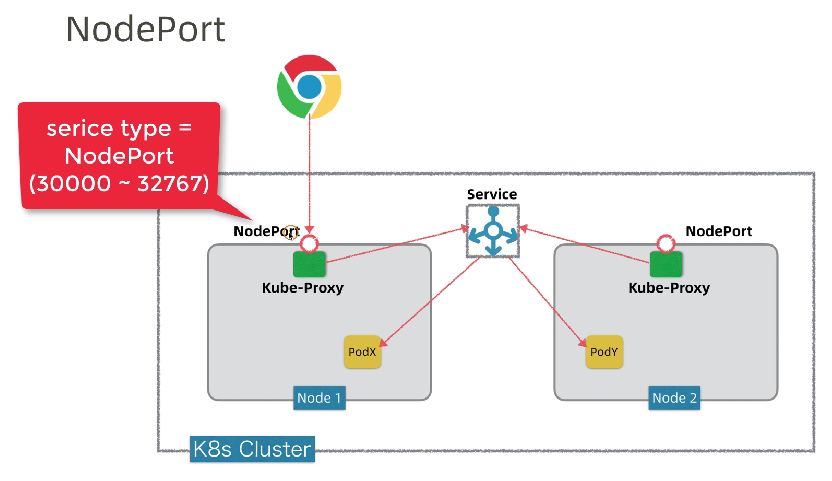
在当集群规模较大时,NodePort的端口管理就是个灾难。
因为每1个端口只能是一种服务,端口范围只能是 30000-32767。
Ingress只需要1个NodePort或者1个LB就可以满足暴露多个Service的需求。
apiVersion: v1
kind: Pod
metadata:
  name: host-network-pod
  namespace: default
spec:
  containers:
  - name: myapp
    image: ikubernetes/myapp:v1
  hostNetwork: true
apiVersion: v1
kind: Pod
metadata:
  name: host-port-pod
spec:
  containers:
  - name: myapp
    image: ikubernetes/myapp:v1
    ports:
    - name: nginx-web
      protocol: TCP
      containerPort: 80
      hostPort: 8080
单独的创建1个pod,则其创建过程是这样的:
1.首先,用户通过kubectl或其他api客户端工具提交需要创建的pod信息给apiserver;
2.apiserver验证客户端的用户权限信息,验证通过开始处理创建请求生成pod对象信息,并将信息存入etcd,然后返回确认信息给客户端;
3.apiserver开始反馈etcd中pod对象的变化,其他组件使用watch机制跟踪apiserver上的变动;
4.scheduler发现有新的pod对象要创建,开始调用内部算法机制为pod分配最佳的主机,并将结果信息更新至apiserver;
5.node节点上的kubelet通过watch机制跟踪apiserver发现有pod调度到本节点,尝试调用docker启动容器,并将结果反馈apiserver;
6.apiserver将收到的pod状态信息存入etcd中。
使用deployment来创建多个pod
1.首先,用户使用kubectl create命令或者kubectl apply命令提交了要创建一个deployment资源请求;
2.api-server收到创建资源的请求后,会对客户端操作进行身份认证,在客户端的~/.kube文件夹下,已经设置好了相关的用户认证信息,这样api-server会知道我是哪个用户,并对此用户进行鉴权,当api-server确定客户端的请求合法后,就会接受本次操作,并把相关的信息保存到etcd中,然后返回确认信息给客户端。
3.apiserver开始反馈etcd中过程创建的对象的变化,其他组件使用watch机制跟踪apiserver上的变动。
4.controller-manager组件会监听api-server的信息,controller-manager是有多个类型的,比如Deployment Controller, 它的作用就是负责监听Deployment,此时Deployment Controller发现有新的deployment要创建,那么它就会去创建一个ReplicaSet,一个ReplicaSet的产生,又被另一个叫做ReplicaSet Controller监听到了,紧接着它就会去分析ReplicaSet的语义,它了解到是要依照ReplicaSet的template去创建Pod, 它一看这个Pod并不存在,那么就新建此Pod,当Pod刚被创建时,它的nodeName属性值为空,代表着此Pod未被调度。
5.调度器Scheduler组件开始介入工作,Scheduler也是通过watch机制跟踪apiserver上的变动,发现有未调度的Pod,则根据内部算法、节点资源情况,pod定义的亲和性反亲和性等等,调度器会综合的选出一批候选节点,在候选节点中选择一个最优的节点,然后将pod绑定该该节点,将信息反馈给api-server。
6.kubelet组件布署于Node之上,它也是通过watch机制跟踪apiserver上的变动,监听到有一个Pod应该要被调度到自身所在Node上来,kubelet首先判断本地是否在此Pod,如果不存在,则会进入创建Pod流程,创建Pod有分为几种情况,第一种是容器不需要挂载外部存储,则相当于直接docker run把容器启动,但不会直接挂载docker网络,而是通过CNI调用网络插件配置容器网络,如果需要挂载外部存储,则还要调用CSI来挂载存储。kubelet创建完pod,将信息反馈给api-server,api-servier将pod信息写入etcd。
7.Pod建立成功后,ReplicaSet Controller会对其持续进行关注,如果Pod因意外或被我们手动退出,ReplicaSet Controller会知道,并创建新的Pod,以保持replicas数量期望值。
四、Kubernetes集群搭建
Kubernetes主要有3种搭建方式
- Minikube:用于搭建单节点Kubernetes集群的工具(开发人员学习);
- Kubeadm:用于快速搭建Kubernetes集群(运维人员学习);
- 二进制源码安装:从K8s官网下载每个组件的源码,依次进行安装,此方式对于理解K8s组件组件更有效(生产环境);
Kubeadm部署工具的出发点很简单就是把大部分K8s集群组件容器化,并通过StaticPod的方式运行;
那么谁来创建出这些组件的StaticPod呢?
如果Kubelet不听从Master节点的指令,用户也可以直接通过kubectl命令Kublet创建Pod,此类Pod称为静态Pod,Kubeadm就是这样工作的。
基于以上原理,要想使用Kubeadm搭建出K8s集群,其大致步骤应当如下
- 下载集群组件(kube-api-server、kube-scheduler、kube-controller-manager、kube-proxy、Flanel)的镜像文件
- 安装docker、kubelet、kubectl和kubeadm程序
- 通过kubeadm调用kubelet把集群组件(kube-api-server、kube-scheduler、kube-controller-manager、kube-proxy、Flane)镜像运行为Pod
[root@master net.d]# kubectl get ns
NAME              STATUS   AGE
default           Active   20h
kube-flannel      Active   20h
kube-node-lease   Active   20h
kube-public       Active   20h
kube-system       Active   20h
[root@master net.d]# kubectl get nodes -n kube-system
NAME     STATUS   ROLES    AGE   VERSION
master   Ready    master   20h   v1.17.4
node1    Ready    <none>   20h   v1.17.4
[root@master net.d]#
Kubeadm大大简化了K8s集群配置文件、手工生成CA证书工作;
基于kubeadm,我们最常用的功能有3个:
-
init:初始化k8s集群的Master节点
-
join:将当前Worker节点加入到K8s集群之中
-
reset:尽最大努力还原init或者join对K8s集群的影响
1.主机环境预设
准备<=3的奇数台Centos7的虚拟主机,用于构建1个完整的K8s集群;
| IP地址 | 组件 | |
|---|---|---|
| master | 192.168.56.18 | docker,kubectl,kubeadm,kubelet |
| node1 | 192.168.56.19 | docker,kubectl,kubeadm,kubelet |
| node2 | 192.168.56.20 | docker,kubectl,kubeadm,kubelet |
1.1.检查操作系统版本
Kubeadmin方式安装K8s要求CentOS的系统内核高于7.5;
root@localhost ~]# cat /etc/redhat-release
CentOS Linux release 7.6.1810 (Core)
1.2.主机名解析
127.0.0.1   localhost localhost.localdomain localhost4 localhost4.localdomain4
::1         localhost localhost.localdomain localhost6 localhost6.localdomain6
192.168.56.18 master
192.168.56.19 node1
1.3.时间同步
[root@master zhanggen]# timedatectl set-timezone Asia/Shanghai
[root@master zhanggen]# ntpdate ntp1.aliyun.com
1.4.关闭firewalld和iptables
[root@master zhanggen]# systemctl stop firewalld
[root@master zhanggen]# systemctl disable firewalld
Removed symlink /etc/systemd/system/multi-user.target.wants/firewalld.service.
Removed symlink /etc/systemd/system/dbus-org.fedoraproject.FirewallD1.service.
[root@master zhanggen]# systemctl disable iptables
Failed to execute operation: No such file or directory
[root@master zhanggen]# systemctl stop iptables
Failed to stop iptables.service: Unit iptables.service not loaded.
[root@master zhanggen]#
1.5.禁用selinux
[root@localhost zhanggen]# cat /etc/selinux/config

# This file controls the state of SELinux on the system.
# SELINUX= can take one of these three values:
#     enforcing - SELinux security policy is enforced.
#     permissive - SELinux prints warnings instead of enforcing.
#     disabled - No SELinux policy is loaded.
SELINUX=disabled
# SELINUXTYPE= can take one of three values:
#     targeted - Targeted processes are protected,
#     minimum - Modification of targeted policy. Only selected processes are protected.
#     mls - Multi Level Security protection.
SELINUXTYPE=targeted
检查一下
[root@node1 zhanggen]# getenforce
Disabled
[root@node1 zhanggen]#
1.6.关闭swap分区
vim /etc/fstab
#
# /etc/fstab
# Created by anaconda on Wed Jun 15 18:12:38 2022
#
# Accessible filesystems, by reference, are maintained under '/dev/disk'
# See man pages fstab(5), findfs(8), mount(8) and/or blkid(8) for more info
#
UUID=eae1aeba-8612-48a4-9d76-fbd933efdd47 /                       xfs     defaults        0 0
UUID=674b7ccf-9765-47dd-b43f-c658c19dbd9b /boot                   xfs     defaults        0 0
#UUID=fedfdf53-e6a3-48e1-b280-db3f2fa44809 swap                    swap    defaults
1.7.配置kubernetes的
cat <<EOF> kubernetes.conf
net.bridge.bridge-nf-call-iptables=1
net.bridge.bridge-nf-call-ip6tables=1
net.ipv4.ip_forward=1
net.ipv4.tcp_tw_recycle=0
vm.swappiness=0 # 禁止使用 swap 空间,只有当系统 OOM 时才允许使用它
vm.overcommit_memory=1 # 不检查物理内存是否够用
vm.panic_on_oom=0 # 开启 OOM
fs.inotify.max_user_instances=8192
fs.inotify.max_user_watches=1048576
fs.file-max=52706963
fs.nr_open=52706963
net.ipv6.conf.all.disable_ipv6=1
net.netfilter.nf_conntrack_max=2310720
EOF

cp kubernetes.conf /etc/sysctl.d/kubernetes.conf
系统加载内核模块
[root@master netfilter]# modprobe br_netfilter
[root@master netfilter]# modprobe nf_conntrack
[root@master netfilter]# sysctl -p /etc/sysctl.d/kubernetes.conf
net.bridge.bridge-nf-call-iptables = 1
net.bridge.bridge-nf-call-ip6tables = 1
net.ipv4.ip_forward = 1
net.ipv4.tcp_tw_recycle = 0
vm.swappiness = 0
vm.overcommit_memory = 1
vm.panic_on_oom = 0
fs.inotify.max_user_instances = 8192
fs.inotify.max_user_watches = 1048576
fs.file-max = 52706963
fs.nr_open = 52706963
net.ipv6.conf.all.disable_ipv6 = 1
net.netfilter.nf_conntrack_max = 2310720
[root@master netfilter]#
[root@master netfilter]#  lsmod |grep  br_netfilter
br_netfilter           22256  0
bridge                151336  1 br_netfilter
[root@master netfilter]# mkdir /var/log/journal
[root@master netfilter]# mkdir /etc/systemd/journald.conf.d
[root@master netfilter]# cat > /etc/systemd/journald.conf.d/99-prophet.conf <<EOF
> [Journal]
> # 持久化保存到磁盘
> Storage=persistent
>
> # 压缩历史日志
> Compress=yes
>
> SyncIntervalSec=5m
> RateLimitInterval=30s
> RateLimitBurst=1000
>
> # 最大占用空间 10G
> SystemMaxUse=10G
>
> # 单日志文件最大 200M
> SystemMaxFileSize=200M
>
> # 日志保存时间 2 周
> MaxRetentionSec=2week
>
> # 不将日志转发到 syslog
> ForwardToSyslog=no
> EOF
[root@master netfilter]# systemctl restart systemd-journald
[root@master netfilter]#
1.9.
yum install ipset ipvsadm -y
[root@node1 zhanggen]# cat <<EOF> /etc/sysconfig/modules/ipvs.modules
> #!/bin/bash
> modprobe -- ip_vs
> modprobe -- ip_vs_rr
> modprobe -- ip_vs_wrr
> modprobe -- ip_vs_sh
> modprobe -- nf_conntrack_ipv4
> EOF
[root@node1 zhanggen]# chmod 755 /etc/sysconfig/modules/ipvs.modules && bash /etc/sysconfig/modules/ipvs.modules && lsmod | grep -e ip_vs -e nf_conntrack_ipv4
ip_vs_sh               12688  0
ip_vs_wrr              12697  0
ip_vs_rr               12600  0
ip_vs                 145497  6 ip_vs_rr,ip_vs_sh,ip_vs_wrr
nf_conntrack_ipv4      15053  2
nf_defrag_ipv4         12729  1 nf_conntrack_ipv4
nf_conntrack          133095  6 ip_vs,nf_nat,nf_nat_ipv4,xt_conntrack,nf_nat_masquerade_ipv4,nf_conntrack_ipv4
libcrc32c              12644  4 xfs,ip_vs,nf_nat,nf_conntrack
[root@node1 zhanggen]#
2.kubeadm安装K8s组件
kubeadm不能帮你安装或者管理 kubelet 或 kubectl,
所以需要确保kubelet、kubectl和kubeadm安装的控制平面的版本相匹配。
yum install -y yum-utils device-mapper-persistent-data lvm2

yum-config-manager --add-repo http://mirrors.aliyun.com/docker-ce/linux/centos/docker-ce.repo

yum install -y docker-ce

## 创建 /etc/docker 目录
mkdir /etc/docker

cat > /etc/docker/daemon.json <<EOF
{
"exec-opts": ["native.cgroupdriver=systemd"],
"log-driver": "json-file",
"log-opts": {
"max-size": "100m"
}
}
EOF
mkdir -p /etc/systemd/system/docker.service.d
# 重启docker服务
systemctl daemon-reload && systemctl restart docker && systemctl enable docker
查看docker的repo
[docker-ce-stable]
name=Docker CE Stable - $basearch
baseurl=https://mirrors.aliyun.com/docker-ce/linux/centos/$releasever/$basearch/stable
enabled=1
gpgcheck=1
gpgkey=https://mirrors.aliyun.com/docker-ce/linux/centos/gpg

[docker-ce-stable-debuginfo]
name=Docker CE Stable - Debuginfo $basearch
baseurl=https://mirrors.aliyun.com/docker-ce/linux/centos/$releasever/debug-$basearch/stable
enabled=0
gpgcheck=1
gpgkey=https://mirrors.aliyun.com/docker-ce/linux/centos/gpg

[docker-ce-stable-source]
name=Docker CE Stable - Sources
baseurl=https://mirrors.aliyun.com/docker-ce/linux/centos/$releasever/source/stable
enabled=0
gpgcheck=1
gpgkey=https://mirrors.aliyun.com/docker-ce/linux/centos/gpg

[docker-ce-test]
name=Docker CE Test - $basearch
baseurl=https://mirrors.aliyun.com/docker-ce/linux/centos/$releasever/$basearch/test
enabled=0
gpgcheck=1
gpgkey=https://mirrors.aliyun.com/docker-ce/linux/centos/gpg

[docker-ce-test-debuginfo]
name=Docker CE Test - Debuginfo $basearch
baseurl=https://mirrors.aliyun.com/docker-ce/linux/centos/$releasever/debug-$basearch/test
enabled=0
gpgcheck=1
gpgkey=https://mirrors.aliyun.com/docker-ce/linux/centos/gpg

[docker-ce-test-source]
name=Docker CE Test - Sources
baseurl=https://mirrors.aliyun.com/docker-ce/linux/centos/$releasever/source/test
enabled=0
gpgcheck=1
gpgkey=https://mirrors.aliyun.com/docker-ce/linux/centos/gpg

[docker-ce-nightly]
name=Docker CE Nightly - $basearch
baseurl=https://mirrors.aliyun.com/docker-ce/linux/centos/$releasever/$basearch/nightly
enabled=0
gpgcheck=1
gpgkey=https://mirrors.aliyun.com/docker-ce/linux/centos/gpg

[docker-ce-nightly-debuginfo]
name=Docker CE Nightly - Debuginfo $basearch
baseurl=https://mirrors.aliyun.com/docker-ce/linux/centos/$releasever/debug-$basearch/nightly
enabled=0
gpgcheck=1
gpgkey=https://mirrors.aliyun.com/docker-ce/linux/centos/gpg

[docker-ce-nightly-source]
name=Docker CE Nightly - Sources
baseurl=https://mirrors.aliyun.com/docker-ce/linux/centos/$releasever/source/nightly
enabled=0
gpgcheck=1
gpgkey=https://mirrors.aliyun.com/docker-ce/linux/centos/gpg
-
kubelet是服务,各个node节点用来调用下层的container管理器创建Pod的组件;
-
kubectl是API,供我们调用,键入命令对k8s资源进行管理。
-
kubeadm是管理器,我们可以使用它进行k8s节点的管理。
2.2.1.配置Kubernetes的yum源
/etc/yum.repos.d/kubernetes.repo
[kubernetes]
name=Kubernetes
baseurl=http://mirrors.aliyun.com/kubernetes/yum/repos/kubernetes-el7-x86_64
enabled=1
gpgchech=0
repo_gpgcheck=0
gpgkey=http://mirrors.aliyun.com/kubernetes/yum/doc/yum-key.gpg
            http://mirrors.aliyun.com/kubernetes/yum/doc/rpm-package-key.gpg
2.2.2.安装kubeadm、kubelet、kubectl
确保kubeadm、kubelet、kubectl的版本(v1.17.4.0)保持一致;
[root@master ~]# yum install --setopt=obsoletes=0 kubeadm-1.17.4-0 kubelet-1.17.4-0 kubectl-1.17.4-0 -y
查看yum安装了哪些文件
[root@master net.d]# rpm -ql kubelet
/etc/kubernetes/manifests
/etc/sysconfig/kubelet
/usr/bin/kubelet
/usr/lib/systemd/system/kubelet.service
[root@master net.d]# rpm -ql kubeadm
/usr/bin/kubeadm
/usr/lib/systemd/system/kubelet.service.d/10-kubeadm.conf
[root@master net.d]#
2.2.3.配置kubelet
/etc/sysconfig/kubelet
KUBELET_CGROUP_ARGS="--cgroup-driver=systemd"
KUBE_PROXY_MODE="ipvs"
2.2.4.设置kubelet开机自启
[root@master ~]# systemctl enable kubelet
2.2.5.手动拉取kubadm所需要的集群组件镜像
由于kubadm所需要的集群组件镜像,在国外的kubernetes的仓库中,由于网络原因,无法连接,下面提供了一种替换方案
[root@master net.d]# kubeadm -h
Available Commands:
  alpha       Kubeadm experimental sub-commands
  completion  Output shell completion code for the specified shell (bash or zsh)
  config      Manage configuration for a kubeadm cluster persisted in(持久化) a ConfigMap in the cluster
  help        Help about any command
  init        Run this command in order to set up the Kubernetes control plane
  join        Run this on any machine you wish to join an existing cluster
  reset       Performs a best effort revert of changes made to this host by 'kubeadm init' or 'kubeadm join'
  token       Manage bootstrap tokens
  upgrade     Upgrade your cluster smoothly to a newer version with this command
  version     Print the version of kubeadm

Flags:
      --add-dir-header           If true, adds the file directory to the header
  -h, --help                     help for kubeadm
      --log-file string          If non-empty, use this log file
      --log-file-max-size uint   Defines the maximum size a log file can grow to. Unit is megabytes. If the value is 0, the maximum file size is unlimited. (default 1800)
      --rootfs string            [EXPERIMENTAL] The path to the 'real' host root filesystem.
      --skip-headers             If true, avoid header prefixes in the log messages
      --skip-log-headers         If true, avoid headers when opening log files
  -v, --v Level                  number for the log level verbosity
查看kubeadm init时默认加载的参数
[root@master net.d]# kubeadm config print init-defaults
W1205 09:27:15.918128  130084 validation.go:28] Cannot validate kube-proxy config - no validator is available
W1205 09:27:15.918569  130084 validation.go:28] Cannot validate kubelet config - no validator is available
apiVersion: kubeadm.k8s.io/v1beta2
bootstrapTokens:
- groups:
  - system:bootstrappers:kubeadm:default-node-token
  token: abcdef.0123456789abcdef
  ttl: 24h0m0s
  usages:
  - signing
  - authentication
kind: InitConfiguration
localAPIEndpoint:
  advertiseAddress: 1.2.3.4
  bindPort: 6443
nodeRegistration:
  criSocket: /var/run/dockershim.sock
  name: master
  taints:
  - effect: NoSchedule
    key: node-role.kubernetes.io/master
---
apiServer:
  timeoutForControlPlane: 4m0s
apiVersion: kubeadm.k8s.io/v1beta2
certificatesDir: /etc/kubernetes/pki
clusterName: kubernetes
controllerManager: {}
dns:
  type: CoreDNS
etcd:
  local:
    dataDir: /var/lib/etcd
imageRepository: k8s.gcr.ioc  加载镜像的地址
kind: ClusterConfiguration
kubernetesVersion: v1.17.0  #一定要和自己Yum的kubernetes-version版本一致,否则在init的时候手动指定
networking: dnsDomain: cluster.local serviceSubnet: 10.96.0.0/12 scheduler: {} #service的默认ip地址
提前去国内阿里云镜像仓库, pull当前kubadm所需要的集群组件镜像。
[root@master ~]# kubeadm config images list
显示kubadm依赖的镜像

images=(
    kube-apiserver:v1.17.4
    kube-controller-manager:v1.17.4
    kube-scheduler:v1.17.4
    kube-proxy:v1.17.4
    pause:3.1
    etcd:3.4.3-0
    coredns:1.6.5
)

for imageName in ${images[@]};do
    docker pull registry.cn-hangzhou.aliyuncs.com/google_containers/$imageName
    docker tag registry.cn-hangzhou.aliyuncs.com/google_containers/$imageName k8s.gcr.io/$imageName
    docker rmi registry.cn-hangzhou.aliyuncs.com/google_containers/$imageName
done
[root@master yum.repos.d]# docker images
REPOSITORY                           TAG       IMAGE ID       CREATED       SIZE
k8s.gcr.io/kube-proxy                v1.17.4   6dec7cfde1e5   2 years ago   116MB
k8s.gcr.io/kube-apiserver            v1.17.4   2e1ba57fe95a   2 years ago   171MB
k8s.gcr.io/kube-controller-manager   v1.17.4   7f997fcf3e94   2 years ago   161MB
k8s.gcr.io/kube-scheduler            v1.17.4   5db16c1c7aff   2 years ago   94.4MB
k8s.gcr.io/coredns                   1.6.5     70f311871ae1   3 years ago   41.6MB
k8s.gcr.io/etcd                      3.4.3-0   303ce5db0e90   3 years ago   288MB
k8s.gcr.io/pause                     3.1       da86e6ba6ca1   4 years ago   742kB
[root@master yum.repos.d]#
使用kubectl version 命令,输出的信息会显示client和server的版本信息;
client代表kubectl版本信息
server代表的是master节点的k8s版本信息
[root@master chapter5]# kubectl version
Client Version: version.Info{Major:"1", Minor:"17", GitVersion:"v1.17.4", GitCommit:"8d8aa39598534325ad77120c120a22b3a990b5ea", GitTreeState:"clean", BuildDate:"2020-03-12T21:03:42Z", GoVersion:"go1.13.8", Compiler:"gc", Platform:"linux/amd64"}
Server Version: version.Info{Major:"1", Minor:"17", GitVersion:"v1.17.4", GitCommit:"8d8aa39598534325ad77120c120a22b3a990b5ea", GitTreeState:"clean", BuildDate:"2020-03-12T20:55:23Z", GoVersion:"go1.13.8", Compiler:"gc", Platform:"linux/amd64"}
[root@master chapter5]#
kubeadm init的执行,--dry-run。
[root@master net.d]# kubeadm init  --apiserver-advertise-address=192.168.56.18 --dry-run
I1205 09:45:45.183662    9203 version.go:251] remote version is much newer: v1.25.4; falling back to: stable-1.17
W1205 09:45:46.092452    9203 validation.go:28] Cannot validate kube-proxy config - no validator is available
W1205 09:45:46.092475    9203 validation.go:28] Cannot validate kubelet config - no validator is available
[init] Using Kubernetes version: v1.17.17
[preflight] Running pre-flight checks
    [WARNING SystemVerification]: this Docker version is not on the list of validated versions: 20.10.21. Latest validated version: 19.03
error execution phase preflight: [preflight] Some fatal errors occurred:
    [ERROR Port-6443]: Port 6443 is in use
    [ERROR Port-10259]: Port 10259 is in use
    [ERROR Port-10257]: Port 10257 is in use
    [ERROR FileAvailable--etc-kubernetes-manifests-kube-apiserver.yaml]: /etc/kubernetes/manifests/kube-apiserver.yaml already exists
    [ERROR FileAvailable--etc-kubernetes-manifests-kube-controller-manager.yaml]: /etc/kubernetes/manifests/kube-controller-manager.yaml already exists
    [ERROR FileAvailable--etc-kubernetes-manifests-kube-scheduler.yaml]: /etc/kubernetes/manifests/kube-scheduler.yaml already exists
    [ERROR FileAvailable--etc-kubernetes-manifests-etcd.yaml]: /etc/kubernetes/manifests/etcd.yaml already exists
    [ERROR Port-10250]: Port 10250 is in use
    [ERROR Port-2379]: Port 2379 is in use
    [ERROR Port-2380]: Port 2380 is in use
    [ERROR DirAvailable--var-lib-etcd]: /var/lib/etcd is not empty
[preflight] If you know what you are doing, you can make a check non-fatal with `--ignore-preflight-errors=...`
To see the stack trace of this error execute with --v=5 or higher
kubeadm init  --apiserver-advertise-address=192.168.56.18
--image-repository registry.aliyuncs.com/google_containers
--kubernetes-version=v1.17.4
--service-cidr=10.96.0.0/12
--pod-network-cidr=10.244.0.0/16
生成Kubernetes的各大组件直接通信使用的CA证书
mkdir -p $HOME/.kube
cp -i /etc/kubernetes/admin.conf $HOME/.kube/config
chown $(id -u):$(id -g) $HOME/.kube/config
kubeadm token create --print-join-command
Node节点加入K8s集群之中
[root@node1 yum.repos.d]# kubeadm join 192.168.56.18:6443 --token 7npygu.rc2yrxy5i4fekbtf
                      --discovery-token-ca-cert-hash sha256:a97ae99ed9d6ddf8659a574e24da69ffda0dd3a8c283d31832a8eb2b53a282a5
当k8s集群中安装好网络插件之后,各个node节点才会进入ready状态;下面来部署网络插件
- Pod网络:10.244.0.0/16
- 10.96.0.0/12
---
# Source: calico/templates/calico-config.yaml
# This ConfigMap is used to configure a self-hosted Calico installation.
kind: ConfigMap
apiVersion: v1
metadata:
  name: calico-config
  namespace: kube-system
data:
  # Typha is disabled.
  typha_service_name: "none"
  # Configure the backend to use.
  calico_backend: "bird"

  # Configure the MTU to use
  veth_mtu: "1440"

  # The CNI network configuration to install on each node.  The special
  # values in this config will be automatically populated.
  cni_network_config: |-
    {
      "name": "k8s-pod-network",
      "cniVersion": "0.3.1",
      "plugins": [
        {
          "type": "calico",
          "log_level": "info",
          "datastore_type": "kubernetes",
          "nodename": "__KUBERNETES_NODE_NAME__",
          "mtu": __CNI_MTU__,
          "ipam": {
              "type": "calico-ipam"
          },
          "policy": {
              "type": "k8s"
          },
          "kubernetes": {
              "kubeconfig": "__KUBECONFIG_FILEPATH__"
          }
        },
        {
          "type": "portmap",
          "snat": true,
          "capabilities": {"portMappings": true}
        }
      ]
    }

---
# Source: calico/templates/kdd-crds.yaml
apiVersion: apiextensions.k8s.io/v1beta1
kind: CustomResourceDefinition
metadata:
  name: felixconfigurations.crd.projectcalico.org
spec:
  scope: Cluster
  group: crd.projectcalico.org
  version: v1
  names:
    kind: FelixConfiguration
    plural: felixconfigurations
    singular: felixconfiguration
---

apiVersion: apiextensions.k8s.io/v1beta1
kind: CustomResourceDefinition
metadata:
  name: ipamblocks.crd.projectcalico.org
spec:
  scope: Cluster
  group: crd.projectcalico.org
  version: v1
  names:
    kind: IPAMBlock
    plural: ipamblocks
    singular: ipamblock

---

apiVersion: apiextensions.k8s.io/v1beta1
kind: CustomResourceDefinition
metadata:
  name: blockaffinities.crd.projectcalico.org
spec:
  scope: Cluster
  group: crd.projectcalico.org
  version: v1
  names:
    kind: BlockAffinity
    plural: blockaffinities
    singular: blockaffinity

---

apiVersion: apiextensions.k8s.io/v1beta1
kind: CustomResourceDefinition
metadata:
  name: ipamhandles.crd.projectcalico.org
spec:
  scope: Cluster
  group: crd.projectcalico.org
  version: v1
  names:
    kind: IPAMHandle
    plural: ipamhandles
    singular: ipamhandle

---

apiVersion: apiextensions.k8s.io/v1beta1
kind: CustomResourceDefinition
metadata:
  name: ipamconfigs.crd.projectcalico.org
spec:
  scope: Cluster
  group: crd.projectcalico.org
  version: v1
  names:
    kind: IPAMConfig
    plural: ipamconfigs
    singular: ipamconfig

---

apiVersion: apiextensions.k8s.io/v1beta1
kind: CustomResourceDefinition
metadata:
  name: bgppeers.crd.projectcalico.org
spec:
  scope: Cluster
  group: crd.projectcalico.org
  version: v1
  names:
    kind: BGPPeer
    plural: bgppeers
    singular: bgppeer

---

apiVersion: apiextensions.k8s.io/v1beta1
kind: CustomResourceDefinition
metadata:
  name: bgpconfigurations.crd.projectcalico.org
spec:
  scope: Cluster
  group: crd.projectcalico.org
  version: v1
  names:
    kind: BGPConfiguration
    plural: bgpconfigurations
    singular: bgpconfiguration

---

apiVersion: apiextensions.k8s.io/v1beta1
kind: CustomResourceDefinition
metadata:
  name: ippools.crd.projectcalico.org
spec:
  scope: Cluster
  group: crd.projectcalico.org
  version: v1
  names:
    kind: IPPool
    plural: ippools
    singular: ippool

---

apiVersion: apiextensions.k8s.io/v1beta1
kind: CustomResourceDefinition
metadata:
  name: hostendpoints.crd.projectcalico.org
spec:
  scope: Cluster
  group: crd.projectcalico.org
  version: v1
  names:
    kind: HostEndpoint
    plural: hostendpoints
    singular: hostendpoint

---

apiVersion: apiextensions.k8s.io/v1beta1
kind: CustomResourceDefinition
metadata:
  name: clusterinformations.crd.projectcalico.org
spec:
  scope: Cluster
  group: crd.projectcalico.org
  version: v1
  names:
    kind: ClusterInformation
    plural: clusterinformations
    singular: clusterinformation

---

apiVersion: apiextensions.k8s.io/v1beta1
kind: CustomResourceDefinition
metadata:
  name: globalnetworkpolicies.crd.projectcalico.org
spec:
  scope: Cluster
  group: crd.projectcalico.org
  version: v1
  names:
    kind: GlobalNetworkPolicy
    plural: globalnetworkpolicies
    singular: globalnetworkpolicy

---

apiVersion: apiextensions.k8s.io/v1beta1
kind: CustomResourceDefinition
metadata:
  name: globalnetworksets.crd.projectcalico.org
spec:
  scope: Cluster
  group: crd.projectcalico.org
  version: v1
  names:
    kind: GlobalNetworkSet
    plural: globalnetworksets
    singular: globalnetworkset

---

apiVersion: apiextensions.k8s.io/v1beta1
kind: CustomResourceDefinition
metadata:
  name: networkpolicies.crd.projectcalico.org
spec:
  scope: Namespaced
  group: crd.projectcalico.org
  version: v1
  names:
    kind: NetworkPolicy
    plural: networkpolicies
    singular: networkpolicy

---

apiVersion: apiextensions.k8s.io/v1beta1
kind: CustomResourceDefinition
metadata:
  name: networksets.crd.projectcalico.org
spec:
  scope: Namespaced
  group: crd.projectcalico.org
  version: v1
  names:
    kind: NetworkSet
    plural: networksets
    singular: networkset
---
# Source: calico/templates/rbac.yaml

# Include a clusterrole for the kube-controllers component,
# and bind it to the calico-kube-controllers serviceaccount.
kind: ClusterRole
apiVersion: rbac.authorization.k8s.io/v1
metadata:
  name: calico-kube-controllers
rules:
  # Nodes are watched to monitor for deletions.
  - apiGroups: [""]
    resources:
      - nodes
    verbs:
      - watch
      - list
      - get
  # Pods are queried to check for existence.
  - apiGroups: [""]
    resources:
      - pods
    verbs:
      - get
  # IPAM resources are manipulated when nodes are deleted.
  - apiGroups: ["crd.projectcalico.org"]
    resources:
      - ippools
    verbs:
      - list
  - apiGroups: ["crd.projectcalico.org"]
    resources:
      - blockaffinities
      - ipamblocks
      - ipamhandles
    verbs:
      - get
      - list
      - create
      - update
      - delete
  # Needs access to update clusterinformations.
  - apiGroups: ["crd.projectcalico.org"]
    resources:
      - clusterinformations
    verbs:
      - get
      - create
      - update
---
kind: ClusterRoleBinding
apiVersion: rbac.authorization.k8s.io/v1
metadata:
  name: calico-kube-controllers
roleRef:
  apiGroup: rbac.authorization.k8s.io
  kind: ClusterRole
  name: calico-kube-controllers
subjects:
- kind: ServiceAccount
  name: calico-kube-controllers
  namespace: kube-system
---
# Include a clusterrole for the calico-node DaemonSet,
# and bind it to the calico-node serviceaccount.
kind: ClusterRole
apiVersion: rbac.authorization.k8s.io/v1
metadata:
  name: calico-node
rules:
  # The CNI plugin needs to get pods, nodes, and namespaces.
  - apiGroups: [""]
    resources:
      - pods
      - nodes
      - namespaces
    verbs:
      - get
  - apiGroups: [""]
    resources:
      - endpoints
      - services
    verbs:
      # Used to discover service IPs for advertisement.
      - watch
      - list
      # Used to discover Typhas.
      - get
  - apiGroups: [""]
    resources:
      - nodes/status
    verbs:
      # Needed for clearing NodeNetworkUnavailable flag.
      - patch
      # Calico stores some configuration information in node annotations.
      - update
  # Watch for changes to Kubernetes NetworkPolicies.
  - apiGroups: ["networking.k8s.io"]
    resources:
      - networkpolicies
    verbs:
      - watch
      - list
  # Used by Calico for policy information.
  - apiGroups: [""]
    resources:
      - pods
      - namespaces
      - serviceaccounts
    verbs:
      - list
      - watch
  # The CNI plugin patches pods/status.
  - apiGroups: [""]
    resources:
      - pods/status
    verbs:
      - patch
  # Calico monitors various CRDs for config.
  - apiGroups: ["crd.projectcalico.org"]
    resources:
      - globalfelixconfigs
      - felixconfigurations
      - bgppeers
      - globalbgpconfigs
      - bgpconfigurations
      - ippools
      - ipamblocks
      - globalnetworkpolicies
      - globalnetworksets
      - networkpolicies
      - networksets
      - clusterinformations
      - hostendpoints
    verbs:
      - get
      - list
      - watch
  # Calico must create and update some CRDs on startup.
  - apiGroups: ["crd.projectcalico.org"]
    resources:
      - ippools
      - felixconfigurations
      - clusterinformations
    verbs:
      - create
      - update
  # Calico stores some configuration information on the node.
  - apiGroups: [""]
    resources:
      - nodes
    verbs:
      - get
      - list
      - watch
  # These permissions are only requried for upgrade from v2.6, and can
  # be removed after upgrade or on fresh installations.
  - apiGroups: ["crd.projectcalico.org"]
    resources:
      - bgpconfigurations
      - bgppeers
    verbs:
      - create
      - update
  # These permissions are required for Calico CNI to perform IPAM allocations.
  - apiGroups: ["crd.projectcalico.org"]
    resources:
      - blockaffinities
      - ipamblocks
      - ipamhandles
    verbs:
      - get
      - list
      - create
      - update
      - delete
  - apiGroups: ["crd.projectcalico.org"]
    resources:
      - ipamconfigs
    verbs:
      - get
  # Block affinities must also be watchable by confd for route aggregation.
  - apiGroups: ["crd.projectcalico.org"]
    resources:
      - blockaffinities
    verbs:
      - watch
  # The Calico IPAM migration needs to get daemonsets. These permissions can be
  # removed if not upgrading from an installation using host-local IPAM.
  - apiGroups: ["apps"]
    resources:
      - daemonsets
    verbs:
      - get
---
apiVersion: rbac.authorization.k8s.io/v1
kind: ClusterRoleBinding
metadata:
  name: calico-node
roleRef:
  apiGroup: rbac.authorization.k8s.io
  kind: ClusterRole
  name: calico-node
subjects:
- kind: ServiceAccount
  name: calico-node
  namespace: kube-system

---
# Source: calico/templates/calico-node.yaml
# This manifest installs the calico-node container, as well
# as the CNI plugins and network config on
# each master and worker node in a Kubernetes cluster.
kind: DaemonSet
apiVersion: apps/v1
metadata:
  name: calico-node
  namespace: kube-system
  labels:
    k8s-app: calico-node
spec:
  selector:
    matchLabels:
      k8s-app: calico-node
  updateStrategy:
    type: RollingUpdate
    rollingUpdate:
      maxUnavailable: 1
  template:
    metadata:
      labels:
        k8s-app: calico-node
      annotations:
        # This, along with the CriticalAddonsOnly toleration below,
        # marks the pod as a critical add-on, ensuring it gets
        # priority scheduling and that its resources are reserved
        # if it ever gets evicted.
        scheduler.alpha.kubernetes.io/critical-pod: ''
    spec:
      nodeSelector:
        beta.kubernetes.io/os: linux
      hostNetwork: true
      tolerations:
        # Make sure calico-node gets scheduled on all nodes.
        - effect: NoSchedule
          operator: Exists
        # Mark the pod as a critical add-on for rescheduling.
        - key: CriticalAddonsOnly
          operator: Exists
        - effect: NoExecute
          operator: Exists
      serviceAccountName: calico-node
      # Minimize downtime during a rolling upgrade or deletion; tell Kubernetes to do a "force
      # deletion": https://kubernetes.io/docs/concepts/workloads/pods/pod/#termination-of-pods.
      terminationGracePeriodSeconds: 0
      priorityClassName: system-node-critical
      initContainers:
        # This container performs upgrade from host-local IPAM to calico-ipam.
        # It can be deleted if this is a fresh installation, or if you have already
        # upgraded to use calico-ipam.
        - name: upgrade-ipam
          image: calico/cni:v3.8.9
          command: ["/opt/cni/bin/calico-ipam", "-upgrade"]
          env:
            - name: KUBERNETES_NODE_NAME
              valueFrom:
                fieldRef:
                  fieldPath: spec.nodeName
            - name: CALICO_NETWORKING_BACKEND
              valueFrom:
                configMapKeyRef:
                  name: calico-config
                  key: calico_backend
          volumeMounts:
            - mountPath: /var/lib/cni/networks
              name: host-local-net-dir
            - mountPath: /host/opt/cni/bin
              name: cni-bin-dir
          securityContext:
            privileged: true
        # This container installs the CNI binaries
        # and CNI network config file on each node.
        - name: install-cni
          image: calico/cni:v3.8.9
          command: ["/install-cni.sh"]
          env:
            # Name of the CNI config file to create.
            - name: CNI_CONF_NAME
              value: "10-calico.conflist"
            # The CNI network config to install on each node.
            - name: CNI_NETWORK_CONFIG
              valueFrom:
                configMapKeyRef:
                  name: calico-config
                  key: cni_network_config
            # Set the hostname based on the k8s node name.
            - name: KUBERNETES_NODE_NAME
              valueFrom:
                fieldRef:
                  fieldPath: spec.nodeName
            # CNI MTU Config variable
            - name: CNI_MTU
              valueFrom:
                configMapKeyRef:
                  name: calico-config
                  key: veth_mtu
            # Prevents the container from sleeping forever.
            - name: SLEEP
              value: "false"
          volumeMounts:
            - mountPath: /host/opt/cni/bin
              name: cni-bin-dir
            - mountPath: /host/etc/cni/net.d
              name: cni-net-dir
          securityContext:
            privileged: true
        # Adds a Flex Volume Driver that creates a per-pod Unix Domain Socket to allow Dikastes
        # to communicate with Felix over the Policy Sync API.
        - name: flexvol-driver
          image: calico/pod2daemon-flexvol:v3.8.9
          volumeMounts:
          - name: flexvol-driver-host
            mountPath: /host/driver
          securityContext:
            privileged: true
      containers:
        # Runs calico-node container on each Kubernetes node.  This
        # container programs network policy and routes on each
        # host.
        - name: calico-node
          image: calico/node:v3.8.9
          env:
            # Use Kubernetes API as the backing datastore.
            - name: DATASTORE_TYPE
              value: "kubernetes"
            # Wait for the datastore.
            - name: WAIT_FOR_DATASTORE
              value: "true"
            # Set based on the k8s node name.
            - name: NODENAME
              valueFrom:
                fieldRef:
                  fieldPath: spec.nodeName
            # Choose the backend to use.
            - name: CALICO_NETWORKING_BACKEND
              valueFrom:
                configMapKeyRef:
                  name: calico-config
                  key: calico_backend
            # Cluster type to identify the deployment type
            - name: CLUSTER_TYPE
              value: "k8s,bgp"
            # Auto-detect the BGP IP address.
            - name: IP
              value: "autodetect"
            # Enable IPIP
            - name: CALICO_IPV4POOL_IPIP
              value: "Always"
            # Set MTU for tunnel device used if ipip is enabled
            - name: FELIX_IPINIPMTU
              valueFrom:
                configMapKeyRef:
                  name: calico-config
                  key: veth_mtu
            # The default IPv4 pool to create on startup if none exists. Pod IPs will be
            # chosen from this range. Changing this value after installation will have
            # no effect. This should fall within `--cluster-cidr`.
            - name: CALICO_IPV4POOL_CIDR
              value: "10.244.0.0/16"
            - name: IP_AUTODETECTION_METHOD
              value: "interface=ens.*"
            # Disable file logging so `kubectl logs` works.
            - name: CALICO_DISABLE_FILE_LOGGING
              value: "true"
            # Set Felix endpoint to host default action to ACCEPT.
            - name: FELIX_DEFAULTENDPOINTTOHOSTACTION
              value: "ACCEPT"
            # Disable IPv6 on Kubernetes.
            - name: FELIX_IPV6SUPPORT
              value: "false"
            # Set Felix logging to "info"
            - name: FELIX_LOGSEVERITYSCREEN
              value: "info"
            - name: FELIX_HEALTHENABLED
              value: "true"
          securityContext:
            privileged: true
          resources:
            requests:
              cpu: 250m
          livenessProbe:
            exec:
              command:
                - /bin/calico-node
                - -felix-live
                - -bird-live
            periodSeconds: 10
            initialDelaySeconds: 10
            failureThreshold: 6
          readinessProbe:
            exec:
              command:
              - /bin/calico-node
              - -bird-ready
              - -felix-ready
            periodSeconds: 10
          volumeMounts:
            - mountPath: /lib/modules
              name: lib-modules
              readOnly: true
            - mountPath: /run/xtables.lock
              name: xtables-lock
              readOnly: false
            - mountPath: /var/run/calico
              name: var-run-calico
              readOnly: false
            - mountPath: /var/lib/calico
              name: var-lib-calico
              readOnly: false
            - name: policysync
              mountPath: /var/run/nodeagent
      volumes:
        # Used by calico-node.
        - name: lib-modules
          hostPath:
            path: /lib/modules
        - name: var-run-calico
          hostPath:
            path: /var/run/calico
        - name: var-lib-calico
          hostPath:
            path: /var/lib/calico
        - name: xtables-lock
          hostPath:
            path: /run/xtables.lock
            type: FileOrCreate
        # Used to install CNI.
        - name: cni-bin-dir
          hostPath:
            path: /opt/cni/bin
        - name: cni-net-dir
          hostPath:
            path: /etc/cni/net.d
        # Mount in the directory for host-local IPAM allocations. This is
        # used when upgrading from host-local to calico-ipam, and can be removed
        # if not using the upgrade-ipam init container.
        - name: host-local-net-dir
          hostPath:
            path: /var/lib/cni/networks
        # Used to create per-pod Unix Domain Sockets
        - name: policysync
          hostPath:
            type: DirectoryOrCreate
            path: /var/run/nodeagent
        # Used to install Flex Volume Driver
        - name: flexvol-driver-host
          hostPath:
            type: DirectoryOrCreate
            path: /usr/libexec/kubernetes/kubelet-plugins/volume/exec/nodeagent~uds
---

apiVersion: v1
kind: ServiceAccount
metadata:
  name: calico-node
  namespace: kube-system

---
# Source: calico/templates/calico-kube-controllers.yaml

# See https://github.com/projectcalico/kube-controllers
apiVersion: apps/v1
kind: Deployment
metadata:
  name: calico-kube-controllers
  namespace: kube-system
  labels:
    k8s-app: calico-kube-controllers
spec:
  # The controllers can only have a single active instance.
  replicas: 1
  selector:
    matchLabels:
      k8s-app: calico-kube-controllers
  strategy:
    type: Recreate
  template:
    metadata:
      name: calico-kube-controllers
      namespace: kube-system
      labels:
        k8s-app: calico-kube-controllers
      annotations:
        scheduler.alpha.kubernetes.io/critical-pod: ''
    spec:
      nodeSelector:
        beta.kubernetes.io/os: linux
      tolerations:
        # Mark the pod as a critical add-on for rescheduling.
        - key: CriticalAddonsOnly
          operator: Exists
        - key: node-role.kubernetes.io/master
          effect: NoSchedule
      serviceAccountName: calico-kube-controllers
      priorityClassName: system-cluster-critical
      containers:
        - name: calico-kube-controllers
          image: calico/kube-controllers:v3.8.9
          env:
            # Choose which controllers to run.
            - name: ENABLED_CONTROLLERS
              value: node
            - name: DATASTORE_TYPE
              value: kubernetes
          readinessProbe:
            exec:
              command:
              - /usr/bin/check-status
              - -r

---

apiVersion: v1
kind: ServiceAccount
metadata:
  name: calico-kube-controllers
  namespace: kube-system
---
# Source: calico/templates/calico-etcd-secrets.yaml

---
# Source: calico/templates/calico-typha.yaml

---
# Source: calico/templates/configure-canal.yaml
使用配置文件启动fannel
kubectl apply -f calicao.yaml
若是集群状态一直是 notready,用下面语句查看kubelet服务日志
journalctl -f -u kubelet.service
kubectl logs myapp-5c6976696c-tggsq -n default -f --tail=1  #pod中包含2个容器
kubectl logs pod-zhanggen -n default -c myapp
[root@master ~]# kubectl create deploy nginx-deploy --image=nginx:1.14-alpine
deployment.apps/nginx-deploy created
[root@master ~]# kubectl get pods
NAME                           READY   STATUS    RESTARTS   AGE
nginx-deploy-75d47d8b7-brtlm   1/1     Running   0          2m11s
[root@master ~]# kubectl get pods -o wide
NAME                           READY   STATUS    RESTARTS   AGE     IP                NODE    NOMINATED NODE   READINESS GATES
nginx-deploy-75d47d8b7-brtlm   1/1     Running   0          2m32s   192.168.166.130   node1   <none>           <none>
[root@master ~]# kubectl create svc clusterip nginx-deploy --tcp=80:80
service/nginx-deploy created
2.k8s核心功能测试
通过service的IP地址访问后端关联的Pod;
通过service的完整域名地址访问后端关联的Pod;
[root@master ~]# kubectl describe svc/nginx-deploy
Name:              nginx-deploy
Namespace:         default
Labels:            app=nginx-deploy
Annotations:       <none>
Selector:          app=nginx-deploy
Type:              ClusterIP
IP:                10.98.82.22          #service的ip
Port:              80-80  80/TCP
TargetPort:        80/TCP
Endpoints:         10.244.166.133:80   #service关联pod的ip
Session Affinity:  None
Events:            <none>
[root@master ~]# kubectl get pod  -o wide
NAME                           READY   STATUS    RESTARTS   AGE     IP               NODE    NOMINATED NODE   READINESS GATES
nginx-deploy-75d47d8b7-z29gn   1/1     Running   0          8m41s   10.244.166.133   node1   <none>           <none>

#1.通过service的IP地址访问后端关联的Pod
[root@master ~]# curl 10.98.82.22
<!DOCTYPE html>
<html>
<head>
<title>Welcome to nginx!</title>
<style>
    body {
        width: 35em;
        margin: 0 auto;
        font-family: Tahoma, Verdana, Arial, sans-serif;
    }
</style>
</head>
<body>
<h1>Welcome to nginx!</h1>
<p>If you see this page, the nginx web server is successfully installed and
working. Further configuration is required.</p>
<p>For online documentation and support please refer to
<a href="http://nginx.org/">nginx.org</a>.<br/>
Commercial support is available at
<a href="http://nginx.com/">nginx.com</a>.</p>
<p><em>Thank you for using nginx.</em></p>
</body>
</html>
#2.通过service的完整域名地址访问后端关联的Pod
[root@master ~]# kubectl get svc -n kube-system
NAME       TYPE        CLUSTER-IP   EXTERNAL-IP   PORT(S)                  AGE
kube-dns   ClusterIP   10.96.0.10   <none>        53/UDP,53/TCP,9153/TCP   8h
[root@master ~]# vim /etc/resolv.conf
[root@master ~]# cat /etc/resolv.conf
# Generated by NetworkManager
#nameserver 114.114.114.114
nameserver 10.96.0.10
[root@master ~]# curl nginx-deploy.default.svc.cluster.local.
<!DOCTYPE html>
<html>
<head>
<title>Welcome to nginx!</title>
<style>
    body {
        width: 35em;
        margin: 0 auto;
        font-family: Tahoma, Verdana, Arial, sans-serif;
    }
</style>
</head>
<body>
<h1>Welcome to nginx!</h1>
<p>If you see this page, the nginx web server is successfully installed and
working. Further configuration is required.</p>
<p>For online documentation and support please refer to
<a href="http://nginx.org/">nginx.org</a>.<br/>
Commercial support is available at
<a href="http://nginx.com/">nginx.com</a>.</p>
<p><em>Thank you for using nginx.</em></p>
</body>
</html>
在线扩容pod,通过service的域名测试pod的负载均衡
[root@master zhanggen]# kubectl scale --replicas=3 deployment myapp
deployment.apps/myapp scaled
[root@master zhanggen]# kubectl get pod -o wide
NAME                           READY   STATUS    RESTARTS   AGE   IP               NODE    NOMINATED NODE   READINESS GATES
myapp-5c6976696c-8vrd6         1/1     Running   0          5s    10.244.104.2     node2   <none>           <none>
myapp-5c6976696c-frg2p         1/1     Running   0          12m   10.244.166.134   node1   <none>           <none>
myapp-5c6976696c-tggsq         1/1     Running   0          5s    10.244.166.135   node1   <none>           <none>
nginx-deploy-75d47d8b7-z29gn   1/1     Running   0          14h   10.244.166.133   node1   <none>           <none>
[root@master zhanggen]# curl myapp.default.svc.cluster.local./hostname.html
myapp-5c6976696c-frg2p
[root@master zhanggen]# curl myapp.default.svc.cluster.local./hostname.html
myapp-5c6976696c-tggsq
[root@master zhanggen]# curl myapp.default.svc.cluster.local./hostname.html
myapp-5c6976696c-frg2p
[root@master zhanggen]# curl myapp.default.svc.cluster.local./hostname.html
myapp-5c6976696c-8vrd6
[root@master zhanggen]# curl myapp.default.svc.cluster.local./hostname.html
myapp-5c6976696c-frg2p
[root@master zhanggen]# curl myapp.default.svc.cluster.local./hostname.html
myapp-5c6976696c-frg2p
[root@master zhanggen]# curl myapp.default.svc.cluster.local./hostname.html
myapp-5c6976696c-8vrd6
定义一个包含busybox容器的pod
apiVersion: v1
kind: Pod
metadata:
  name: pod-zhanggen
spec:
  containers:
  - name: myapp
    image: ikubernetes/myapp:v1
  - name: busybox
    image: busybox:latest
    imagePullPolicy: IfNotPresent
    command: ["/bin/sh","-c","sleep 86400"]
进入pod包含的容器
kubectl exec -it podname -n argo -c authenticator -- /bin/sh
进入的pod中容器中测试网络
[root@master basic]# kubectl get pods -o wide
NAME                           READY   STATUS    RESTARTS   AGE     IP               NODE    NOMINATED NODE   READINESS GATES
myapp-5c6976696c-8vrd6         1/1     Running   0          3h8m    10.244.104.2     node2   <none>           <none>
myapp-5c6976696c-frg2p         1/1     Running   0          3h21m   10.244.166.134   node1   <none>           <none>
myapp-5c6976696c-tggsq         1/1     Running   0          3h8m    10.244.166.135   node1   <none>           <none>
nginx-deploy-75d47d8b7-z29gn   1/1     Running   0          17h     10.244.166.133   node1   <none>           <none>
pod-zhanggen                   2/2     Running   0          18m     10.244.166.136   node1   <none>           <none>
[root@master basic]# kubectl exec -it pod-zhanggen -c busybox -n default /bin/sh
/ # ping 10.244.104.3
PING 10.244.104.3 (10.244.104.3): 56 data bytes
64 bytes from 10.244.104.3: seq=0 ttl=62 time=0.815 ms
64 bytes from 10.244.104.3: seq=1 ttl=62 time=0.522 ms
^C
--- 10.244.104.3 ping statistics ---
2 packets transmitted, 2 packets received, 0% packet loss
round-trip min/avg/max = 0.522/0.668/0.815 ms
/ # nslookup nginx-deploy.default.svc.cluster.local.
Server:        10.96.0.10
Address:    10.96.0.10:53
在同1个pod的中的多个容器共享同1个网络名称空间
/ # ifconfig
eth0      Link encap:Ethernet  HWaddr 26:D3:5E:86:83:3C
          inet addr:10.244.166.136  Bcast:0.0.0.0  Mask:255.255.255.255
          UP BROADCAST RUNNING MULTICAST  MTU:1440  Metric:1
          RX packets:25 errors:0 dropped:0 overruns:0 frame:0
          TX packets:25 errors:0 dropped:0 overruns:0 carrier:0
          collisions:0 txqueuelen:0
          RX bytes:3059 (2.9 KiB)  TX bytes:1952 (1.9 KiB)

lo        Link encap:Local Loopback
          inet addr:127.0.0.1  Mask:255.0.0.0
          UP LOOPBACK RUNNING  MTU:65536  Metric:1
          RX packets:22 errors:0 dropped:0 overruns:0 frame:0
          TX packets:22 errors:0 dropped:0 overruns:0 carrier:0
          collisions:0 txqueuelen:1000
          RX bytes:1912 (1.8 KiB)  TX bytes:1912 (1.8 KiB)

/ # netstat -tnl #在busybox容器中哪里开启的80端口?
Active Internet connections (only servers)
Proto Recv-Q Send-Q Local Address           Foreign Address         State
tcp        0      0 0.0.0.0:80              0.0.0.0:*               LISTEN
/ # ps -ef
PID   USER     TIME  COMMAND
    1 root      0:00 sleep 86400
   26 root      0:00 /bin/sh
   44 root      0:00 ps -ef
/ # wget -O - -q 127.0.0.1
Hello MyApp | Version: v1 | <a href="hostname.html">Pod Name</a>
/ #
五、Kubernetes集群管理
显示管理
[root@master ~]# kubectl get ns/zhanggen -o wide
[root@master ~]# kubectl get ns/zhanggen -o yaml
#生成资源清单的模板
kubectl get pod myapp-5c6976696c-8vrd6 -o yaml --> ./pod-deamon.yaml
kubectl get ns/zhanggen -o json
集群组件管理
[root@master ~]# kubectl get cm -n kube-system
NAME                                 DATA   AGE
calico-config                        4      6d19h
coredns                              1      7d2h
extension-apiserver-authentication   6      7d2h
kube-proxy                           2      7d2h
kubeadm-config                       2      7d2h
kubelet-config-1.17                  1      7d2h
[root@master ~]# kubectl edit cm kube-proxy -n kube-system
标签管理
借助标签+标签选择器,可以从K8s集群的众多Pod中筛选,定位到K8s管理员关注的特定k8s资源。
创建标签
可以在yaml文件的metadata.labels字段中定义标签,也可以通过kubectl创建和覆盖标签。
#新增标签
[root@master basic]# kubectl get pods --show-labels
NAME       READY   STATUS    RESTARTS   AGE     LABELS
pod-demo   1/1     Running   0          6h54m   app=pod-demo,rel=stable
[root@master basic]# kubectl label pods pod-demo tier=frontend
pod/pod-demo labeled
[root@master basic]# kubectl get pods --show-labels
NAME       READY   STATUS    RESTARTS   AGE     LABELS
pod-demo   1/1     Running   0          6h55m   app=pod-demo,rel=stable,tier=frontend
[root@master basic]# kubectl label pods pod-demo app=myapp
error: 'app' already has a value (pod-demo), and --overwrite is false
[root@master basic]# kubectl label pods pod-demo app=myapp --overwrite
pod/pod-demo labeled
[root@master basic]#
标签查询
根据标签查询Pod资源
#查看标签的app=zhanggen的pod
[root@master basic]# kubectl get pods --show-labels -l app=zhanggen
No resources found in default namespace.
#查看标签的app!=zhanggen的pod
[root@master basic]# kubectl get pods --show-labels -l app!=zhanggen
NAME       READY   STATUS    RESTARTS   AGE     LABELS
pod-demo   1/1     Running   0          3m51s   app=pod-demo,rel=stable
#查看标签的值在某1访问内的
[root@master basic]# kubectl get pods --show-labels -l "app in (pod-demo)"
NAME       READY   STATUS    RESTARTS   AGE     LABELS
pod-demo   1/1     Running   0          4m40s   app=pod-demo,rel=stable
[root@master basic]# kubectl get pods --show-labels -l "app in (pod-demo)" -L app
NAME       READY   STATUS    RESTARTS   AGE     APP        LABELS
pod-demo   1/1     Running   0          5m19s   pod-demo   app=pod-demo,rel=stable
#查看标签的值不在某1访问内的
[root@master basic]# kubectl get pods --show-labels -l "app notin (pod-demo)" -L app
No resources found in default namespace.
[root@master basic]# kubectl get pods --show-labels -l "app notin (pod-demo)"
No resources found in default namespace.
#查看标签的键为app的Pod
[root@master basic]# kubectl get pods --show-labels -l app
NAME       READY   STATUS    RESTARTS   AGE     LABELS
pod-demo   1/1     Running   0          7m14s   app=pod-demo,rel=stable
[root@master basic]# kubectl get pods -l '!app'
No resources found in default namespace.
[root@master basic]#
删除多个deployment
[root@master basic]# kubectl get deploy
NAME           READY   UP-TO-DATE   AVAILABLE   AGE
myapp          3/3     3            3           2d
nginx-deploy   1/1     1            1           2d15h
[root@master basic]# kubectl get pods -o wide
NAME                           READY   STATUS    RESTARTS   AGE     IP               NODE    NOMINATED NODE   READINESS GATES
myapp-5c6976696c-frg2p         1/1     Running   0          2d      10.244.166.134   node1   <none>           <none>
myapp-5c6976696c-tggsq         1/1     Running   0          47h     10.244.166.135   node1   <none>           <none>
myapp-5c6976696c-wrxq4         1/1     Running   0          7m31s   10.244.104.4     node2   <none>           <none>
nginx-deploy-75d47d8b7-z29gn   1/1     Running   0          2d14h   10.244.166.133   node1   <none>           <none>
[root@master basic]# kubectl delete deployments myapp nginx-deploy
deployment.apps "myapp" deleted
deployment.apps "nginx-deploy" deleted
[root@master basic]#
六、Kubernetes资源管理
K8s的的API是RestFull风格的,在RestFull风格API中资源类似OOP中类,类中的方法就是HTTP所支持的固定方法(Get/Post/Set/Delete...), K8s有下列对象。
Kubernetes contains a number ofabstractions that represent the state of your system:deployed containerized applications and workloads, their associated networkand disk resources.and other information about what your cluster is doing.
These abstractions are represented by objects in the Kubernetes API.
- The basic Kubernetes objects include Pod, Service, Namespace and Volume·
- Inaddition Kubernetes contains a number of higher-level abstractions called Controllers.Controllers build upon the basic objects, and provide additional functionality and convenience features.
- Controllers include ReplicaSet、Deployment、DaemonSet、StatefulSet and Job.
在K8s中我们可以在yaml文件中定义各种集群资源;
1.Pod资源管理
在k8s中Pod是核心资源,所有的资源都为Pod资源服务的;
Pod控制器资源是为了动态地创建、管理Pod资源;
Service和Ingress资源是为了实现Pod资源的网络访问;
1.1.Pod的生命周期
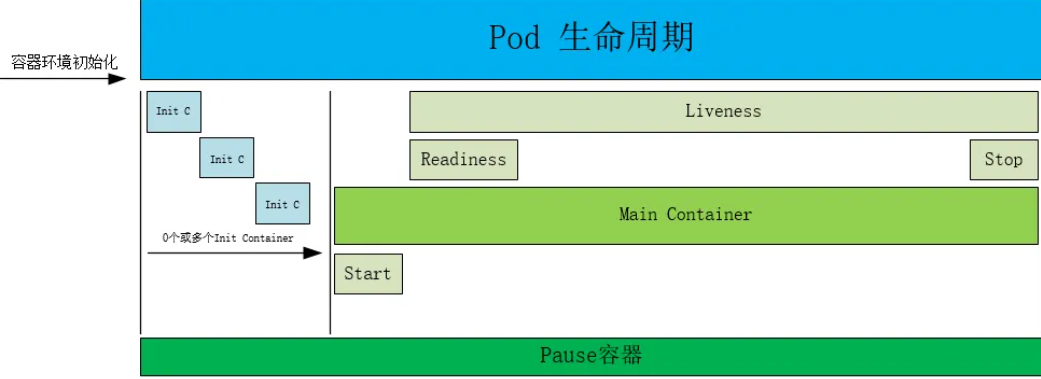
在1个Pod中通常包含以下3类容器,这3类容器的分工各有不同。
初始化容器
执行主容器运行之前所需的初始化工作,初始化容器运行在主容器启动之前,初始化容器串行运行完毕之后,主容器才会启动,否则主容器不启动;
主容器
执行重要任务,生命周期包含PostStartHook(启动后)、Runing(运行中)、PreStopHook(停止前)3个阶段,主容器和Sidecar容器同时运行,同时销毁;
主容器在运行的过程中可以设置3类探针以监控容器的启动、就绪、存活状态;
启动探针(startupProbe)
探测容器内的应用是否启动成功,在启动探针探测成功之前,其它类型的探针都会暂时处于禁用状态;启动失败Pod状态为Not
就绪探针(ReadinessProbe)
探测Pod是否进入READY状态,并做好接收请求的准备。如果探测失败Pod则会进入NOTREADY状态(READY为0/1)并且从所关联的Service资源的端点(Endpoints)中踢出,Service将不会再把访问请求转发给这个Pod;
存活探针(LivenessProbe)
探测容器是否运行正常。如果探测失败,控制器会修改改Pod的资源状态进而触发Kubelet杀掉容器(不是Pod),容器会根据重启策略决定是否重启;
SideCar容器
执行辅助业务,生命周期包含ready和stop阶段,Sidecar和主容器同时运行,同时销毁;
1.1.1.健康状态检测
livenessProbe:在当前容器启动后,通过执行Shell命令、发送HTTP请求、连接Socket这3种方法,对容器的运行状态进行周期性的健康状态检测;
如果当前容器的健康状态检测失败,当前容器就会被重启。
1.1.1.1.exec command
apiVersion: v1
kind: Pod
metadata:
  labels:
    test: liveness-exec
  name: liveness-exec
spec:
  containers:
  - name: liveness-demo
    image: busybox
    args:
    - /bin/sh
    - -c
    - touch /tmp/healthy; sleep 30; rm -rf /tmp/healthy; sleep 600
    livenessProbe:
      exec:
        command:
        - test
        - -e
        - /tmp/healthy
kubectl describe pod liveness-exec
ame:         liveness-exec
Namespace:    default
Priority:     0
Node:         node1/192.168.56.19
Start Time:   Sat, 10 Dec 2022 10:45:45 +0800
Labels:       test=liveness-exec
Annotations:  cni.projectcalico.org/podIP: 10.244.166.138/32
              kubectl.kubernetes.io/last-applied-configuration:
                {"apiVersion":"v1","kind":"Pod","metadata":{"annotations":{},"labels":{"test":"liveness-exec"},"name":"liveness-exec","namespace":"default...
Status:       Running
IP:           10.244.166.138
IPs:
  IP:  10.244.166.138
Containers:
  liveness-demo:
    Container ID:  docker://8a653437e5326a55aacf20ce1b7544fc7bd352802fbc24fb4091a872d9445ae4
    Image:         busybox
    Image ID:      docker-pullable://busybox@sha256:5acba83a746c7608ed544dc1533b87c737a0b0fb730301639a0179f9344b1678
    Port:          <none>
    Host Port:     <none>
    Args:
      /bin/sh
      -c
      touch /tmp/healthy; sleep 30; rm -rf /tmp/healthy; sleep 600
    State:          Waiting
      Reason:       CrashLoopBackOff
    Last State:     Terminated
      Reason:       Error
      Exit Code:    137
      Started:      Sat, 10 Dec 2022 11:34:02 +0800
      Finished:     Sat, 10 Dec 2022 11:35:31 +0800
    Ready:          False
    Restart Count:  15
    Liveness:       exec [test -e /tmp/healthy] delay=0s timeout=1s period=10s #success=1 #failure=3
    Environment:    <none>
    Mounts:
      /var/run/secrets/kubernetes.io/serviceaccount from default-token-2wg5g (ro)
Conditions:
  Type              Status
  Initialized       True
  Ready             False
  ContainersReady   False
  PodScheduled      True
Volumes:
  default-token-2wg5g:
    Type:        Secret (a volume populated by a Secret)
    SecretName:  default-token-2wg5g
    Optional:    false
QoS Class:       BestEffort
Node-Selectors:  <none>
Tolerations:     node.kubernetes.io/not-ready:NoExecute for 300s
                 node.kubernetes.io/unreachable:NoExecute for 300s
Events:
  Type     Reason     Age                   From               Message
  ----     ------     ----                  ----               -------
  Normal   Scheduled  <unknown>             default-scheduler  Successfully assigned default/liveness-exec to node1
  Normal   Created    47m (x3 over 51m)     kubelet, node1     Created container liveness-demo
  Normal   Started    47m (x3 over 51m)     kubelet, node1     Started container liveness-demo
  Normal   Killing    46m (x3 over 50m)     kubelet, node1     Container liveness-demo failed liveness probe, will be restarted
  Normal   Pulling    30m (x9 over 51m)     kubelet, node1     Pulling image "busybox"
  Normal   Pulled     19m (x12 over 51m)    kubelet, node1     Successfully pulled image "busybox"
  Warning  BackOff    9m15s (x90 over 39m)  kubelet, node1     Back-off restarting failed container
  Warning  Unhealthy  3m56s (x43 over 50m)  kubelet, node1     Liveness probe failed:
1.1.1.2.发送HTTP请求
deployment:
  spec:
    replicas: 2
    strategy:
      rollingUpdate:
        maxSurge: 0
        maxUnavailable: 1
    template:
      spec:
        nodeSelector:
          ailme: "a100"
        containers:
        - name: app
          command:
            - "python"
            - "serve.py"
          resources:
            limits:
              cpu: '2'
              memory: 2000Mi
            requests:
              cpu: '1'
              memory: 1000Mi
          env:
          - name: ENV
            value: cn
          volumeMounts:
          - mountPath: /mnt
            name: model
        - name: text-generation-inference-ailme
          image: 'qa-roc.apuscn.com/deploy_prod/nlp/text-generation-inference-ailme:sha-5a58226'
          imagePullPolicy: Always
          args: ["--model-id", "/data/ailme13b","--port","8080","--json-output","--sharded","false","--max-input-length", "2040","--max-total-tokens","2048"]
          ports:
          - containerPort: 8080
            protocol: TCP
            scheme: HTTP
          resources:
            requests:
              cpu: "2"
              memory: 10000Mi
            limits:
              cpu: "4"
              memory: 32000Mi
              tke.cloud.tencent.com/qgpu-core: "100"
          volumeMounts:
            - mountPath: /data
              name: model
          livenessProbe:
            failureThreshold: 3
            httpGet:
              path: /info
              port: 8080
            initialDelaySeconds: 120
            periodSeconds: 10
            successThreshold: 1
            timeoutSeconds: 1
        - name: apusagent
        volumes:
        - name: model
          nfs:
            server: 10.56.9.229
            path: /
ingress:
service:
  spec:
    type: ClusterIP
测试
apiVersion: v1
kind: Pod
metadata:
  labels:
    test: liveness
  name: liveness-http
spec:
  containers:
  - name: liveness-demo
    image: nginx:1.14-alpine
    ports:
    - name: http
      containerPort: 80
    lifecycle:
      postStart:
        exec:
          command:
          - /bin/sh
          - -c
          - 'echo Healty > /usr/share/nginx/html/healthz'
    livenessProbe:
      httpGet:
        path: /healthz
        port: http
        scheme: HTTP
      periodSeconds: 2
      failureThreshold: 2
      initialDelaySeconds: 3
kubectl describe pod liveness-http
Containers:
  liveness-demo:
    Container ID:   docker://5455b4c3b1220617e5455b0ebf0d32aec39de58ce028f64b06c6eb3d4e03c939
    Image:          nginx:1.14-alpine
    Image ID:       docker-pullable://nginx@sha256:485b610fefec7ff6c463ced9623314a04ed67e3945b9c08d7e53a47f6d108dc7
    Port:           80/TCP
    Host Port:      0/TCP
    State:          Running
      Started:      Sat, 10 Dec 2022 11:17:21 +0800
    Ready:          True
    Restart Count:  0
    Liveness:       http-get http://:http/healthz delay=3s timeout=1s period=2s #success=1 #failure=2
    Environment:    <none>
    Mounts:
      /var/run/secrets/kubernetes.io/serviceaccount from default-token-2wg5g (ro)
1.1.2.就绪状态检测
ReadinessProbe用于检查容器中运行的应用程序是否准备就绪?是否可以负载均衡来自Service的流量?
1.1.2.1.exec command
piVersion: v1
kind: Pod
metadata:
  labels:
    test: readiness-exec
  name: readiness-exec
spec:
  containers:
  - name: readiness-demo
    image: busybox
    args: ["/bin/sh", "-c", "while true; do rm -f /tmp/ready; sleep 30; touch /tmp/ready; sleep 300; done"]
    readinessProbe:
      exec:
        command: ["test", "-e", "/tmp/ready"]
      initialDelaySeconds: 5
      periodSeconds: 5
kubectl describe pod readiness-exec
Name:         readiness-exec
Namespace:    default
Priority:     0
Node:         node1/192.168.56.19
Start Time:   Sat, 10 Dec 2022 15:54:15 +0800
Labels:       test=readiness-exec
Annotations:  cni.projectcalico.org/podIP: 10.244.166.143/32
              kubectl.kubernetes.io/last-applied-configuration:
                {"apiVersion":"v1","kind":"Pod","metadata":{"annotations":{},"labels":{"test":"readiness-exec"},"name":"readiness-exec","namespace":"defau...
Status:       Running
IP:           10.244.166.143
IPs:
  IP:  10.244.166.143
Containers:
  readiness-demo:
    Container ID:  docker://b476ef68b3eb3aa38851eb13c929a20e1c89ff67ff54845db82c15bad170d79f
    Image:         busybox
    Image ID:      docker-pullable://busybox@sha256:5acba83a746c7608ed544dc1533b87c737a0b0fb730301639a0179f9344b1678
    Port:          <none>
    Host Port:     <none>
    Args:
      /bin/sh
      -c
      while true; do rm -f /tmp/ready; sleep 30; touch /tmp/ready; sleep 300; done
    State:          Running
      Started:      Sat, 10 Dec 2022 15:54:31 +0800
    Ready:          True
    Restart Count:  0
    Readiness:      exec [test -e /tmp/ready] delay=5s timeout=1s period=5s #success=1 #failure=3
    Environment:    <none>
    Mounts:
      /var/run/secrets/kubernetes.io/serviceaccount from default-token-2wg5g (ro)
Conditions:
  Type              Status
  Initialized       True
  Ready             True
  ContainersReady   True
  PodScheduled      True
Volumes:
  default-token-2wg5g:
    Type:        Secret (a volume populated by a Secret)
    SecretName:  default-token-2wg5g
    Optional:    false
QoS Class:       BestEffort
Node-Selectors:  <none>
Tolerations:     node.kubernetes.io/not-ready:NoExecute for 300s
                 node.kubernetes.io/unreachable:NoExecute for 300s
Events:
  Type     Reason     Age                From               Message
  ----     ------     ----               ----               -------
  Normal   Scheduled  <unknown>          default-scheduler  Successfully assigned default/readiness-exec to node1
  Normal   Pulling    61s                kubelet, node1     Pulling image "busybox"
  Normal   Pulled     45s                kubelet, node1     Successfully pulled image "busybox"
  Normal   Created    45s                kubelet, node1     Created container readiness-demo
  Normal   Started    45s                kubelet, node1     Started container readiness-demo
  Warning  Unhealthy  16s (x5 over 36s)  kubelet, node1     Readiness probe failed:
1.2.Pod的状态
2、Running 运行中,Pod 已经被绑定到一个节点上,并且所有的容器都已经被创建,而且至少有一个是运行状态,或者是正在启动或者重启,可以通过 kubectl logs 查看 Pod 的日志
3、Succeeded 成功,所有容器执行成功并终止,并且不会再次重启,可以通过 kubectl logs 查看 Pod 日志
4、Failed 失败,所有容器都已终止,并且至少有一个容器以失败的方式终止,也就是说这个容器要么以非零状态退出,要么被系统终止,可以通过 logs 和 describe 查看 Pod 日志和状态
5、Unknown 未知,通常是由于API-Server和Kubelet之间的通信问题,造成API-Server无法获得 Pod 的状态
6、ImagePullBackOff 镜像拉取失败,一般是由于镜像不存在、网络不通或者需要登录认证引起的,可以使用 describe 命令查看具体原因
7、CrashLoopBackOff 容器启动失败,可以通过 logs 命令查看具体原因,一般为启动命令不正确,健康检查不通过等
8、OOMKilled 容器内存溢出,一般是容器的内存 Limit 设置的过小,或者程序本身有内存溢出,可以通过 logs 查看程序启动日志
9、Terminating Pod 正在被删除,可以通过 describe 查看状态
10、SysctlForbidden Pod 自定义了内核配置,但 kubelet 没有添加内核配置或配置的内核参数不支持,可以通过 describe 查看具体原因
11、Completed 容器内部主进程退出,一般计划任务执行结束会显示该状态,此时可以通过 logs 查看容器日志
12、ContainerCreating Pod 正在创建,一般为正在下载镜像,或者有配置不当的地方,可以通过 describe 查看具体原因
13、InvalidImageName 无法解析镜像名称
14、ImageInspectError 无法校验镜像
15、ErrImageNeverPull 策略禁止拉取镜像
16、RegistryUnavailable 连接不到镜像中心
17、CreateContainerConfigError 不能创建kubelet使用的容器配置
18、CreateContainerError 创建容器失败
19、m.internalLifecycle.PreStartContainer 执行hook报错
20、RunContainerError 启动容器失败
21、PostStartHookError 执行hook报错
22、ContainersNotInitialized 容器没有初始化完毕
23、ContainersNotReady 容器没有准备完毕
24、PodInitializing pod 初始化中
25、DockerDaemonNotReady docker还没有完全启动
26、NetworkPluginNotReady
1.3.Pod的安全上下文
定义容器以什么系统用户身份运行
1.4.Pod的资源配额
在K8s集群中可以定义Pod的资源配额,这就容器云的多租户,弹性计算,提供条件;
CPU资源的计量方式:1个核心=1000个微核心,即1=1000m,0.5=500m;
内存资源的计量方式:默认单位为字节,也可以使用K/E/P/T/G/M或者Ki/Ei/Pi/Ti/Gi/Mi的形式为单位后缀;
我们可以定义Pod对Node节点的存储、CPU、内存资源的要求和上限,CPU属于压缩资源,当容器使用的内存、硬盘资源达到上限被被Kill;
apiVersion: v1
kind: Pod
metadata:
  name: stress-pod
spec:
  containers:
  - name: stress
    image: ikubernetes/stress-ng
    command: ["/usr/bin/stress-ng", "-c 1", "-m 1", "--metrics-brief"]
    resources:
      requests:
        memory: "128Mi"
        cpu: "200m"
      limits:
        memory: "512Mi"
        cpu: "400m"
1.5.Pod服务质量类别
根据Pod对象的request、limits属性,Kubenetes把Pod对象归类为BestEffort、Burstable、Guaranteed 三个服务质量类别(Quality Of Service)即Qos;
- Guraranteed:每个容器都为CPU/内存资源设置了相同值的request和limit属性,这类Pod资源具有最高优先级;
- Burstable:至少有1个容器这种CPU/内存资源的request属性值,但不满足Guraranteed类别;
- BestEffort:没有任何1个容器设置request和limit属性
2.控制器资源管理
我们通过.yaml文件创建出来的各种类型的控制器对象,称为活动的控制器对象(LiveObjects),它们统称为控制器资源;
控制器对象(LiveObjcet)通过ReconciliationLoop保证LiveObjects的状态属性(Status)和用户期望的状态属性(Spec)一致;
在k8s中几乎每1种特定资源(Pod/Service/Ingress)都有一1种特定的Controller对象来创建、维护,那谁来创建、维护各种Controller对象呢?
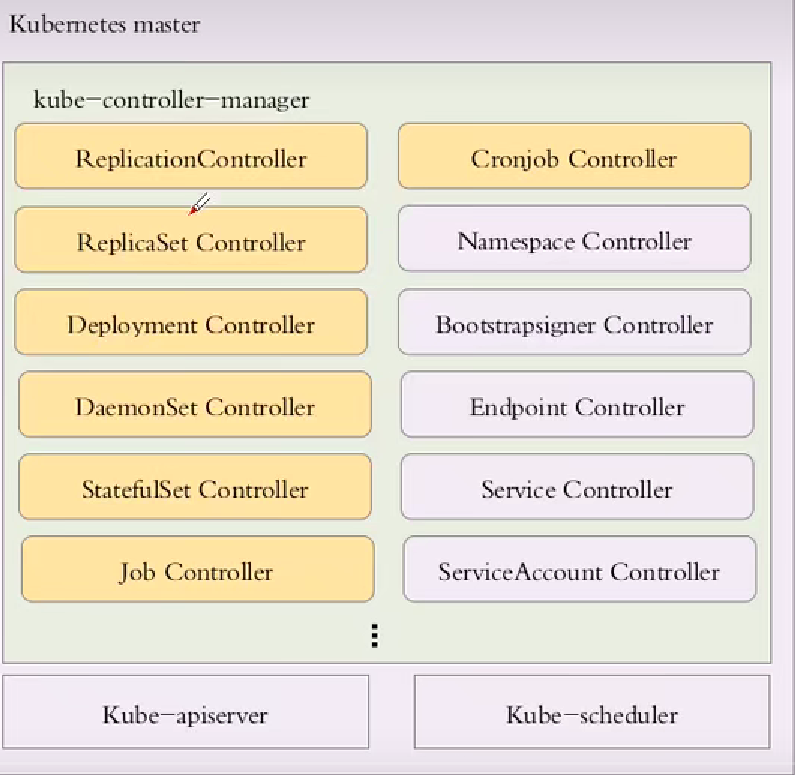
ControllerManager中包含各类Controller类的代码,ControllerManager可以创建各种类型的Controller,这些Controllers由ControllerManager进行统一管理;
各种类型的Controller被包含在ControllerManager中,所有的Controllers最终被运行为1个守护进程,这个组织了各种Controllers的守护进程名称为kube-controller-manager,我们称这个守护进程为ControllerManager;
/etc/kubernetes/manifests/kube-controller-manager.yaml
apiVersion: v1
kind: Pod
metadata:
  creationTimestamp: null
  labels:
    component: kube-controller-manager
    tier: control-plane
  name: kube-controller-manager
  namespace: kube-system
spec:
  containers:
  - command:
    - kube-controller-manager
    - --allocate-node-cidrs=true
    - --authentication-kubeconfig=/etc/kubernetes/controller-manager.conf
    - --authorization-kubeconfig=/etc/kubernetes/controller-manager.conf
    - --bind-address=127.0.0.1
    - --client-ca-file=/etc/kubernetes/pki/ca.crt
    - --cluster-cidr=10.244.0.0/16
    - --cluster-signing-cert-file=/etc/kubernetes/pki/ca.crt
    - --cluster-signing-key-file=/etc/kubernetes/pki/ca.key
    - --controllers=*,bootstrapsigner,tokencleaner
    - --kubeconfig=/etc/kubernetes/controller-manager.conf
    - --leader-elect=true
    - --node-cidr-mask-size=24
    - --requestheader-client-ca-file=/etc/kubernetes/pki/front-proxy-ca.crt
    - --root-ca-file=/etc/kubernetes/pki/ca.crt
    - --service-account-private-key-file=/etc/kubernetes/pki/sa.key
    - --service-cluster-ip-range=10.96.0.0/12
    - --use-service-account-credentials=true
    image: registry.aliyuncs.com/google_containers/kube-controller-manager:v1.17.4
    imagePullPolicy: IfNotPresent
例如:1个由Deployment控制器对象管理的Pod对象,之上的管理组织架构应当如下:

运行在kube-controller-manager守护进程中的DeploymentPod控制器-----------管理--------->各种Deployment控制器对象(Nginx-deploy、Django-deploy......)
各种Deployment控制器对象(Nginx-deploy、Django-deploy...)-----------管理--------->各种Pod资源对象(Nginx-pod、Django-pod......)
2.1.Pod控制器
Pod控制器是用于管理Pod基础资源的;
Pod是用来管理容器的,容器是用来运行应用程序的,根据应用程序业务类型不同,k8s管理员需要选择不同的Pod控制器来管理部署不同的应用程序;
应用程序可以划分为多种类型:
守护进程
无状态:上一次用户请求和当前用户请求无关;
非系统级:采用Deployment控制器管理
系统级:DaemontSet
有状态:上一次用户请求和当前用户请求有关; (采用StatefulSet控制器管理)
非守护进程
非周期性运行:Job
周期性运行:CronJob
以下将介绍在.yaml文件定义Pod控制器的格式,实例化出各种Pod控制器;
2.1.1.ReplicationSetController
ReplicaSet控制器是可以直接控制Pod的控制器, 可以保证用户指定的Pod副本数量,精确满足用户要求;
定义1个名称为myapp-rs的ReplicaSet控制器
apiVersion: apps/v1
kind: ReplicaSet
metadata:
  name: myapp-rs
spec:
  replicas: 2
  selector:
     matchLabels:
       app: myapp-pod
  template:
    metadata:
      labels:
        app: myapp-pod
    spec:
      containers:
      - name: myapp
        image: ikubernetes/myapp:v1
        ports:
        - name: http
          containerPort: 80
删除名称为myapp-rs的ReplicaSet控制器
由控制器创建出来的Pod资源,通过删控制器,删除Pod。
[root@master chapter5]# kubectl delete rs myapp-rs
replicaset.apps "myapp-rs" deleted
Pod数量的在线扩缩容
当Pod资源被控制器创建出来之后,我们可以对Pod的数量进行动态调整,达到在线扩缩容的目的,但无法触发Pod中应用程序版本的滚动更新功能;
[root@master chapter5]# kubectl scale --replicas=3 rs myapp-rs
replicaset.apps/myapp-rs scaled
2.1.2.DeploymentController
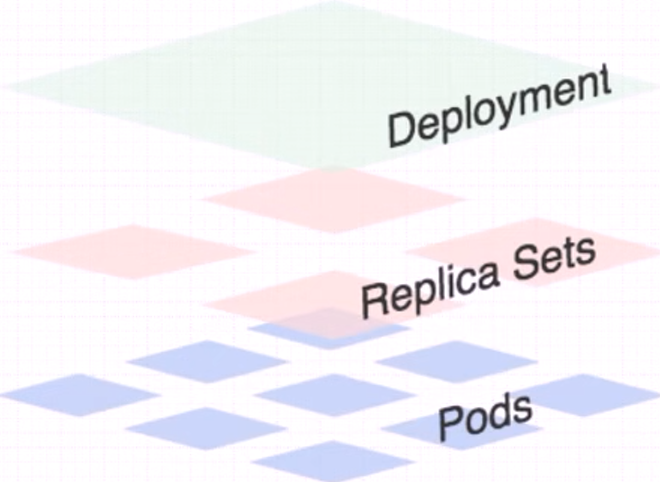
DeploymentPod控制器不直接控制Pod资源;
由于ReplicaSet控制器无法实现版本滚动更新和回退 ,Deployment控制器封装了ReplicaSet控制器,间接为ReplicaSet控制器扩展了滚动部署的功能;
DeploymentPod控制器控制ReplicaSet控制器的方式实现版本滚动更新;
创建Deployment控制器
apiVersion: apps/v1
kind: Deployment
metadata:
  name: deploy-nginx
spec:
  replicas: 3
  minReadySeconds: 10
  strategy:
    rollingUpdate:
      maxSurge: 1
      maxUnavailable: 1
    type: RollingUpdate
  selector:
    matchLabels:
      app: nginx
  template:
    metadata:
      labels:
        app: nginx
    spec:
      containers:
      - name: nginx
        image: nginx:1.10-alpine
        ports:
        - containerPort: 80
          name: http
        readinessProbe:
          periodSeconds: 1
          httpGet:
            path: /
            port: http
查看RS控制器的名称和Pod名称
[root@master chapter5]# kubectl apply -f deploy-nginx.yaml
deployment.apps/deploy-nginx unchanged
[root@master chapter5]# kubectl get deploy
NAME           READY   UP-TO-DATE   AVAILABLE   AGE
deploy-nginx   3/3     3            3           4m15s
[root@master chapter5]# kubectl get rs
NAME                      DESIRED   CURRENT   READY   AGE
deploy-nginx-5745bb45d7   3         3         3       4m19s
[root@master chapter5]# kubectl get pod
NAME                            READY   STATUS    RESTARTS   AGE
deploy-nginx-5745bb45d7-2vspv   1/1     Running   0          4m22s
deploy-nginx-5745bb45d7-db4vd   1/1     Running   0          4m22s
deploy-nginx-5745bb45d7-qhdgx   1/1     Running   0          4m22s
[root@master chapter5]#
一键版本滚动更新
kubectl set image deployment deploy-nginx nginx=nginx:1.15-alpine
滚动更新策略
在不影响线上业务的情况下,如果镜像的版本需要更新,可以采用Devplyment的滚动更新功能;
Devplyment控制器支持滚动更新操作,也可以在yaml中设置其滚动更新的详细步骤即滚动更新策略;
如用户指定了滚动更新策略replicas=3,maxSurge=1,maxUnavailab=1,就等于声明了Depolyment控制器在滚动更新过程中出现的Pod副本的数量。
为什么要从maxSurge和maxUnavailab这2个层面来限,滚动更新过程中新旧Pod的总数量呢?
因为有时候整个K8s集群必须运行特定数量的Pod;
- K8S集群之中的Node资源,无法运行(replicas+1)个Pod,但是可以少1个; (性能限制)
- 线上服务不允许运行(replicas-1)个Pod,服务整体会出问题,但是可以多1个; (服务要求限制)
Depolyment控制器在滚动更新过程中:
- maxSurge=1: 新旧Pod副本的总数量可以多1个,那么新旧pod数量总和的上限= 3+1=4个;
- maxUnavailab=1: 新旧Pod副本的总数量可以少1个,那么新旧pod数量总和的上限=3-1=2个;
Depolyment控制器在滚动更新之后
- 用户期望新版本Pod的副本(replicas)总数量最终=3个;
strategy:
    rollingUpdate:
      maxSurge: 1        #滚动更新时Pod的副本运行少1个
      maxUnavailable: 1  #滚动更新时Pod的副本运行多1个
type: RollingUpdate
rollingUpdate策略的更新步骤应该如下
减1个old版本,then加2个new版本
减2个old版本, then减1个old版本
[root@master chapter5]# vim deploy-nginx.yaml
[root@master chapter5]# kubectl apply -f deploy-nginx.yaml
deployment.apps/deploy-nginx configured
[root@master chapter5]# kubectl get pod -w
NAME                            READY   STATUS              RESTARTS   AGE
deploy-nginx-5745bb45d7-db4vd   1/1     Running             0          12m
deploy-nginx-5745bb45d7-qhdgx   1/1     Running             0          12m
deploy-nginx-754874567-2sfs9    1/1     Running             0          4s
deploy-nginx-754874567-d2dbn    0/1     ContainerCreating   0          4s
^C[root@master chapter5]# kubectl get pod
NAME                            READY   STATUS              RESTARTS   AGE
deploy-nginx-5745bb45d7-db4vd   1/1     Running             0          13m
deploy-nginx-5745bb45d7-qhdgx   1/1     Running             0          13m
deploy-nginx-754874567-2sfs9    1/1     Running             0          15s
deploy-nginx-754874567-d2dbn    0/1     ContainerCreating   0          15s
[root@master chapter5]# kubectl get pod -w
NAME                            READY   STATUS              RESTARTS   AGE
deploy-nginx-5745bb45d7-db4vd   1/1     Running             0          13m
deploy-nginx-5745bb45d7-qhdgx   1/1     Running             0          13m
deploy-nginx-754874567-2sfs9    1/1     Running             0          20s
deploy-nginx-754874567-d2dbn    0/1     ContainerCreating   0          20s
deploy-nginx-754874567-d2dbn    0/1     Running             0          73s
deploy-nginx-5745bb45d7-qhdgx   1/1     Terminating         0          13m
deploy-nginx-754874567-pr9jb    0/1     Pending             0          0s
deploy-nginx-754874567-pr9jb    0/1     Pending             0          0s
deploy-nginx-754874567-pr9jb    0/1     ContainerCreating   0          0s
deploy-nginx-754874567-d2dbn    1/1     Running             0          74s
deploy-nginx-754874567-pr9jb    0/1     ContainerCreating   0          1s
deploy-nginx-5745bb45d7-qhdgx   0/1     Terminating         0          13m
deploy-nginx-754874567-pr9jb    0/1     Running             0          2s
deploy-nginx-754874567-pr9jb    1/1     Running             0          2s
deploy-nginx-5745bb45d7-qhdgx   0/1     Terminating         0          14m
deploy-nginx-5745bb45d7-qhdgx   0/1     Terminating         0          14m
deploy-nginx-5745bb45d7-db4vd   1/1     Terminating         0          14m
deploy-nginx-5745bb45d7-db4vd   0/1     Terminating         0          14m
deploy-nginx-5745bb45d7-db4vd   0/1     Terminating         0          14m
deploy-nginx-5745bb45d7-db4vd   0/1     Terminating         0          14m
^C[root@master chapter5]# kubectl get pod
NAME                           READY   STATUS    RESTARTS   AGE
deploy-nginx-754874567-2sfs9   1/1     Running   0          110s
deploy-nginx-754874567-d2dbn   1/1     Running   0          110s
deploy-nginx-754874567-pr9jb   1/1     Running   0          37s
[root@master chapter5]# kubectl get rs
NAME                      DESIRED   CURRENT   READY   AGE
deploy-nginx-5745bb45d7   0         0         0       14m    #DeploymentPod控制器可以控制ReplicaSet控制器的方式实现版本滚动更新;
deploy-nginx-754874567    3         3         3       2m12s  #DeploymentPod控制器底层换了1个ReplicaSet控制器
maxUnavailable和maxSurge这2个滚动更新配置项,可以同时指定2个,也可以仅指定其中的1个。
例如:目前只有1个node节点支持GPU功能,且这个节点上目前正在运行着1个Pod(Pod副本数量为1)。
这是滚动更新策略可以仅设置maxUnavailable: 1,那么新的Pod就会更新成功;
apiVersion: apps/v1
kind: Deployment
metadata:
  name: deploy-nginx
spec:
  replicas: 1
  minReadySeconds: 10
  strategy:
    rollingUpdate:
      maxUnavailable: 1
    type: RollingUpdate
  selector:
    matchLabels:
      app: nginx
  template:
    metadata:
      labels:
        app: nginx
    spec:
      containers:
      - name: nginx
        image: nginx:1.10-alpine
        ports:
        - containerPort: 80
          name: http
        readinessProbe:
          periodSeconds: 1
          httpGet:
            path: /
            port: http
Recreate策略
其实当replicas=1时,更加简单直接的方式是采用Recreate策略,而不是滚动更新策略。
在测试环境中,还有1种更加简单直接的策略去更新Pod,那就是重新创建pod。
重建更新策略不支持maxSurge、maxUnavailable参数,此策略是将原有Pod删除后重建新的Pod,更新期间Pod(应用)将不可用,这也是不推荐此策略的原因。
apiVersion: apps/v1
kind: Deployment
metadata:
  name: deploy-nginx
spec:
  replicas: 1
  minReadySeconds: 10
  strategy:
    type: Recreate
版本回滚策略
[root@master ~]# kubectl get rs -o wide
NAME                      DESIRED   CURRENT   READY   AGE     CONTAINERS   IMAGES              SELECTOR
deploy-nginx-5745bb45d7   0         0         0       64m     nginx        nginx:1.10-alpine   app=nginx,pod-template-hash=5745bb45d7
deploy-nginx-5b5d689658   3         3         3       6m21s   nginx        nginx:1.15-alpine   app=nginx,pod-template-hash=5b5d689658
deploy-nginx-754874567    0         0         0       52m     nginx        nginx:1.14-alpine   app=nginx,pod-template-hash=754874567
[root@master ~]# kubectl rollout history deployment/deploy-nginx
deployment.apps/deploy-nginx
REVISION  CHANGE-CAUSE
1         <none>
2         <none>
3         <none>
[root@master ~]# kubectl rollout undo deployment/deploy-nginx
deployment.apps/deploy-nginx rolled back
[root@master ~]# kubectl rollout history deployment/deploy-nginx
deployment.apps/deploy-nginx
REVISION  CHANGE-CAUSE
1         <none>
3         <none>
4         <none>
[root@master ~]# kubectl get rs -o wide
NAME                      DESIRED   CURRENT   READY   AGE     CONTAINERS   IMAGES              SELECTOR
deploy-nginx-5745bb45d7   0         0         0       68m     nginx        nginx:1.10-alpine   app=nginx,pod-template-hash=5745bb45d7
deploy-nginx-5b5d689658   0         0         0       9m35s   nginx        nginx:1.15-alpine   app=nginx,pod-template-hash=5b5d689658
deploy-nginx-754874567    3         3         3       55m     nginx        nginx:1.14-alpine   app=nginx,pod-template-hash=754874567
[root@master ~]#
Rollout Pause和Rollout resume
如果在版本滚动更新的过程中,只更新了一部分Pod之后就Pause暂停了, 产生了新旧2种类型的Pod,称为金丝雀发布;
[root@master ~]# kubectl set image deployment deploy-nginx nginx=nginx:1.16-alpine && kubectl rollout pause deployment/deploy-nginx
deployment.apps/deploy-nginx paused
[root@master ~]# kubectl get pod
NAME READY STATUS RESTARTS AGE
deploy-nginx-5b5d689658-dtcps 1/1 Running 0 17m
deploy-nginx-5b5d689658-mdmqs 1/1 Running 0 17m
deploy-nginx-84957d6795-kmc8d 1/1 Running 0 52s  #放2只金丝雀
deploy-nginx-84957d6795-lr4lz 1/1 Running 0 52s
借助Istio引入一部分用户流量之后,发现金丝雀版本没bug,那就彻底放开继续resume发新版吧,称为滚动更新;
[root@master ~]# kubectl set image deployment deploy-nginx nginx=nginx:1.15-alpine && kubectl rollout resume deployment/deploy-nginx
[root@master ~]# kubectl get pod
NAME READY STATUS RESTARTS AGE
deploy-nginx-84957d6795-bnqxs 1/1 Running 0 15s
deploy-nginx-84957d6795-kmc8d 1/1 Running 0 2m15s
deploy-nginx-84957d6795-lr4lz 1/1 Running 0 2m15s
至此,DeploymentPod控制器又有了一键滚动更新功能,运维工程师就不用再像之前那样,写脚本精心策划版本更新策略了;
DeploymentPod控制器完全可以替代运维人员的3大核心职能,即发布管理、变更管理、故障处理;
2.1.3.DaemonSet
DaemonSet Pod控制器可以保证每1个节点上只运行1个Pod,支持滚动更新功能;
用户就无法定义Pod副本的数量,当DaemonSet控制器中指定的NodeSlector完全匹配K8s集群中所有Nodes时, DaemonSet Pod控制器控制的Pod副本数量=Node节点的数量;
一旦新的Node节点加入K8s集群Pod的数量就会增加,一旦新的Node节点退出K8s集群,该节点中运行的Pod被垃圾回收;
kubectl apply -f filebeat-ds.yaml
apiVersion: apps/v1
kind: DaemonSet
metadata:
  name: filebeat-ds
  labels:
    app: filebeat
spec:
  selector:
    matchLabels:
      app: filebeat
  template:
    metadata:
      labels:
        app: filebeat
      name: filebeat
    spec:
      containers:
      - name: filebeat
        image: ikubernetes/filebeat:5.6.5-alpine
        env:
        - name: REDIS_HOST
          value: db.ikubernetes.io:6379
        - name: LOG_LEVEL
          value: info
查看DaemonSet控制器
[root@master ~]# kubectl get ds
NAME          DESIRED   CURRENT   READY   UP-TO-DATE   AVAILABLE   NODE SELECTOR   AGE
filebeat-ds   2         2         2       2            2           <none>          17m
查看创建的Pod
[root@master chapter5]# kubectl get pods -l app=filebeat -o wide --show-labels
NAME                READY   STATUS    RESTARTS   AGE     IP               NODE    NOMINATED NODE   READINESS GATES   LABELS
filebeat-ds-5w4g4   1/1     Running   0          6m34s   10.244.166.166   node1   <none>           <none>            app=filebeat,controller-revision-hash=fb6b847cc,pod-template-generation=1
filebeat-ds-xtv4l   1/1     Running   0          6m34s   10.244.104.18    node2   <none>           <none>            app=filebeat,controller-revision-hash=fb6b847cc,pod-template-generation=1
Daemonset控制器滚动更新
[root@master ~]# kubectl set image daemonset/filebeat-ds filebeat=ikubernetes/filebeat:5.6.6-alpine -n default
daemonset.apps/filebeat-ds image updated
[root@master chapter5]# kubectl get pods -w
NAME                READY   STATUS    RESTARTS   AGE
filebeat-ds-5w4g4   1/1     Running   0          15m
filebeat-ds-xtv4l   1/1     Running   0          15m
filebeat-ds-5w4g4   1/1     Terminating   0          21m
filebeat-ds-5w4g4   0/1     Terminating   0          21m
filebeat-ds-5w4g4   0/1     Terminating   0          21m
filebeat-ds-5w4g4   0/1     Terminating   0          21m
filebeat-ds-s2vm8   0/1     Pending       0          0s
filebeat-ds-s2vm8   0/1     Pending       0          0s
filebeat-ds-s2vm8   0/1     ContainerCreating   0          0s
filebeat-ds-s2vm8   0/1     ContainerCreating   0          1s
filebeat-ds-s2vm8   1/1     Running             0          20s
filebeat-ds-xtv4l   1/1     Terminating         0          22m
filebeat-ds-xtv4l   0/1     Terminating         0          22m
filebeat-ds-xtv4l   0/1     Terminating         0          22m
filebeat-ds-xtv4l   0/1     Terminating         0          22m
filebeat-ds-98r79   0/1     Pending             0          0s
filebeat-ds-98r79   0/1     Pending             0          0s
filebeat-ds-98r79   0/1     ContainerCreating   0          0s
filebeat-ds-98r79   0/1     ContainerCreating   0          2s
filebeat-ds-98r79   1/1     Running             0          6s
增加nodeSelector选择指定节点
apiVersion: apps/v1
kind: DaemonSet
metadata:
  name: filebeat-ds
  labels:
    app: filebeat
spec:
  selector:
    matchLabels:
      app: filebeat
  template:
    metadata:
      labels:
        app: filebeat
      name: filebeat
    spec:
      containers:
      - name: filebeat
        image: ikubernetes/filebeat:5.6.5-alpine
        env:
        - name: REDIS_HOST
          value: db.ikubernetes.io:6379
        - name: LOG_LEVEL
          value: info
      nodeSelector:
        logcollecting: "on"
node节点设置logcollecting="on"标签
[root@master chapter5]# kubectl get pods
No resources found in default namespace.
[root@master chapter5]# kubectl label node node2 logcollecting="on" --overwrite
node/node2 labeled
[root@master chapter5]# kubectl get pods
NAME                READY   STATUS    RESTARTS   AGE
filebeat-ds-wnfzg   1/1     Running   0          3s
2.1.4.Job
Job控制器能创建出1个或多个Pod,控制Pod执行完1次性作业任务,之后退出;
如果1次性作业任务可以被切分成N个子任务,可以使用Job控制器创建多个Pod并行去完成各个子任务。(多进程)
2.1.4.1.restartPolicy任务重启策略
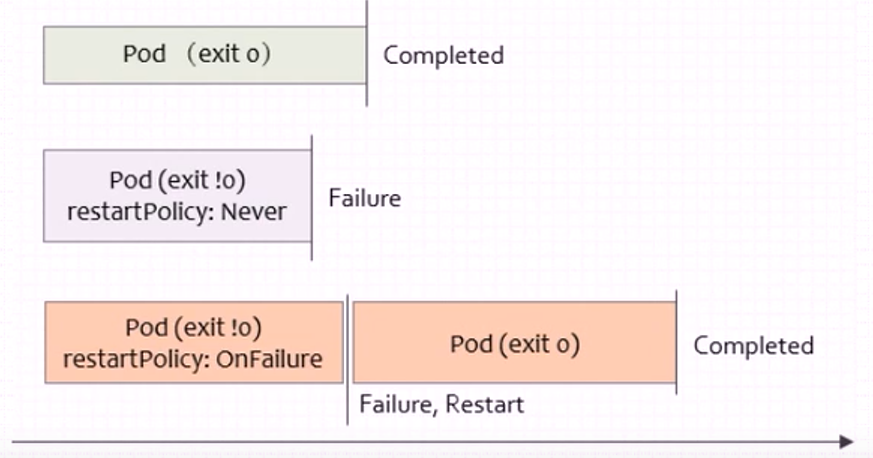
Never: Pod在执行作业时出现了错误,当前Pod不会被重启直接退出,Pod状态为Failure,但是会创建NewPod;
OnFailure:Pod在执行作业时出现了错误,当前Pod会被不断重启,直到作业完成。
2.1.4.2.单路作业
apiVersion: batch/v1
kind: Job
metadata:
  name: job-example
spec:
  template:
    metadata:
      labels:
        app: myjob
    spec:
      containers:
      - name: myjob
        image: alpine
        command: ["/bin/sh",  "-c", "sleep 10"]
      restartPolicy: Never
--------------------------------
[root@master chapter5]# kubectl apply -f job-example.yaml
job.batch/job-example unchanged
[root@master chapter5]# kubectl get job
NAME          COMPLETIONS   DURATION   AGE
job-example   1/1           29s        6m6s
[root@master chapter5]# kubectl get job -o wide
NAME          COMPLETIONS   DURATION   AGE     CONTAINERS   IMAGES   SELECTOR
job-example   1/1           29s        6m12s   myjob        alpine   controller-uid=8818358f-2dd6-4a15-ab20-e4cb4c59bde7
[root@master chapter5]# kubectl get pod
NAME                READY   STATUS      RESTARTS   AGE
job-example-pqh8t   0/1     Completed   0          6m33s
[root@master chapter5]#
2.1.4.3.多路作业
apiVersion: batch/v1
kind: Job
metadata:
  name: job-multi
spec:
  completions: 5
  parallelism: 2
  template:
    metadata:
      labels:
        app: myjob
    spec:
      containers:
      - name: myjob
        image: alpine
        command: ["/bin/sh",  "-c", "sleep 3"]
      restartPolicy: Never
completions: 5 parallelism: 2的含义:共有5个Pod(任务),1次最多能同时执行2个任务,所以需要分个3批次完成;
[root@master ~]# kubectl get pods -w
NAME              READY   STATUS    RESTARTS   AGE
job-multi-c5sb7   0/1     Pending   0          0s
job-multi-c5sb7   0/1     Pending   0          0s
job-multi-s4prd   0/1     Pending   0          0s
job-multi-s4prd   0/1     Pending   0          0s
job-multi-c5sb7   0/1     ContainerCreating   0          0s
job-multi-s4prd   0/1     ContainerCreating   0          0s
job-multi-s4prd   0/1     ContainerCreating   0          1s
job-multi-c5sb7   0/1     ContainerCreating   0          1s
job-multi-s4prd   1/1     Running             0          16s
job-multi-c5sb7   1/1     Running             0          17s
job-multi-s4prd   0/1     Completed           0          19s
job-multi-d2x7w   0/1     Pending             0          0s
job-multi-d2x7w   0/1     Pending             0          1s
job-multi-d2x7w   0/1     ContainerCreating   0          1s
job-multi-d2x7w   0/1     ContainerCreating   0          1s
job-multi-c5sb7   0/1     Completed           0          21s
job-multi-p4dlz   0/1     Pending             0          0s
job-multi-p4dlz   0/1     Pending             0          0s
job-multi-p4dlz   0/1     ContainerCreating   0          0s
job-multi-p4dlz   0/1     ContainerCreating   0          0s
job-multi-d2x7w   1/1     Running             0          17s
job-multi-d2x7w   0/1     Completed           0          20s
job-multi-7779j   0/1     Pending             0          0s
job-multi-7779j   0/1     Pending             0          0s
job-multi-7779j   0/1     ContainerCreating   0          0s
job-multi-7779j   0/1     ContainerCreating   0          1s
job-multi-7779j   1/1     Running             0          12s
job-multi-p4dlz   1/1     Running             0          30s
job-multi-7779j   0/1     Completed           0          14s
job-multi-p4dlz   0/1     Completed           0          32s
2.1.5.CronJob
类似于replicaSet和deployment控制器的关系;
CronJob控制器通过控制Job控制器,去周期性执行Job任务;
apiVersion: batch/v1beta1
kind: CronJob
metadata:
  name: cronjob-example
  labels:
    app: mycronjob
spec:
  schedule: "*/2 * * * *"
  jobTemplate:
    metadata:
      labels:
        app: mycronjob-jobs
    spec:
      parallelism: 2
      template:
        spec:
          containers:
          - name: myjob
            image: alpine
            command:
            - /bin/sh
            - -c
            - date; echo Hello from the Kubernetes cluster; sleep 10
          restartPolicy: OnFailure
查看
[root@master chapter5]# kubectl get job
NAME                         COMPLETIONS   DURATION   AGE
cronjob-example-1670823360   2/1 of 2      41s        79s
[root@master chapter5]# kubectl get cronjob
NAME              SCHEDULE      SUSPEND   ACTIVE   LAST SCHEDULE   AGE
cronjob-example   */2 * * * *   False     0        98s             2m46s
[root@master chapter5]# kubectl get pod
NAME                               READY   STATUS      RESTARTS   AGE
cronjob-example-1670823360-ljmzw   0/1     Completed   0          92s
cronjob-example-1670823360-ts48l   0/1     Completed   0          92s
2.1.6.StatefulSets
StatefulSet 是用来管理有状态应用的工作负载 API 对象。
实例之间有不对等关系,以及实例对外部数据有依赖关系的应用,称为有状态应用;
StatefulSet 用来管理 Deployment 和扩展一组 Pod,并且能为这些 Pod 提供序号和唯一性保证。
StatefulSets 对于需要满足以下一个或多个需求的应用程序很有价值:
稳定的、唯一的网络标识符。 稳定的、持久的存储。 有序的、优雅的部署和缩放。 有序的、自动的滚动更新。
3.Service资源管理
Pod对象的动态性会给访问Pod的客户端带来以下困扰:
- Pod资源对象存在生命周期且不可以被重建,必要时仅能创建1个新的替代者;
- Pod对象在其控制器进行应用规模伸缩时,同1应用程序的Pod对象会增加或减少;
Service资源为动态管理的Pod对象添加了1个有着固定访问入口的抽象层
- Service通过标签选择器关联到拥有相关标签的Pod对象;
- 客户端向Service发送请求,间接到达目标Pod;
3.1.Service创建流程
简单来说,1个Service对象本质是存在在每1个工作节点(Node)上的iptables/ipvs规则;
- 每1个Node节点上的kube-proxy始终watch着kube-apiserver上的每1个Service资源的变更;
- 一旦Service资源发生变动,kube-apiserver马上通知给每1个Node节点上的kube-proxy;
- 1个Node节点上的kube-proxy把Service的定义转换为当前Node上相应的iptables/ipvs规则;
3.2.Service转发流程
基于以上Service的创建流程,现在iptables/ipvs规则已经生成,并正常工作做每1个节点的内核空间;
ClientPod通过Service访问ServerPod的大致流程如下:
- Pod中的容器本质是运行Node节点上的进程,进程请求Service的IP地址,就一定会被当前Node节点内核空间中的iptables/ipvs拦截到;
- iptables/ipvs根据Node节点内核空间中的生成的iptables/ipvs规则被转发到Endpoint;
- 如果Endpoint是PodIP直接通过Pod网络直接通信,如果是Endpoint是外部IP通过外网通信;
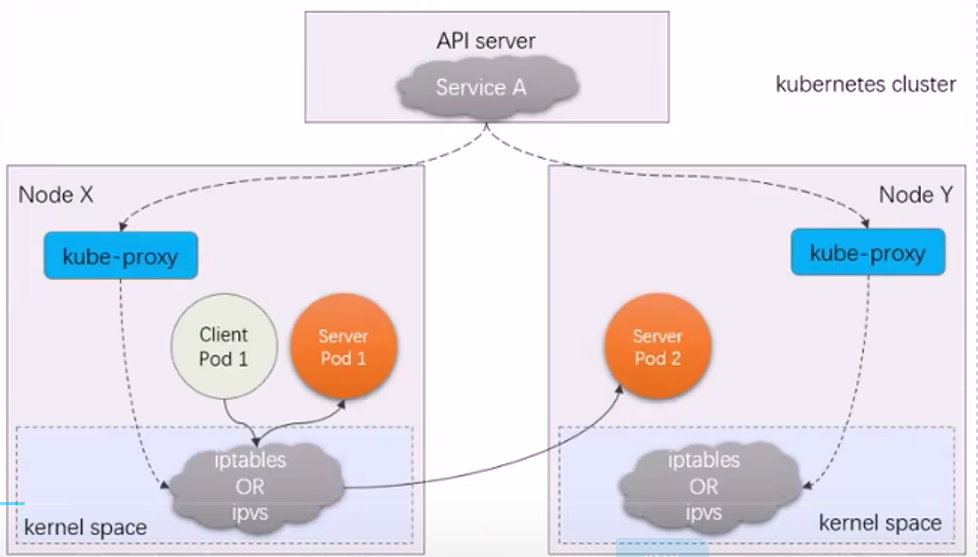
3.3.Service资源定义
Service资源是K8s的标准资源之一,可以通过yaml文件进行定义;
Service资源分为以下几种类型,分别实现不同Service的调用功能;
kubectl explain service.spec.type
KIND:     Service
VERSION:  v1

FIELD:    type <string>

DESCRIPTION:
     type determines how the Service is exposed. Defaults to ClusterIP. Valid
     options are ExternalName, ClusterIP, NodePort, and LoadBalancer.
     "ExternalName" maps to the specified externalName. "ClusterIP" allocates a
     cluster-internal IP address for load-balancing to endpoints. Endpoints are
     determined by the selector or if that is not specified, by manual
     construction of an Endpoints object. If clusterIP is "None", no virtual IP
     is allocated and the endpoints are published as a set of endpoints rather
     than a stable IP. "NodePort" builds on ClusterIP and allocates a port on
     every node which routes to the clusterIP. "LoadBalancer" builds on NodePort
     and creates an external load-balancer (if supported in the current cloud)
     which routes to the clusterIP. More info:
3.3.1.ClusterIP
默认类型,使用PodIP
apiVersion: v1
kind: Service
metadata:
 name: myapp-service
 namespace: default
spec:
 ports:
  - name: http
    port: 80
    targetPort: 80
 selector:
  app: myapp-pod
3.3.2.NodePort
在每1个Node节点上暴露30080端口;
apiVersion: v1
kind: Service
metadata:
  name: myapp-service
  namespace: default
spec:
  ports:
    - name: http
      port: 80
      nodePort: 30080
      targetPort: 80
  selector:
    app: myapp-pod
  type: NodePort
3.3.3.LoadBalancer
为NodePort类型引入自动管理的负载均衡器,需要想底层的云计算厂商发API请求,得购买LBAS服务;
3.3.4.ExternalName
如果K8s集群中Pod需要调用外网的服务,可以使用ExternalName类型的Service;
ExternalName类型的Service可以将集群外部的Service引入集群内部,提供给集群内部的各个客户端Pod使用;
3.3.5.HeadLessService
客户端Pod直接通过CoreDNS调度和服务端Pod通信,不受service调度(调度结果受DNS缓存影响),用于Stateful类型的Pod;
4.Ingress资源管理
虽然通过HostNetwork/HostPort/NodePort类型的Service可以引入K8s集群外部的客户端的流量,但是Service本质是工作在节点(Node)的Linux内核空间中的1组Iptables/ipvs规则,所以Service工作在传输层,无法实现应用层的代理功能;
如果在K8s集群中,我们想根据URL的方式进行负载均衡, 可以借助Ingress可以实现七层代理功能;
4.1.Ingress与IngressController
Ingress仅是用于定义流量转发规则和调度方式的通用格式的配置信息;
IngressController
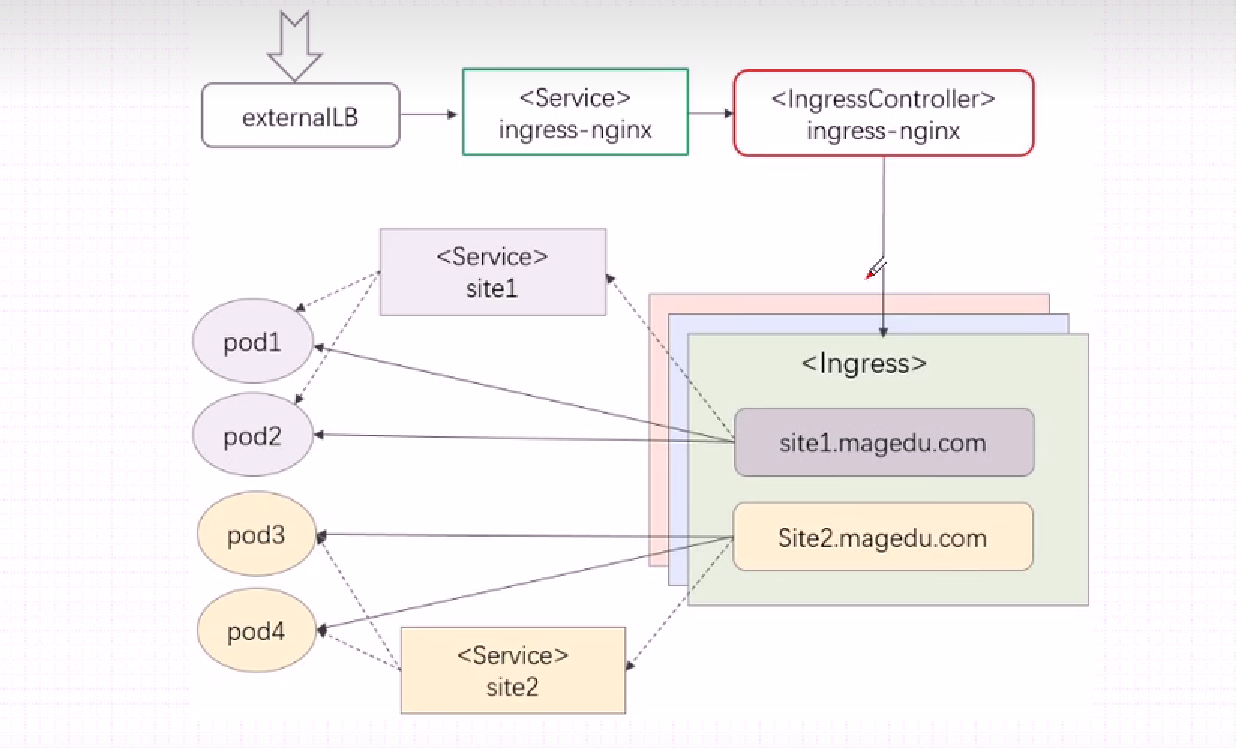
4.2.IngressController与Service
Ingress自身不运行使用标签选择器挑选正在提供服务的Pod对象;
Ingress需要由Service对象的辅助完成对后端Pod对象的动态发现和收拢;
IngressController也运行为1个Pod对象,这个Pod可以于后端的Pod直接进行通信;
[root@master ~]# kubectl get pods -n ingress-nginx -o wide
NAME                                        READY   STATUS    RESTARTS   AGE     IP               NODE    NOMINATED NODE   READINESS GATES
nginx-ingress-controller-5556bd798f-4xrmf   1/1     Running   0          5m55s   10.244.166.134   node1   <none>           <none>
IngressController(1个Pod对象)根据Ingress对象的配置,调度流量时,其报文将由IngressController(1个Pod对象)直接调度至目的Pod,中间不再由Service调度;
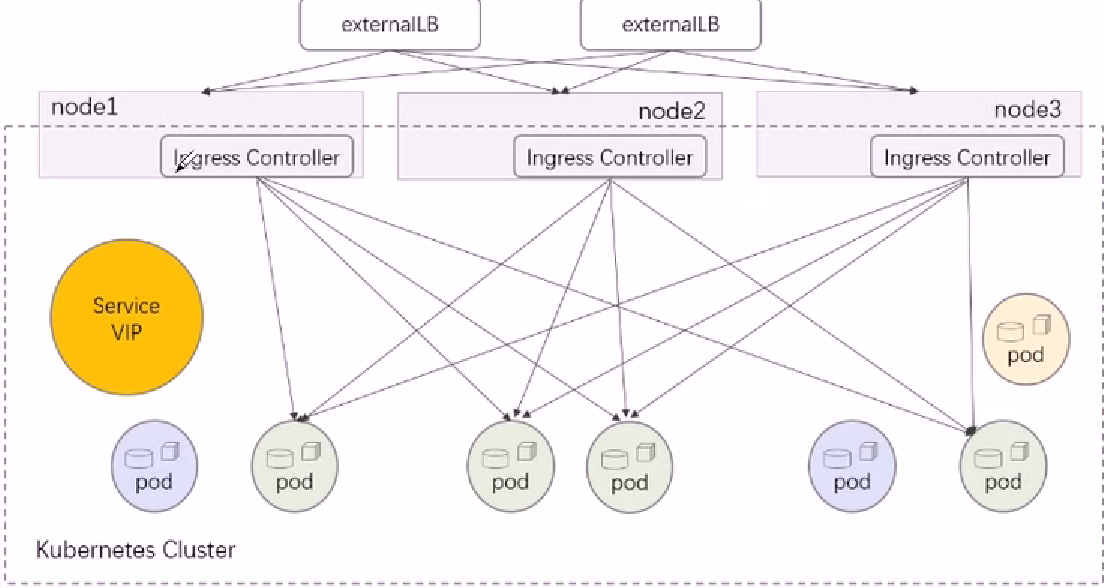
4.3.部署Ingress-nginx
Ingress-nginx就是基于Nginx原有功能进行扩展开发出来的1款用于实现IngressController功能的软件;
IngressController需要由Kubernetes管理员额外以Addons的形式部署为Pod资源对象;
这个Pod通过kube-api-server获取用户定义在Ingress中的配置信息;
4.3.1.部署nginx-ingress的Pod
apiVersion: v1
kind: Namespace
metadata:
  name: ingress-nginx
  labels:
    app.kubernetes.io/name: ingress-nginx
    app.kubernetes.io/part-of: ingress-nginx

---

kind: ConfigMap
apiVersion: v1
metadata:
  name: nginx-configuration
  namespace: ingress-nginx
  labels:
    app.kubernetes.io/name: ingress-nginx
    app.kubernetes.io/part-of: ingress-nginx

---
kind: ConfigMap
apiVersion: v1
metadata:
  name: tcp-services
  namespace: ingress-nginx
  labels:
    app.kubernetes.io/name: ingress-nginx
    app.kubernetes.io/part-of: ingress-nginx

---
kind: ConfigMap
apiVersion: v1
metadata:
  name: udp-services
  namespace: ingress-nginx
  labels:
    app.kubernetes.io/name: ingress-nginx
    app.kubernetes.io/part-of: ingress-nginx

---
apiVersion: v1
kind: ServiceAccount
metadata:
  name: nginx-ingress-serviceaccount
  namespace: ingress-nginx
  labels:
    app.kubernetes.io/name: ingress-nginx
    app.kubernetes.io/part-of: ingress-nginx

---
apiVersion: rbac.authorization.k8s.io/v1beta1
kind: ClusterRole
metadata:
  name: nginx-ingress-clusterrole
  labels:
    app.kubernetes.io/name: ingress-nginx
    app.kubernetes.io/part-of: ingress-nginx
rules:
  - apiGroups:
      - ""
    resources:
      - configmaps
      - endpoints
      - nodes
      - pods
      - secrets
    verbs:
      - list
      - watch
  - apiGroups:
      - ""
    resources:
      - nodes
    verbs:
      - get
  - apiGroups:
      - ""
    resources:
      - services
    verbs:
      - get
      - list
      - watch
  - apiGroups:
      - ""
    resources:
      - events
    verbs:
      - create
      - patch
  - apiGroups:
      - "extensions"
      - "networking.k8s.io"
    resources:
      - ingresses
    verbs:
      - get
      - list
      - watch
  - apiGroups:
      - "extensions"
      - "networking.k8s.io"
    resources:
      - ingresses/status
    verbs:
      - update

---
apiVersion: rbac.authorization.k8s.io/v1beta1
kind: Role
metadata:
  name: nginx-ingress-role
  namespace: ingress-nginx
  labels:
    app.kubernetes.io/name: ingress-nginx
    app.kubernetes.io/part-of: ingress-nginx
rules:
  - apiGroups:
      - ""
    resources:
      - configmaps
      - pods
      - secrets
      - namespaces
    verbs:
      - get
  - apiGroups:
      - ""
    resources:
      - configmaps
    resourceNames:
      # Defaults to "<election-id>-<ingress-class>"
      # Here: "<ingress-controller-leader>-<nginx>"
      # This has to be adapted if you change either parameter
      # when launching the nginx-ingress-controller.
      - "ingress-controller-leader-nginx"
    verbs:
      - get
      - update
  - apiGroups:
      - ""
    resources:
      - configmaps
    verbs:
      - create
  - apiGroups:
      - ""
    resources:
      - endpoints
    verbs:
      - get

---
apiVersion: rbac.authorization.k8s.io/v1beta1
kind: RoleBinding
metadata:
  name: nginx-ingress-role-nisa-binding
  namespace: ingress-nginx
  labels:
    app.kubernetes.io/name: ingress-nginx
    app.kubernetes.io/part-of: ingress-nginx
roleRef:
  apiGroup: rbac.authorization.k8s.io
  kind: Role
  name: nginx-ingress-role
subjects:
  - kind: ServiceAccount
    name: nginx-ingress-serviceaccount
    namespace: ingress-nginx

---
apiVersion: rbac.authorization.k8s.io/v1beta1
kind: ClusterRoleBinding
metadata:
  name: nginx-ingress-clusterrole-nisa-binding
  labels:
    app.kubernetes.io/name: ingress-nginx
    app.kubernetes.io/part-of: ingress-nginx
roleRef:
  apiGroup: rbac.authorization.k8s.io
  kind: ClusterRole
  name: nginx-ingress-clusterrole
subjects:
  - kind: ServiceAccount
    name: nginx-ingress-serviceaccount
    namespace: ingress-nginx

---

apiVersion: apps/v1
kind: Deployment
metadata:
  name: nginx-ingress-controller
  namespace: ingress-nginx
  labels:
    app.kubernetes.io/name: ingress-nginx
    app.kubernetes.io/part-of: ingress-nginx
spec:
  replicas: 1
  selector:
    matchLabels:
      app.kubernetes.io/name: ingress-nginx
      app.kubernetes.io/part-of: ingress-nginx
  template:
    metadata:
      labels:
        app.kubernetes.io/name: ingress-nginx
        app.kubernetes.io/part-of: ingress-nginx
      annotations:
        prometheus.io/port: "10254"
        prometheus.io/scrape: "true"
    spec:
      # wait up to five minutes for the drain of connections
      terminationGracePeriodSeconds: 300
      serviceAccountName: nginx-ingress-serviceaccount
      nodeSelector:
        kubernetes.io/os: linux
      containers:
        - name: nginx-ingress-controller
          image: quay.io/kubernetes-ingress-controller/nginx-ingress-controller:0.28.0
          args:
            - /nginx-ingress-controller
            - --configmap=$(POD_NAMESPACE)/nginx-configuration
            - --tcp-services-configmap=$(POD_NAMESPACE)/tcp-services
            - --udp-services-configmap=$(POD_NAMESPACE)/udp-services
            - --publish-service=$(POD_NAMESPACE)/ingress-nginx
            - --annotations-prefix=nginx.ingress.kubernetes.io
          securityContext:
            allowPrivilegeEscalation: true
            capabilities:
              drop:
                - ALL
              add:
                - NET_BIND_SERVICE
            # www-data -> 101
            runAsUser: 101
          env:
            - name: POD_NAME
              valueFrom:
                fieldRef:
                  fieldPath: metadata.name
            - name: POD_NAMESPACE
              valueFrom:
                fieldRef:
                  fieldPath: metadata.namespace
          ports:
            - name: http
              containerPort: 80
              protocol: TCP
            - name: https
              containerPort: 443
              protocol: TCP
          livenessProbe:
            failureThreshold: 3
            httpGet:
              path: /healthz
              port: 10254
              scheme: HTTP
            initialDelaySeconds: 10
            periodSeconds: 10
            successThreshold: 1
            timeoutSeconds: 10
          readinessProbe:
            failureThreshold: 3
            httpGet:
              path: /healthz
              port: 10254
              scheme: HTTP
            periodSeconds: 10
            successThreshold: 1
            timeoutSeconds: 10
          lifecycle:
            preStop:
              exec:
                command:
                  - /wait-shutdown

---

apiVersion: v1
kind: LimitRange
metadata:
  name: ingress-nginx
  namespace: ingress-nginx
  labels:
    app.kubernetes.io/name: ingress-nginx
    app.kubernetes.io/part-of: ingress-nginx
spec:
  limits:
  - default:
    min:
      memory: 90Mi
      cpu: 100m
    type: Container
4.3.2.为nginx-ingress的Pod添加Service
使IngressController的Pod对象(nginx-ingress)可以通过NodePort的方式引入外网;
apiVersion: v1
kind: Service
metadata:
  name: ingress
  namespace: ingress-nginx
spec:
  selector:
    app.kubernetes.io/name: ingress-nginx
    app.kubernetes.io/part-of: ingress-nginx
  ports:
  - name: http
    port: 80
  - name: https
    port: 443
  type: NodePort
4.4.Ingress资源定义
5.存储资源(Volume)管理
在Docker中使用本地文件系统的目录作为Docker的挂载卷,可以使Docker产生的数据,脱离容器的生命周期存在;
在K8s中Pod是会被动态调度到不同的Node之上的,如果使用本地存储卷,一旦Pod重建到K8s集群中的其他节点,该Pod所依赖的历史数据就会丢失;
为了使Pod产生的数据,可以脱离Pod的生命周期保存 ,就需要1套外置在K8S集群之外、可通过网络访问分布式存储系统;例如:Ceph、NFS
5.1.K8s支持的存储资源类型
K8s支持以下几种类型的存储系统,作为K8S的文件存储后端;
[root@master ~]# kubectl explain pod.spec.volumes
KIND:     Pod
VERSION:  v1

RESOURCE: volumes <[]Object>

DESCRIPTION:
     List of volumes that can be mounted by containers belonging to the pod.
     More info: https://kubernetes.io/docs/concepts/storage/volumes

     Volume represents a named volume in a pod that may be accessed by any
     container in the pod.

FIELDS:
   awsElasticBlockStore    <Object>
     AWSElasticBlockStore represents an AWS Disk resource that is attached to a
     kubelet's host machine and then exposed to the pod. More info:
     https://kubernetes.io/docs/concepts/storage/volumes#awselasticblockstore

   azureDisk    <Object>
     AzureDisk represents an Azure Data Disk mount on the host and bind mount to
     the pod.

   azureFile    <Object>
     AzureFile represents an Azure File Service mount on the host and bind mount
     to the pod.

   cephfs    <Object>
     CephFS represents a Ceph FS mount on the host that shares a pod's lifetime

   cinder    <Object>
     Cinder represents a cinder volume attached and mounted on kubelets host
     machine. More info: https://examples.k8s.io/mysql-cinder-pd/README.md

   configMap    <Object>
     ConfigMap represents a configMap that should populate this volume

   csi    <Object>
     CSI (Container Storage Interface) represents storage that is handled by an
     external CSI driver (Alpha feature).

   downwardAPI    <Object>
     DownwardAPI represents downward API about the pod that should populate this
     volume

   emptyDir    <Object>
     EmptyDir represents a temporary directory that shares a pod's lifetime.
     More info: https://kubernetes.io/docs/concepts/storage/volumes#emptydir

   fc    <Object>
     FC represents a Fibre Channel resource that is attached to a kubelet's host
     machine and then exposed to the pod.

   flexVolume    <Object>
     FlexVolume represents a generic volume resource that is
     provisioned/attached using an exec based plugin.

   flocker    <Object>
     Flocker represents a Flocker volume attached to a kubelet's host machine.
     This depends on the Flocker control service being running

   gcePersistentDisk    <Object>
     GCEPersistentDisk represents a GCE Disk resource that is attached to a
     kubelet's host machine and then exposed to the pod. More info:
     https://kubernetes.io/docs/concepts/storage/volumes#gcepersistentdisk

   gitRepo    <Object>
     GitRepo represents a git repository at a particular revision. DEPRECATED:
     GitRepo is deprecated. To provision a container with a git repo, mount an
     EmptyDir into an InitContainer that clones the repo using git, then mount
     the EmptyDir into the Pod's container.

   glusterfs    <Object>
     Glusterfs represents a Glusterfs mount on the host that shares a pod's
     lifetime. More info: https://examples.k8s.io/volumes/glusterfs/README.md

   hostPath    <Object>
     HostPath represents a pre-existing file or directory on the host machine
     that is directly exposed to the container. This is generally used for
     system agents or other privileged things that are allowed to see the host
     machine. Most containers will NOT need this. More info:
     https://kubernetes.io/docs/concepts/storage/volumes#hostpath

   iscsi    <Object>
     ISCSI represents an ISCSI Disk resource that is attached to a kubelet's
     host machine and then exposed to the pod. More info:
     https://examples.k8s.io/volumes/iscsi/README.md

   name    <string> -required-
     Volume's name. Must be a DNS_LABEL and unique within the pod. More info:
     https://kubernetes.io/docs/concepts/overview/working-with-objects/names/#names

   nfs    <Object>
     NFS represents an NFS mount on the host that shares a pod's lifetime More
     info: https://kubernetes.io/docs/concepts/storage/volumes#nfs

   persistentVolumeClaim    <Object>
     PersistentVolumeClaimVolumeSource represents a reference to a
     PersistentVolumeClaim in the same namespace. More info:
     https://kubernetes.io/docs/concepts/storage/persistent-volumes#persistentvolumeclaims

   photonPersistentDisk    <Object>
     PhotonPersistentDisk represents a PhotonController persistent disk attached
     and mounted on kubelets host machine

   portworxVolume    <Object>
     PortworxVolume represents a portworx volume attached and mounted on
     kubelets host machine

   projected    <Object>
     Items for all in one resources secrets, configmaps, and downward API

   quobyte    <Object>
     Quobyte represents a Quobyte mount on the host that shares a pod's lifetime

   rbd    <Object>
     RBD represents a Rados Block Device mount on the host that shares a pod's
     lifetime. More info: https://examples.k8s.io/volumes/rbd/README.md

   scaleIO    <Object>
     ScaleIO represents a ScaleIO persistent volume attached and mounted on
     Kubernetes nodes.

   secret    <Object>
     Secret represents a secret that should populate this volume. More info:
     https://kubernetes.io/docs/concepts/storage/volumes#secret

   storageos    <Object>
     StorageOS represents a StorageOS volume attached and mounted on Kubernetes
     nodes.

   vsphereVolume    <Object>
     VsphereVolume represents a vSphere volume attached and mounted on kubelets
     host machine
云存储
- awsElasticBlockStorc
- azureDisk
- azurcFilc
- gcePdrsistentDisk
- vshpereVolume
分布式存储
- cephfs
- glusterfs
- rbd
网络存储
- NFS
- iscsi
- fc
临时存储
一旦Pod消失存储的数据也随之消失。
- emptyDir
- gitRepo (deprecated)
本地存储
无法跨K8s的Node节点进行数据保存。
- hostPath:本地文件系统,无法跨节点
- local:直接挂载硬盘设备
特殊存储
- configMap:保存明文配置文件
- secret:保存秘文的配置文件
- downwardAPl:获取当前Pod的元数据信息
自定义存储
- CSI:Container Storage Interface,基于此接口,自定义开发K8s和存储系统的驱动
持久卷申请
- Persistent Volume Claim:统一的抽象层
5.2.本地存储
本地存储不支持Pod跨节点运行之后依然保存数据,除非Pod设置Node绑定;
hostPath
只能提供节点级别的数据持久性,一旦Pod被调度到其他Node,Pod就无法使用之前的历史数据;
apiVersion: v1
kind: Pod
metadata:
  name: myapp
  namespace: vol
  labels:
    app: myapp
spec:
  nodeName: node1
  containers:
  - name: myapp
    image: ikubernetes/myapp:v1
    volumeMounts:
    - name: web-storage
      mountPath: /usr/share/nginx/html
      readOnly: true
  volumes:
  - name: web-storage
    hostPath:
      path: /volumes/myapp
      type: DirectoryOrCreate
emptydir
1个Pod中运行2个容器,这2个容器通过emptydir类型的存储卷进行数据交换 ,Pod消失数据也被删除;
apiVersion: v1
kind: Pod
metadata:
  name: vol-emptydir-pod
spec:
  volumes:
  - name: html
    emptyDir: {}
  containers:
  - name: nginx
    image: nginx:1.12-alpine
    volumeMounts:
    - name: html
      mountPath: /usr/share/nginx/html
  - name: pagegen
    image: alpine
    volumeMounts:
    - name: html
      mountPath: /html
    command: ["/bin/sh", "-c"]
    args:
    - while true; do
        echo $(hostname) $(date) >> /html/index.html;
        sleep 10;
      done
5.3.特殊存储
应用程序配容器化之后,通常通过环境变量的方式配置Pod中的容器,弊端是
K8s的ConfigMap/Secret资源是K8s资源中的First-Class-Citizen,是可以被Container所挂载的资源,ConfigMap/Secre对象就是Pod的集中配置中心;
一旦Container挂载了ConfigMap/Secret资源,就会定期热加载ConfigMap/Secret中的配置信息,从而实现容器中应用热更新的目的;
ConfigMap
[root@kubemaster001.eq-sg-2.aliyun.com zhanggen]# kubectl get configmap -n ingress-nginx
NAME                              DATA   AGE
ingress-controller-leader-nginx   0      4y94d
nginx-configuration               8      4y94d
prometheus-configuration          1      4y94d
[root@kubemaster001.eq-sg-2.aliyun.com zhanggen]# kubectl -n ingress-nginx edit configmap nginx-configuration
Edit cancelled, no changes made.
[root@kubemaster001.eq-sg-2.aliyun.com zhanggen]#
Secret
存储密码信息
downwardAPI
为了在容器内获取Pod级别的信息,Kubernetes提供了DownwardAPI机制来将Pod和容器的某些元数据信息注入容器环境内,供容器应用方便地使用。
Downward API可以通过以下两种方式将Pod和容器的元数据信息注入容器内部:
- 环境变量:将Pod或Container信息设置为容器内的环境变量;
- Volume挂载:将Pod或Container信息以文件的形式挂载到容器内部。
5.4.持久卷申请(PVC)
我们可以在定义Pod的时候,使用sepc.volume字段可以直接指定外置存储系统的连接方式,但是这样无疑增加了K8s使用存储卷的复杂度,
如果当前使用外置存储是Ceph这样复杂的外置存储系统,需要指定rbd的monitor、pool、image、user....会给K8s的使用人员造成很高的使用门槛;
为了简化在K8s中使用存储资源的配置,可以把各种外置存储系统提供的存储资源抽象为PV
- 存储团队: 负责维护外置存储系统
- K8S管理员:负责配置连接外置存储资源的PV
- 开发人员: 负责通过PVC占用PV,具体方法为在某1个namespace中定义1PVC占用1个PV(多租户数据隔离);
持久卷存储(Persistent Volume Storage)就是把外置的存储资源抽象成PV、PVC的模式,为K8s集群中Pod动态/静态供给存储资源;
与本地存储不同,本地存储支持Pod跨节点运行之后依然保存数据,除非Pod设置Node绑定;
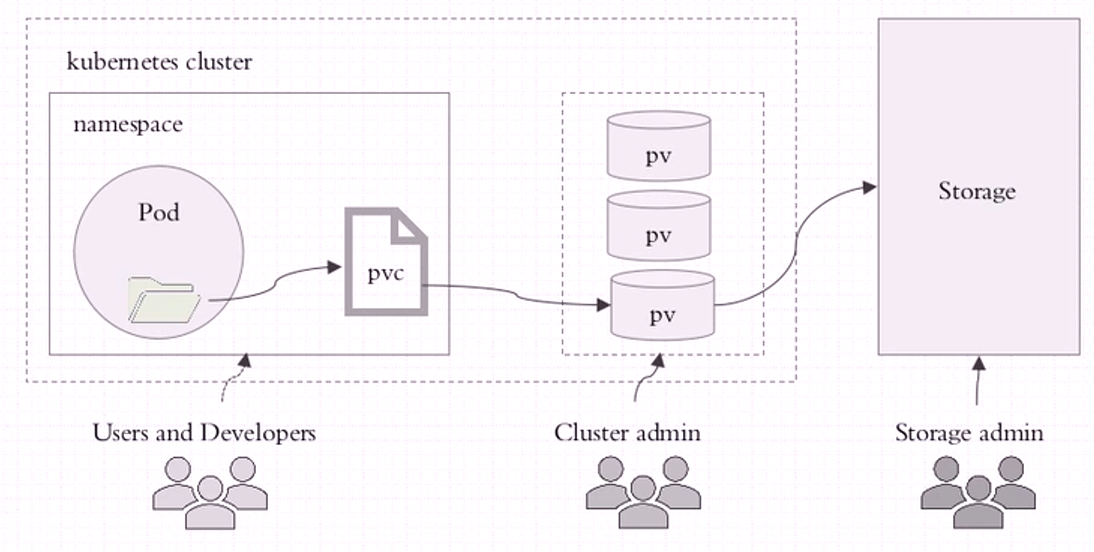
PersistentVolume(PV)
是外置存储设备可以提供给PVC占用的最小逻辑存储单元;
PV属于集群资源,不属于任何namespace;
PV的mode
PVC申请占用PV之后,限制Pause容器(客户端)可以通过PVC(代理),在PV(服务端)上执行哪些权限的操作;
- ReadWriteOnce:单路读、写
- ReadWriteMany:多路读、写
- ReadOnlyMany:多路只读
PV的生命周期
- Provisionging:分为静态供给和动态供给,取决于存储系统的API;
- Binding: PVC和PV的1对1绑定建立成功;
- Using: Pause容器通过PVC使用PV存储资源;
PVC
- Persistent Volum Claim属于集群级别的资源,不属于任何Namespace,而Pod属于Namespace资源;
- 如果Pod想要使用PV就必须把PV注册到namespace资源当中去,当PV注册到某1个namespace中之后叫做PVC;
- 此后Pod就通过PVC去使用PV;
CS
StorageClass,可定义连接复杂存储设备(ceph)的参数, StorageClass能够根据PVC的要求,动态、自动创建出符合PVC需求的PV, 实现了动态的PV资源供应,但是需要存储设备API的支持;
6.K8s对接huawei-fusionstorage分布式存储
由于Kubernetes集群中的Pod会在不同的Node节点迁移,想要实现Pod数据的持久化,Pod的存储后端通常会使用分布式存储。
例如huawei-FusionStorage分布式存储系统。
6.2.分布式存储概念
华为FusionStorage作为分布式存储系统,存储节点一般通过网络互联。
操作系统通过挂载网络的网络存储协议(NFS/iSCSI/FCP等)来访问其存储资源。
6.3.网络存储协议
网络存储协议一般都是基于TCP/IP协议的封装;
当容器通过CSI插件挂载上分布式存储的数据卷之后,容器通过宿主机的存储客户端,利用网络存储协议与后端分布式存储系统完成容器的读/写操作;
以下是NFS、iSCSI、FCP的英文缩写及其中文含义:
NFS
英文全称: Network File System
中文含义: 网络文件系统
描述: NFS 是一种远程文件系统协议,允许通过网络在不同操作系统之间共享文件。客户端可以通过网络访问服务器上的文件,就像本地文件一样。
ISCSI
英文全称: Internet Small Computer System Interface
中文含义: 网络小型计算机系统接口
描述: iSCSI 是一种通过IP网络传输SCSI命令的协议,用于将存储设备(如磁盘)通过网络连接到服务器上。它允许远程存储设备(如存储区域网络)在网络上传输数据,作为本地磁盘使用。
FCP
英文全称: Fibre Channel Protocol
中文含义: 光纤通道协议
描述: FCP 是一种通过光纤通道网络传输的协议,用于连接存储设备与服务器。它广泛应用于存储区域网络(SAN),提供高速的块级数据传输。
6.4.Pod使用分布式存储流程
以huawei-fusion分布式存储系统为例
每个Node宿主机安装huawei-fusionStorage客户端,如果你在Kubernetes集群中使用NFS存储卷,每个节点都需要安装 NFS 客户端。
CSI驱动程序安装包下载
从华为官方渠道获取适用于华为FusionStorage的CSI驱动安装包
CSI驱动安装与配置
apiVersion: v1
kind: ConfigMap
metadata:
  name: fusionstorage-csi-config
data:
  fusionstorage.ip: "192.168.100.100"  # FusionStorage管理IP
  fusionstorage.username: "admin"
  fusionstorage.password: "password123"
  fusionstorage.port: "8080"  # 管理端口,根据实际情况
部署huawei-fusion存储驱动程序
通过YAML文件部署CSI驱动程序,CSI驱动程序Deployment或Daemonset引用上述ConfigMap将配置信息,传递给CSI驱动容器
apiVersion: apps/v1
kind: DaemonSet
metadata:
  name: huawei-fusionstorage-csi-driver           #声明驱动名称便于SttorageClass使用
spec:
  template:
    spec:
      containers:
      - name: csi-driver
        image: huawei/fusionstorage-csi-driver:v1.0  #CSI驱动镜像
        env:
        - name: FUSIONSTORAGE_IP
          valueFrom:
            configMapKeyRef:
              name: fusionstorage-csi-config
              key: fusionstorage.ip
        - name: FUSIONSTORAGE_USERNAME
          valueFrom:
            configMapKeyRef:
              name: fusionstorage-csi-config
              key: fusionstorage.username
        - name: FUSIONSTORAGE_PASSWORD
          valueFrom:
            configMapKeyRef:
              name: fusionstorage-csi-config
              key: fusionstorage.password
定义StorageClass
StorageClass可以被看作是对CSI(Container Storage Interface)驱动程序的1种封装和抽象;
apiVersion: storage.k8s.io/v1
kind: StorageClass
metadata:
  name: fusionstorage-sc
provisioner: huawei-fusionstorage-csi-driver  #这里指定华为FusionStorage的CSI驱动作为存储供应者
parameters:
  storagePool: pool1      #FusionStorage中的存储池名称
  accessProtocol: iSCSI   #访问协议,例如iSCSI或FC
  fsType: ext4            #文件系统类型
StrorageClass可以使K8s同时挂载多种不同类型存储系统,还可以根据PVC动态创建PV,其中动态创建PVC的流程如下:
-
当用户创建PVC时,K8s控制平面会根据PVC指定的StorageClass找到对应的CSI驱动。
-
Kubelet向CSI驱动发送Provision请求,请求中包含PVC的规格信息,如存储容量、访问模式等。
-
CSI 驱动接收到请求后,从上述ConfigMap配置中获取FusionStorage系统的管理IP、认证信息等,使用这些信息与FusionStorage 存储系统建立连接。
-
CSI 驱动通过与FusionStorage存储系统的 API 进行交互,在指定的存储池中创建符合PVC要求的PV。
6.5.CSI规范
Kubernetes官方提供了1个标准容器存储接口规范(Container Storage Interface) ;
不同存储提供商(如Ceph、GlusterFS、AWS EBS等)遵循该CSI接口规范开发自己的插件;
这样K8s就可以灵活地接入各种后端存储系统,而不需要为每个存储系统定制特定的代码。
6.6.CSI插件
Kubernetes的CSI (Container Storage Interface)插件本质上是1个实现了CSI接口规范的程序。
Kubelet会根据CSI接口规范调用CSI插件来进行存储管理操作(如挂载、卸载、快照、扩展等,不包含磁盘读/写操作);
这些操作背后会间接地通过CSI插件与后端的分布式存储系统进行交互,从而实现对存储资源的动态管理。
简单来说,CSI插件的作用是:
- 提供一个统一的存储操作接口(如挂载、卸载、扩展等)。
- 作为Kubelet和后端存储系统之间的中间层,确保Kubernetes能够管理各种不同类型的存储。
6.7.容器对存储卷的读/写操作
容器对存储卷的读/写操作本质上是通过宿主机的文件系统来完成的;
一旦分布式存储系统提供的存储卷被挂载到宿主机上,容器就直接通过宿主机的文件系统路径来进行读写。
这个过程通常是不需要 CSI插件直接介入的,因为 CSI 插件的作用主要是在存储卷的挂载和卸载阶段,它负责与后端存储系统交互,确保存储卷正确地被挂载到宿主机。
云原生架构下,应用之间的资源配置交换从“手动操作”转变为“声明式管理”。通过 YAML 文件和控制器来自动化应用资源的配置与管理,不再需要人工干预。平台自动完成从网络配置到存储挂载、服务发现等一系列操作。

 浙公网安备 33010602011771号