
java 定时任务
一、Timer
这是java自带的java.util.Timer类,这个类允许你调度一个java.util.TimerTask任务。使用这种方式可以让你的程序按照某一个频度执行,但不能在指定时间运行。一般用的较少。


package com.wh.timingJob;

import java.util.Date;
import java.util.Timer;
import java.util.TimerTask;

/**
 * 文章摘自:https://www.jianshu.com/p/b6809b5a0c26
 * @Description //Timer:这是java自带的java.util.Timer类,这个类允许你调度一个java.util.TimerTask任务。
 *                      使用这种方式可以让你的程序按照某一个频度执行,但不能在指定时间运行。一般用的较少。
 * @Author wanghao
 * @Date 2019-08-03 10:12
 **/
public class TestTimer {


    public static void main(String[] args) {

        // 声明任务
        TimerTask timerTask = new TimerTask() {
            @Override
            public void run() {
                System.out.println("task  run:"+ new Date());
            }
        };
        Timer timer = new Timer();
        //安排指定的任务在指定的时间开始进行重复的固定延迟执行。这里是每3秒执行一次
        /**
         *  @param task   task to be scheduled.     执行的任务
         *  @param delay  delay in milliseconds before task is to be executed.      任务执行前的延迟(毫秒)。
         *  @param period time in milliseconds between successive task executions.   连续任务执行之间的时间(毫秒)。
          */
        timer.schedule(timerTask,5000,3000);
    }
}
代码如上,有加注释不再赘述。
二、ScheduledExecutorService
也jdk自带的一个类;是基于线程池设计的定时任务类,每个调度任务都会分配到线程池中的一个线程去执行,也就是说,任务是并发执行,互不影响。
package com.wh.timingJob;

import java.util.Date;
import java.util.concurrent.Executors;
import java.util.concurrent.ScheduledExecutorService;
import java.util.concurrent.TimeUnit;

/**
 * @Description //ScheduledExecutorService:也jdk自带的一个类;是基于线程池设计的定时任务类,
 *                  每个调度任务都会分配到线程池中的一个线程去执行,也就是说,任务是并发执行,互不影响。
 * @Author wanghao
 * @Date 2019-08-03 10:17
 **/
public class TestScheduledExecutorService {


    public static void main(String[] args) {
        ScheduledExecutorService service = Executors.newSingleThreadScheduledExecutor();
        /**
         *   @param command the task to execute
         *                      命令要执行的任务
         *   @param initialDelay the time to delay first execution
         *                      初始化延迟第一次执行的延迟时间
         *   @param period the period between successive executions
         *                      连续执行之间的时间段
         *   @param unit the time unit of the initialDelay and period parameters
         *                      参数单位初始延迟和周期参数的时间单位
         *   @return a ScheduledFuture representing pending completion of the task, and whose {@code get()} method will throw an exception upon cancellation
         *                      表示任务的挂起完成
         */
        service.scheduleAtFixedRate(new Runnable() {
            @Override
            public void run() {
                System.out.println("task "+Thread.currentThread().getName()+" ScheduledExecutorService "+new Date());
            };  //Time unit representing one second 表示一秒钟的时间单位
        },0,3,TimeUnit.SECONDS);


        // 参数:1、任务体 2、首次执行的延时时间
        //      3、任务执行间隔 4、间隔时间单位
        //service.scheduleAtFixedRate(()->System.out.println("task ScheduledExecutorService "+new Date()), 0, 3, TimeUnit.SECONDS);

    }
}
代码如上,有加注释不再赘述。
三、Quartz
这是一个功能比较强大的的调度器,可以让你的程序在指定时间执行,也可以按照某一个频度执行,配置起来稍显复杂。
Quartz需要添加依赖
如果SpringBoot版本是2.0.0以后的,则在spring-boot-starter中已经包含了quart的依赖,则可以直接使用spring-boot-starter-quartz依赖:
<dependency>
    <groupId>org.springframework.boot</groupId>
    <artifactId>spring-boot-starter-quartz</artifactId>
</dependency>
如果是1.5.9则要使用以下添加依赖:
<dependency>
  <groupId>org.quartz-scheduler</groupId>
  <artifactId>quartz</artifactId>
  <version>2.3.0</version>
</dependency>
<dependency>
  <groupId>org.springframework</groupId>
  <artifactId>spring-context-support</artifactId>
</dependency>
1、单任务Quartz
首先创建一个任务
package com.wh.timingJob.quartz;

import org.quartz.JobExecutionContext;
import org.quartz.JobExecutionException;
import org.springframework.scheduling.quartz.QuartzJobBean;

import java.text.SimpleDateFormat;
import java.util.Date;

/**
 * @Description //定时任务类
 * @Author wanghao
 * @Date 2019-08-04 21:40
 **/
public class TestTask1 extends QuartzJobBean {
    @Override
    protected void executeInternal(JobExecutionContext jobExecutionContext) throws JobExecutionException {
        SimpleDateFormat sdf=new SimpleDateFormat("yyyy-MM-dd HH:mm:ss");
        System.out.println("TestQuartz01----" + sdf.format(new Date()));
    }
}
然后创建一个启动任务的
package com.wh.timingJob.quartz;

import org.quartz.*;
import org.springframework.context.annotation.Bean;
import org.springframework.context.annotation.Configuration;

/**
 * @Description //TODO
 * @Author wanghao
 * @Date 2019-08-04 21:41
 **/

@Configuration
public class QuartzConfig {

    @Bean
    public JobDetail testQuartz1() {
        return JobBuilder.newJob(TestTask1.class).withIdentity("testTask1").storeDurably().build();
    }

    @Bean
    public Trigger testQuartzTrigger1() {
        //5秒执行一次
        SimpleScheduleBuilder scheduleBuilder = SimpleScheduleBuilder.simpleSchedule()
                .withIntervalInSeconds(5)
                .repeatForever();
        return TriggerBuilder.newTrigger().forJob(testQuartz1())
                .withIdentity("testTask1")
                .withSchedule(scheduleBuilder)
                .build();
    }


}
2、多个任务Quartz
添加一个任务二
package com.wh.timingJob.quartz;

import org.quartz.JobExecutionContext;
import org.quartz.JobExecutionException;
import org.springframework.scheduling.quartz.QuartzJobBean;

import java.text.SimpleDateFormat;
import java.util.Date;

/**
 * @Description //TODO
 * @Author wanghao
 * @Date 2019-08-04 21:40
 **/
//Job - 由希望由调度程序执行的组件实现的接口。
public class TestTask2 extends QuartzJobBean {
    @Override
    protected void executeInternal(JobExecutionContext jobExecutionContext) throws JobExecutionException {
        SimpleDateFormat sdf=new SimpleDateFormat("yyyy-MM-dd HH:mm:ss");
        System.out.println("TestQuartz02----" + sdf.format(new Date()));
    }
}
然后把启动类改为如下;
package com.wh.timingJob.quartz;

import org.quartz.*;
import org.springframework.context.annotation.Bean;
import org.springframework.context.annotation.Configuration;

/**
 * @Description //TODO
 * @Author wanghao
 * @Date 2019-08-04 21:41
 **/

@Configuration
public class QuartzConfig {

    @Bean
    //JobDetail - 用于定义作业的实例。
    public JobDetail testQuartz1() {
        return JobBuilder.newJob(TestTask1.class).withIdentity("testTask1").storeDurably().build();
    }

    @Bean
    public Trigger testQuartzTrigger1() {
        //5秒执行一次
        SimpleScheduleBuilder scheduleBuilder = SimpleScheduleBuilder.simpleSchedule()
                .withIntervalInSeconds(5)
                .repeatForever();
            return TriggerBuilder.newTrigger().forJob(testQuartz1())
                .withIdentity("testTask1")
                .withSchedule(scheduleBuilder)
                .build();
    }

    @Bean
    public JobDetail testQuartz2() {
        return JobBuilder.newJob(TestTask2.class).withIdentity("testTask2").storeDurably().build();
    }

    @Bean
    public Trigger testQuartzTrigger2() {
        //cron方式,每隔5秒执行一次
        return TriggerBuilder.newTrigger().forJob(testQuartz2())
                .withIdentity("testTask2")
                .withSchedule(CronScheduleBuilder.cronSchedule("*/5 * * * * ?"))
                .build();
    }
}
启动springboot即可。
3、另一种写法
package com.wh.timingJob;

/**
 * @Description //TODO
 * @Author wanghao
 * @Date 2019-08-03 10:46
 **/

import org.quartz.Job;
import org.quartz.JobExecutionContext;
import org.quartz.JobExecutionException;
import org.springframework.scheduling.quartz.QuartzJobBean;

import java.util.Date;

/**
 * jar包依赖
 *
 * <dependency>
 *     <groupId>org.springframework.boot</groupId>
 *     <artifactId>spring-boot-starter-quartz</artifactId>
 * </dependency>
 */
public class TestQuartz implements Job {

    /**
     * 执行定时任务
     * @param jobExecutionContext
     * @throws JobExecutionException
     */
    @Override
    public void execute(JobExecutionContext jobExecutionContext) throws JobExecutionException {
        System.out.println("TestQuartz quartz task "+new Date());
    }
}
package com.wh.timingJob;

/**
 * @Description //TODO
 * @Author wanghao
 * @Date 2019-08-03 10:46
 **/

import org.quartz.Job;
import org.quartz.JobExecutionContext;
import org.quartz.JobExecutionException;
import org.springframework.scheduling.quartz.QuartzJobBean;

import java.util.Date;

/**
 * jar包依赖
 *
 * <dependency>
 *     <groupId>org.springframework.boot</groupId>
 *     <artifactId>spring-boot-starter-quartz</artifactId>
 * </dependency>
 */
public class TestQuartz2 implements Job {

    /**
     * 执行定时任务
     * @param jobExecutionContext
     * @throws JobExecutionException
     */
    @Override
    public void execute(JobExecutionContext jobExecutionContext) throws JobExecutionException {
        System.out.println("TestQuartz2222 quartz task "+new Date());
    }
}
package com.wh.timingJob;

import org.quartz.*;
import org.springframework.beans.factory.annotation.Autowired;
import org.springframework.scheduling.quartz.SchedulerFactoryBean;
import org.springframework.stereotype.Component;

/**
 * @Description //TODO
 * @Author wanghao
 * @Date 2019-08-03 11:02
 **/

@Component
public class SchedulerAllJob {

    @Autowired
    private SchedulerFactoryBean schedulerFactoryBean;

    /**
     * @throws SchedulerException
     */
    public void scheduleJobs() throws SchedulerException {
        Scheduler scheduler = schedulerFactoryBean.getScheduler();
        /**
         *
         */
        scheduleJob1(scheduler);
        scheduleJob2(scheduler);
    }

    /**
     * 配置Job1
     * @param scheduler
     * @throws SchedulerException
     */
    private void scheduleJob1(Scheduler scheduler) throws SchedulerException{
        JobDetail jobDetail = JobBuilder.newJob(TestQuartz.class) .withIdentity("job1", "group1").build();
        // 每5s执行一次
        CronScheduleBuilder scheduleBuilder = CronScheduleBuilder.cronSchedule("0/5 * * * * ?");
        CronTrigger cronTrigger = TriggerBuilder.newTrigger().withIdentity("trigger1", "group1") .withSchedule(scheduleBuilder).build();
        scheduler.scheduleJob(jobDetail,cronTrigger);
    }
    /**
     * 配置Job
     * @param scheduler
     * @throws SchedulerException
     */
    private void scheduleJob2(Scheduler scheduler) throws SchedulerException{
        JobDetail jobDetail = JobBuilder.newJob(TestQuartz2.class) .withIdentity("job2", "group1").build();
        CronScheduleBuilder scheduleBuilder = CronScheduleBuilder.cronSchedule("0/10 * * * * ?");
        // 每10s执行一次
        CronTrigger cronTrigger = TriggerBuilder.newTrigger().withIdentity("trigger2", "group1") .withSchedule(scheduleBuilder).build();
        scheduler.scheduleJob(jobDetail,cronTrigger);
    }

}
package com.wh.timingJob;

import org.springframework.beans.factory.annotation.Autowired;
import org.springframework.boot.CommandLineRunner;
import org.springframework.stereotype.Component;

/**
 * @Description //TODO
 * @Author wanghao
 * @Date 2019-08-03 10:49
 **/


@Component
public class InitRunner implements CommandLineRunner {


    @Autowired
    SchedulerAllJob schedulerAllJob;

    @Override
    public void run(String... args) throws Exception {
        schedulerAllJob.scheduleJobs();
    }
}
TestQuartz都是任务的实现
SchedulerAllJob 任务调度。
InitRunner 任务启动。
注:在使用SpringBoot构建项目时,我们通常有一些预先数据的加载。那么SpringBoot提供了一个简单的方式来实现–CommandLineRunner。换句话说就是,项目启动后就执行的
详情可点击链接:https://www.cnblogs.com/myblogs-miller/p/9046425.html https://blog.csdn.net/qq_34531925/article/details/82527066
四、使用Spring Task
package com.wh.timingJob;

/**
 * @Description // Spring Task:Spring3.0以后自带的task,
 *                  可以将它看成一个轻量级的Quartz,而且使用起来比Quartz简单许多。
 * @Author wanghao
 * @Date 2019-08-03 10:24
 **/

import org.springframework.scheduling.annotation.EnableScheduling;
import org.springframework.scheduling.annotation.Scheduled;
import org.springframework.stereotype.Component;

import java.util.Date;

/**
 * 需要引入jar包依赖:
 * <dependencies>
 *   <dependency>
 *     <groupId>org.springframework.boot</groupId>
 *     <artifactId>spring-boot-starter-web</artifactId>
 *   </dependency>
 *   <dependency>
 *     <groupId>org.springframework.boot</groupId>
 *     <artifactId>spring-boot-starter</artifactId>
 *   </dependency>
 *   <dependency>
 *     <groupId>org.projectlombok</groupId>
 *     <artifactId>lombok</artifactId>
 *     <optional>true</optional>
 *   </dependency>
 *   <dependency>
 *     <groupId>org.springframework.boot</groupId>
 *     <artifactId>spring-boot-starter-test</artifactId>
 *     <scope>test</scope>
 *   </dependency>
 * </dependencies>
 */

/**
 * 例子:
 * # 每月的最后1天
 * @Scheduled(cron = "0 0 18 28–31 * ?")
 * public void doAtLastDayOfMonth() {
 *     final Calendar calendar = Calendar.getInstance();
 *     if (c.get(Calendar.DATE) == c.getActualMaximum(Calendar.DATE)) {
 *         // do something here...
 *     }
 * }
 *
 * 说明:
 * Java(Spring)
 * *    *    *    *    *    *    *  springboot不支持年
 * -    -    -    -    -    -    -
 * |    |    |    |    |    |    |
 * |    |    |    |    |    |    + year [optional]
 * |    |    |    |    |    +----- day of week (0 - 7) (Sunday=0 or 7)
 * |    |    |    |    +---------- month (1 - 12)
 * |    |    |    +--------------- day of month (1 - 31)
 * |    |    +-------------------- hour (0 - 23)
 * |    +------------------------- min (0 - 59)
 * +------------------------------ second (0 - 59)
 */
@Component
@EnableScheduling
public class AlarmTask {

    /**默认是fixedDelay 上一次执行完毕时间后执行下一轮   springboot不支持年*/
    @Scheduled(cron = "0/5 * * * * *")
    public void run() throws InterruptedException {
        System.out.println(Thread.currentThread().getName()+"=====>>>>>使用cron  {}"+new Date());
        Thread.sleep(6000);
        System.out.println(Thread.currentThread().getName()+"=====>>>>>使用cron sleep 6 {}"+new Date());
    }

    /**fixedRate:间隔5s执行一次*/
    @Scheduled(fixedRate = 5000)
    public void run1() throws InterruptedException {
        System.out.println(Thread.currentThread().getName()+"=====>>>>>                             使用fixedRate  {}"+new Date());
    }

    /**fixedDelay:上一次执行完毕时间点之后5秒再执行*/
    @Scheduled(fixedDelay = 5000)
    public void run2() throws InterruptedException {
        System.out.println(Thread.currentThread().getName()+"=====>>>>>                                                     使用fixedDelay  {}"+new Date());
    }

    /**第一次延迟2秒后执行,之后按fixedDelay的规则每5秒执行一次*/
//    @Scheduled(initialDelay = 2000, fixedDelay = 5000)
    public void run3(){
        System.out.println(Thread.currentThread().getName()+"=====>>>>>                                                                                 使用initialDelay  {}"+new Date());
    }


}
这次写的都只是快速上手启动的模板,后期会贴上任务的详情介绍链接。
cron
cron表达式 每隔指定时间执行任务,
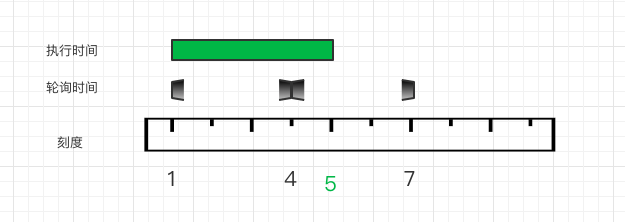
例如:每个3秒执行,第一次01执行任务,任务执行4秒,第二次任务执行的时候判断任务仍然在执行则跳过,第三次执行任务的时候检查任务已经结束,开始执行任务,01+3+3>01+4所以是07开始下一次任务,如下图所示,定时任务轮询如果任务正在执行则跳过这次,如果检测任务没有运行则正常执行。
fixeddelay
上一次任务执行结束等待间隔时间执行,这个很好理解,例如:间隔时间是3秒,01开始任务,任务执行4秒,下次任务执行时间就是01+4+3=08;
fixedrate
间隔时间执行,如果任务时间超出间隔时间,则下次任务再这次任务结束立即执行。例如:间隔时间是3秒,01开始任务,任务执行4秒,下次任务执行时间就是01+4=05;立即执行
@Scheduled(cron ="${testCron2}")
    public void testCron2() {
        log.info("开始 testCron2  ---------");
    }


    @Scheduled(cron ="0/1 * * * * ? ")
    public void testCron() {
        log.info("开始 testCron  ---------");
    }


    @Scheduled(fixedRate = 3000)
    public void testFixedRate() throws InterruptedException {
        log.info("开始 testFixedRate  ---------");
        Thread.sleep(14000);
    }

    @Scheduled(fixedDelay = 3000)
    public void testFixedDelay() throws InterruptedException {
        log.info("开始 testFixedDelay  ---------");
        Thread.sleep(4000);
    }

    /**
     *  fixedDelayString 可以从配置文件获取
     */
    @Scheduled(fixedDelayString = "${fixedDelayString}")
    public void TestFixedDelayString() {
        log.info("开始 TestFixedDelayString  ---------");
    }

    /**
     *   fixedRateString 可以从配置文件获取
     */
    @Scheduled(fixedRateString = "${fixedRateString}")
    public void TestFixedRateString() {
        log.info("开始 TestFixedRateString  ---------");
    }
配置文件
fixedDelayString: 4000
fixedRateString: 4000
testCron2: 0/1 * * * * ?
参考资料:


【推荐】国内首个AI IDE,深度理解中文开发场景,立即下载体验Trae
【推荐】编程新体验,更懂你的AI,立即体验豆包MarsCode编程助手
【推荐】抖音旗下AI助手豆包,你的智能百科全书,全免费不限次数
【推荐】轻量又高性能的 SSH 工具 IShell:AI 加持,快人一步
· .NET Core 中如何实现缓存的预热?
· 从 HTTP 原因短语缺失研究 HTTP/2 和 HTTP/3 的设计差异
· AI与.NET技术实操系列:向量存储与相似性搜索在 .NET 中的实现
· 基于Microsoft.Extensions.AI核心库实现RAG应用
· Linux系列:如何用heaptrack跟踪.NET程序的非托管内存泄露
· TypeScript + Deepseek 打造卜卦网站:技术与玄学的结合
· 阿里巴巴 QwQ-32B真的超越了 DeepSeek R-1吗?
· 【译】Visual Studio 中新的强大生产力特性
· 【设计模式】告别冗长if-else语句:使用策略模式优化代码结构
· AI与.NET技术实操系列(六):基于图像分类模型对图像进行分类