chaitin-Nginx+Docker
Nginx实战
任务一
1、源码包安装NGINX A,搭建Web Server,任意HTML页面,其8080端口提供Web访问服务,截图成功访问http(s)😕/[Server1]:8080并且回显Web页面
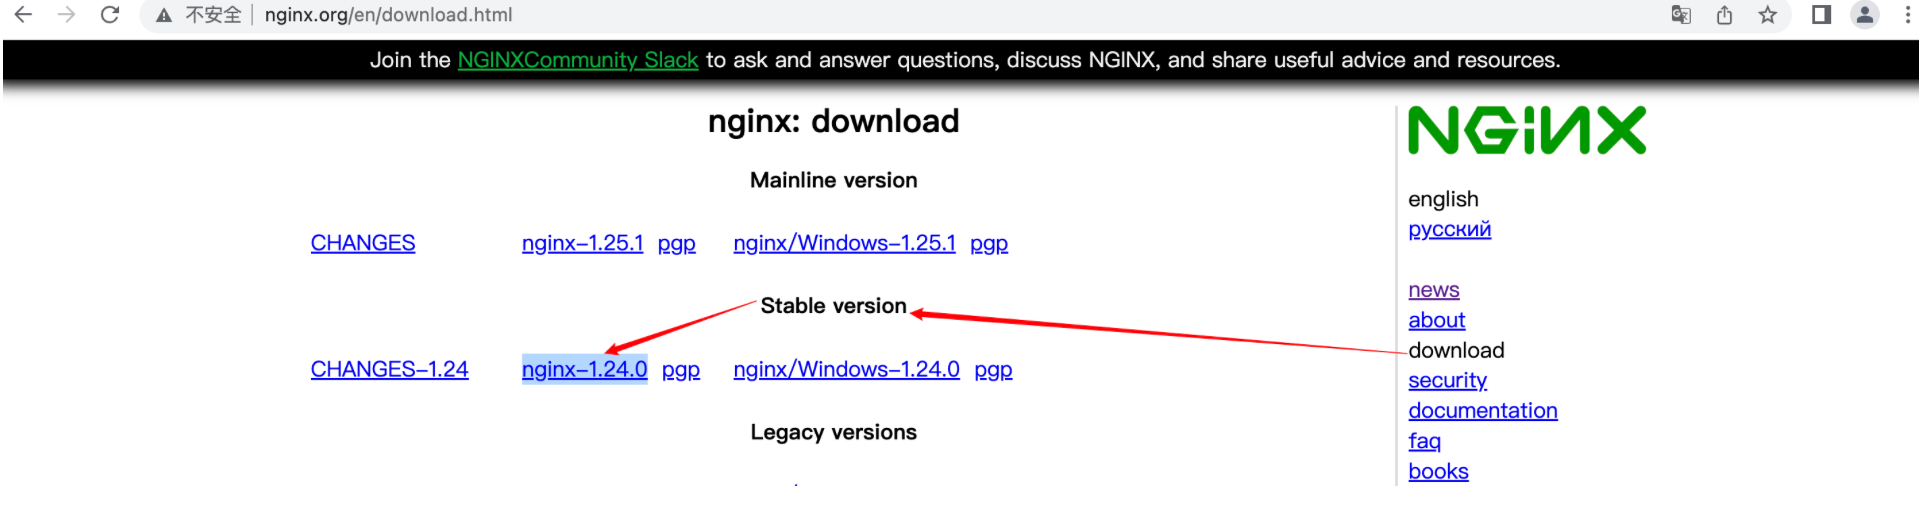
步骤一:下载源码包
[root@node01 ~]# wget -c http://nginx.org/download/nginx-1.24.0.tar.gz
步骤二:解压到指定目录
[root@node01 ~]# tar xf nginx-1.24.0.tar.gz -C /usr/local/
[root@node01 ~]# cd /usr/local/
[root@node01 local]# ls
aegis  bin  etc  games  include  lib  lib64  libexec  nginx-1.24.0  rvm  sbin  share  src
步骤三:进入Nginx目录编译安装
[root@node01 local]# cd nginx-1.24.0/
[root@node01 nginx-1.24.0]# ls
auto CHANGES CHANGES.ru conf configure contrib html LICENSE man README src
# 也可以直接config,使用默认路径
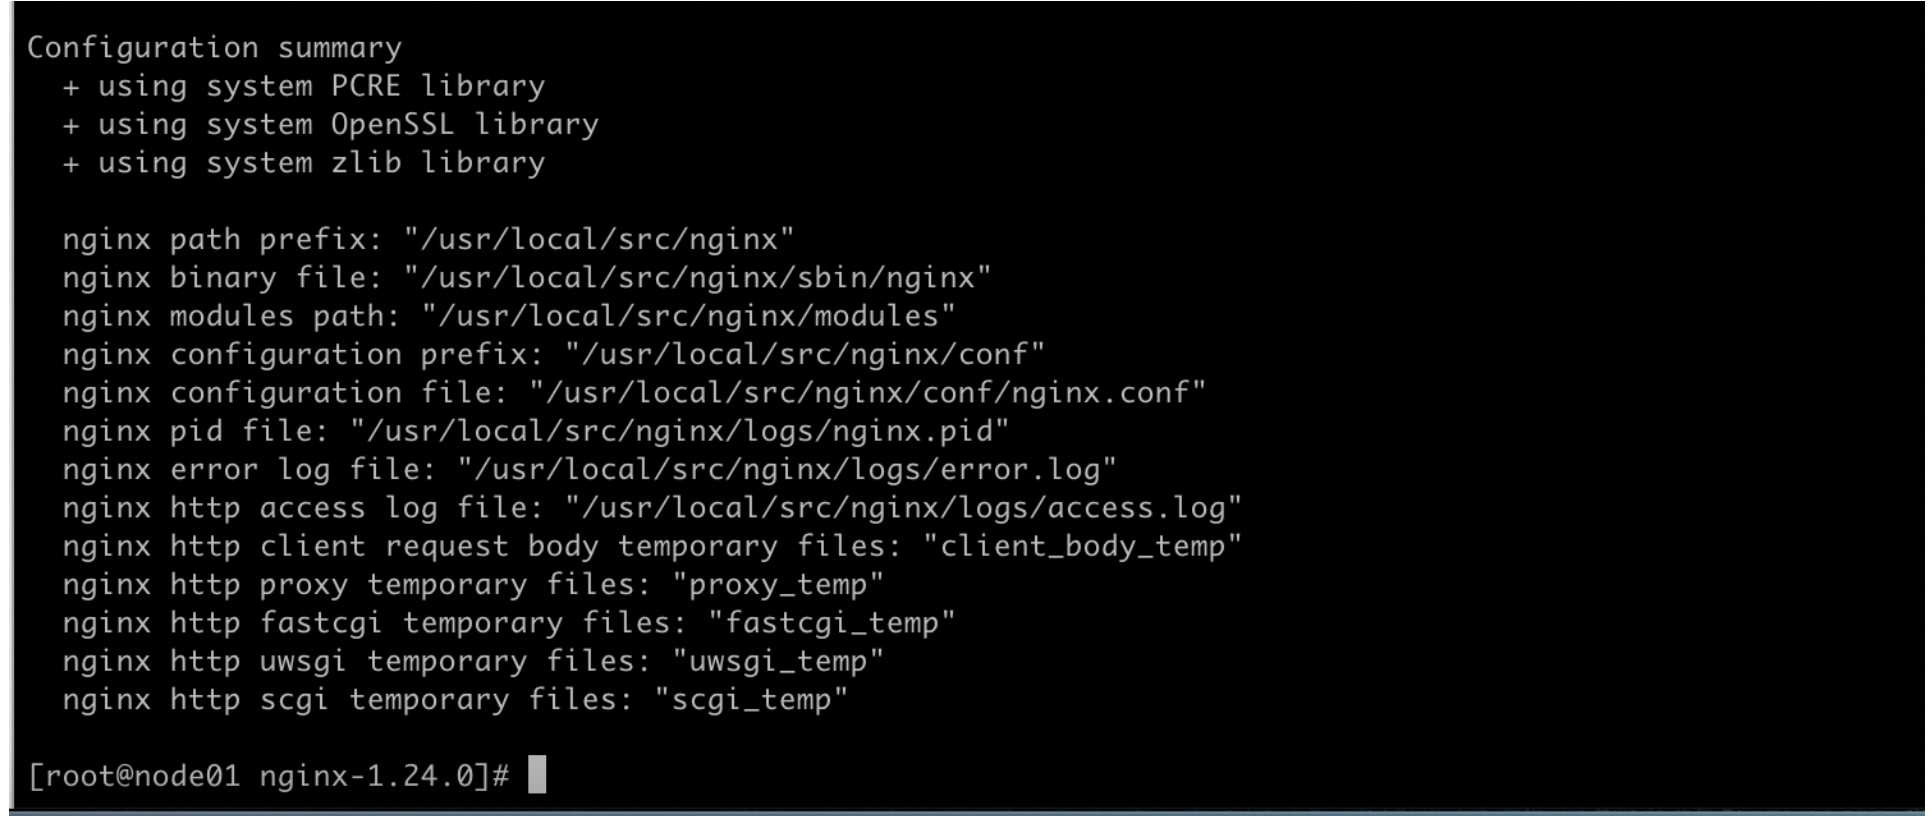
[root@node01 nginx-1.24.0]# ./configure --user=nginx --group=nginx \
--prefix=/usr/local/nginx \
--with-http_stub_status_module \
--with-http_ssl_module \
--with-http_gzip_static_module

汇总信息
步骤四:make make install
[root@node01 nginx-1.24.0]# make && make install
步骤五:创建用户和用户组
[root@node01 nginx-1.24.0]# groupadd nginx
[root@node01 nginx-1.24.0]# useradd -s /sbin/nologin -g nginx -M nginx
步骤六:修改目录权限
[root@node01 nginx-1.24.0]# chown -R nginx.nginx /usr/local/nginx-1.24.0/

步骤七:创建服务脚本
cat > /usr/lib/systemd/system/nginx.service << EOF
[Unit]
Description=nginx - high performance web server
Documentation=http://nginx.org/en/docs/
After=network.target remote-fs.target nss-lookup.target

[Service]
Type=forking
PIDFile=/usr/local/nginx/logs/nginx.pid
ExecStartPre=/usr/local/nginx/sbin/nginx -t -c /usr/local/nginx/conf/nginx.conf
ExecStart=/usr/local/nginx/sbin/nginx -c /usr/local/nginx/conf/nginx.conf
ExecReload=/bin/kill -s HUP $MAINPID
ExecStop=/bin/kill -s QUIT $MAINPID
PrivateTmp=true

[Install]
WantedBy=multi-user.target
EOF
步骤八:创建PID文件
[root@node01 nginx-1.24.0]# touch /usr/local/nginx/logs/nginx.pid
步骤九:脚本测试
[root@node01 nginx-1.24.0]# systemctl daemon-reload
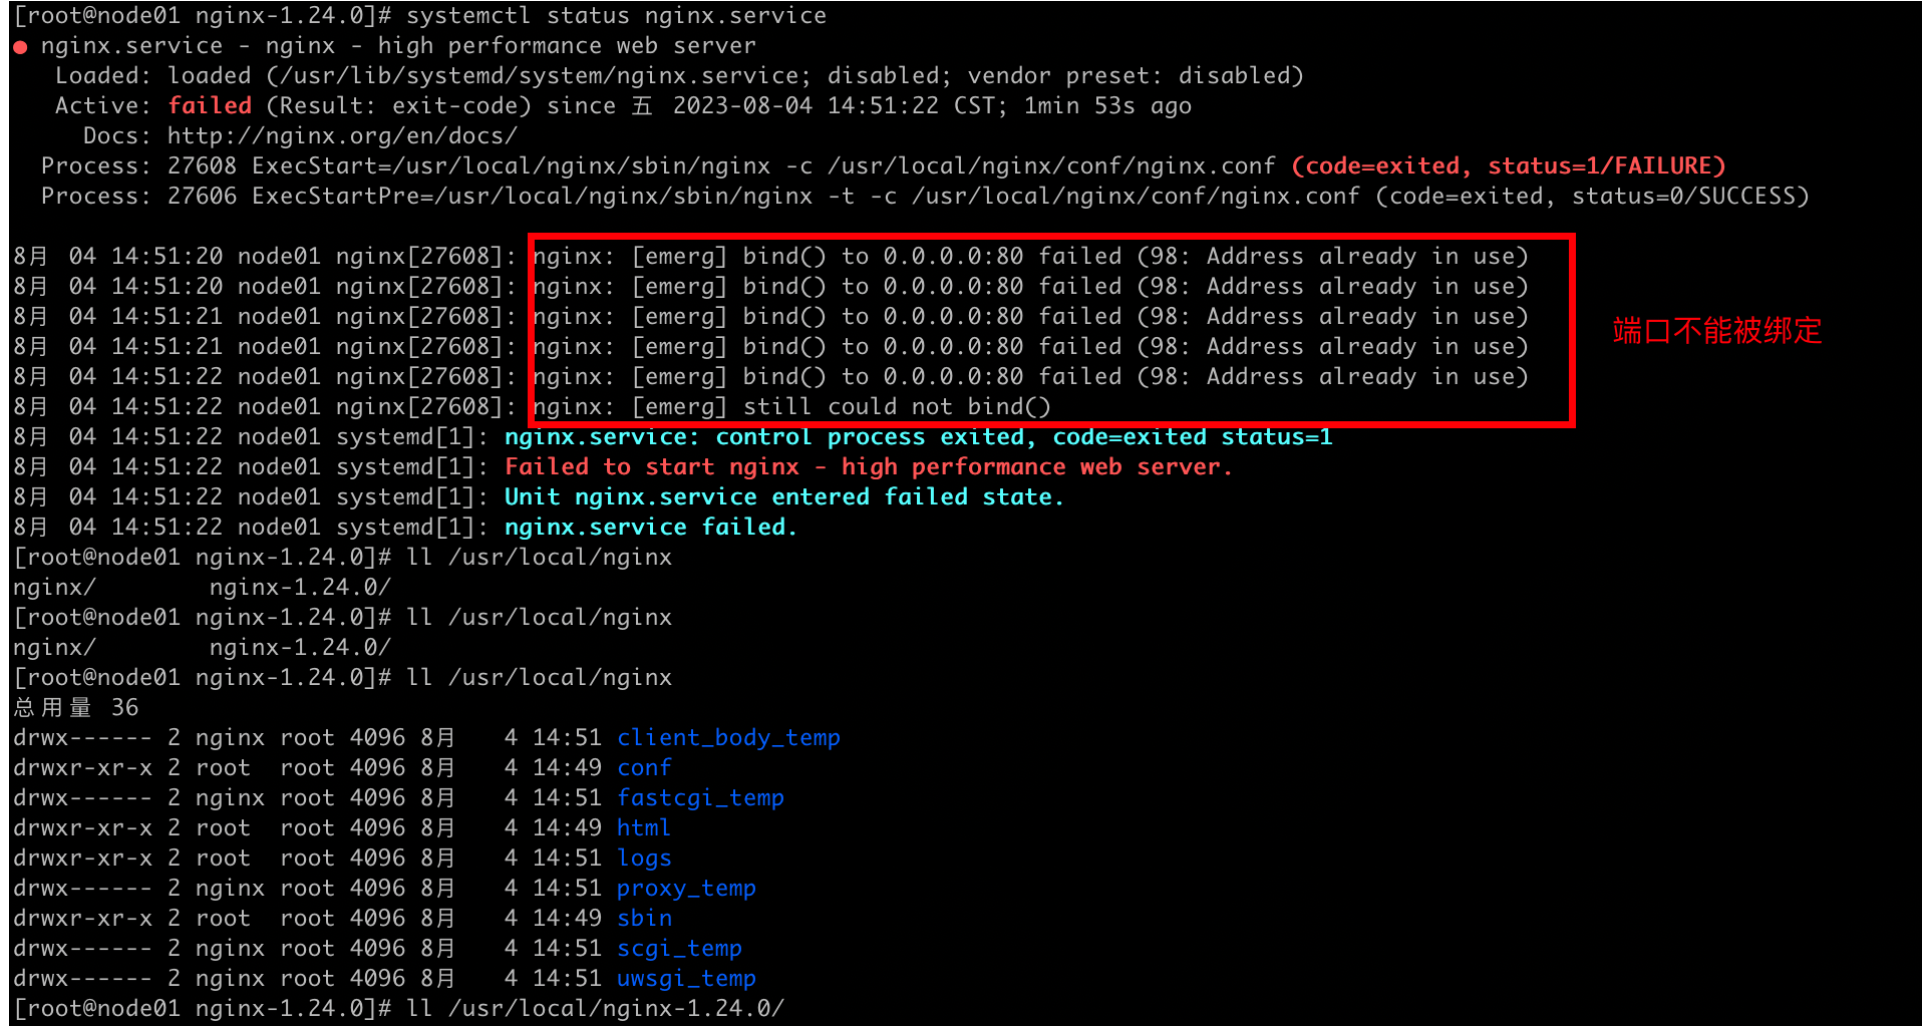
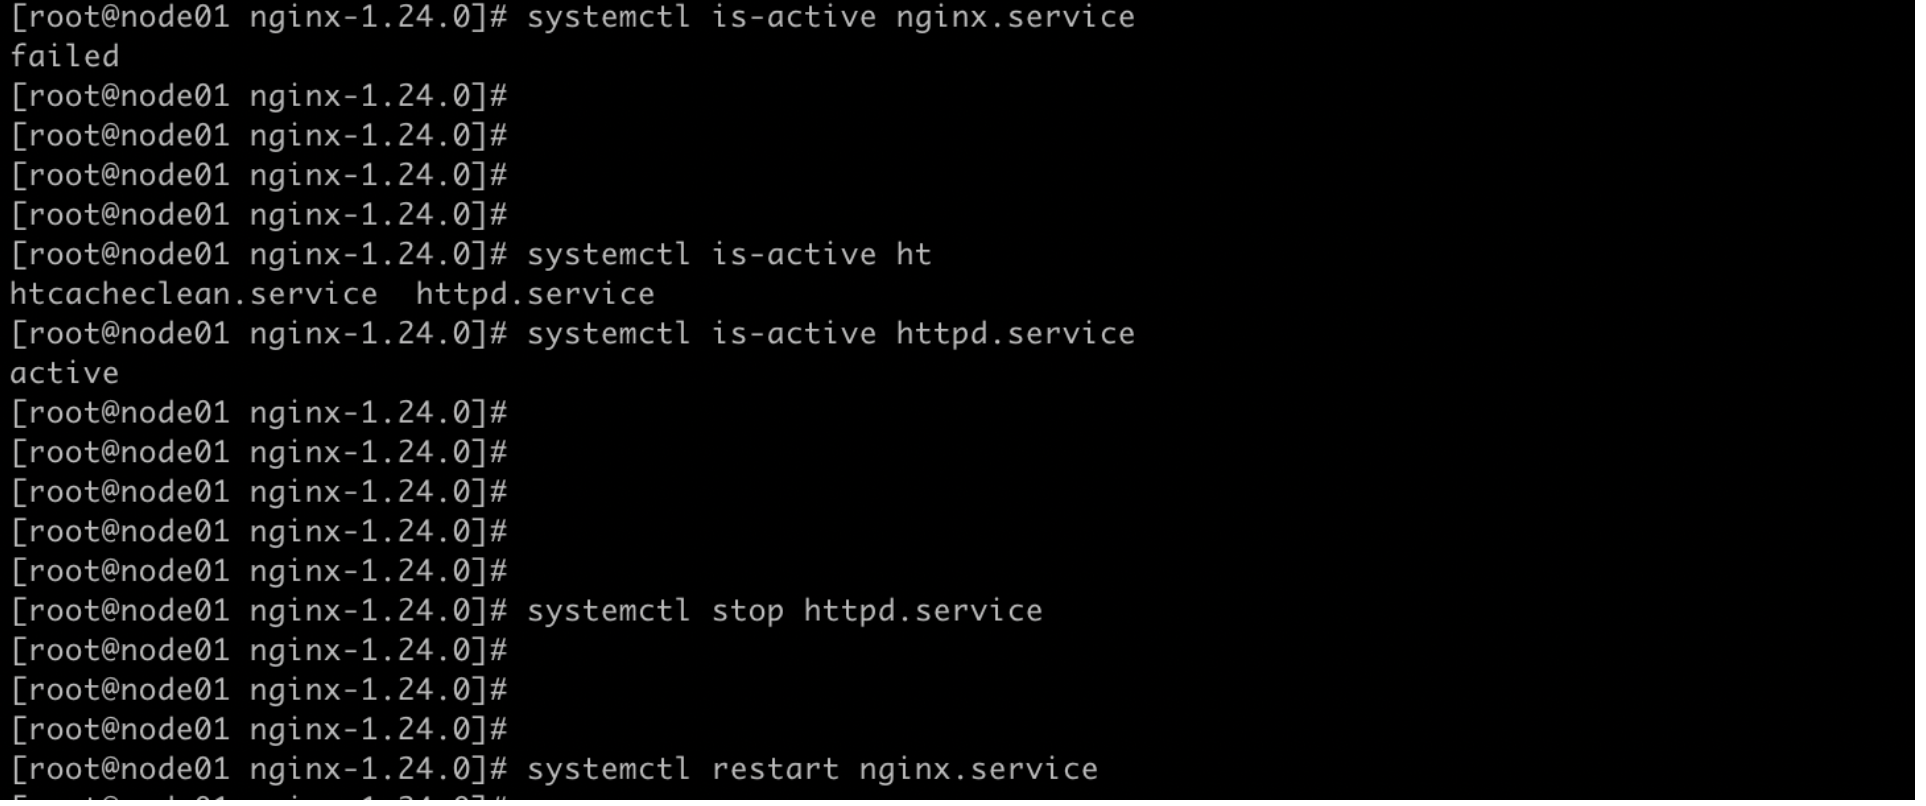
# 很好出现问题了,排错
[root@node01 nginx-1.24.0]# systemctl restart nginx.service
Job for nginx.service failed because the control process exited with error code. See "systemctl status nginx.service" and "journalctl -xe" for details.

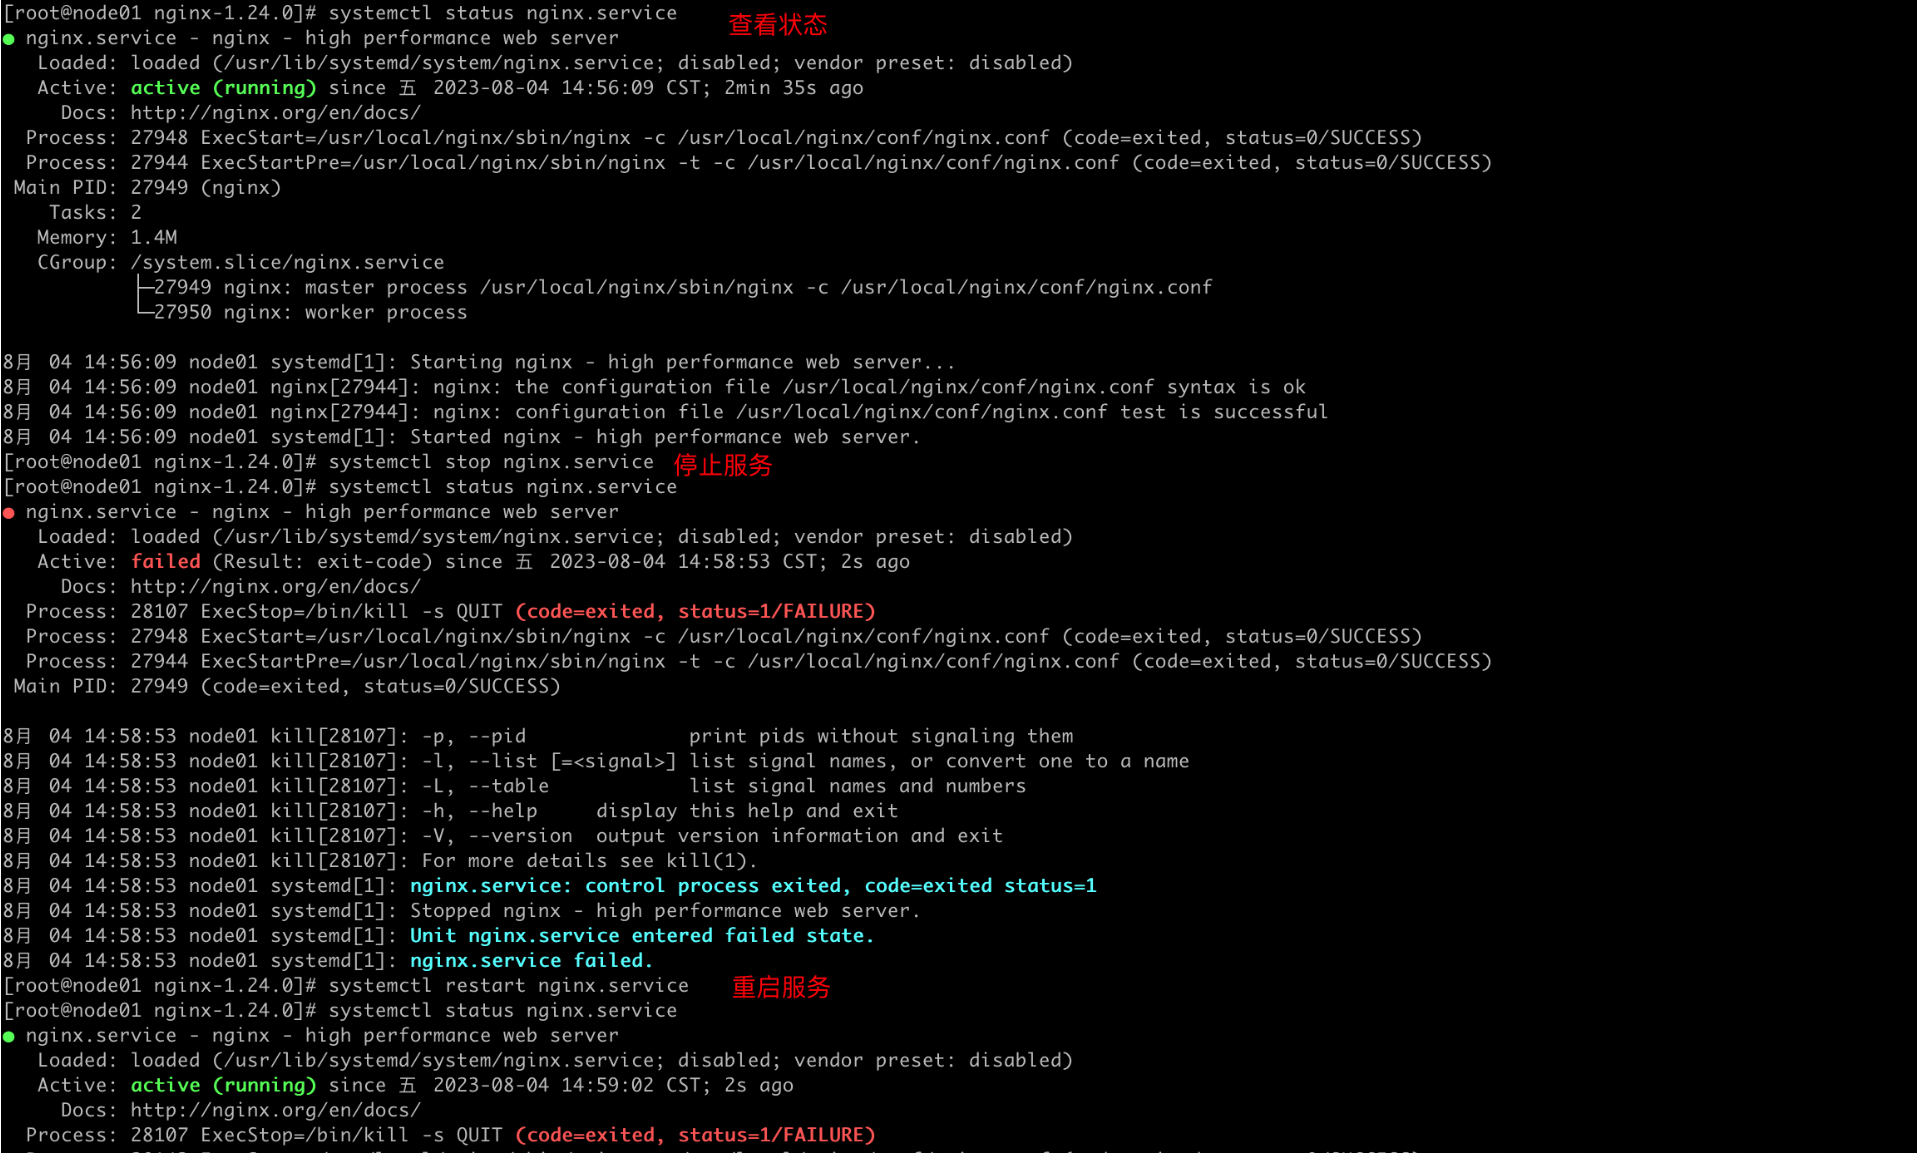
排错
还好,以前装了httpd,端口被占用了,根据这个提示信息找到的
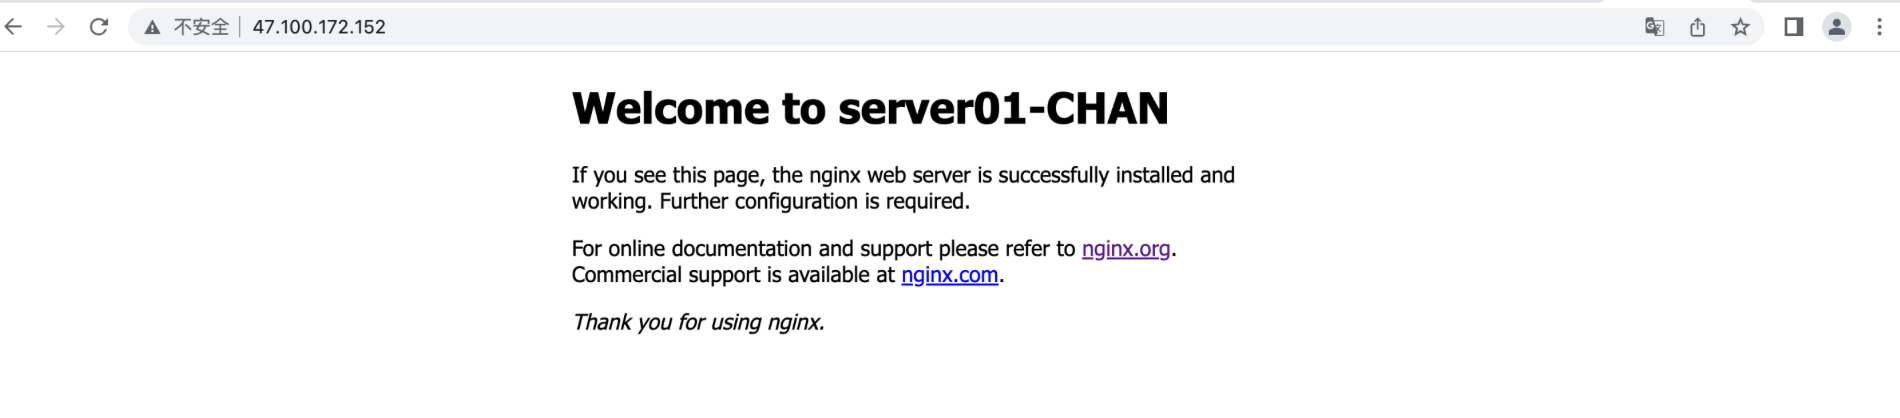
测试结果:
访问web界面
任务二
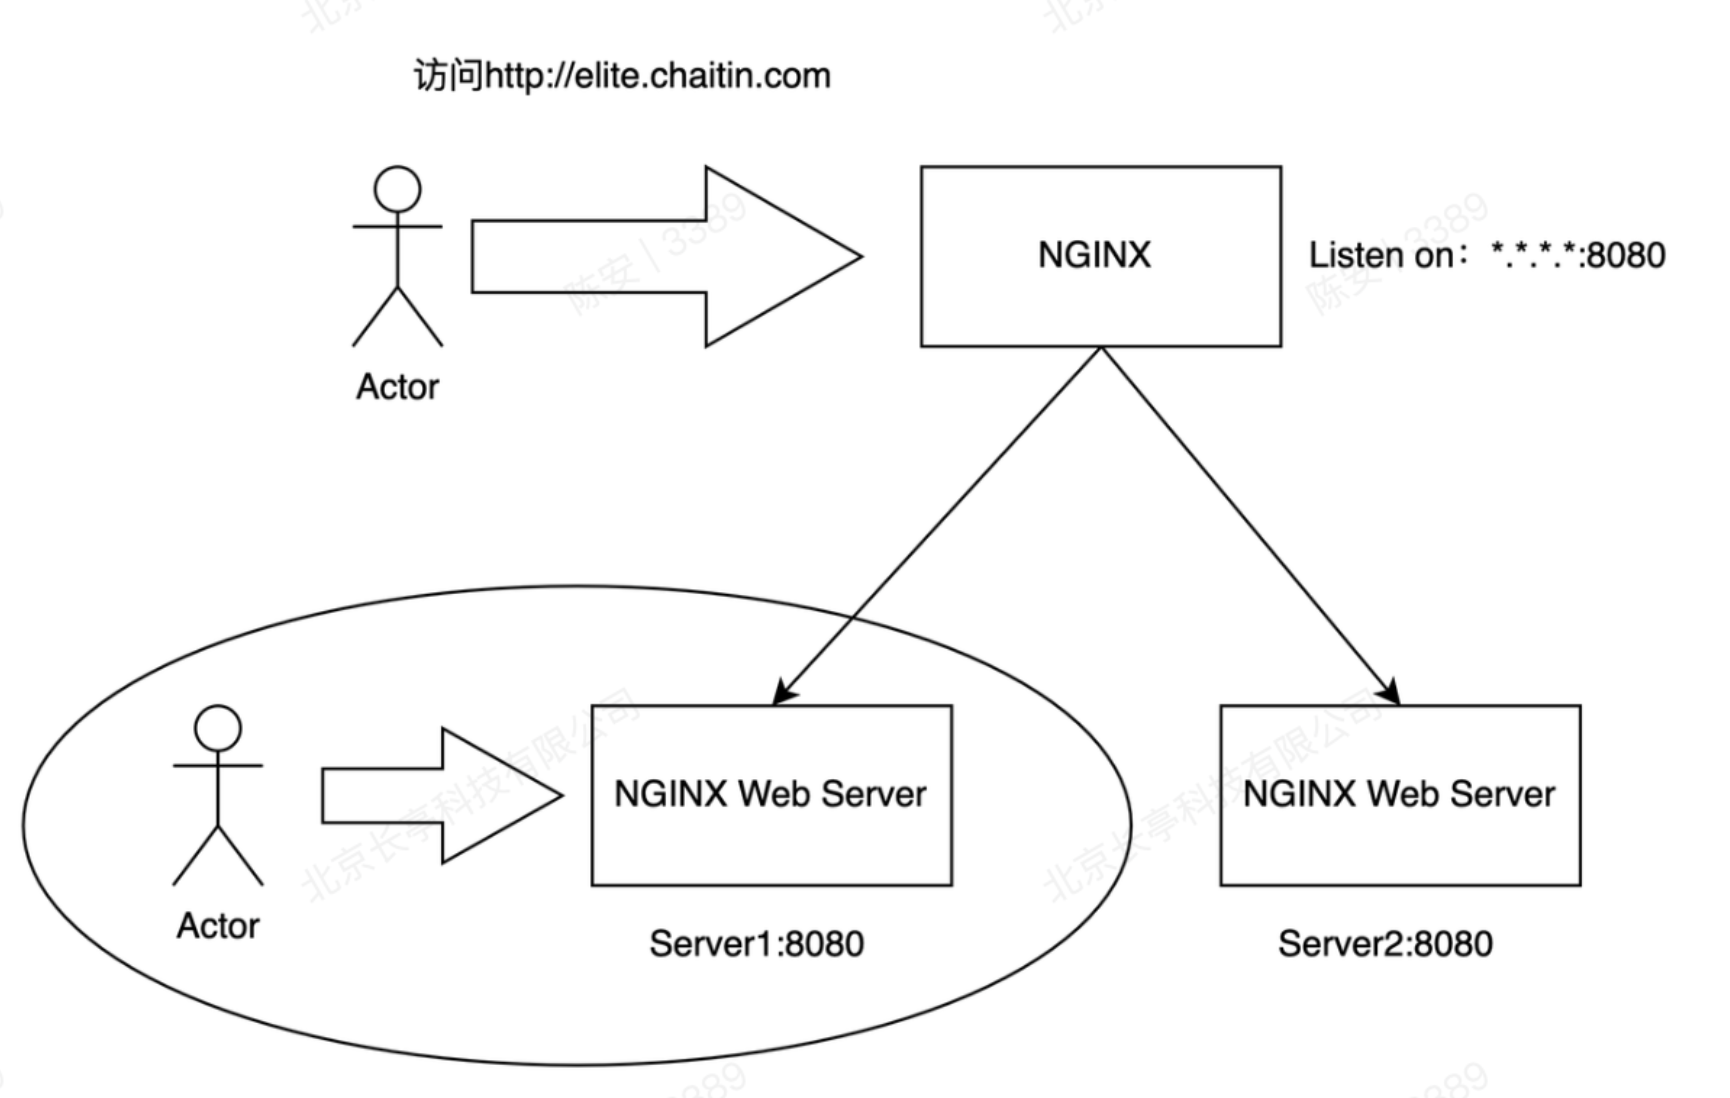
2、保留Server1,但是不允许直接访问Server 1,再部署1套NGINX B,利用其实现反向代理功能,要求有且仅有访问http://elite.chaitin.com 可以访问到Web Server1的8080服务。(截图并详细说明NGINX上配置/参数)
步骤一:部署Nginx
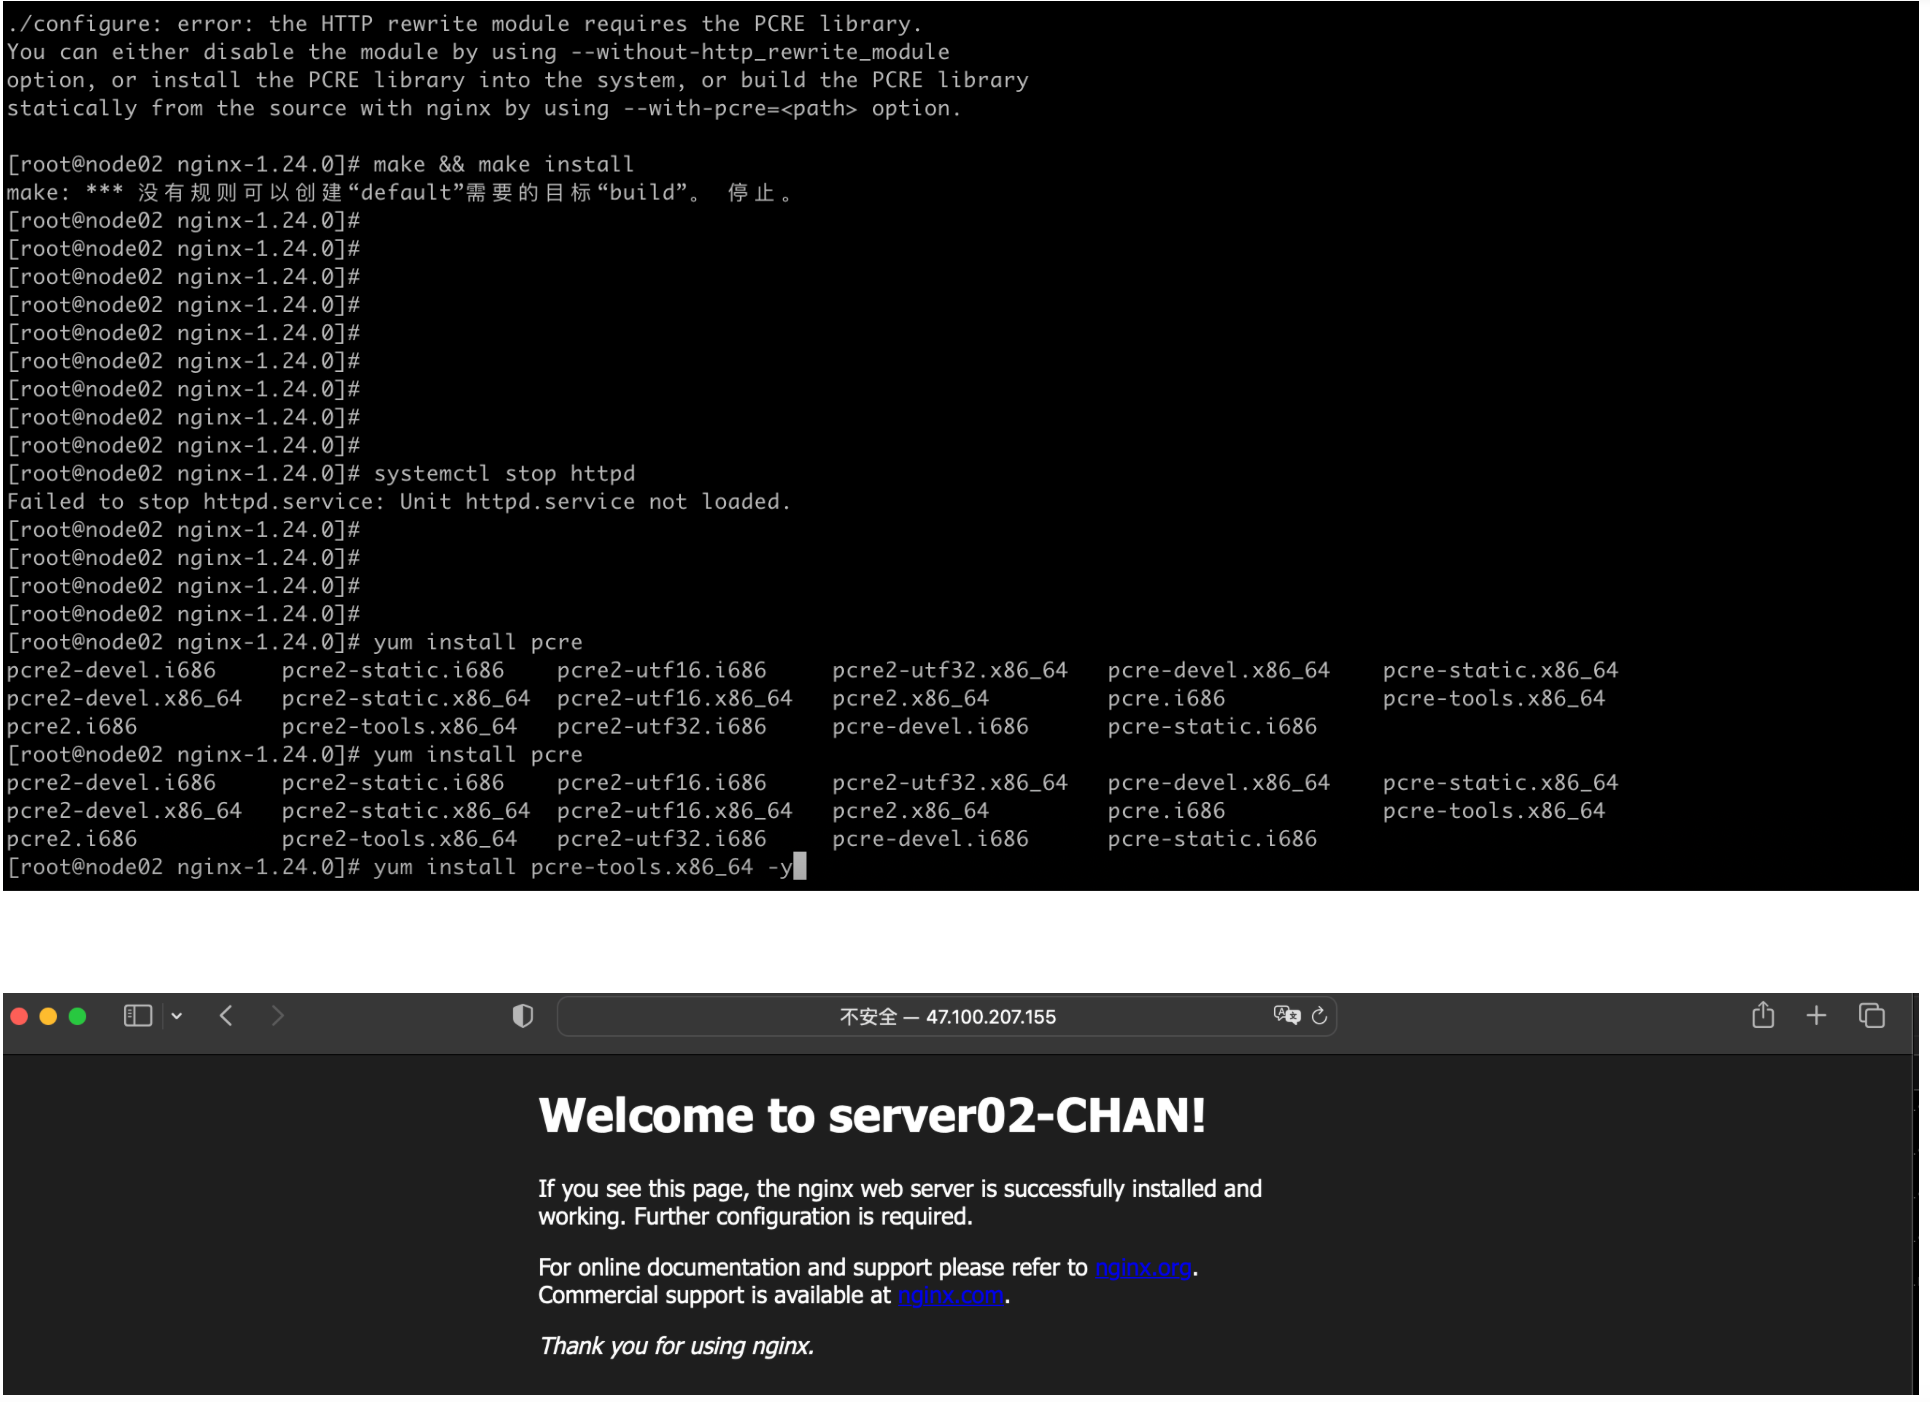
编译安装的是报错:
./configure: error: the HTTP rewrite module requires the PCRE library.
You can either disable the module by using --without-http_rewrite_module
option, or install the PCRE library into the system, or build the PCRE library
statically from the source with nginx by using --with-pcre=<path> option.

# 下载相应的依赖即可
[root@node02 nginx-1.24.0]# yum install pcre-devel  gc gcc gcc-c++ zlib-devel openssl-devel -y
自此,俩台nginx服务器配置完成
步骤二:配置反向代理-俩台服务器都做,配置虚拟主机
# node01主机的配置信息
[root@node01 conf]# cat nginx.conf

# 添加部分
server{
	listen 80;
	server_name elite.chaitin.com;
	location / {
		root /usr/local/nginx/html;
		index index.html index.htm;
	}
}
[root@node01 conf]# echo "`hostname -I `server01-CHAN" > /usr/local/nginx/html/index.html

[root@node01 conf]# scp nginx.conf node02:$PWD
[root@node02 conf]# echo "`hostname -I `server02-CHAN" > /usr/local/nginx/html/index.html
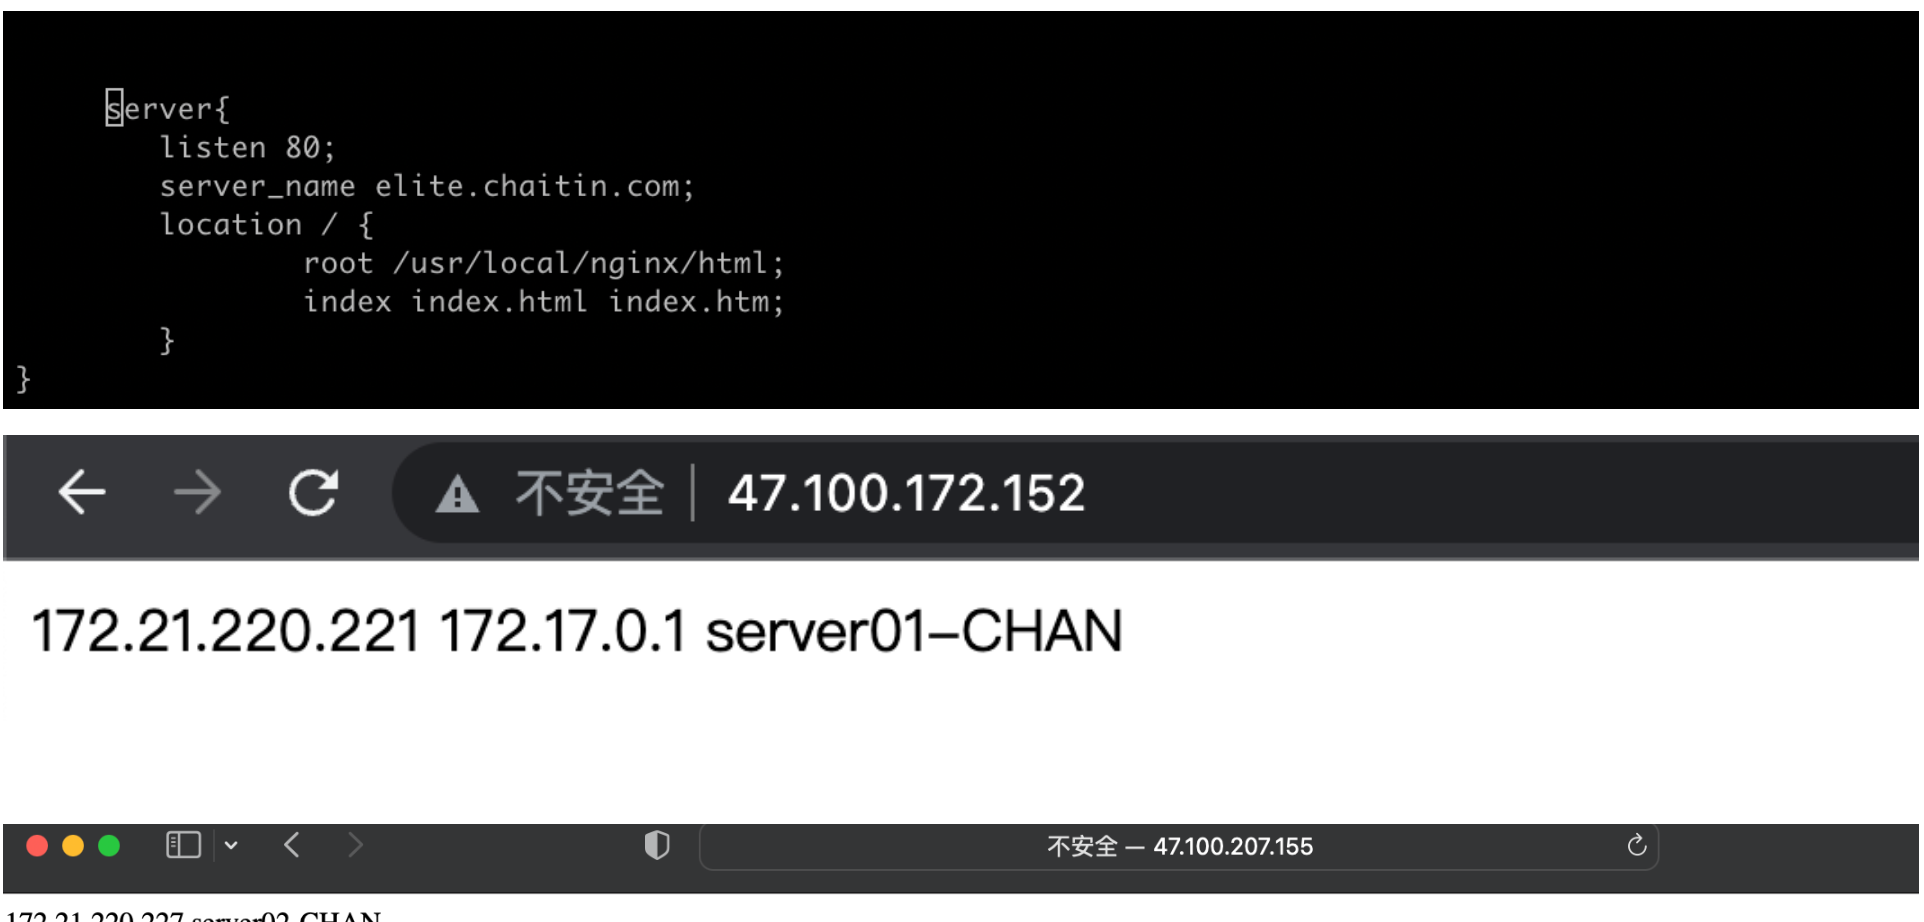
测试结果
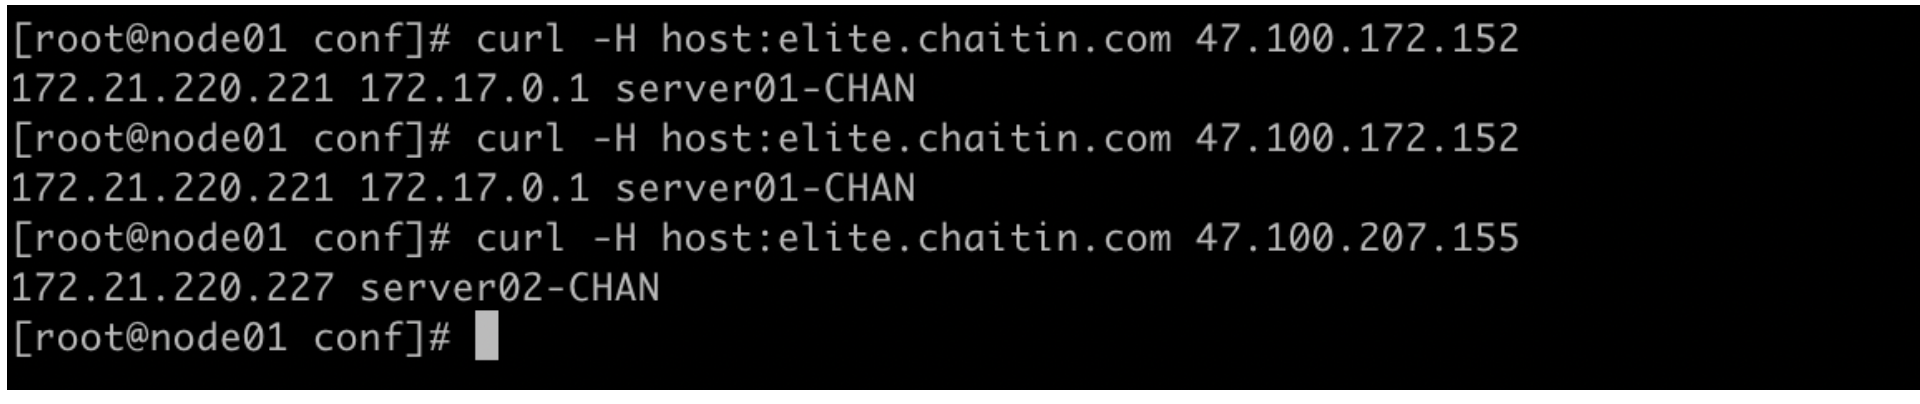
配置访问node02主机对应的域名代理到node01上
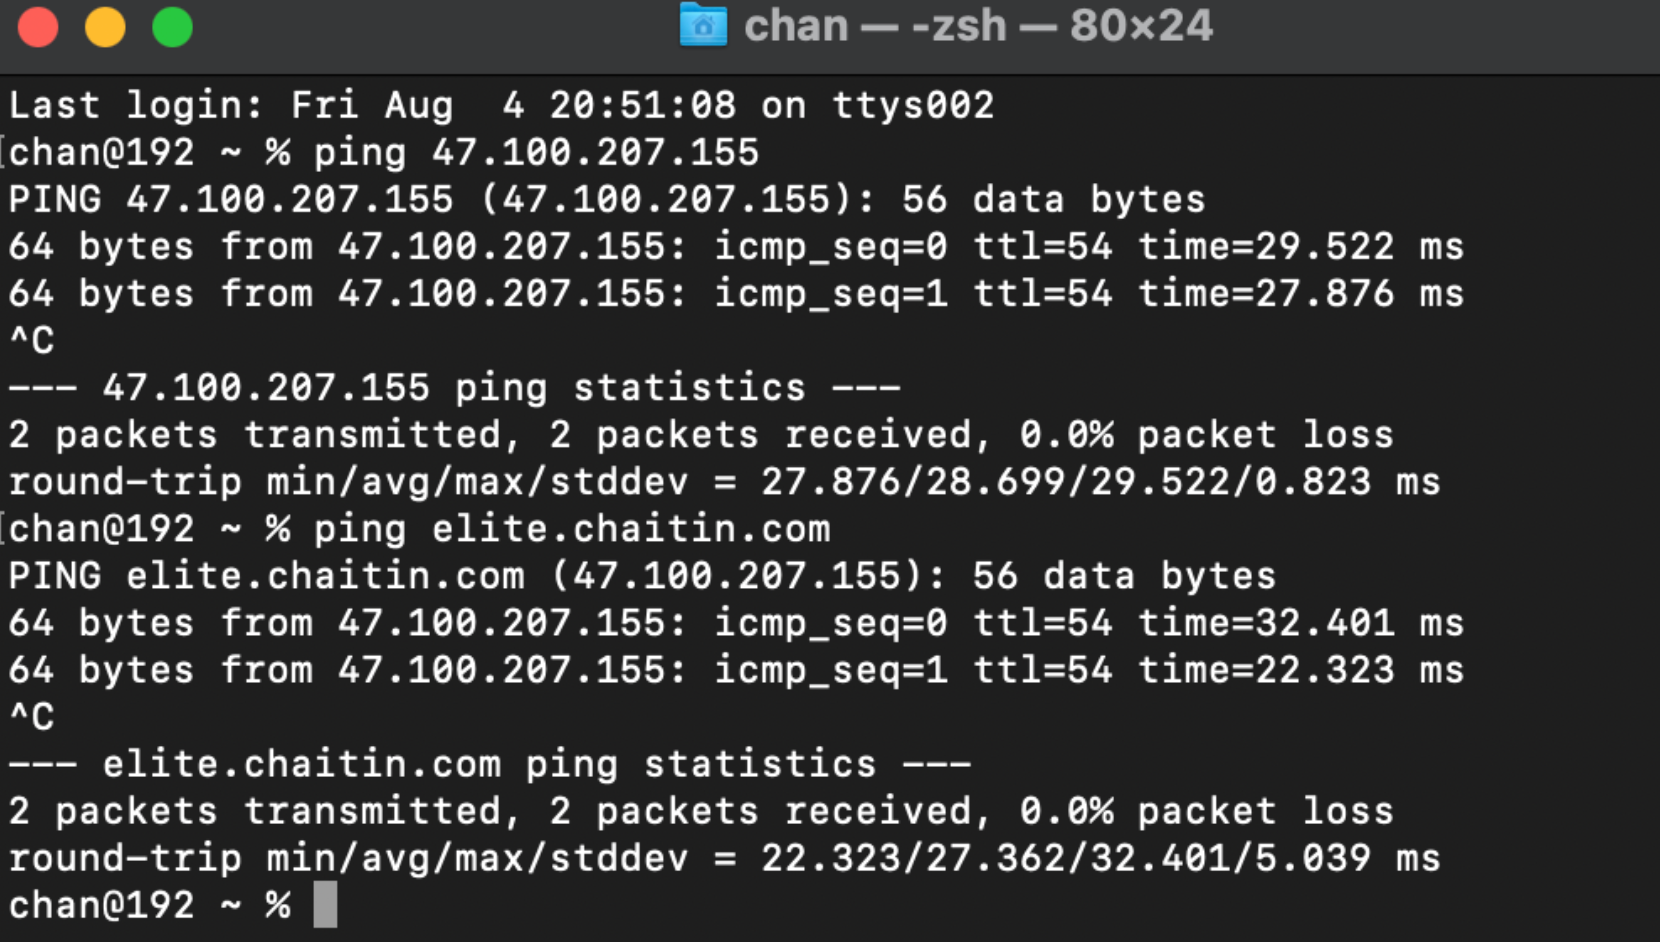
# 没有DNS,做本地解析
root@node02 ~]# tail -1  /etc/hosts
47.100.207.155 elite.chaitin.com

MAC本地解析
chan@192 ~ % sudo vim /etc/hosts
Password:
chan@192 ~ % tail -1 /etc/hosts
47.100.207.155 elite.chaitin.com
node02设置为仅可通过域名访问
#所有不匹配elite.chaitin.com的请求全都返回403
server{
 	listen 80;
 	server_name _;
 	location / {
	return 403;
	}
}

# 将匹配elite.chaitin.com的请求转发到server1
 server{
 listen 80;
 server_name elite.chaitin.com;
 location / {
 proxy_pass http://47.100.172.152:80;
 }
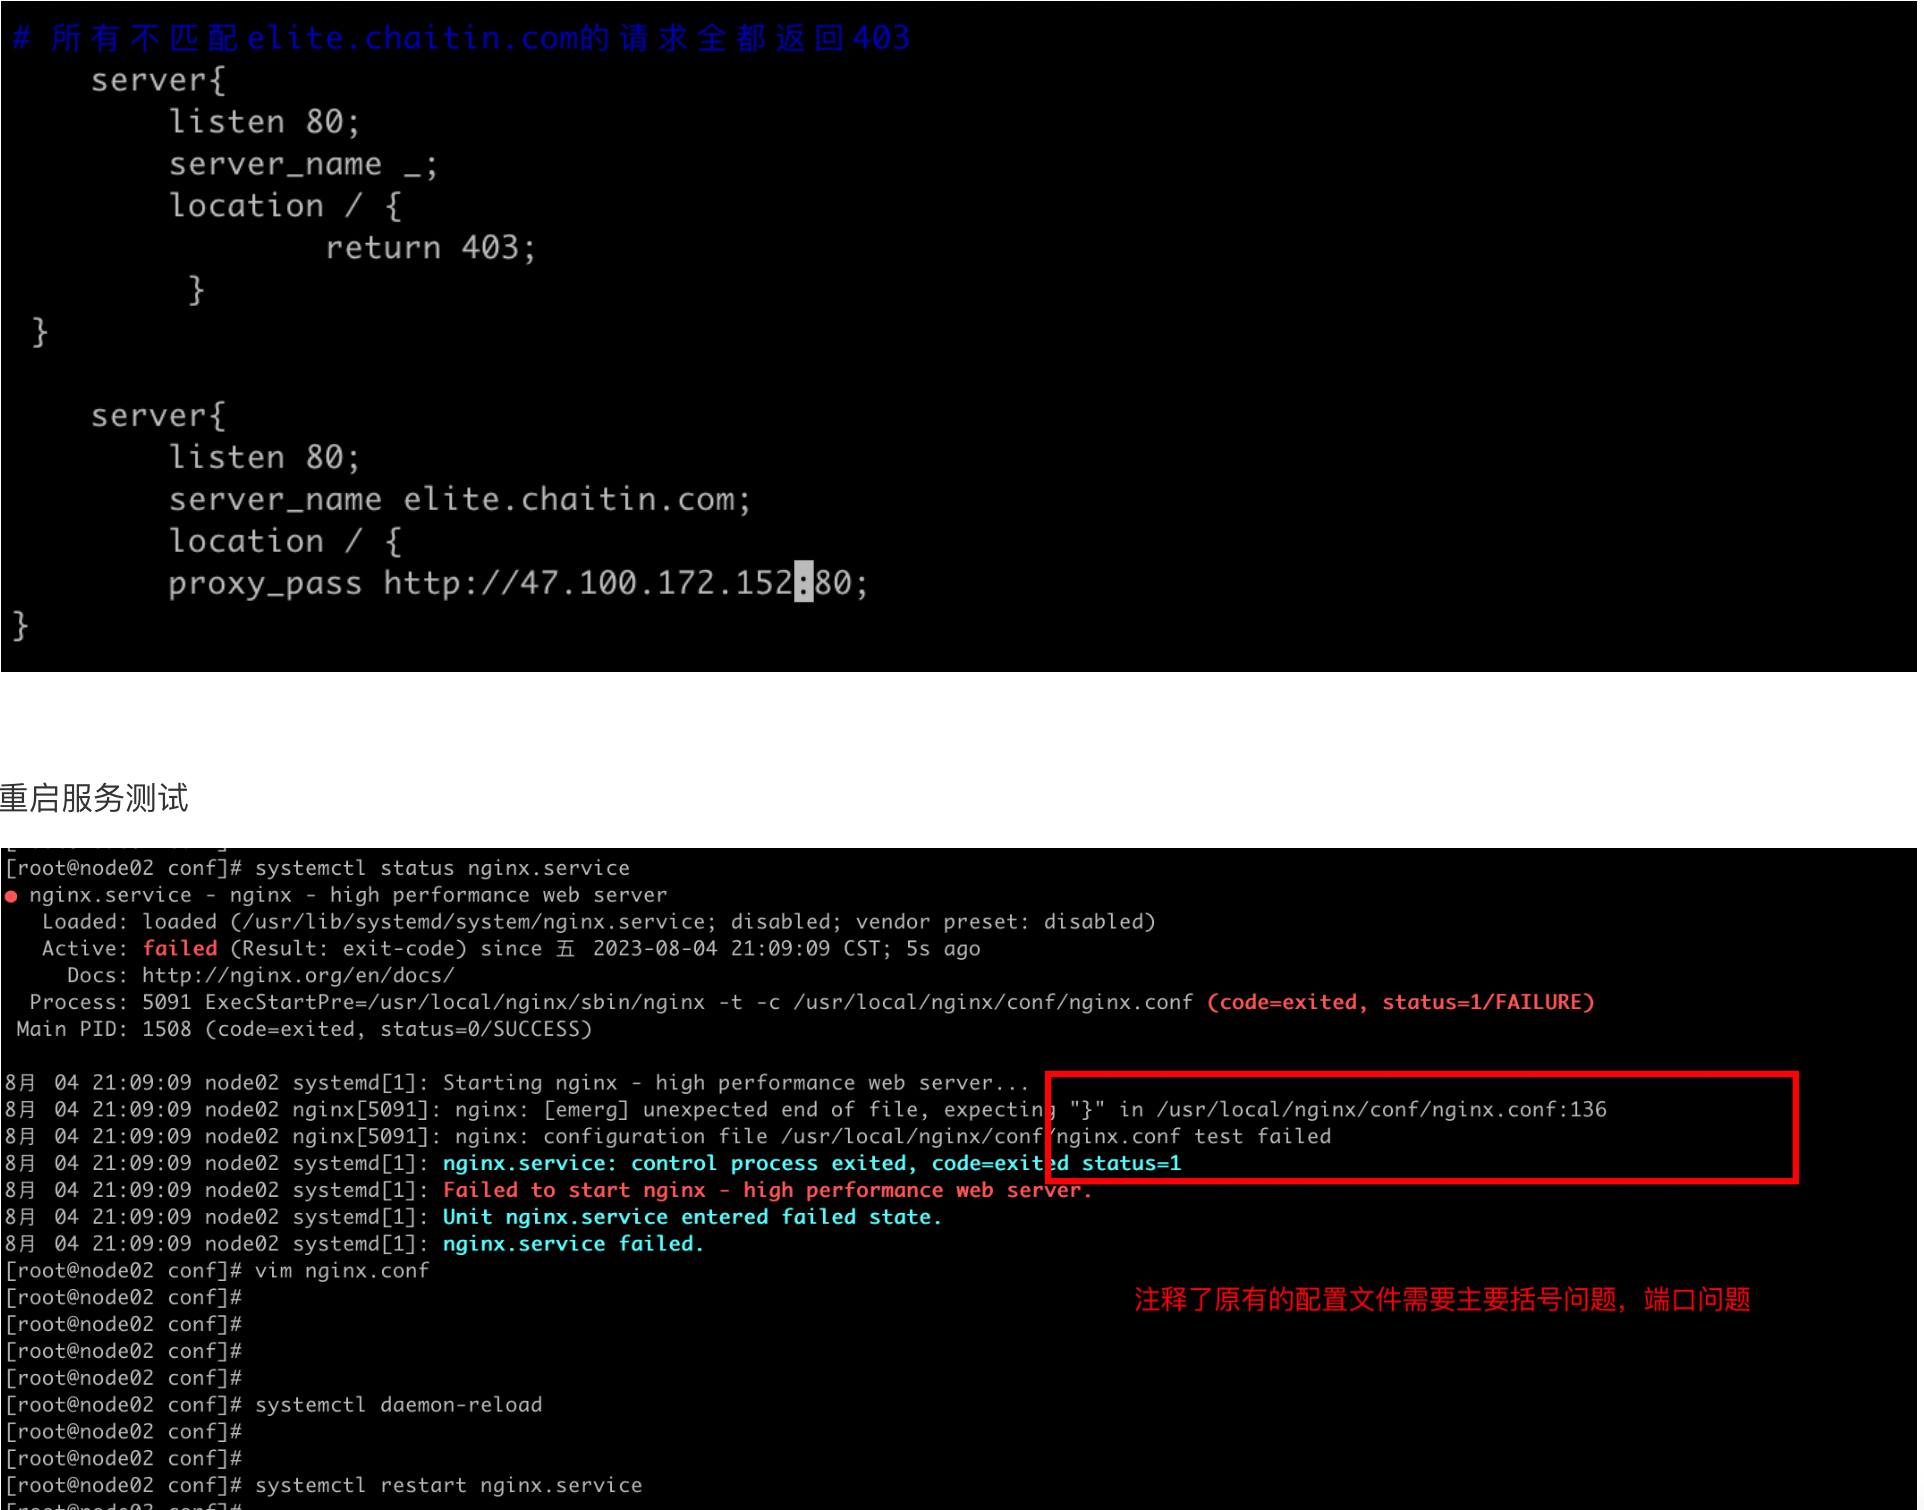
访问node02的IP看不到node01-server01界面

任务三,负载均衡
3、(加强提升题目)假设再加1套Web Server 2,其8080端口提供与Server 1相同服务,如何配置NGINX A实现访问http://elite.chaitin.com 的请求可以被负载分发到Server1或者Server2?
配置好server02后,需要将server01配置为只接受来⾃server02的访问,编辑server01的nginx.conf,在监听80端⼝的server块中添加allow和deny
 # node01 配置
 server{
        listen 80;
        server_name elite.chaitin.com;
        location / {
                root /usr/local/nginx/html;
                index index.html index.htm;
								allow 47.100.207.155;
								deny all;
        }
}
重启测试

访问主机node01的ip看不到server01界面,达到效果,访问域名,转发到node02对应的服务

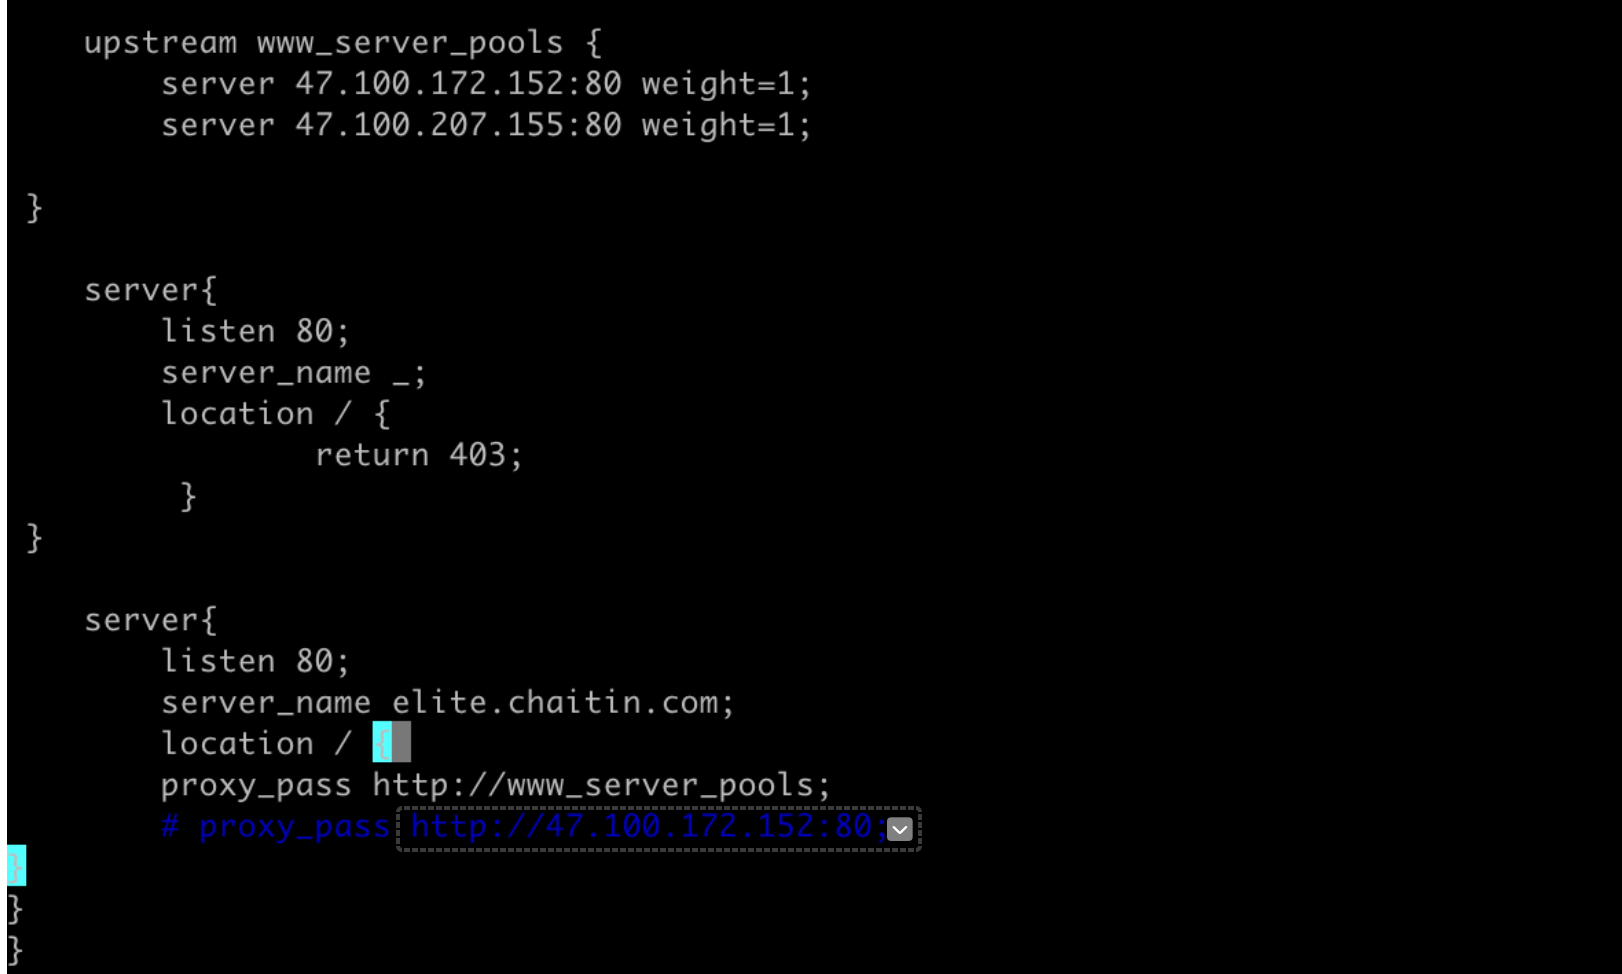
配置简单的负载均衡算法:轮训
 upstream www_server_pools {
        server 47.100.172.152:80 weight=1;
        server 47.100.207.155:80 weight=1;

 }

    server{
        listen 80;
        server_name _;
        location / {
                return 403;
         }
 }

    server{
        listen 80;
        server_name elite.chaitin.com;
        location / {
        proxy_pass http://www_server_pools;
        # proxy_pass http://47.100.172.152:80;
		}
	}
}
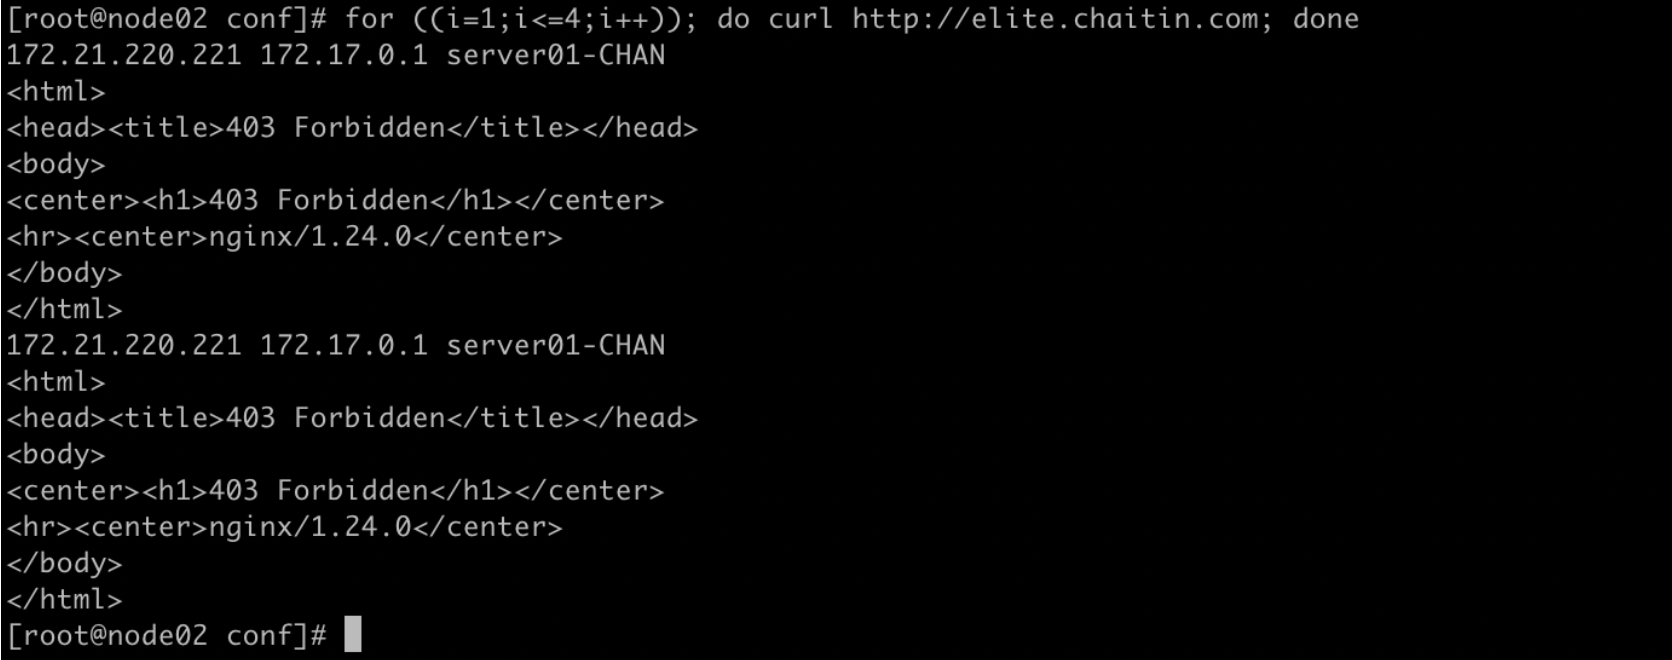
重启测试
[root@node02 conf]# systemctl daemon-reload
[root@node02 conf]# systemctl restart nginx.service
[root@node02 conf]# for ((i=1;i<=4;i++)); do curl http://elite.chaitin.com; done
任务四:负载均衡其他算法
4、(加强提升题目)在上文题目3基础之上,配置和验证NGINX支持哪些负载均衡算法及其效果?并结合NGINX配置参数详细说明不同负载均衡算法工作原理
常用调动算法
①. 定义轮询调度算法-rr-默认调度算法
②. 定义权重调度算法-wrr
③. 定义静态调度算法-ip_hash
该调度算法可以解决动态网页的session共享问题
④. 定义最小的连接数-least_conn
# 基本配置
upstream www_server_pools {
	# upstream是关键字必须有,后面的www_server_pools为一个Upstream集群组的名字,可以自己起名, 调用时就用这个名字
	server 192.168.0.223:80 weight=5;
	server 192.168.0.224:80 weight=10;
	server 192.168.0.225:80 weight=15;
	#server关键字是固定的,后面可以接域名(门户会用)或IP。如果不指定端口,默认是80端口。weight代 表权重,数值越大被分配的请求越多,结尾有分号。
}

# 比较完整的配置
upstream www_server_pools {
server 192.168.0.223; #这行标签和下行是等价的
server 192.168.0.224:80 weight=1 max_fails=1 fail_timeout=10s; #这行标签和上 一行是等价的,此行多余的部分就是默认配置,不写也可以。
server 192.168.0.225:80 weight=1 max_fails=2 fail_timeout=20s backup; # server最后面可以加很多参数,具体参数作用看下文的表格 }
算法:最小连接数
upstream elite.chaitin.com{
 		least_conn;
 		server 47.100.172.152:80;
 		server 47.100.207.155:80;
 }
算法:权重
upstream elite.chaitin.com{
	  server 47.100.172.152:80 weight=1;
 		server 47.100.207.155:80 weight=5;
 }
任务五:高可用
5、在上文题目2基础之上,增加节点NGINX B,如何配置实现高可用?demo演示当NGINX A故障时,流量自动切换到NGINX B(客户端访问几乎无感知)。详细说明VRRP协议在本题所述场景下的应用
环境准备
搭建双主高可用服务,首先需要有两台阿里云服务器,然后在阿里云控制台-申请一个高可用虚拟IP,这个IP需要在keepalived中配置
nginx+keepalived
两台服务器上分别部署nginx和keepalived,部署方式略,其中一台keepalived配置如下 ,其中virtual_ipaddress就是自己申请的虚拟ip,unicast_src_ip是本机的ip,unicast_peer是另一台的ip,router_id需要不一致,smtp_server是网关ip,smtp_connect_timeout是超时时间,这个要自己学习一下keepalive的用法,这里不做多余解释。
script "/etc/keepalived/nginx_check.sh"这个需要自己编写脚本

! Configuration File for keepalived

vrrp_script chk_nginx {
    script "/etc/keepalived/nginx_check.sh"
    interval 5
    weight -5
    fall 3
    rise 2
}

global_defs {
   notification_email {
     acassen@firewall.loc
     failover@firewall.loc
     sysadmin@firewall.loc
   }
   notification_email_from Alexandre.Cassen@firewall.loc
   smtp_server 47.100.172.152
   smtp_connect_timeout 10
   router_id LVS_DEVEL
   vrrp_skip_check_adv_addr

  # vrrp_strict

   vrrp_garp_interval 0
   vrrp_gna_interval 0
}

vrrp_instance VI_1 {
    state MASTER
    interface eth0
    virtual_router_id 51
    priority 100
    advert_int 1
    authentication {
        auth_type PASS
        auth_pass 1111
    }
    unicast_src_ip 172.26.168.166
    unicast_peer {
      172.26.168.165
    }
    virtual_ipaddress {
        xxxx.xxxx.xxxx.xxxx
    }

   track_script {
    chk_nginx
   }
}
另一台
! Configuration File for keepalived

vrrp_script chk_nginx {
    script "/etc/keepalived/nginx_check.sh"
    interval 5
    weight -5
    fall 3
    rise 2
}

global_defs {
   notification_email {
     acassen@firewall.loc
     failover@firewall.loc
     sysadmin@firewall.loc
   }
   notification_email_from Alexandre.Cassen@firewall.loc
   smtp_server 172.26.168.1
   smtp_connect_timeout 10
   router_id LVS_DEVEL2
   vrrp_skip_check_adv_addr

  # vrrp_strict

   vrrp_garp_interval 0
   vrrp_gna_interval 0
   script_user root
}

vrrp_instance VI_1 {
    state BACKUP
    interface eth0
    virtual_router_id 51
    priority 90
    advert_int 1
    authentication {
        auth_type PASS
        auth_pass 1111
    }
    unicast_src_ip 172.26.168.165
    unicast_peer {
      172.26.168.166
    }
    virtual_ipaddress {
      172.26.168.168
    }

   track_script {
    chk_nginx
   }
}
脚本,其中某服务名代表自己需要高可用的服务名称,如果其中一台某个服务挂了,就让当前的keepalived一起挂掉,保证服务迁移。这里面的服务都是用docker部署的
#!/bin/bash
#检测nginx是否存活的脚本
A=`docker ps -q -f "name=某服务名" | grep -v grep | wc -l`
B=`docker ps -q -f "name=某服务名" | grep -v grep | wc -l`
C=`docker ps -q -f "name=某服务名" | grep -v grep | wc -l`
D=`docker ps -q -f "name=某服务名" | grep -v grep | wc -l`
if [ $B -eq 0 ];then
  sleep 2
  if [ $B -eq 0 ];then
      systemctl stop keepalived
  fi
  elif [ $B -eq 0 ];then
      sleep 2
      if [ $B -eq 0 ];then
          systemctl stop keepalived
      fi
  elif [ $C -eq 0 ];then
      sleep 2
      if [ $C -eq 0 ];then
          systemctl stop keepalived
      fi
  elif [ $D -eq 0 ];then
      sleep 2
      if [ $D -eq 0 ];then
          systemctl stop keepalived
      fi
fi
任务六:健康检查
6、(加强提升题目)在上文题目3基础之上,配置和验证主动和被动两种健康检查方式及其效果?并结合NGINX配置参数详细说明不同健康检查方式区别和工作原理
健康检查方式
keepalived具有很强大、灵活的后端检测方式,其具有
HTTP_GET|SSL_GET|TCP_CHECK|SMTP_CHECK|MISC_CHECK 几种健康检测方式
TCP_CHECK:工作在第4层,keepalived向后端服务器发起一个tcp连接请求,如果后端服务器没有响应或 超时,那么这个后端将从服务器池中移除。

HTTP_GET:工作在第5层,向指定的URL执行http请求,将得到的结果用md5加密并与指定的md5值比较看是 否匹配,不匹配则从服务器池中移除;此外还可以指定http返回码来判断检测是否成功。HTTP_GET可以指定 多个URL用于检测,这个一台服务器有多个虚拟主机的情况下比较好用。

SSL_GET:跟上面的HTTP_GET相似,不同的只是用SSL连接

MISC_CHECK:用脚本来检测,脚本如果带有参数,需将脚本和参数放入双引号内。脚本的返回值需为: 0) 检测成功 1) 检测失败,将从服务器池中移除 2-255)检测成功;如果有设置misc_dynamic,权重自动调整为 退出码-2,如退出码为200, 权重自动调整为198=200-2。

SMTP_CHECK:用来检测邮件服务的smtp的
相关配置
delay_loop 隔多长时间做一次健康检测,单位为秒
connect_timeout 连接超时时间,单位为秒
nb_get_retry 检测失败后的重试次数,如果达到重试次数仍然失败,将后端从服务器池中移除。
delay_before_retry 失败重试的间隔时间,单位为秒
TCP检查方式
TCP_CHECK {
connect_timeout 5 #连接超时时间
nb_get_retry 3#重连次数
delay_before_retry 3 #重连间隔时间
connect_port 80 #健康检查的端口
} # TCP_CHECK
HTTP_GET|SSL_GET
HTTP_GET | SSL_GET
{
 url {
 path /# HTTP/SSL 检查的url 可以是多个
 digest <STRING> # HTTP/SSL 检查后的摘要信息 用工具genhash生成
 status_code 200# HTTP/SSL 检查返回的状态码
 }
 connect_port 80 # 连接端口
 bindto <IPADD>
 connect_timeout 3 # 连接超时时间
 nb_get_retry 3 # 重连次数
 delay_before_retry 2 #连接间隔时间
 }
 # END OF HTTP_GET|SSL_GET
1)、两者都有两种检测方式,一种是简单的基于返回码确认;另一种是基于确认后端页面内容hash值,确认前 后是否发生变化(是不是感觉有点高端,还有简单的防止页面被篡改的作用,当然,动态页面显然不行);
2)、两者都是处理简单的GET请求,基于post返回值确认是否正常,这种方法显然不适用 ,不过POST方式是 可以通过MISC_CHECK方式进行支持检测的;
3)、两者配置语法上相同,只不过类型名不同而已 。同属于大的web请求范畴,只不过一个走的HTTP协议, 一个走的HTTPS协议;
Docker实战
1、docker、docker-compose安装
在Centos系统下,分别使用在线和离线两种方式安装docker和docker-compose
1.1 在线安装
步骤一:下载Docker源
[root@node01 ~]# yum-config-manager \
    --add-repo \
    http://mirrors.aliyun.com/docker-ce/linux/centos/docker-ce.repo

[root@node01 ~]# ll /etc/yum.repos.d/
total 12
-rw-r--r-- 1 root root  675 Jul 10 15:24 CentOS-Base.repo
-rw-r--r-- 1 root root 1919 Jul 31 22:46 docker-ce.repo
-rw-r--r-- 1 root root  230 Jul 10 15:24 epel.repo
步骤二:在线安装最新版本Docker
[root@node01 ~]# yum install docker-ce docker-ce-cli containerd.io
步骤三:启动并设置为开机自启动
[root@node01 ~]# systemctl enable --now docker.service
Created symlink from /etc/systemd/system/multi-user.target.wants/docker.service to /etc/systemd/system/docker.service.
步骤四:在线安装docker-compose
[root@node02 ~]# yum install docker-compose.noarch -y
1.2 离线安装
1.2.1 卸载docker docker-compose
# 用之前写的脚本docker-uninstall.sh卸载
cat > docker-uninstall.sh << EOF
#!/bin/bash
yum remove -y docker \
docker-client \
docker-client-latest \
docker-common \
docker-latest \
docker-latest-logrotate \
docker-logrotate \
docker-selinux \
docker-engine-selinux \
docker-engine \
docker-ce

# 删除docker的目录

rm -rf /etc/docker
rm -rf /run/docker
rm -rf /var/lib/dockershim

#删除docker的镜像文件
rm -rf /var/lib/docker

ps -ef|grep docker|grep -v grep|xargs kill -s 9

#卸载docker相关包
yum remove -y docker-*

yum remove -y docker-ce-cli-*
yum remove -y docker-scan-plugin*

# 删除旧版docker-compose
rm -rf /usr/local/bin/docker-compose
rm -rf /usr/bin/docker-compose

# 重启服务器
reboot
EOF


cat > docker-uninstall-v2.sh << EOF
#!/bin/bash
echo "start uninstalling  docker"
echo "======================================="
# 停止docker服务
sudo systemctl stop docker

# 杀死docker进程(为防止特殊情况下有残留的docker进程)
# ps -ef | grep docker | awk '{print $2}' | xargs sudo kill -s 9

# 删除执行状态文件的根目录
sudo rm -rf /run/docker

# 删除系统服务配置文件
sudo rm -rf /etc/systemd/system/docker.service

# 删除docker配置文件
sudo rm -rf /etc/docker
sudo rm -rf /usr/bin/docker
sudo rm -rf /usr/bin/docker-containerd
sudo rm -rf /usr/bin/docker-containerd-ctr
sudo rm -rf /usr/bin/docker-containerd-shim
sudo rm -rf /usr/bin/docker-init
sudo rm -rf /usr/bin/docker-proxy
sudo rm -rf /usr/bin/docker-runc
sudo rm -rf /usr/bin/dockerd
#重新加载配置文件
systemctl daemon-reload

echo "docker uninstalled successfully"
EOF
添加执行权限并执行
[root@node01 ~]# chmod +x docker-uninstall.sh

[root@node01 ~]# ./docker-uninstall.sh
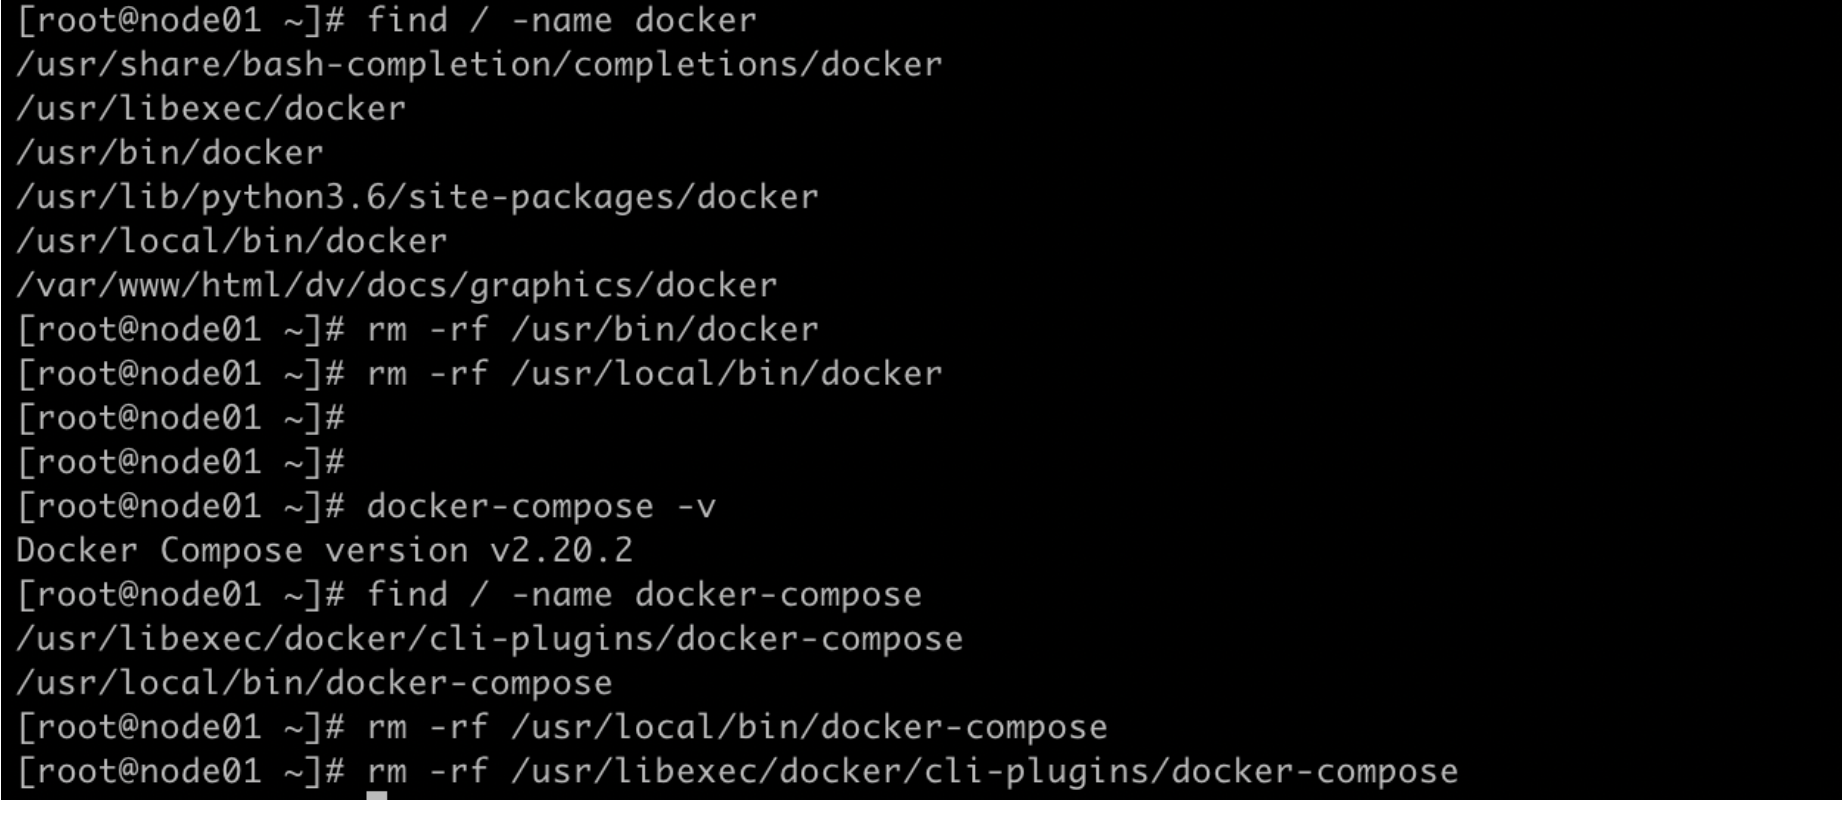
验证:
[root@node01 ~]# docker -v

[root@node01 ~]# docker-compose -v

1.2.2 离线安装docker
步骤一:源码包下载
[root@node01 ~]# wget -c https://download.docker.com/linux/static/stable/x86_64/docker-24.0.4.tgz

步骤二:解压到指定路径
[root@node01 ~]# tar xf  docker-24.0.4.tgz -C /usr/bin/
[root@node01 ~]# cd /usr/bin/
[root@node01 bin]# ll -d docker/
drwxrwxr-x 2 1000 rvm 4096 7月   7 22:53 docker/
步骤三:配置服务启动脚本
# vim /etc/systemd/system/docker.service
# 添加
[Unit]
Description=Docker Application Container Engine
Documentation=https://docs.docker.com
After=network-online.target firewalld.service
Wants=network-online.target

[Service]
Type=notify
ExecStart=/usr/bin/dockerd
ExecReload=/bin/kill -s HUP $MAINPID
LimitNOFILE=infinity
LimitNPROC=infinity
TimeoutStartSec=0
Delegate=yes
KillMode=process
Restart=on-failure
StartLimitBurst=3
StartLimitInterval=60s

[Install]
WantedBy=multi-user.target
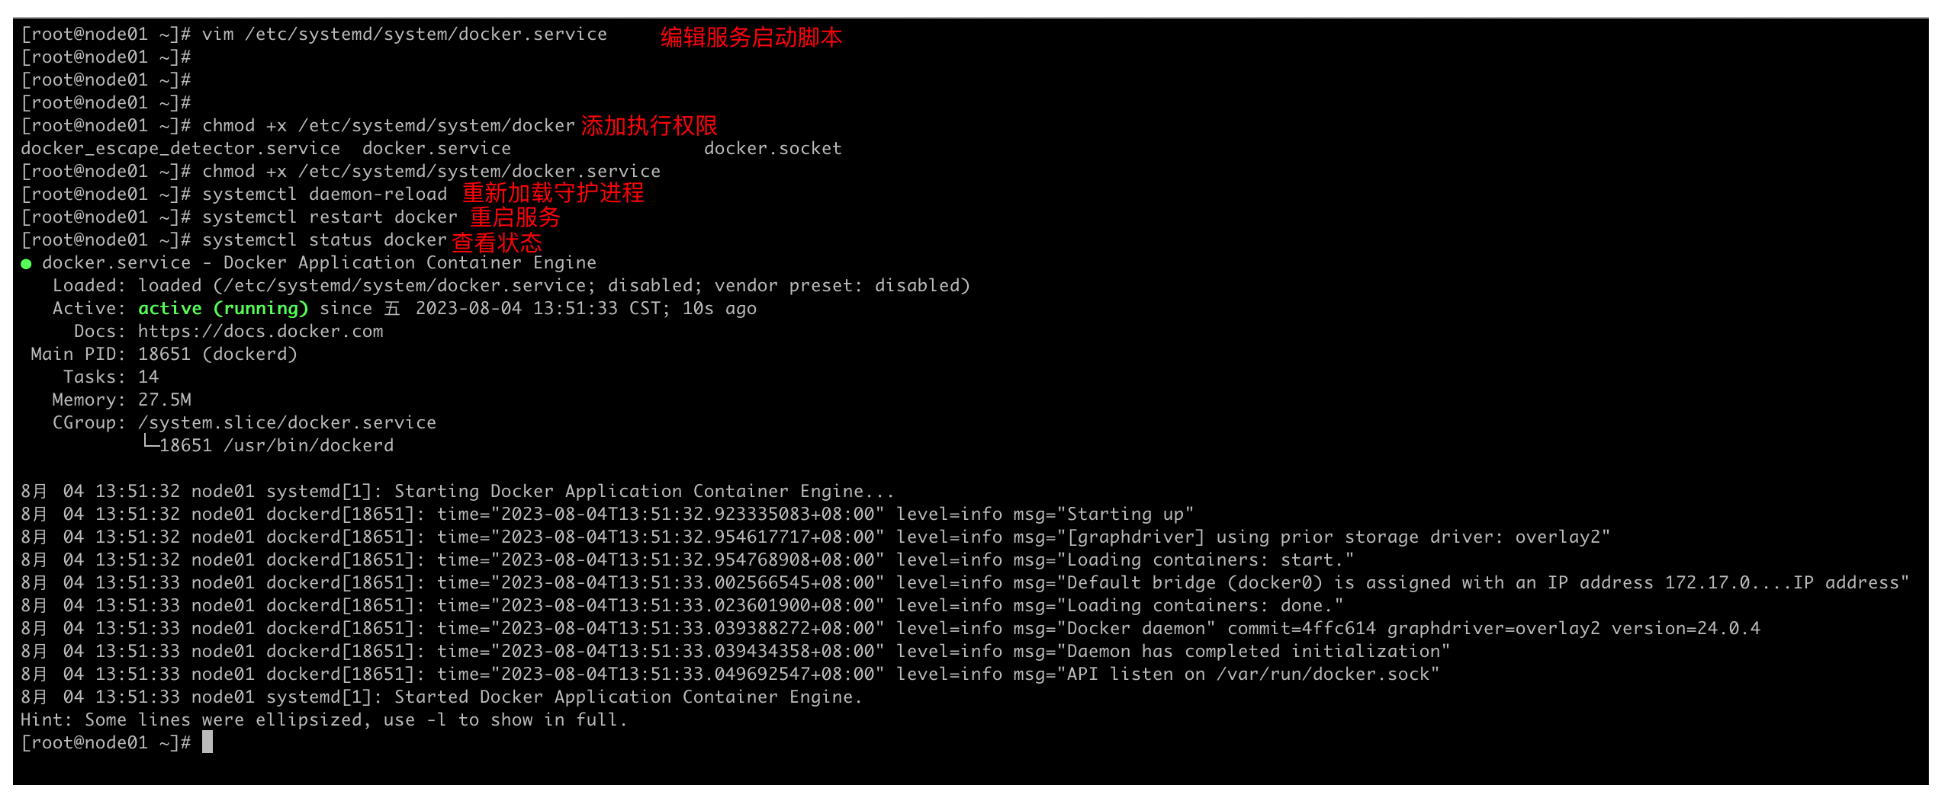
步骤四:添加执行权限并验证
[root@node01 ~]# chmod +x /etc/systemd/system/docker
docker_escape_detector.service  docker.service                  docker.socket
[root@node01 ~]# chmod +x /etc/systemd/system/docker.service
[root@node01 ~]# systemctl daemon-reload
[root@node01 ~]# systemctl restart docker
[root@node01 ~]# systemctl status docker
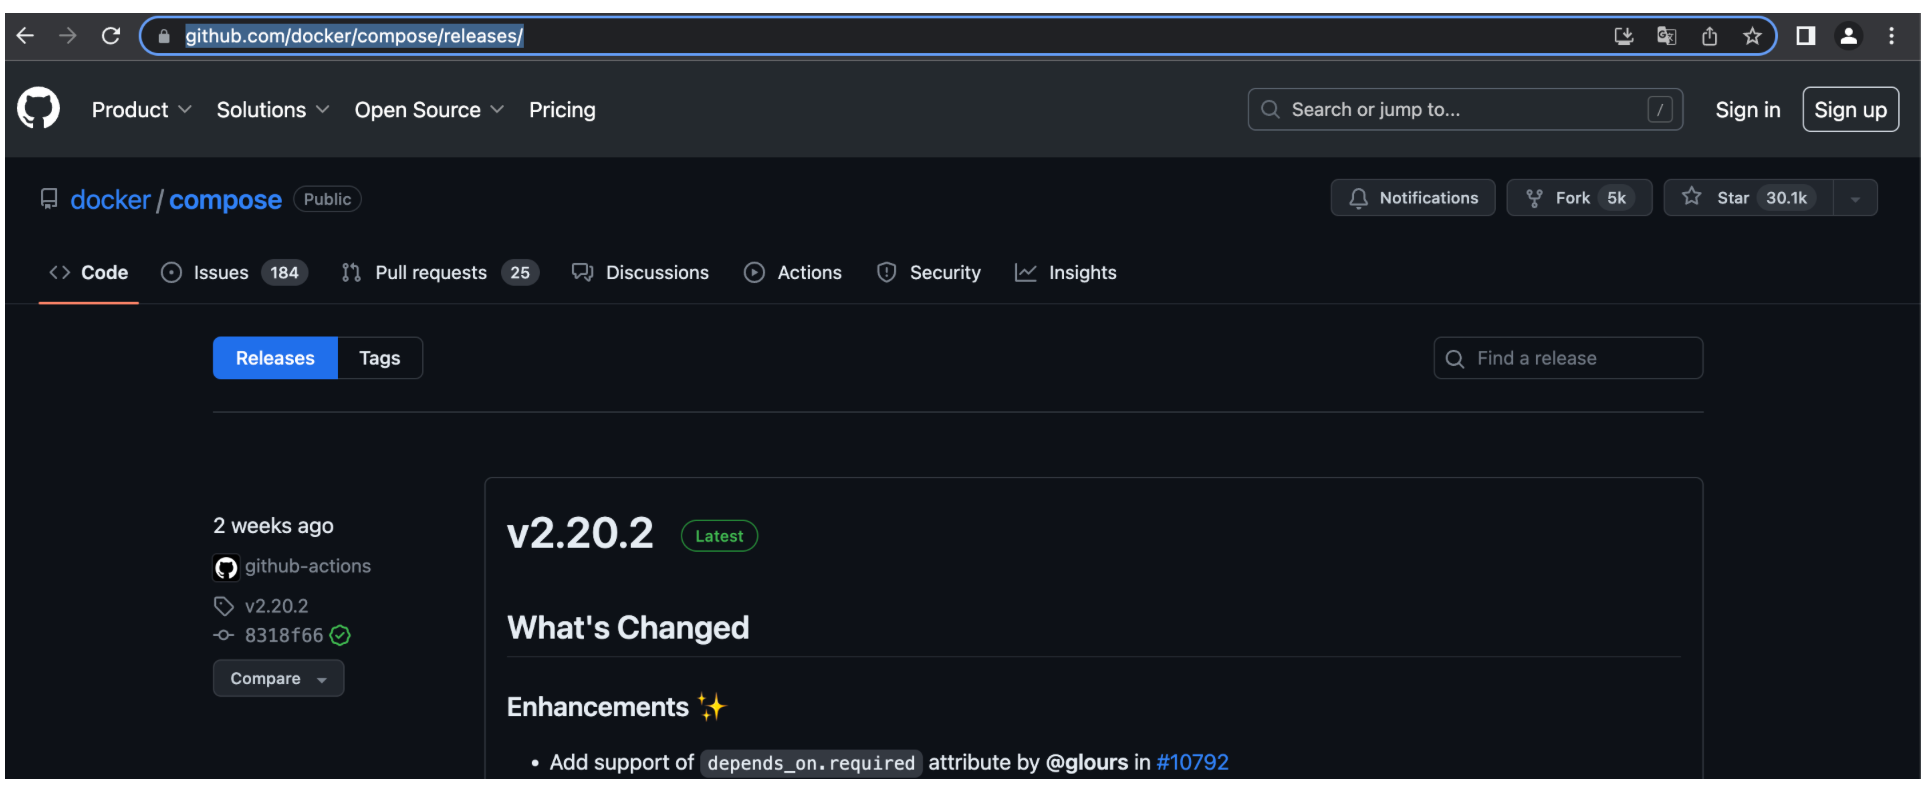
1.2.3 离线安装 docker-compose
GitHub地址:https://github.com/docker/compose/releases/
官网地址:https://docs.docker.com/compose/install/linux/#install-using-the-repository
步骤一:GitHub下载包到本地
[root@node01 ~]# wget -c https://github.com/docker/compose/releases/download/v2.20.2/docker-compose-linux-x86_64
步骤二:移动到服务启动脚本并加执行权限
[root@node01 ~]# chmod +x docker-compose-linux-x86_64

[root@node01 ~]# mv docker-compose-linux-x86_64 /usr/local/bin/docker-compose
[root@node01 ~]# cd /usr/local/bin/
[root@node01 bin]# ls
cloud-id    cloud-init-per  containerd-shim          ctr     docker          jsondiff   jsonpointer  normalizer
cloud-init  containerd      containerd-shim-runc-v2  docker  docker-compose  jsonpatch  jsonschema   runc
步骤三:验证
[root@node01 bin]# docker-compose -v
Docker Compose version v2.20.2

2、应用
利用docker实现安装NGINX A,搭建Web Server,任意HTML页面,其8000端口提供Web访问服务,截图成功访问http(s)😕/[Server1]:8000并且回显Web页面
PS:本地映射的8000端口
[root@node02 ~]# docker ps -a | grep nginx
ac6df312c118   dsensor-nginx:latest         "nginx -g 'daemon of…"   2 weeks ago   Up 2 weeks                 0.0.0.0:80->80/tcp, :::80->80/tcp, 0.0.0.0:443->443/tcp, :::443->443/tcp, 0.0.0.0:1338->1338/tcp, :::1338->1338/tcp, 1935/tcp   dsensor_nginx
[root@node02 ~]# docker run -d --name nginx-web -p 8000:80 nginx
3cee024b85d682a69c439e6e81447e9444445218f1cce48f18ad06348d23f63f
[root@node02 ~]# docker port nginx-web
80/tcp -> 0.0.0.0:8000
80/tcp -> [::]:8000

3、Docker基础命令使用
- 搭建docker容器提供服务
端口被占用,先停掉其他的服务
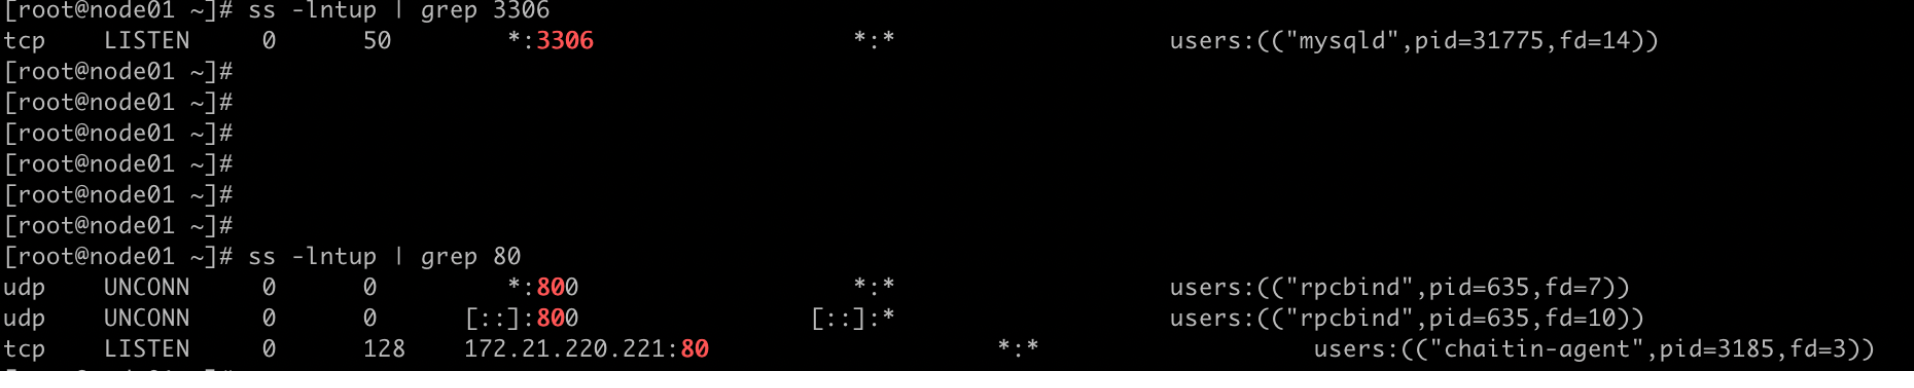
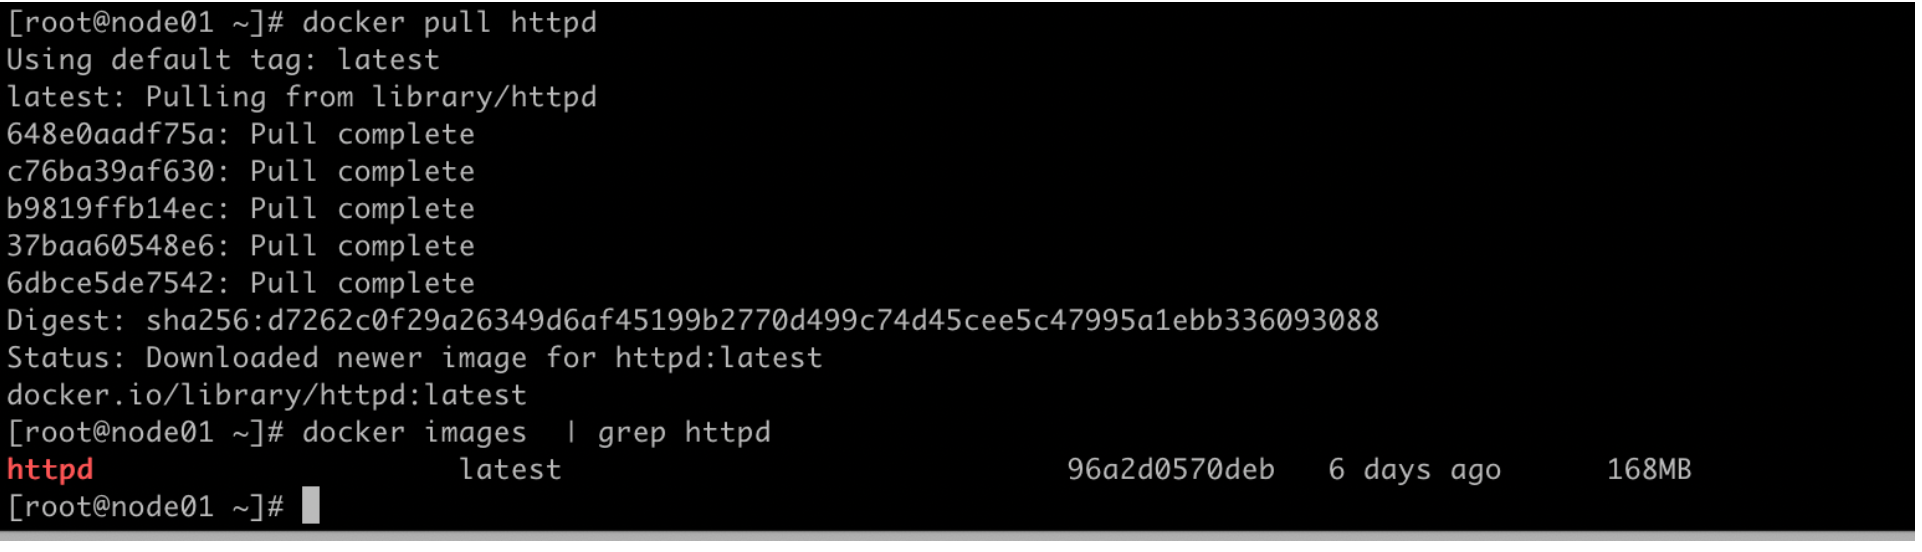
提供web服务,拉取镜像
[root@node01 ~]# docker pull httpd
[root@node01 ~]# docker images  | grep httpd
httpd                     latest                             96a2d0570deb   6 days ago      168MB
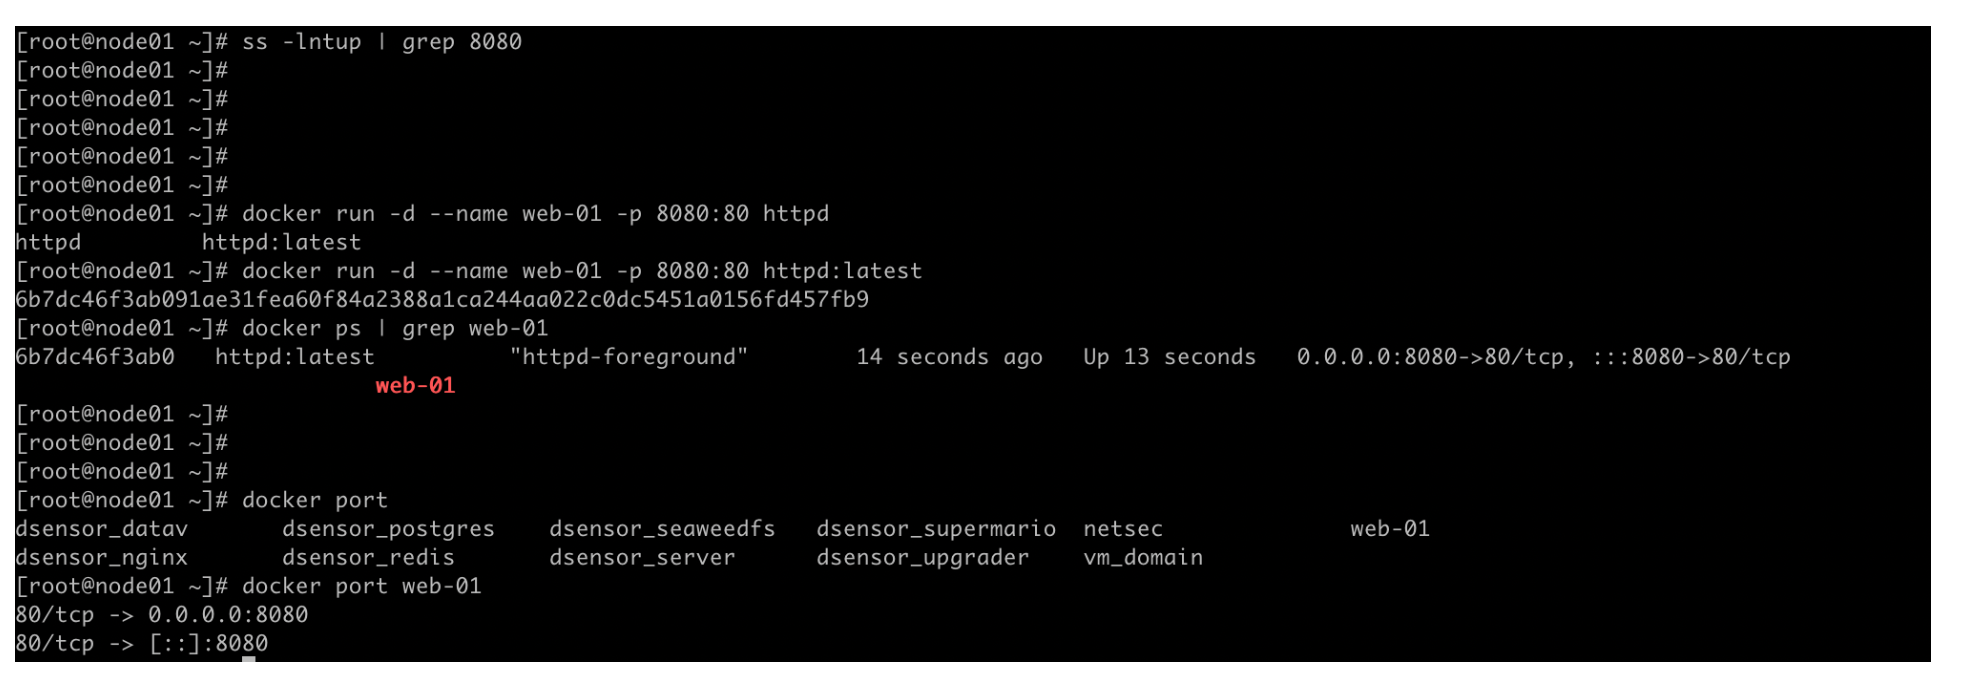
运行容器并映射端口
[root@node01 ~]# docker run -d --name web-02 -p 8081:80 httpd:latest
72e4b4f467e4e50cfb50c08c8c78fda15a7d4a7041f3e4ef78197101a9a4bb88
[root@node01 ~]# docker port web-02
80/tcp -> 0.0.0.0:8081
80/tcp -> [::]:8081
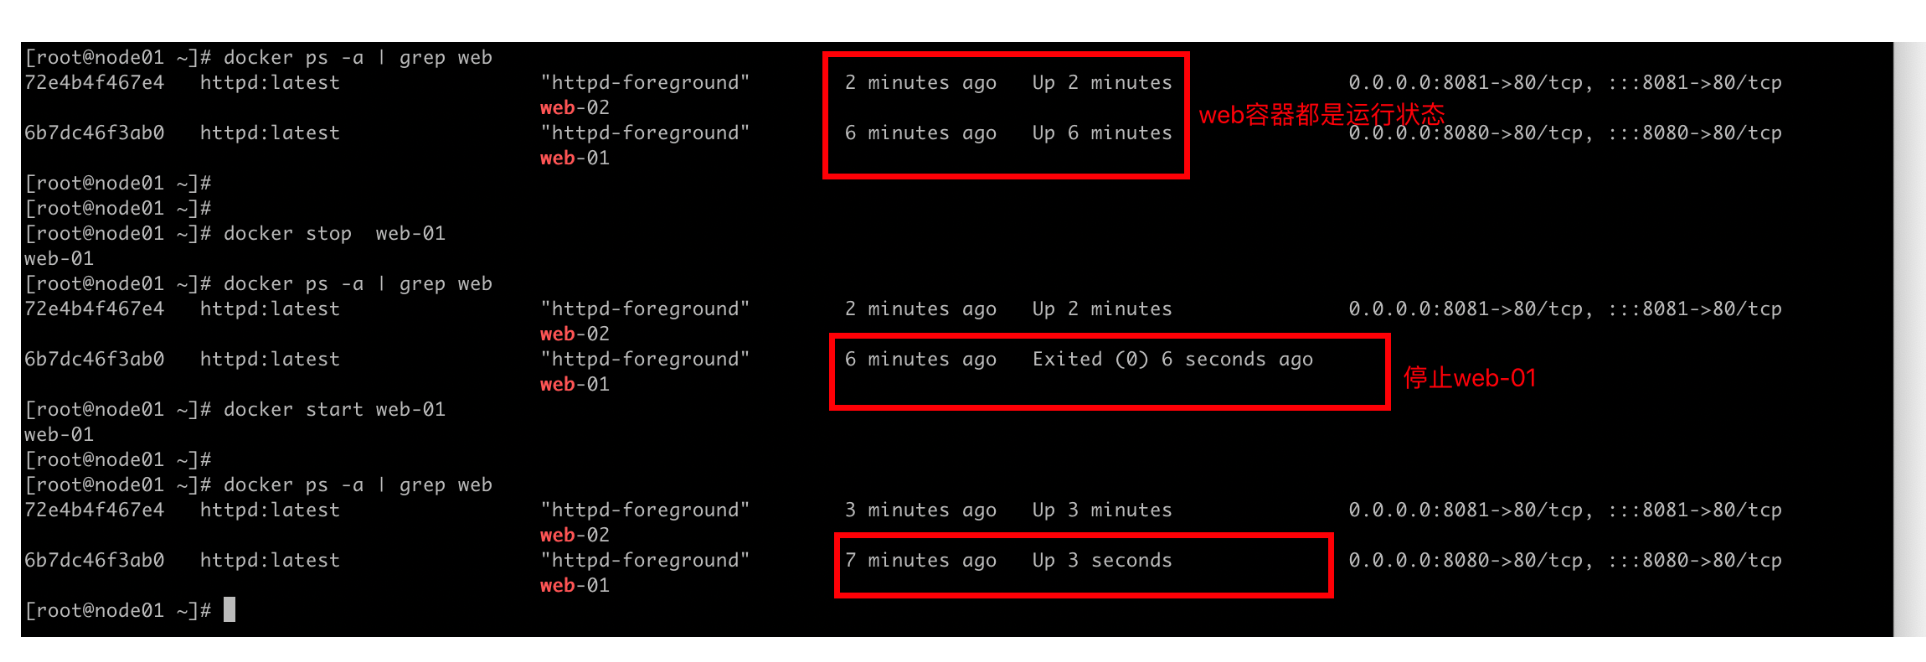
- 操作docker容器(启动、停止、删除、进入容器内部等)
# 容器的启动和停止
[root@node01 ~]# docker stop  web-01
web-01
[root@node01 ~]# docker start web-01
web-01
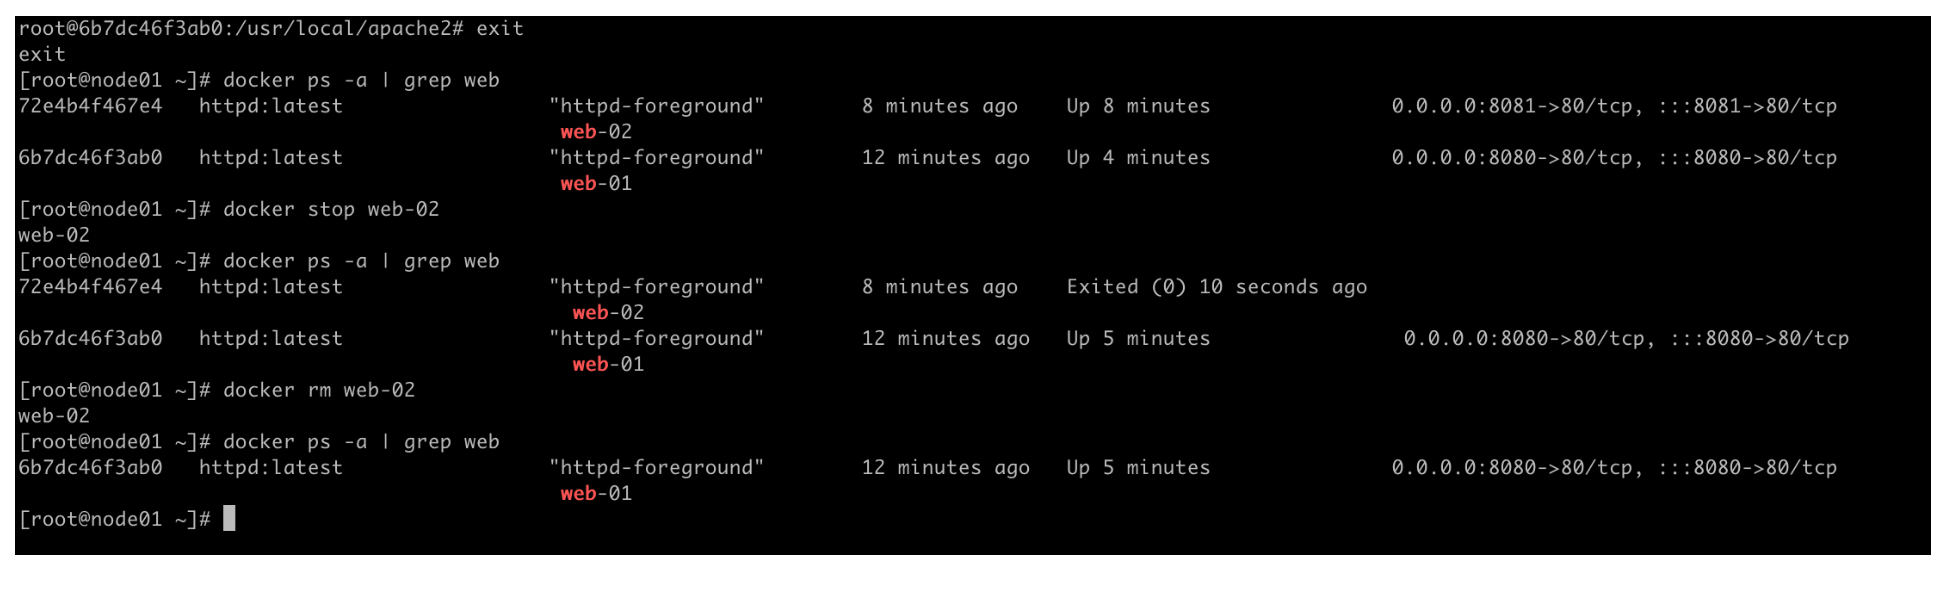
# 进入容器内部和删除
[root@node01 ~]# docker exec -it web-01 bash
root@6b7dc46f3ab0:/usr/local/apache2#
root@6b7dc46f3ab0:/usr/local/apache2# ls
bin  build  cgi-bin  conf  error  htdocs  icons  include  logs	modules

root@6b7dc46f3ab0:/usr/local/apache2# exit
exit
[root@node01 ~]# docker stop web-02
web-02
[root@node01 ~]# docker rm web-02
web-02

# 也可以强制删除一个运行着的容器
[root@node01 ~]# docker rm `docker ps -qa`
- 查看docker容器详细信息
[root@node01 ~]# docker inspect web-01
选项	说明
-f	指定返回值的模板文件。
-s	显示总的文件大小。
–type	为指定类型返回JSON。
[root@node01 ~]# docker inspect --help

Usage:  docker inspect [OPTIONS] NAME|ID [NAME|ID...]

Return low-level information on Docker objects

Options:
  -f, --format string   Format output using a custom template:
                        'json':             Print in JSON format
                        'TEMPLATE':         Print output using the given Go template.
                        Refer to https://docs.docker.com/go/formatting/ for more information about formatting output with templates
  -s, --size            Display total file sizes if the type is container
      --type string     Return JSON for specified type
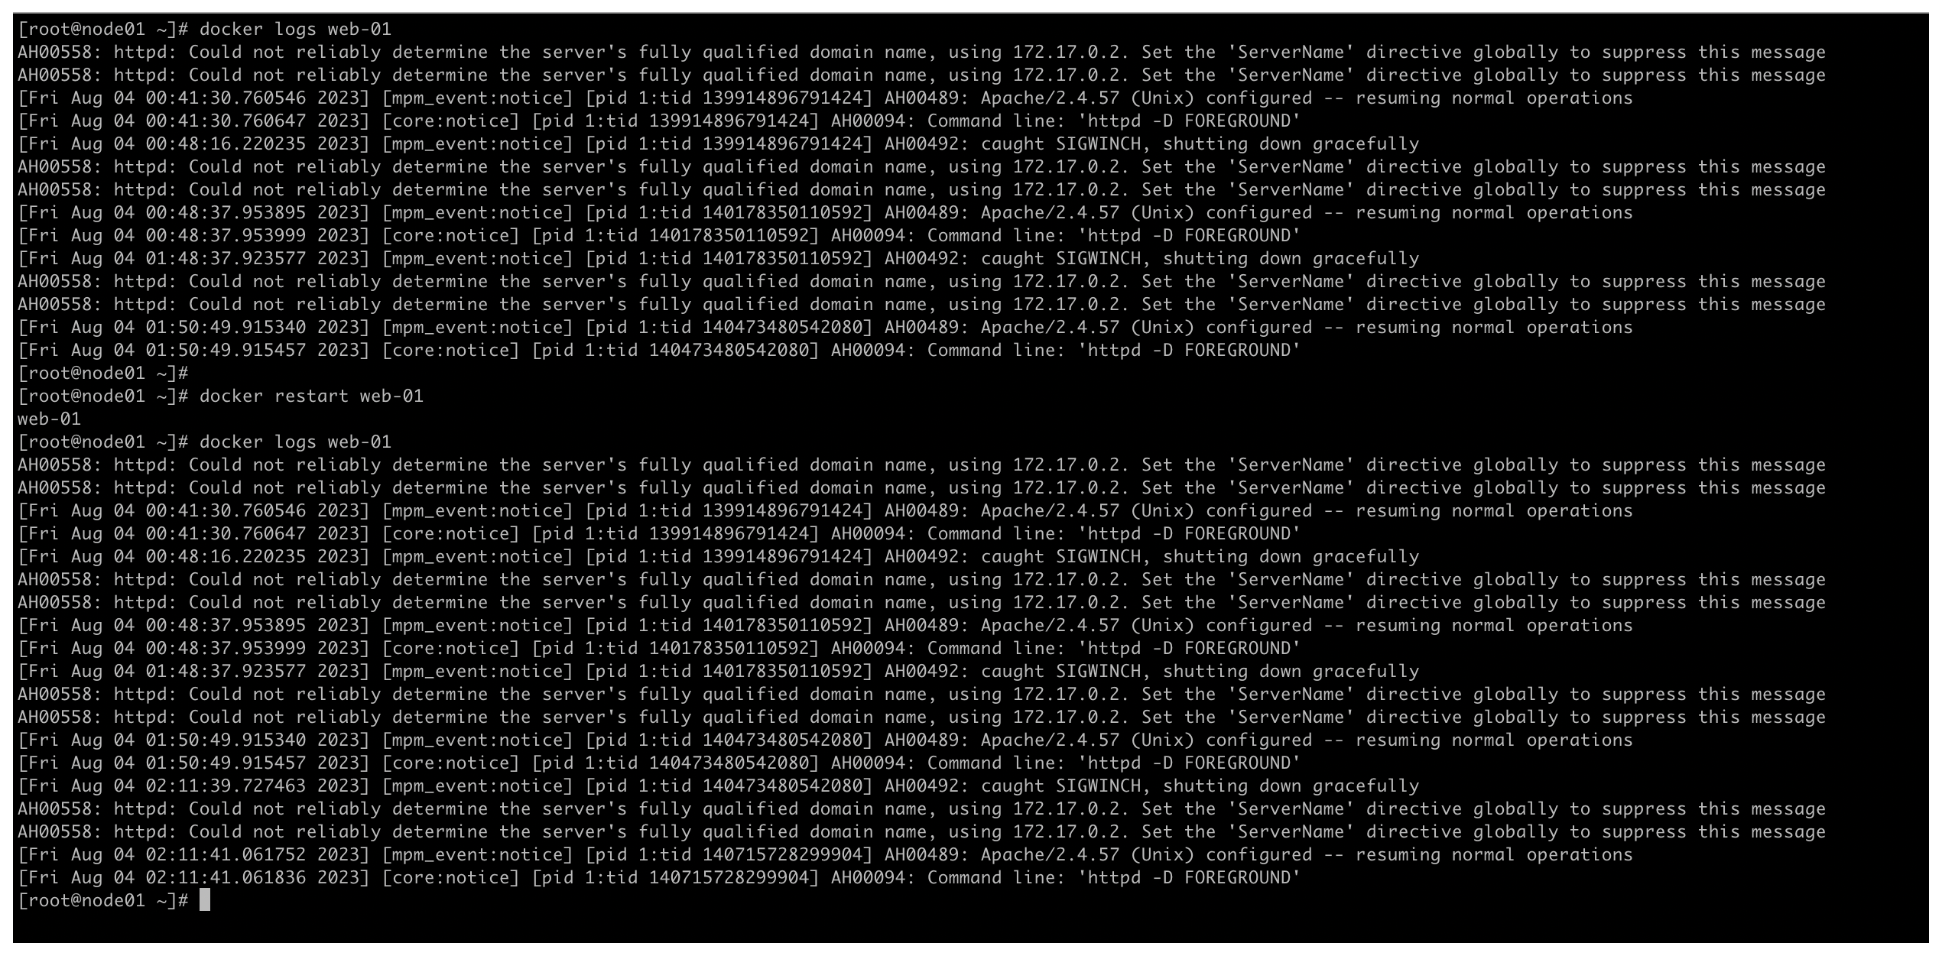
- 查看docker容器日志(包含实时查看)
[root@node01 ~]# docker logs web-01
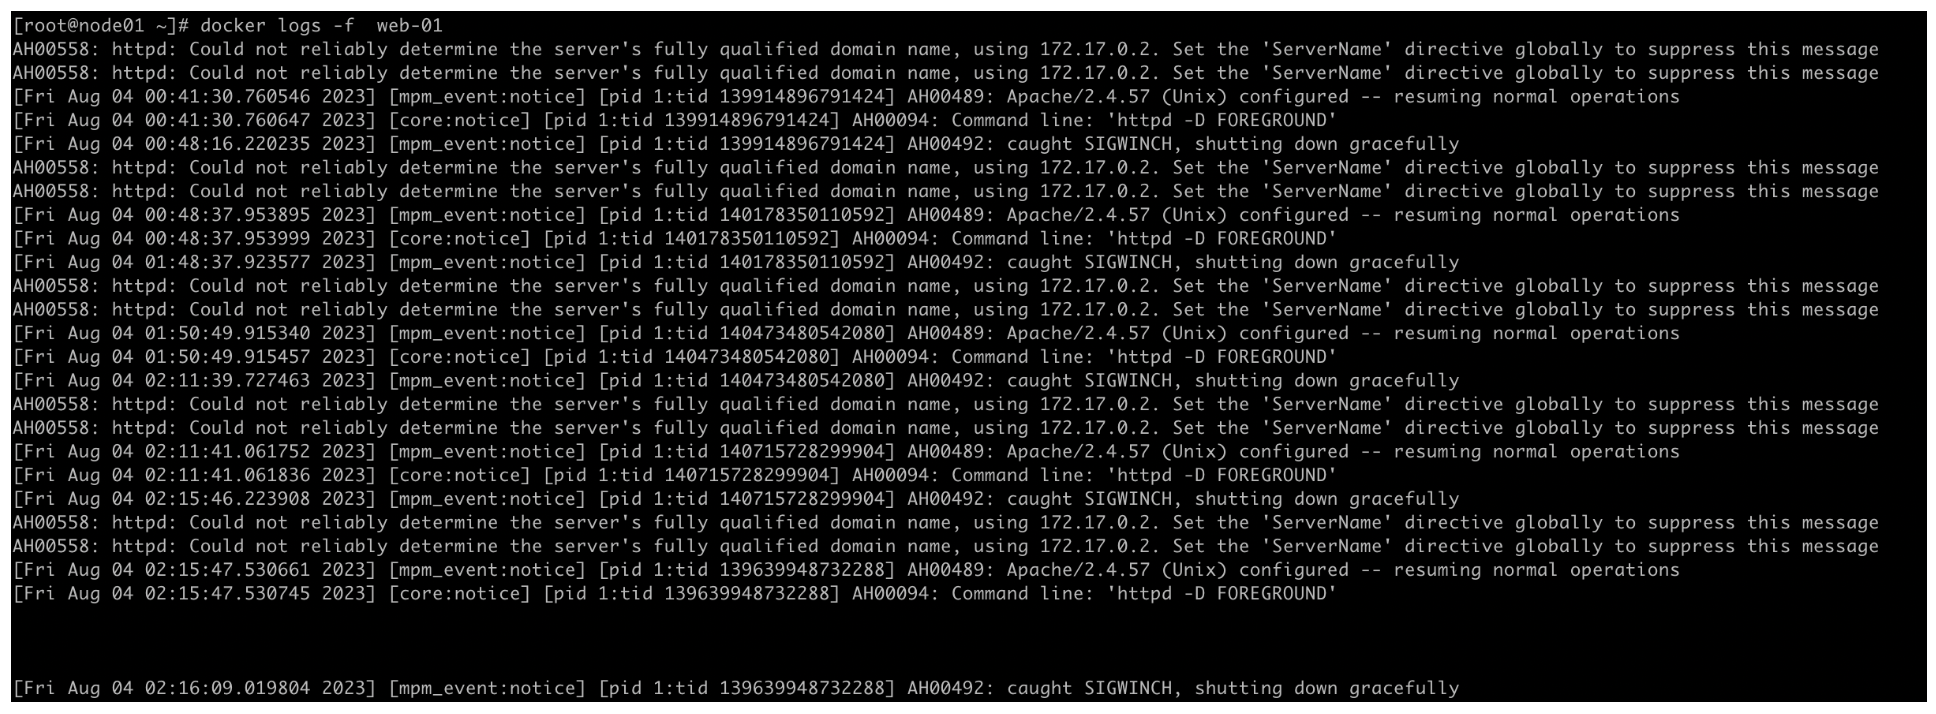
实时追踪日志
[root@node01 ~]# docker logs -f web-01
- 查看docker network信息
[root@node01 ~]# docker network ls
NETWORK ID     NAME               DRIVER    SCOPE
b54bc86f5549   bridge             bridge    local
33e8595a6d6c   d-sensor_default   bridge    local
d2007b2d7a47   honey_orphanage    bridge    local
0948fed97cc7   host               host      local
9a93dcc91b8b   none               null      local
| Docker网络模式 | 配置 | 说明 |
|---|---|---|
| host模式 | –net=host | 容器和宿主机共享Network namespace。容器将不会虚拟出自己的网卡,配置自己的IP等,而是使用宿主机的IP和端口。 |
| container模式 | –net=container:NAME_or_ID | 容器和另外一个容器共享Network namespace。创建的容器不会创建自己的网卡,配置自己的IP,而是和一个指定的容器共享IP、端口范围 |
| bridge模式 | –net=bridge | (默认为该模式)此模式会为每一个容器分配、设置IP等,并将容器连接到一个docker0虚拟网桥,通过docker0网桥以及Iptables nat表配置与宿主机通信。 |
| none模式 | –net=none | 该模式关闭了容器的网络功能。 |
- 批量操作docker容器(批量停止、删除等)
批量停止容器
[root@node01 ~]# docker stop `docker ps -qa `
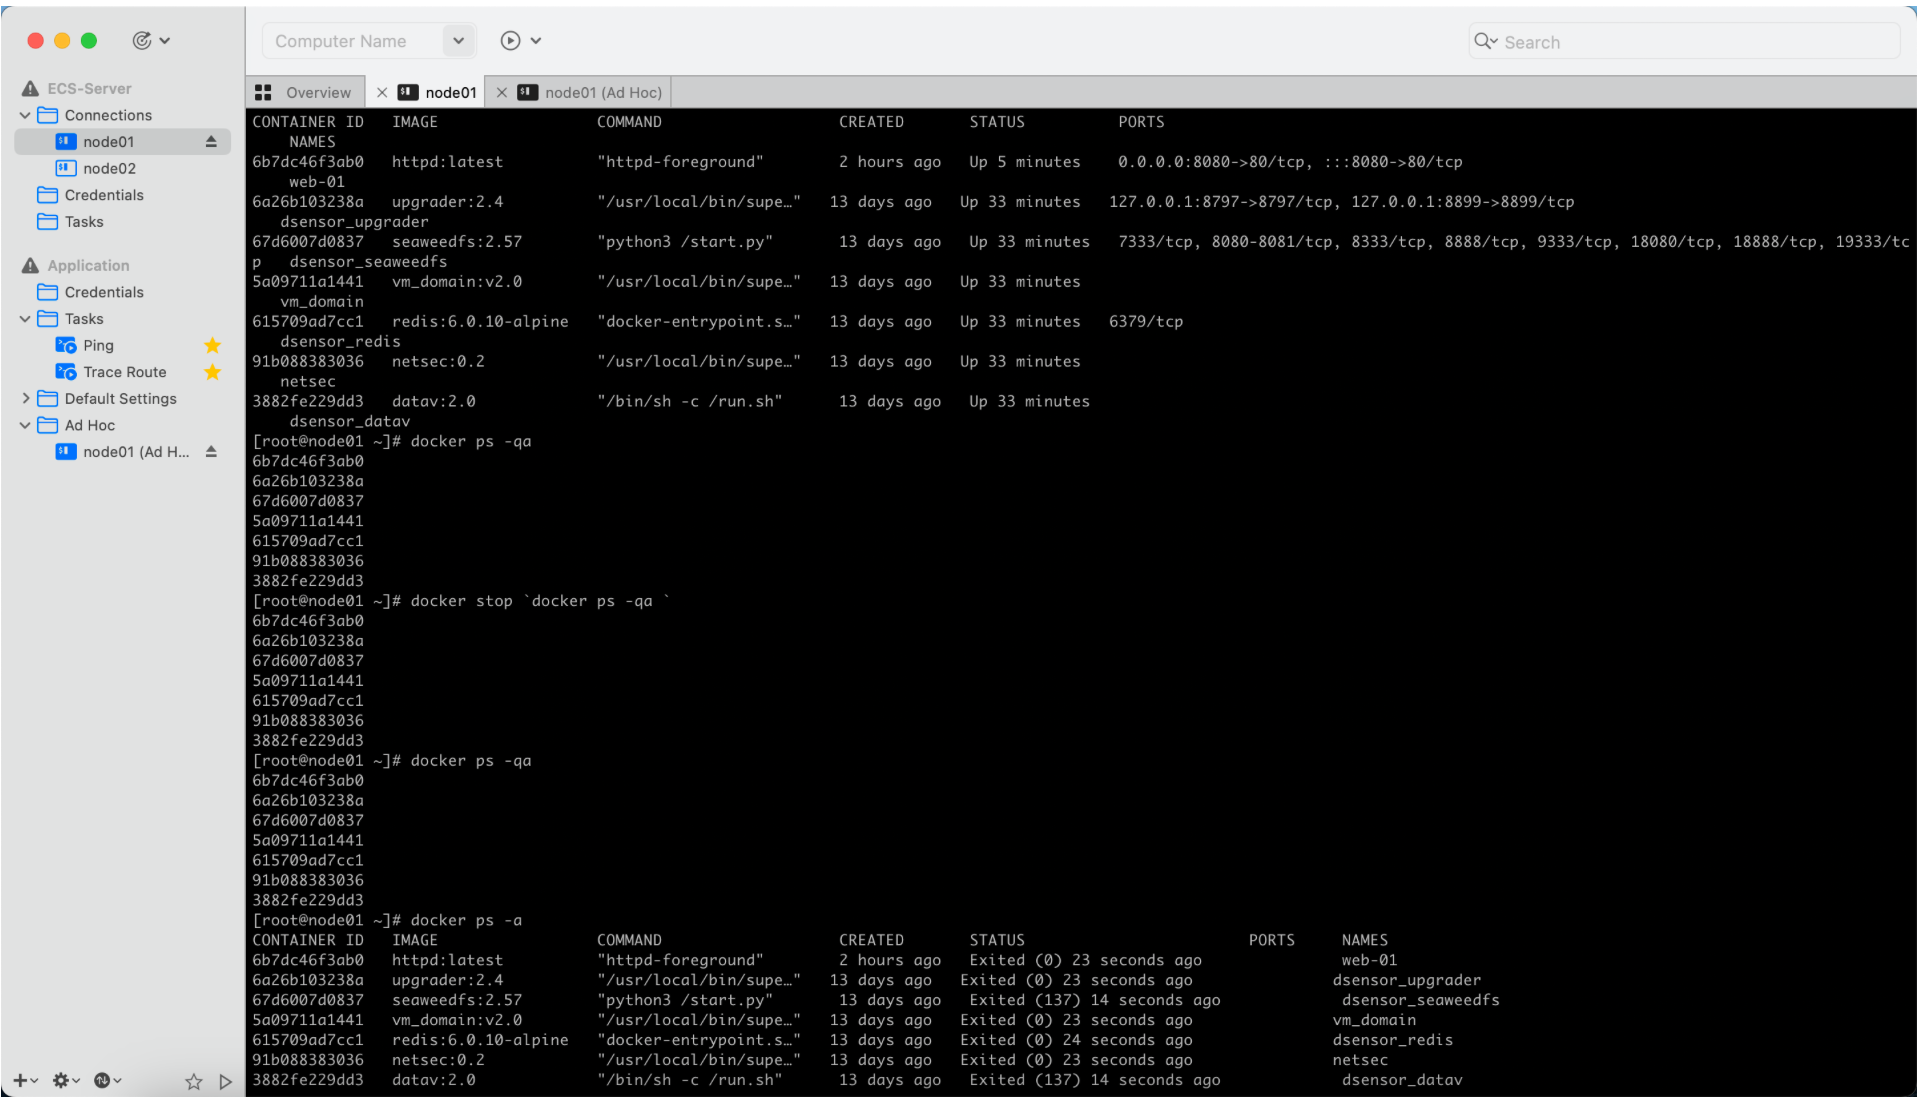
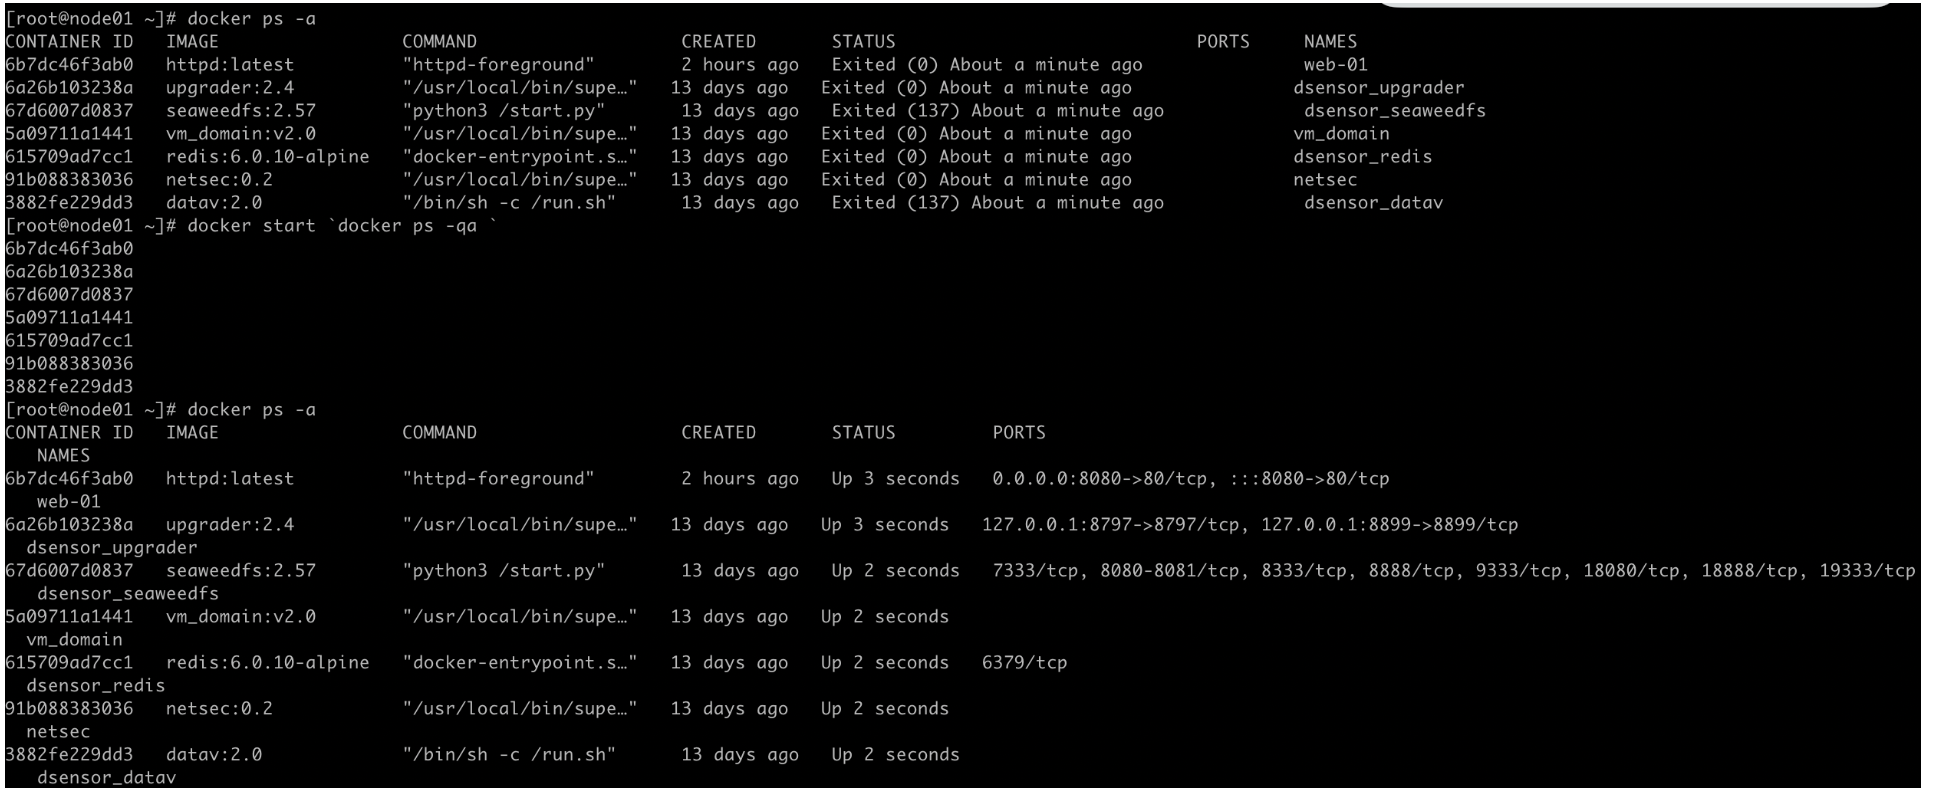
批量启动容器
[root@node01 ~]# docker start `docker ps -qa `
批量删除容器
[root@node01 ~]# docker rm -f `docker ps -qa `
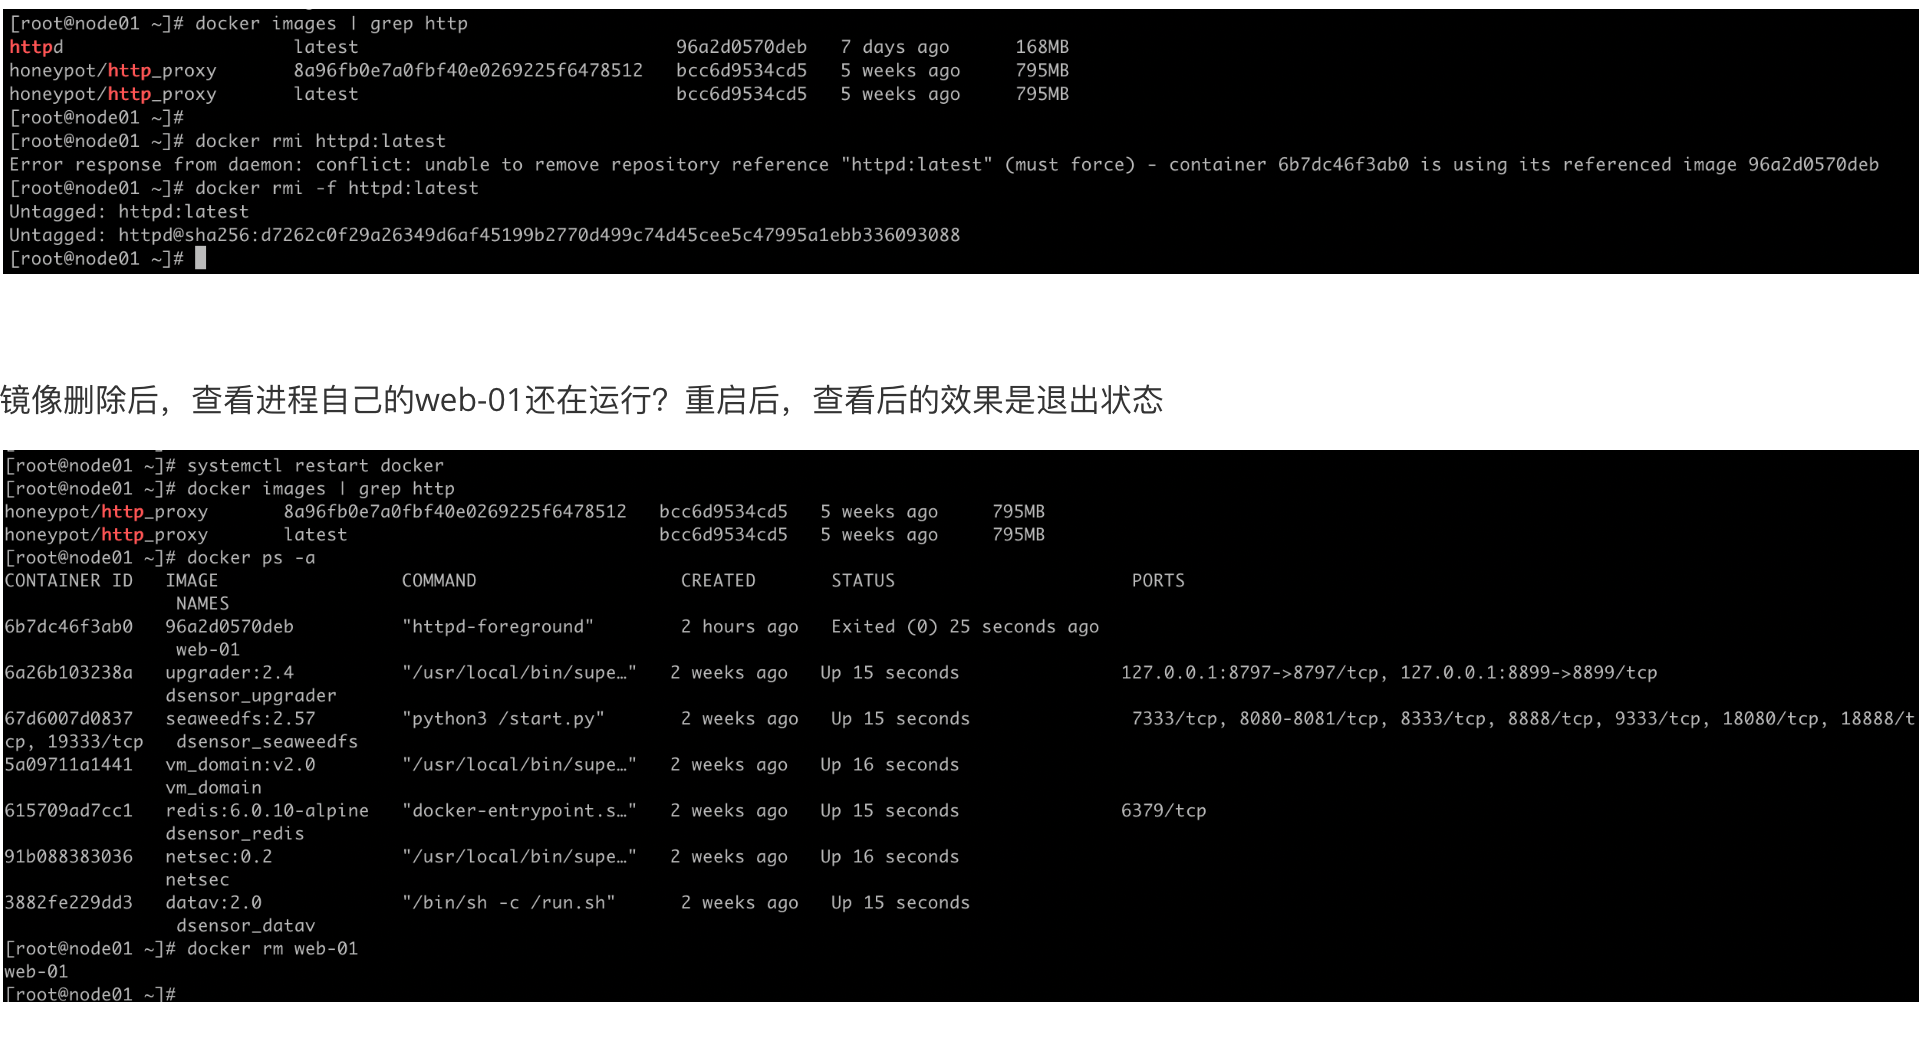
- 操作docker images
# httpd自己拉的镜像
[root@node01 ~]# docker images | grep http
httpd                     latest                             96a2d0570deb   7 days ago      168MB
honeypot/http_proxy       8a96fb0e7a0fbf40e0269225f6478512   bcc6d9534cd5   5 weeks ago     795MB
honeypot/http_proxy       latest                             bcc6d9534cd5   5 weeks ago     795MB

# 删除镜像(一个正在运行的容器删除不了,但是可以强制删除 -f)
[root@node01 ~]# docker rmi httpd:latest
Error response from daemon: conflict: unable to remove repository reference "httpd:latest" (must force) - container 6b7dc46f3ab0 is using its referenced image 96a2d0570deb

[root@node01 ~]# docker rmi -f httpd:latest
Untagged: httpd:latest
Untagged: httpd@sha256:d7262c0f29a26349d6af45199b2770d499c74d45cee5c47995a1ebb336093088
- docker 容器内与宿主机互相复制文件
重宿主机拷贝到容器中
[root@node01 ~]# docker cp dockercp.txt nginx-web01:/
Successfully copied 2.05kB to nginx-web01:/

重容器中拷贝到宿主机本地
[root@node01 ~]# docker cp nginx-web01:/dockercp-Tohost.txt .
Successfully copied 2.05kB to /root/.

- Docker容器内抓包,nsenter 网络命名空间部分
[root@node01 ~]# docker images | grep nginx
nginx                     latest                             89da1fb6dcb9   7 days ago      187MB
dsensor-nginx-hw          f9c26108                           c5cc3fb357a3   6 weeks ago     1.13GB
dsensor-nginx-hw          latest                             c5cc3fb357a3   6 weeks ago     1.13GB
dsensor-nginx             f9c26108                           a0ab9278b2bc   6 weeks ago     1.13GB
dsensor-nginx             latest                             a0ab9278b2bc   6 weeks ago     1.13GB
[root@node01 ~]# docker inspect -f {{.State.Pid}} nginx-web01
12498


# -n 表示切换网络命名空间,-t 指定的 pid 为步骤
[root@node01 ~]# nsenter -n -t12498
[root@node01 ~]# ip a
1: lo: <LOOPBACK,UP,LOWER_UP> mtu 65536 qdisc noqueue state UNKNOWN group default qlen 1000
    link/loopback 00:00:00:00:00:00 brd 00:00:00:00:00:00
    inet 127.0.0.1/8 scope host lo
       valid_lft forever preferred_lft forever
126: eth0@if127: <BROADCAST,MULTICAST,UP,LOWER_UP> mtu 1500 qdisc noqueue state UP group default
    link/ether 02:42:ac:11:00:02 brd ff:ff:ff:ff:ff:ff link-netnsid 0
    inet 172.17.0.2/16 brd 172.17.255.255 scope global eth0
       valid_lft forever preferred_lft forever

[root@node01 ~]# tcpdump -i eth0 tcp and port 80 -vvv

下周学习计划:
- 学习目标1:了解常见的安全产品和雷池功能特性;考核方法:会议发言
- 学习目标2:硬件雷池的安装(包括设备上架、初始安装、minion shell切换、模式切换、软件系统升级、patch、引擎升级)考核方法:现场实操
- 学习目标3:软件雷池安装(反代集群或者单机模式,雷池各功能学习)考核方法:软件安装关键步骤
在学习硬件前,需要明白雷池的集中部署模式:反向代理、透明代理、透明桥、镜像流量等
-------------------------------------------
个性签名:今天做了别人不想做的事,明天你就做得到别人做不到的事,尝试你都不敢,你拿什么赢!
如果觉得这篇文章对你有小小的帮助的话,记得在右下角点个“推荐”哦,博主在此感谢!


 浙公网安备 33010602011771号