CentOS7---基于 CentOS 7 构建 LVS-DR 群集(手动添加和脚本实现俩种方式)
一、对比 LVS 负载均衡群集的 NAT 模式和 DR 模式,比较其各自的优势
NAT模式(地址转换)
原理:就是把客户端发来的数据包的IP头的目的地址,在负载均衡器上换成其中一台RS的IP地址 并发至此RS来处理,RS处理完后把数据交给负载均衡器,负载均衡器再把数据包原IP地址改为自己的IP,将目的地址改为客户端IP地址即可期间,无论是进来的流量,还是出去的流量,都必须经过负载均衡器(原路返回,只改变了Mac地址)
优点:集群中的物理服务器可以使用任何支持TCP/IP操作系统,只有负载均衡器需要一个合法的IP地址;
缺点:扩展性有限。当服务器节点(普通PC服务器)增长过多时,负载均衡器将成为整个系统的瓶颈 因为所有的请求包和应答包的流向都经过负载均衡器。当服务器节点过多时,大量的数据包都交汇在负载均衡器,速度就会变慢!
2、 直接路由(DR模式)
原理:负载均衡器和RS都使用同一个IP对外服务,但只有DR对ARP请求进行响应。所有RS对本身这个IP的ARP请求保持静默也就是说,网关会把对这个服务IP的请求全部定向给DR,而DR收到数据包后根据调度算法,找出对应的RS,把目的MAC地址改为RS的MAC(因为IP一致),并将请求分发给这台RS这时RS收到这个数据包。处理完成之后,由于IP一致,可以直接将数据返给客户,则等于直接从客户端收到这个数据包无异,处理后直接返回给客户端,由于负载均衡器要对二层包头进行改换,所以负载均衡器和RS之间必须在一个广播域也可以简单的理解为在同一台交换机上
优点:和TUN(隧道模式)一样,负载均衡器也只是分发请求,应答包通过单独的路由方法返回给客户端与VS-TUN相比,VS-DR这种实现方式不需要隧道结构,因此可以使用大多数操作系统做为物理服务器。
缺点:(不能说缺点,只能说是不足)要求负载均衡器的网卡必须与物理网卡在一个物理段上。
二、 基于 CentOS 7 构建 LVS-DR 群集
1、环境准备
主机名    IP              作用
node01   192.168.11.21  client
node02   192.168.11.22    LVS
node03   192.168.11.23    LVS
node04   192.168.11.24  RS-web1
node05   192.168.11.25  RS-web2
2、关闭防火墙和selinux
[root@node01 ~]# systemctl stop firewalld.service
[root@node01 ~]# systemctl disable firewalld.service
[root@node01 ~]# sed -i '/^SELINUX=/ c SELINUX=disabled' /etc/selinux/config
3、修改主机名和设置为静态IP
4、先在节点node04 node05准备俩个web服务器访问页面---4和5一样的配置
# 安装Apache软件,做web服务器
[root@node04 ~]# yum install httpd -y

# 提供测试页,为了区分用IP标识
[root@node04 ~]# echo "web test page...host is `hostname -I`." > /var/www/html/index.html

# 重启服务
[root@node04 ~]# systemctl start httpd.service

# 本地测试访问
[root@node04 ~]# curl 192.168.11.24
web test page...host is 192.168.11.24 .

[root@node04 ~]# curl 192.168.11.25
web test page...host is 192.168.11.25 .
5、配置LVS负载均衡服务
第一种LVS配置方式:node02上配置
# 下载负载均衡工具
[root@node02 ~]# yum install ipvsadm.x86_64 -y
6、添加VIP地址,注意掩码
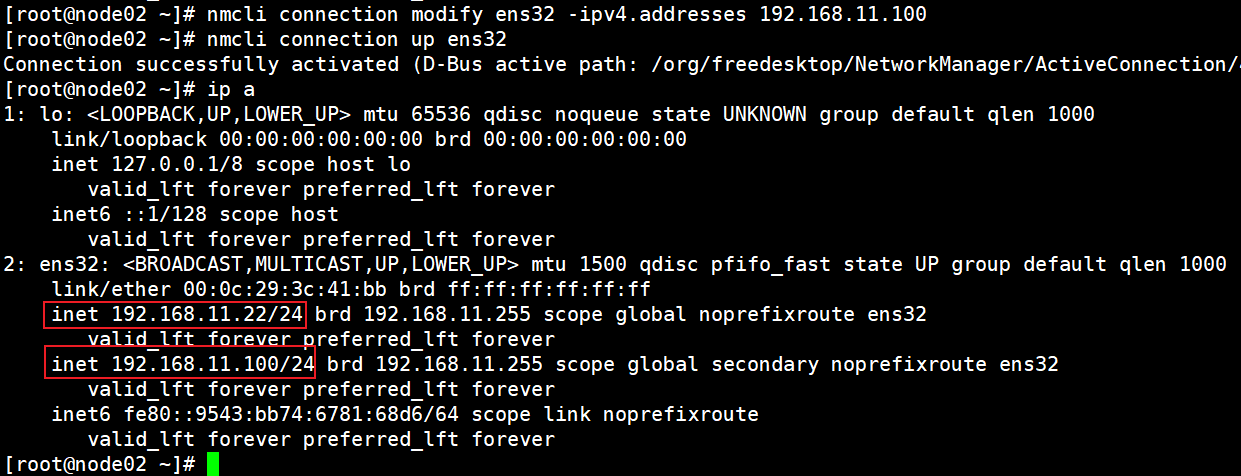
[root@node02 ~]# nmcli connection modify ens32 +ipv4.addresses 192.168.11.100/24
[root@node02 ~]# nmcli connection up ens32
Connection successfully activated (D-Bus active path: /org/freedesktop/NetworkManager/ActiveConnection/4)
[root@node02 ~]# ip a
1: lo: <LOOPBACK,UP,LOWER_UP> mtu 65536 qdisc noqueue state UNKNOWN group default qlen 1000
    link/loopback 00:00:00:00:00:00 brd 00:00:00:00:00:00
    inet 127.0.0.1/8 scope host lo
       valid_lft forever preferred_lft forever
    inet6 ::1/128 scope host
       valid_lft forever preferred_lft forever
2: ens32: <BROADCAST,MULTICAST,UP,LOWER_UP> mtu 1500 qdisc pfifo_fast state UP group default qlen 1000
    link/ether 00:0c:29:3c:41:bb brd ff:ff:ff:ff:ff:ff
    inet 192.168.11.22/24 brd 192.168.11.255 scope global noprefixroute ens32
       valid_lft forever preferred_lft forever
    inet 192.168.11.100/24 brd 192.168.11.255 scope global secondary noprefixroute ens32
       valid_lft forever preferred_lft forever
    inet6 fe80::9543:bb74:6781:68d6/64 scope link noprefixroute
       valid_lft forever preferred_lft forever
7、配置LVS策略
# 清除策略
[root@node02 ~]# ipvsadm -C

# 对TCP80端口提供负载分流服务,使用的调度为轮询
[root@node02 ~]# ipvsadm -A -t 192.168.11.100:80 -s rr

# 查看本地规则
[root@node02 ~]# ipvsadm -Ln
IP Virtual Server version 1.2.1 (size=4096)
Prot LocalAddress:Port Scheduler Flags
  -> RemoteAddress:Port           Forward Weight ActiveConn InActConn
TCP  192.168.11.100:80 rr

# 添加节点服务器RS
[root@node02 ~]# ipvsadm -a -t 192.168.11.100:80 -r 192.168.11.24:80 -g
[root@node02 ~]# ipvsadm -a -t 192.168.11.100:80 -r 192.168.11.25:80 -g
[root@node02 ~]# ipvsadm -Ln
IP Virtual Server version 1.2.1 (size=4096)
Prot LocalAddress:Port Scheduler Flags
  -> RemoteAddress:Port           Forward Weight ActiveConn InActConn
TCP  192.168.11.100:80 rr
  -> 192.168.11.24:80             Route   1      0          0
  -> 192.168.11.25:80             Route   1      0          0

8、保存配置,重启服务即失效
[root@node02 ~]# ipvsadm-save
-A -t node02:http -s rr
-a -t node02:http -r 192.168.11.24:http -g -w 1
-a -t node02:http -r 192.168.11.25:http -g -w 1
9、配置说明
[删除方法]
# ipvsadm -D -t 192.168.11.100:80-s wrr
# ipvsadm -d -t 192.168.11.100:80 -r 192.168.11.24:80
[相关参数说明]
[root@node02 ~]# ipvsadm –help
-A 添加虚拟服务器
-t 设置群集地址(VIP,Virtual IP)
-s 指定负载调度算法
-a 添加真实服务器
-d 删除真实服务器
-r 指定真实服务器(Real Server)的地址
-m 使用NAT模式;-g、-i分别对应DR、TUN模式
-w 为节点服务器设置权重,默认为1
10、手工在RS端绑定VIP,添加本机访问VIP的路由信息
[root@node04 ~]# ifconfig lo:110 192.168.11.100 netmask 255.255.255.255 up
[root@node04 ~]# route add -host 192.168.11.100 dev lo
11、手工在RS端抑制ARP响应
[root@node05 ~]# echo "1" > /proc/sys/net/ipv4/conf/lo/arp_ignore
[root@node05 ~]# echo "2" > /proc/sys/net/ipv4/conf/lo/arp_announce
[root@node05 ~]# echo "1" > /proc/sys/net/ipv4/conf/all/arp_ignore
[root@node05 ~]# echo "2" > /proc/sys/net/ipv4/conf/all/arp_announce
PS:也可以使用arptables实现抑制arp
arptables -A INPUT -d $VIP -j DROP
arptables -A OUTPUT -s $VIP -j mangle --mangle-ip-s $RIP
# arptables-save > /etc/sysconfig/arptables
# systemctl enable --now arptables
12、测试
# 在LVS上监控
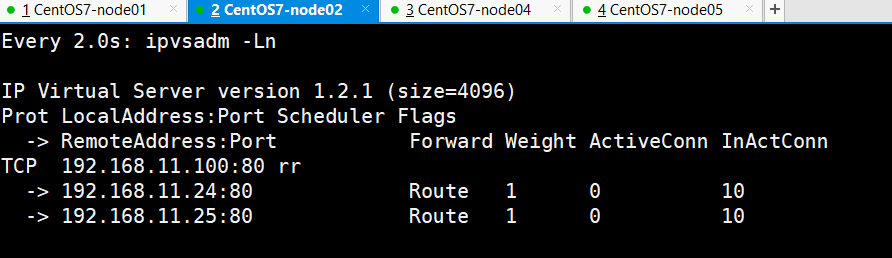
[root@node02 ~]# watch ipvsadm -Ln
# 在客户端上测试
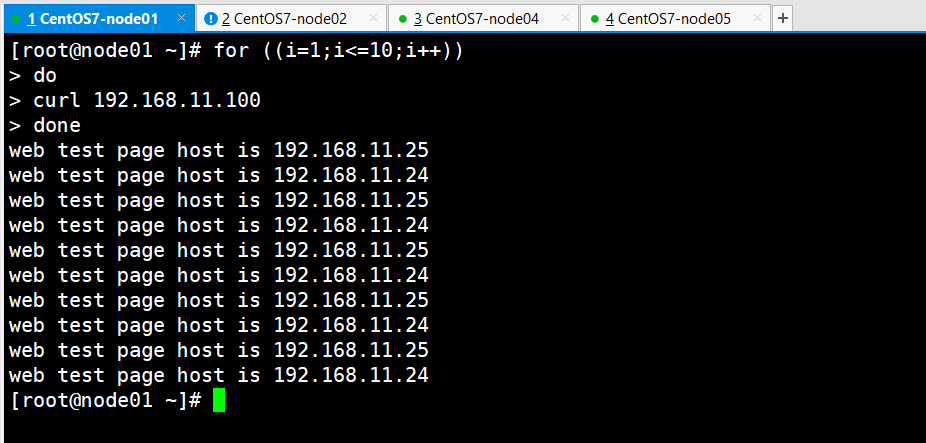
[root@node01 ~]# for ((i=1;i<=10;i++)); do curl 192.168.11.100; done
web test page host is 192.168.11.25
web test page host is 192.168.11.24
web test page host is 192.168.11.25
web test page host is 192.168.11.24
web test page host is 192.168.11.25
web test page host is 192.168.11.24
web test page host is 192.168.11.25
web test page host is 192.168.11.24
web test page host is 192.168.11.25
web test page host is 192.168.11.24
LVS调度器上动态监控
通过脚本实现
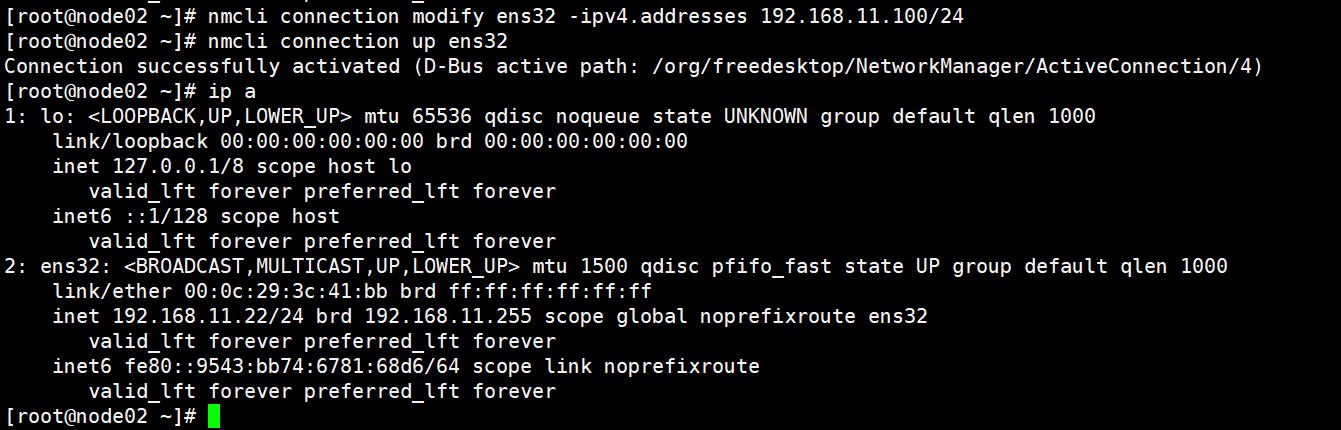
13、删除VIP
[root@node02 ~]# nmcli connection modify ens32 -ipv4.addresses 192.168.11.100/24
[root@node02 ~]# nmcli connection up ens32
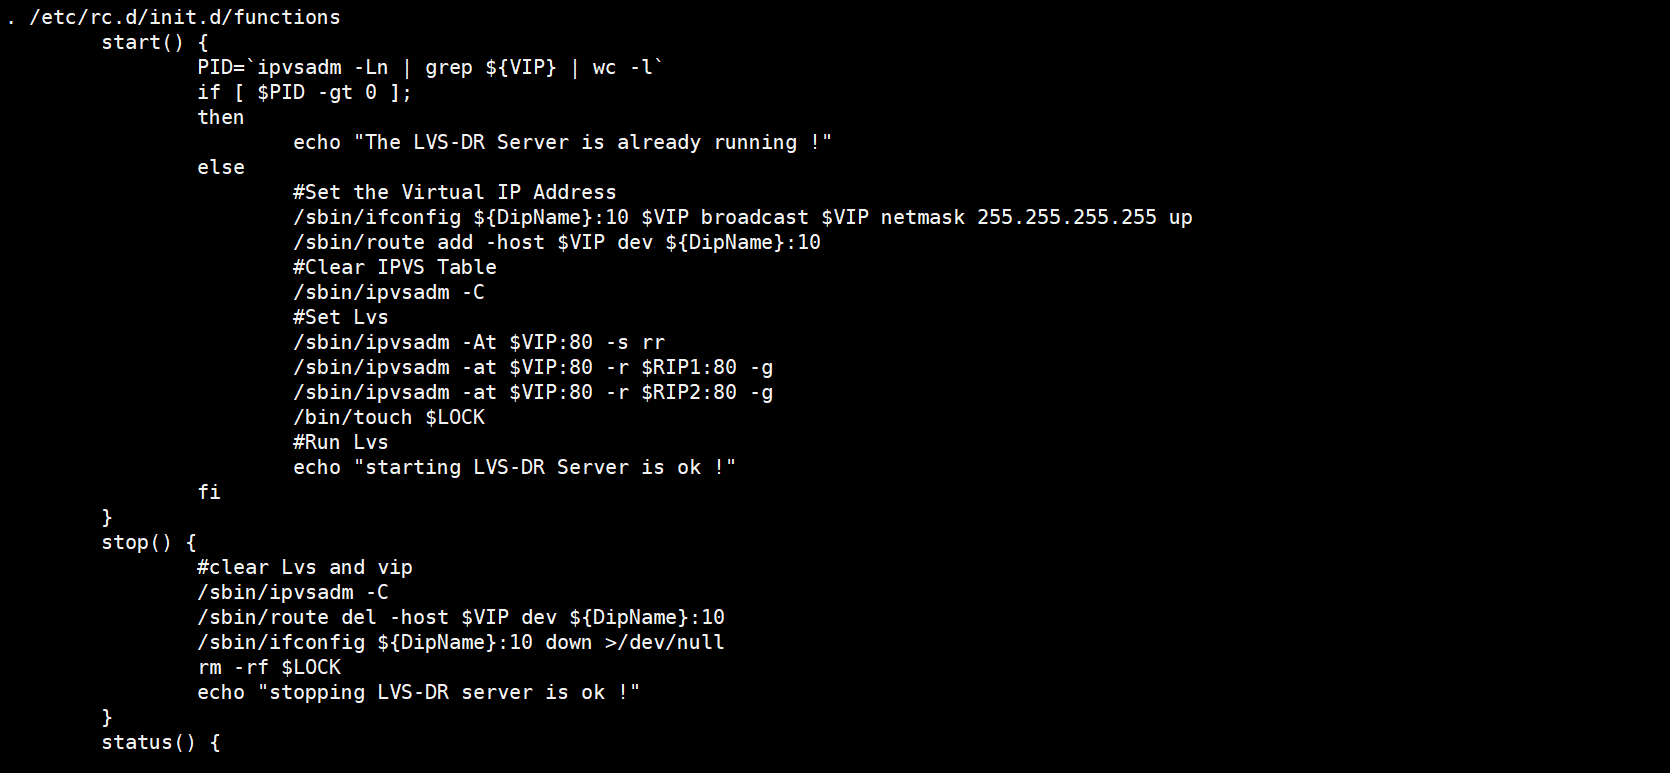
14、开发脚本实现LVS-DR模式配置
LVS_director
[root@node02 ~]# cat /etc/init.d/lvs_dr
# 小样,自己写吧
15、添加执行权限
[root@node02 ~]# chmod +x lvs_dr.sh
[root@node02 ~]# ll
total 8
-rw-------. 1 root root 1425 Apr 22 23:13 anaconda-ks.cfg
-rwxr-xr-x  1 root root 1748 Apr 23 05:00 lvs_dr.sh
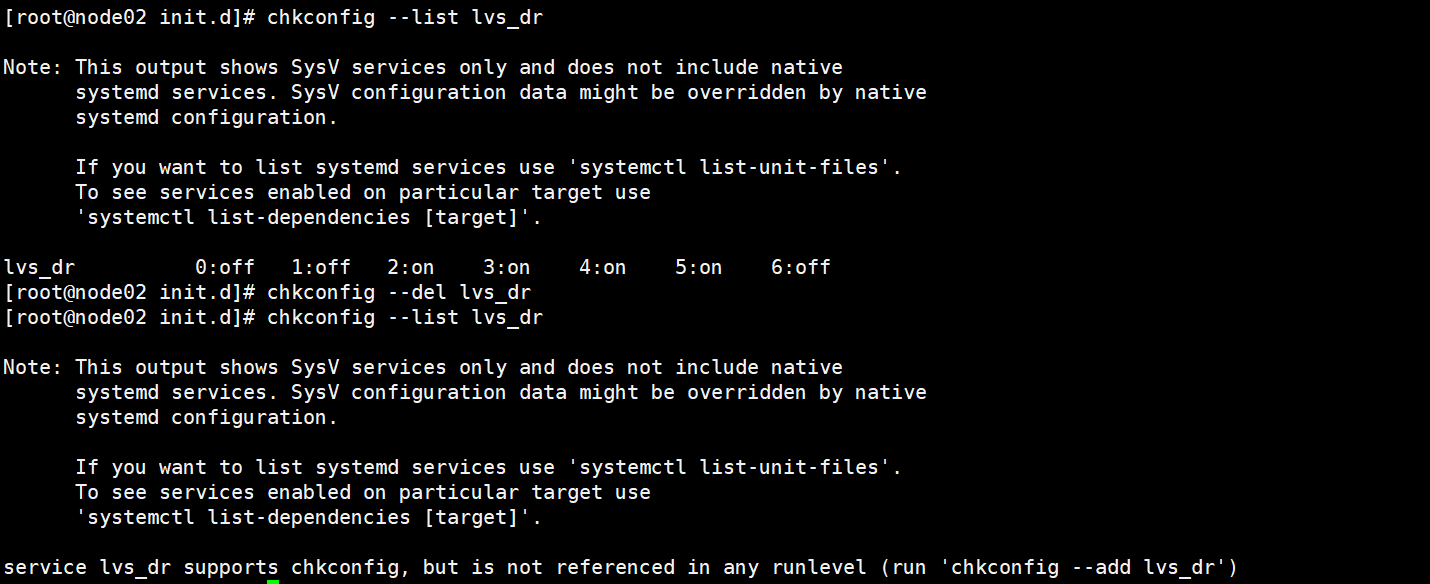
16、添加到系统服务
[root@node02 ~]# cd /etc/init.d/
[root@node02 init.d]# chkconfig --add lvs_dr
[root@node02 init.d]# chkconfig lvs_dr on
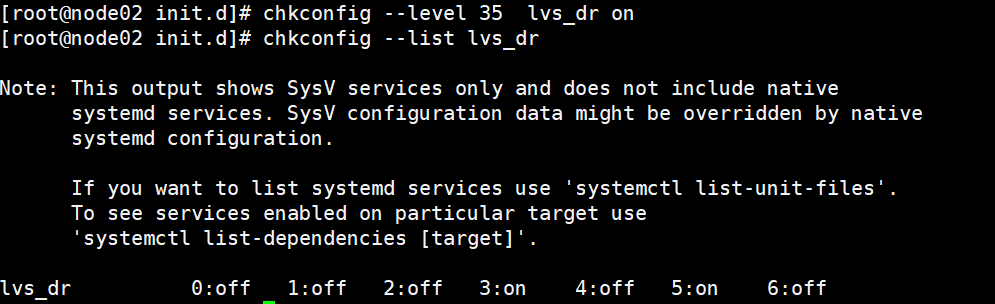
17、默认的启动级别
18、指定级别
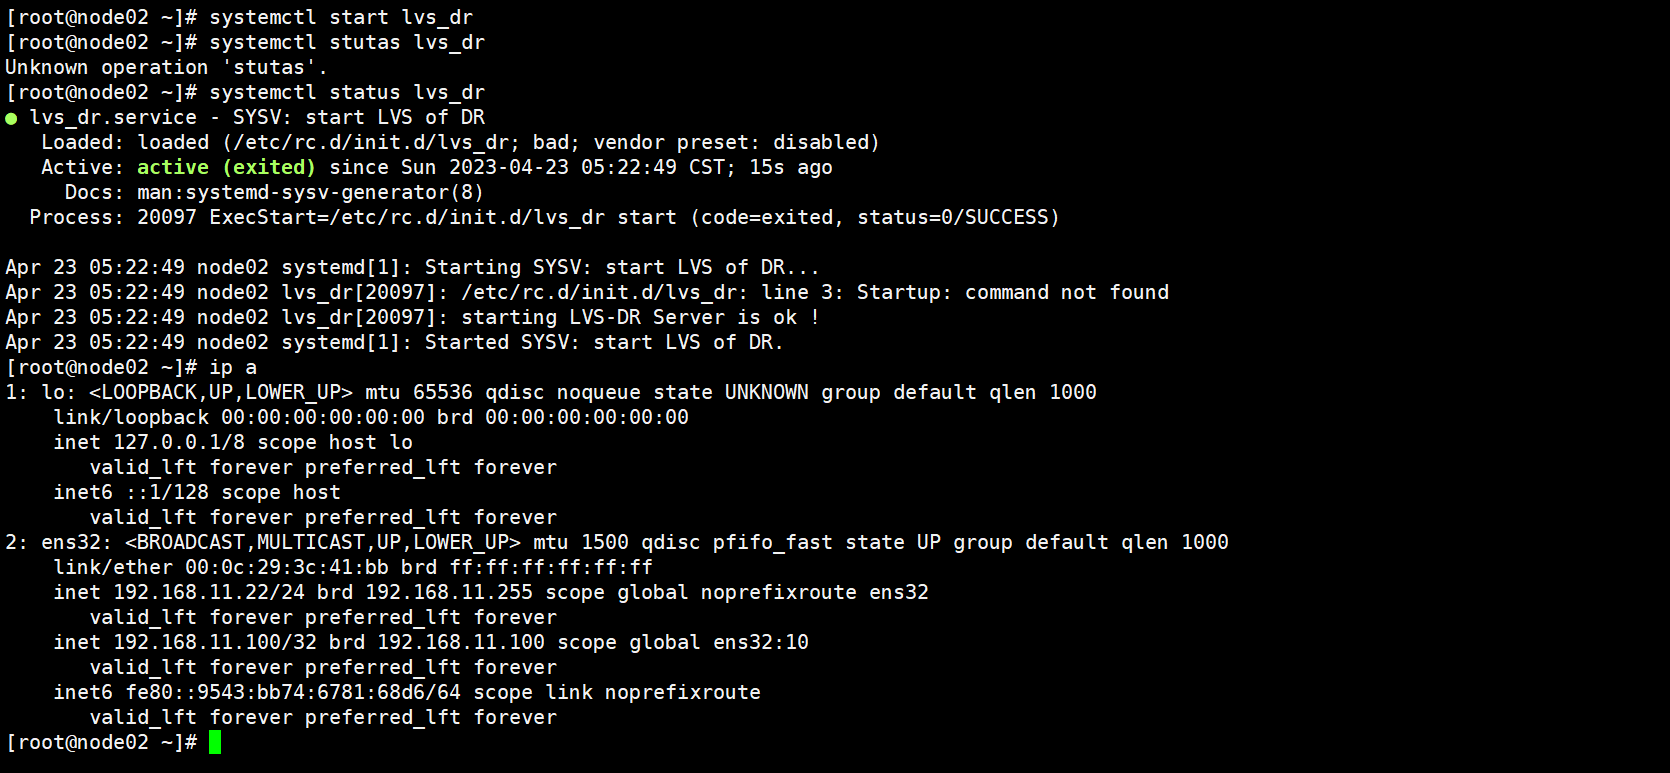
19、测试脚本是否运行成功
[root@node02 ~]# systemctl start lvs_dr
[root@node02 ~]# systemctl status lvs_dr
[root@node02 ~]# ip a
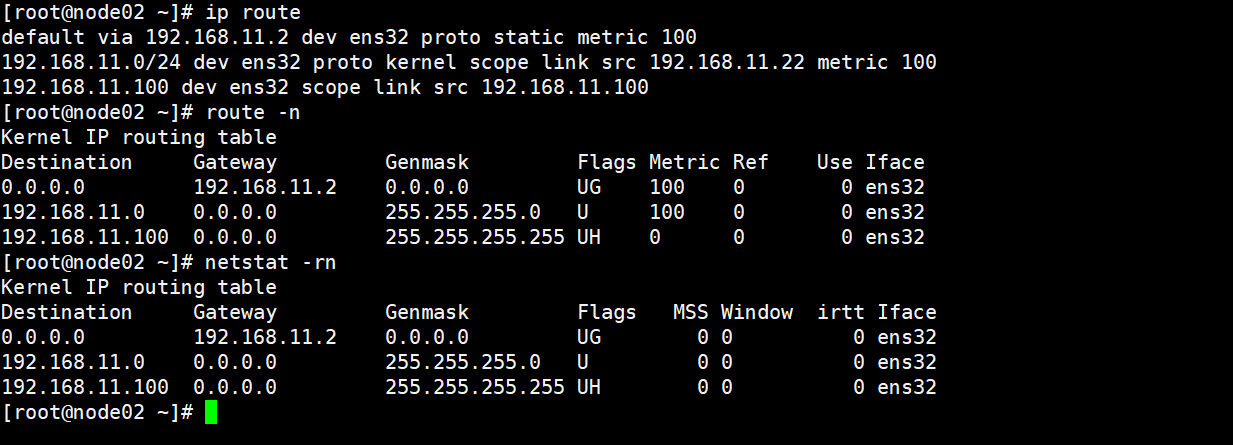
20、三种显示主机路由方式
[root@node02 ~]# ip route
[root@node02 ~]# route -n
[root@node02 ~]# netstat -rn
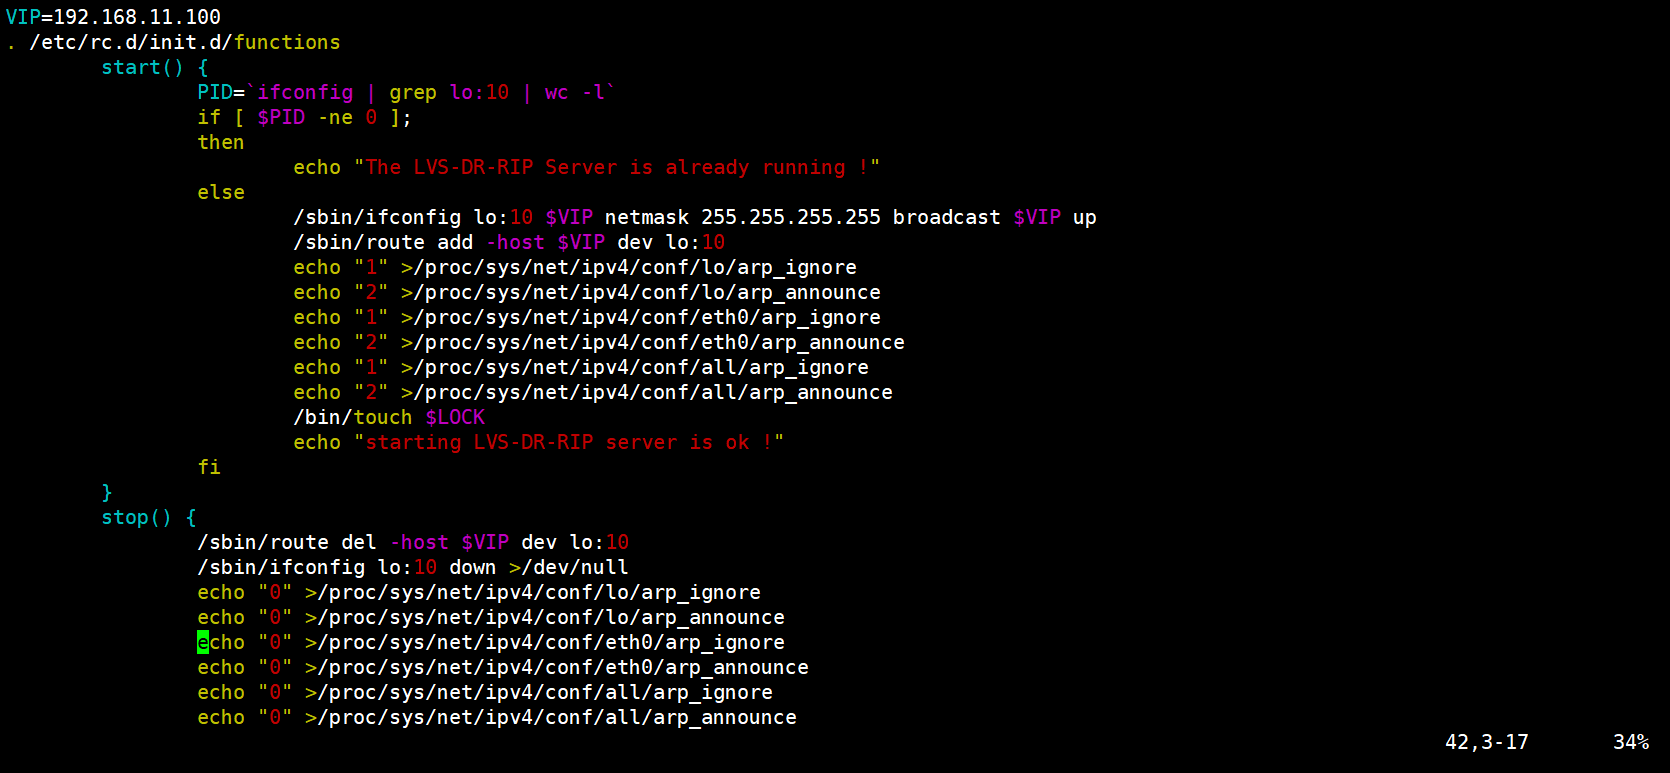
21、RS主机脚本
[root@node04 ~]# vim /etc/init.d/lvs_rs
# 哈哈哈哈
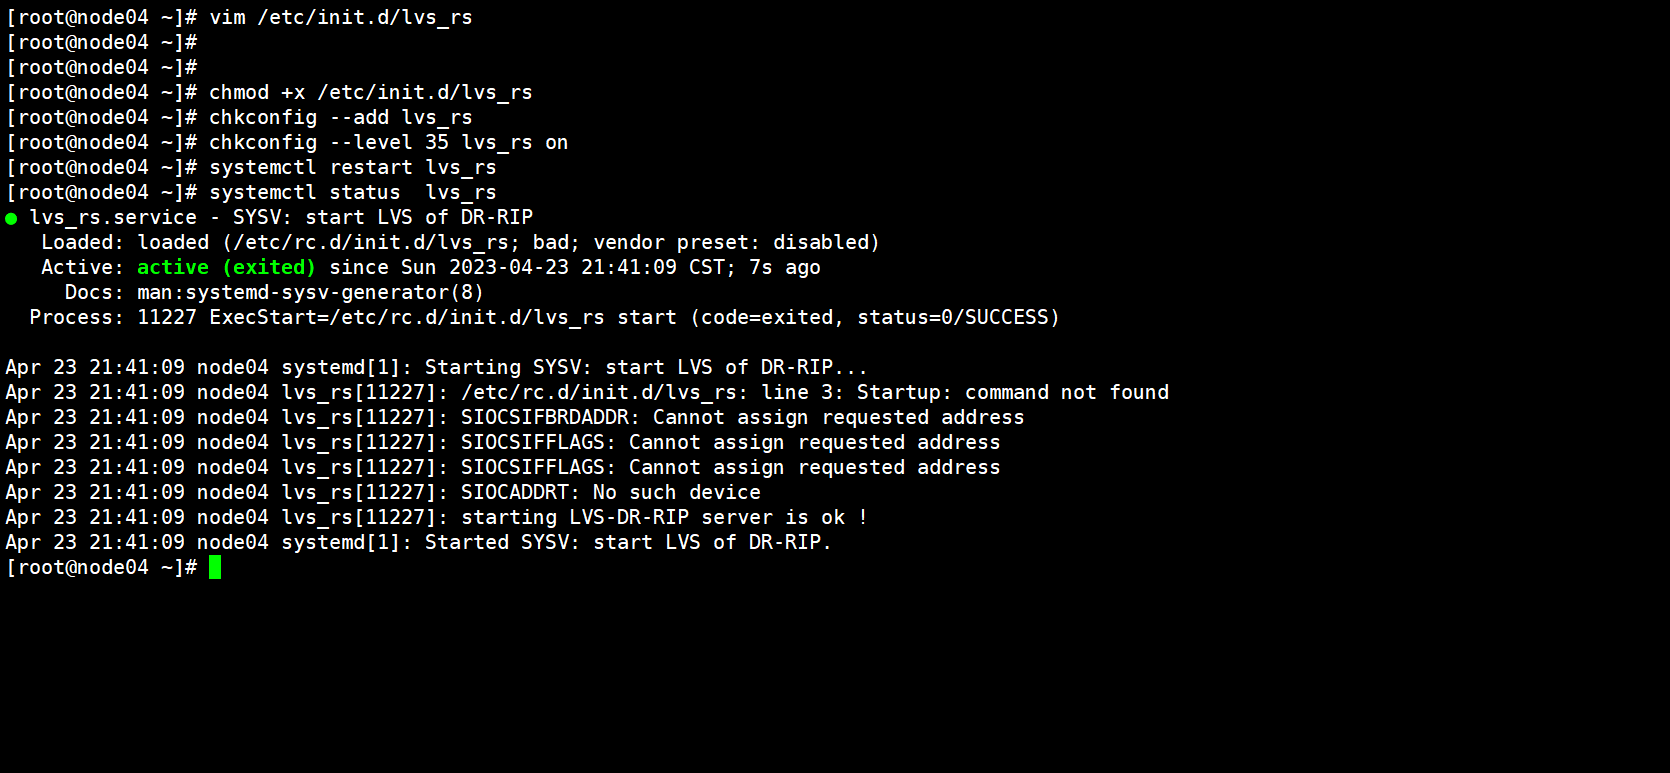
22、添加权限测试脚本
[root@node04 ~]# chmod +x /etc/init.d/lvs_rs
[root@node04 ~]# chkconfig --add lvs_rs
[root@node04 ~]# chkconfig --level 35 lvs_rs on
[root@node04 ~]# systemctl restart lvs_rs
[root@node04 ~]# systemctl status  lvs_rs
23、随机抽查
[root@node04 ~]# route -n
Kernel IP routing table
Destination     Gateway         Genmask         Flags Metric Ref    Use Iface
0.0.0.0         192.168.11.2    0.0.0.0         UG    100    0        0 ens32
192.168.11.0    0.0.0.0         255.255.255.0   U     100    0        0 ens32
192.168.11.100  0.0.0.0         255.255.255.255 UH    0      0        0 lo
[root@node04 ~]# cat /proc/sys/net/ipv4/conf/all/arp_ignore
1

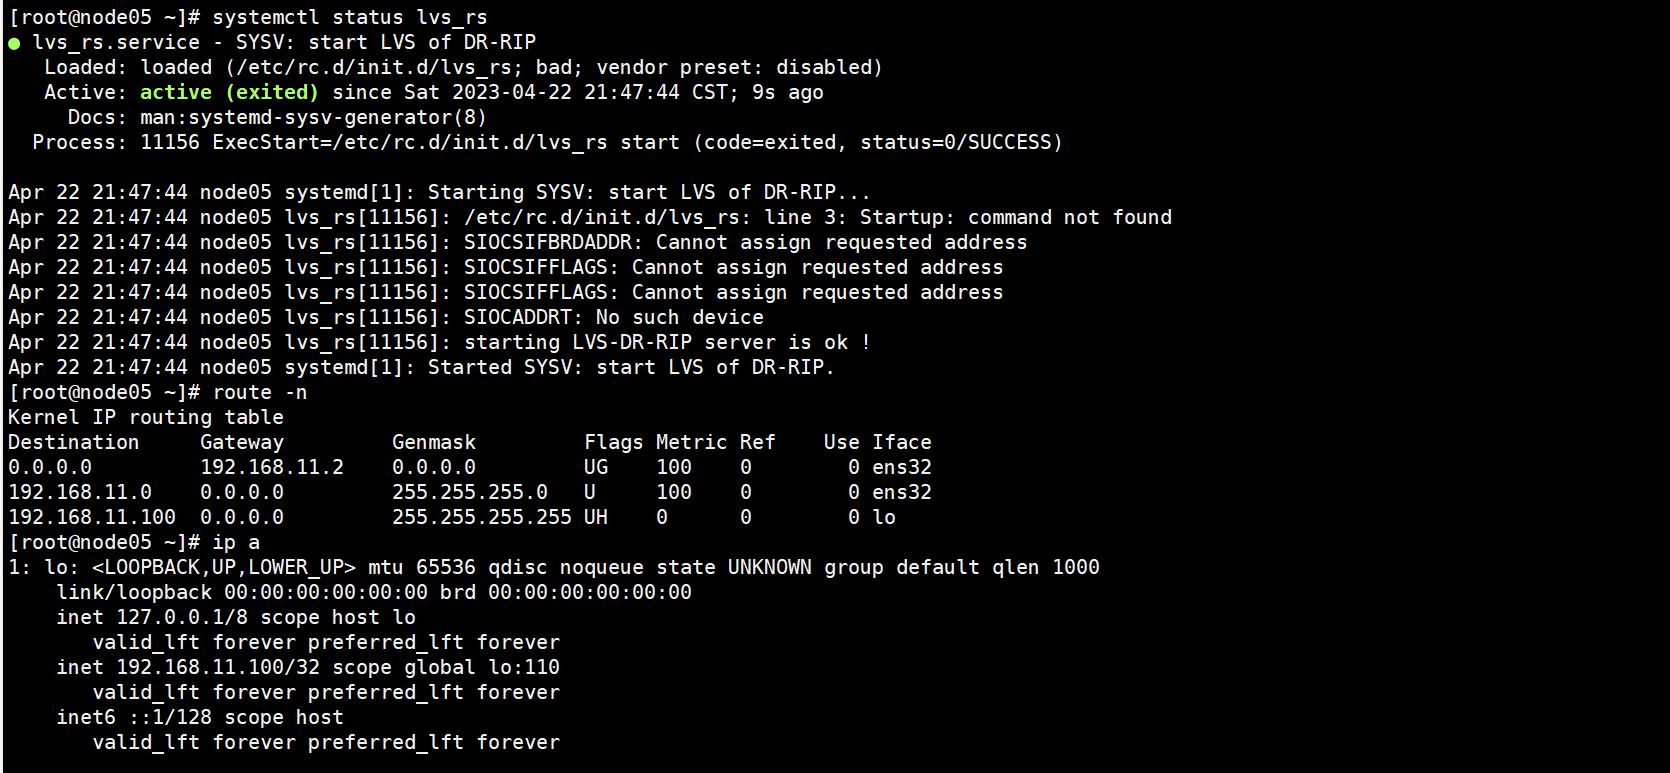
24、将脚本拷到node05web节点上
[root@node04 ~]# scp /etc/init.d/lvs_rs 192.168.11.25:/etc/init.d/
[root@node05 ~]# ll /etc/init.d/lvs_rs
-rwxr-xr-x 1 root root 2058 Apr 22 21:45 /etc/init.d/lvs_rs
25、添加成系统服务脚本
[root@node05 ~]# chkconfig --add lvs_rs
[root@node05 ~]# chkconfig --level 35 lvs_rs on
[root@node05 ~]#
[root@node05 ~]#
[root@node05 ~]# systemctl restart lvs_rs
26、检查绑定情况
27、最后测试
[root@node01 ~]# for ((i=1;i<=10;i++)); do curl 192.168.11.100; done
web test page host is 192.168.11.25
web test page host is 192.168.11.24
web test page host is 192.168.11.25
web test page host is 192.168.11.24
web test page host is 192.168.11.25
web test page host is 192.168.11.24
web test page host is 192.168.11.25
web test page host is 192.168.11.24
web test page host is 192.168.11.25
web test page host is 192.168.11.24

[root@node02 ~]# ipvsadm -Ln
IP Virtual Server version 1.2.1 (size=4096)
Prot LocalAddress:Port Scheduler Flags
  -> RemoteAddress:Port           Forward Weight ActiveConn InActConn
TCP  192.168.11.100:80 rr
  -> 192.168.11.24:80             Route   1      0          5
  -> 192.168.11.25:80             Route   1      0          5
三、高可用实现
1、安装软件
[root@node01 ~]# yum localinstall ldirectord-4.1.1-3.40.el7.noarch.rpm
2、配置文件
[root@node01 ~]# rpm -qc ldirectord
/etc/logrotate.d/ldirectord
[root@node01 ~]# rpm -ql  ldirectord
/etc/ha.d
/etc/ha.d/conf
/etc/ha.d/resource.d
/etc/ha.d/resource.d/ldirectord
/etc/logrotate.d/ldirectord
/etc/rc.d/init.d/ldirectord
/run/ldirectord
/usr/lib/systemd/system/ldirectord.service
/usr/lib/tmpfiles.d/ldirectord.conf
/usr/sbin/ldirectord
/usr/share/doc/ldirectord-4.1.1
/usr/share/doc/ldirectord-4.1.1/ldirectord.cf
/usr/share/man/man8/ldirectord.8.gz
3、修改模板文件/usr/share/doc/ldirectord-4.1.1/ldirectord.cf
[root@node01 ~]# vim /etc/ha.d/ldirectord.cf
[root@node01 ~]# cat /etc/ha.d/ldirectord.cf

#
# Sample ldirectord configuration file to configure various virtual services.
#
# Ldirectord will connect to each real server once per second and request
# /index.html. If the data returned by the server does not contain the
# string "Test Message" then the test fails and the real server will be
# taken out of the available pool. The real server will be added back into
# the pool once the test succeeds. If all real servers are removed from the
# pool then localhost:80 is added to the pool as a fallback measure.

# Global Directives
checktimeout=3
checkinterval=1
#fallback=127.0.0.1:80
#fallback6=[::1]:80
autoreload=yes
#logfile="/var/log/ldirectord.log"
#logfile="local0"
#emailalert="admin@x.y.z"
#emailalertfreq=3600
#emailalertstatus=all
quiescent=no

# Sample for an http virtual service
virtual=192.168.11.100:80
	servicename=Web Site
	comment=Test load balanced web site
	real=192.168.11.24:80 gate
	real=192.168.11.25:80 gate
	fallback=127.0.0.1:80 gate
	service=http
	scheduler=rr
	#persistent=600
	#netmask=255.255.255.255
	protocol=tcp
	checktype=negotiate
	checkport=80
4、启动服务
[root@node01 ~]# systemctl start ldirectord.service
5、LVS调度器上也安装该软件,并把客户端配好的配置文件传给LVS调度器
[root@node01 ~]# scp /etc/ha.d/ldirectord.cf 192.168.11.22:/etc/ha.d/
The authenticity of host '192.168.11.22 (192.168.11.22)' can't be established.
ECDSA key fingerprint is SHA256:TN/N+pOd66YniDRIloElVvjmj2etQ5JgxhJ3wqe1yoo.
ECDSA key fingerprint is MD5:08:68:0f:e2:5b:85:81:02:b3:4c:dc:89:56:db:fa:c5.
Are you sure you want to continue connecting (yes/no)? yes
Warning: Permanently added '192.168.11.22' (ECDSA) to the list of known hosts.
root@192.168.11.22's password:
ldirectord.cf                                                                                           100% 1093     1.4MB/s   00:00
[root@node01 ~]# ls /etc/ha.d/ldirectord.cf
/etc/ha.d/ldirectord.cf

[root@node02 ~]# yum localinstall ldirectord-4.1.1-3.40.el7.noarch.rpm
6、启动服务并测试
[root@node01 ~]# systemctl restart ldirectord.service
[root@node02 ~]# systemctl restart ldirectord.service
7、关闭web1模拟宕机
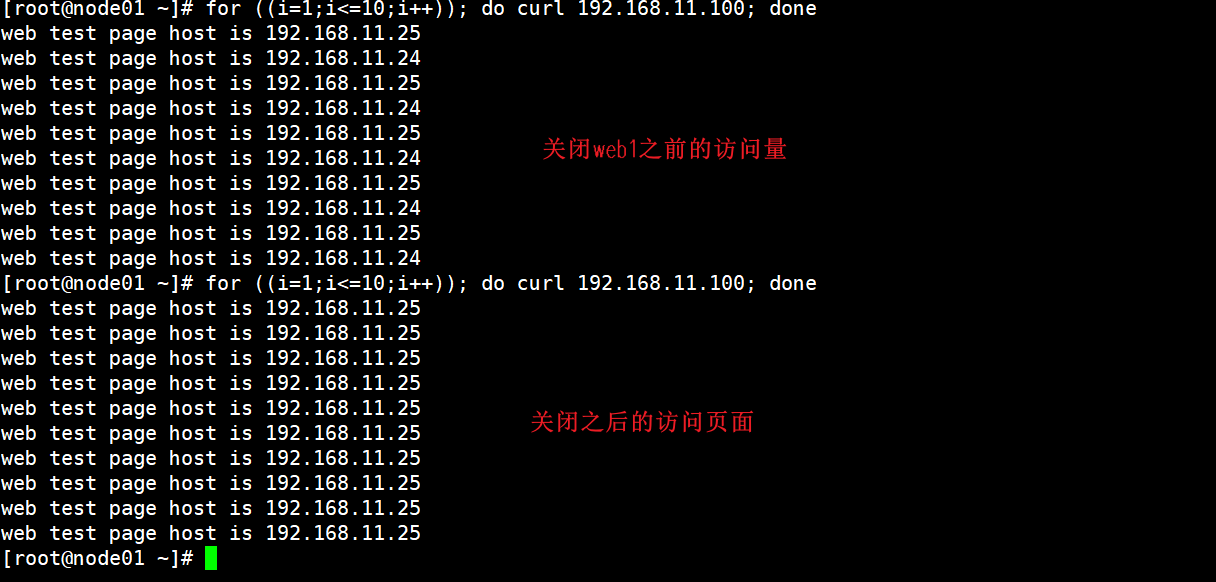
[root@node01 ~]# for ((i=1;i<=10;i++)); do curl 192.168.11.100; done

[root@node04 ~]# systemctl stop httpd.service

[root@node04 ~]# systemctl restart httpd.service
web自动踢出
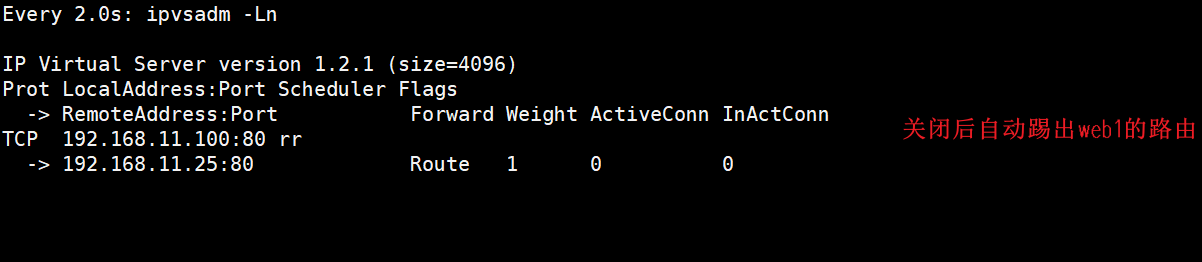
web宕机之后的访问量
看右上角的时间,修复后自动加入路由

修复后的访问页面

8、如果所有的web服务器全部宕机,这时候需要在本地安装Apache
[root@node01 ~]# yum install httpd -y
[root@node01 ~]# echo "服务器维护中..." > /var/www/html/index.html
[root@node01 ~]# systemctl restart httpd.service
9、停止所有的web服务器
[root@node04 ~]# systemctl stop httpd.service
[root@node05 ~]# systemctl stop httpd.service
这时候的路由表

10、访问测试
[root@node01 ~]# systemctl restart ldirectord.service
[root@node01 ~]# systemctl restart httpd.service
[root@node01 ~]# for ((i=1;i<=10;i++)); do curl 192.168.11.100; done
作者:ChAn
-------------------------------------------
个性签名:今天做了别人不想做的事,明天你就做得到别人做不到的事,尝试你都不敢,你拿什么赢!
如果觉得这篇文章对你有小小的帮助的话,记得在右下角点个“推荐”哦,博主在此感谢!


 浙公网安备 33010602011771号