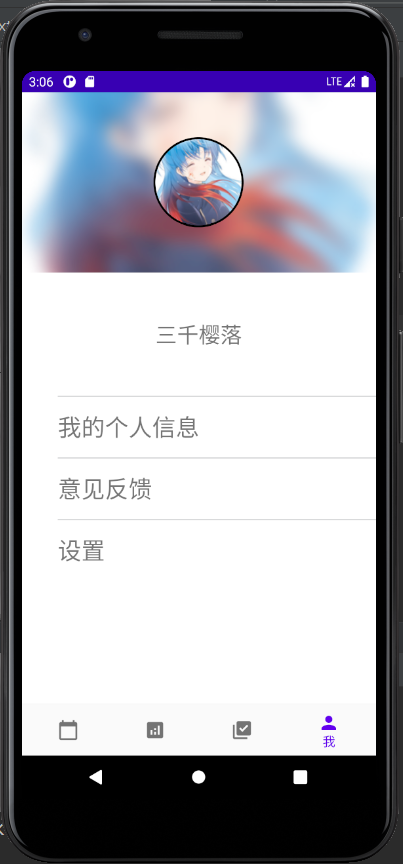
先展示效果

页面整体使用了LinearLayout布局,从上到下依次为:
FrameLayout(头像)
-ImageView 模糊头像
-CircleImageView 圆形头像
TextView 用户名
TextView 个人信息
TextView 意见反馈
TextView 设置
附该页面xml文件如下。
<?xml version="1.0" encoding="utf-8"?>
<LinearLayout xmlns:android="http://schemas.android.com/apk/res/android"
    android:layout_width="match_parent"
    android:layout_height="match_parent"
    xmlns:app="http://schemas.android.com/apk/res-auto"
    android:orientation="vertical"
    android:background="@color/white">

    <FrameLayout
        android:layout_width="match_parent"
        android:layout_height="wrap_content" >
        <ImageView
            android:id="@+id/userImg_mohu"
            android:layout_width="match_parent"
            android:layout_height="200dp"
            android:scaleType="centerCrop"/>
        <de.hdodenhof.circleimageview.CircleImageView
            android:id="@+id/userImg_circle"
            android:layout_gravity="center"
            android:layout_height="100dp"
            android:layout_width="100dp"
            android:src="@mipmap/ic_user_img_chtholly"
            app:civ_border_width="2dp"
            app:civ_border_color="@color/black"/>
    </FrameLayout>

    <TextView
        android:layout_width="match_parent"
        android:layout_height="0dp"
        android:layout_weight="2"
        android:text="@string/SqyL"
        android:gravity="center"
        android:textSize="24sp"/>
    <TextView
        android:id="@+id/text_user"
        android:layout_width="match_parent"
        android:layout_height="0dp"
        android:layout_weight="1"
        android:gravity="center_vertical"
        android:text="@string/Userinf"
        android:textSize="26sp"
        android:layout_marginLeft="40dp"
        android:background="@drawable/textview_border"/>
    <TextView
        android:id="@+id/text_feedback"
        android:text="@string/feedback"
        android:layout_width="match_parent"
        android:layout_height="0dp"
        android:layout_weight="1"
        android:textSize="26sp"
        android:gravity="center_vertical"
        android:layout_marginLeft="40dp"
        android:background="@drawable/textview_border"/>
    <TextView
        android:id="@+id/text_settings"
        android:text="@string/settings"
        android:layout_width="match_parent"
        android:layout_height="0dp"
        android:layout_weight="1"
        android:textSize="26sp"
        android:gravity="center_vertical"
        android:layout_marginLeft="40dp"
        android:background="@drawable/textview_border"/>
    <View
        android:layout_width="match_parent"
        android:layout_height="0dp"
        android:layout_weight="2" />

</LinearLayout>
其中圆形头像调用了de.hdodenhof.circleimageview.CircleImageView库,模糊头像的处理调用了GLide库。
在使用GLide中方法时,首先编写了BitmapTransformation类的继承类BlurTransformation,然后在Fragment中调用高斯变换函数。
BlurTransformation类取自网页链接如下:
package com.example.tryyun.ui.user;

import android.content.Context;
import android.graphics.Bitmap;
import android.graphics.Canvas;
import android.graphics.Paint;
import android.os.Build;
import android.renderscript.RSRuntimeException;

import androidx.annotation.NonNull;

import com.bumptech.glide.Glide;
import com.bumptech.glide.load.engine.bitmap_recycle.BitmapPool;
import com.bumptech.glide.load.resource.bitmap.BitmapTransformation;

import java.nio.charset.Charset;
import java.security.MessageDigest;

import jp.wasabeef.glide.transformations.internal.FastBlur;
import jp.wasabeef.glide.transformations.internal.RSBlur;


    /**
     * 虚化Transformation
     * 更多效果参考:https://github.com/wasabeef/glide-transformations
     */

    public class BlurTransformation extends BitmapTransformation {

        private static String STRING_CHARSET_NAME = "UTF-8";
        private static final String ID = "com.kevin.glidetest.BlurTransformation";
        private static Charset CHARSET = Charset.forName(STRING_CHARSET_NAME);
        private static final byte[] ID_BYTES = ID.getBytes(CHARSET);

        private static int MAX_RADIUS = 25;
        private static int DEFAULT_DOWN_SAMPLING = 1;

        private Context mContext;
        private BitmapPool mBitmapPool;

        private int mRadius;
        private int mSampling;

        public BlurTransformation(Context context) {
            this(context, Glide.get(context).getBitmapPool(), MAX_RADIUS, DEFAULT_DOWN_SAMPLING);
        }

        public BlurTransformation(Context context, BitmapPool pool) {
            this(context, pool, MAX_RADIUS, DEFAULT_DOWN_SAMPLING);
        }

        public BlurTransformation(Context context, BitmapPool pool, int radius) {
            this(context, pool, radius, DEFAULT_DOWN_SAMPLING);
        }

        public BlurTransformation(Context context, int radius) {
            this(context, Glide.get(context).getBitmapPool(), radius, DEFAULT_DOWN_SAMPLING);
        }

        public BlurTransformation(Context context, int radius, int sampling) {
            this(context, Glide.get(context).getBitmapPool(), radius, sampling);
        }

        public BlurTransformation(Context context, BitmapPool pool, int radius, int sampling) {
            mContext = context.getApplicationContext();
            mBitmapPool = pool;
            mRadius = radius;
            mSampling = sampling;
        }


        @Override
        protected Bitmap transform(@NonNull BitmapPool pool, @NonNull Bitmap toTransform, int
                outWidth, int outHeight) {
            Bitmap source = toTransform ;

            int width = source.getWidth();
            int height = source.getHeight();
            int scaledWidth = width / mSampling;
            int scaledHeight = height / mSampling;

            Bitmap bitmap = mBitmapPool.get(scaledWidth, scaledHeight, Bitmap.Config.ARGB_8888);
            if (bitmap == null) {
                bitmap = Bitmap.createBitmap(scaledWidth, scaledHeight, Bitmap.Config.ARGB_8888);
            }

            Canvas canvas = new Canvas(bitmap);
            canvas.scale(1 / (float) mSampling, 1 / (float) mSampling);
            Paint paint = new Paint();
            paint.setFlags(Paint.FILTER_BITMAP_FLAG);
            canvas.drawBitmap(source, 0, 0, paint);

            if (Build.VERSION.SDK_INT >= Build.VERSION_CODES.JELLY_BEAN_MR2) {
                try {
                    bitmap = RSBlur.blur(mContext, bitmap, mRadius);
                } catch (RSRuntimeException e) {
                    bitmap = FastBlur.blur(bitmap, mRadius, true);
                }
            } else {
                bitmap = FastBlur.blur(bitmap, mRadius, true);
            }

            //return BitmapResource.obtain(bitmap, mBitmapPool);
            return bitmap;
        }

        @Override
        public int hashCode() {
            return ID.hashCode();
        }

        @Override
        public boolean equals(Object obj) {
            return obj instanceof BlurTransformation;
        }

        @Override
        public void updateDiskCacheKey(MessageDigest messageDigest) {
            messageDigest.update(ID_BYTES);
        }

    }
GLide具体的处理方法如下:
mohuImage = root.findViewById(R.id.userImg_mohu);
        circleImage = root.findViewById(R.id.userImg_circle);

        //背景模糊实现
        // 参数20 表示模糊背景图片的放大参数 越大背景图片越模糊
        Glide.with(getActivity())
                .load(R.mipmap.ic_user_img_chtholly)
                .apply(RequestOptions.bitmapTransform(new BlurTransformation(
                                                      getActivity(), 10, 1)))
                .into(mohuImage);
        //头像圆形实现
        Glide.with(getActivity())
                .load(R.mipmap.ic_user_img_chtholly)
                .into(circleImage);
TextView中边框文件配置如下:
<?xml version="1.0" encoding="utf-8"?>
<layer-list xmlns:android="http://schemas.android.com/apk/res/android">
    <item>
        <shape>
            <solid android:color="#ffa8abad" />
        </shape>
    </item>

    <item android:top="1dp">
        <shape >
            <solid android:color="#FFFFFF"     />
        </shape>
    </item>

</layer-list>
效果如上所示。


