Nginx详解
nginx安装配置

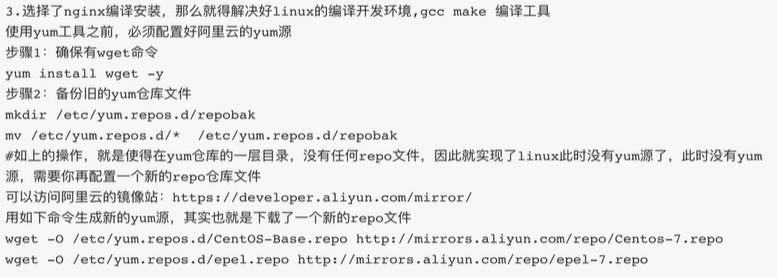
选择nginx编译安装,就得解决linux的编译开发环境,gcc make编译工具
https://developer.aliyun.com/mirror/centos?spm=a2c6h.13651102.0.0.3e221b118UVnYC

清空旧的yum缓存
yum clean all
生成新的阿里云的yum缓存,加速下次下载
yum makecache
yum install -y gcc gcc-c++ autoconf make

yum install zlib zlib-devel openssl openssl-devel pcre pcre-devel wget httpd-tools vim -y
安装完毕nginx所需的基础依赖库,还得检查系统的防火墙是否关闭,selinux,yum配置 ,网络情况等
iptables -L
getenforce
ping baidu.com
编译安装nginx
1.下载程序源代码 nginx官网
wget https://nginx.org/download/nginx-1.18.0.tar.gz
还可以获取淘宝的nginx代码
http://tengine.taobao.org/ #淘宝nginx官网
wget http://tengine.taobao.org/download/tengine-2.3.2.tar.gz
解压文件
tar -zxvf nginx-1.18.0.tar.gz # z:解压 x:拆包 v:显示过程 f:在最后 指定文件

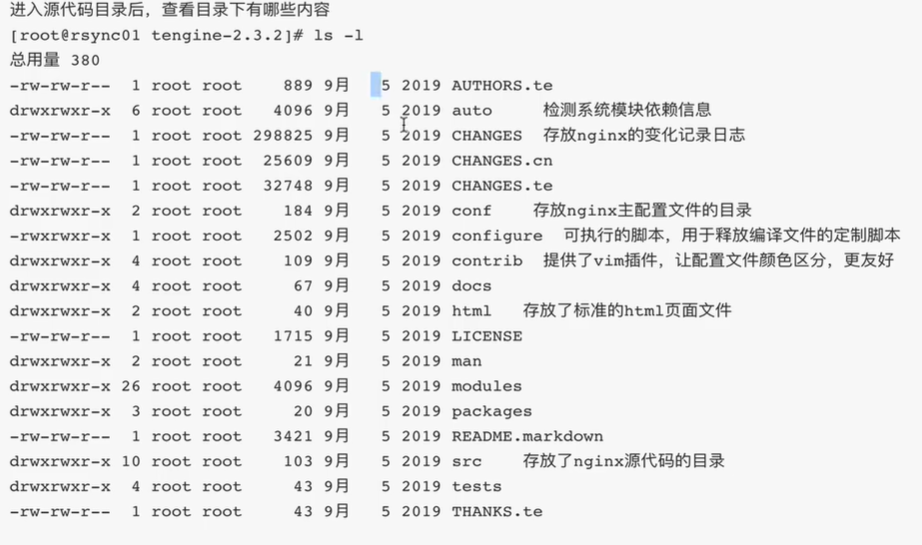
解压缩nginx源代码后,进入源代码目录,准备开始编译安装
进入源代码目录后,查看目录下有哪些内容

开始编译
进入软件源代码目录,执行编译脚本文件,如制定安装路径,以及开启额外功能等
查看编译脚本的信息
./configure --help
1.执行编译脚本文件,释放makefile等信息
./configure --prefix=/opt/nginx1.8 --with-http_ssl_module --with-http_flv_module --with-http_gzip_static_module --with-http_stub_status_module --with-threads --with-file-aio
2.(直接开始下一步安装) 输入make指令
3(如同点击开始安装) make install
查看安装后的nginx目录
[root@localhost ~]# cd /opt/nginx1.8/
[root@localhost nginx1.8]# ls
conf html logs sbin

直接执行nginx命令,默认是代表启动nginx进程

提示找不到nginx,如何解决
编写一个nginx的专属环境变量,创建一个脚本文件
vim /etc/profile.d/nginx.sh
export PATH="$PATH:/opt/nginx1.8/sbin"
退出当前会话,重新登录,系统默认加载 /etc/profile.d 下所有的环境变量文件
exit
退出会话后重新登录后,查看nginx的环境变量是否被添加了
[root@localhost ~]# echo $PATH
/usr/local/sbin:/usr/local/bin:/usr/sbin:/usr/bin:/opt/nginx1.8/sbin:/root/bi n

此时检查nginx 的编译安装信息
[root@localhost ~]# nginx -V
nginx version: nginx/1.18.0
built by gcc 4.8.5 20150623 (Red Hat 4.8.5-44) (GCC)
built with OpenSSL 1.0.2k-fips 26 Jan 2017
TLS SNI support enabled
configure arguments: --prefix=/opt/nginx1.8 --with-http_ssl_module --with-http_flv_module --with-http_gzip_static_module --with-http_stub_status_module --with-threads --with-file-aio


 浙公网安备 33010602011771号