NPOI生成excel并下载
NPOI文件下载地址:http://npoi.codeplex.com/
将文件直接引用至项目中即可,,,,,
虽然网上资料很多,但有可能并找不到自己想要的功能,今天闲的没事,所以就稍微整理了一个简单的例子,希望自己在以后的项目中用得着,到时候就不用在网上查找了,直接把代码copy过来就可以啦~~~~主要是在mvc控制器里面敲的,直接贴代码了。。。。。
1、逻辑代码
 public EmptyResult ExportExcle()
        {
            HSSFCellStyle style;
            HSSFFont font;
#if DEBUG
            UserInfo u = new UserInfo();
            List<UserInfo> list = u.GetDate();
            string url = Server.MapPath(@"\Content\File\MyBook.xls");
            string sheetName = "MySheet";
#endif
            HSSFWorkbook hssfworkbook = new HSSFWorkbook();
            FileStream filecreate = new FileStream(url, FileMode.Create, FileAccess.ReadWrite);
            //创建工作表
            HSSFSheet sheet = hssfworkbook.CreateSheet(sheetName) as HSSFSheet;
            IRow row = sheet.CreateRow(0);
            row.CreateCell(0).SetCellValue("用户编号");
            row.CreateCell(1).SetCellValue("用户名");
            row.CreateCell(2).SetCellValue("性别");
            row.CreateCell(3).SetCellValue("年龄");
            row.CreateCell(4).SetCellValue("电话");
            row.CreateCell(5).SetCellValue("身份证");
            //行高
            row.HeightInPoints = 20;
            //给表头单元格设置样式(对齐方式、边框、字体、背景颜色)
            List<ICell> cell = row.Cells;
            style = hssfworkbook.CreateCellStyle() as HSSFCellStyle;
            font = hssfworkbook.CreateFont() as HSSFFont;
            font.IsBold = true;//加粗
            font.FontName = "宋体";
            font.Color = HSSFColor.Red.Index;//字体颜色
            style.SetFont(font);
            this.CellStyle(style, sheet);
            style.FillForegroundColor = NPOI.HSSF.Util.HSSFColor.Green.Index;
            style.FillPattern = FillPattern.SolidForeground;
            cell.ForEach(delegate(ICell c)
            {
                c.CellStyle = style;
            });

            //加载内容
            if (list.Any())
            {
                style = hssfworkbook.CreateCellStyle() as HSSFCellStyle;
                this.CellStyle(style, sheet);
                for (int i = 0; i < list.Count; i++)
                {
                    row = sheet.CreateRow(i + 1);
                    row.HeightInPoints = 20;
                    row.CreateCell(0).SetCellValue(list[i].UserId);
                    row.CreateCell(1).SetCellValue(list[i].UserName);
                    row.CreateCell(2).SetCellValue(list[i].Sex);
                    row.CreateCell(3).SetCellValue(list[i].Age);
                    row.CreateCell(4).SetCellValue(list[i].Tel);
                    row.CreateCell(5).SetCellValue(list[i].IdCard);
                    cell = row.Cells;
                    cell.ForEach(p => p.CellStyle = style);
                }
            }
            //将流写入excel文件
            hssfworkbook.Write(filecreate);
            filecreate.Close();

            #region 下载文件
            FileStream fileopen = new FileStream(url, FileMode.Open);
            byte[] bytes = new byte[(int)fileopen.Length];
            fileopen.Read(bytes, 0, bytes.Length);
            Response.ContentType = "application/octet-stream";
            Response.AddHeader("Content-Disposition", "attachment; filename=" + HttpUtility.UrlEncode("MyBook.xls", System.Text.Encoding.UTF8));
            Response.BinaryWrite(bytes);
            fileopen.Close();
            Response.Flush();
            Response.End();
            return new EmptyResult();
            #endregion
        }
2、单元格样式
        /// <summary>
        /// 样式
        /// </summary>
        /// <param name="style"></param>
        /// <param name="sheet"></param>
        private void CellStyle(HSSFCellStyle style, HSSFSheet sheet)
        {
            //自动换行
            style.WrapText = true;
            //边框
            style.BorderBottom = BorderStyle.Thin;
            style.BorderLeft = BorderStyle.Thin;
            style.BorderRight = BorderStyle.Thin;
            style.BorderTop = BorderStyle.Thin;
            //对齐方式
            style.Alignment = HorizontalAlignment.Center;
            style.VerticalAlignment = VerticalAlignment.Center;
            //设置第四列、第五列的宽度
            sheet.SetColumnWidth(4, 20 * 256);
            sheet.SetColumnWidth(5, 30 * 256);
        }
3、数据源
private class UserInfo
        {
            public int UserId { get; set; }
            public string UserName { get; set; }
            public string Sex { get; set; }
            public int Age { get; set; }
            public string Tel { get; set; }
            public string IdCard { get; set; }

            public List<UserInfo> GetDate()
            {
                List<UserInfo> list = new List<UserInfo>()
                {
                 new UserInfo{UserId=1,UserName="张三",Sex="男",Age=20,Tel="18217722343",IdCard="150726198810235436"},
                 new UserInfo{UserId=2,UserName="李四",Sex="女",Age=23,Tel="18217722343",IdCard="150726198810235436"},
                 new UserInfo{UserId=3,UserName="王五",Sex="男",Age=21,Tel="18217722343",IdCard="150726198810235436"},
                 new UserInfo{UserId=4,UserName="赵六",Sex="女",Age=30,Tel="18217722343",IdCard="150726198810235436"},
                 new UserInfo{UserId=5,UserName="钱七",Sex="男",Age=45,Tel="18217722343",IdCard="150726198810235436"},
                 new UserInfo{UserId=6,UserName="张三",Sex="女",Age=18,Tel="18217722343",IdCard="150726198810235436"}
                };
                return list;
            }
        }
4、前端代码
之前遇到了一个问题,因为刚开始我使用的是Ajax方式提交的,所以在浏览器上无法看到下载提示框,最后搞了半天,原来是因为提交方式不对,换成location就可以了。
<!DOCTYPE html>

<html>
<head>
    <meta name="viewport" content="width=device-width" />
    <title>Index</title>
    <script src="~/Scripts/jquery-1.10.2.min.js"></script>
    <script type="text/javascript">
        $(function () {
            $("#btnExportExcle").click(function () {
                //var options = {
                //    type: 'get',
                //    cache: false,
                //    async:false,
                //    url: '/Index/ExportExcle',
                //    success: function (data) {
                //    }
                //};
                //$.ajax(options);
                location = "/Index/ExportExcle";
            });
        });
    </script>
</head>
<body>
    <input type="button" value="导出Excel" id="btnExportExcle" />
</body>
</html>
5、前台页面效果

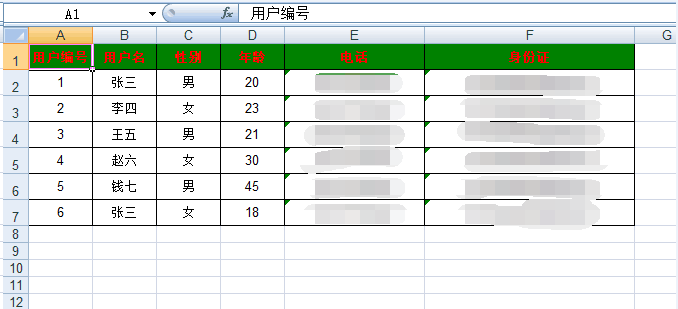
6、打开Excel

好了,就介绍到这里了,希望对大家也有所帮助~~~~

