一、Golang环境安装及配置Go Module#
https://go-zero.dev/cn/docs/prepare/golang-install
mac OS安装Go##
Copy Highlighter-hljs
$ go version
go version go1.15 .1 darwin/amd64
linux 安装Go##
下载Go for Linux
解压压缩包至/usr/local
Copy Highlighter-hljs
$ tar -C /usr/local -xzf go1.15.8.linux-amd64.tar.gz
Copy Highlighter-hljs
$ $HOME /.profile
$ export PATH=$PATH :/usr/local/go/bin
$ source $HOME /.profile
Copy Highlighter-hljs
$ go version
go version go1.15 .1 linux/amd64
Windows安装Go##
下载并安装Go for Windows
验证安装结果
Copy Highlighter-hljs
$ go version
go version go1.15 .1 windows/amd64
MODULE配置#
Go Module是Golang管理依赖性的方式,像Java中的Maven,Android中的Gradle类似。
Copy Highlighter-hljs
开启GO111MODULE,如果已开启(即执行go env GO111MODULE结果为on)请跳过。
Copy Highlighter-hljs
$ go env -w GO111MODULE="on"
Copy Highlighter-hljs
$ go env -w GOPROXY=https://goproxy.cn
Copy Highlighter-hljs
查看GOMODCACHE
$ go env GOMODCACHE
Copy Highlighter-hljs
go env -w GOMODCACHE=$GOPATH /pkg/mod
二、Goctl 安装#
Goctl在go-zero项目开发着有着很大的作用,其可以有效的帮助开发者大大提高开发效率,减少代码的出错率,缩短业务开发的工作量,更多的Goctl的介绍请阅读Goctl介绍
Copy Highlighter-hljs
GO111MODULE =on GOPROXY=https://goproxy.cn/,direct go get -u github.com/zeromicro/go-zero/tools/goctl@latest
GOPROXY =https://goproxy.cn/,direct go install github.com/zeromicro/go-zero/tools/goctl@latest
Copy Highlighter-hljs
go install github.com/zeromicro/go -zero/tools/goctl@latest
环境变量检测(mac&linux)$ GOPATH/bin 目录下,要确保 $GOPATH/bin已经添加到环境变量。
Copy Highlighter-hljs
sudo vim /etc/paths //添加环境变量
在最后一行添加如下内容 //$GOPATH 为你本机上的文件地址
Copy Highlighter-hljs
$GOPATH /bin
Copy Highlighter-hljs
$ goctl -v
goctl version 1.1.4 darwin/amd64
二、初始化go-zero#
Copy Highlighter-hljs
goctl api new greet
cd greet
go mod init
go mod tidy
go run greet.go -f etc/greet-api.yaml
默认侦听在 8888 端口greet-api.yaml配置文件里修改,此时,可以通过 curl 请求,或者直接在浏览器中打开http://localhost:8888/from/you
Copy Highlighter-hljs
$ curl -i http://localhost:8888/from/you
HTTP/1.1 200 OK
Content-Type: application/json; charset=utf-8
Traceparent: 00 -45fa9e7a7c505bad3a53a024e425ace9-eb5787234cf3e308-00
Date: Thu, 22 Oct 2020 14:03:18 GMT
Content-Length: 14
null
Copy Highlighter-hljs
$ tree greet
greet
├── etc
│ └── greet-api.yaml
├── greet.api
├── greet.go
└── internal
├── config
│ └── config.go
├── handler
│ ├── greethandler.go
│ └── routes.go
├── logic
│ └── greetlogic.go
├── svc
│ └── servicecontext.go
└── types
└── types.go
三、查看注册Handler路由流程#
Copy Highlighter-hljs
var configFile = flag.String("f" , "etc/greet-api.yaml" , "the config file" )
func main ()
flag.Parse()
var c config.Config
conf.MustLoad(*configFile, &c)
server := rest.MustNewServer(c.RestConf)
defer server.Stop()
ctx := svc.NewServiceContext(c)
handler.RegisterHandlers(server, ctx)
fmt.Printf("Starting server at %s:%d...\n" , c.Host, c.Port)
server.Start()
}
RegisterHandlers在internal\handler\routes.go中
Copy Highlighter-hljs
func RegisterHandlers(server *rest .Server , serverCtx *svc.ServiceContext ) {
server.AddRoutes ( //往rest .Server 中添加路由
[] rest .Route { //路由数组
{
Method: http.MethodGet,
Path: "/from/:name" , //路由
Handler: GreetHandler (serverCtx),//当前路由的处理Handler
},
},
)
}
GreetHandler在internal\handler\greethandler.go中
Copy Highlighter-hljs
func GreetHandler (ctx *svc.ServiceContext)
return func (w http.ResponseWriter, r *http.Request)
1. var req types.Request
2. if err := httpx.Parse(r, &req); err != nil {
3. httpx.Error(w, err)
4. return
5. }
l := logic.NewGreetLogic(r.Context(), ctx)
resp, err := l.Greet(req)
if err != nil {
httpx.Error(w, err)
} else {
httpx.OkJson(w, resp)
}
}
}
四、对注册Handler路由进行简化#
项目文件的增加#
在路由注册时,我们如果服务越加越多,那么相对应的func xxxxHandler(ctx *svc.ServiceContext) http.HandlerFunc就要进行多次的添加,并且这个方法体内部1到5行是属于额外的重复添加customlogic.gointernal\logic目录下添加customlogic.go文件,然后在internal\handler目录下添加customhandler.go文件,并且两个文件都添加相对应的结构体和函数等,最后在routes.go中再添加一次
Copy Highlighter-hljs
{
Method: http.MethodGet,
Path: "/custom/:name" ,
Handler: CustomHandler (serverCtx),
},
此时,我们的文件结构应该是这样
Copy Highlighter-hljs
greet
├── etc
│ └── greet-api.yaml
├── greet.api
├── greet.go
└── internal
├── config
│ └── config.go
├── handler
│ ├── greethandler.go
│ ├── customhandler.go
│ ├── ...
│ └── routes.go
├── logic
│ ├── greetlogic.go
│ ├── ...
│ └── customlogic.go
├── svc
│ └── servicecontext.go
└── types
└── types.go
当单体应用达到一定的数量级,handler和logic文件夹下将会同步增加很多的文件
引入泛型概念#
自Go1.18开始,go开始使用泛型,泛型的广泛定义 :是一种把明确类型的工作推迟到创建对象或者调用方法的时候才去明确的特殊的类型。 也就是说在泛型使用过程中,操作的数据类型被指定为一个参数,而这种参数类型可以用在 类、方法和接口 中,分别被称为 泛型类 、 泛型方法 、 泛型接口 。Handler: GreetHandler(serverCtx)推迟到后面,去根据实际的Logic结构体去判断需要真正执行的logic.NewGreetLogic(r.Context(), ctx)初始化结构体和l.Greet(req)逻辑处理方法
如何去做#
在internal\logic下添加一个baselogic.go文件,参考Go泛型实战 | 如何在结构体中使用泛型
Copy Highlighter-hljs
package logic
import (
"greet/internal/svc"
"greet/internal/types"
"net/http"
)
type BaseLogic interface {
any
Handler(req types.Request, w http.ResponseWriter, r *http.Request, svcCtx *svc.ServiceContext)
}
type logic[T BaseLogic] struct {
data T
}
func New [T BaseLogic ]()
c := logic[T]{}
var ins T
c.data = ins
return c
}
func (a *logic[T])
a.data.Handler(req, w, r, svcCtx)
}
将greethandler.go文件修改成basehandler.go,注释掉之前的GreetHandler方法
Copy Highlighter-hljs
package handler
import (
"net/http"
"greet/internal/logic"
"greet/internal/svc"
"greet/internal/types"
"github.com/zeromicro/go-zero/rest/httpx"
)
func BaseHandlerFunc [T logic .BaseLogic ](svcCtx *svc.ServiceContext, t T)
return func (w http.ResponseWriter, r *http.Request)
var req types.Request
if err := httpx.Parse(r, &req); err != nil {
httpx.Error(w, err)
return
}
cc := logic.New[T]()
cc.LogicHandler(req, w, r, svcCtx)
}
}
在internal\logic\greetlogic.go中增加一个Handler方法
Copy Highlighter-hljs
package logic
import (
"context"
"net/http"
"greet/internal/svc"
"greet/internal/types"
"github.com/zeromicro/go-zero/core/logx"
"github.com/zeromicro/go-zero/rest/httpx"
)
type GreetLogic struct {
logx.Logger
ctx context.Context
svcCtx *svc.ServiceContext
}
func NewGreetLogic (ctx context.Context, svcCtx *svc.ServiceContext)
return &GreetLogic{
Logger: logx.WithContext(ctx),
ctx: ctx,
svcCtx: svcCtx,
}
}
func (a GreetLogic)
l := NewGreetLogic(r.Context(), svcCtx)
resp, err := l.Greet(&req)
if err != nil {
httpx.Error(w, err)
} else {
httpx.OkJson(w, resp)
}
}
func (l *GreetLogic) error ) {
response := new (types.Response)
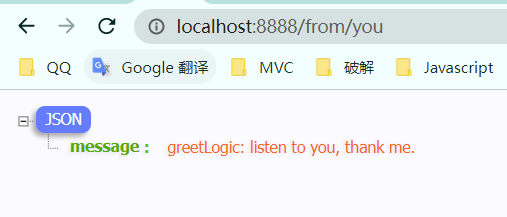
if (*req).Name == "me" {
response.Message = "greetLogic: listen to me, thank you."
} else {
response.Message = "greetLogic: listen to you, thank me."
}
return response, nil
}
然后修改internal\handler\routes.go下面的server.AddRoutes部分
Copy Highlighter-hljs
func RegisterHandlers(server *rest .Server , serverCtx *svc.ServiceContext ) {
server.AddRoutes ( //往rest .Server 中添加路由
[] rest .Route { //路由数组
{
Method: http.MethodGet,
Path: "/from/:name" , //路由
Handler: BaseHandlerFunc (serverCtx,logic.GreetLogic{}),
},
},
)
}
现在就大功告成了,我们启动一下
Copy Highlighter-hljs
go run greet.go -f etc/greet-api.yaml
然后在浏览器中请求一下http://localhost:8888/from/you
验证一下新增api路由#
在internal\logic下新增一个customlogic.go文件
Copy Highlighter-hljs
package logic
import (
"context"
"net/http"
"greet/internal/svc"
"greet/internal/types"
"github.com/zeromicro/go-zero/core/logx"
"github.com/zeromicro/go-zero/rest/httpx"
)
type CustomLogic struct {
logx.Logger
ctx context.Context
svcCtx *svc.ServiceContext
}
func NewCustomLogic (ctx context.Context, svcCtx *svc.ServiceContext)
return &CustomLogic{
Logger: logx.WithContext(ctx),
ctx: ctx,
svcCtx: svcCtx,
}
}
func (a CustomLogic)
l := NewCustomLogic(r.Context(), svcCtx)
resp, err := l.Custom(&req)
if err != nil {
httpx.Error(w, err)
} else {
httpx.OkJson(w, resp)
}
}
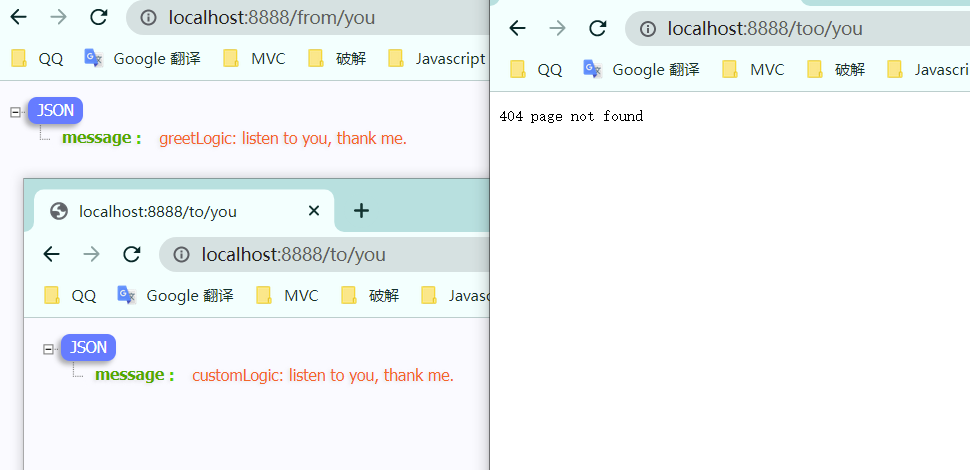
func (l *CustomLogic) error ) {
response := new (types.Response)
if (*req).Name == "me" {
response.Message = "customLogic: listen to me, thank you."
} else {
response.Message = "customLogic: listen to you, thank me."
}
return response, nil
}
然后修改internal\handler\routes.go
Copy Highlighter-hljs
func RegisterHandlers(server *rest .Server , serverCtx *svc.ServiceContext ) {
server.AddRoutes ( //往rest .Server 中添加路由
[] rest .Route { //路由数组
{
Method: http.MethodGet,
Path: "/from/:name" , //路由
Handler: BaseHandlerFunc (serverCtx,logic.GreetLogic{}),
},
{
Method: http.MethodGet,
Path: "/to/:name" , //路由
Handler: BaseHandlerFunc (serverCtx,logic.CustomLogic{}),
},
},
)
}
其他地方不需要修改
Copy Highlighter-hljs
go run greet.go -f etc/greet-api.yaml
然后在浏览器中请求一下http://localhost:8888/from/you、http://localhost:8888/to/you、http://localhost:8888/too/you
现在,在添加新的logic做路由映射时,就可以直接简化掉添加xxxxhandler.go文件了,实际上是将这个Handler移动到了xxxxlogic.go中。
新手,不喜轻喷
五、后面对于之前繁琐的泛型使用进行了简化#
BaseHandlerFunc中改为
Copy Highlighter-hljs
func BaseHandlerFunc [T logic .BaseLogic ](svcCtx *svc.ServiceContext, t T)
return func (w http.ResponseWriter, r *http.Request)
var req types.Request
if err := httpx.Parse(r, &req); err != nil {
httpx.Error(w, err)
return
}
var ins T
ins.Handler(req, w, r, svcCtx)
}
}
baselogic.go改为
Copy Highlighter-hljs
package logic
import (
"greet/internal/svc"
"greet/internal/types"
"net/http"
)
type BaseLogic interface {
any
Handler(req types.Request , w http.ResponseWriter , r *http.Request , svcCtx *svc.ServiceContext )
}
这样就可以了


【推荐】国内首个AI IDE,深度理解中文开发场景,立即下载体验Trae
【推荐】编程新体验,更懂你的AI,立即体验豆包MarsCode编程助手
【推荐】抖音旗下AI助手豆包,你的智能百科全书,全免费不限次数
【推荐】轻量又高性能的 SSH 工具 IShell:AI 加持,快人一步
· winform 绘制太阳,地球,月球 运作规律
· AI与.NET技术实操系列(五):向量存储与相似性搜索在 .NET 中的实现
· 超详细:普通电脑也行Windows部署deepseek R1训练数据并当服务器共享给他人
· 上周热点回顾(3.3-3.9)
· AI 智能体引爆开源社区「GitHub 热点速览」