
Rust中的ORM探索 Diesel库(2):使用Diesel完成CRUD操作
介绍
在上文中,已经将diesel安装配置成功。接下来,我们跟着官网的例子,在项目操作MySQL数据库。
1. 在项目中配置Diesel
首先,我们需要告诉 Diesel 去哪里找到数据库。第一种方式,可以通过配置机器的环境变量DATABASE_URL来实现,但是这样是全局的,当有多个项目时无法灵活使用。因此,我们使用第二种方式,在项目目录中创建.env文件,Diesel运行时优先使用.env文件中的配置信息。如,我们使用本地MySQL数据:
echo DATABASE_URL=mysql://root:123456@localhost/diesel_demo > .env创建配置后,使用Diesel CLI生成配置:
diesel setup如果本地MySQL中没有test数据库,执行命令后,会创建名为diesel_demo的数据库。

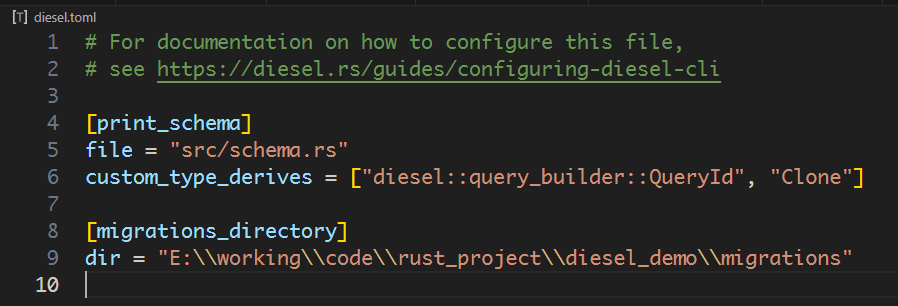
同时生成diesel.toml配置文件和迁移目录,配置文件内容如下:
现在,我们使用Diesel CLI创建一个migration。执行后,Diesel CLI会创建两个空文件。
diesel migration generate init
up.sql存放应用变更,down.sql存放恢复变更。
如up.sql(MySQL)文件:
CREATE TABLE posts (
  id INTEGER AUTO_INCREMENT PRIMARY KEY,
  title VARCHAR(255) NOT NULL,
  body TEXT NOT NULL,
  published BOOLEAN NOT NULL DEFAULT FALSE
);
down.sql(MySQL)文件:
DROP TABLE posts执行migration命令,diesel会根据up.sql文件创建posts表
diesel migration run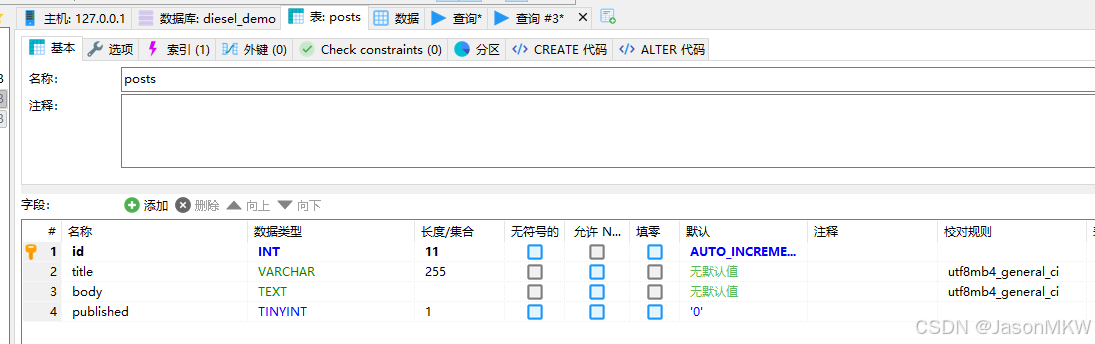
同时创建src/schema.rs文件,文件内容:
// @generated automatically by Diesel CLI.

diesel::table! {
    posts (id) {
        id -> Integer,
        #[max_length = 255]
        title -> Varchar,
        body -> Text,
        published -> Bool,
    }
}
diesel::table! 宏中列出了表中的字段和字段类型。 详细介绍可以看官方文档
2. 编写rust代码
第一步,先建立数据库连接
use diesel::prelude::*;
use dotenvy::dotenv;
use std::env;

pub fn establish_connection() -> MysqlConnection {
    dotenv().ok();

    let database_url = env::var("DATABASE_URL").expect("DATABASE_URL must be set");
    MysqlConnection::establish(&database_url)
        .unwrap_or_else(|_| panic!("Error connecting to {}", database_url))
}
查询数据库
在src/models.rs文件中创建一个Post结构体,表示数据库中数据格式。
use diesel::prelude::*;

#[derive(Queryable, Selectable)]
#[diesel(table_name = crate::schema::posts)]
#[diesel(check_for_backend(diesel::mysql::Mysql))]
pub struct Post {
    pub id: i32,
    pub title: String,
    pub body: String,
    pub published: bool,
}
#[derive(Queryable)] 将生成从 SQL 查询加载 Post 结构所需的所有代码。
#[derive(Selectable)] 将生成代码,根据通过 #[diesel(table_name = crate::schema::posts)] 定义的表的模型类型构造匹配的 select 子句。
#[diesel(check_for_backend(diesel::mysql::Mysql))] (可选)将在编译时检查以验证结构中的所有字段类型与其相应的 SQL 端表达式兼容。
下一步,在src/lib.rs中声明models和schema两个模块
pub mod models;
pub mod schema;
最后,我们在src/bin/show_posts.rs 中,编写代码查询数据库中的内容,并展示
use self::models::*;
use diesel::prelude::*;
use diesel_demo::*;

fn main() {
    use self::schema::posts::dsl::*;

    let connection = &mut establish_connection();
    let results = posts
        .filter(published.eq(true))
        .limit(5)
        .select(Post::as_select())
        .load(connection)
        .expect("Error loading posts");

    println!("Displaying {} posts", results.len());
    for post in results {
        println!("{}", post.title);
        println!("-----------\n");
        println!("{}", post.body);
    }
}
运行命令,编译并执行
cargo run --bin show_posts创建新数据
在src/models.rs文件中创建NewPost结构体,用于插入新记录
use crate::schema::posts;

#[derive(Insertable)]
#[diesel(table_name = posts)]
pub struct NewPost<'a> {
    pub title: &'a str,
    pub body: &'a str,
}
下一步,在src/lib.rs中,添加保存新帖子的功能
use self::models::{NewPost, Post};

pub fn create_post(conn: &mut MysqlConnection, title: &str, body: &str) -> Post {
    use crate::schema::posts;

    let new_post = NewPost { title, body };

    conn.transaction(|conn| {
        diesel::insert_into(posts::table)
            .values(&new_post)
            .execute(conn)?;

        posts::table
            .order(posts::id.desc())
            .select(Post::as_select())
            .first(conn)
    })
    .expect("Error while saving post")
}
最后在src/bin/write_post.rs文件中,编写调用的代码
use diesel_demo::*;
use std::io::{stdin, Read};

fn main() {
    let connection = &mut establish_connection();

    let mut title = String::new();
    let mut body = String::new();

    println!("What would you like your title to be?");
    stdin().read_line(&mut title).unwrap();
    let title = title.trim_end(); // Remove the trailing newline

    println!("\nOk! Let's write {title} (Press {EOF} when finished)\n",);
    stdin().read_to_string(&mut body).unwrap();

    let post = create_post(connection, title, &body);
    println!("\nSaved draft {title} with id {}", post.id);
}

#[cfg(not(windows))]
const EOF: &str = "CTRL+D";

#[cfg(windows)]
const EOF: &str = "CTRL+Z";
编译并执行write_post
cargo run --bin write_post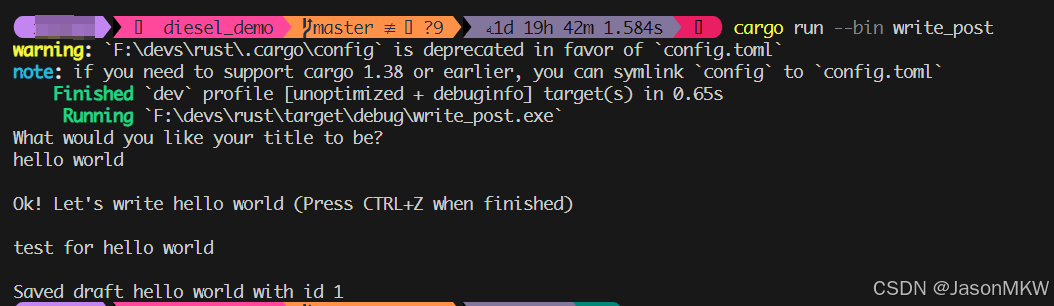
更新数据
执行后,查看数据库中增加了一条记录。但是当我们执行show_posts时,无法查出刚添加的记录。原因是我们在查询数据时,我们增加了过滤器.filter(published.eq(true)),刚插入的数据published为false。接下来我们编写代码修改数据库,将该条记录的published修改为true。
在src/bin/publish_post.rs编写修改数据库的代码
use self::models::Post;
use diesel::prelude::*;
use diesel_demo::*;
use std::env::args;

fn main() {
    use self::schema::posts::dsl::{posts, published};

    let id = args()
        .nth(1)
        .expect("publish_post requires a post id")
        .parse::<i32>()
        .expect("Invalid ID");
    let connection = &mut establish_connection();

    let post = connection
        .transaction(|connection| {
            let post = posts.find(id).select(Post::as_select()).first(connection)?;

            diesel::update(posts.find(id))
                .set(published.eq(true))
                .execute(connection)?;
            Ok(post)
        })
        .unwrap_or_else(|_: diesel::result::Error| panic!("Unable to find post {}", id));

    println!("Published post {}", post.title);
}
接下来我们用cargo run --bin publish_post 1 来尝试修改第一条记录

查询单条数据
之前的show_posts,可以查询所有published为true的数据记录。下面我们尝试根据id查询单条记录。在src/bin/get_post.rs编写代码
use self::models::Post;
use diesel::prelude::*;
use diesel_demo::*;
use std::env::args;

fn main() {
    use self::schema::posts::dsl::posts;

    let post_id = args()
        .nth(1)
        .expect("get_post requires a post id")
        .parse::<i32>()
        .expect("Invalid ID");

    let connection = &mut establish_connection();

    let post = posts
        .find(post_id)
        .select(Post::as_select())
        .first(connection)
        .optional(); // This allows for returning an Option<Post>, otherwise it will throw an error

    match post {
        Ok(Some(post)) => println!("Post with id: {} has a title: {}", post.id, post.title),
        Ok(None) => println!("Unable to find post {}", post_id),
        Err(_) => println!("An error occured while fetching post {}", post_id),
    }
}
现在我们可以执行命令 cargo run --bin get_post 1

删除数据
截止现在我们已经编写了CRUD的是三个,接下来我们在src/bin/delete_post.rs中编写删除数据。
use diesel::prelude::*;
use diesel_demo::*;
use std::env::args;

fn main() {
    use self::schema::posts::dsl::*;

    let post_id = args()
        .nth(1)
        .expect("delete_post requires a post id")
        .parse::<i32>()
        .expect("Invalid ID");

    let connection = &mut establish_connection();
    diesel::delete(posts.filter(id.eq(post_id)))
        .execute(connection)
        .expect("Error deleting post");

    println!("Deleted post {}", post_id);
}
现在我们来执行命令 cargo run --bin delete_post 1

总结
至此,我们已经将Diesel的CRUD操作都编写完成了,当然这些只是触及了diesel皮毛。后续我们可以参考diesel的学习更多的内容。
本文来自博客园,作者:Spanner,转载请注明原文链接:https://www.cnblogs.com/spanner/p/18670249

 浙公网安备 33010602011771号