Tomcat 传递请求到应用程序
先上一个图: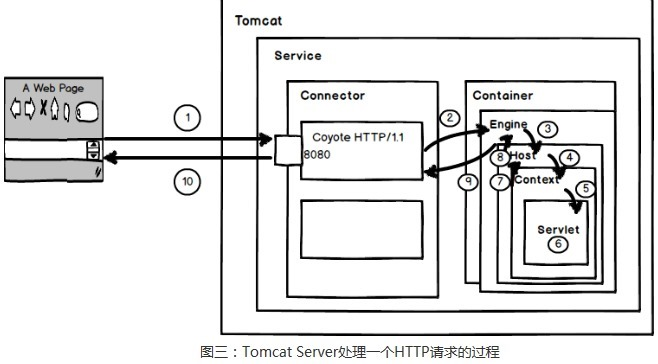
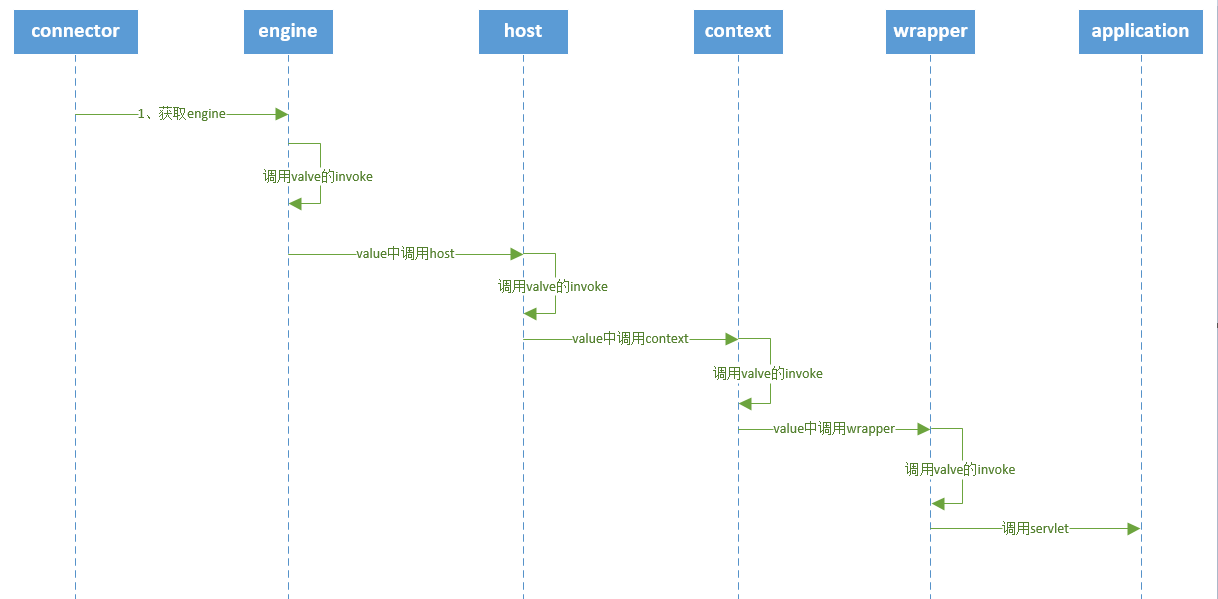
从图上我们可以了解到跟一个请求相关的组件大概有 connector、coyote、engine、host、context、servlet
那么会有几个问题:
1、connector是如何监听和接收请求的
2、connector如何传递请求到engine
3、engine又是如何经过一步一步的传递到servlet中
4、servlet又是如何传递到我们自己写的servlet中
1、connector如何接收请求
a、从tomcat初始化和启动,可以看出connector会反射初始化一个protocolHandler,
 1     public Connector(String protocol) {
 2         setProtocol(protocol);
 3         // Instantiate protocol handler
 4         ProtocolHandler p = null;
 5         try {
 6             Class<?> clazz = Class.forName(protocolHandlerClassName);
 7             p = (ProtocolHandler) clazz.getConstructor().newInstance();
 8         } catch (Exception e) {
 9             log.error(sm.getString(
10                     "coyoteConnector.protocolHandlerInstantiationFailed"), e);
11         } finally {
12             this.protocolHandler = p;
13         }
14
15         if (Globals.STRICT_SERVLET_COMPLIANCE) {
16             uriCharset = StandardCharsets.ISO_8859_1;
17         } else {
18             uriCharset = StandardCharsets.UTF_8;
19         }
20     }
在初始化connector的时候也会初始化protocolHandler的adapter
        // Initialize adapter
        adapter = new CoyoteAdapter(this);
        protocolHandler.setAdapter(adapter);
protocolHandler我们一般会在server.xml中配置 org.apache.coyote.http11.Http11NioProtocol ,如果不配置默认也是NioProtocol(tomcat8中)
    /**
     * Coyote Protocol handler class name.
     * Defaults to the Coyote HTTP/1.1 protocolHandler.
     */
    protected String protocolHandlerClassName = "org.apache.coyote.http11.Http11NioProtocol";
b、protocol 在初始化的时候又会初始化endpoint
public class Http11NioProtocol extends AbstractHttp11JsseProtocol<NioChannel> {

    private static final Log log = LogFactory.getLog(Http11NioProtocol.class);


    public Http11NioProtocol() {
        super(new NioEndpoint());
    }
最终会调用父类的构造方法,有设置默认连接超时时间为60000毫秒,并且初始化一个ConnectionHandler,这个类就是请求处理的入口。
    public AbstractHttp11Protocol(AbstractEndpoint<S> endpoint) {
        super(endpoint);
        setConnectionTimeout(Constants.DEFAULT_CONNECTION_TIMEOUT);
        ConnectionHandler<S> cHandler = new ConnectionHandler<>(this);
        setHandler(cHandler);
        getEndpoint().setHandler(cHandler);
    }
public static final int DEFAULT_CONNECTION_TIMEOUT = 60000;
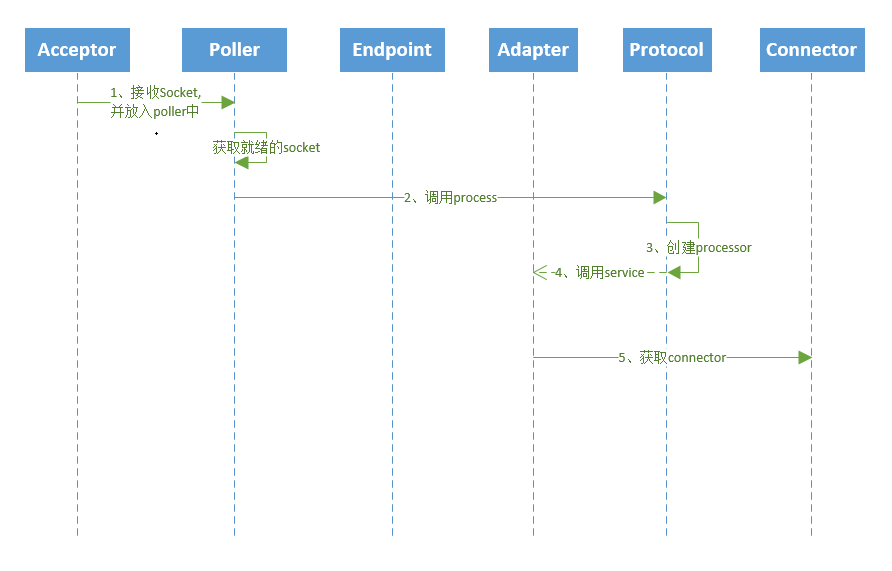
c、上面找到了请求入口,那么下面我们看一下如何接收的(endpoint)
在初始化和启动protocol的时候会一起初始化和启动endpoint,在endpoint中会启动一批poller线程和acceptor线程
/**
     * Start the NIO endpoint, creating acceptor, poller threads.
     */
    @Override
    public void startInternal() throws Exception {
            .......
            // Start poller threads
            pollers = new Poller[getPollerThreadCount()];
            for (int i=0; i<pollers.length; i++) {
                pollers[i] = new Poller();
                Thread pollerThread = new Thread(pollers[i], getName() + "-ClientPoller-"+i);
                pollerThread.setPriority(threadPriority);
                pollerThread.setDaemon(true);
                pollerThread.start();
            }

            startAcceptorThreads();
        }
    }
    protected final void startAcceptorThreads() {
        int count = getAcceptorThreadCount();
        acceptors = new Acceptor[count];

        for (int i = 0; i < count; i++) {
            acceptors[i] = createAcceptor();
            String threadName = getName() + "-Acceptor-" + i;
            acceptors[i].setThreadName(threadName);
            Thread t = new Thread(acceptors[i], threadName);
            t.setPriority(getAcceptorThreadPriority());
            t.setDaemon(getDaemon());
            t.start();
        }
    }
下面看一下Acceptor的Nio实现:
/**
     * The background thread that listens for incoming TCP/IP connections and
     * hands them off to an appropriate processor.
     */
    protected class Acceptor extends AbstractEndpoint.Acceptor {

        @Override
        public void run() {

            int errorDelay = 0;

            // Loop until we receive a shutdown command
            while (running) {

                // Loop if endpoint is paused
                while (paused && running) {
                    state = AcceptorState.PAUSED;
                    try {
                        Thread.sleep(50);
                    } catch (InterruptedException e) {
                        // Ignore
                    }
                }

                if (!running) {
                    break;
                }
                state = AcceptorState.RUNNING;

                try {
                    //if we have reached max connections, wait
                    countUpOrAwaitConnection();

                    SocketChannel socket = null;
                    try {
                        // Accept the next incoming connection from the server
                        // socket
                        socket = serverSock.accept();
                    } catch (IOException ioe) {
                        // We didn't get a socket
                        countDownConnection();
                        if (running) {
                            // Introduce delay if necessary
                            errorDelay = handleExceptionWithDelay(errorDelay);
                            // re-throw
                            throw ioe;
                        } else {
                            break;
                        }
                    }
                    // Successful accept, reset the error delay
                    errorDelay = 0;

                    // Configure the socket
                    if (running && !paused) {
                        // setSocketOptions() will hand the socket off to
                        // an appropriate processor if successful
                        if (!setSocketOptions(socket)) {
                            closeSocket(socket);
                        }
                    } else {
                        closeSocket(socket);
                    }
                } catch (Throwable t) {
                    ExceptionUtils.handleThrowable(t);
                    log.error(sm.getString("endpoint.accept.fail"), t);
                }
            }
            state = AcceptorState.ENDED;
        }
上面可以看见主要做的事就是接收一个socket连接,然后调用setSocketOptions()
    protected boolean setSocketOptions(SocketChannel socket) {
        // Process the connection
        try {
            //disable blocking, APR style, we are gonna be polling it
            socket.configureBlocking(false);
            Socket sock = socket.socket();
            socketProperties.setProperties(sock);

            NioChannel channel = nioChannels.pop();
            if (channel == null) {
                SocketBufferHandler bufhandler = new SocketBufferHandler(
                        socketProperties.getAppReadBufSize(),
                        socketProperties.getAppWriteBufSize(),
                        socketProperties.getDirectBuffer());
                if (isSSLEnabled()) {
                    channel = new SecureNioChannel(socket, bufhandler, selectorPool, this);
                } else {
                    channel = new NioChannel(socket, bufhandler);
                }
            } else {
                channel.setIOChannel(socket);
                channel.reset();
            }
            getPoller0().register(channel);
        } catch (Throwable t) {
            ExceptionUtils.handleThrowable(t);
            try {
                log.error("",t);
            } catch (Throwable tt) {
                ExceptionUtils.handleThrowable(tt);
            }
            // Tell to close the socket
            return false;
        }
        return true;
    }
在setSocketOptions中,会将socket的channel放入poller中处理。
        /**
         * Registers a newly created socket with the poller.
         *
         * @param socket    The newly created socket
         */
        public void register(final NioChannel socket) {
            socket.setPoller(this);
            NioSocketWrapper ka = new NioSocketWrapper(socket, NioEndpoint.this);
            socket.setSocketWrapper(ka);
            ka.setPoller(this);
            ka.setReadTimeout(getSocketProperties().getSoTimeout());
            ka.setWriteTimeout(getSocketProperties().getSoTimeout());
            ka.setKeepAliveLeft(NioEndpoint.this.getMaxKeepAliveRequests());
            ka.setSecure(isSSLEnabled());
            ka.setReadTimeout(getConnectionTimeout());
            ka.setWriteTimeout(getConnectionTimeout());
            PollerEvent r = eventCache.pop();
            ka.interestOps(SelectionKey.OP_READ);//this is what OP_REGISTER turns into.
            if ( r==null) r = new PollerEvent(socket,ka,OP_REGISTER);
            else r.reset(socket,ka,OP_REGISTER);
            addEvent(r);
        }
注册channel事件的时候,先将channel包装成一个socketWrapper然后放入poller中,
Nio的poller大概实现的功能包括:请求事件注册(上面方法),获取请求就绪的socket,处理就绪的socket
1)请求注册到select上面,获取事件,调用run()方法来注册socket
        /**
         * Processes events in the event queue of the Poller.
         *
         * @return <code>true</code> if some events were processed,
         *   <code>false</code> if queue was empty
         */
        public boolean events() {
            boolean result = false;

            PollerEvent pe = null;
            for (int i = 0, size = events.size(); i < size && (pe = events.poll()) != null; i++ ) {
                result = true;
                try {
                    pe.run();
                    pe.reset();
                    if (running && !paused) {
                        eventCache.push(pe);
                    }
                } catch ( Throwable x ) {
                    log.error("",x);
                }
            }

            return result;
        }
event的run方法会将socket时间注入到select上
            if (interestOps == OP_REGISTER) {
                try {
                    socket.getIOChannel().register(
                            socket.getPoller().getSelector(), SelectionKey.OP_READ, socketWrapper);
                } catch (Exception x) {
                    log.error(sm.getString("endpoint.nio.registerFail"), x);
                }
            } else {
                final SelectionKey key = socket.getIOChannel().keyFor(socket.getPoller().getSelector());
2)poller注册了socket事件,当事件就绪后,poller会获取就绪的socket
                Iterator<SelectionKey> iterator =
                    keyCount > 0 ? selector.selectedKeys().iterator() : null;
                // Walk through the collection of ready keys and dispatch
                // any active event.
                while (iterator != null && iterator.hasNext()) {
                    SelectionKey sk = iterator.next();
                    NioSocketWrapper attachment = (NioSocketWrapper)sk.attachment();
                    // Attachment may be null if another thread has called
                    // cancelledKey()
                    if (attachment == null) {
                        iterator.remove();
                    } else {
                        iterator.remove();
                        processKey(sk, attachment);
                    }
                }//while
processKey主要会做3件事: 处理sendFile(后面讲)、处理socket、关闭socket
              if ( attachment.getSendfileData() != null ) {
                            processSendfile(sk,attachment, false);
                        } else {
                            unreg(sk, attachment, sk.readyOps());
                            boolean closeSocket = false;
                            // Read goes before write
                            if (sk.isReadable()) {
                                if (!processSocket(attachment, SocketEvent.OPEN_READ, true)) {
                                    closeSocket = true;
                                }
                            }
3)处理socket事件
                    SocketState state = SocketState.OPEN;
                    // Process the request from this socket
                    if (event == null) {
                        state = getHandler().process(socketWrapper, SocketEvent.OPEN_READ);
                    } else {
                        state = getHandler().process(socketWrapper, event);
                    }
handler极为最初connector初始化的Http11NioProtocol ,process()方法会创建一个processor,并调用processor的process()方法
                if (processor == null) {
                    processor = getProtocol().createProcessor();
                    register(processor);
                }

                processor.setSslSupport(
                        wrapper.getSslSupport(getProtocol().getClientCertProvider()));

                // Associate the processor with the connection
                connections.put(socket, processor);

                SocketState state = SocketState.CLOSED;
                do {
                    state = processor.process(wrapper, status);
getProtocol().createProcessor()创建的是Http11Processor对象,主要功能是process,service,dispatch,dispatch暂时不讲,process会调用service方法来处理请求。
            } else if (isAsync() || isUpgrade() || state == SocketState.ASYNC_END) {
                state = dispatch(status);
                if (state == SocketState.OPEN) {
                    // There may be pipe-lined data to read. If the data isn't
                    // processed now, execution will exit this loop and call
                    // release() which will recycle the processor (and input
                    // buffer) deleting any pipe-lined data. To avoid this,
                    // process it now.
                    state = service(socketWrapper);
                }
service 方法又会调用adapter的service方法
            // Process the request in the adapter
            if (!getErrorState().isError()) {
                try {
                    rp.setStage(org.apache.coyote.Constants.STAGE_SERVICE);
                    getAdapter().service(request, response);
终上所述,我们已经走到Adapter(CoyoteAdapter)的service方法了,也就是最上面的图的第一步已经走完了。那么请求又是如何从adapter传递到Engine的呢。
                //check valves if we support async
                request.setAsyncSupported(
                        connector.getService().getContainer().getPipeline().isAsyncSupported());
                // Calling the container
                connector.getService().getContainer().getPipeline().getFirst().invoke(
                        request, response);
3、connector.getService()获取到的就是standardService, getContainer()获取到的就是standardEngine
standardEngine的pipeline就是StandardPipeline,getFirst()会调用StandardEngine的StandardEngineValve对象的invoke()
    @Override
    public final void invoke(Request request, Response response)
        throws IOException, ServletException {

        // Select the Host to be used for this Request
        Host host = request.getHost();
        if (host == null) {
            response.sendError
                (HttpServletResponse.SC_BAD_REQUEST,
                 sm.getString("standardEngine.noHost",
                              request.getServerName()));
            return;
        }
        if (request.isAsyncSupported()) {
            request.setAsyncSupported(host.getPipeline().isAsyncSupported());
        }

        // Ask this Host to process this request
        host.getPipeline().getFirst().invoke(request, response);

    }
请求就在进入engine的管道后,就开始了请求链的处理。
找到host(StandardHost)的pipeline/valve。
host找到context(StandardConext)的pipeline/valve。
4、context找到wrapper(StandardWrapper)的pileline/valve,wrapper的valve就是最接近servlet处理的地方了,它会分配一个servlet并创建一个过滤器链
        // Allocate a servlet instance to process this request
        try {
            if (!unavailable) {
                servlet = wrapper.allocate();
            }
        } catch (UnavailableException e) {
    public Servlet allocate() throws ServletException {boolean newInstance = false;
        // If not SingleThreadedModel, return the same instance every time
        if (!singleThreadModel) {
            // Load and initialize our instance if necessary
            if (instance == null || !instanceInitialized) {
                synchronized (this) {
                    if (instance == null) {
                        try {
                            // Note: We don't know if the Servlet implements
                            // SingleThreadModel until we have loaded it.
                            instance = loadServlet();
                            newInstance = true;
    public synchronized Servlet loadServlet() throws ServletException {
        // Nothing to do if we already have an instance or an instance pool
        if (!singleThreadModel && (instance != null))
            return instance;

        Servlet servlet;
        try {
            InstanceManager instanceManager = ((StandardContext)getParent()).getInstanceManager();
            try {
                servlet = (Servlet) instanceManager.newInstance(servletClass);
            } catch (ClassCastException e) {
创建过滤器链
        // Create the filter chain for this request
        ApplicationFilterChain filterChain =
                ApplicationFilterFactory.createFilterChain(request, wrapper, servlet);
关于servlet如何加载的在讲tomcat初始化的时候有提到,在StandardContext的时候会读取web.xml配置文件加载application,
具体实现在ContextConfig的configureStart()中会调用webConfig(),最终会调用configureContext加载配置的servlet
        for (ServletDef servlet : webxml.getServlets().values()) {
            Wrapper wrapper = context.createWrapper();
            // Description is ignored
            // Display name is ignored
            // Icons are ignored

            // jsp-file gets passed to the JSP Servlet as an init-param

            if (servlet.getLoadOnStartup() != null) {
                wrapper.setLoadOnStartup(servlet.getLoadOnStartup().intValue());
            }
            if (servlet.getEnabled() != null) {
                wrapper.setEnabled(servlet.getEnabled().booleanValue());
            }
            wrapper.setName(servlet.getServletName());
            Map<String,String> params = servlet.getParameterMap();
            for (Entry<String, String> entry : params.entrySet()) {
                wrapper.addInitParameter(entry.getKey(), entry.getValue());
            }
            wrapper.setRunAs(servlet.getRunAs());
            Set<SecurityRoleRef> roleRefs = servlet.getSecurityRoleRefs();
            for (SecurityRoleRef roleRef : roleRefs) {
                wrapper.addSecurityReference(
                        roleRef.getName(), roleRef.getLink());
            }
            wrapper.setServletClass(servlet.getServletClass());
到此就进入了应用的servlet了。具体的servlet如何处理request,然后如何返回response,tomcat如何处理response就不再此讲述了。
附图:
A、接收请求
B、传递请求到servlet