IBatis.net介绍
IBatis.net介绍
IBatis.net 是2001年发起的开源项目,它是一个轻量级的ORM框架,现在IBatisNET已经是属于Apache下的一个子项目了,最新版本是1.6.2.
.net项目下载地址:http://code.google.com/p/mybatisnet/
DataMapper:通过配置映射关系的xml业务对象与SQL语句和存储过程进行映射.
DataAcces:简单的说就是IBatis的数据访问层.
IBatis.net配置
主要要用到的几个配置文件:
providers.config 这个直接拷贝到根目录,该文件定义各种数据库的驱动,包括SqlServer, Oracle, MySQL, PostgreSQL, DB2 and OLEDB, ODBC 等。
sqlmap.config 就是非常核心的一个配置文件,主要配置了数据库访问字符串,settings设置,以及配置实体类和数据库表相关xml。
还有一个database.config 文件,它是配置一些在sqlmap中用到得参数.
然后需要引入两个DLL文件.
sqlmap.config文件代码:
<?xml version="1.0" encoding="utf-8"?>
<sqlMapConfig xmlns="http://ibatis.apache.org/dataMapper" xmlns:xsi="http://www.w3.org/2001/XMLSchema-instance">
<!--<providers resource="database.config" />-->
<settings>
<setting useStatementNamespaces="true"/>
<setting cacheModelsEnabled="true"/>
</settings>
<providers resource="providers.config" />
<database>
<!-- Optional ( default ) -->
<provider name="sqlServer2.0"/>
<dataSource name="iBatisNet" connectionString="Server=.; User ID=sa;Password=sa;Database=TestDB;Persist Security Info=True"/>
</database>
<sqlMaps>
<sqlMap resource="Maps/Account.xml"/>
</sqlMaps>
</sqlMapConfig>
useStatementNamespaces:是否启用命名空间
cacheModelsEnabled:是否缓存数据
<providers resource="providers.config" /> 引入数据库驱动文件
sqlMaps 节点就是配置一些sql语句以及实体映射的xml文件.
IBatis.net实战
现在让我们来做一个Demo
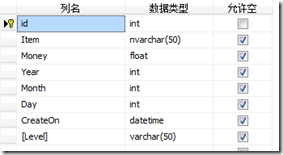
我用的是Sqlserver2005 ,新建一个数据表
在Vs2010下新建项目IBatisDemo
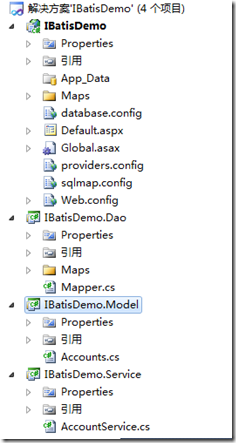
项目结构如下
IBatisDemo.Dao 提供一个统一的Mapper访问接口,
IBatisDemo.Model 数据实体
IBatisDemo.Service 数据操作
因为是做Demo没有对整体架构做过多的细节设置.
首先配置网站根目录下的Maps/Account.xml如下:
<?xml version="1.0" encoding="utf-8" ?>
<sqlMap namespace="Account" xmlns="http://ibatis.apache.org/mapping" xmlns:xsi="http://www.w3.org/2001/XMLSchema-instance">
<alias>
<!-- alias:取别名
assembly:表示类所在的文件
type:表示该类的完整的名称
-->
<typeAlias alias="Account" assembly="IBatisDemo.Model.dll" type="IBatisDemo.Model.Accounts" />
</alias>
<resultMaps>
<resultMap id="Account-result" class="Account">
<result property="Id" column="id"/>
<result property="Item" column="Item"/>
<result property="Year" column="Year"/>
<result property="Month" column="Month"/>
<result property="Day" column="Day"/>
<result property="CreateOn" column="CreateOn"/>
<result property="Level" column="Level"/>
</resultMap>
</resultMaps>
<statements>
<select id="sql_selectByid" resultMap="Account-result">
select * from Accounts
<dynamic prepend="where">
<isParameterPresent property="id" prepend="">
[id] = #id#
</isParameterPresent>
</dynamic>
</select>
<select id="sql_selectAll" resultMap="Account-result">
select * from Accounts
</select>
<insert id="sql_InsertOne" parameterClass="Account">
insert into Accounts (Item,Money,Year,Month,Day,CreateOn,Level)
values
(#Item#,
#Money#,
#Year#,
#Month#,
#Day#,
#CreateOn#,
#Level#
)
<selectKey type="post" resultClass="int" property="Id">
SELECT CAST(@@IDENTITY as int) as Id
</selectKey>
</insert>
</statements>
</sqlMap>
说明:
statements 节点:
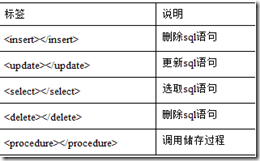
在这些容器标签中有一些常用的属性如下所示
resultMap和resultclass对比:
1、resultMap属于直接映射,可以把结果集中的数据库字段与实体类中的属性一一对应,这样通过select语句得到的结果就会准确的对上号
2、resultclass属于隐身映射,虽然你指定resultclass=“”,具体某一个类,但是select语句得到的结果是一条实力记录,但如果数据库字段与类的属性名字不一致,这个时候就会出现映射错误,有一种方式可以解决就是在写select语句时,给每个字段用as运算符取名字与属性一样:例如:select realname as name...其中realname是字段列名,name是属性字段名
3、resultmap比resultclass性能要高。尽量使用resultmap
insert标签下的selectKey 是表示返回刚插入数据的主键id,具体说明如下
<!-- 为了使insert操作能够返回插入记录的id,必须为insert写一个selectKey –>
<!-- 下面是sqlserver写法-->
<selectKey type="post" resultClass="int" property="Id">
SELECT CAST(@@IDENTITY as int) as Id
</selectKey>
<!--
下面是针对Oracle的写法,Oracle没有autoincrement,而是用触发器实现的
CURRVAL是在触发器中定义的
-->
<!--<insert id="insertRemark" parameterClass="RemarkInfo">
insert into SGS_REMARK(REMARK) values(#remark#)
<selectKey resultClass="int" keyProperty="id" >
SELECT S_SGS_REMARK.CURRVAL AS ID FROM DUAL
</selectKey>
</insert>
-->
<!-- 下面是针对MySQL的写法 -->
<!--
<selectKey resultClass="int" keyProperty="id" >
SELECT @@IDENTITY AS id
</selectKey> -->
Account.xml配置完成 .建实体类:
using System;
using System.Collections.Generic;
using System.Text;
namespace IBatisDemo.Model
{
public class Accounts
{
public int Id { get; set; }
public string Item { get; set; }
public float Money { get; set; }
public int Month { get; set; }
public int Year { get; set; }
public int Day { get; set; }
public DateTime CreateOn { get; set; }
public string Level { get; set; }
}
}
Mapper.cs 获取Mapper的对象类:
using System;
using System.Collections.Generic;
using System.Linq;
using System.Text;
using IBatisNet.DataMapper;
using IBatisNet.Common.Utilities;
using IBatisNet.DataMapper.Configuration;
namespace IBatisDemo.Dao
{
public class Mapper
{
private static volatile ISqlMapper _mapper = null;
protected static void Configure(object obj)
{
_mapper = null;
}
protected static void InitMapper()
{
ConfigureHandler handler = new ConfigureHandler(Configure);
DomSqlMapBuilder builder = new DomSqlMapBuilder();
_mapper = builder.ConfigureAndWatch(handler);
}
public static ISqlMapper Instance()
{
if (_mapper == null)
{
lock (typeof(SqlMapper))
{
if (_mapper == null) // double-check
{
InitMapper();
}
}
}
return _mapper;
}
public static ISqlMapper Get()
{
return Instance();
}
/// <summary>
/// RealMarket Mapper
/// </summary>
public static ISqlMapper GetMaper
{
get
{
if (_mapper == null)
{
lock (typeof(ISqlMapper))
{
if (_mapper == null)
{
ConfigureHandler hander = new ConfigureHandler(Configure);
DomSqlMapBuilder builder = new DomSqlMapBuilder();
_mapper = builder.ConfigureAndWatch("sqlmap.config", hander);
}
}
}
return _mapper;
}
}
}
}
然后再Service里面建立AccountService.cs 数据访问
using System;
using System.Collections.Generic;
using System.Text;
using System.Reflection;
using System.IO;
using IBatisDemo.Model;
using System.Data.SqlClient;
using IBatisDemo.Dao;
namespace IBatisDemo.Service
{
public class AccountService
{
public int TestInsertOne(Accounts account)
{
Object obj =Mapper.GetMaper.Insert("Account.sql_InsertOne", account);
return (int)obj;
}
public Accounts GetAccount(int id)
{
return (Accounts)Mapper.GetMaper.QueryForObject("Account.sql_selectByid", id);
}
public IList<Accounts> GetAccountList()
{
return Mapper.GetMaper.QueryForList<Accounts>("Account.sql_selectAll", null);
}
}
}
这里要注意命名空间.
在Default.aspx页面上调用Service
protected void Button1_Click(object sender, EventArgs e)
{
Accounts account = new Accounts();
account.Id =-1;
account.CreateOn = DateTime.Now;
account.Day = 12;
account.Item = "小刚1";
account.Level = "无";
account.Money = 56;
account.Month = 6;
account.Year = 2011;
AccountService service = new AccountService();
service.TestInsertOne(account);
}
protected void Button3_Click(object sender, EventArgs e)
{
AccountService service = new AccountService();
IList<Accounts> accounts = service.GetAccountList();
this.GridView1.DataSource = accounts;
this.GridView1.DataBind();
}
protected void Button2_Click(object sender, EventArgs e)
{
AccountService service = new AccountService();
Accounts account = service.GetAccount(2);
}
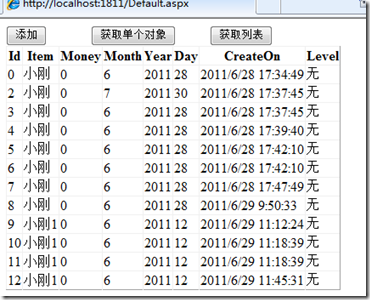
运行效果:


 浙公网安备 33010602011771号