08 GD图像处理
GD是一种图像处理扩展(外部提供的API),允许PHP在脚本中使用对应的函数实现画图功能
目前默认已经被集成到PHP中扩展中,只需要开启扩展,即可使用
GD图像基本处理
画图的基本流程:画图的本质是在内存中开辟一块很大的内存区用于图片制作
- 准备画布
- 开始作画
- 保存内容
- 销毁画布
1. 创建画布
返回结果是资源类型
1.1. imagecreate(宽, 高):创建一个空白画布,背景色是白色的
1.2. imagecreatetruecolor(宽,高):创建一个真彩画布,背景色是黑色的,就是一个无色图片,需要自己填充
$img = imagecreatetruecolor(100, 200);
var_dump($img);
1.3. imagecreatefromjpeg(图片文件路径):打开一个jpeg格式的图片资源
$img = imagecreatefromjpeg('img/1.jpg');
var_dump($img);
1.4. imagecreatefromgif(图片文件路径):打开一个gif格式的图片资源
1.5. imagecreatefrompng(图片文件路径):打开一个png格式的图片资源
2. 操作画布
注意:所有的画布操作都是需要指定画布资源的,都是第一个参数
2.1 imagecolorallocate(画布资源,0,0,0):分配颜色
根据RGB三原色组合给指定的画布分配一组颜色(每组色号都是从0到255),会返回一个颜色句柄;
在真彩图片资源中,所有分配的颜色都不会自动给图片资源上色,是用来后续操作图片资源的时候,指定着色的:但是如果当前使用的 imaggsreate,创建的图片资源,那么第一个分配的颜色,会自动被着色为图片背景色。
一般凡是需要在图片上添加内容的,都是需要给画布资源分配颜色的
<?php
// 1. 创建一个宽100,高100的无色画布资源
$ch = imagecreatetruecolor(100, 100);

// 2. 分配颜色
$color = imagecolorallocate($ch, 94, 197, 138);
var_dump($color);  // 返回 int(6210954)
2.2 imagefill(画布资源,起始x坐标,起始y坐标,$color颜色句柄):填充区域
指定位置填充指定颜色:x坐标从左向右增大,y坐标从上往下增大
// 3. 指定位置填充指定颜色
imagefill($ch, 100, 200, $color);
2.3 imageline(画布资源,起始点x,起始点y,终点x,终点y,$color颜色):画直线
// 4.1 制作直线
// 创建直线的颜色
$line_color = imagecolorallocate($ch, 39, 206, 89);
imageline($ch, 200, 320, 300, 320, $line_color);
2.4 imagerectangle(画布资源,,左上角x,左上角y,右下角x,右下角y,$color颜色):画矩形
// 4.2 画矩形
// 创建矩形的颜色
$rec_color = imagecolorallocate($ch, 38, 44, 197);
imagerectangle($ch, 20, 20, 120, 140, $rec_color);
2.5 imagearc((画布资源,圆心x, 圆心y, 宽, 高, 起始角度x, 结束角度y, $arc_color):画圆弧
// 4.3. 画圆弧
// 创建圆弧的颜色
// 角度是0-360
$arc_color = imagecolorallocate($ch, 174, 34, 175);
imagearc($ch, 100, 200, 90, 90, 120, 360, $arc_color);
// 一个圆圈
imagearc($ch, 100, 300, 90, 90, 0, 360, $arc_color);
2.6 在画布上写字:imagestring()和imagettftext()
imagestring(图片资源,文字大小,起始x,起始y,颜色):只能是英文,文字大小0-5
imagettftext(图片资源,文字大小,旋转角度,起始x,起始y,颜色,字体,内容):可以是任意字符
字体:需要加载来自windows的字体,可以从 C:\Windows\Fonts 复制字体
// 4.4. 在画布上写字
// 文字大小1-5
$txt_color = imagecolorallocate($ch, 255, 255, 255);
// 输出应为字母
imagestring($ch, 5, 200, 80, 'Hello China', $txt_color);
// 任意字符  字体:C:\Windows\Fonts
imagettftext($ch, 40, 0, 130, 140, $txt_color, 'F:/mylpj/phpdemo/gd/simsun.ttc', '你好,中国');
3. 输出画布
将设置好的图片资源输出到画布,有2种方式:
- 输出为图片文件:以图片文件形式保存到本地文件夹
- 输出为网页图片:将图片展出给HTML
如果只提供了图片资源,没有指定图片文件的保存位置,系统默认认为是输出给浏览器;如果指定了具体的图片文件保存位置,那么系统认为是保存到本地
// 一般是保存为png,因为是自己创建的画布;如果是打开的图片资源,那么一般会保存为相应的图片格式
imagepng($ch, 'my.png'); // 保存为图片文件

// 输出到浏览器html:必须设置响应头是图片
header('Content-type:image/png');
imagepng($ch);
4. 销毁画布
从内存中将画布资源释放掉
// 释放资源
imagedestroy($ch);
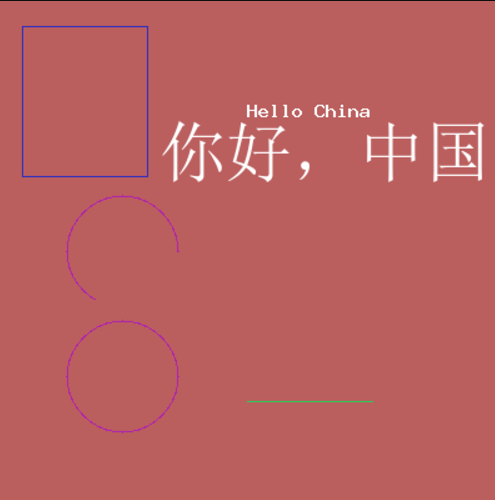
5. 一个简单的应用
<?php
// 1. 创建一个宽400,高400的无色画布资源
$ch = imagecreatetruecolor(400, 400);

// 2. 分配一个颜色
$color = imagecolorallocate($ch, 187, 94, 94);

// 3. 给画布指定位置填充指定颜色
imagefill($ch, 0, 0, $color);


// 4.1 制作直线
// 创建直线的颜色
$line_color = imagecolorallocate($ch, 39, 206, 89);
imageline($ch, 200, 320, 300, 320, $line_color);

// 4.2 画矩形
// 创建矩形的颜色
$rec_color = imagecolorallocate($ch, 38, 44, 197);
imagerectangle($ch, 20, 20, 120, 140, $rec_color);


// 4.3. 画圆弧
// 创建圆弧的颜色
// 角度是0-360
$arc_color = imagecolorallocate($ch, 174, 34, 175);
imagearc($ch, 100, 200, 90, 90, 120, 360, $arc_color);
// 一个圆圈
imagearc($ch, 100, 300, 90, 90, 0, 360, $arc_color);


// 4.4. 在画布上写字
// 文字大小1-5
$txt_color = imagecolorallocate($ch, 255, 255, 255);
// 输出应为字母
imagestring($ch, 5, 200, 80, 'Hello China', $txt_color);
// 任意字符  字体:C:\Windows\Fonts
imagettftext($ch, 40, 0, 130, 140, $txt_color, 'F:/mylpj/phpdemo/gd/simsun.ttc', '你好,中国');


// 5. 保存输出画布
// 如果只提供了图片资源,没有指定图片文件的保存位置,系统默认认为是输出给浏览器;
// 如果指定了具体的图片文件保存位置,那么系统认为是保存到本地
// imagejpeg() // 保存成jpg格式图片
// imagegif() // 保存成gif格式图片
// imagepng() // 保存成png格式图片

// 一般是保存为png,因为是自己创建的画布;如果是打开的图片资源,那么一般会保存为相应的图片格式
imagepng($ch, 'my.png'); // 保存为图片文件

// 输出到浏览器html:必须设置响应头是图片
header('Content-type:image/png');
imagepng($ch);


// 释放资源
imagedestroy($ch);

6. 获取图片基本信息
imagesx和imagesy函数获取图片资源的宽度和高度,其参数必须是图片资源
getimagesize获取图片的所有信息,参数可以直接是图片路径
// GD函数:获取图片基本信息
$image = 'my.png';

// 打开图片资源
$img = imagecreatefrompng($image);

// imagesx和imagesy的参数必须是图片资源

// 获取图片资源的宽度
$width = imagesx($img);
// 获取图片资源的宽度
$height = imagesy($img);

// 获取图片全部信息
$mm = getimagesize($image);
echo '<pre>';
print_r($mm);

返回一个具有四个单元的数组。
索引0包含图像宽度的像素值
索引1包含图像高度的像素值
索引2是图像类型的标记:
1= GIF,2=JPG,3 = PNG, 4 = SWF, 5 = PSD ,6 = BMP,7 = TIFF(intel byte order), 8 = TiFF(motorola byte order),9 = Jpc , 10 IP2,11 =JPX,12 = JB2,13= SWC,14 = IFF,15= WBMP,16 = XBM

索引3 是文本字符串,内容为“height="yyy" width="xxX"”,可直接用于 IMG 标记。
验证码
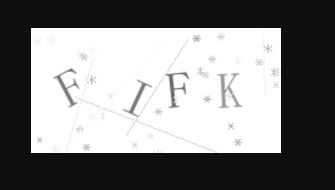
图片验证码:计算机将拿到的验证码存放图片中,展示给用户,用户根据验证码再提交到服务器,服务器再与之前的验证码进行比对。
生成随机验证码
captcah.php

<?php
// 随机验证码
// 1. 创建一个100 100的画布
$ch = imagecreatetruecolor(200, 100);

// 2. 构建画布的颜色
$ch_color = imagecolorallocate($ch, 255, 255, 255);

// 3. 填充画布颜色
imagefill($ch, 0, 0, $ch_color);


// 4. 生成文字
for ($m = 1; $m < 5; $m++) {
  // 随机字符
  $text = generateRandomString(1);
  // 随机X位置
  $x = 30 + 40 * ($m - 1);
  // 随机旋转角度
  $roate = random_int(-30, 30);
  // 随机字体颜色
  $randColor = random_int(0, 180);  // 颜色深一点
  $font_color = imagecolorallocate($ch,  $randColor,   $randColor,   $randColor);

  imagettftext($ch, 30,  $roate, $x, 64, $font_color, 'F:/mylpj/phpdemo/gd/simsun.ttc', $text);
}


// 5. 验证码背景或干扰噪点:实际上就是随机化一些点或线
// 5.1 干扰点
for ($m = 1; $m < 40; $m++) {
  $randColor = random_int(180, 250);  // 颜色淡一点
  $font_color = imagecolorallocate($ch,  $randColor,   $randColor,   $randColor);
  imagestring($ch, random_int(1, 5), random_int(0, 200), random_int(0, 100), '*', $font_color);
}

// 5.2 干扰线
for ($m = 1; $m < 6; $m++) {
  $randColor = random_int(180, 250);  // 颜色淡一点
  $font_color = imagecolorallocate($ch,  $randColor,   $randColor,   $randColor);
  // 画直线
  imageline($ch, random_int(0, 200), random_int(0, 100), random_int(0, 200), random_int(0, 100), $font_color);
}


// 展示画布资源
header('Content-type:image/png');
imagepng($ch);

// 销毁资源
imagedestroy($ch);


// 产生随机字符串(数字和字母)
function generateRandomString($length = 10)
{
  $characters = '0123456789abcdefghijklmnopqrstuvwxyzABCDEFGHIJKLMNOPQRSTUVWXYZ';
  $randomString = '';
  $charactersLength = strlen($characters);
  for ($i = 0; $i < $length; $i++) {
    $randomIndex = random_int(0, $charactersLength - 1);
    $randomString .= $characters[$randomIndex];
  }
  return $randomString;
}
缩略图
缩略图:通过技术处理,将原图变成一个尺寸较小的图
缩略图的原理:将原图打开,然后放到另外一个较小的图片资源中,最后保存即可
流程:
- 打开一个原图资源
- 构建一个较小的缩略图图片资源
- 图片采集复制:GD函数库imagecopyresampled
- 保存缩略图
- 销毁所有资源
复制采样图片imagecopyresampled:
imagecopyresampled(缩略图资源,原始资源,缩略图存放开始x,缩略图存放开始y,采样原始图x,采样原始图y,缩略图宽,缩略图高,原始图宽,原始图高)
dst_image目标图像资源 src_image原始图像资源
如果原始资源的宽度和高度与目标资源的宽度、高度不一致,则会进行相应的收缩或拉伸
1. 固定宽高
<?php

/**
 * 缩略图
 * 1. 打开一个原图资源
 * 2. 构建一个较小的缩略图图片资源
 * 3. 图片采集复制:GD函数库
 * 4. 保存缩略图
 * 5. 销毁所有资源
 */

//  制作固定尺寸的缩略图:不管原图比例,会存在失真的情况
//  1. 打开一个原图资源
$img = 'img/2.jpg';
$src_img = imagecreatefromjpeg($img);

// 2. 构建一个较小的缩略图图片资源
$dst_img = imagecreatetruecolor(100, 100);

// 3. 图片采集复制,采样拷贝部分图像并调整大小,返回结果是布尔值
// imagecopyresampled(缩略图资源,原始资源,缩略图存放开始x,缩略图存放开始y,采样原始图x,采样原始图y,缩略图宽,缩略图高,原始图宽,原始图高)
// dst_image目标图像资源  src_image原始图像资源
// 如果原始资源的宽度和高度与目标资源的宽度、高度不一致,则会进行相应的收缩或拉伸
imagecopyresampled($dst_img, $src_img, 0, 0, 0, 0, 100, 100, imagesx($src_img), imagesy($src_img));

// 4. 保存缩略图
header('Content-type:image/png');
imagepng($dst_img); // 输出到浏览器
imagepng($dst_img, 'img/thumb-2.png'); // 保存为图片

// 5. 销毁资源
imagedestroy($dst_img);
imagedestroy($src_img);
2. 等比例宽高缩略图
等比例宽高计算的原理
- 计算缩略图的宽高比
- 计算原始图的宽高比
- 将原始图和缩略图的宽高比进行比较:
-
- 如果 原始图比 < 缩略图比,说明原始图很高,那么缩略图的高是完整的,宽度不够(补白)
-
- 如果 原始图比 > 缩略图比,说明原始图很宽,那么缩略图的宽是完整的,高度不够(补白)
<?php
//  制作 等比例 缩放的缩量图:图片不会变形,但是缩略图有些部分需要额外的白色填充(补白)
//  1. 打开一个原图资源
$img = 'img/1.jpg';
$src_img = imagecreatefromjpeg($img);

// 2. 指定画布的宽高
$thum_width_max = 300;
$thum_height_max = 100;

// 3. 计算缩略图的宽和高
// 等比例宽高计算的原理
// * 计算缩略图的宽高比
// * 计算原始图的宽高比
// * 将原始图和缩略图的宽高比进行比较:
// * 1. 如果 原始图比 < 缩略图比,说明原始图很高,那么缩略图的高是完整的,宽度不够(补白)
// * 2. 如果 原始图比 > 缩略图比,说明原始图很宽,那么缩略图的宽是完整的,高度不够(补白)

// 原始图的宽高比
$src_width = imagesx($src_img);
$src_height = imagesy($src_img);
$src_b = $src_width / $src_height;

// 缩略图宽高比
$thum_width = $thum_height = 0;
$thum_b  = $thum_width_max / $thum_height_max;

if ($src_b  > $thum_b) {
  // 1. 如果 原始图比 < 缩略图比,说明原始图很高,那么缩略图的高是完整的,宽度不够(补白)
  // echo '1';
  $thum_width  = $thum_width_max;
  $thum_height = $thum_width / $src_b;
} else {
  // echo '2';
  // 2. 如果 原始图比 > 缩略图比,说明原始图很宽,那么缩略图的宽是完整的,高度不够(补白)
  $thum_height = $thum_height_max;
  $thum_width =  $thum_height *  $src_b;
}
// echo  '缩略图宽高比:' . $thum_b . '</br>';
// echo  '原始图宽高比:' . $src_b . '</br>';
// echo  '缩量图的宽和高:' . $thum_width . '和' . $thum_height . '</br>';

// 4. 构建一个较小的缩略图图片资源
$dst_img = imagecreatetruecolor($thum_width, $thum_height);
// // 3. 补白 填充白色
// $dst_color = imagecolorallocate($dst_img, 255, 255, 255);
// imagefill($dst_img, 0, 0, $dst_color);

// 5. 图片采集复制
imagecopyresampled($dst_img, $src_img, 0, 0, 0, 0,  $thum_width, $thum_height,  $src_width, $src_height);


// 6. 保存缩略图
header('Content-type:image/jpeg');
imagepng($dst_img); // 输出到浏览器
imagepng($dst_img, 'img/11-thum.jpg'); // 保存为图片

// 7. 销毁资源
imagedestroy($dst_img);
imagedestroy($src_img);
水印图
水印图:一般是在某个图片上增加透明的印记
原理:将一张带有明显标记的图片放到需要处理的原始图上
流程:
- 获取原始图资源(需要处理的图片资源)
- 获取水印图资源(水印标记)
- 合并图片(将水印图放到原始图资源上)
- 保存输出
- 销毁资源
合并图片:
imagecopymerge函数用于将一个图像(源图像--水印标记)复制并合并到另一个图像(目标图像)上
imagecopymerge(目标图象资源,源图象资源,目标点的 x 坐标,目标点的 y 坐标,源点的 x 坐标,源点的 x 坐标,源图象的宽度,源图象的高度,pct透明度)
<?php
// 水印图:将一张带有明显标记的图片放到需要处理的原始图上
/**
 * 流程
 * 1. 获取原始图资源(需要处理的图片资源)
 * 2. 获取水印图资源(水印标记)
 * 3. 合并图片(将水印图放到原始图资源上)
 * 4. 保存输出
 * 5. 销毁资源
 */


/**
 * 制作水印图
 * $dst_image:原图 filename路径
 * $wat_image:水印标记 filename路径
 * $path:制作后的水印图存储路径 filename路径
 * &$error:记录错误信息的变量
 * $position:$position=1,水印标记位置1左上角 依次类推,9是右下角
 * $pct:透明度 默认10,值越小越模糊
 */
$error = '';
function generateWatermark($src_image, $wat_image, $path, &$error, $position = 1, $pct = 20)
{
  // 验证原图和水印标记是否存在
  if (!is_file($src_image)) {
    $error = '原图不存在';
    return false;
  }
  if (!is_file($wat_image)) {
    $error = '水印标记不存在';
    return false;
  }

  // 判定保存路径是否存在
  if (!is_dir($path)) {
    $error = '保存位置不正确';
    return false;
  }

  $src_info = getimagesize($src_image);
  $wat_info = getimagesize($wat_image);
  $src_type = $src_info['mime']; // 图片的mime类型
  $wat_type = $wat_info['mime'];

  $allow = array(
    'image/jpeg' => 'jpeg',
    'image/png' => 'png',
    'image/jpg' => 'jpg',
  );

  // src_info检查数组里是否有指定的键名或索引
  if (!array_key_exists($src_type, $allow)) {
    $error = '原图片类型有误';
    return false;
  }
  if (!array_key_exists($wat_type, $allow)) {
    $error = '水印标记图片类型有误';
    return false;
  }

  // 组合 图片名称
  $src_open = 'imagecreatefrom' . $allow[$src_type];
  $wat_open = 'imagecreatefrom' . $allow[$wat_type];
  $src_save = 'image' . $allow[$src_type]; // 保存输出的图片数据类型

  // 打开图片资源
  $src_img = $src_open($src_image);
  $wat_img = $wat_open($wat_image);

  // 合并图片(将水印图放到原始图资源上):固定位置
  // 函数用于将一个图像(源图像--水印标记)复制并合并到另一个图像(目标图像)上
  // imagecopymerge(目标图象资源,源图象资源,目标点的 x 坐标,目标点的 y 坐标,源点的 x 坐标,源点的 x 坐标,源图象的宽度,源图象的高度,pct透明度)
  // 两个图像将根据 pct 合并,范围是 0 到 100 透明度
  // 计算水印的位置
  $start_x = $start_y = 0;
  switch ($position) {
    case 1:
      // 左上角
      $start_x = $start_y = 0;
      break;
    case 2:
      // 上中
      $start_x = floor(($src_info[0] - $wat_info[0]) / 2);
      $start_y = 0;
      break;
    case 3:
      // 右上角
      $start_x = floor($src_info[0] - $wat_info[0]);
      $start_y = 0;
      break;
    case 4:
      // 中左
      $start_x = 0;
      $start_y = floor(($src_info[1] - $wat_info[1]) / 2);
      break;
    case 5:
      // 正中间
      $start_x = floor(($src_info[0] - $wat_info[0]) / 2);
      $start_y = floor(($src_info[1] - $wat_info[1]) / 2);
      break;
    case 6:
      // 中右
      $start_x = floor(($src_info[0] - $wat_info[0]));
      $start_y = floor(($src_info[1] - $wat_info[1]) / 2);
      break;
    case 7:
      // 下左
      $start_x = 0;
      $start_y = floor($src_info[1] - $wat_info[1]);;
      break;
    case 8:
      // 下中
      $start_x = floor(($src_info[0] - $wat_info[0]) / 2);
      $start_y = floor($src_info[1] - $wat_info[1]);;
      break;
    case 9:
      // 下右
      $start_x = floor($src_info[0] - $wat_info[0]);
      $start_y = floor($src_info[1] - $wat_info[1]);
      break;
  }
  imagecopymerge($src_img, $wat_img, $start_x, $start_y, 0, 0, imagesx($wat_img), imagesy($wat_img), $pct);

  // 目标图片保存路径
  $filePath = $path . date('Y-m-d-H-i-s') . '-watermark.' . pathinfo($src_image)['extension'];
  // 4. 保存输出
  header("Content-type:{ $src_type }");
  $src_save($src_img);  // 输出到浏览器
  $src_save($src_img,   $filePath); // 保存为图片

  // 7. 销毁资源
  imagedestroy($src_img);
  imagedestroy($wat_img);
  return true;
}

$dst_image = 'img/1.jpg';
$wat_image  = 'img/icon4.png';
if (generateWatermark($dst_image, $wat_image, 'img/', $error, 5, 40)) {
  echo '制作成功';
} else {
  echo $error;
}


【推荐】国内首个AI IDE,深度理解中文开发场景,立即下载体验Trae
【推荐】编程新体验,更懂你的AI,立即体验豆包MarsCode编程助手
【推荐】抖音旗下AI助手豆包,你的智能百科全书,全免费不限次数
【推荐】轻量又高性能的 SSH 工具 IShell:AI 加持,快人一步
· Manus重磅发布:全球首款通用AI代理技术深度解析与实战指南
· 被坑几百块钱后,我竟然真的恢复了删除的微信聊天记录!
· 没有Manus邀请码?试试免邀请码的MGX或者开源的OpenManus吧
· 园子的第一款AI主题卫衣上架——"HELLO! HOW CAN I ASSIST YOU TODAY
· 【自荐】一款简洁、开源的在线白板工具 Drawnix