springboot+vue整合百度的Ueditor
前言
最近应上级要求,添加一个富文本编辑器,百度的Ueditor(主角来了);划重点2016年就停更了!
废话不多说,直接开始操作吧。
!!!建议看的时候仔细一点,因为很可能遗漏了某个地方就很抓狂!!!
相信你看完肯定会有收获的
1、先去GitHub官网上下载Ueditor(点这里)

下载完成之后解压出来,一会要复制文件的
注意:我这里直接开始导入操作,默认你会maven,vue,并且会使用IDEA工具
2、再下载一个jsp版本(我是用java写得)
此处也可以不下载,但是怕有童鞋整不明白,所以还是多下一个吧
第一个zip是整个源码,第二个是分离出来的,后面会涉及到修改源码
点我下载

3、复制文件
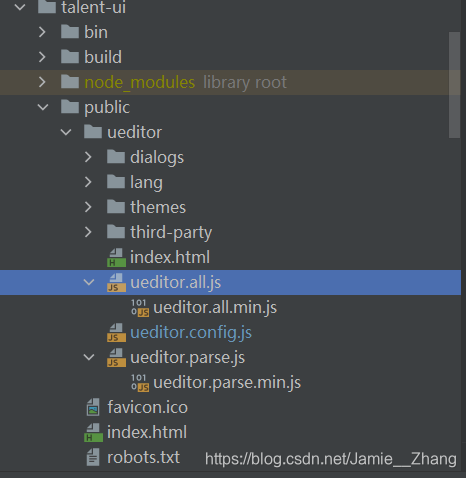
1、将ueditor1_4_3_3-utf8-jsp中的文件全部复制到 vue 项目的static目录或者public目录的 ueditor 文件夹下(自行创建),效果如图:

注:我的jsp文件夹已经删了,后面都移走了
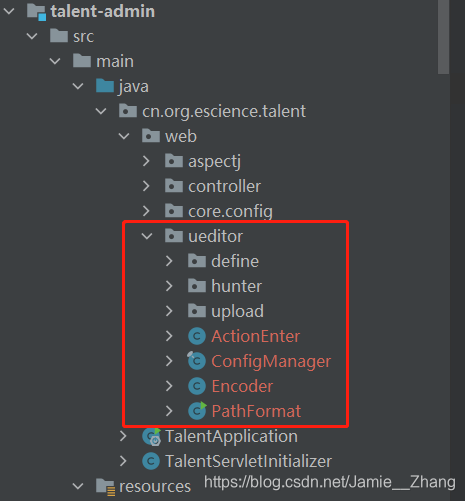
2、将这个路径下ueditor-1.4.3.3\jsp\src\com\baidu\ueditor中的文件全部复制到 springboot 工程当中
如图:

3、引入maven
将下面这4个jar包引入工程中

注:因为我们上面引入了源码,所以第5个jar包就不需要引入
<!--Ueditor--><dependency><groupId>commons-fileupload</groupId><artifactId>commons-fileupload</artifactId></dependency><dependency><groupId>commons-io</groupId><artifactId>commons-io</artifactId></dependency><dependency><groupId>commons-codec</groupId><artifactId>commons-codec</artifactId></dependency><dependency><groupId>org.json</groupId><artifactId>json</artifactId><version>1.0.0</version></dependency>
这里上面 3 个可以直接通过 maven 引入,第 4 个可能会有问题(没问题的略过~)
笔者这里是通过 mvn 命令引入的,如下:
mvn install:install-file -Dfile=D:\DEV\work\erp_server_v4\src\web\WEB-INF\lib\proxool-0.9.1.jar -DgroupId=proxool -DartifactId=proxool -Dversion=0.9.1 -Dpackaging=jar

4、编写 Ueditor 组件
创建组件引入下面的 css 和 js 文件

注:注意红色的框,引入的是 ueditor.all.js,别问为什么,血泪史~~
压缩之后会有莫名其妙的问题,还是别用的好
还需要注意文件引用的路径,根据自己的项目结构而定
功能和参数都是因地制宜的,难度不大。下面直接附上源码:
<template><div><script:id="editorId"type="text/plain"></script></div>
</template>
<script>
import'../../../public/ueditor/ueditor.config.js'
import'../../../public/ueditor/ueditor.all.js'
import'../../../public/ueditor/ueditor.parse.js'
import'../../../public/ueditor/lang/zh-cn/zh-cn.js'
import'../../../public/ueditor/themes/default/css/ueditor.css'
exportdefault{name:'UEditor',props:{/* 编辑器Id */editorId:{type:String,default:'',},/* 编辑器的内容 */value:{type:String,default:"",},/* 高度 */height:{type:Number,default:300,}},data(){return{editor:null,config:{autoHeightEnabled:false,initialFrameHeight:this.height,initialFrameWidth:'100%',UEDITOR_HOME_URL:'/ueditor/',toolbars:[['source',//源代码'undo',//撤销'redo',//重做'bold',//加粗'italic',//斜体'underline',//下划线'strikethrough',//删除线'subscript',//下标'superscript',//上标'fontborder',//字符边框'blockquote',//引用'pasteplain',//纯文本粘贴模式'preview',//预览'horizontal',//分隔线'removeformat',//清除格式'time',//时间'date',//日期'cleardoc',//清空文档'insertcode',//代码语言'fontfamily',//字体'fontsize',//字号'paragraph',//段落格式'insertimage',//多图上传'edittd',//单元格属性'inserttable',//插入表格'deletetable',//删除表格'link',//超链接'emotion',//表情'spechars',//特殊字符'searchreplace',//查询替换'justifyleft',//居左对齐'justifyright',//居右对齐'justifycenter',//居中对齐'justifyjustify',//两端对齐'forecolor',//字体颜色'backcolor',//背景色'insertorderedlist',//有序列表'insertunorderedlist',//无序列表'fullscreen',//全屏'imagenone',//默认'imageleft',//左浮动'imageright',//右浮动'attachment',//附件'imagecenter',//居中'wordimage',//图片转存'lineheight',//行间距'autotypeset',//自动排版'touppercase',//字母大写'tolowercase',//字母小写]]}}},mounted(){/*** 初始化编辑器,并设置值*/this.editor=UE.getEditor(this.editorId,this.config);this.editor.addListener('ready',()=>{this.editor.setContent(this.value)})/*** 监听编辑器,当编辑器中输入内容时与父组件进行同步*/this.editor.addListener("contentChange",()=>{this.$emit('input',this.editor.getContent())})},methods:{getUEContent(){returnthis.editor.getContent()},setUEContent(value){returnthis.editor.setContent(value)}},destroyed(){this.editor.destroy()}
}
</script>
这里提一嘴,创建每一个ueditor实例时一定要有不同的id,不然在同一个组件无法多次使用(害,该踩的坑让我来,一个都不少~)
5、写好另一个父组件引用我们刚刚完成的Ueditor组件
这里不具体实现,朋友们自己动手啦~
此时成功的显示出来即可,注意还不能上传图像

6、(重点)开始配置图像上传功能
1、将
ueditor1_4_3_3-utf8-jsp/jsp 文件夹下的 config.json 文件复制到 springboot 项目下的 resources 文件夹下
2、在后台编写 UEditorController 来代替 controller.jsp 文件
@RestController
publicclassUEditorController{@RequestMapping("/config")publicStringexec(HttpServletRequestrequest,HttpServletResponseresponse,@RequestParam(value="action")Stringaction)throwsException{request.setCharacterEncoding("utf-8");response.setContentType("text/html");StringrootPath=request.getSession().getServletContext().getRealPath("/");returnnewActionEnter(request,rootPath).exec();}
}
解释:
controller.jsp 这个文件主要是用来获取 config.json 中的内容,并返回过去,因为富文本编辑器在初始化时会调接口来访问这个文件中的内容
所以你在baidu的时候会发现有很多不一样的版本,没关系,目的都一样
这里我们获取的路径还会有问题,因此我们还有修改源码
修改一:修改 ConfigManager.java 文件中的 getConfigPath() 方法
privateStringgetConfigPath(){
// return this.parentPath + File.separator + ConfigManager.configFileName;// 修改源码try{return this.getClass().getClassLoader().getResource("config.json").toURI().getPath();} catch (URISyntaxException e) {e.printStackTrace();return null;}}
修改二:修改 BinaryUploader.java 文件中的 save() 方法(删除或注释掉)
publicstaticfinalStatesave(HttpServletRequestrequest,Map<String, Object>conf){if(!ServletFileUpload.isMultipartContent(request)){returnnewBaseState(false,AppInfo.NOT_MULTIPART_CONTENT);}try{MultipartHttpServletRequestmultipartRequest=(MultipartHttpServletRequest)request;MultipartFilemultipartFile=multipartRequest.getFile(conf.get("fieldName").toString());if(multipartFile==null){returnnewBaseState(false,AppInfo.NOTFOUND_UPLOAD_DATA);}StringsavePath=(String)conf.get("savePath");StringoriginFileName=multipartFile.getOriginalFilename();Stringsuffix=FileType.getSuffixByFilename(originFileName);originFileName=originFileName.substring(0,originFileName.length()-suffix.length());savePath=savePath+suffix;longmaxSize=((Long)conf.get("maxSize")).longValue();if(!validType(suffix,(String[])conf.get("allowFiles"))){returnnewBaseState(false,AppInfo.NOT_ALLOW_FILE_TYPE);}savePath=PathFormat.parse(savePath,originFileName);StringphysicalPath=(String)conf.get("rootPath")+savePath;InputStreamis=multipartFile.getInputStream();StatestorageState=StorageManager.saveFileByInputStream(is,physicalPath,maxSize);is.close();if(storageState.isSuccess()){storageState.putInfo("url",PathFormat.format(savePath));storageState.putInfo("type",suffix);storageState.putInfo("original",originFileName+suffix);}returnstorageState;}catch(IOExceptione){}returnnewBaseState(false,AppInfo.IO_ERROR);}
到这里启动工程访问http://localhost:8080/config?action=config应该能正常返回 config.json 中的内容了
如果访问不能正常返回的话,注意路径问题,
或者未知原因也有,其实里面bug挺多的,界面也过时了,但是耐不住人家功能强大…
修改三:修改 ueditor.all.js 文件
varconfigUrl=me.getActionUrl('config'),// isJsonp = utils.isCrossDomainUrl(configUrl);isJsonp=false;
ctrl+f 找到并注释掉它,再补上 isJsonp = false;
注意:
使用了security的童鞋要放开链接访问权限和相关的文件(资源)访问权限(如png,jpg等等)
这一点对后面的测试也很重要,能少走很多弯路!!!
7、修改配置文件
1、修改 config.json 文件


也就是说再上传成功后,会调用 http://localhost:8081/image/upload/ueditor/{time}/{filename} 来显示在文本框里面
没理解也不要紧,接着往下看,后面实践了就恍然大悟了
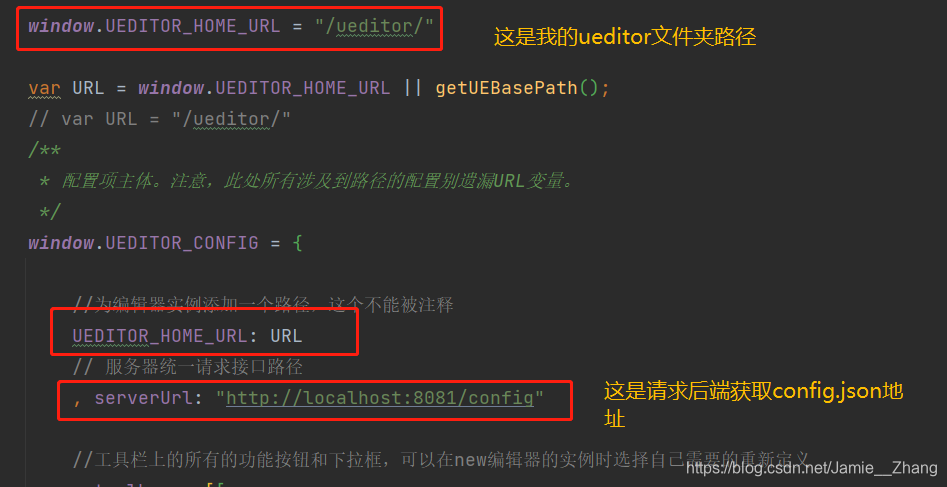
2、修改 ueditor.config.js 文件

再把controller放过来对照
@RestController
publicclassUEditorController{@RequestMapping("/config")//看这里!!!publicStringexec(HttpServletRequestrequest,HttpServletResponseresponse,@RequestParam(value="action")Stringaction)throwsException{request.setCharacterEncoding("utf-8");response.setContentType("text/html");StringrootPath=request.getSession().getServletContext().getRealPath("/");returnnewActionEnter(request,rootPath).exec();}
}
这里就是编辑器初始化时,向服务器发送请求读取 config.json 文件的配置
3、编写上传文件的controller

放在这里方便你拷贝~
@AutowiredprivateUEditorUploaduEditorUpload;@RequestMapping("/config")publicStringexec(HttpServletRequestrequest,HttpServletResponseresponse,@RequestParam(value="action")Stringaction,@RequestParam(value="upfile",required=false)MultipartFileupfile)throwsException{if(action.equals("config")){request.setCharacterEncoding("utf-8");response.setContentType("text/html");StringrootPath=request.getSession().getServletContext().getRealPath("/");returnnewActionEnter(request,rootPath).exec();}elseif(action.equals("uploadimage")){UEditorFileuEditorFile=uEditorUpload.uploadImage(upfile);JSONObjectjsonObject=newJSONObject(uEditorFile);returnjsonObject.toString();}return"无效Action";}
4、补充注入方法和返回结果封装类(没错,不返回指定参数是用不了的!!)具体情况请看官网要求。
新建 UEditorUpload.java 源码如下:
(相信看到这里的朋友,有能力自己分析方法实现了上面,我偷懒去了)
privateLoggerlog=LoggerFactory.getLogger(UEditorUpload.class);privateStringpath=ClassUtils.getDefaultClassLoader().getResource("").getPath();publicUEditorFileuploadImage(MultipartFilefile)throwsIOException{log.info("UEditor开始上传文件");StringfileName=file.getOriginalFilename();//获取文件名//Ueditor的config.json规定的返回路径格式StringreturnPath="/image/upload/ueditor/"+newDate().getTime()+"/"+fileName;FilesaveFile=newFile(path+"static"+returnPath);if(!saveFile.exists()){saveFile.mkdirs();}file.transferTo(saveFile);//将临时文件移动到保存路径log.info("UEditor上传文件成功,保存路径:"+saveFile.getAbsolutePath());UEditorFileuEditorFile=newUEditorFile();uEditorFile.setState("SUCCESS");uEditorFile.setUrl(returnPath);//访问URLuEditorFile.setTitle(fileName);uEditorFile.setOriginal(fileName);returnuEditorFile;}
String path = ClassUtils.getDefaultClassLoader().getResource("").getPath();
这是引用spring中的工具类来获取地址,有兴趣的话可以试试
getClass().getClassLoader().getResource(“文件”).toURI().getPath();

新建 UEditorFile.java 这个文件主要是按照上传文件返回格式而创建的,源码如下:
@Data
@NoArgsConstructor
@Accessors(chain=true)
publicclassUEditorFile{privatestaticfinallongserialVersionUID=1L;privateStringstate;privateStringurl;privateStringtitle;privateStringoriginal;@OverridepublicStringtoString(){return"{"+"state='"+state+'\''+", url='"+url+'\''+", title='"+title+'\''+", original='"+original+'\''+'}';}
}
整理到这里就可以去启动整个工程项目了
7、启动测试
ok的话就很nice,说明你成功了!
下面我总结一下我遇到的及其解决办法,由于已经写完了,错误截图就没有,后面找时间补上(求放过~)
1、读取不到 config.json 文件
1、检查读取路径是否正确,这个得自己一步步debug了
2、直接访问时记得带上参数action。。。(虽然时笨笨的问题,但是我发生了)
3、放开地址访问权限
4、检查文件是否被过滤
2、跨域问题可自行百度,方案挺多的
3、控制台显示http请求错误
1、认真检查配置文件路径
2、测试后端接口带上参数看看有没有问题
3、2中可以的话,看看vue组件是不是用的 ueditor.all.min.js,改成 ueditor.all.js,(我就是这里离谱的问题!!!,估计时压缩后的问题)
4、能选择图片,(多图上传按钮下)点击上传后,后端能拿到数据,也存下来图片,但是编辑器显示http错误 或者 服务器端错误
1、检查路径…(没错,还是检查路径)
2、返回的数据类型要是 string 类型的,或者说要 json 的字符串
3、返回的字符串没按照官网要求,具体可以翻上面,我将了
5、上传成功了,但是编辑器不能正常显示
我这里报的是跨域的错,但是其实不是的,这种情况还有很多,前面也出现了!!!
我把静态文件访问路径放开就能正常回显了
参考文章:http://blog.ncmem.com/wordpress/2023/09/13/springbootvue%e6%95%b4%e5%90%88%e7%99%be%e5%ba%a6%e7%9a%84ueditor/
欢迎入群一起讨论


 浙公网安备 33010602011771号