iOS笔记054 - 核心动画
注意事项 :locationInView和translationInView
// 返回相对于控件自身内部触摸点的位置
[pan locationInView:self];
// 返回两个触摸点之间的偏移量,这个是偏移量,其实和具体的控件关系不大
CGPoint curP = [pan translationInView:self];
CAlayer 对象
在创建UIView对象时,UIView内部会自动创建一个图层(即CALayer对象),通过UIView的layer属性可以访问这个层
@property(nonatomic,readonly,retain) CALayer *layer;
例如:
// 1 阴影
// 阴影不透明度,默认是0
_redView.layer.shadowOpacity = 10;
// 注意:图层的颜色都是核心绘图框架,通常:CGColor,要进行类型转换
_redView.layer.shadowColor = [UIColor blueColor].CGColor;
_redView.layer.shadowOffset = CGSizeMake(10, 10);
_redView.layer.shadowRadius = 10;
// 2 边框
_redView.layer.borderWidth = 5;
_redView.layer.borderColor = [UIColor yellowColor].CGColor;

UIImageView图层
// UIImageView的图层属性
_imageView.layer.borderWidth = 3;
_imageView.layer.borderColor = [UIColorblueColor].CGColor;
// // 阴影
// _imageView.layer.shadowOpacity = 1; // 不透明
// _imageView.layer.shadowOffset = CGSizeMake(10, 10);
// _imageView.layer.shadowColor = [[UIColor purpleColor] CGColor];
// 圆角,默认不会裁切为圆形
_imageView.layer.cornerRadius = 50;
// 设置这个参数可以使超出圆角的部分强制裁切
_imageView.layer.masksToBounds = YES;

CALayer注意事项
CALayer是定义在QuartzCore框架中的
CGImageRef、CGColorRef两种数据类型是定义在CoreGraphics框架中的
UIColor、UIImage是定义在UIKit框架中的
QuartzCore框架和CoreGraphics框架是可以跨平台使用的,在iOS和Mac OS X上都能使用
但是UIKit只能在iOS中使用
为了保证可移植性,QuartzCore不能使用UIImage、UIColor,只能使用CGImageRef、CGColorRef
CALayer和UIView的选择
对比CALayer,UIView多了一个事件处理的功能。也就是说,CALayer不能处理用户的触摸事件,而UIView可以
所以,如果显示出来的东西需要跟用户进行交互的话,用UIView;如果不需要跟用户进行交互,用UIView或者CALayer都可以
图层的形变属性transform
- (void)touchesBegan:(NSSet *)touches withEvent:(UIEvent *)event
{
_redView.layer.transform = CATransform3DMakeScale(0.5, 0.5, 1);
CGFloat angle = arc4random_uniform(360)/180.0*M_PI; // 随机角度
[UIView animateWithDuration:1animations:^{
_redView.layer.transform = CATransform3DMakeRotation(angle, 0, 0, 1);
_redView.layer.transform = CATransform3DMakeTranslation(100, 100, 100);
// _redView.layer.transform = CATransform3DMakeScale(1, 1, 1);
// 也可以使用KVC进行属性监视,但是有时可能出现一些莫名其妙的问题
[_redView.layer setValue:@(angle) forKeyPath:@"transform.scale"];
}];
}
手动创建图层
// 手动创建图层
CALayer *layer = [CALayer layer];
layer.bounds = CGRectMake(0, 0, 100, 100);
// 起始点 position
layer.position = CGPointMake(100, 100);
// 锚点 anchorPoint,在图层内部的某个点,决定这position显示的点
// layer.anchorPoint = CGPointMake(0,0);
// layer.anchorPoint = CGPointMake(0.5,1);
layer.anchorPoint = CGPointMake(1,0.5);
layer.backgroundColor = [UIColor redColor].CGColor;
// 如过想图层中添加图片,需要添加到属性contents中,返回类型是CGImageRef
layer.contents = (id)[[UIImage imageNamed:@"阿狸头像"] CGImage];
// 将图层添加到子图层
[self.view.layer addSublayer:layer];
隐式动画
每一个UIView内部都默认关联着一个CALayer,我们可用称这个Layer为Root Layer(根层)
所有的非Root Layer,也就是手动创建的CALayer对象,都存在着隐式动画
当对非Root Layer的部分属性进行修改时,默认会自动产生一些动画效果
而这些属性称为Animatable Properties(可动画属性)
具体哪个属性修改可以产生动画,可以直接在头文件里看到Animatable 只要介绍里含有Animatable 都可以产生动画
/* The background color of the layer. Default value is nil. Colors
* created from tiled patterns are supported. Animatable. */
@property CGColorRef backgroundColor;
常见属性
- (void)touchesBegan:(NSSet *)touches withEvent:(UIEvent *)event
{
// 常见带有动画的属性
CGFloat angle = arc4random_uniform(360)/180.0*M_PI; // 随机角度
_redView.layer.transform = CATransform3DRotate(_redView.layer.transform, angle, 0, 0, 1);
_redView.layer.transform = CATransform3DTranslate(_redView.layer.transform, arc4random_uniform(50), arc4random_uniform(50), 1);
// _redView.layer.transform = CATransform3DScale(_redView.layer.transform, arc4random_uniform(10)/10.0,arc4random_uniform(10)/10.0, 1);
_redView.layer.borderWidth = arc4random_uniform(5) + 1;
_redView.layer.borderColor = [selfrandomColor].CGColor;
_redView.layer.shadowOpacity = 1;
_redView.layer.shadowOffset = CGSizeMake(10, 10);
_redView.layer.shadowRadius = arc4random_uniform(10);
_redView.layer.cornerRadius = arc4random_uniform(50);
}
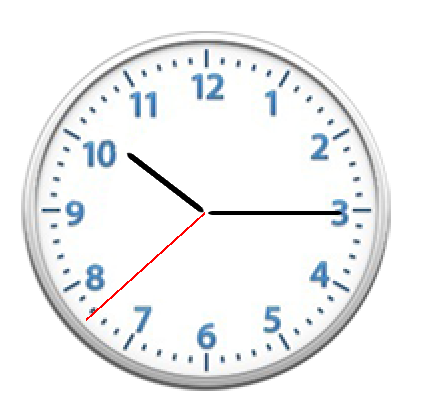
简单钟表实现

绘制秒针、时针、分针
添加三个图层表示时分秒,因为不需要响应事件所以使用图层.
@property (weak, nonatomic) IBOutletUIImageView *clockImage;
@property (strong, nonatomic) CALayer *secondLayer;
@property (strong, nonatomic) CALayer *minuteLayer;
@property (strong, nonatomic) CALayer *hourLayer;
设置时分秒针显示的位置以及大小
// 设置秒针
- (void)setSecond
{
// 秒针
_secondLayer = [CALayerlayer];
// 边界大小
_secondLayer.bounds = CGRectMake(0, 0, 1, kClockH/2 - 20);
// 背景色
_secondLayer.backgroundColor = [UIColor redColor].CGColor;
// 位置
_secondLayer.position = CGPointMake(kClockH/2, kClockH/2);
// 锚点
_secondLayer.anchorPoint = CGPointMake(0.5, 1);
// 添加到图层
[self.clockImage.layer addSublayer:_secondLayer];
}
// 设置分针
- (void)setMinute
{
// 分针
_minuteLayer= [CALayerlayer];
_minuteLayer.bounds = CGRectMake(0, 0, 2, kClockH/2 - 30);
_minuteLayer.cornerRadius = 4;
_minuteLayer.backgroundColor = [UIColor blackColor].CGColor;
_minuteLayer.position = CGPointMake(kClockH/2, kClockH/2);
_minuteLayer.anchorPoint = CGPointMake(0.5, 1);
_minuteLayer.transform = CATransform3DMakeRotation(M_PI_2, 0, 0, 1);
[self.clockImage.layer addSublayer:_minuteLayer];
}
// 设置时针
- (void)setHour
{
// 时针
_hourLayer = [CALayer layer];
_hourLayer.bounds = CGRectMake(0, 0, 3, kClockH/2 - 50);
_hourLayer.cornerRadius = 4;
_hourLayer.backgroundColor = [UIColor blackColor].CGColor;
_hourLayer.position = CGPointMake(kClockH/2, kClockH/2);
_hourLayer.anchorPoint = CGPointMake(0.5, 1);
_hourLayer.transform = CATransform3DMakeRotation(M_PI, 0, 0, 1);
[self.clockImage.layer addSublayer:_hourLayer];
}
设置一个定时器,定时刷新每个表针的位置
- (void)viewDidLoad
{
[superviewDidLoad];
[self setMinute];
[self setHour];
[self setSecond];
// 添加定时器
[NSTimer scheduledTimerWithTimeInterval:1target:self selector:@selector(timeChange) userInfo:nil repeats:YES];
}
刷新表针的方法
// 定时器实现
- (void)timeChange
{
// 获取系统时间
NSCalendar *calendar = [NSCalendar currentCalendar];
// 获取时间:时分秒
// 获取日期的组件:年月日小时分秒
// components:需要获取的日期组件
// fromDate:获取哪个日期的组件
// 经验:以后枚举中有移位运算符,通常一般可以使用并运算(|)
NSDateComponents *comp = [calendar components:NSCalendarUnitSecond | NSCalendarUnitMinute | NSCalendarUnitHourfromDate:[NSDatedate]];
NSLog(@"timeChange:%@",comp);
// 获取秒
NSInteger sec = comp.second;
// 获取分
NSInteger minute = comp.minute;
// 获取小时
NSInteger hour = comp.hour;
// 秒针当前的弧度
CGFloat secondAngle = (perSecondA * sec) / 180.0 * M_PI;
// 分针当前的弧度
CGFloat minuteAngle = (perMinuteA * minute) / 180.0 * M_PI;
// 时针当前的弧度
CGFloat hourAngle = (perHourA * hour + perMinuteHourA * minute) / 180.0 * M_PI;
// 旋转秒针
_secondLayer.transform = CATransform3DMakeRotation(secondAngle, 0, 0, 1);
// 旋转分针
_minuteLayer.transform = CATransform3DMakeRotation(minuteAngle, 0, 0, 1);
// 旋转时针
_hourLayer.transform = CATransform3DMakeRotation(hourAngle, 0, 0, 1);
}
还有几个宏
#define kClockH (_clockImage.bounds.size.height)
// 一秒钟秒针转6°
#define perSecondA 6
// 一分钟分针转6°
#define perMinuteA 6
// 一小时时针转30°
#define perHourA 30
// 每分钟时针转多少度
#define perMinuteHourA 0.5
基本动画 CABasicAnimation
- (void)touchesBegan:(NSSet *)touches withEvent:(UIEvent *)event
{
// 创建动画
CABasicAnimation *anim = [CABasicAnimation animation];
// 描述动画的属性
anim.keyPath = @"position";
// anim.keyPath = @"transform.scale";
// 动画延迟2s执行
// anim.beginTime = CACurrentMediaTime() + 2;
// 属性改变的值
anim.toValue = [NSValue valueWithCGPoint:CGPointMake(300, 200)];
// 重读次数
anim.repeatCount = 10;
// 取消动画反弹,默认为yes,动画执行完毕后恢复原状,为NO时表示动画执行结束显示动画最后的状态
anim.removedOnCompletion = YES;
// 保持动画最后的状态
anim.fillMode = kCAFillModeForwards;
[self.blueView.layer addAnimation:anim forKey:nil];
}
关键帧动画 CAKeyframeAnimation
#import "DrawView.h"
@interfaceDrawView()
@property (nonatomic, strong) UIBezierPath *path;
@end
@implementation DrawView
// 绘制一条路径
-(void)touchesBegan:(NSSet *)touches withEvent:(UIEvent *)event
{
UITouch *tou = [touches anyObject];
CGPoint curP = [tou locationInView:self];
_path = [UIBezierPath bezierPath];
[_path moveToPoint:curP];
}
- (void)touchesMoved:(NSSet *)touches withEvent:(UIEvent *)event
{
UITouch *tou = [touches anyObject];
CGPoint curP = [tou locationInView:self];
[_path addLineToPoint:curP];
[self setNeedsDisplay];
}
- (void)touchesEnded:(NSSet *)touches withEvent:(UIEvent *)event
{
// 按照路径进行移动
CAKeyframeAnimation *keyframeAnim = [CAKeyframeAnimation animation];
keyframeAnim.keyPath = @"position";
keyframeAnim.path = (_path.CGPath); // 转换路径格式
keyframeAnim.duration = 1;
keyframeAnim.repeatCount = 3;
keyframeAnim.fillMode = kCAFilterLinear;
[[[self.subviewsfirstObject] layer] addAnimation:keyframeAnim forKey:nil];
}
- (void)drawRect:(CGRect)rect
{
// 绘制路径
[_path stroke];
}
@end
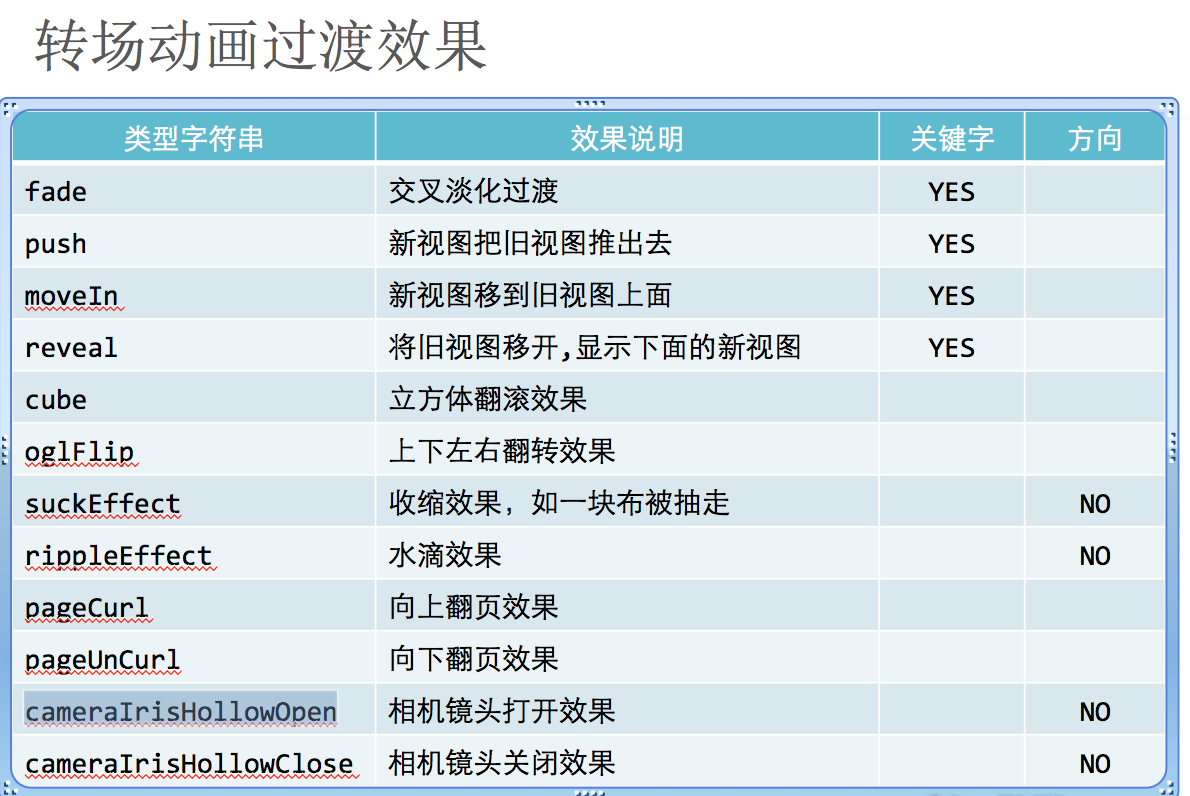
转场动画 CATransition
// 三张图片切换显示
static int i = 2;
- (void)touchesBegan:(NSSet *)touches withEvent:(UIEvent *)event
{
// 转场动画
if (i == 4) {
i = 1;
}
NSString *imageName = [NSString stringWithFormat:@"%d",i];
_imageView.image = [UIImage imageNamed:imageName];
i ++;
// 转场动画
CATransition *transition = [[CATransition alloc] init];
transition.type = @“rippleEffect”; // 动画类型
transition.duration = 2;
[self.imageView.layer addAnimation:transition forKey:nil];
}

动画组:CAAnimationGroup
//CAAnimationGroup 动画组:给一个图层添加多个动画
- (void)touchesBegan:(NSSet *)touches withEvent:(UIEvent *)event
{
CAAnimationGroup *grounp = [CAAnimationGroup animation];
CABasicAnimation *animPosition= [CABasicAnimation animation];
// 描述动画的属性
animPosition.keyPath = @"position";
// 属性改变的值
animPosition.toValue = [NSValuevalueWithCGPoint:CGPointMake(arc4random_uniform(300),arc4random_uniform(200))];
CABasicAnimation *animScale= [CABasicAnimation animation];
// 描述动画的属性
animScale.keyPath = @"transform.scale";
// 属性改变的值
animScale.toValue = @0.5;
CABasicAnimation *animRotate= [CABasicAnimation animation];
// 描述动画的属性
animRotate.keyPath = @"transform.rotation";
// 属性改变的值
animRotate.toValue = @(arc4random_uniform(M_PI));
// 添加到动画组
grounp.animations = @[animPosition,animRotate,animScale];
[self.imageView.layer addAnimation:grounp forKey:nil];
}
注意:核心动画一切都是假象,并不会真实的改变图层的属性值,如果以后做动画的时候,不需要与用户交互,通常用核心动画(转场)。
UIView动画必须通过修改属性的真实值,才有动画效果。
渐变图层 - CAGradientLayer

实现这种效果需要将一张图片拆分成两张,直接使用两个imageView
然后添加一个响应手势的UIView,大小和图片大小一致。
图层的属性contentsRect 使用注意:取值范围0~1
// 通过设置contentsRect可以设置图片显示的尺寸,取值0~1
// 获取上半部分
_topView.layer.contentsRect = CGRectMake(0, 0, 1, 0.5);
_topView.layer.anchorPoint = CGPointMake(0.5, 1);
// 显示下半部分
_bottomView.layer.contentsRect = CGRectMake(0, 0.5, 1, 0.5);
_bottomView.layer.anchorPoint = CGPointMake(0.5, 0);
// 添加滑动手势
UIPanGestureRecognizer *pan = [[UIPanGestureRecognizer alloc] initWithTarget:self action:@selector(pan:)];
[self.dragView addGestureRecognizer:pan];
// 渐变图层
CAGradientLayer *layer = [CAGradientLayerlayer];
layer.frame = self.bottomView.bounds; // 渐变图层位置和尺寸
layer.opacity = 0; // 透明
// 添加渐变色
layer.colors = @[(id)[UIColor clearColor].CGColor,(id)[UIColorblackColor].CGColor];
_gradientLayer = layer;
// 添加到底部
[self.bottomView.layer addSublayer:layer];
- (void)pan:(UIPanGestureRecognizer *)pan
{
// 图片高度
CGFloat imageH = _dragView.bounds.size.width;
CGPoint curP = [pan translationInView:self.dragView];
// 旋转角度
CGFloat angle = - curP.y / imageH *M_PI;
// 默认原始位置
CATransform3D transform = CATransform3DIdentity;
// 增加旋转的立体感,近大远小,d:距离图层的距离
transform.m34 = -1 / 500.0 ;
// 旋转
transform = CATransform3DRotate(transform, angle, 1, 0, 0);
self.topView.layer.transform = transform;
// 设置阴影效果
self.gradientLayer.opacity = curP.y / imageH;
// 手指抬起后将图片反弹
if (pan.state == UIGestureRecognizerStateEnded) {
[UIViewanimateWithDuration:0.5delay:0usingSpringWithDamping:0.2initialSpringVelocity:10options:UIViewAnimationOptionCurveEaseInOutanimations:^{
// topView恢复原状
self.topView.layer.transform = CATransform3DIdentity;
// 阴影恢复原状
self.gradientLayer.opacity = 0;
} completion:^(BOOL finished) {
}];
}
}
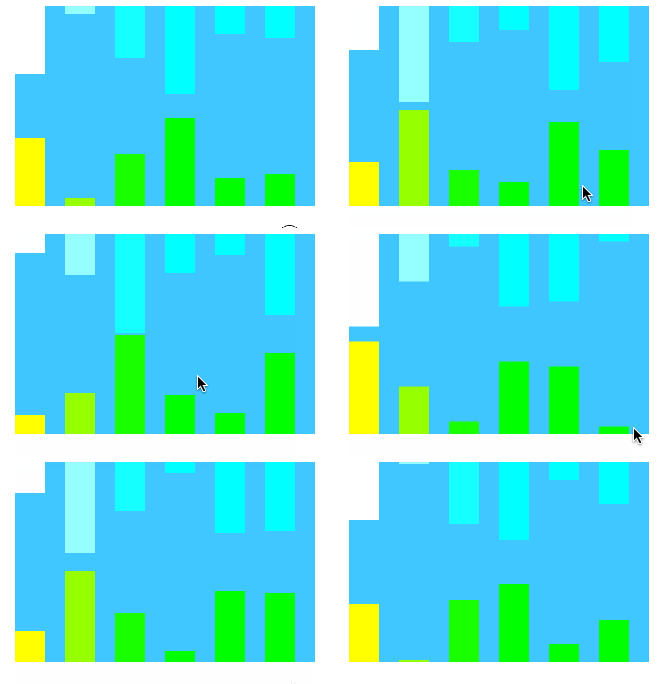
复制图层 - CAReplicatorLayer
可以复制非根层的所有子层

- (void)createLayerWithColor:(UIColor *)color anchorPoint:(CGPoint )point frame:(CGRect)rect
{
// 复制图层 CAReplicatorLayer
CAReplicatorLayer *replicator = [CAReplicatorLayer layer];
// 必须设置尺寸
replicator.frame = self.imageView.bounds;
[self.imageView.layer addSublayer:replicator];
// 创建图层
CALayer *layer = [CALayer layer];
layer.backgroundColor = color.CGColor;
// 注意设置锚点和frame的顺序,先设置锚点再设置位置
layer.anchorPoint = point;
layer.frame = rect;;
// 添加图层动画
CABasicAnimation *anim = [CABasicAnimation animation];
anim.keyPath = @"transform.scale.y"; // 只改变y值
anim.fromValue = @(0);
anim.toValue = @(1);
anim.repeatCount = MAXFLOAT;
anim.duration = 0.5;
anim.autoreverses = YES; // 自动反转动画
[layer addAnimation:anim forKey:nil];
// 将图层添加到复制图层
[replicator addSublayer:layer];
// 复制图层总个数,包括原图层
replicator.instanceCount = 6;
// 图层之间显示的延迟
replicator.instanceDelay = 0.3;
// 图层之间的距离或者其他属性
replicator.instanceTransform = CATransform3DMakeTranslation(50, 0, 0);
// 如果设置了原始层背景色,就不需要设置这个属性
replicator.instanceRedOffset = - 0.4;
}
动态加载

// 复制层
CAReplicatorLayer *repl = [CAReplicatorLayer layer];
repl.frame = self.imageView.bounds;
[self.imageView.layer addSublayer:repl];
// 一般层
CALayer *layer = [CALayer layer];
// layer.anchorPoint = CGPointMake(0.5, 1);
// 一开始不想显示的话就先隐藏
layer.transform = CATransform3DMakeScale(0, 0, 0);
layer.frame = CGRectMake((self.imageView.bounds.size.width-20)/2, 0, 20, 20);
layer.backgroundColor = [UIColorredColor].CGColor;
layer.cornerRadius = 10;
CABasicAnimation *anim = [CABasicAnimation animation];
anim.keyPath = @"transform.scale";
anim.fromValue = @(1);
anim.toValue = @(0);
anim.repeatCount = MAXFLOAT;
CGFloat duraton = 1;
anim.duration = duraton;
[layer addAnimation:anim forKey:nil];
[repl addSublayer:layer];
repl.instanceCount = kViewCount;
CGFloat angle = M_PI * 2 / kViewCount;
repl.instanceTransform = CATransform3DMakeRotation(angle, 0, 0, 1);
repl.instanceDelay = duraton / kViewCount;
}
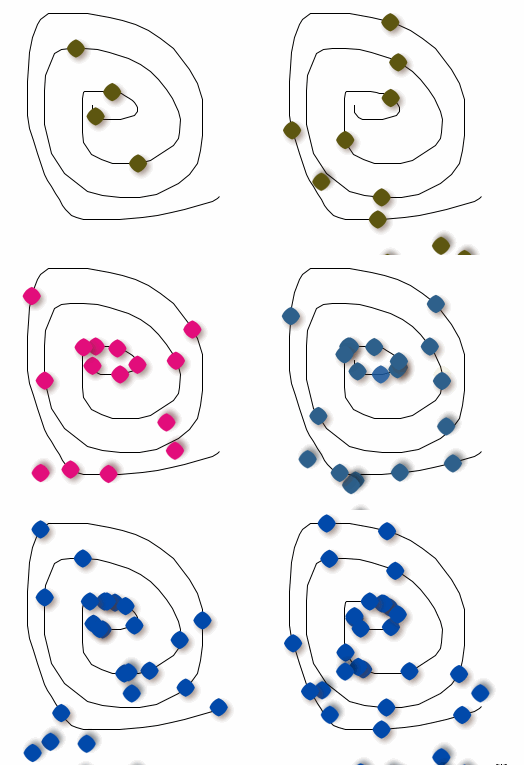
粒子效果
使用关键帧动画可以实现跟随粒子效果

#import "DrawView.h"
@interfaceDrawView ()
@property (nonatomic, strong) UIBezierPath *path;
@property (weak, nonatomic) IBOutletUIImageView *imageView;
@property (weak, nonatomic) CAReplicatorLayer *repl;
@property (weak, nonatomic) CALayer *dotLayer;
@end
@implementation DrawView
//
- (CALayer *)dotLayer
{
if (_dotLayer == nil) {
CALayer *layer = [CALayer layer];
// 初始显示到屏幕以外位置
layer.frame = CGRectMake(1100, 0, 20, 20);
layer.cornerRadius = 15;
layer.backgroundColor = [UIColor whiteColor].CGColor;
layer.shadowOpacity = 0.5;
layer.shadowOffset = CGSizeMake(3, 3);
layer.shadowColor = [self randomColor].CGColor;
_dotLayer = layer;
[_repl addSublayer:_dotLayer];
}
return_dotLayer;
}
- (UIColor *)randomColor
{
CGFloat r = arc4random_uniform(256)/255.0;
CGFloat g = arc4random_uniform(256)/255.0;
CGFloat b = arc4random_uniform(256)/255.0;
return [UIColorcolorWithRed:r green:g blue:b alpha:1];
}
// 只加载一次,将所有线全部保存在一个路径中
- (UIBezierPath *)path
{
if (_path == nil) {
_path = [UIBezierPath bezierPath];
}
return _path;
}
- (void)touchesBegan:(NSSet *)touches withEvent:(UIEvent *)event
{
UITouch *tou = [touches anyObject];
CGPoint curP = [tou locationInView:self];
[self.path moveToPoint:curP];
}
static int count = 0; // 复制子层个数
- (void)touchesMoved:(NSSet *)touches withEvent:(UIEvent *)event
{
UITouch *tou = [touches anyObject];
CGPoint curP = [tou locationInView:self];
[self.path addLineToPoint:curP];
[selfsetNeedsDisplay];
count ++;
}
- (void)start
{
CAKeyframeAnimation *anim = [CAKeyframeAnimationanimation];
anim.keyPath = @"position";
anim.path = self.path.CGPath;
anim.duration = 3;
anim.repeatCount = MAXFLOAT;
[self.dotLayeraddAnimation:anim forKey:nil];
[_repladdSublayer:self.dotLayer];
// 注意:如果复制的子层有动画,先添加动画,在复制
// 复制子层
self.repl.instanceCount = count;
self.repl.instanceDelay = 0.2;
// _repl.instanceTransform = CATransform3DMakeRotation(M_PI,1, 0,0);
_repl.instanceTransform = CATransform3DMakeScale(1, 0.3, 1);
// _repl.instanceTransform = CATransform3DMakeTranslation(10, 3, 0);
// self.repl.instanceRedOffset = - 0.1;
// self.repl.instanceBlueOffset = - 0.1;
// self.repl.instanceGreenOffset = - 0.1;
self.repl.instanceColor = [selfrandomColor].CGColor;
}
- (void)redraw
{
// 清空路径
self.path = nil;
[self setNeedsDisplay];
// 移除子层
[_dotLayer removeFromSuperlayer];
_dotLayer = nil;
// 计数清零
count = 0;
}
- (void)awakeFromNib
{
// 显示粒子
CAReplicatorLayer *repl = [CAReplicatorLayerlayer];
repl.frame = self.bounds;
[self.layer addSublayer:repl];
_repl = repl;
}
// Only override drawRect: if you perform custom drawing.
// An empty implementation adversely affects performance during animation.
- (void)drawRect:(CGRect)rect {
// Drawing code
[self.path stroke];
}
@end
倒影

通过复制图层复制多个照片图层,然后设置属性。
// 复制子层
CAReplicatorLayer *repl = (CAReplicatorLayer *)_imageRootView.layer;
repl.instanceCount = 4;
CGFloat angel = 0;
for (int i = 0 ; i < 4 ; i ++) {
angel = i * M_PI_2;
CATransform3D transform = CATransform3DMakeTranslation(-_imageView.bounds.size.width,_imageView.bounds.size.height * 2, 0);
transform = CATransform3DRotate(transform,angel,0 , 0,1);
// 平移并旋转
repl.instanceTransform = transform;
}
// 添加一个阴影效果
repl.instanceRedOffset = - 0.1;
repl.instanceGreenOffset = - 0.1;
repl.instanceBlueOffset = - 0.1;
repl.instanceAlphaOffset = - 0.1;
不规则图形图层 CAShapeLayer
可以绘制各种不规则图形,指定路径和填充颜色
@propertyCGPathRef path;
@property CGColorRef fillColor;
直接指定路径可以绘制。不需要在drawRect中绘制。
// 展示不规则矩形,通过不规则矩形路径生成一个图层
CAShapeLayer *layer = [CAShapeLayerlayer];
layer.fillColor = self.backgroundColor.CGColor;
_shapeLayer = layer;
[self.superview.layer insertSublayer:_shapeLayer below:self.layer];
本文来自博客园,作者:struggle_time,转载请注明原文链接:https://www.cnblogs.com/songliquan/p/4600631.html


【推荐】国内首个AI IDE,深度理解中文开发场景,立即下载体验Trae
【推荐】编程新体验,更懂你的AI,立即体验豆包MarsCode编程助手
【推荐】抖音旗下AI助手豆包,你的智能百科全书,全免费不限次数
【推荐】轻量又高性能的 SSH 工具 IShell:AI 加持,快人一步
· go语言实现终端里的倒计时
· 如何编写易于单元测试的代码
· 10年+ .NET Coder 心语,封装的思维:从隐藏、稳定开始理解其本质意义
· .NET Core 中如何实现缓存的预热?
· 从 HTTP 原因短语缺失研究 HTTP/2 和 HTTP/3 的设计差异
· 周边上新:园子的第一款马克杯温暖上架
· Open-Sora 2.0 重磅开源!
· 分享 3 个 .NET 开源的文件压缩处理库,助力快速实现文件压缩解压功能!
· Ollama——大语言模型本地部署的极速利器
· DeepSeek如何颠覆传统软件测试?测试工程师会被淘汰吗?