🍖Vue 组件间通信
引入
组件是 vue.js最强大的功能之一,而组件实例的作用域是相互独立的,这就意味着不同组件之间的数据无法相互引用, 如果想要组件间通信就需要使用一些 Vue 提供给我们的方法, 下面介绍几种常见的方法
一.父组件向子组件传值
1.方式
- 父组件定义 js 变量, 通过属性指令方式放置在子组件的标签上, 子组件内使用 props 来指定接收父组件传来的属性指令
// proos 指定传值的属性
props:['myname','myage'],

// 还可以以对象的方式限制传过来值的类型
props:{
    myname:String,  // 限制myname属性的值为字符串类型
    myage:Number,   // 限制myage属性传过来的值为数值
},
2.示例
<meta charset="UTF-8">
<title>Title</title>
<script src="https://cdn.bootcdn.net/ajax/libs/jquery/3.4.1/jquery.min.js"></script>
<link href="https://cdn.bootcdn.net/ajax/libs/twitter-bootstrap/3.4.1/css/bootstrap.min.css" rel="stylesheet">
<script src="https://cdn.bootcdn.net/ajax/libs/twitter-bootstrap/3.4.1/js/bootstrap.min.js"></script>
<script src="https://cdn.jsdelivr.net/npm/vue@2.6.12"></script>
<div id="app">
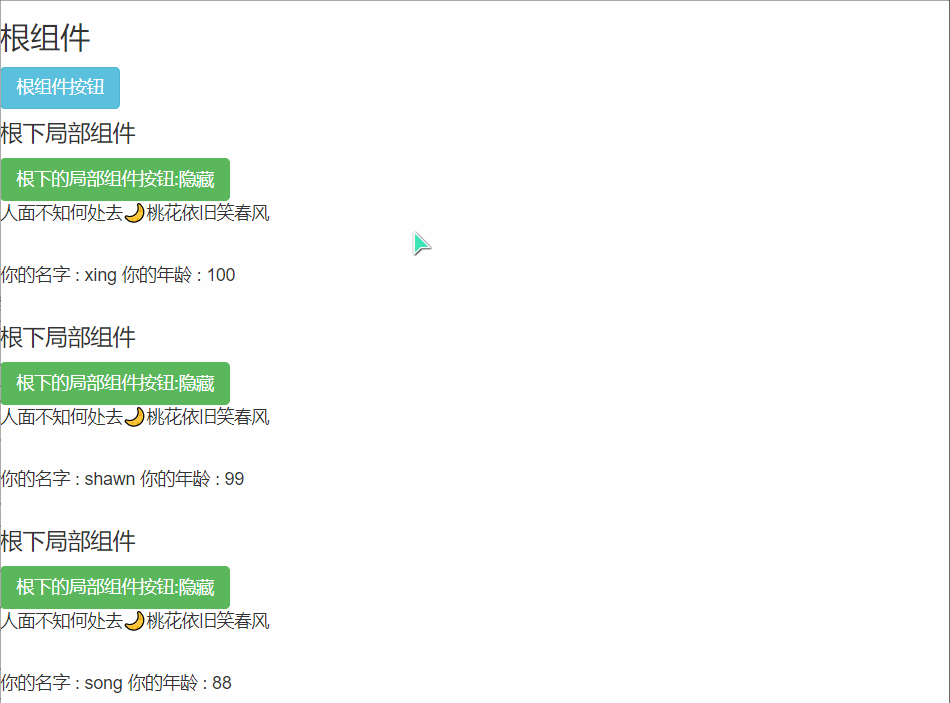
<h3>根组件</h3>
<button @click="root1" class="btn btn-info">根组件按钮</button>
<br>
<!--父传子-->
<!--直接通过"属性=值"方式传递-->
<child2 myname="xing" myage="100"></child2>
<br>
<!--通过属性指令传一个js变量,父可在data中定义该变量-->
<child2 :myname="name" :myage="age"></child2>
<br>
<!--通过属性指令直接传字符串类型的值-->
<child2 :myname="'song'" :myage="88"></child2>
<hr>
<myhead></myhead>
<hr>
</div>
<script>
// 根(父)组件
var vm = new Vue({
el: '#app',
data: {
// 通过js变量给子组件进行传值
name:'shawn',
age:99
},
methods: {
root1() {
alert('我是根div的按钮!')
}
},
// 根组件的局部组件,组件名"child2"
components:{
child2:{
// 在局部组件中渲染父组件传过来的值
template:`
<div>
<h4>根下局部组件</h4>
<button @click="handleClick" class="btn btn-success">根下的局部组件按钮:{{isShow?'隐藏':'展示'}}</button>
<p v-show="isShow">人面不知何处去🌙桃花依旧笑春风</p>
<br>
你的名字 : {{myname}}
你的年龄 : {{myage}}
</div>
`,
// 父传子是通过属性来传递的,需要在子组件内使用props指定传值的属性
// props:['myname','myage'],
// 除了使用这种方式,还可以以对象的方式限制传过来值的类型
props:{
myname:String, // 限制myname属性的值为字符串类型
myage:Number, // 限制myage属性传过来的值为数值
},
// 局部组件内的js变量
data(){
return{
isShow: true,
}
},
// 局部组件使用的函数
methods:{
handleClick(){
this.isShow = !this.isShow
}
}
}
}
})
</script>
3.效果展示
二.子组件向父组件传值 ( 通过事件的形式)
1.方式
- 通过 $emit 来自动触发自定义事件的执行
<!--HTML中自定义的事件-->
<child2 @myevent="handleParent" @custom="handleCustom"></child2>
// 使用 $emit 无论在哪里都能指定触发某个自定义事件的执行
this.$emit('myevent',this.name,this.age)  // this指的是Vue实例
this.$emit('myevent')  // 也可以不传值

this.$emit('custom')
2.示例
<meta charset="UTF-8">
<title>Title</title>
<script src="https://cdn.bootcdn.net/ajax/libs/jquery/3.4.1/jquery.min.js"></script>
<link href="https://cdn.bootcdn.net/ajax/libs/twitter-bootstrap/3.4.1/css/bootstrap.min.css" rel="stylesheet">
<script src="https://cdn.bootcdn.net/ajax/libs/twitter-bootstrap/3.4.1/js/bootstrap.min.js"></script>
<script src="https://cdn.jsdelivr.net/npm/vue@2.6.12"></script>
<div id="app">
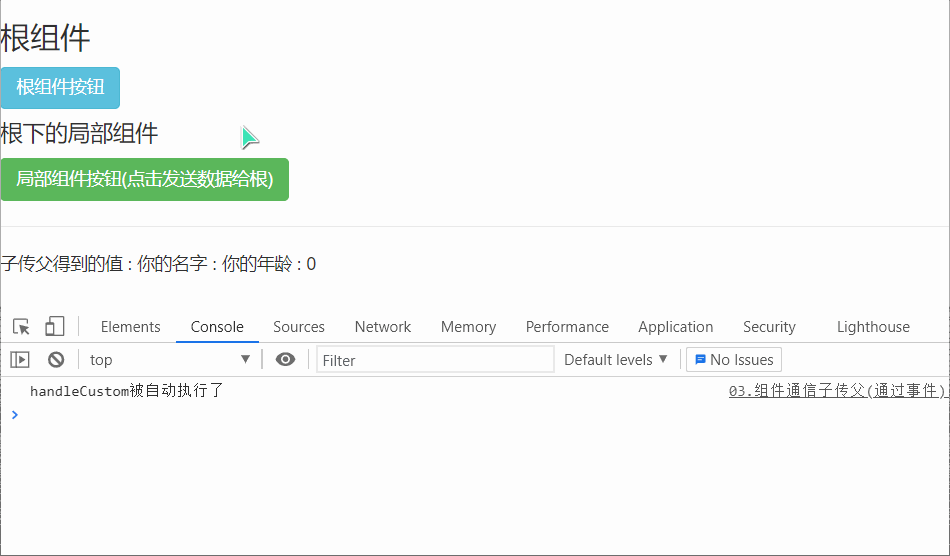
<h3>根组件</h3>
<button @click="root1" class="btn btn-info">根组件按钮</button>
<br>
<!--局部(子)组件,在子组件标签内定义了两个自定义的事件,可以通过它们来进行传值-->
<child2 @myevent="handleParent" @custom="handleCustom"></child2>
<hr>
子传父得到的值 : 你的名字 : {{name}} 你的年龄 : {{age}}
</div>
<script>
// 根(父)组件
var vm = new Vue({
el: '#app',
data: {
// 根(父)组件中可以定义空的js变量来接收子组件传过来的值
name:'',
age:0,
},
methods: {
root1() {
alert('我是根div的按钮!')
},
// 根(父)组件中执行该函数接收两个来自子组件的参数,并将值赋给自己的js变量
handleParent(name,age){
console.log('自定义事件被执行了')
this.name = name
this.age = age
},
handleCustom(){
console.log('handleCustom被自动执行了')
}
},
// 根内局部(子)组件,组件名"child2"
components:{
child2:{
template:`
<div>
<h4>根下的局部组件</h4>
<button @click="handleClick" class="btn btn-success">局部组件按钮(点击发送数据给根)</button>
</div>
`,
// 子组件使用的js变量
data(){
return{
// 子组件内定义的js变量,等下传给父组件
name:'shawn',
age:990
}
},
// 子组件使用的函数
methods:{
handleClick(){
console.log('子组件按钮被点击')
// 子传父通过"$emit"自动触发事件的执行来进行传值
// 下面是触发自定义事件"myevent"的执行,并传入两个当前子组件内的js变量
this.$emit('myevent',this.name,this.age)
// this.$emit('myevent') // 也可以不传值
// this.$emit('custom')
},
},
// 生命期钩子函数 : DOM渲染之后触发(挂载之后)
// "$emit"指的是自动触发某一个指定的事件,并不是要指定在某个位置,可以是任意位置(渲染之后)
mounted(){
this.$emit('custom')
}
}
}
})
</script>
3.展示
三.ref 实现父子双向通信
1.使用方式
- 在标签或组件上添加
ref属性 - 通过
this.$refs.[ref属性值]拿到原生节点或者组件对象, 之后再进行操作
2.ref 使用注意
- ref 放在标签上, 拿到的是原生节点
console.log(this.$refs.myinput1)
// <input type="text" placeholder="父组件input1">
- ref 放在组件上, 拿到的是组件对象
console.log(this.$refs.mychild)
// a{_uid: 1, _isVue: true, $options: {…}, _renderProxy: a, _self: a,…}
// 对象中的数据、函数都可以被直接使用
3.示例
<meta charset="UTF-8">
<title>Title</title>
<script src="https://cdn.bootcdn.net/ajax/libs/jquery/3.4.1/jquery.min.js"></script>
<link href="https://cdn.bootcdn.net/ajax/libs/twitter-bootstrap/3.4.1/css/bootstrap.min.css" rel="stylesheet">
<script src="https://cdn.bootcdn.net/ajax/libs/twitter-bootstrap/3.4.1/js/bootstrap.min.js"></script>
<script src="https://cdn.jsdelivr.net/npm/vue@2.6.12"></script>
<div id="app">
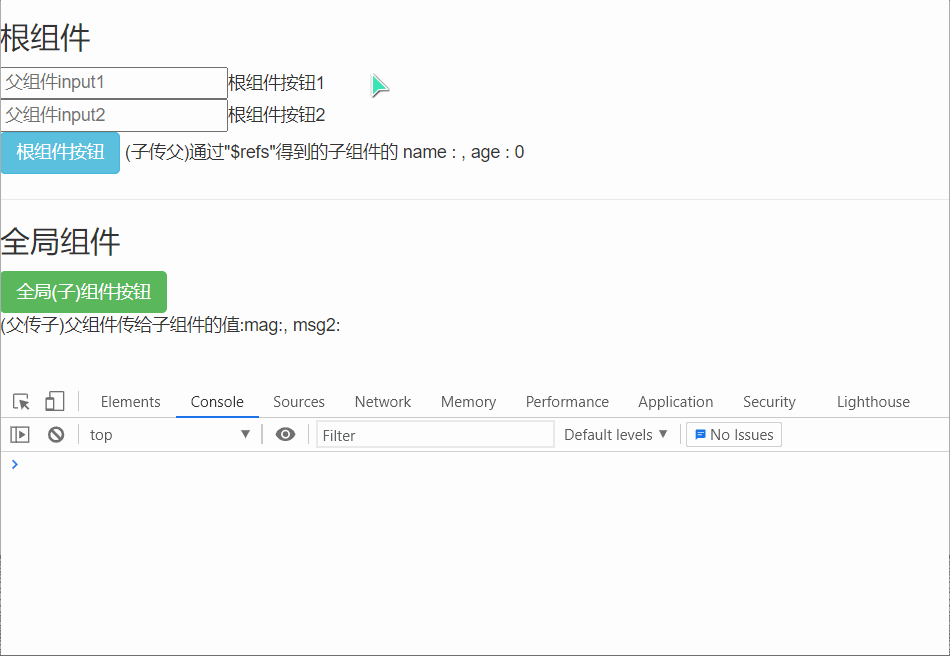
<h3>根组件</h3>
<input type="text" placeholder="父组件input1" ref="myinput1">根组件按钮1<br>
<input type="text" placeholder="父组件input2" ref="myinput2">根组件按钮2<br>
<button @click="handleParent" class="btn btn-info">根组件按钮</button>
(子传父)通过"$refs"得到的子组件的 name : {{name}}, age : {{age}}
<hr>
<myhead ref="mychild" @custom="customParent"></myhead>
</div>
<script>
Vue.component('myhead', {
template: `
<div>
<h3>全局组件</h3>
<button @click="myheadButton" class="btn btn-success">全局(子)组件按钮</button>
<br>
<p>(父传子)父组件传给子组件的值:mag:{{ msg }}, msg2:{{ msg2 }}</p>
</div>
`,
data() {
return {
// 父组件通过ref拿到子组件对象后可以拿到子组件的任意js变量和函数
name: 'shawn',
age: 333,
msg: '',
msg2: ''
}
},
methods: {
myheadButton() {
console.log('子组件button被点击')
this.$emit('custom')
},
// 子组件方法
childCustom(msg2) {
console.log('父组件进行了传值')
this.msg2 = msg2
}
},
})
var vm = new Vue({
el: '#app',
data: {
name: '',
age: 0
},
methods: {
customParent(){
// 拿到子组件内的name,age赋值给自己的name,age实现子传父
this.name = this.$refs.mychild.name
this.age = this.$refs.mychild.age
},
handleParent() {
console.log('父组件button被点击')
// 拿到子组件的msg,并使用自己的数据对其进行赋值,实现父传子
this.$refs.mychild.msg = this.$refs.myinput1.value
// 也可以触发子组件的方法,传入自己的值作为参数
this.$refs.mychild.childCustom(this.$refs.myinput2.value)
// ref放在标签上, 拿到的是原生节点
console.log(this.$refs.myinput1) // <input type="text" placeholder="父组件input1">
// ref放在组件上, 拿到的是组件对象
console.log(this.$refs.mychild) // a{_uid: 1, _isVue: true, $options: {…}, _renderProxy: a, _self: a,…}
}
},
})
</script>
4.展示
四.事件总线实现不同组件间通信
1.使用步骤
- 创建一个事件总线实例
- 组件可以通过事件总线发送数据(对应一个事件名)
- 而另一个组件可以监听该事件名, 一旦有数据发过来了就会接收到
- 可以多个组件共同监听一个事件
2.示例
<meta charset="UTF-8">
<title>Title</title>
<script src="https://cdn.bootcdn.net/ajax/libs/jquery/3.4.1/jquery.min.js"></script>
<link href="https://cdn.bootcdn.net/ajax/libs/twitter-bootstrap/3.4.1/css/bootstrap.min.css" rel="stylesheet">
<script src="https://cdn.bootcdn.net/ajax/libs/twitter-bootstrap/3.4.1/js/bootstrap.min.js"></script>
<script src="https://cdn.jsdelivr.net/npm/vue@2.6.12"></script>
<div id="app">
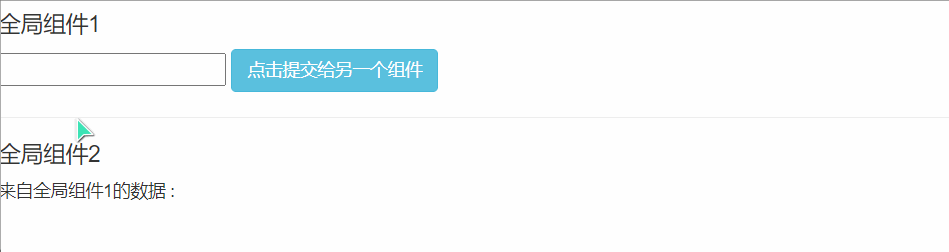
<!--全局组件1-->
<child1></child1>
<hr>
<!--全局组件2-->
<child2></child2>
</div>
<script>
// 创建一个事件总线实例
var bus = new Vue()
// 创建一个全局组件1
Vue.component('child1', {
template: `
<div>
<h4>全局组件1</h4>
<input type="text" v-model="mytext">
<button @click="handleClick" class="btn btn-info">点击提交给另一个组件</button>
</div>
`,
data(){
return{
mytext:''
}
},
methods: {
handleClick() {
// 通过事件总线发送数据,'submits'是被另一个组件在总线上监听的名字
bus.$emit('submits',this.mytext)
}
},
})
// 创建另一个全局组件2
Vue.component('child2', {
template: `
<div>
<h4>全局组件2</h4>
<p>来自全局组件1的数据 : {{mycontent}}</p>
</div>
`,
data(){
return{
mycontent:''
}
},
// 在挂载之后就进行监听(DOM渲染完成后)
mounted(){
// 监听事件总线上的"submits",如果有数据就会接收到(观察者模式)
bus.$on('submits',(item) =>{
this.mycontent = item // 将值赋给自己的js变量
})
}
})
// 根组件
var vm = new Vue({
el: '#app',
data: {},
})
</script>
3.展示
五.动态组件
1.使用方式
- vue 动态组件用于实现在指定位置上,动态加载不同的组件
<component :is="who"></component>
- "who" 为自定义的变量,将需要加载的组件名赋值给它,即可在
<component>标签出现的位置,渲染该组件
var vm = new Vue({
    el: '#app',
    data: {
        who: 'myhead1' // 赋值组件名
    },
})
2.示例
    <meta charset="UTF-8">
    <title>Title</title>
    <script src="https://cdn.bootcdn.net/ajax/libs/jquery/3.4.1/jquery.min.js"></script>
    <link href="https://cdn.bootcdn.net/ajax/libs/twitter-bootstrap/3.4.1/css/bootstrap.min.css" rel="stylesheet">
    <script src="https://cdn.bootcdn.net/ajax/libs/twitter-bootstrap/3.4.1/js/bootstrap.min.js"></script>
    <script src="https://cdn.jsdelivr.net/npm/vue@2.6.12"></script>


<div id="app">
    <button @click="who='myhead1'">文章</button>
    <button @click="who='myhead2'">相册</button>
    <button @click="who='myhead3'">管理</button>

    <!--点击哪个按钮就会切换到哪个按钮对应的组件-->
    <component :is="who"></component>
</div>

<script>
    // 🔰文章组件
    Vue.component('myhead1', {
        template: `
            <div>
                <hr>
                标题: <br>
                <input type="text" placeholder="请输入标题">
                <br>
                内容: <br>
                <textarea cols="30" rows="10">请输入内容</textarea>
                <br>
                <button class="btn btn-info">提交文章</button>
            </div>
        `,
    })

    // 🔰相册组件
    Vue.component('myhead2', {
        template: `
            <div>
                <div style="height: 200px;background-color: #7de7bd">图片1</div>
                <hr>
                <div style="height: 200px;background-color: #71d058">图片2</div>
            </div>
        `,
    })

    // 🔰后台设置组件
    Vue.component('myhead3', {
        template: `
            <div>
            <hr>
                设置:<input type="text" placeholder="请输入设置">
                <br>
                设置:<input type="text" placeholder="请输入设置">
                <br>
                设置:<input type="text" placeholder="请输入设置">
                <br>
                <button class="btn btn-success">提交设置</button>
            </div>
        `,
    })

    // 🔰根组件
    var vm = new Vue({
        el: '#app',
        data: {
            who: 'myhead1' // 默认展示这个组件
        },
    })
</script>
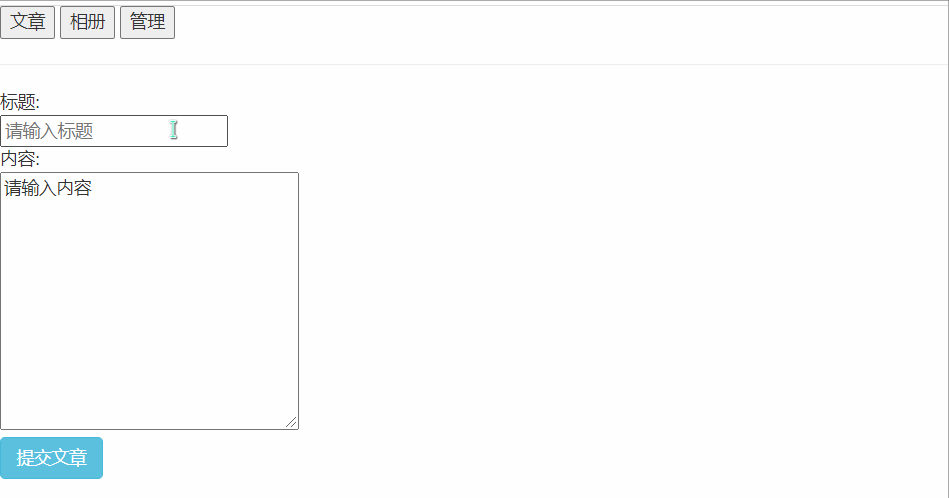
3.展示

> 上面存在的一个问题 : 只要组件切换, 之前在输入框内输入的内容就被清空了, vue 提供了 keep-alive 来帮我们保持输入框内容保持
4.keep-alive 的使用
- 使用很简单, 只需要在
component外套一层keep-alive标签即可
<!--keep-alive(保持存活)可以让输入框内有的内容一直保持,不会因为切换而清空-->
<keep-alive>
    <!--点击哪个按钮就会切换到哪个按钮对应的组件-->
    <component :is="who"></component>
</keep-alive>
5.keep-alive 效果展示

 浙公网安备 33010602011771号