Mac安装Homebrew|Jenkins - iOS脚本自动化打包
为了解决iOS打包每次都要打开Xcode,配置证书和描述文件进行编译完成Achieve,打包完成还需要把包推送到AppStore或者TestFlight中很实麻烦,而且频繁的打包非常占用工作时间,所以本次通过mac作为一台本地服务器通过Jekins的完成脚本打包上传Appstore|TestFlight一站到位。
新的mac电脑需要提前安装的工具如下:
- Xocde-直接在appstore里面安装。
- 安装cocoapods-这里不做介绍。
- 安装Flutter坏境-这里不做介绍(只有支持flutter的项目才需要,Native可以省略)+ Android Studio工具 + mac坏境变量配置。
一:安装Homebrew
直接打开Terminal复制进去运行:
/bin/zsh -c "$(curl -fsSL https://gitee.com/cunkai/HomebrewCN/raw/master/Homebrew.sh)"
注意:因为这里用的国内镜像安装,选择中科大进行安装即可。
安装完成运行是否安装完成:brew -v
Homebrew 3.6.6-32-g2bec760
Homebrew/homebrew-core (git revision 0f1819a0778; last commit 2022-10-21)
Homebrew/homebrew-cask (git revision f35ec19027; last commit 2022-10-20)
以上信息表示安装完成。
二:安装Jenkins
安装地址:https://www.jenkins.io/download/lts/macos/
- Install the latest LTS version:
brew install jenkins-lts - Install a specific LTS version:
brew install jenkins-lts@YOUR_VERSION - Start the Jenkins service:
brew services start jenkins-lts - Restart the Jenkins service:
brew services restart jenkins-lts - Update the Jenkins version:
brew upgrade jenkins-lts
我们直接选者LTS安装最新Jenkins就行了。
brew install jenkins-lts
接下来等待一段时间,安装完成。
关于Jenkins相关命令:
启动Jenkins命令:
brew services start jenkins-lts
停止Jenkins命令:
brew services stop jenkins-lts
重启命令:
brew services restart jenkins-lts
安装Jenkins如下:
启动完成只需要在浏览器输入:http://localhost:8080/
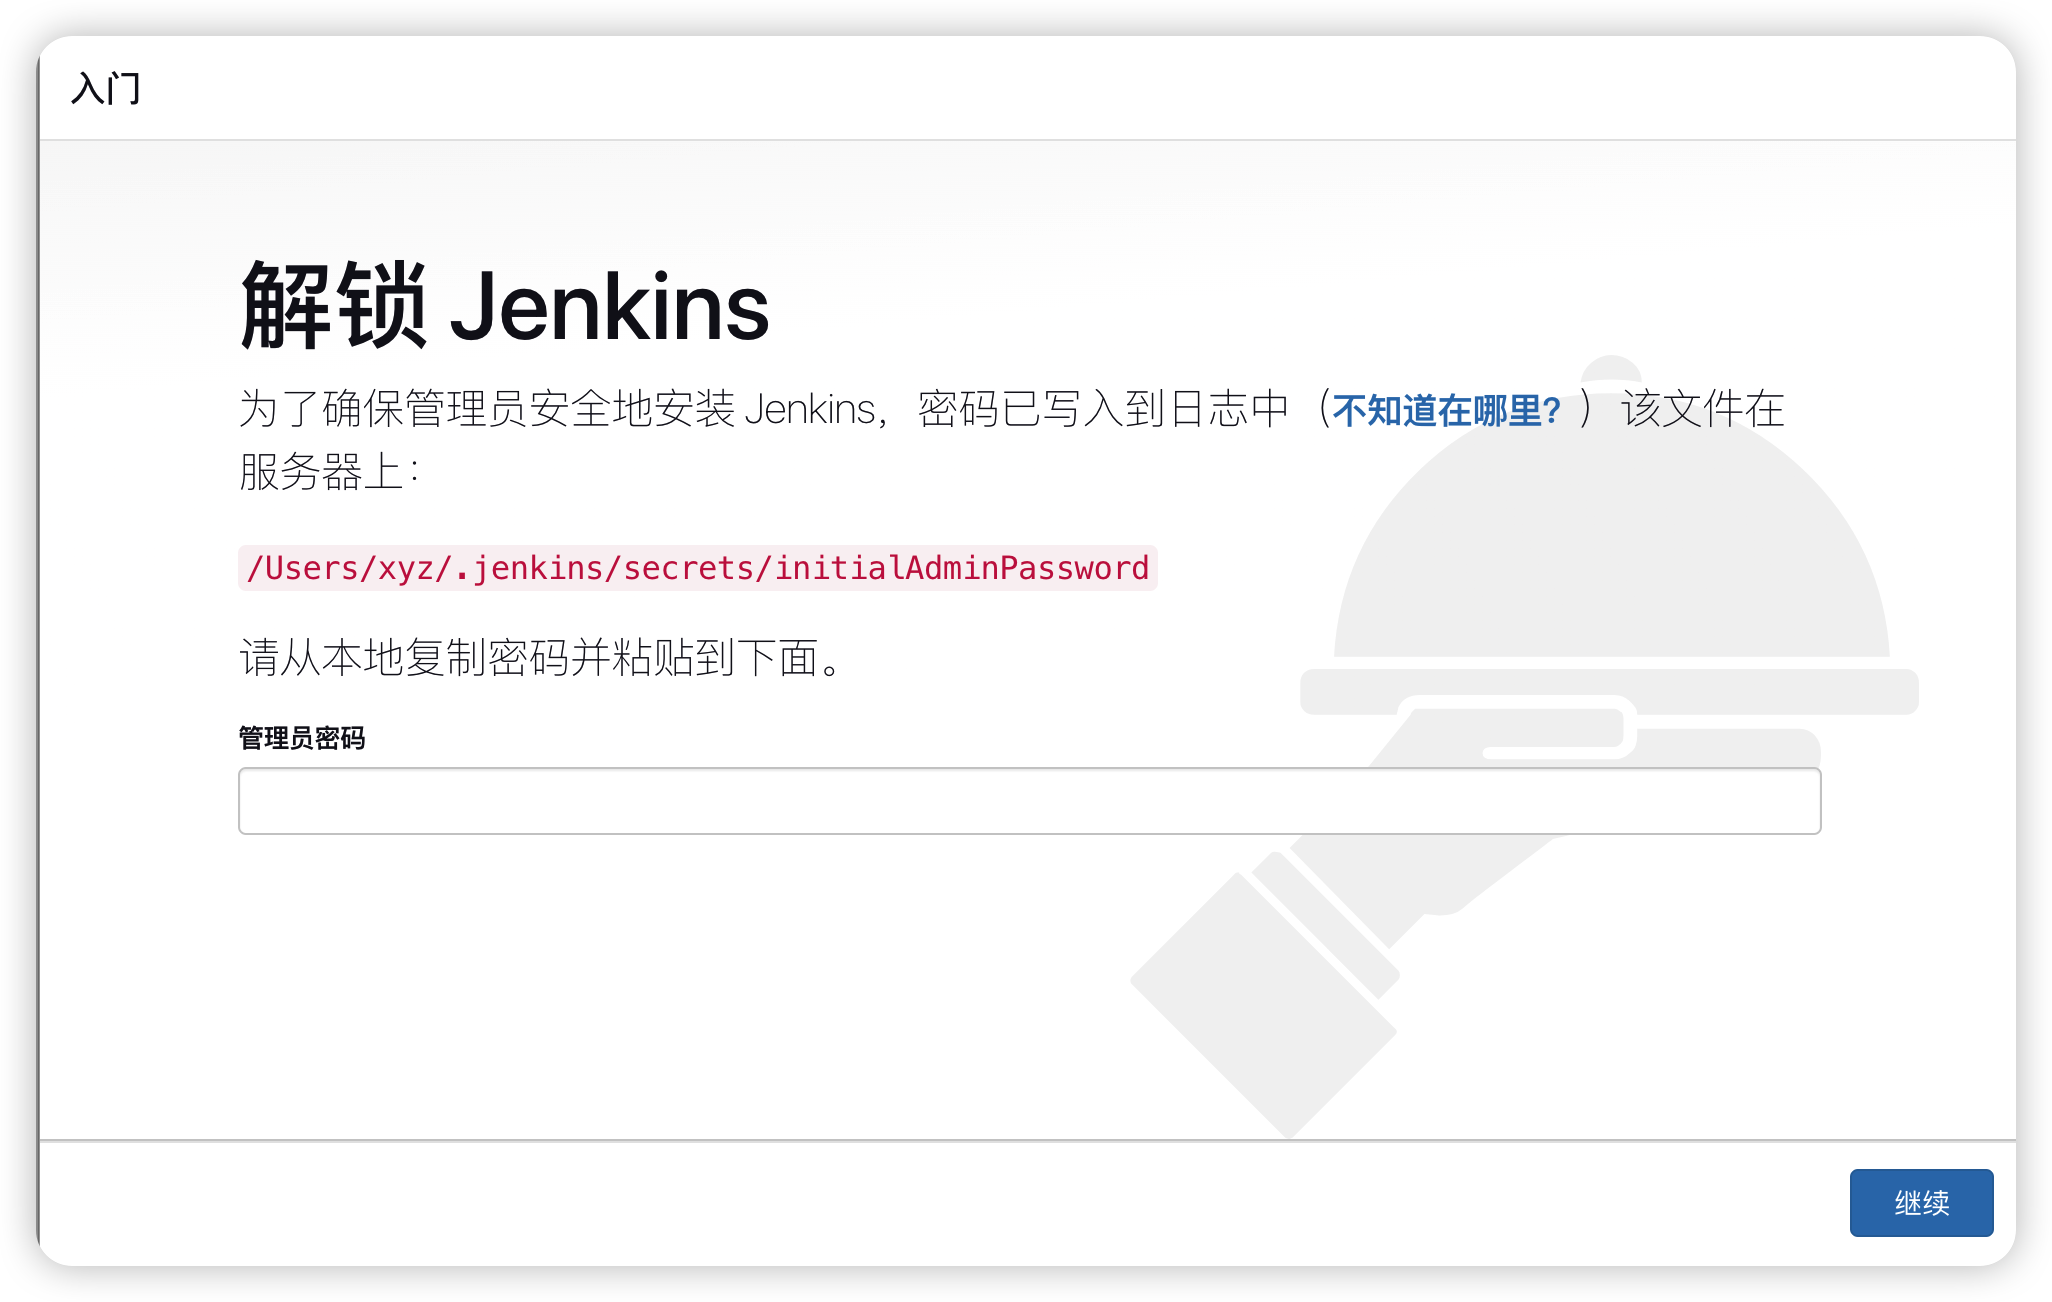
第一次打开需要管理员密码,命令如下:
cat /Users/xyz/.jenkins/secrets/initialAdminPassword
然后输入密码,选择推荐安装插件,等待安装。
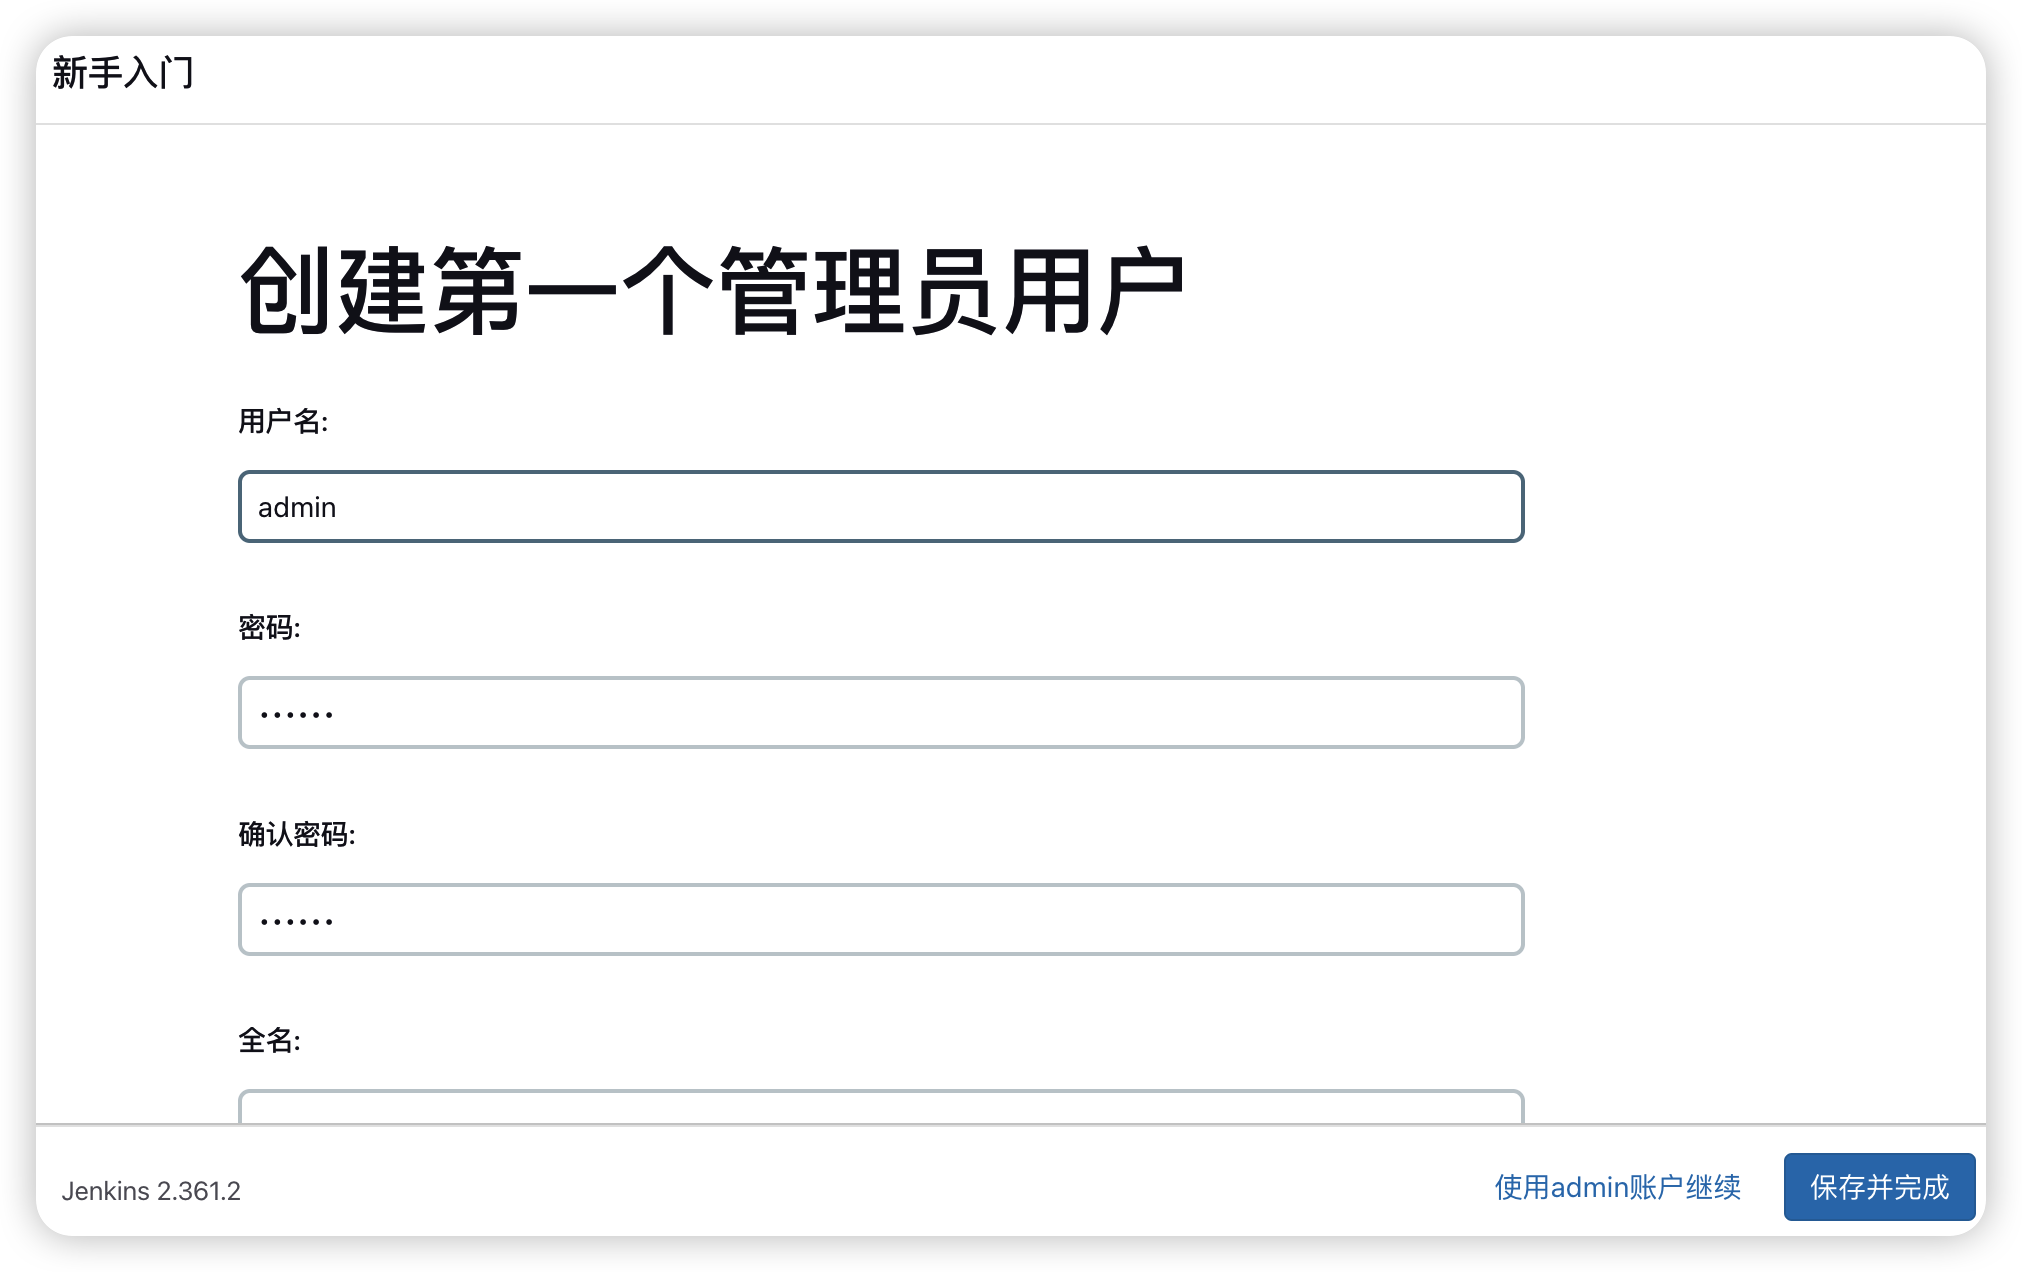
创建用户,点击保存并完成。
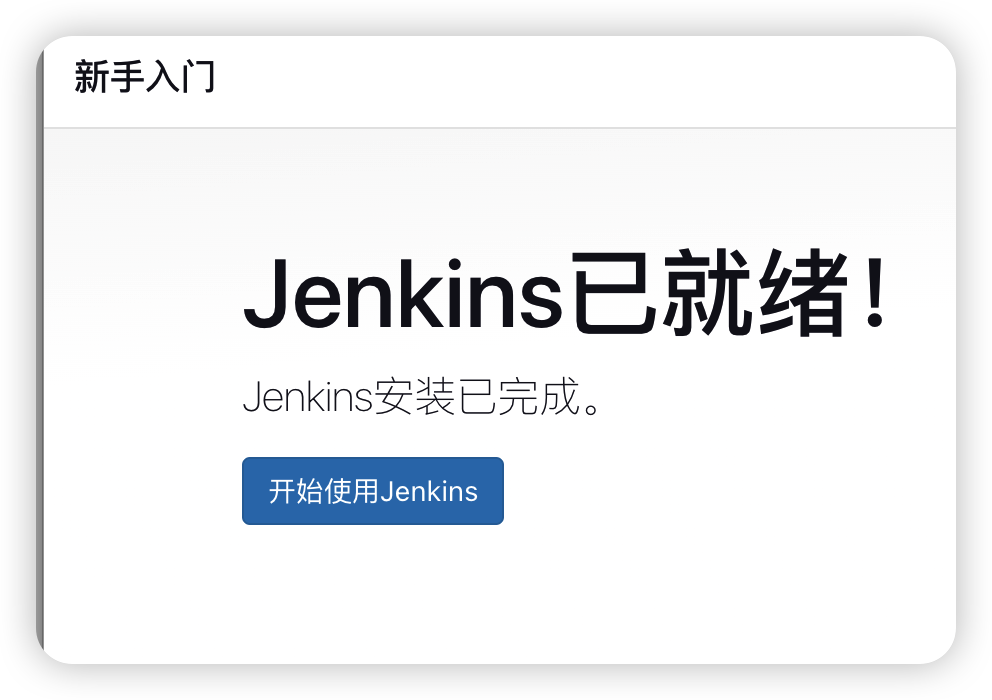
好了,Jenkins安装完成了。
创建一个Jenkins项目:
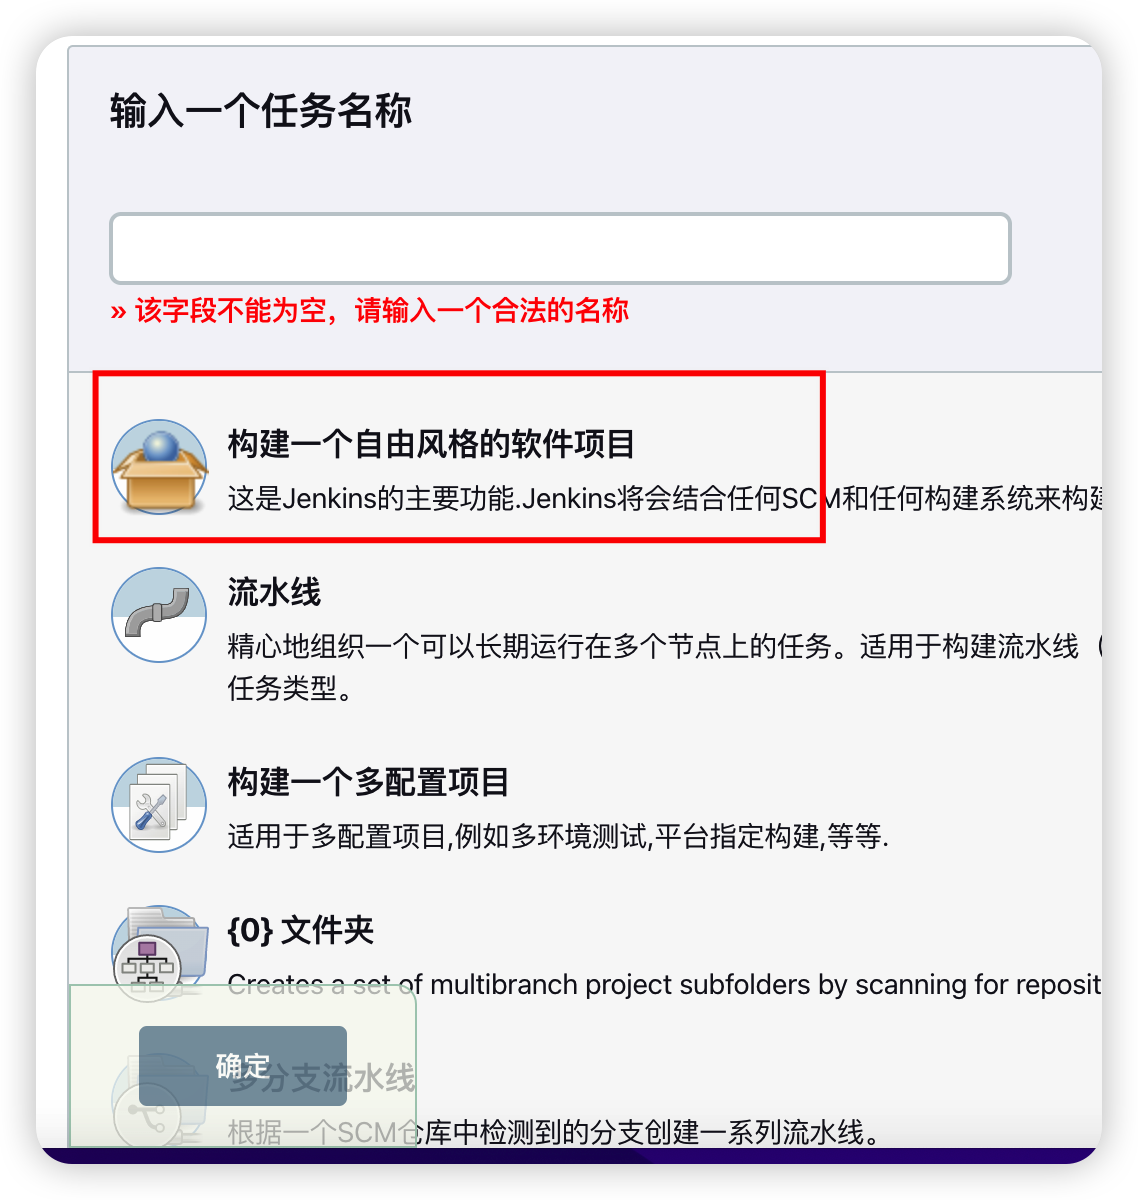
配置Jenkins如下:
1.下载GitLabel关联Jenkins的插件:
主界面->Dashboard->Manage Jenkins->Manage Plugins->"List Git Branches Parameters Plugin"->安装
2.进入item项目配置信息:
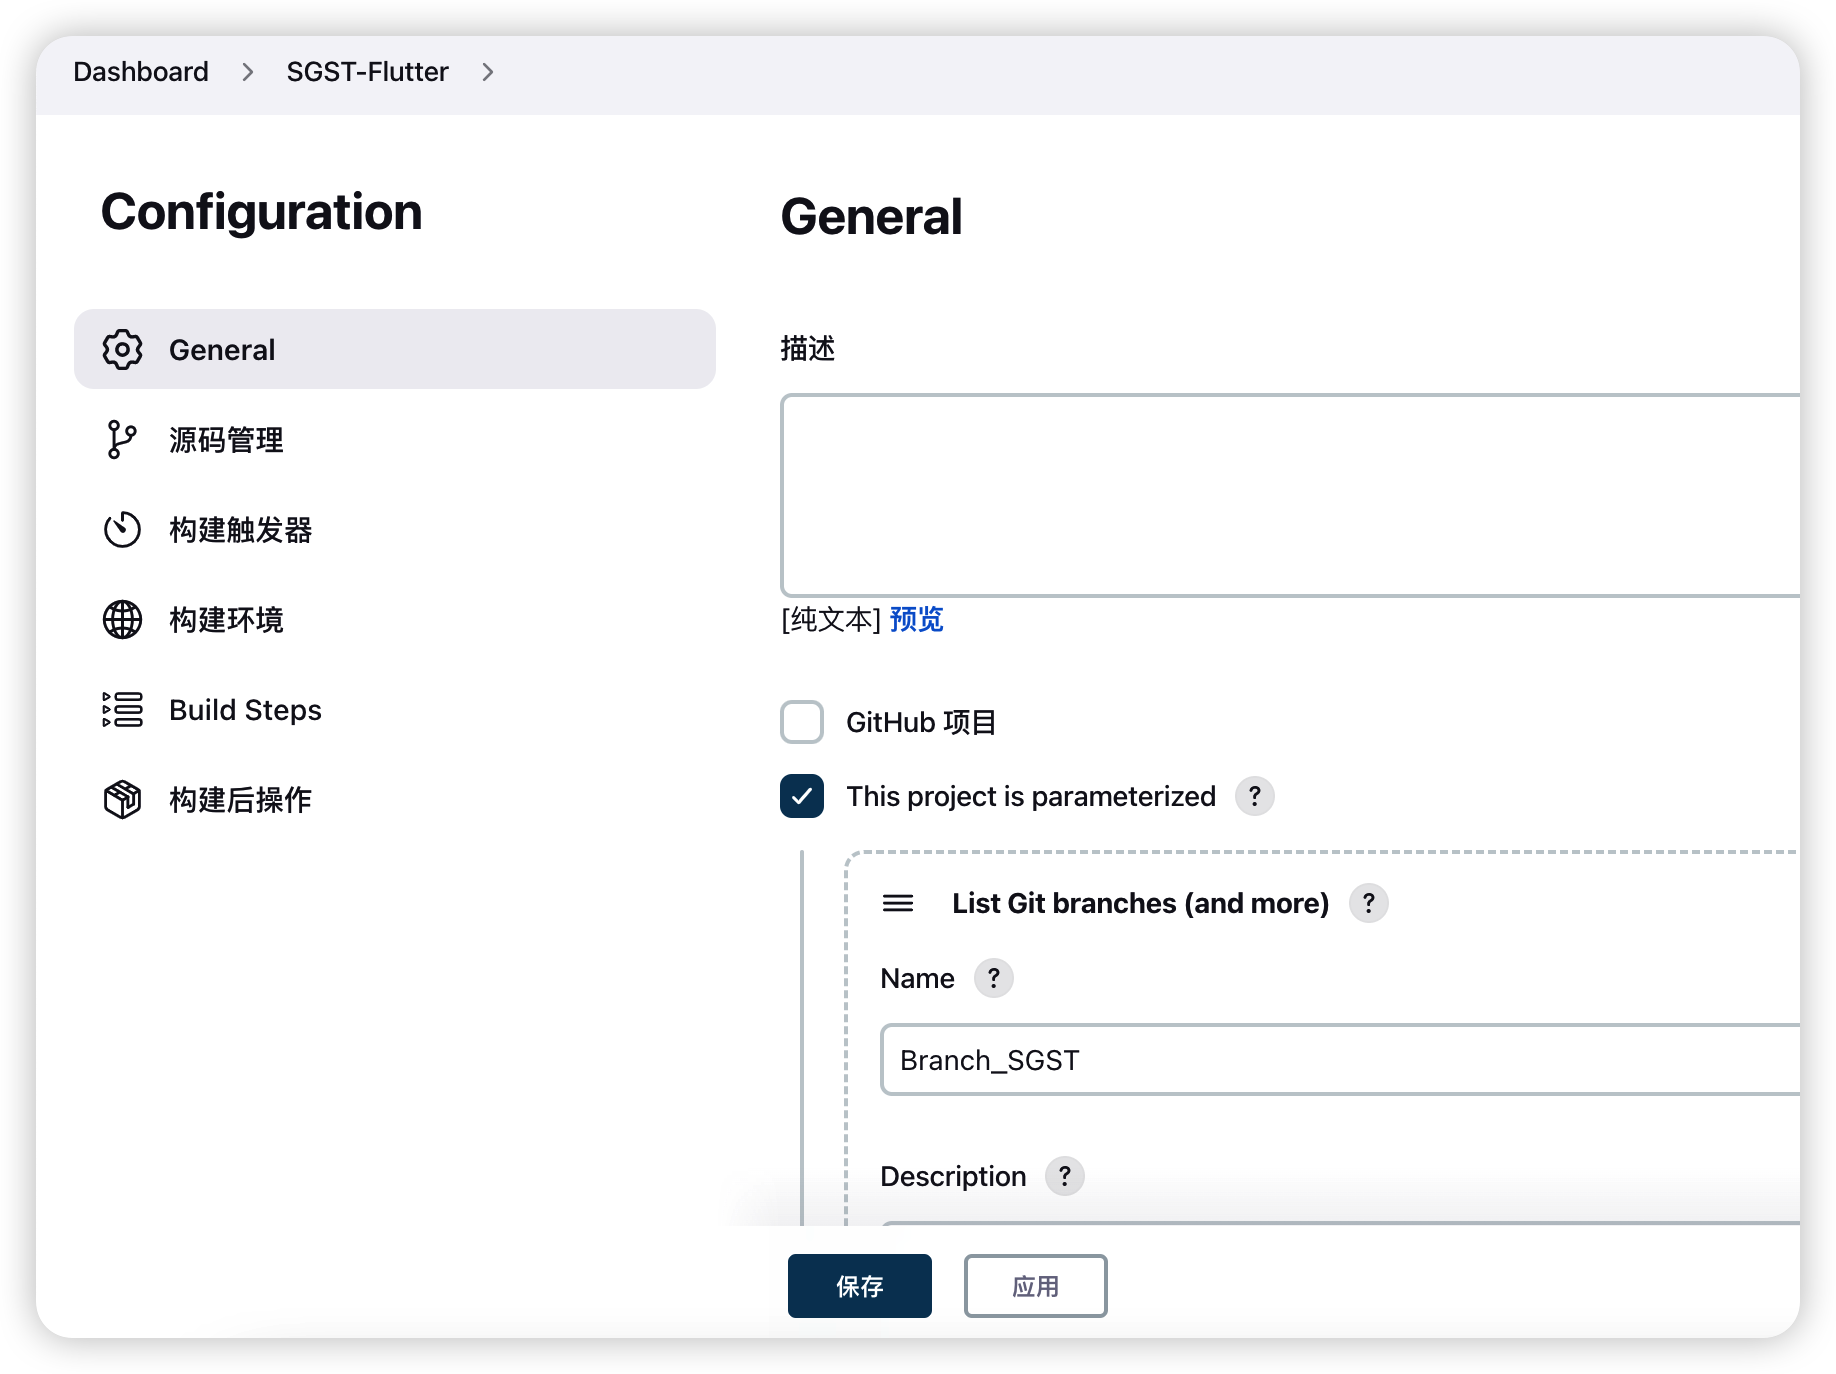
- 选中 This project is Parameterized 进行配置。
- Name:输入分支的变量信息
- Description:描述信息
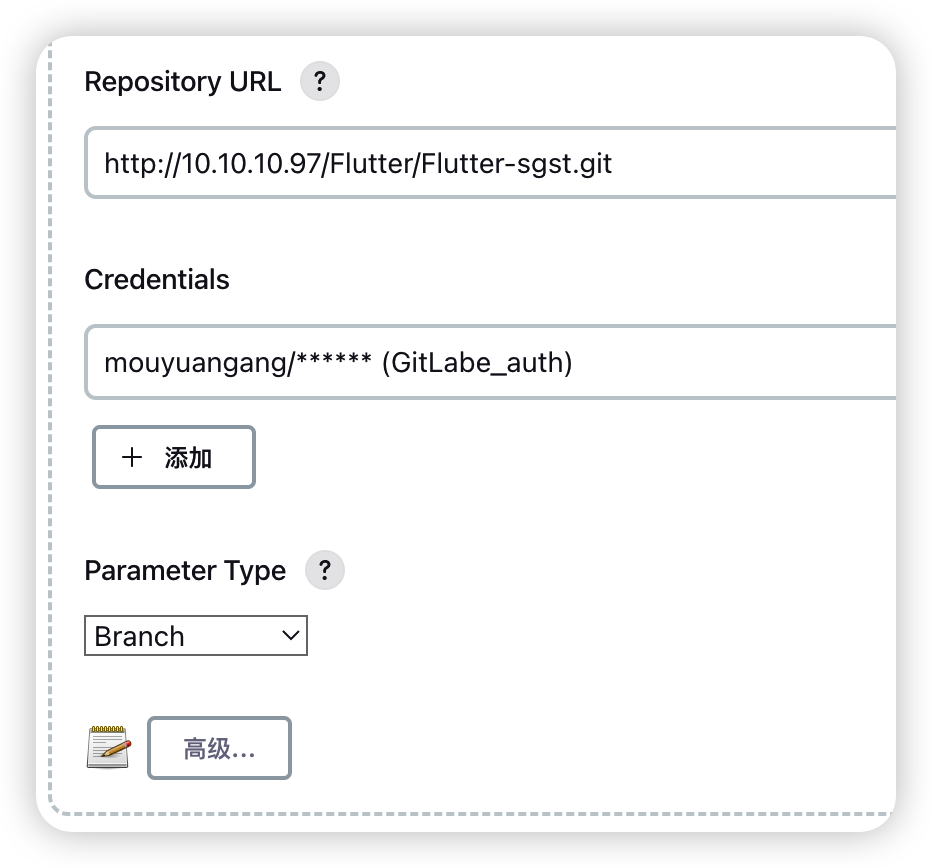
- Respository URL:GitLabel下载地址
- CreDentials:凭证,点击添加输入GitLabel的账号和密码,
- Parameter Type:选择分枝,Branch即可
- 点击高级设置,在Branch filter填入:refs/heads/(.*)
好了以上信息基本配置完毕了,接下来需要配置项目执行的脚本。
三:iOS脚本打包
运行iOS打包命令,可以依次运行:
1.编译flutter的插件,没有flutter支持的项目(这里跳过)
flutter get pub2.保证pod执行最新
pod install3.运行sh脚本执行打包-上传命令,这里看打包命令
最后就完成所有的iOS打包上传命令了。
三:iOS整合到Jenkins
事例:
Jenkins命令如下:
export LANG=en_US.UTF-8
pwd
cd yunna
/usr/local/bin/pod --version
/usr/local/bin/pod install
echo `find . -type f -name archive.sh`

logs_path='/Users/xyz/.jenkins/workspace/Logs/Test_CX'
if [ ! -d "${logs_path}" ]; then
mkdir -p ${logs_path}
echo "创建夹文件成功"
else
echo "文件夹已经存在"
fi

flag1="********ENDING********"
pwd
sh `find . -type f -name archive.sh` yunna CX testcx_dis_2023 >> ${logs_path}/archive.log
echo 111
tail -n 1 ${logs_path}/archive.log
if [[ `tail -n 1 ${logs_path}/archive.log` == "${flag1}" ]]
then
exit 0;
fi
sh脚本如下:
#!/bin/bash

#bin/bsah - l

export LANG=en_US.UTF-8

export LANGUAGE=en_US.UTF-8

export LC_ALL=en_US.UTF-8

set -e

function createPath() {
    if [ ! -d $1 ]; then
        mkdir -p $1
        echo "创建文件夹成功"
    else
        echo "文件夹已经存在"
    fi
}

function endAction(){
    #用于标识结束
    echo "********ENDING********"
    exit
}


#当前项目的名称--------------??????????
if [ $1 != "" ]; then
project_name="$1"
else
echo "-参数1【项目名称】不能为空-"
endAction
fi


#echo "====================开始执行pod依赖===================="
#安装pod依赖
#cd ${project_name}
#pwd
#pod install
#echo "====================pod依赖执行完毕===================="


#定义Target--------------??????????
if [ $2 != "" ]; then
target="$2"
else
echo "-参数2【Target】不能为空-"
endAction
fi


#ipa包输出的路径--------------??????????
current_time=$(date "+%Y-%m-%d-%H-%M")
root_output_path="/Library/Yunna/IOS"
ipa_path="${root_output_path}/${target}"
ipa_path_name=${ipa_path}/${current_time}
createPath $ipa_path_name

#生成打包的文件地址
archive_name="${root_output_path}/${target}/${current_time}/${target}.xcarchive"

#证书名称
code_sign_identify="【证书名称全称】"

#描述文件
if [ $3 != "" ]; then
provision_profile="$3"
else
echo "-参数3【描述文件】不能为空-"
endAction
fi

#apiKey
apiKey="【apiKey】"

#apiIssuer
apiIssuer="【apiIssuer】"

#打包
echo "====================开始===================="
#***由于每次编译完成的ipa包会保留,会占用内存空间,所以要解决删除ipa包的方案,一下有两种***
#####第一种方案,只保留多少天以前的ipa包,==推荐==#####
#删除15天以前的
find ${ipa_path} -mtime +14 -name "*" -type d -maxdepth 1 -mindepth 1 -exec rm -rf {} \;
#####第二种方案,重命名即将要删除的ipa文件夹,下次变异时优先删除#####
#执行back文件夹清理
#findback=`find ${ipa_path} -type d -name "*_bak"`
#echo $findback
#rm -rf $findback
#重命名文件夹
#currentPath=`find ${ipa_path} -maxdepth 1 -mindepth 1 -type d`
#for i in $currentPath
#do
#echo $i
#mv $i $i"_bak"
#done
echo "====================开始构建项目===================="

xcodebuild archive -workspace ${project_name}.xcworkspace -scheme ${target} -configuration Release -archivePath ${archive_name} CODE_SIGN_IDENTIFY="${code_sign_identify}" PROVISIONING_PROFILE="${provision_profile}"


echo xcodebuild -exportArchive -archivePath ${archive_name} -exportPath ${ipa_path_name} -exportOptionsPlist ./ExportOptions.plist

xcodebuild -exportArchive -archivePath ${archive_name} -exportPath ${ipa_path_name}  -exportOptionsPlist ./ExportOptions.plist

echo "====================项目构建完成===================="

echo "====================开始上传AppStore===================="

echo "====================开始进行Appstore检验通道===================="

xcrun altool --validate-app -f ${ipa_path_name}/${target}.ipa -t ios --apiKey ${apiKey} --apiIssuer ${apiIssuer} --verbose

echo "====================Appstore检验通道已通过===================="

xcrun altool --upload-app -f ${ipa_path_name}/${target}.ipa -t ios --apiKey ${apiKey} --apiIssuer ${apiIssuer} --verbose


echo "====================AppStore上传完毕===================="

endAction
方式二,直接Jenkins命令:
export LANG=en_US.UTF-8
pwd
cd customer_flutter
/usr/local/flutter/bin/flutter pub get
cd ../dawai_ios
/usr/local/bin/pod install
function createPath() {
if [ ! -d $1 ];then
mkdir -p $1
echo "创建文件夹成功"
else
echo "文件夹已经存在"
fi
}
#打包
echo "====================开始===================="
#当前项目的名称
project_name="yunna"
#定义Target
target="Dawai"
#ipa包输出的路径
current_time=$(date "+%Y-%m-%d-%H-%M")
root_output_path="~/Documents/Yunna/IOS"
archive_name="${root_output_path}/${target}/${current_time}/${target}"
ipa_path="${root_output_path}/${target}"
createPath $archive_name
#证书名称
code_sign_identify="【全称的发布证书名称】"
#描述文件
provision_profile="【描述文件】"
apiKey="【apiKey】"
apiIssuer="【apiIssuer】"
echo "====================开始构建项目===================="
ipa_path_name=${ipa_path}/${current_time}
xcodebuild archive -workspace ${project_name}.xcworkspace -scheme ${target} -configuration Release -archivePath ${archive_name}.xcarchive CODE_SIGN_IDENTIFY="${code_sign_identify}" PROVISIONING_PROFILE="${provision_profile}"
echo xcodebuild -exportArchive -archivePath ${archive_name}.xcarchive -exportPath ${ipa_path_name} -exportOptionsPlist ./ExportOptions.plist
xcodebuild -exportArchive -archivePath ${archive_name}.xcarchive -exportPath ${ipa_path_name} -exportOptionsPlist ./ExportOptions.plist
echo "====================项目构建完成===================="
echo "====================开始上传AppStore===================="
echo "====================开始进行Appstore检验通道===================="
xcrun altool --validate-app -f ${ipa_path_name}/${target}.ipa -t ios --apiKey ${apiKey} --apiIssuer ${apiIssuer} --verbose
echo "====================Appstore检验通道已通过===================="
xcrun altool --upload-app -f ${ipa_path_name}/${target}.ipa -t ios --apiKey ${apiKey} --apiIssuer ${apiIssuer} --verbose
echo "====================AppStore上传完毕===================="
echo "********ENDING********"

 浙公网安备 33010602011771号