Pro Git
git分支实践网站:
https://docs.microsoft.com/zh-cn/learn/paths/intro-to-vc-git/
Git起步
- Git的思想和基本工作原理
Git和其它版本控制系统的主要差别在于Git对待数据的方法。大部分其他系统以文件变更列表的方法存储信息。Git不按照以上方式保存项目状态,每次提交更新或在Git中保存项目状态时,它会对当时的全部文件制作一个快照并保存这个快照的索引。若文件没有修改,Git不在重新存储该文件,只会保留一个链接指向之前存储的文件。 - Git几乎都在本地操作
Git的绝大多数操作都只需要访问本地的文件和资源。 - Git保证完整性
Git中所有数据都在存储前计算校验和,然后以校验和来引用。Git用以计算校验和的机制叫做SHA-1散列(hash,哈希)。Git数据库中保存的信息都是以文件内容的哈希值来索引,而不是文件名。 - Git一般只添加数据
- 三种状态
- Git的3中状态
在Git中,文件可能处于其中之一:- 已提交(committed):表示数据已经安全的保存在本地数据库
- 已修改(modified):表示修改了文件,但还没保存到数据库中
- 已暂存(staged):对一个已经修改文件的当前版本做了标记,使之包含在下次提交的快照中。

Git仓库目录(.git directory)是GIt用来保存项目的元数据和对象数据库的地方。从其他计算机克隆仓库时,拷贝的就是这里的数据。
工作目录(Working Directory)是对项目的某个版本独立提取出来的内容。这些从Git仓库的压缩数据库中提取出来的文件,放在磁盘上供你使用或修改。
暂存区(Staging Area)是一个文件,保存了下次将提交的文件列表信息,一般在Git仓库目录中。有时候也被称为索引。
Git工作的基本流程
- 在工作目录中修改文件。
- 暂存文件,将文件的快照放入暂存区域。
- 提交更新,找到暂存区的文件,将快照永久性存储到Git仓库目录。
Git目录中文件的3种状态:
已提交状态:在Git目录中保存着特定版本的文件。
已暂存状态:文件做了修改并已放入暂存区域。
已修改状态:文件做了了修改但还没放到暂存区域中。
初次运行Git前配置
git config可以用来设置控制Git外观和行为的配置变量。这些变量存储在三个不同的位置。
git config [options]
--system加上该参数,会读取/etc/gitconfig文件,包含系统时尚每一个用户及他们仓库的通用配置。--global读取~/.gitconfig或~/.config/git/config,只针对当前用户。- 在当前仓库,读取的就是
.git/config
git config --global user.name "John Doe"
git config --global user.email "johndoe@example.com"
# 使用global,该命令只需要运行一次,在该系统内都会使用这些信息。针对新项目时,可以在该目录下运行没有参数的命令来配置
git config --global core.editor emacs
检查配置信息
git config --list
git config <key>
git config user.name
帮助
git help <verb>
git <verb> --help
man git-<verb>
Git基础
学习技能
- 配置并初始化一个仓库(repository)
- 开始或停止追踪文件(track)、暂存(stage)或提交(commit)
- 配置Git忽略指定文件和文件模式
- 撤销错误操作
- 浏览项目历史版本以及不同提交间的差异
- 向远程仓库推送以及从远程仓库拉取文件
获取Git仓库
在现有项目或目录下导入所有文件到Git中
在空目录中初始化仓库,只需要进入该项目目录,并输入git init ,该命令将创建一个名为.git 的隐藏子目录。子目录中含有初始化Git仓库中所有的必须文件,这些文件时Git的骨干。
如果是在一个已经存在文件的文件夹中初始化Git仓库时,也要先输入git init 。并开始跟踪文件,并提交。
git add .
git commit -m "init commit"
从服务器克隆一个现有的Git仓库
使用git clone [url] 可以克隆仓库服务器上的几乎所有数据,而不仅仅时复制完成工作所需要的文件。
# 自定义本地仓库的文件名mylibgit
git clone https://github.com/libgit2/libgit2 mylibgit
记录每次更新到仓库
在工作目录下,每一个文件只有两种状态:已跟踪或未跟踪。已跟踪文件指那些被纳入版本控制的文件,包括未修改、已修改或已放入暂存区的文件。除了已跟踪的文件之外都属于未跟踪的文件,他们不存在于上次快照的记录中,也没有放入暂存区。初次克隆的仓库中所有的文件都属于已跟踪文件,并处于未修改状态。使用Git时,文件的生命周期如下:

未被追踪的文件添加到暂存区以后提交编程已被追踪未修改的文件,修改文件后变为已被追踪已修改文件,已被追踪的文件添加到暂存区以后通过提交变为已被追踪未修改的文件,如此反复。
检查文件的状态
查看文件状态,使用git status命令。创建一个新的文件,使用git status命令,可以看到一个新的未跟踪文件:
[root@VM-48-93-centos test]# git status
# On branch master
nothing to commit, working directory clean
[root@VM-48-93-centos test]# echo "My Project" > new.txt
[root@VM-48-93-centos test]# git status
# On branch master
# Untracked files:
#   (use "git add <file>..." to include in what will be committed)
#
#       new.txt
nothing added to commit but untracked files present (use "git add" to track)
跟踪新的文件
使用命令git add file 开始跟踪一个新的文件。
git add README
取消跟踪文件
git rm --cached <file>
暂存已修改文件
已跟踪的文件内容发生改变,查看状态会看到下面的内容:
[root@localhost test]# git status
# On branch master
# Changes not staged for commit:
#   (use "git add <file>..." to update what will be committed)
#   (use "git checkout -- <file>..." to discard changes in working directory)
#
#       modified:   README
#
no changes added to commit (use "git add" and/or "git commit -a")
要暂存这次更新,需要运行git add命令。git add是个多功能命令:可以用它开始跟踪新文件,或者把已跟踪的文件放到暂存区,可以用用于合并时把 有冲突的文件标记为已解决状态等。可以将这个命令理解为“添加内容到下一次提交中“。
[root@localhost test]# git add README
[root@localhost test]# git status
# On branch master
# Changes to be committed:
#   (use "git reset HEAD <file>..." to unstage)
#
#       modified:   README
#
再次修改文件,会发现该文件会重新出现在暂存区和非暂存区。如果现在提交,文件的版本将会是你最后一次运行git add命令时的版本,而不是当前工作目录中的版本。因此需要重新运行git add命令才能把最新的版本暂存起来。
[root@localhost test]# vim README
[root@localhost test]# git status
# On branch master
# Changes to be committed:
#   (use "git reset HEAD <file>..." to unstage)
#
#       modified:   README
#
# Changes not staged for commit:
#   (use "git add <file>..." to update what will be committed)
#   (use "git checkout -- <file>..." to discard changes in working directory)
#
#       modified:   README
#
[root@localhost test]# git add README
[root@localhost test]# git status
# On branch master
# Changes to be committed:
#   (use "git reset HEAD <file>..." to unstage)
#
#       modified:   README
#
状态简览
git status -s或者git status —short命令可以简要输出当前的文件修改状态。
[root@localhost test]# git status -s
M  README
忽略文件
.gitignore文件可以将文件按照一定的模式忽略git的管理。
[root@localhost test]# cat .gitignore
*.[oa]
*~
以上规则第一行表示让Git忽略所有以.o或.a结尾的文件。第二行表示忽略所有以~结尾的文件。
文件.gitignore的格式规范如下:
- 所有空行或者以#开头的行都会被git忽略。
- 可以使用标准的glob模式匹配。
- 匹配模式可以以(/)开头防止递归。
- 匹配模式可以以(/)结尾指定目录。
- 要忽略指定模式意外的文件或陌路,可以再模式前加上惊叹号(!)取反。
glob模式指shell所使用的简化了的正则表达式。
星号()匹配零个或多个任意字符;
[abc] 匹配任何一个列在方括号中的字符(这个例子要么匹配一个 a,要么匹配一个 b,要么匹配一个 c);
问号(?)只匹配一个任意字符;如果在方括号中使用短划线分隔两个字符,表示所有在这两个字符范围内的都可以匹配(比如 [0-9] 表示匹配所有 0 到 9 的数字)。
使用两个星号(**) 表示匹配任意中间目录,比如a/**/z 可以匹配 a/z, a/b/z 或 a/b/c/z等。
查看已暂存和为暂存的修改
git diff可以具体查看文件更新了哪些行。
[root@localhost test]# git diff
diff --git a/README b/README
index 317aded..7a44e67 100644
--- a/README
+++ b/README
@@ -1,2 +1,3 @@
 test
 my project
+git
[root@localhost test]# git status
# On branch master
# Changes not staged for commit:
#   (use "git add <file>..." to update what will be committed)
#   (use "git checkout -- <file>..." to discard changes in working directory)
#
#       modified:   README
#
no changes added to commit (use "git add" and/or "git commit -a")
git diff命令比较的是工作目录中当前文件和暂存区快照之间的差异,也就是修改后还没有暂存起来的变化内容。
若要查看已暂存的将要添加到下一次提交里的内容,可以用git diff --cacahed (同git diff --staged)命令。
git diff本身只显示尚未暂存的改动。而不是自上次提交以来的所有改动。注意git diff和git diff --cache的区别。
[root@localhost test]# git status
# On branch master
# Changes to be committed:
#   (use "git reset HEAD <file>..." to unstage)
#
#       modified:   README
#
# Changes not staged for commit:
#   (use "git add <file>..." to update what will be committed)
#   (use "git checkout -- <file>..." to discard changes in working directory)
#
#       modified:   README
#
[root@localhost test]# git diff
diff --git a/README b/README
index 202917e..5040fce 100644
--- a/README
+++ b/README
@@ -2,3 +2,4 @@ test
 my project
 git
 java
+python
[root@localhost test]# git diff --cached
diff --git a/README b/README
index 7a44e67..202917e 100644
--- a/README
+++ b/README
@@ -1,3 +1,4 @@
 test
 my project
 git
+java
git difftool可以通过图形化的方式来输出文件差异。详细自查。
提交更新
git commit可以把暂存区的记录提交到git仓库。使用这种方式会再运行命令时进入编辑器环境以便输入本次提交的说明。(默认会启用shell的环境变量$EDITOR所指定的软件,一般是vim或emacs。git config --global core.editor可以指定编辑软件。)
默认第一行填写提交信息,还会打印出最后一次运行git status显示的输出信息(可删除)。-v参数还可以将所作的改变的diff输出放到编辑器中。退出编辑器时,Git会丢掉注释行,用你输入提交附带信息生成一次提交。
[root@localhost test]# git commit

# Please enter the commit message for your changes. Lines starting
# with '#' will be ignored, and an empty message aborts the commit.
# On branch master
# Changes to be committed:
#   (use "git reset HEAD <file>..." to unstage)
#
#       modified:   README
#
# Changes not staged for commit:
#   (use "git add <file>..." to update what will be committed)
#   (use "git checkout -- <file>..." to discard changes in working directory)
#
#       modified:   README
#
[root@localhost test]# git commit -v

# Please enter the commit message for your changes. Lines starting
# with '#' will be ignored, and an empty message aborts the commit.
# On branch master
# Changes to be committed:
#   (use "git reset HEAD <file>..." to unstage)
#
#       modified:   README
#
# Changes not staged for commit:
#   (use "git add <file>..." to update what will be committed)
#   (use "git checkout -- <file>..." to discard changes in working directory)
#
#       modified:   README
#
diff --git a/README b/README
index 7a44e67..202917e 100644
--- a/README
+++ b/README
@@ -1,3 +1,4 @@
 test
 my project
 git
+java
在命令后面添加-m参数,可以将提交信息和命令放在同一行。
[root@localhost test]# git commit -m "init commit"
[master a2f2445] init commit
 1 file changed, 1 insertion(+)
跳过使用暂存区
git commit -a可以把所有已跟踪的文件暂存起来一并提交,从而跳过git add步骤。
移除文件
情况一:
要从Git中移除某个文件,就必须要从已跟踪的文件清单中移除(从暂存区域移除),然后提交。
git rm可以完成此项工作,并连带从工作目录中删除指定文件。只是在工作目录中删除了文件,还需要通过git rm进行删除,并使用git commit提交,才能使git status显示无异常信息。
[root@localhost test]# rm 123
[root@localhost test]# git rm 123
rm '123'
[root@localhost test]# git status
# On branch master
# Changes to be committed:
#   (use "git reset HEAD <file>..." to unstage)
#
#       deleted:    123
#
[root@localhost test]# git commit -m "delete 123"
[master 86201df] delete 123
 1 file changed, 0 insertions(+), 0 deletions(-)
 delete mode 100644 123
[root@localhost test]# git status
# On branch master
nothing to commit, working directory clean
如果删除之前修改过并且已经放到暂存区域的话,则必须要用强制删除选项 -f(译注:即 force 的首字母)。 这是一种安全特性,用于防止误删还没有添加到快照的数据,这样的数据不能被 Git 恢复。
情况二:
只把文件从Git仓库删除(从暂存区移除),但仍保留在磁盘中。最好的方法当然是在提交前添加.gitignore文件。每天修改.gitignore文件的话可以使用--cached选项 。
[root@localhost test]# git rm --cached README
rm 'README'
[root@localhost test]# git status
# On branch master
# Changes to be committed:
#   (use "git reset HEAD <file>..." to unstage)
#
#       deleted:    README
#
# Untracked files:
#   (use "git add <file>..." to include in what will be committed)
#
#       README
git rm命令后面可以接文件或者目录的名字,也可以使用glob模式(简单正则表达式)
[root@localhost test]# git rm log/\*.log
[root@localhost test]# git rm \*~
移动文件
[root@localhost test]# git mv README readme.md
[root@localhost test]# git status
# On branch master
# Changes to be committed:
#   (use "git reset HEAD <file>..." to unstage)
#
#       renamed:    README -> readme.md
#
相当于运行下面三条命令:
[root@localhost test]# mv readme.md README
[root@localhost test]# git rm readme.md
rm 'readme.md'
[root@localhost test]# git add README
[root@localhost test]# git status
# On branch master
nothing to commit, working directory clean
查看提交历史
git log可以查看git仓库的提交历史。
[root@localhost test]# git log
commit 86201df2d13d612fa923ee9e23ac8009f11eb1f4
Author: entercoder <entercoder1993@gmail.com>
Date:   Sun Jul 18 23:05:12 2021 -0400

    delete 123

commit 8f9b7b82cb78c71fb6efb77d25cb6db2a4d443c4
Author: entercoder <entercoder1993@gmail.com>
Date:   Sun Jul 18 23:02:44 2021 -0400

    add 123

commit 28bb38a5dd220b2b069e20cbdda4322550d920a6
Author: entercoder <entercoder1993@gmail.com>
Date:   Sun Jul 18 22:59:13 2021 -0400

    modified README
...
不添加任何参数时,git log会按提交时间显示出所有更新,最新更新的在最上面。常用选项:
-p 选项用来显示每次提交的内容禅意。可以接上-2 显示最近两次提交。
[root@localhost test]# git log -p -2
commit 86201df2d13d612fa923ee9e23ac8009f11eb1f4
Author: entercoder <entercoder1993@gmail.com>
Date:   Sun Jul 18 23:05:12 2021 -0400

    delete 123

diff --git a/123 b/123
deleted file mode 100644
index e69de29..0000000

commit 8f9b7b82cb78c71fb6efb77d25cb6db2a4d443c4
Author: entercoder <entercoder1993@gmail.com>
Date:   Sun Jul 18 23:02:44 2021 -0400

    add 123

diff --git a/123 b/123
new file mode 100644
index 0000000..e69de29
--stat 可以查看每次提交的简略的统计信息。
Date:   Sun Jul 18 01:11:14 2021 -0400
[root@localhost test]# git log --stat -p -2
commit 86201df2d13d612fa923ee9e23ac8009f11eb1f4
Author: entercoder <entercoder1993@gmail.com>
Date:   Sun Jul 18 23:05:12 2021 -0400

    delete 123
---
 123 | 0
 1 file changed, 0 insertions(+), 0 deletions(-)

diff --git a/123 b/123
deleted file mode 100644
index e69de29..0000000

commit 8f9b7b82cb78c71fb6efb77d25cb6db2a4d443c4
Author: entercoder <entercoder1993@gmail.com>
Date:   Sun Jul 18 23:02:44 2021 -0400

    add 123
---
 123 | 0
 1 file changed, 0 insertions(+), 0 deletions(-)

diff --git a/123 b/123
new file mode 100644
index 0000000..e69de29
--pretty 可以指定不通与默认格式的方式显示提交提示。
另外还有 short,full 和 fuller 可以用,展示的信息或多或少有些不同
[root@localhost test]# git log --pretty=oneline
86201df2d13d612fa923ee9e23ac8009f11eb1f4 delete 123
8f9b7b82cb78c71fb6efb77d25cb6db2a4d443c4 add 123
28bb38a5dd220b2b069e20cbdda4322550d920a6 modified README
a2f244535cb85cc56026480d6b58d26e5de2b1d2 init commit
6977913f1b10e8617bb93ed7ca42f746e501388a test
932f082a68a5e0c2339b8a40b0d489e2cd881def third commit
7f42e3a1c58b28df48685a1f14bca193121e7364 init commit
5506b457d7bd9e19ba86e59867137a0d20eb38bb delete README
edaff464ee439229d1f20511457f900bc120d41a init commit
format可以定制想要显示的记录格式。
[root@localhost test]# git log --pretty=format:"%h -%an, %ar : %s"
86201df -entercoder, 27 minutes ago : delete 123
8f9b7b8 -entercoder, 29 minutes ago : add 123
28bb38a -entercoder, 33 minutes ago : modified README
a2f2445 -entercoder, 34 minutes ago : init commit
6977913 -entercoder, 22 hours ago : test
932f082 -entercoder, 23 hours ago : third commit
7f42e3a -entercoder, 25 hours ago : init commit
5506b45 -entercoder, 25 hours ago : delete README
edaff46 -entercoder, 25 hours ago : init commit

作者和提交者,作者是指实际作出修改的人,提交者是指最后将工作成果提交到仓库的人。
oneline或format经常与另一个log选项--graph组合使用。
[root@localhost test]# git log --pretty=format:"%h %s" --graph
* 86201df delete 123
* 8f9b7b8 add 123
* 28bb38a modified README
* a2f2445 init commit
* 6977913 test
* 932f082 third commit
* 7f42e3a init commit
* 5506b45 delete README
* edaff46 init commit
其他git log的常用选项。

限制输出长度
按照时间作限制的选项,--since和--until。
[root@localhost test]# git log --since=1.weeks
commit 86201df2d13d612fa923ee9e23ac8009f11eb1f4
Author: entercoder <entercoder1993@gmail.com>
Date:   Sun Jul 18 23:05:12 2021 -0400

    delete 123

commit 8f9b7b82cb78c71fb6efb77d25cb6db2a4d443c4
Author: entercoder <entercoder1993@gmail.com>
Date:   Sun Jul 18 23:02:44 2021 -0400

    add 123
...
还可以给出若干搜索条件,列出符合的提交。 用 --author 选项显示指定作者的提交,用 --grep 选项搜索提交说明中的关键字。 (请注意,如果要得到同时满足这两个选项搜索条件的提交,就必须用 --all-match 选项。否则,满足任意一个条件的提交都会被匹配出来)另一个非常有用的筛选选项是 -S,可以列出那些添加或移除了某些字符串的提交。
[root@localhost test]# git log -Sjava
commit a2f244535cb85cc56026480d6b58d26e5de2b1d2
Author: entercoder <entercoder1993@gmail.com>
Date:   Sun Jul 18 22:58:12 2021 -0400

    init commit
[root@localhost test]# git log -Spython
commit 28bb38a5dd220b2b069e20cbdda4322550d920a6
Author: entercoder <entercoder1993@gmail.com>
Date:   Sun Jul 18 22:59:13 2021 -0400

    modified README
最后一个很实用的 git log 选项是路径(path), 如果只关心某些文件或者目录的历史提交,可以在 git log选项的最后指定它们的路径。 因为是放在最后位置上的选项,所以用两个短划线(--)隔开之前的选项和后面限定的路径名。

撤销操作
有时候操作错误,就需要撤销操作。
重新提交
有时候我们提交完了才发现漏掉几个文件没有添加,或者提交信息写错。此时带有--amend选线的提交命令尝试重新提交。
[root@localhost test]# git commit --amend
[master cab366b] reset commit
 1 file changed, 0 insertions(+), 0 deletions(-)
 delete mode 100644 123
此命令会将暂存区中的文件提交。如果子上次提交以来你还未做过任何修改,那么快照会保持不变,只会修改原来的提交信息。
如果发现忘记暂存某些需要的修改,可以像下面这样操作。最终只会有一个提交。
[root@localhost test]# git commit -m 'init commit'
[root@localhost test]# git add forgotten_file
[root@localhost test]# git commit --amend
取消暂存文件
git reset HEAD 用来取消暂存文件。
[root@localhost test]# touch a.txt
[root@localhost test]# touch b.txt
[root@localhost test]# git add .
[root@localhost test]# git status
# On branch master
# Changes to be committed:
#   (use "git reset HEAD <file>..." to unstage)
#
#       new file:   a.txt
#       new file:   b.txt
#
[root@localhost test]# git reset HEAD b.txt
[root@localhost test]# git status
# On branch master
# Changes to be committed:
#   (use "git reset HEAD <file>..." to unstage)
#
#       new file:   a.txt
#
# Untracked files:
#   (use "git add <file>..." to include in what will be committed)
#
#       b.txt
在调用时加上
--hard选项可以令git reset成为一个危险的命令(可能导致工作目录中所有当前进度丢失)。不加选项的git reset只会修改暂存区域。
撤销对文件的修改
要把文件还原成上次提交的样子,可以使用git checkout -- <file>
[root@localhost test]# cat a.txt
a
[root@localhost test]# echo b > a.txt
[root@localhost test]# git checkout -- a.txt
[root@localhost test]# cat a.txt
a
git checkout -- [file]是一个危险的命令。你对文件所做的任何修改都会消失。
在 Git 中任何 已提交的东西几乎总是可以恢复的。 甚至那些被删除的分支中的提交或使用 --amend 选项覆盖的提交也可以恢复。 然而,任何你未提交的东西丢失后很可能再也找不到了。
远程仓库
远程仓库是指托管在因特网或其他网络中的你的项目的版本库。
查看远程仓库
指定-v选项,会显示需要读写远程仓库使用的Git保存的简写与其对应的URL。
[root@localhost ~]# git clone https://github.com/schacon/ticgit
Cloning into 'ticgit'...
remote: Enumerating objects: 1857, done.
remote: Total 1857 (delta 0), reused 0 (delta 0), pack-reused 1857
Receiving objects: 100% (1857/1857), 334.06 KiB | 153.00 KiB/s, done.
Resolving deltas: 100% (837/837), done.

[root@localhost ticgit]# git remote -v
origin  https://github.com/schacon/ticgit (fetch)
origin  https://github.com/schacon/ticgit (push)
添加远程仓库
运行git remove add <shortname> <url>添加一个新的远程git仓库,同时指定一个你可以轻松引用的简写。
[root@localhost ticgit]# git remote add pb https://github.com/paulboone/ticgit
[root@localhost ticgit]# git remote -v
origin  https://github.com/schacon/ticgit (fetch)
origin  https://github.com/schacon/ticgit (push)
pb      https://github.com/paulboone/ticgit (fetch)
pb      https://github.com/paulboone/ticgit (push)
[root@localhost ticgit]# git fetch pb
remote: Enumerating objects: 43, done.
remote: Counting objects: 100% (22/22), done.
remote: Total 43 (delta 22), reused 22 (delta 22), pack-reused 21
Unpacking objects: 100% (43/43), done.
From https://github.com/paulboone/ticgit
 * [new branch]      master     -> pb/master
 * [new branch]      ticgit     -> pb/ticgit
从远程仓库抓取或拉取
从远程仓库中获取数据,可以运行git fetch [remote-name] 。这个命令会访问远程仓库,从中拉取你还没有的数据。执行完成后,你将会拥有那个远程仓库中所有分支的引用,可以随时合并查看。
如果你使用 clone 命令克隆了一个仓库,命令会自动将其添加为远程仓库并默认以 “origin” 为简写。 所以,git fetch origin 会抓取克隆(或上一次抓取)后新推送的所有工作。 必须注意 git fetch 命令会将数据拉取到你的本地仓库 - 它并不会自动合并或修改你当前的工作。
如果你有一个分支设置为跟踪一个远程分支(阅读下一节与 Git 分支 了解更多信息),可以使用 git pull 命令来自动的抓取然后合并远程分支到当前分支。 这对你来说可能是一个更简单或更舒服的工作流程;默认情况下,git clone 命令会自动设置本地 master 分支跟踪克隆的远程仓库的 master 分支(或不管是什么名字的默认分支)。 运行 git pull 通常会从最初克隆的服务器上抓取数据并自动尝试合并到当前所在的分支。
推送到远程仓库
git push [remote-name] [branch-name]可以推送项目到远程分支。当你想要将master分支推送到origin服务器时,运行这个命令就可以将你所做的备份到服务器:
[root@localhost ticgit]# git push origin master
只有当你有所克隆服务器的写入权限,并且之前没有人推送过时,这条命令才能生效。 当你和其他人在同一时间克隆,他们先推送到上游然后你再推送到上游,你的推送就会毫无疑问地被拒绝。 你必须先将他们的工作拉取下来并将其合并进你的工作后才能推送。
查看远程仓库
git remote show [remote-name]命令可以查看远程仓库的更多信息。
远程仓库的移除与重命名
git remote rename old_name new_name可以重命名远程仓库的简写。
git remote rm 可以移除远程仓库。
打标签
Git可以给历史中的某一个提交打上标签,以示重要。通常会使用这个功能来标记发布节点(v1.0等)。
列出标签
git tag列出已有的标签(以字母顺序)。
[root@localhost test]# git tag
v1.0
v1.0-lw
v2.0
使用特定模式查找标签。
[root@localhost test]# git tag v1.0-lw
[root@localhost test]# git tag -l 'v1.0*'
v1.0
v1.0-lw
[root@localhost test]# git tag
v1.0
v1.0-lw
v2.0
创建标签
Git使用两种主要类型的标签:轻量标签(lightweight)和附注标签(annotated)。
轻量标签:一个特定提交的引用。本质上是将调教校验和机制存储到一个文件中,没有保存任何其他信息。
[root@localhost test]# git tag v1.5
[root@localhost test]# git tag
v1.0
v1.0-lw
v1.4
v1.5
v2.0
在标签上运行git show,你不会看到额外信息。命令只会显示提交信息。
附注标签:存储在Git数据库忠的一个完整对象。是可以被校验的。其中包含打标签者的名字、电子
邮件地址、日期时间;还有一个标签信息;并且可以使用 GNU Privacy Guard (GPG)签名与验证。
[root@localhost test]# git tag -a v1.4 -m 'my version 1.4'
[root@localhost test]# git tag
v1.0
v1.0-lw
v1.4
v2.0
-m参数制定了一条将会存储在标签中的信息。
git show命令可以看到标签信息与对应的提交信息。
[root@localhost test]# git show v1.4
tag v1.4
Tagger: entercoder <entercoder1993@gmail.com>
Date:   Mon Jul 19 11:36:49 2021 -0400

my version 1.4

commit c708a0822fc0c5cad11f7d6900302a97fcf08dfd
Author: entercoder <entercoder1993@gmail.com>
Date:   Mon Jul 19 11:36:07 2021 -0400

    add a

diff --git a/a.txt b/a.txt
new file mode 100644
index 0000000..e69de29
后期打标签
[root@localhost test]# git log --pretty=oneline
c708a0822fc0c5cad11f7d6900302a97fcf08dfd add a
aec17407c381edacc7fb701d36b5a11937396088 init commit

[root@localhost test]# git tag -a v1.6 aec1740
共享标签
默认情况下,git push 命令并不会传送标签到远程仓库服务器上。 在创建完标签后你必须显式地推送标签到共享服务器上。 这个过程就像共享远程分支一样 - 你可以运行 git push origin [tagname]。
如果想要一次性推送很多标签,也可以使用带有 --tags 选项的 git push 命令。 这将会把所有不在远程仓库服务器上的标签全部传送到那里。
检出标签
在Git忠不能真的检出一个标签,它们并不像分支一样来回移动。
如果你想要工作目录与仓库中特定的标签版本完全一样,可以使用 git checkout -b [branchname] [tagname] 在特定的标签上创建一个新分支。
git checkout -b version2 v2.0.0
别名
git config可以为每一个命令设置别名。
[entercoder@localhost ~]$ git config --global alias.co checkout
[entercoder@localhost ~]$ git config --global alias.br branch
[entercoder@localhost ~]$ git config --global alias.ci commit
[entercoder@localhost ~]$ git config --global alias.st status

[root@localhost test]# git config --global alias.st status
[root@localhost test]# git st
# On branch master
nothing to commit, working directory clean

[root@localhost test]# git config --global alias.unstage 'reset HEAD --'
[root@localhost test]# git unstage fileA
[root@localhost test]# git reset HEAD -- fileA

[root@localhost test]# git config --global alias.last 'log -1 HEAD'
[root@localhost test]# git last
commit 843d51fd55b61d00edf4bb965b45e899f884a81a
Author: entercoder <entercoder1993@gmail.com>
Date:   Mon Jul 19 11:48:48 2021 -0400

    modified readme.md
Git分支
分支在Git上重中之重。
简介
在进行提交操作时,Git会保存一个提交对象(commit object)。该提交对象会包含一个指向暂存内容快照的指针。还包含作者的相关信息以及只想他的父对象的指针。首次提交产生的提交对象没有父对象,普通提交会产生的提交对象有一个父对象,而由多个分支合并产生的提交对象包含多个父对象。
假设现在有一个工作目录,包含了三个将要被暂存和提交的文件。暂存操作会为每一个文件计算校验和,然后会把当前版本的文件快照保存到Git仓库中(Git使用blob对象来保存他们),最终将校验和加入到暂存区等待提交。
[root@localhost test]# ls
a.txt  readme.md
[root@localhost test]# touch test.rb
[root@localhost test]# git status
# On branch master
# Untracked files:
#   (use "git add <file>..." to include in what will be committed)
#
#       test.rb
nothing added to commit but untracked files present (use "git add" to track)
[root@localhost test]# git add test.rb
[root@localhost test]# git commit -m "init commit"
[master 380c648] init commit
 1 file changed, 0 insertions(+), 0 deletions(-)
 create mode 100644 test.rb
当使用Git commit进行提交时,Git会先计算每一个子目录的校验和,然后在Git仓库忠把这些校验和保存为树对象。然后Git便会创建一个提交对象,它除了上面包含的信息之外,还会包含树对象的指针。
现在Git仓库中有五个对象:三个blob对象(保存文件快照)、一个树对象(记录目录结构和blob对象的索引)以及一个提交对象(包含指向树对象的指针和所有的提交信息)。

再次提交时,产生的提交对象会包含一个指向父对象的指针。

Git的分支的本质就是指向提交对象的可变指针。

分支的创建
git branch branch-name 用于创建分支。
[root@localhost test]# git branch testing
[root@localhost test]# git branch
* master
  testing
[root@localhost test]# git branch
* master
  testing

Git通过HEAD这个特殊指针来指导自己当前处于哪个分支。HEAD指向当前所在的分支。
[root@localhost test]# git log --oneline --decorate
380c648 (HEAD, testing, master) init commit
843d51f modified readme.md
c708a08 (tag: v1.5, tag: v1.4) add a
aec1740 (tag: v2.0, tag: v1.6, tag: v1.2, tag: v1.0-lw, tag: v1.0) init commit

分支的切换
git checkout命令可以用来切换分支。
[root@localhost test]# git checkout testing
Switched to branch 'testing'
[root@localhost test]# git log --oneline --decorate
380c648 (HEAD, testing, master) init commit
843d51f modified readme.md
c708a08 (tag: v1.5, tag: v1.4) add a
aec1740 (tag: v2.0, tag: v1.6, tag: v1.2, tag: v1.0-lw, tag: v1.0) init commit
[root@localhost test]# git branch
  master
* testing
[root@localhost test]# git log
commit 380c648ebb6d74e71f4a89e4886d006e126b7ed0
# 再提交一次
[root@localhost test]# git commit -a -m "make a change"
[testing 9cd6201] make a change
 1 file changed, 1 insertion(+)
再次提交一次,testing分支向前移动了,而master分支却没有。

[root@localhost test]# git checkout master
Switched to branch 'master'
[root@localhost test]# git log --oneline --decorate
380c648 (HEAD, master) init commit
843d51f modified readme.md
c708a08 (tag: v1.5, tag: v1.4) add a
aec1740 (tag: v2.0, tag: v1.6, tag: v1.2, tag: v1.0-lw, tag: v1.0) init commit
切换回master分支做了两件事,一是使HEAD指回master,二是将工作目录恢复成master分支所指向的快照内容。
[root@localhost test]# vim test.rb
[root@localhost test]# git commit -a -m "make other changes"
[master bfbbf08] make other changes
 1 file changed, 1 insertion(+)
在master分支上同样尽心一次提交,这时项目的提交历史将产生分叉。上述的两次改动是在不同的分支下进行的,你可以在不同的分支下切换和工作,并在合适的时机将他们合并起来。

使用git log命令查看分支。运行git log --oneline --decorate --graph --all 可以输出当前项目的分支情况。
[root@localhost test]# git log --oneline --decorate --graph --all
* bfbbf08 (HEAD, master) make other changes
| * 9cd6201 (testing) make a change
|/
* 380c648 init commit
* 843d51f modified readme.md
* c708a08 (tag: v1.5, tag: v1.4) add a
* aec1740 (tag: v2.0, tag: v1.6, tag: v1.2, tag: v1.0-lw, tag: v1.0) init commit
分支的新建和合并
实际工作中可能存在类似的工作流:
- 开发某个网站
- 为实现某一个新的需求,创建一个分支。
- 在这个分支下开展工作。
突然有bug需要进行修复:
- 切换到线上分支。
- 创建一个新的bugfix分支。
- 测试通过后,切换回线上分支,合并这个修补分支。最后将改动推送到线上分支。
- 切换回开发分支,继续工作。
新建分支
假设在当前项目中,提交历史如下:
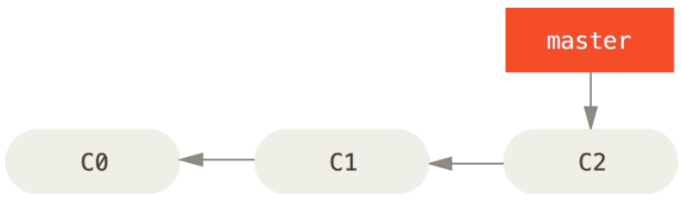
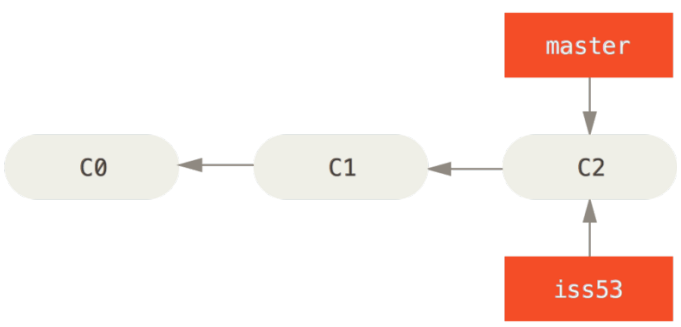
当前有一个新的需求需要解决,新建了一个分支。
[root@localhost test]# git checkout -b iss53
Switched to a new branch 'iss53'

# 相当于以下命令的简写
[root@localhost test]# git branch iss53
[root@localhost test]# git checkout iss53
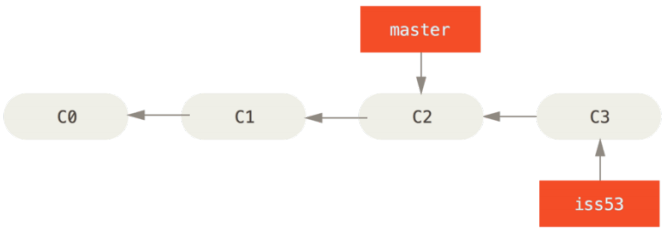
在iss53上工作,并作了一些提交。在此过程中iss53分支在不断前进。
[root@localhost test]# vim readme.md
[root@localhost test]# git add readme.md
[root@localhost test]# git commit -m "modified readme.md"
[iss53 a4fe631] modified readme.md
 1 file changed, 1 insertion(+)
[root@localhost test]# git log
commit a4fe631074e8cc060cf4771d2e63190bf36ae99b
Author: entercoder <entercoder1993@gmail.com>
Date:   Sun Jul 25 21:56:45 2021 -0400

    modified readme.md

commit 4cf8305841eb54574405471073b0b1eb23e7bbeb
Author: entercoder <entercoder1993@gmail.com>
Date:   Sun Jul 25 21:54:22 2021 -0400

    init commit
此时master分支出现了一个bug需要进行紧急修复,你需要切换到master分支进行修复。在切换分支之前,最好保持工作目录和暂存目录处于一个干净的状态,否则可能会出现数据丢失等情况。
[root@localhost test]# git checkout -b hotfix
Switched to a new branch 'hotfix'
[root@localhost test]# vim readme.md
[root@localhost test]# git add readme.md
[root@localhost test]# git commit -m "hotfix"
[hotfix 2a27d83] hotfix
 1 file changed, 1 insertion(+)
[root@localhost test]# git status
# On branch hotfix
nothing to commit, working directory clean
[root@localhost test]# git checkout master
Switched to branch 'master'
[root@localhost test]# git merge hotfix
Updating 4cf8305..2a27d83
Fast-forward
 readme.md | 1 +
 1 file changed, 1 insertion(+)
[root@localhost test]# git branch -d hotfix
Deleted branch hotfix (was 2a27d83).
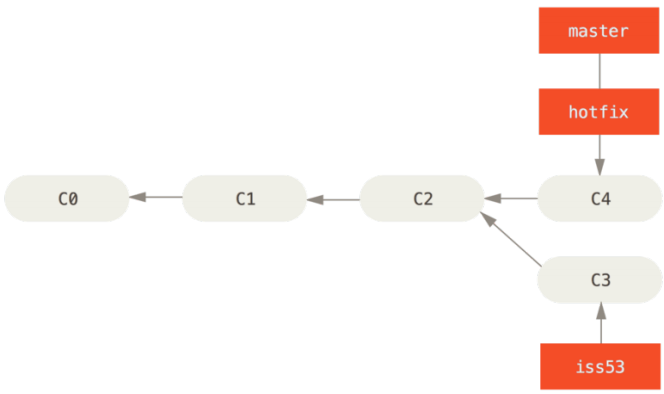
fast-forward 由于当前master分支所指向的提交时你当前分支hotfix的提交的直接上游,所以Git只是简单的将指针向前移动。也就是说,当你合并两个分支时,如果合并操作没有需要解决的分歧,Git只会简单的将指针向前推进。这就叫做fast-forward。
修复已经处理完成后,就可以直接删除hotfix分支了。因为此时master已经指向该分支了。在hotfix分支上所作的工作并没有包含在iss53分支中。如果需要拉取hotfix所作的修改,也可以切换到iss53分支中,git merge master将master分支合并入iss53分支中。也可等iss53分支完成后,再将其合并到master分支中。
分支的合并
在iss53分支合并到master分支时。因为master分支所在的提交并不是iss53分支所在提交的直接祖先,Git会做一个额外的工作。Git会将两个分支的末端所指的快照(C4和C5)以及两个分支的工作祖先(C2),做一个简单的三方合并。

Git将此次的三方合并的结果作了一个新的快照并且自动创建一个新的提交指向它。这个被称作一次合并提交,它的特别之处在于他不止有一个父提交。
遇到冲突时的分支合并
在两个不同的分支中对同一个文件的同一个部分进行了不同的修改,Git就无法自动干净地合并它们。Git会自动做合并,当时不会自动地创建一个新的合并提交。等你解决完合并产生的冲突,就需要你自己手动进行暂存和提交操作。git status用来查看那些因包含冲突而处于未合并状态的文件。
Git会在冲突文件中加入标准的冲突解决标记,这样你可以打开这些包含冲突的文件然后手动解决冲突。
<<<<<<< HEAD 表示当前HEAD所指示的版本在这个区段的上半部分(======= 的上半部分),而iss53分支所指示的版本在=======的下半部分。将文件内容进行合并并把冲突标记删除后。对每个冲突文件使用git add将其标记未冲突已解决。
也可以使用图形化工具git mergetool来解决冲突。
如果已经合并完成,可以通过git commit命令来完成合并提交。
[root@localhost test]# git merge iss53
Auto-merging readme.md
CONFLICT (content): Merge conflict in readme.md
Automatic merge failed; fix conflicts and then commit the result.
[root@localhost test]# cat readme.md
<<<<<<< HEAD
java python
=======
hello world
java python
html css javascript
>>>>>>> iss53
[root@localhost test]# vim readme.md
[root@localhost test]# git merge iss53
error: 'merge' is not possible because you have unmerged files.
hint: Fix them up in the work tree,
hint: and then use 'git add/rm <file>' as
hint: appropriate to mark resolution and make a commit,
hint: or use 'git commit -a'.
fatal: Exiting because of an unresolved conflict.
[root@localhost test]# git add readme.md
[root@localhost test]# git commit -m "git merge with no ref"
[master febb6ed] git merge with no ref
[root@localhost test]# git status
# On branch master
nothing to commit, working directory clean
[root@localhost test]# git log --oneline --graph
*   febb6ed git merge with no ref
|\
| * 79f104d add web
| * 66a63a4 add java python
* |   4d1b037 Merge branch 'hotfix'
|\ \
| * | 43e2f67 insert readme
| |/
| * a4fe631 modified readme.md
* | 2a27d83 hotfix
|/
* 4cf8305 init commit
分支的管理
git branch还可以查看当前分支的列表。
[root@localhost test]# git branch
* master
  testing

# 查看每一个分支的最后一次提交
[root@localhost test]# git branch -v
* master  bfbbf08 make other changes
  testing 9cd6201 make a change
* 代表目前所在的分支(HEAD指针所指向的分支)。
--merged与--no-merged这两个有用的选项可以过滤这个列表中已经合并或尚未合并到当前分支的分支。
[root@localhost test]# git branch --no-merged
  testing
[root@localhost test]# git branch --merged
* master
git branch -d 可以用来删除分支。但如果分支还未合并,将会出现删除失败。可以使用-D选项强制删除。
分支开发工作流
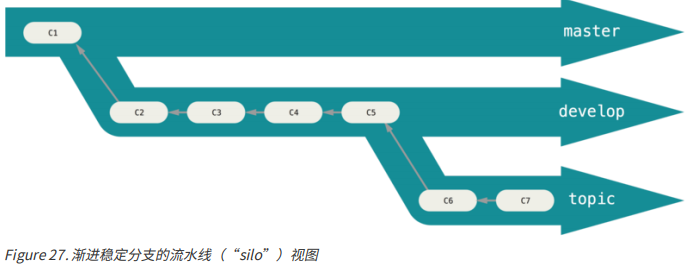
长期分支
因为 Git 使用简单的三方合并,所以就算在一段较长的时间内,反复把一个分支合并入另一个分支,也不是什么难事。 也就是说,在整个项目开发周期的不同阶段,你可以同时拥有多个开放的分支;你可以定期地把某些特性分支合并入其他分支中。
随着提交而不断右移的指针,稳定分支总是在提交历史中落后一大截,而前沿分支的指针往往比较靠前。

这中方法可以维护不同层次的稳定性。
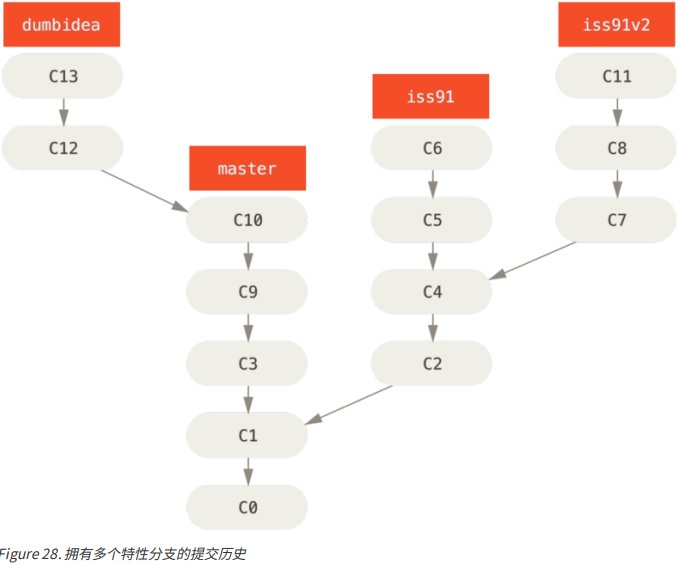
特性分支
远程分支
远程引用时对远程仓库的引用(指针),包括分支、标签等等。可以通过git remote来显示地获得远程引用的完整列表,或通过git remote show获得远程分支的更多信息。
远程跟踪分支是远程分支状态的引用。他们不是你能够移动的本地引用,当你做任何网络通信操作时,他们会自动移动。远程跟踪分支像时你上次连接到远程仓库时,那些分支所处状态的书签。
变基
本文来自博客园,作者:Solita1y,转载请注明原文链接:https://www.cnblogs.com/solita1y/articles/17154566.html
