nginx反向代理_负载均衡
注意ip地址为:
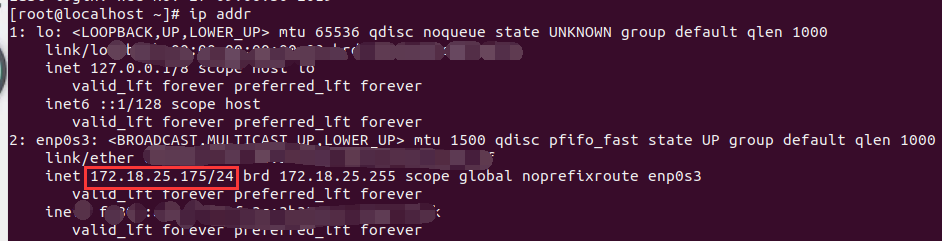
虚拟机ip设置
BOOTPROTO="static"
NAME="enp0s3"
DEVICE="enp0s3"
ONBOOT="yes"
IPADDR="172.18.25.175"
NETMASK="255.255.255.0"
GATEWAY="172.18.25.1"
DNS1=8.8.4.4
DNS2=8.8.8.8
IPV6INIT=no
Nginx简介
Nginx (engine x) 是一个高性能的 HTTP 和反向代理服务,也是一个 IMAP/POP3/SMTP 服务。 其特点是占有内存少,并发能力强,事实上nginx 的并发能力确实在同类型的网页服务器中 表现较好,中国大陆使用 nginx网站用户有:百度、京东、新浪、网易、腾讯、淘宝等。在连接高并发的情况下,Nginx 是 Apache 服务不错的替代品。
Nginx 的主要功能
Nginx安装
安装Nginx环境依赖
- 编译环境
yum install gcc gcc-c++
- Pcre库
yum -y install pcre-devel
- Zlib压缩工具
yum install zlib-devel
本地主机上传nginx安装包
- 服务器新建文件夹
mkdir -p /soldier/app
-
服务器直接下载
cd /soldier/app
yum install wget
wget http://nginx.org/download/nginx-1.8.1.tar.gz
- 或者本地上传
scp nginx-1.8.0.tar.gz 172.18.25.172:/soldier/app/
- 创建安装目录
mkdir /usr/local/nginx
-
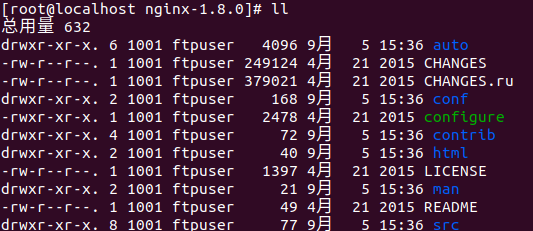
解压安装包
tar zxvf nginx-1.8.1.tar.gz

Nginx参数配置并安装
- 进入解压好的Nginx目录
cd /soldier/app/nginx-1.8.1
- 配置参数
#新建nginx安装目录
mkdir /usr/local/nginx
直接复制粘贴执行
./configure \
--prefix=/usr/local/nginx \
--pid-path=/var/run/nginx/nginx.pid \
--lock-path=/var/lock/nginx.lock \
--error-log-path=/var/log/nginx/error.log \
--http-log-path=/var/log/nginx/access.log \
--with-http_gzip_static_module \
--http-client-body-temp-path=/var/temp/nginx/client \
--http-proxy-temp-path=/var/temp/nginx/proxy \
--http-fastcgi-temp-path=/var/temp/nginx/fastcgi \
--http-uwsgi-temp-path=/var/temp/nginx/uwsgi \
--http-scgi-temp-path=/var/temp/nginx/scgi
直接复制粘贴执行
- 执行make编译
make

- 执行make install安装
make install

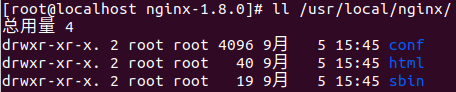
- 查看安装效果
ll /usr/local/nginx/
配置防火墙的80端口
- 修改
vi /etc/sysconfig/iptables
- 添加
-A INPUT -p tcp -m state --state NEW -m tcp --dport 80 -j ACCEPT - 重启
service iptables restart
- 或者直接关闭防火墙
systemctl stop firewalld
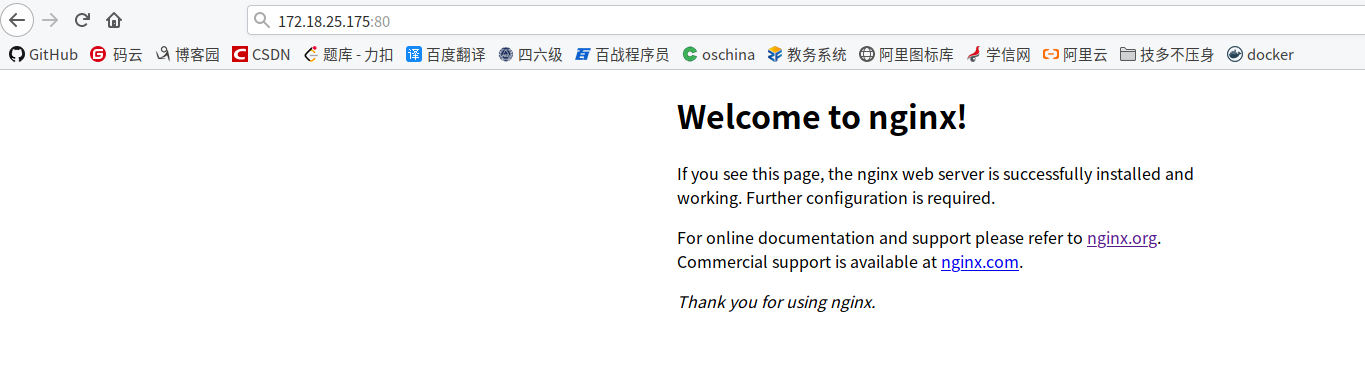
启动Ngxin
- 进入Nginx安装目录的sbin目录
cd /usr/local/nginx/sbin/

- 启动
./nginx

- 重启命令
./nginx -s reload
一、Nginx 实现虚拟主机
应用场景:
当多个系统需要部署的时候,有系统访问很小,为了节省成本,就需要将多个系统部署到同一台服务器上,怎么在同一台服务器上,完成不同系统的部署和访问,就需要使用虚拟主机实现。

1、使用端口号实现虚拟主机
第一步:配置nginx.conf
vi /usr/local/nginx/conf/nginx.conf
把server下没用的注解删除
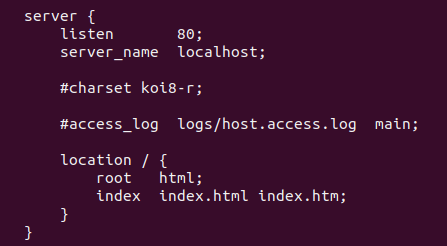
将server复制一份,端口为90,并修改80访问index1,90访问index2
server {
        listen       80;
        server_name  localhost;
        #charset koi8-r;
        #access_log  logs/host.access.log  main;

        location / {
            root   html;
            index  index1.html index.htm;
        }
    }

    server {
        listen       90;
        server_name  localhost;
        #charset koi8-r;
        #access_log  logs/host.access.log  main;

        location / {
            root   html;
            index  index2.html index.htm;
        }
    }
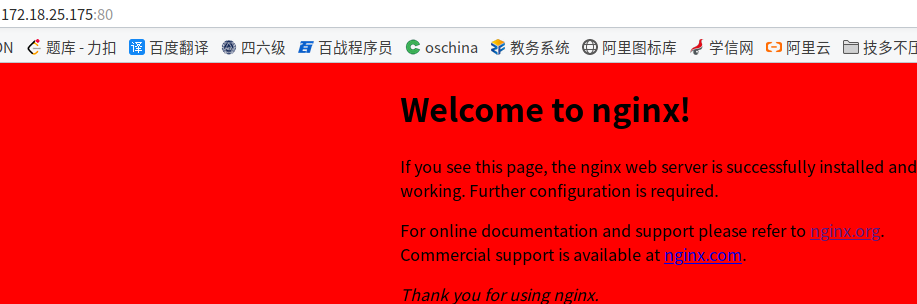
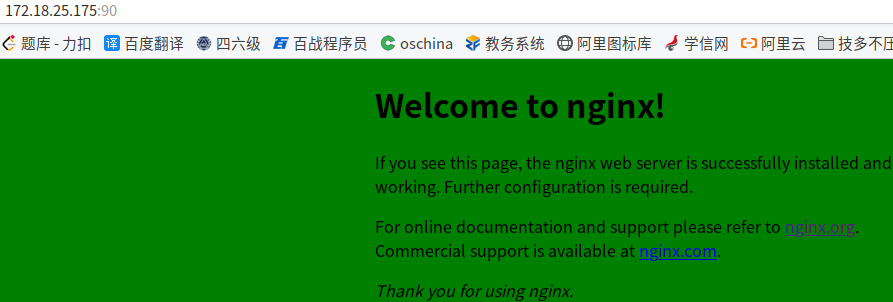
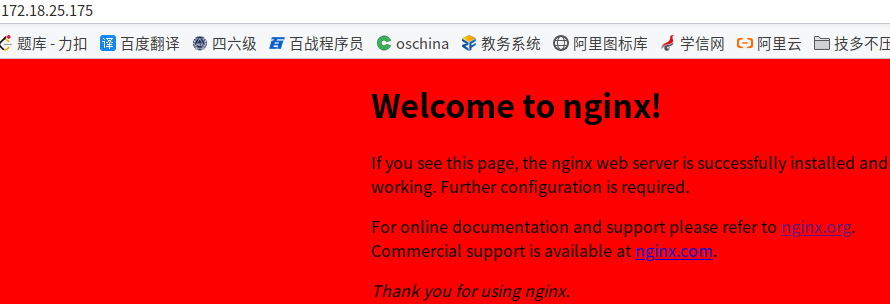
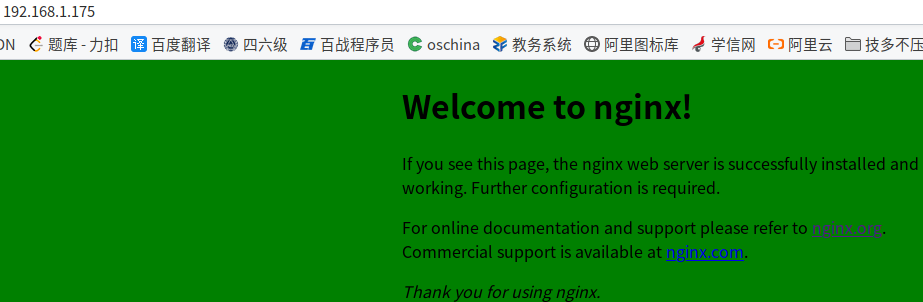
第二步:将html目录下的index.html复制两份,并分别修改他们的背景颜色为red,green
cd /usr/local/nginx/html/
cp -rf index.html index1.html
cp -rf index.html index2.html
bgcolor='red' bgcolor='green'
第三步:重启nginx并访问
/usr/local/nginx/sbin/nginx -s reload
2、使用IP地址实现虚拟主机
第一步:关闭当前虚拟机,打开virtualbox,为虚拟机为主机添加第二网卡
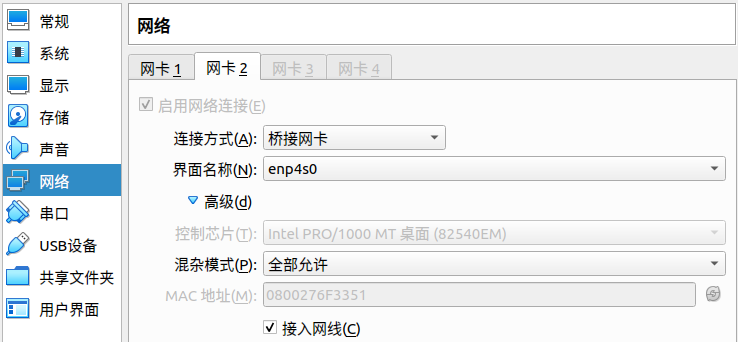

cd /etc/sysconfig/network-scripts/
cp ifcfg-enp0s3 ifcfg-enp0s8
vi ifcfg-enp0s8
将里面的IPADDR="172.18.25.175"改为IPADDR="192.168.1.175"
TYPE="Ethernet"
BOOTPROTO="static"
NAME="enp0s8"
DEVICE="enp0s8"
ONBOOT="yes"
IPADDR="192.168.1.175"
NETMASK="255.255.255.0"
GATEWAY="192.168.1.1"
DNS1=4.4.4.4
DNS2=8.8.8.8
IPV6INIT=NO
service network restart
第二步:配置nginx.conf
vi /usr/local/nginx/conf/nginx.conf
将两个server修改为,均访问80端口
server {
        listen       80;
        server_name  172.18.25.175;
        #charset koi8-r;
        #access_log  logs/host.access.log  main;

        location / {
            root   html;
            index  index1.html index.htm;
        }
    }

    server {
        listen       80;
        server_name  192.168.1.175;
        #charset koi8-r;
        #access_log  logs/host.access.log  main;

        location / {
            root   html;
            index  index2.html index.htm;
        }
    }
第三步:重启nginx并访问
/usr/local/nginx/sbin/nginx -s reload
3、使用域名实现虚拟主机
第一步:删除网卡2,并删除ifcfg-enp0s8文件,配置nginx.conf
vi /usr/local/nginx/conf/nginx.conf
server {
        listen       80;
        server_name  www.nwes.com;
        #charset koi8-r;
        #access_log  logs/host.access.log  main;

        location / {
            root   html;
            index  index1.html index.htm;
        }
    }

    server {
        listen       80;
        server_name  www.item.com;
        #charset koi8-r;
        #access_log  logs/host.access.log  main;

        location / {
            root   html;
            index  index2.html index.htm;
        }
    }
第二步:修改本地主机的hosts文件,为ip172.18.25.175添加两个域名
su
vim /etc/hosts
加入
172.18.25.175 www.news.com www.item.com
重启本地主机网络模块
sudo /etc/init.d/networking restart
第三步:重启nginx并访问
/usr/local/nginx/sbin/nginx -s reload
二、Nginx实现反向代理_负载均衡
新建一个虚拟机(172.18.25.176),模拟负载均衡,上传或者下载jdk和tomcat
vi /etc/profile
末尾加入
# 2019.11.27 11:30:14
JAVA_HOME=/usr/local/java/jdk1.8.0_221
PATH=$PATH:$JAVA_HOME/bin
CLASSPATH=.:$JAVA_HOME/lib/dt.jar:$JAVA_HOME/lib/tools.jar
export JAVA_HOME
export PATH
export CLASSPATH
生效
source /etc/profile
解压tomcat并复制3份,实现集群
cp -rf apache-tomcat-9.0.20/ apache-tomcat-9.0.20-01
cp -rf apache-tomcat-9.0.20/ apache-tomcat-9.0.20-02
cp -rf apache-tomcat-9.0.20/ apache-tomcat-9.0.20-03
分别修改他们的端口号
vi apache-tomcat-9.0.20-01/conf/server.xml
将里面的8005 8080 8009改为:
apache-tomcat-9.0.20-01占用端口:6005 6060 6009
apache-tomcat-9.0.20-02占用端口:7005 7070 7009
apache-tomcat-9.0.20-03占用端口:8005 8080 8009
启动3个tomcat,关闭防火墙
./apache-tomcat-9.0.20-01/bin/startup.sh
./apache-tomcat-9.0.20-02/bin/startup.sh
./apache-tomcat-9.0.20-03/bin/startup.sh
systemctl stop firewalld
修改nginx虚拟机里的nginx.conf
ssh 172.18.25.175
vi /usr/local/nginx/conf/nginx.conf
把两个server修改为:
# nginx需要代理的三台tomcat主机,然后由nginx实现负载均衡
    upstream www.manager.com{
        #ip_hash;    可以根据hash选择主机
        # weight 是权重,权重越大被选中概率越大
        server 172.18.25.176:6060 weight=5;
        server 172.18.25.176:7070;
        server 172.18.25.176:8080;
    }

    server {
        listen       80;
        server_name  www.ego.com;
        #charset koi8-r;
        #access_log  logs/host.access.log  main;

        location / {
            #root   html;
            #index  index1.html index.htm;
            proxy_pass http://www.manager.com;
        }
    # 如果项目页面加载静态资源时,动静分离了,这里就不用配了,如:www.xxx.com/js/jquery.js
    location ~ .*\.(ico|png|jpg|js|css)$ {
            # 指定静态资源的位置
            proxy_pass http://www.manager.com;
        }
    }
修改本地hosts文件
su
vim /etc/hosts
加入
172.18.25.175 www.manager.com
重启本地主机网络模块
sudo /etc/init.d/networking restart
