Elasticsearch集群搭建及使用Java客户端对数据存储和查询
本次博文发两块,前部分是怎样搭建一个Elastic集群,后半部分是基于Java对数据进行写入和聚合统计。
一、Elastic集群搭建
1. 环境准备。
该集群环境基于VMware虚拟机、CentOS 7系统,公司目前用的服务器系统基本全是CentOS系统,因此就选了这个。Elasticsearch需要依赖的最低环境就是JDK8,且要配置好环境变量JAVA_HOME. Elasticsearch的安装也可以查看官网给出的安装说明。
虚拟机系统采用的是最小化安装,没有安装桌面程序。安装完程序再安装JDK,配置环境变量即可。
2. 集群搭建。
2.1 安装包解压
下载完成后的Elastic包为elasticsearch-6.3.2.tar.gz,对其解压。
# 将elastic包加压到目录 /data/elastic 下
tar zxvf elasticsearch-6.3.2.tar.gz -C /data/elastic
2.2 配置文件修改
解压后的路径为/data/elastic/elasticsearch-6.3.2,在/data/elastic目录下新增两个文件夹,为data,logs,其中data用来存储节点数据,logs用来存储日志,下面在修改配置文件中需要用到。修改config/elasticsearch.yml如下。
# 集群名称
cluster.name: elastic_test

# 节点名称
node.name: node-1

# 数据目录,刚才创建的data目录
path.data: /data/elastic/data

#日志路径 ,刚才创建的logs目录
path.logs: /data/elastic/logs

#绑定地址,修改为任何机器都能访问
network.host: 0.0.0.0

#端口,默认9200,不做修改
#http.port: 9200

# 集群节点,当节点启动后平台就会发现
discovery.zen.ping.unicast.hosts: ["172.16.106.190", "172.16.106.191", "172.16.106.192"]

# 最小主节点数量,配置2
# 该配置告诉ELasticsearch当没有足够的master候选节点的时候,不进行master节点选举,等master节点足够了才进行选举
discovery.zen.minimum_master_nodes: 2
2.3 其他机器修改
修改完一台机器后,同样其他两台机器类似修改,注意把节点名称改为不一样的就可以了。
2.4 集群启动
启动说明:elasticsearch的启动不能使用root用户,所以要新建一个普通用户。以下是具体操作。
# 新建一个用户组为elasticgp
groupadd elasticgp

# 新建一个用户名为elastic的用户,并且归属到elasticgp用户组
useradd -g elasticgp elastic

# 给用户设置密码
passwd elastic

# 上面已经减了一个文件夹,/data/elastic,该文件夹存储了elastic软件和数据目录data及日志目录logs
# 现在将elastic目录的归属组修改成elastgp
chgrp -R elasticgp elastic/

# 将文件目录/data/elastic所属用户修改为用户elastic
chown -R elastic elastic/
用户配置好后切换到elastic用户进行启动程序。
# 切换到elastic用户
su elastic

# 切换到程序目录下
cd /data/elastic/elasticsearch-6.3.2

# 后台启动程序
./bin/elasticsearch -d

# 查看输出日志
tailf ../logs/elastic_test.log
2.5 问题排查
启动的时候可能会出现以下两个问题

问题1:将当前用户的软硬限制调大
修改文件 /etc/security/limits.conf
# elastic用户的软限制 当然也可用*代替,标识修改所有用户
elastic soft nofile 65535
# elastic用户的硬限制 当然也可用*代替,标识修改所有用户
elastic hard nofile 65537
问题2:修改/etc/sysctl.conf
vm.max_map_count=262144
问题3: 启动内存设置
在内存不充足的情况下,可以修改elastic的初始内存,在/data/elastic/elasticsearch-6.3.2/config目录下有配置文件
# 将内存使用设置为512M
-Xms512M
-Xmx512M
问题4:端口是否开放
elastic需要用到9200和9300两个端口,可以用telnet来查看端口是否开放,以下是修改防火墙打开端口的命令。
集群中的节点通过端口 9300 彼此通信。如果这个端口没有打开,节点将无法形成一个集群。
# 永久开放9200端口
firewall-cmd --permanent --zone=public --add-port=9200/tcp
# 永久开放9300端口
firewall-cmd --permanent --zone=public --add-port=9300/tcp

#重新加载防火墙配置,使开放端口生效
firewall-cmd --reload
2.6 集群状态查看
如下图,通过访问某一个节点,查看所有的节点,其中node-1为主节点。

如下图,查看集群健康状态

以上为elasticsearch集群具体安装过程。具体的API调用说明可以查看官网CAT_API和Cluster_APIs等等。
2.7 kibana 使用
集群搭建好之后,可用通过kibana来访问集群的一个节点,然后做一下简单的测试。先去官网下载kibana安装包
https://www.elastic.co/downloads/kibana
我是下载的mac客户端,其他客户端应该也是一样的。
解压kibana安装包后,在bin目录下执行
# 查看kibana命令帮助
./bin/kibana -h
会看到如下提示:
Usage: bin/kibana [command=serve] [options]

  Kibana is an open source (Apache Licensed), browser based analytics and search dashboard for Elasticsearch.

  Commands:
    serve  [options]  Run the kibana server
    help  <command>   Get the help for a specific command

  "serve" Options:

    -h, --help                 output usage information
    -e, --elasticsearch <uri>  Elasticsearch instance
    -c, --config <path>        Path to the config file, can be changed with the CONFIG_PATH environment variable as well. Use multiple --config args to include multiple config files.
    -p, --port <port>          The port to bind to
    -q, --quiet                Prevent all logging except errors
    -Q, --silent               Prevent all logging
    --verbose                  Turns on verbose logging
    -H, --host <host>          The host to bind to
    -l, --log-file <path>      The file to log to
    --plugin-dir <path>        A path to scan for plugins, this can be specified multiple times to specify multiple directories
    --plugin-path <path>       A path to a plugin which should be included by the server, this can be specified multiple times to specify multiple paths
    --plugins <path>           an alias for --plugin-dir
其中我们需要用的就是 -e 参数,来连接指定的elasticsearch
# 启动kibana,连接到制定的Elastic服务节点
./bin/kibana -e http://172.16.106.201:9200
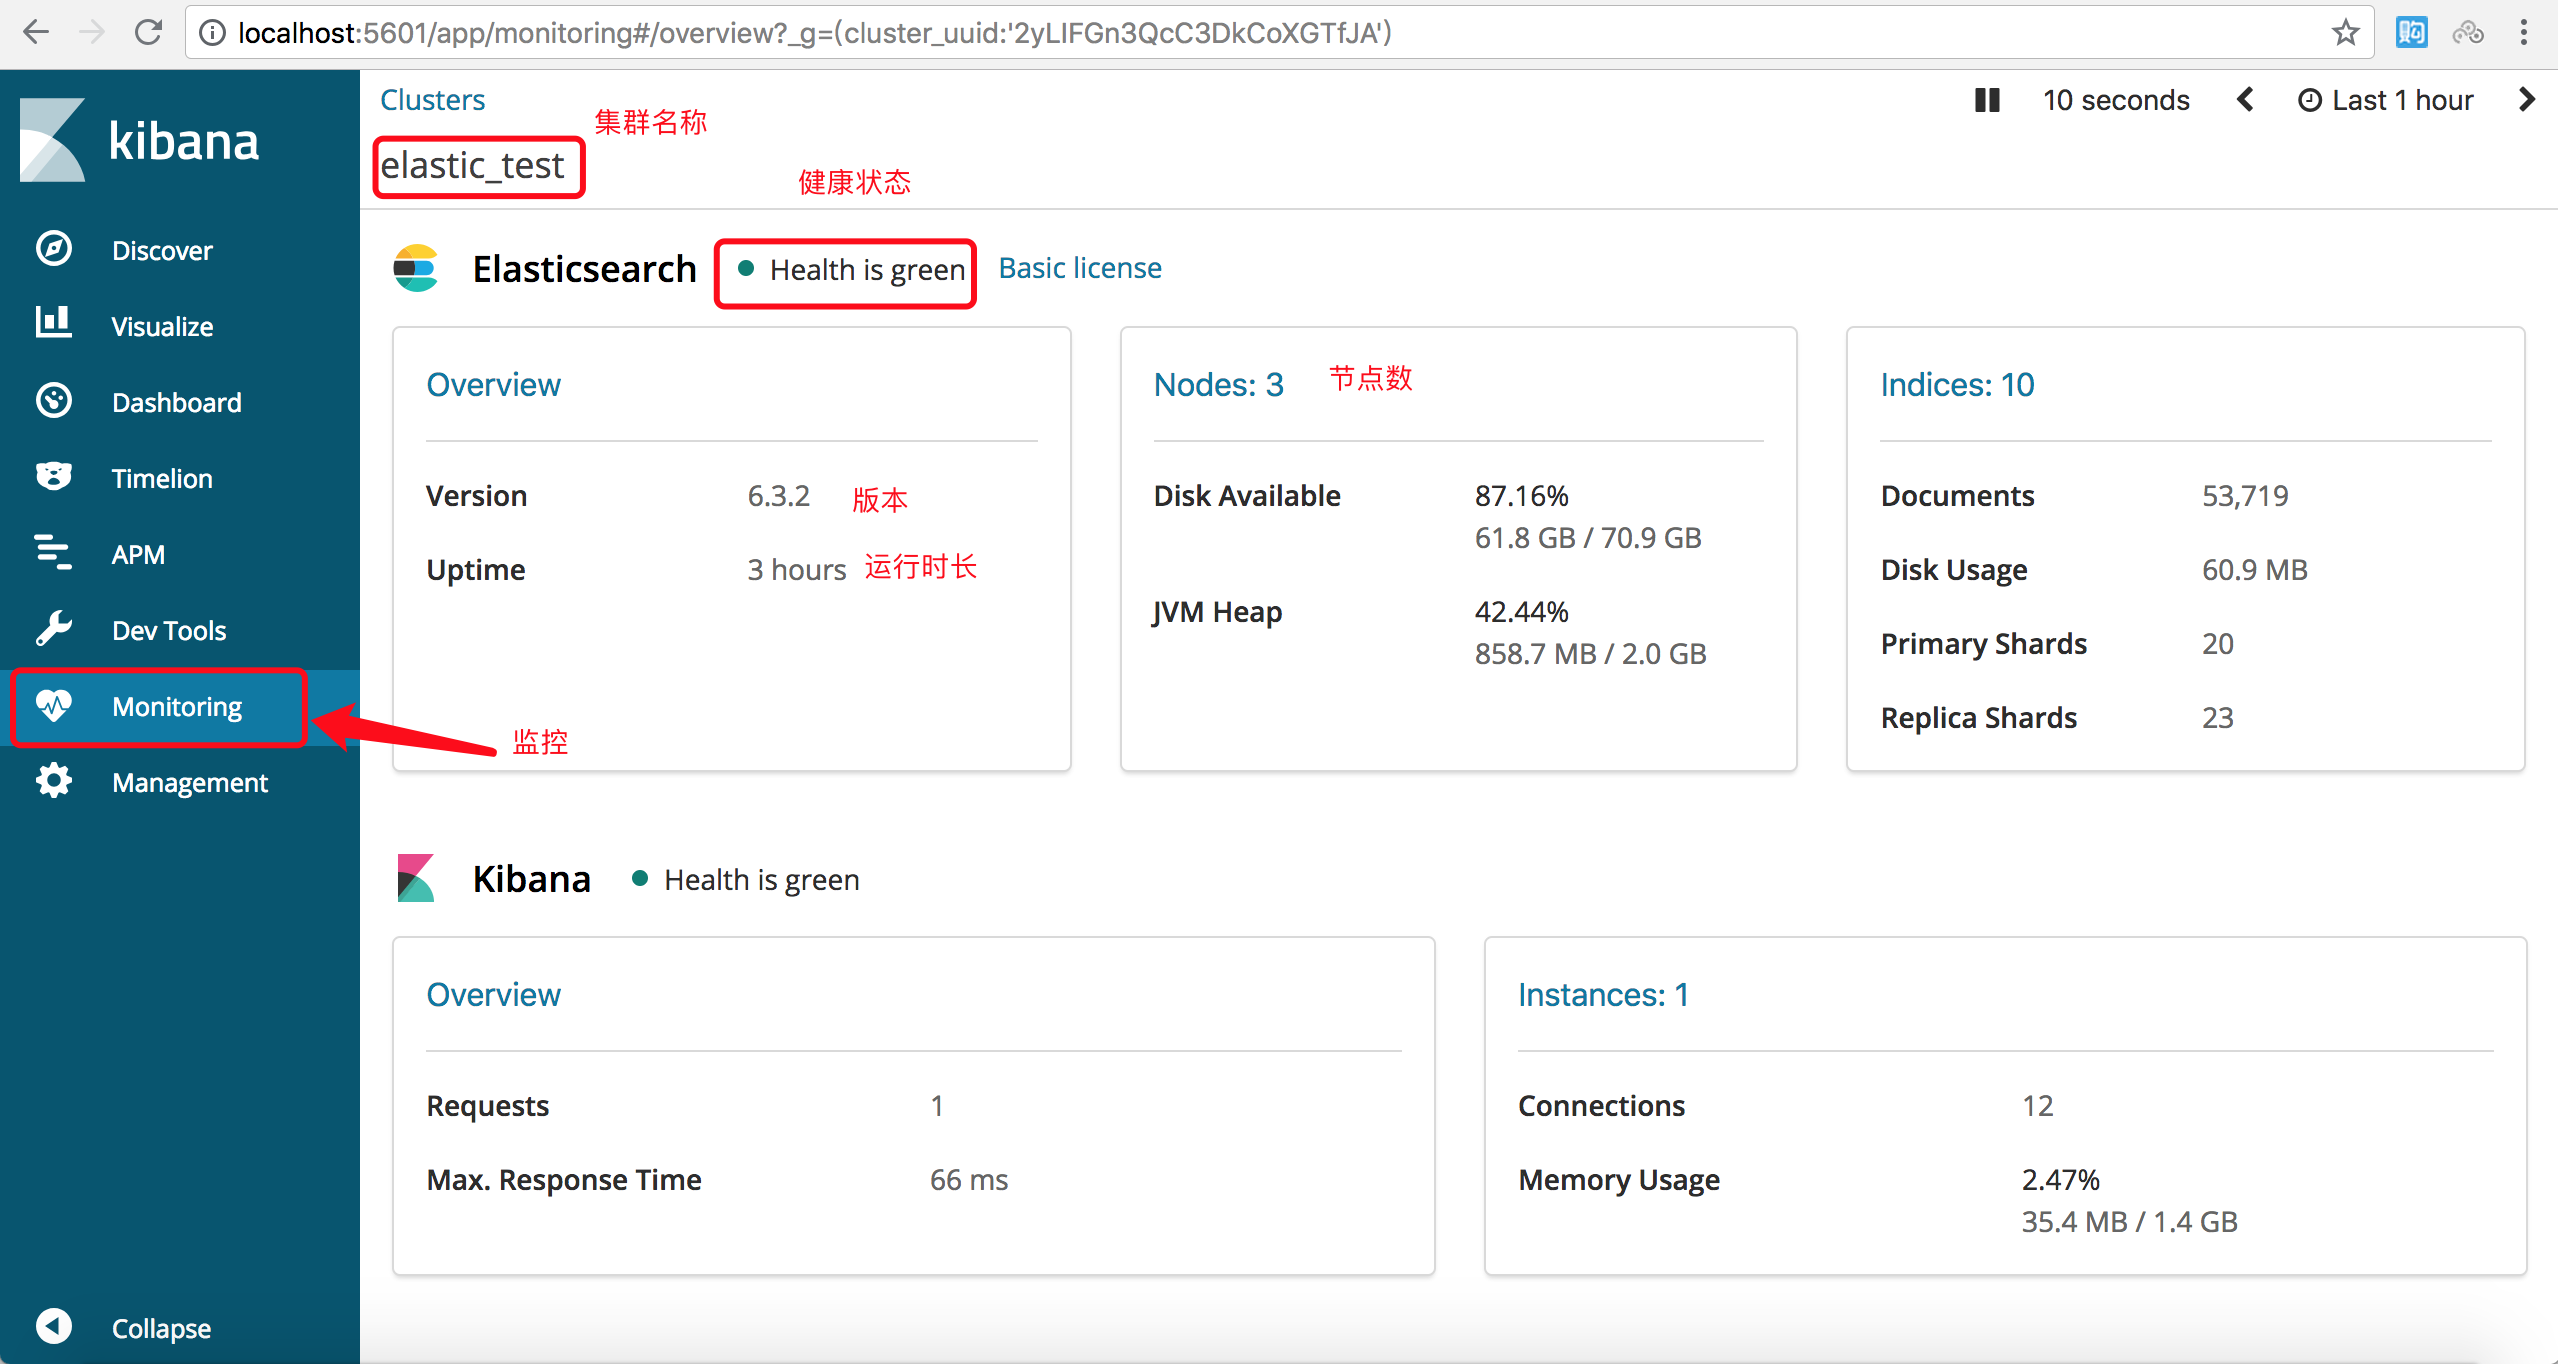
启动成功后可以访问localhost:5601,如下图,点击监控菜单看到集群的一些状态信息。indices是索引数量,除了自己新建的索引Elasticsearch本身也有一些索引。
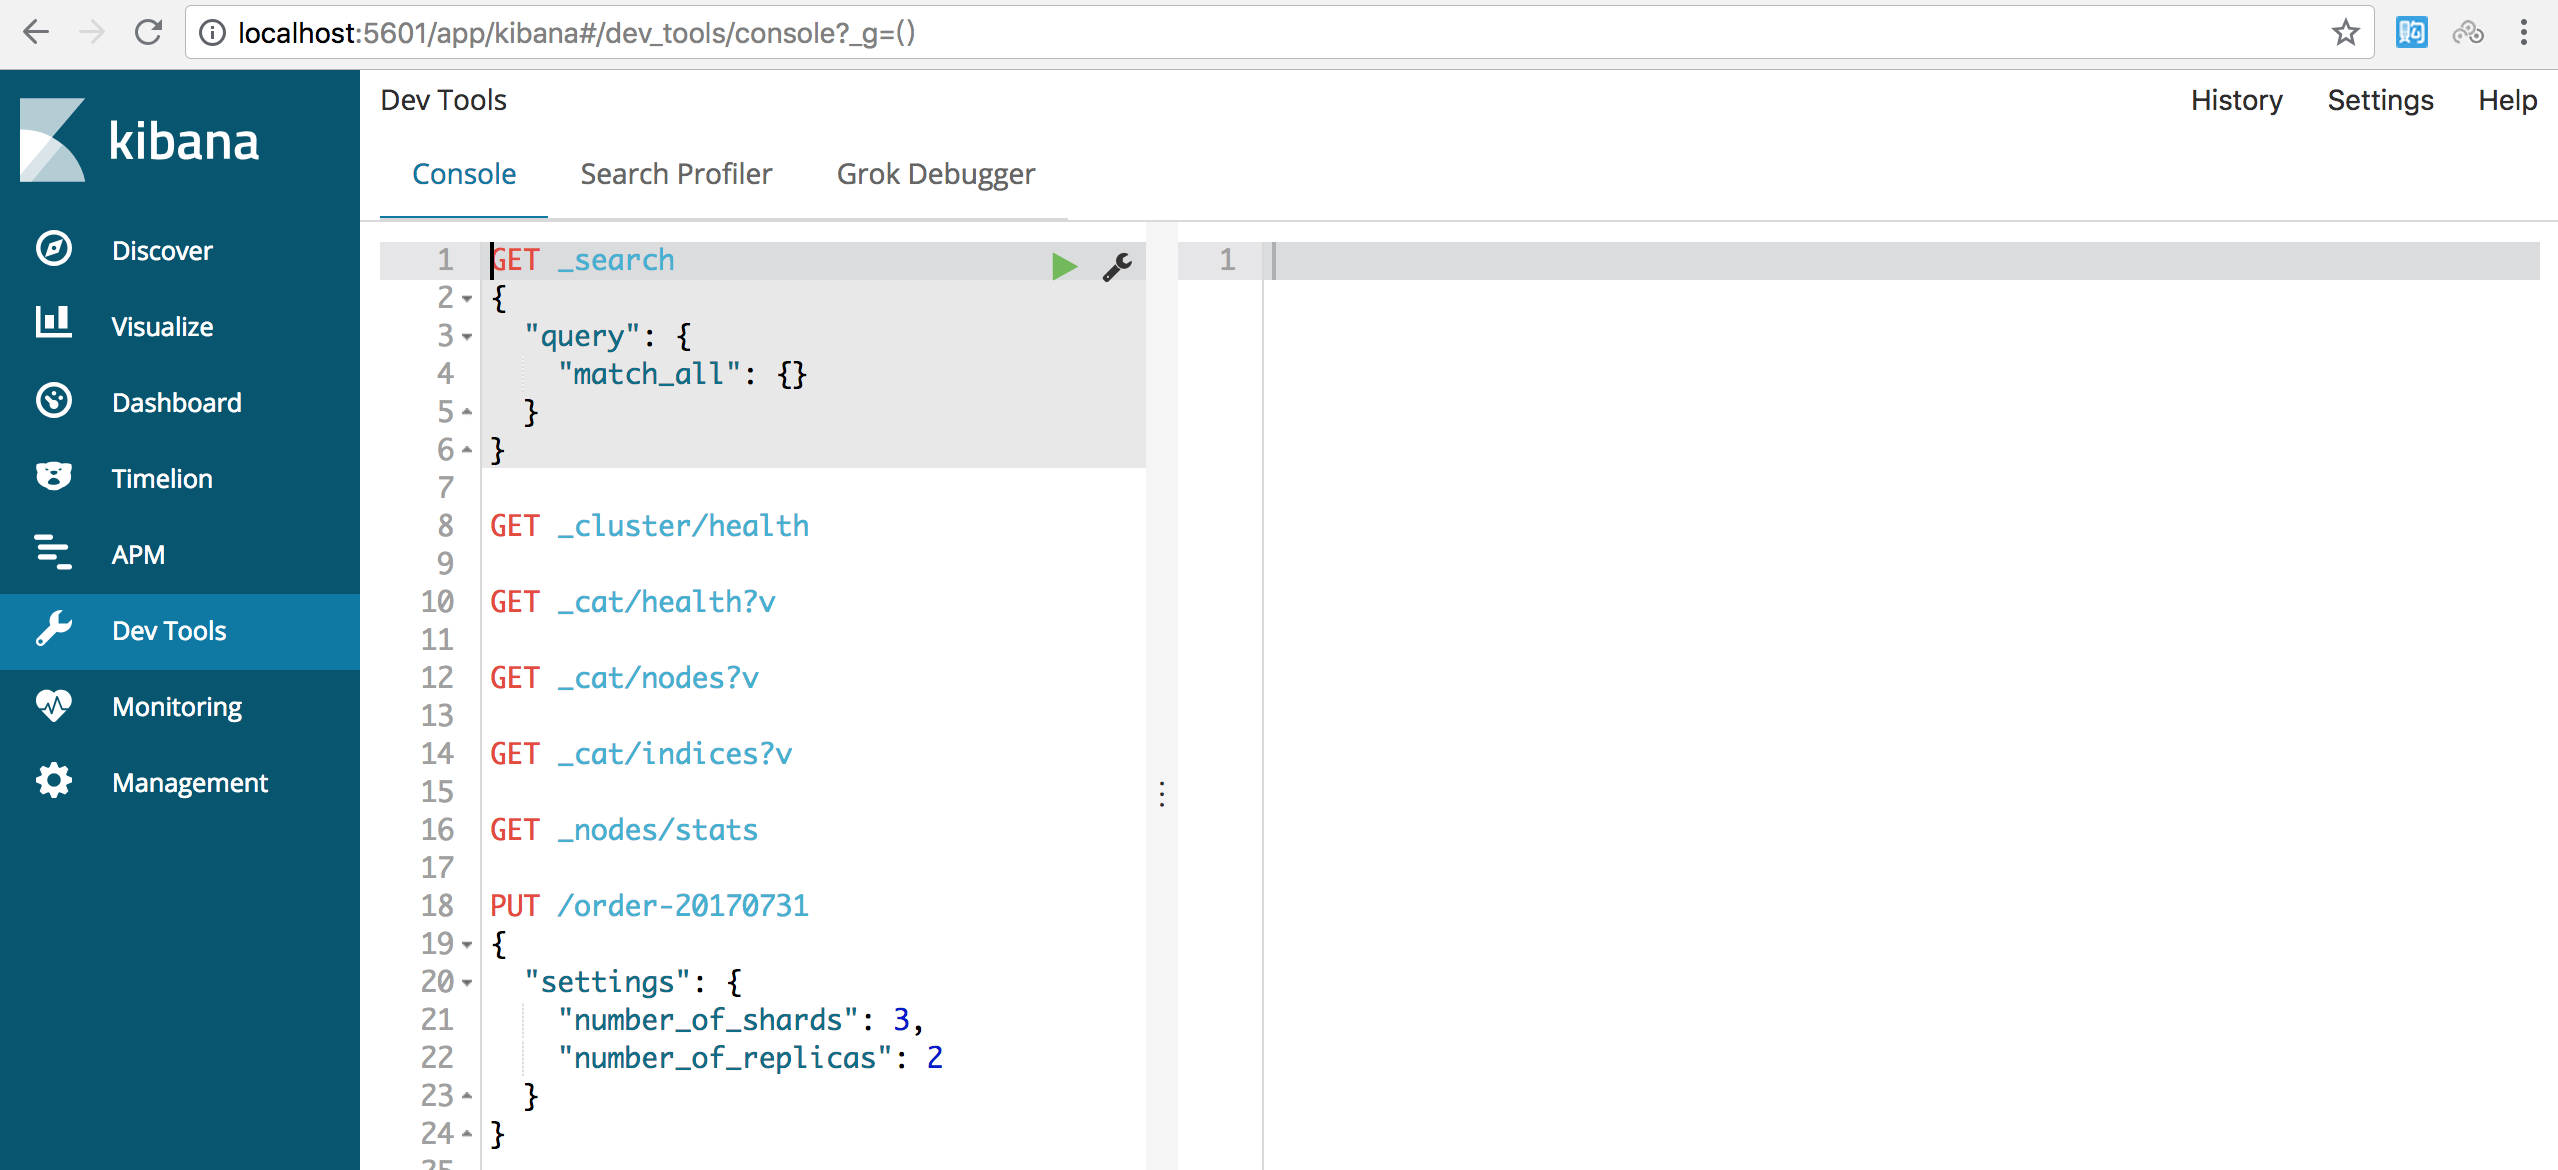
如下图,点击DevTools菜单,可以对集群节点上的数据进行查询了。
二、Java客户端对数据存储和查询
1. 客户端配置,可以查看官网详细配置
采用maven管理,添加依赖的pom配置即可
    <!-- Java High Level REST Client -->
        <dependency>
            <groupId>org.elasticsearch.client</groupId>
            <artifactId>elasticsearch-rest-high-level-client</artifactId>
            <version>6.3.2</version>
            <exclusions>
                <exclusion>
                    <groupId>org.elasticsearch</groupId>
                    <artifactId>elasticsearch</artifactId>
                </exclusion>
            </exclusions>
        </dependency>

        <!-- Client 包缺少一些东西,因此引入此包
            可以具体查看ISSUE https://github.com/elastic/elasticsearch/issues/26959
         -->
        <dependency>
            <groupId>org.elasticsearch</groupId>
            <artifactId>elasticsearch</artifactId>
            <version>6.3.2</version>
        </dependency>
2. 以下是测试主要代码
package com.woasis.elastic.demo;

import org.apache.http.HttpHost;
import org.elasticsearch.action.get.GetRequest;
import org.elasticsearch.action.get.GetResponse;
import org.elasticsearch.action.index.IndexRequest;
import org.elasticsearch.action.index.IndexResponse;
import org.elasticsearch.action.search.SearchRequest;
import org.elasticsearch.action.search.SearchResponse;
import org.elasticsearch.client.RestClient;
import org.elasticsearch.client.RestHighLevelClient;
import org.elasticsearch.common.xcontent.XContentBuilder;
import org.elasticsearch.common.xcontent.XContentFactory;
import org.elasticsearch.index.query.QueryBuilders;
import org.elasticsearch.search.SearchHit;
import org.elasticsearch.search.SearchHits;
import org.elasticsearch.search.builder.SearchSourceBuilder;
import org.springframework.util.StringUtils;
import org.springframework.web.bind.annotation.GetMapping;
import org.springframework.web.bind.annotation.RestController;

import java.io.IOException;
import java.text.SimpleDateFormat;
import java.util.Date;
import java.util.Random;

@RestController
public class IndexController {


    private static RestHighLevelClient client = new RestHighLevelClient(
            RestClient.builder(
                    new HttpHost("172.16.106.201",9200, "http"),
                    new HttpHost("172.16.106.202",9200, "http"),
                    new HttpHost("172.16.106.203",9200, "http")
            )
    );

    /**
     * 向索引下增加数据
     * @param indexName
     * @param type
     * @return
     */
    @GetMapping("/putdata")
    public String putDataForIndex(String indexName, String type){

        if (StringUtils.isEmpty(indexName)){
            return "请指定索引名称";
        }

        SimpleDateFormat simpleDateFormat = new SimpleDateFormat("yyyy-MM-dd");

        StringBuilder indexBuilder = new StringBuilder();
        indexBuilder.append(indexName);
        indexBuilder.append("-");
        indexBuilder.append(simpleDateFormat.format(new Date()));

        String fullIndexName = indexBuilder.toString();
        System.out.println("索引名称是:"+fullIndexName);

        Random random = new Random();

        try {
            XContentBuilder contentBuilder = XContentFactory.jsonBuilder();
            contentBuilder.startObject();
            contentBuilder.field("name", "people"+System.currentTimeMillis());
            contentBuilder.field("age", random.nextInt(30));
            contentBuilder.field("createDate", new Date());
            contentBuilder.endObject();

            //索引请求
            IndexRequest indexRequest = new IndexRequest(fullIndexName, type).source(contentBuilder);

            IndexResponse indexResponse = client.index(indexRequest);

            System.out.println(indexResponse.getIndex());

//            client.close();
        } catch (IOException e) {
            e.printStackTrace();
        }
        return "SUCCESS";
    }


    /**
     * 根据索引名称,type,id获取数据
     * @return
     */
    @GetMapping("/getdata")
    public String getData(){

        //Get请求
        GetRequest getRequest = new GetRequest("people-2018-07-31","student", "DfLL72QBGxN1JyvW1KG4");

        try {
            GetResponse response = client.get(getRequest);
            System.out.println("index:"+response.getIndex());
            System.out.println("type:"+response.getType());
            System.out.println("id:"+response.getId());
            System.out.println("sourceString:"+response.getSourceAsString());
        } catch (IOException e) {
            e.printStackTrace();
        }

        return "SUCCESS";
    }

    /**
     * 搜索数据
     * @return
     */
    @GetMapping("/searchdata")
    public String searchData(){

        //Search请求
        SearchRequest searchRequest = new SearchRequest("people-2018-07-31");

        //查询过滤条件
        SearchSourceBuilder searchSourceBuilder = new SearchSourceBuilder();
        searchSourceBuilder.query(QueryBuilders.termQuery("name","people1533031470255"));
        searchRequest.source(searchSourceBuilder);

        try {
            SearchResponse searchResponse = client.search(searchRequest);

            SearchHits searchHits = searchResponse.getHits();

            for (SearchHit hit : searchHits){
                System.out.println("index:"+hit.getIndex());
                System.out.println("type:"+hit.getType());
                System.out.println("id:"+hit.getId());
                System.out.println("sourceString:"+hit.getSourceAsString());
            }

        } catch (IOException e) {
            e.printStackTrace();
        }

        return "SUCCESS";
    }

}
官方在各个API使用方式上都有详细的讲解,有用到的可以在官网查看。跳转地址
该demo程序使用spring boot搭建,可以查看Github源码https://github.com/liuzwei/elastic-demo


 浙公网安备 33010602011771号