Swagger 专题
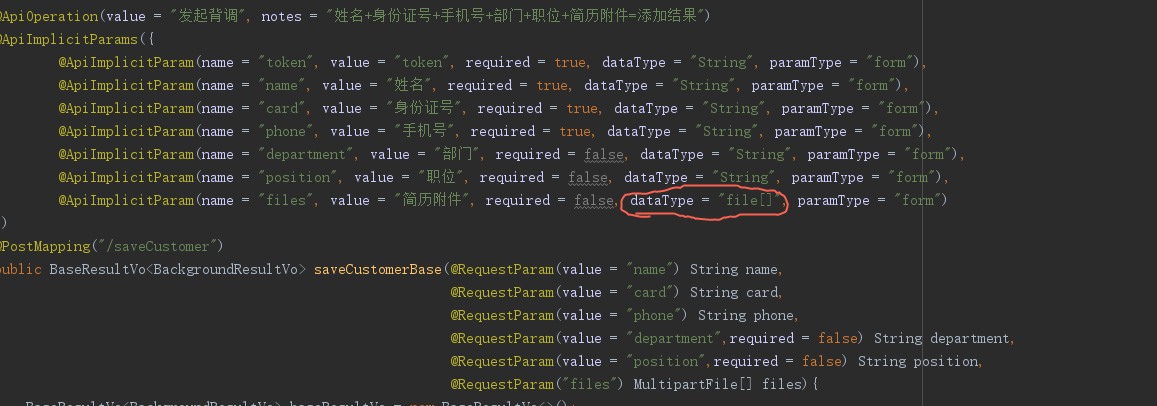
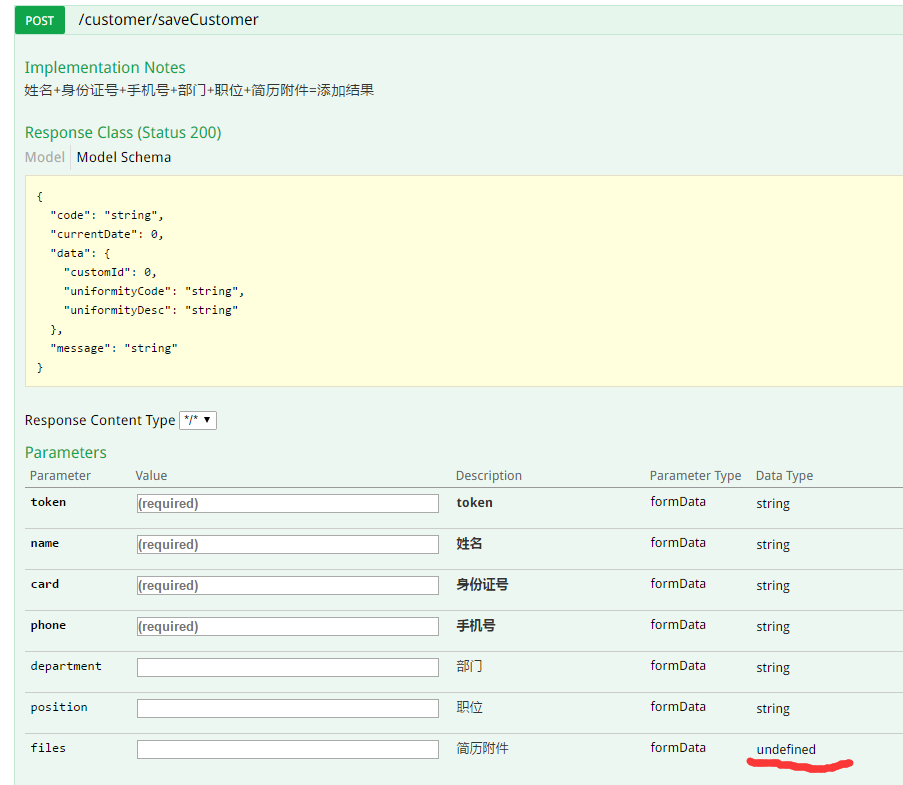
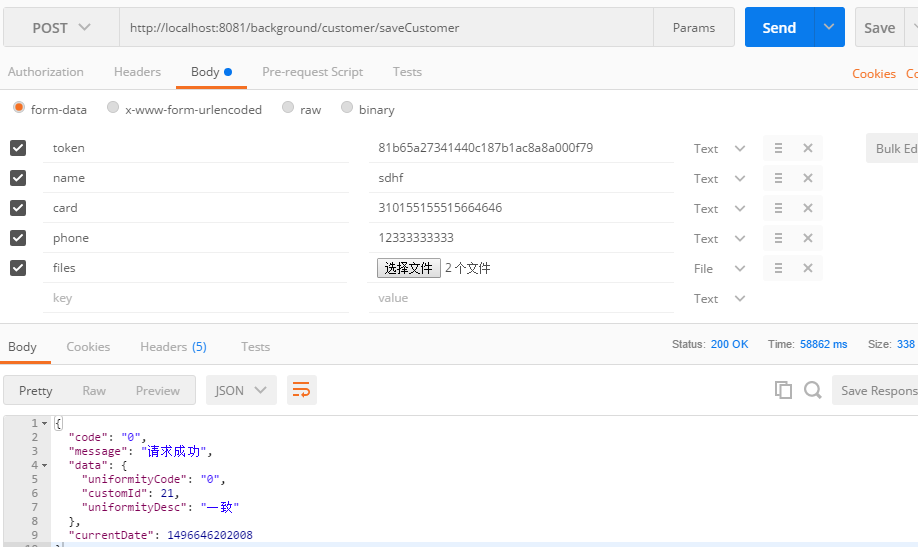
用postman能用,但是swagger的datatype不知道怎么写
随着互联网技术的发展,现在的网站架构基本都由原来的后端渲染,变成了:前端渲染、前后端分离的形态,而且前端和后端在各自的技术道路上越走越远。
前端和后端的唯一联系,变成了API接口;API文档成了前后端开发人员联系的纽带,变得越来越重要, swagger就是一款让你更好的书写API文档的框架。
文档工具
没有API文档工具之前,大家都是手写API文档的,在什么地方书写的都有,有在 Word上写的,有在对应的项目目录下 readme.md上写的,每个公司都有每个公司的玩法,无所谓好坏。
现如今市场上书写API文档的工具有很多,常见的有 postman、yapi、阿里的RAP 但是能称之为框架的,估计也只有 swagger了。
swagger 优缺点
- 集成方便,功能强大
- 在线调试与文档生成
- 代码耦合,需要注解支持,但不影响程序性能
实体类
swagger 提供了非常齐全的注解,为 POJO提供了 @ApiModel、 @ApiModelProperty,以便更好的渲染最终结果
import io.swagger.annotations.ApiModel;
import io.swagger.annotations.ApiModelProperty;
import lombok.Data;
import org.hibernate.validator.constraints.NotEmpty;

import javax.validation.constraints.Min;
import javax.validation.constraints.NotNull;

/**
 * @author tangcheng
 * 2018/05/02
 */
@ApiModel("Swagger使用示例")
@Data
public class SayHelloReq {

    @ApiModelProperty(required = true, value = "UserId", dataType = "int", example = "123")
    @NotNull
    @Min(value = 1, message = "最小值必须大于1")
    private Integer userId;

    @ApiModelProperty(required = true, value = "内容", example = "Best Wish!")
    @NotEmpty
    private String content;

    /**
     * 普通的数组
     * example 中 数组中字符串会自动加上双引号
     */
    @ApiModelProperty(example = "[http://1.com,http://2.com]")
    @NotEmpty
    private String[] pics;

    @ApiModelProperty(example = "\"{name:开心}\"")
    @NotEmpty
    private String mood;

    @ApiModelProperty(value = "普通的数组。使用@RequestBody注解,会将对象全部转换成JSON。" +
            "如果请求参数不是JSON格式会报错HttpMessageNotReadableException:\n" +
            " JSON parse error: Can not deserialize instance of java.lang.Integer[] out of VALUE_STRING token;"
            , example = "[1,2]", dataType = "type:array")
    public Integer[] classIds;

}
Why does @ApiModelProperty “name” attribute has no effect?
更改Swagger网页上展示的字段名:
@JsonProperty("phonenumbers") //生成swagger接口参数时用到
@JSONField(name="phonenumbers") //处理请求时用到,如果没有这个注解,RequstMappingAdapter在将HTTP请求参数set到Request对象中时,会仍然使用以前的phoneNumberDTOList,然后导致phoneNumberDTOList字段值为空
@ApiModelProperty(value = "list of phone numbers")
List<PhoneNumberDTO> phoneNumberDTOList = new ArrayList<>();
https://github.com/springfox/springfox/issues/1289
https://stackoverflow.com/questions/53082934/why-does-apimodelproperty-name-attribute-has-no-effect
package com.tangcheng.learning.web.dto.vo;

import io.swagger.annotations.ApiModel;
import io.swagger.annotations.ApiModelProperty;
import lombok.AllArgsConstructor;
import lombok.Data;

/**
 * spring-boot-cookbook
 *
 * @author tangcheng
 * @date 6/17/2018 11:32 AM
 */
@ApiModel("用户信息")
@Data
@AllArgsConstructor
public class UserVO {

    @ApiModelProperty("主键ID")
    private Long id;

    @ApiModelProperty("用户名")
    private String username;

    @ApiModelProperty("密码")
    private String password;

}
@Api:用在请求的类上,表示对类的说明
tags="说明该类的作用,可以在UI界面上看到的注解"
value="该参数没什么意义,在UI界面上也看到,所以不需要配置"
示例:
@Api(tags="APP用户注册Controller")


@ApiOperation:用在请求的方法上,说明方法的用途、作用
value="说明方法的用途、作用"
notes="方法的备注说明"
示例:
@ApiOperation(value="用户注册",notes="手机号、密码都是必输项,年龄随边填,但必须是数字")


@ApiImplicitParams:用在请求的方法上,表示一组参数说明
@ApiImplicitParam:用在@ApiImplicitParams注解中,指定一个请求参数的各个方面
name:参数名
value:参数的汉字说明、解释
required:参数是否必须传
paramType:参数放在哪个地方
· header --> 请求参数的获取:@RequestHeader
· query --> 请求参数的获取:@RequestParam
· path(用于restful接口)--> 请求参数的获取:@PathVariable
· body(不常用)
· form(不常用)
dataType:参数类型,默认String,其它值dataType="Integer"
defaultValue:参数的默认值
示例:
@ApiImplicitParams({
    @ApiImplicitParam(name="mobile",value="手机号",required=true,paramType="form"),
    @ApiImplicitParam(name="password",value="密码",required=true,paramType="form"),
    @ApiImplicitParam(name="age",value="年龄",required=true,paramType="form",dataType="Integer")
})


@ApiResponses:用在请求的方法上,表示一组响应
@ApiResponse:用在@ApiResponses中,一般用于表达一个错误的响应信息
code:数字,例如400
message:信息,例如"请求参数没填好"
response:抛出异常的类
示例:
@ApiOperation(value = "select1请求",notes = "多个参数,多种的查询参数类型")
@ApiResponses({
    @ApiResponse(code=400,message="请求参数没填好"),
    @ApiResponse(code=404,message="请求路径没有或页面跳转路径不对")
})

@ApiModel:用于响应类上,表示一个返回响应数据的信息(这种一般用在post创建的时候,使用@RequestBody这样的场景,请求参数无法使用@ApiImplicitParam注解进行描述的时候)
@ApiModelProperty:用在属性上,描述响应类的属性
示例:
import io.swagger.annotations.ApiModel;
import io.swagger.annotations.ApiModelProperty;
import java.io.Serializable;

@ApiModel(description= "返回响应数据")
public class RestMessage implements Serializable{

    @ApiModelProperty(value = "是否成功")
    private boolean success=true;

    @ApiModelProperty(value = "返回对象")
    private Object data;

    @ApiModelProperty(value = "错误编号")
    private Integer errCode;

    @ApiModelProperty(value = "错误信息")
    private String message;

    /* getter/setter */

}
restful 风格接口
注解描述
-
@Api: 描述Controller -
@ApiIgnore: 忽略该Controller,指不对当前类做扫描 -
@ApiOperation: 描述Controller类中的method接口 -
@ApiParam: 单个参数描述,与@ApiImplicitParam不同的是,他是写在参数左侧的。如(@ApiParam(name="username",value="用户名")Stringusername) -
@ApiModel: 描述POJO对象 -
@ApiProperty: 描述POJO对象中的属性值 -
@ApiImplicitParam: 描述单个入参信息 -
@ApiImplicitParams: 描述多个入参信息 -
@ApiResponse: 描述单个出参信息 -
@ApiResponses: 描述多个出参信息 -
@ApiError: 接口错误所返回的信息
package com.tangcheng.learning.web.api;

import com.tangcheng.learning.web.dto.req.SayHelloReq;
import com.tangcheng.learning.web.dto.vo.UserVO;
import io.swagger.annotations.Api;
import io.swagger.annotations.ApiImplicitParam;
import io.swagger.annotations.ApiImplicitParams;
import io.swagger.annotations.ApiOperation;
import lombok.extern.slf4j.Slf4j;
import org.springframework.http.ResponseEntity;
import org.springframework.web.bind.annotation.*;
import org.springframework.web.multipart.MultipartFile;

import javax.validation.Valid;

/**
 * @author tangcheng
 * 2018/05/02
 */
@Api(tags = "Case:MVC参数校验DSL ", description = "MVC参数校验DSL")
@Slf4j
@RestController
@RequestMapping("dsl")
public class MVC_DSL_TestController {

    @GetMapping
    @ApiOperation(value = "条件查询")
    @ApiImplicitParams({
            @ApiImplicitParam(name = "username", value = "用户名", dataType = "string", paramType = "query"),
            @ApiImplicitParam(name = "password", value = "密码", dataType = "string", paramType = "query"),
    })
    public UserVO query(String username, String password) {
        log.info("多个参数用  @ApiImplicitParams");
        return new UserVO(1L, username, password);
    }

    @GetMapping("/{id}")
    @ApiOperation(value = "获取单条信息详情")
    @ApiImplicitParam(name = "id", value = "用户编号", dataType = "long", paramType = "path")
    public ResponseEntity<UserVO> get(@PathVariable Long id) {
        log.info("单个参数用  @ApiImplicitParam");
        UserVO userVO = new UserVO(id, "swagger", "swagger");
        return ResponseEntity.ok(userVO);
    }

    @ApiOperation(value = "RequestBody 校验DSL", notes = "RequestBody 校验DSL")
    @PostMapping("/say/hello")
    public ResponseEntity<String> sayHello(@Valid @RequestBody SayHelloReq request) {
        log.info("如果是 POST PUT 这种带 @RequestBody 的可以不用写 @ApiImplicitParam ,swagger 也会使用默认的参数名作为描述信息");

        Integer[] classIds = request.getClassIds();
        if (classIds == null) {
            throw new IllegalArgumentException("classIds is null");
        }
        return ResponseEntity.ok(request.getUserId() + request.getContent() + request.getMood());
    }


    @ApiOperation(value = "upload", notes = "如果添加@RequestBody注解,会报错:org.springframework.web.HttpMediaTypeNotSupportedException" +
            "Content type 'multipart/form-data;boundary=----WebKitFormBoundaryKz1zt5cbBPPXkMrt;charset=UTF-8' not supported")
    @PostMapping("/upload")
    public ResponseEntity<String> uploadFile(@RequestParam("file") MultipartFile multipartFile) {
        log.info("name:{}", multipartFile.getName());//@RequestParam("file") ,引自会返回 file
        return ResponseEntity.ok(multipartFile.getName() + "  " + multipartFile.getOriginalFilename() + " " + multipartFile.getContentType() + " " + multipartFile.getSize());
    }

    /**
     * attribute 'value' and its alias 'name' are present with values of [headerArg] and [Header中传的参数], but only one is permitted.
     *
     * @param headerArg
     * @return
     */
    @ApiOperation(value = "@RequestHeader", notes = "@RequestHeader")
    @GetMapping("header")
    public ResponseEntity<String> sayHello(@RequestHeader(value = "headerArg", defaultValue = "helloworld") String headerArg) {
        return ResponseEntity.ok("headerArg:" + headerArg);
    }

}
Spring Boot下,一个好用的starter
<dependency>
    <groupId>com.spring4all</groupId>
    <artifactId>swagger-spring-boot-starter</artifactId>
    <version>1.7.1.RELEASE</version>
</dependency>
https://github.com/SpringForAll/spring-boot-starter-swagger
@Data
@NoArgsConstructor
public class TodoDetailReqVO {

    private Long categoryId = 1L;

    @Min(1)
    @ApiModelProperty(required = true, value = "权重")
    private Integer weight = 1;

    @NotEmpty
    @Size(min = 2, max = 200)
    @ApiModelProperty(required = true, value = "摘要")
    private String digest;

    @Size(max = 1000)
    @ApiModelProperty(required = true, value = "详细内容")
    private String content;

}

Swagger中设置默认值:
    @JSONField(jsonDirect = true)
    @ApiModelProperty(value = "标签", dataType = "json")
    private String tags;

    @ApiModelProperty(value = "经验", example = "{}")
    private String exps;
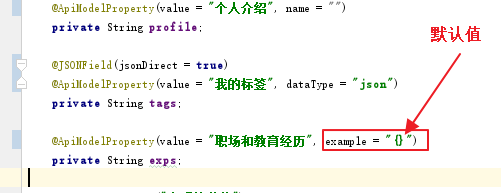
Swagger-ui.html中展示情况:
Data Types
The data type of a schema is defined by the type keyword, for example, type: string.
OpenAPI defines the following basic types:
These types exist in most programming languages, though they may go by different names. Using these types, you can describe any data structures.
Note that there is no null type; instead, the nullable attribute is used as a modifier of the base type.
Additional type-specific keywords can be used to refine the data type, for example, limit the string length or specify an enum of possible values.
https://swagger.io/docs/specification/data-models/data-types/
前言
Swagger 是一款RESTFUL接口的文档在线自动生成+功能测试功能软件。本文简单介绍了在项目中集成swagger的方法和一些常见问题。如果想深入分析项目源码,了解更多内容,见参考资料。Swagger 是一个规范和完整的框架,用于生成、描述、调用和可视化 RESTful 风格的 Web 服务。总体目标是使客户端和文件系统作为服务器以同样的速度来更新。文件的方法,参数和模型紧密集成到服务器端的代码,允许API来始终保持同步。Swagger 让部署管理和使用功能强大的API从未如此简单。
一、使用介绍
什么是 Swagger?
Swagger™的目标是为REST APIs 定义一个标准的,与语言无关的接口,使人和计算机在看不到源码或者看不到文档或者不能通过网络流量检测的情况下能发现和理解各种服务的功能。当服务通过Swagger定义,消费者就能与远程的服务互动通过少量的实现逻辑。类似于低级编程接口,Swagger去掉了调用服务时的很多猜测。
浏览 Swagger-Spec 去了解更多关于Swagger 项目的信息,包括附加的支持其他语言的库。
如何集成Swagger-springmvc到我们的项目中?
依赖:
Maven
<dependency>
      <groupId>com.mangofactory</groupId>
      <artifactId>swagger-springmvc</artifactId>
      <version>0.9.4</version>
</dependency>
Gradle
repositories {
jcenter()
}

compile "com.mangofactory:swagger-springmvc:0.9.4"
使用:
要最快捷地启动swagger-springmvc项目并且使用默认设置,推荐的方式是使用SwaggerSpringMvc插件
Spring Java Configuration
@Configuration
@EnableWebMvc
@EnableSwagger
@ComponentScan("com.myapp.packages")
public class WebAppConfig {
 ...
}
Spring xml Configuration
<mvc:annotation-driven/> <!-- Required so swagger-springmvc can access spring's RequestMappingHandlerMapping  -->
<bean class="com.mangofactory.swagger.configuration.SpringSwaggerConfig" />
SwaggerSpringMvcPlugin XML Configuration
为了使用这个插件,你需要创造一个spring Java配置类。使用spring的 @Configuration ,这个配置类必须被定义到你的xml上下文
<!-- Required so swagger-springmvc can access spring's RequestMappingHandlerMapping  -->
<mvc:annotation-driven/>


<bean class="com.yourapp.configuration.MySwaggerConfig"/>
@Configuration
@EnableSwagger //Loads the spring beans required by the framework
public class MySwaggerConfig {

private SpringSwaggerConfig springSwaggerConfig;

/**
* Required to autowire SpringSwaggerConfig
*/
@Autowired
public void setSpringSwaggerConfig(SpringSwaggerConfig springSwaggerConfig) {
  this.springSwaggerConfig = springSwaggerConfig;
}

/**
* Every SwaggerSpringMvcPlugin bean is picked up by the swagger-mvc framework - allowing for multiple
* swagger groups i.e. same code base multiple swagger resource listings.
 */
@Bean
public SwaggerSpringMvcPlugin customImplementation(){
  return new SwaggerSpringMvcPlugin(this.springSwaggerConfig)
          .includePatterns(".*pet.*");
}

}
SwaggerSpringMvcPlugin Spring Java Configuration
使用@EnableSwagger注解
自动注入SpringSwaggerConfig
定义一个或多个SwaggerSpringMvcPlugin实例,通过springs @Bean注解
@Configuration
@EnableWebMvc
@EnableSwagger
@ComponentScan("com.myapp.controllers")
public class CustomJavaPluginConfig {

private SpringSwaggerConfig springSwaggerConfig;

@Autowired
public void setSpringSwaggerConfig(SpringSwaggerConfig springSwaggerConfig) {
  this.springSwaggerConfig = springSwaggerConfig;
}

@Bean //Don't forget the @Bean annotation
public SwaggerSpringMvcPlugin customImplementation(){
  return new SwaggerSpringMvcPlugin(this.springSwaggerConfig)
        .apiInfo(apiInfo())
        .includePatterns(".*pet.*");
}

private ApiInfo apiInfo() {
  ApiInfo apiInfo = new ApiInfo(
          "My Apps API Title",
          "My Apps API Description",
          "My Apps API terms of service",
          "My Apps API Contact Email",
          "My Apps API Licence Type",
          "My Apps API License URL"
    );
  return apiInfo;
}
}
二、碰到的问题
关于@API注解
在Swagger Annotation中:
API表示一个开放的API,可以通过description简要描述该API的功能。在一个@API下,可有多个@ApiOperation,表示针对该API的CRUD操作。在ApiOperation Annotation中可以通过value,notes描述该操作的作用,response描述正常情况下该请求的返回对象类型。
在一个ApiOperation下,可以通过ApiResponses描述该API操作可能出现的异常情况。
ApiParam用于描述该API操作接受的参数类型
再接着,为项目的Model对象添加Swagger Annotation,这样Swagger Scanner可以获取更多关于Model对象的信息。
@ApiModel(value = "A SayingRepresentation is a representation of greeting")
@JsonSerialize(include = JsonSerialize.Inclusion.NON_NULL)
public class SayingRepresentation {
private long id;
@ApiModelProperty(value = "greeting content", required = true)
private String content;

public SayingRepresentation(long id, String content) {
    this.id = id;
    this.content = content;
}

public long getId() {
    return id;
}

public String getContent() {
    return content;
}
通过上面的步骤,项目已经具备了提供Swagger格式的API信息的能力,接下来,我们把这些信息和Swagger UI集成,以非常美观,实用的方式把这些API信息展示出来。
和Swagger UI的集成
首先,从github(https://github.com/wordnik/swagger-ui)上下载Swagger-UI, 把该项目dist目录下的内容拷贝到项目的resources的目录assets下。
然后,修改index.html, 把Swagger UI对象中的URL替换为自己的API路径。
  window.swaggerUi = new SwaggerUi({
  url: "/api/api-docs",
  dom_id: "swagger-ui-container",
最后,为了能访问到该页面,还需要在Service的Initialize方法中,添加AssetsBundle
public void initialize(Bootstrap<HelloWorldConfiguration> bootstrap) {
    //指定配置文件的名字
    bootstrap.setName("helloWorld");
    bootstrap.addBundle(new AssetsBundle("/assets", "/", "index.html"));
}
最后的效果图:
三、评价
Swagger可以充当前后端交流的重要桥梁,方便快捷。很实用。
Swagger项目允许你生产,显示和消费你自己的RESTful服务。不需要代理和第三方服务。是一个依赖自由的资源集合,它能通过Swagger API动态的生成漂亮的文档和沙盒,因为Swagger UI没有依赖,你可以把他部署到任何服务器环境或者是你自己的机器。
四、参考资料
GitHub:
swagger-springmvc:https://github.com/martypitt/swagger-springmvc
swagger-ui:https://github.com/swagger-api/swagger-ui
swagger-core:https://github.com/swagger-api/swagger-core
swagger-spec:https://github.com/swagger-api/swagger-spec
http://blog.csdn.net/wangnan9279/article/details/44541665
supportHeaderParams默认为false,而我用的是swagger2,不需要配置静态的那些东西,所以我在SwaggerConfig添加了几行代码:
@EnableSwagger2
@EnableWebMvc
@ComponentScan("com.g.web")
public class SwaggerConfig {
    @Bean
    public Docket api(){
        ParameterBuilder tokenPar = new ParameterBuilder();
        List<Parameter> pars = new ArrayList<Parameter>();
        tokenPar.name("x-access-token").description("令牌").modelRef(new ModelRef("string")).parameterType("header").required(false).build();
        pars.add(tokenPar.build());
        return new Docket(DocumentationType.SWAGGER_2)
            .select()
            .apis(RequestHandlerSelectors.any())
            .paths(PathSelectors.regex("/api/.*"))
            .build()
            .globalOperationParameters(pars)
            .apiInfo(apiInfo());
    }

    private ApiInfo apiInfo() {
        return new ApiInfoBuilder()
            .title("后台接口文档与测试")
            .description("这是一个给app端人员调用server端接口的测试文档与平台")
            .version("1.0.0")
            .termsOfServiceUrl("http://terms-of-services.url")
            //.license("LICENSE")
            //.licenseUrl("http://url-to-license.com")
            .build();
    }
}
那我们怎样在swagger中,写入Token值,发送swagger请求,测试这个接口呢?
步骤:
1. 得到用户Token(前端的任何请求都会有这个Token记录,只要不退出登录,Token没有过期,就会一直存在)
2. swagger2配置
import org.springframework.context.annotation.Bean;
import org.springframework.context.annotation.Configuration;
import springfox.documentation.builders.ApiInfoBuilder;
import springfox.documentation.builders.PathSelectors;
import springfox.documentation.builders.RequestHandlerSelectors;
import springfox.documentation.service.*;
import springfox.documentation.spi.DocumentationType;
import springfox.documentation.spi.service.contexts.SecurityContext;
import springfox.documentation.spring.web.plugins.Docket;
import springfox.documentation.swagger2.annotations.EnableSwagger2;
import java.util.ArrayList;
import java.util.List;

@Configuration
@EnableSwagger2
public class Swagger2 {

    @Bean
    public Docket createRestApi() {

        return new Docket(DocumentationType.SWAGGER_2)
                .apiInfo(apiInfo())
                .select()
                .apis(RequestHandlerSelectors.basePackage("com.tfjybj.training.provider.controller"))
                .paths(PathSelectors.any())
                .build()

                .securitySchemes(securitySchemes())
                .securityContexts(securityContexts());

    }
    private List<ApiKey> securitySchemes() {
        List<ApiKey> apiKeys = new ArrayList<>();
        apiKeys.add(new ApiKey("Authorization", "Authorization", "header"));
        return apiKeys;
    }

    private List<SecurityContext> securityContexts() {
        List<SecurityContext> securityContexts = new ArrayList<>();
        securityContexts.add(SecurityContext.builder()
                .securityReferences(defaultAuth())
                .forPaths(PathSelectors.regex("^(?!auth).*$")).build());
        return securityContexts;
    }
    private List<SecurityReference> defaultAuth() {
        AuthorizationScope authorizationScope = new AuthorizationScope("global", "accessEverything");
        AuthorizationScope[] authorizationScopes = new AuthorizationScope[1];
        authorizationScopes[0] = authorizationScope;
        List<SecurityReference> securityReferences = new ArrayList<>();
        securityReferences.add(new SecurityReference("Authorization", authorizationScopes));
        return securityReferences;
    }


    private ApiInfo apiInfo() {
        return new ApiInfoBuilder()
                .title("Demo4SpringBoot APIs")
                .description("")
                .termsOfServiceUrl("")
                .version("1.0")
                .build();
    }
}
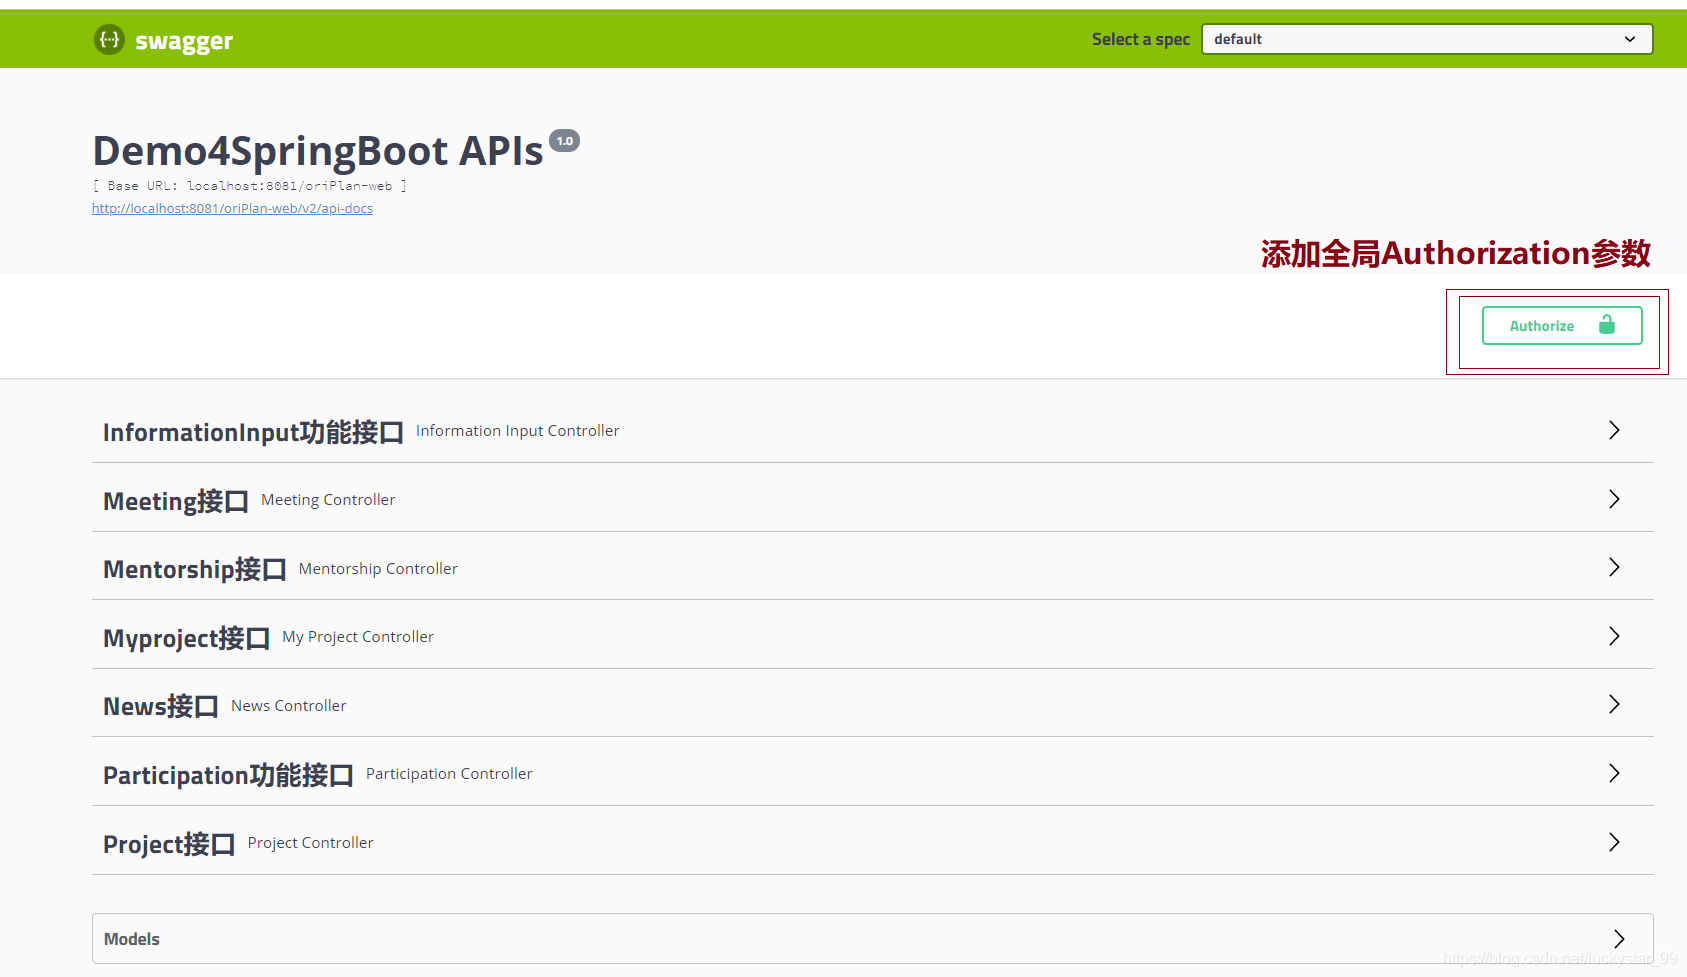
4. 添加全局Authorization参数后,先点击Authorize,再点击Close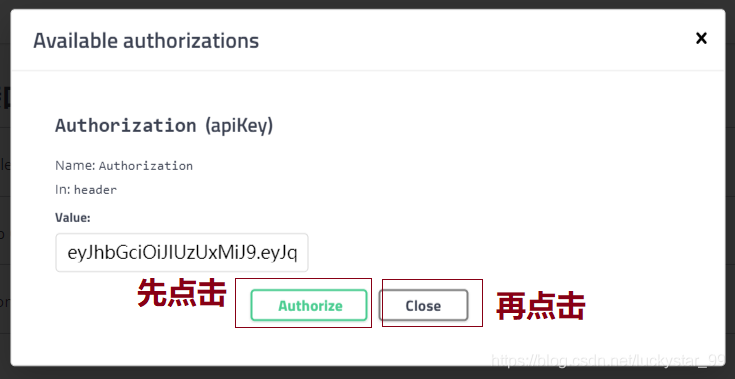
5. 添加成功后:锁关闭

之后我们再发送需要Token验证的请求,就可以测通了!!!


 浙公网安备 33010602011771号