Nginx负载均衡反向代理服务器
1、第一步先在IIS中创建多个网站,分别用不同的端口号。这里创建两个网站端口号分别8084、8085,在Nginx配置中会用到。测试两个网站能正常访问。
2、配置Nginx
1)增加负载均衡请求列表
upstream ytest {
server 127.0.0.1:8084 weight=1;
server 127.0.0.1:8085 weight=2;
}
2)配置Nginx对外请求地址
server {
listen 80;
server_name www.hellonginx.com ; #对外提供访问地址
location / {
root html;
index index.html index.htm;
proxy_pass http://ytest; #负载均衡列表
}
}
到这里我们的Nginx就配好了,是不是想看到效果,别急这里还没有完,因为我们增加了一个域名。所以还需要在hosts中增加域名配置。
3、域名配置
hosts地址:C:\Windows\System32\drivers\etc,打开hosts文件,在尾部增加:127.0.0.1 www.hellonginx.com
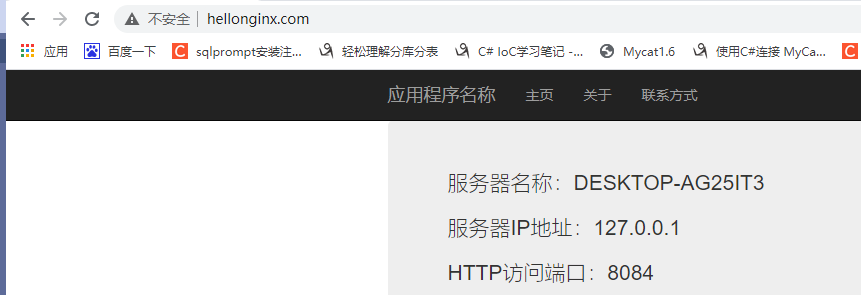
最后打开浏览器,在地址栏中输入:www.hellonginx.com,但是这里打开的网址输出的内容都一样,不知道打开是哪个网站。
这里就需要再回到网站修改一下代码,这里我创建的是asp.net mvc网站,直接上干货:
Controller中修改Index ,代码:
public ActionResult Index()
{
var serverName = "服务器名称:" + Server.MachineName;
var ip = "服务器IP地址:" + Request.ServerVariables["LOCAL_ADDR"];
var port = Request.ServerVariables["SERVER_PORT"];
var portStr = "HTTP访问端口:" + Request.ServerVariables["SERVER_PORT"];
var message = "hello nginx";
if (port == "8084") message = "good morning,Sir";
ViewBag.serverName = serverName;
ViewBag.ip = ip;
ViewBag.portStr = portStr;
ViewBag.message = message;
return View();
}
前端View:
<div class="jumbotron">
<p>@ViewBag.serverName</p>
<p>@ViewBag.ip</p>
<p>@ViewBag.portStr</p>
<p>@ViewBag.message</p>
</div>
再次生成发布,看效果如下图:


