cocos2d
引用:http://www.cnblogs.com/anndaming/archive/2012/02/12/2347287.html
在cocos2d-x提供的工程样例(HelloWorld)的init函数中添加以下功能:
功能1:实现精灵的动作
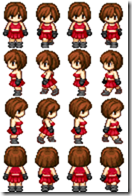
图片资源:
代码:
|
1
2
3
4
5
6
7
8
9
10
11
12
13
14
15
16
17
18
19
20
21
22
23
24
25
26
27
28
29
30
31
32
33
|
// 得到设备屏幕的大小CCSize s = CCDirector::sharedDirector()->getWinSize(); // 加载精灵图片CCTexture2D *texture = CCTextureCache::sharedTextureCache()->addImage("player.png");// 创建精灵角色的帧纹理,四个方向CCSpriteFrame *frame0 = CCSpriteFrame::frameWithTexture(texture, CCRectMake(32*0, 48*0, 32, 48));CCSpriteFrame *frame1 = CCSpriteFrame::frameWithTexture(texture, CCRectMake(32*1, 48*0, 32, 48));CCSpriteFrame *frame2 = CCSpriteFrame::frameWithTexture(texture, CCRectMake(32*2, 48*0, 32, 48));CCSpriteFrame *frame3 = CCSpriteFrame::frameWithTexture(texture, CCRectMake(32*3, 48*0, 32, 48));// 把精灵角色的帧纹理加到动画管理器中CCMutableArray<CCSpriteFrame*> *animFrames = new CCMutableArray<CCSpriteFrame*>(4);animFrames->addObject(frame0);animFrames->addObject(frame1);animFrames->addObject(frame2);animFrames->addObject(frame3);// 创建精灵角色的动作对象,这里设置成0.2秒变帧CCAnimation *animation = CCAnimation::animationWithFrames(animFrames, 0.2f);// 将管理器中的资源释放掉animFrames->release();// 创建精灵对象,这里把图片资源的第一行元素当前默认动画效果CCSprite *sprite = CCSprite::spriteWithSpriteFrame(frame0);// 设置精灵对象在屏幕上的位置,sprite->setPosition(ccp(s.width/2, s.height/2));// 把精灵对象添加到显示层中this->addChild(sprite);// 创建动画的实例CCAnimate *animate = CCAnimate::actionWithAnimation(animation, false);// 让精灵开始动画sprite->runAction(CCRepeatForever::actionWithAction(animate)); |
效果图:
功能2:实现遮罩效果
图片资源:
代码(紧跟功能1):
首先实现这么一个函数:
|
1
2
3
4
5
6
7
8
9
10
11
12
13
14
15
16
17
18
19
20
|
//************************************// Method: spriteWithFile// FullName: spriteWithFile// Access: public // Returns: cocos2d::CCSprite *// Qualifier: 根据文件名得到文件资源// Parameter: const char * filename//************************************cocos2d::CCSprite *spriteWithFile(const char *filename){ cocos2d::CCSprite *pobSprite = new CCSprite(); if(pobSprite && pobSprite->initWithFile(filename)) { pobSprite->autorelease(); // 把资源的释放权交给引擎 return pobSprite; // 这样就得到绑定指定资源的角色对象 } CC_SAFE_DELETE(pobSprite); return NULL;} |
在init函数中追加:
|
1
2
3
4
5
6
7
8
9
10
11
12
13
14
15
16
17
18
|
// 为光圈创建一个实例CCSprite *sprite1 = CCSprite::spriteWithFile("light.png");// 设置光圈的位置sprite1->setPosition(ccp(100, 100));// 把光圈添加到显示层中this->addChild(sprite1, 2);// 设置光圈的动画sprite1->runAction(CCRepeatForever::actionWithAction( // 将光圈的动画设置成序列化,采用双补间动画方式 (CCActionInterval *)CCSequence::actions(CCMoveBy::actionWithDuration(3.0f, ccp(300, 0)), CCMoveBy::actionWithDuration(0.1f, ccp(-300,0)), NULL)));// 创建遮罩对象darknessLayer = CCRenderTexture::renderTextureWithWidthAndHeight(s.width, s.height);// 设备遮罩的位置darknessLayer->setPosition(ccp(s.width/2, s.height/2));// 将遮罩效果加到显示层中this->addChild(darknessLayer, 20);// 定义遮罩效果的色彩darknessLayer->clear(0,0,0,0.5f); |
最后在HelloWorld中复写draw方法如下:
|
1
2
3
4
5
6
|
void HelloWorld::draw(){ // 恢复遮罩效果的色彩 darknessLayer->clear(0,0,0,0.5f); cocos2d::CCLayer::draw();} |
效果图:


![image_thumb[2] image_thumb[2]](https://images.cnblogs.com/cnblogs_com/anndaming/201202/201202120037075766.png)

![image_thumb[4] image_thumb[4]](https://images.cnblogs.com/cnblogs_com/anndaming/201202/201202120037087883.png)

 浙公网安备 33010602011771号