ffmpeg视频录制
前面讲了一下ffmpeg的一些基本概念(ffmpeg中的基本概念),这里说一下如何使用ffmpeg进行视频录制。
录制视频的基本步骤是:
1. 初始化ffmpeg的基本对象,并将这些对象关联起来,然后打开文件并写入文件头。
2. 编码视频,并将编码后数据存写到文件中。
3. 写入文件尾,并清理ffmpeg对象。
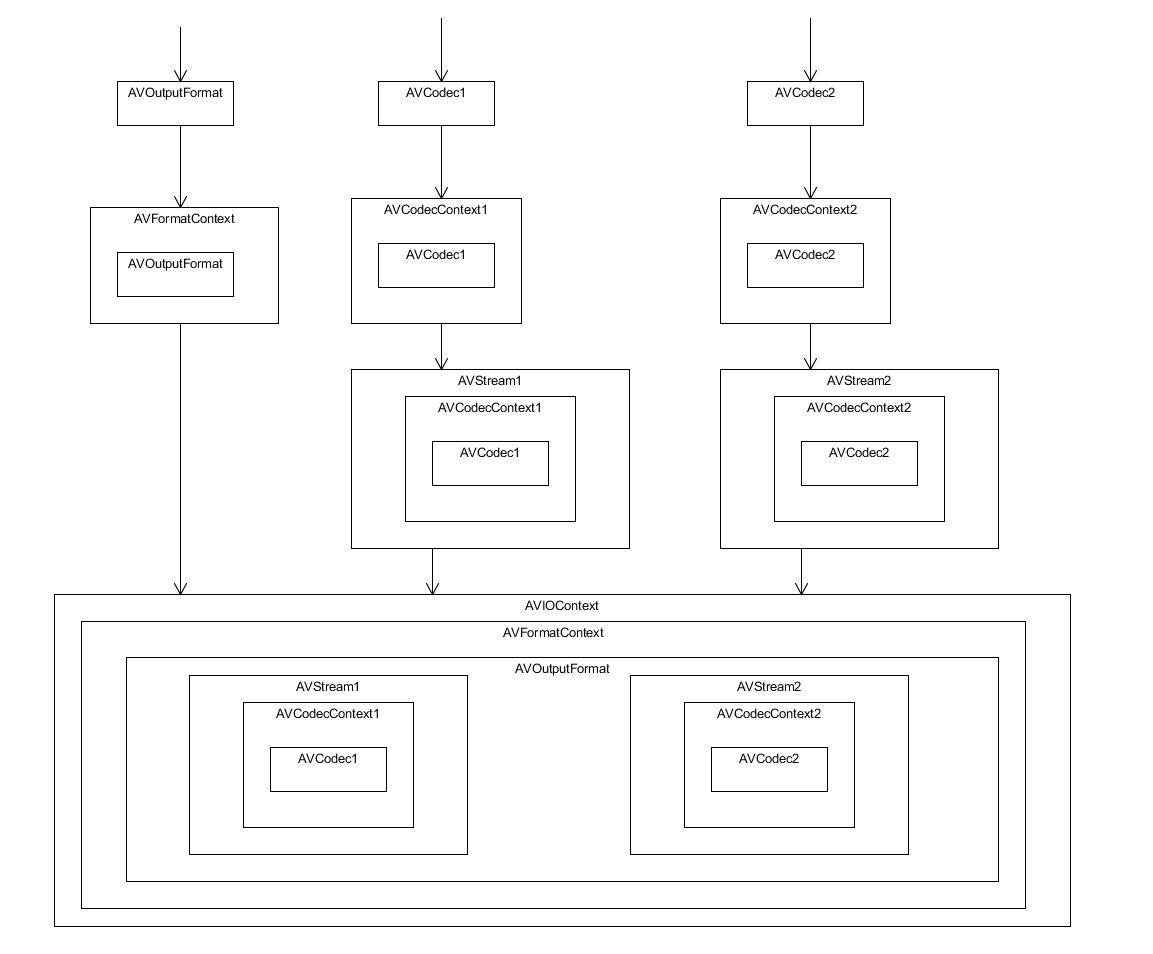
首先,需要初始化ffmpeg的一些对象,初始化的顺序为:
创建并初始化AVOutputFormat, 基于AVOutputFormat创建并初始化AVFormatContext。
然后查找AVCodec, 基于找到的AVCodec创建并初始化AVCodecContext,打开AVCodec。
然后基于找到的AVCodec创建AVStream。
然后创建并初始化AVIOContext。
其中AVStream, AVCodec, AVCodecContext可能会有两组,一组用来录制音频,一组用来录制视频,如下:

AVOutputFormat和AVFormatContext可以通过avformat_alloc_output_context函数来初始化。
AVCodec通过avcodec_find_encoder函数来查找
AVCodecContext通过avcodec_alloc_context3来分配
AVCodecContext初始化完成后,可以通过avcodec_open2打开编码器
AVStream通过avformat_new_stream来分配
以上对象初始化完成后,需要将codec的信息拷贝到AVFormatContext对象中,以便与将编码器信息存储到文件中,这个操作可以通过avcodec_parameters_from_context操作
最后通过avio_open打开文件并初始化AVIOContext。
最后通过avformat_write_header写入文件头,整个初始化阶段就算是完成了
以下初始化代码供参考:
 1     avformat_alloc_output_context2(&format_context_, nullptr, nullptr, file_path.c_str());
 2     if(format_context_ == nullptr){
 3         avformat_alloc_output_context2(&format_context_, nullptr, "mpeg", file_path.c_str());
 4     }
 5
 6     if(format_context_ == nullptr){
 7         return false;
 8     }
 9
10     AVOutputFormat *output_format = format_context_->oformat;
11     output_format->video_codec = AV_CODEC_ID_H264;
12
13     AVCodec *codec = avcodec_find_encoder(output_format->video_codec);
14
15     codec_context_ = avcodec_alloc_context3(codec);
16     codec_context_->codec_id = output_format->video_codec;
17     codec_context_->pix_fmt = AV_PIX_FMT_YUV420P;
18     codec_context_->width = width;
19     codec_context_->height = height;
20     codec_context_->time_base = {1, 1000};
21     codec_context_->gop_size = 12;
22     if (codec_context_->codec_id == AV_CODEC_ID_MPEG2VIDEO){
23         codec_context_->max_b_frames = 2;
24     }
25     if (codec_context_->codec_id == AV_CODEC_ID_MPEG1VIDEO){
26         codec_context_->mb_decision = 2;
27     }
28
29     if (output_format->flags & AVFMT_GLOBALHEADER)
30         codec_context_->flags |= AV_CODEC_FLAG_GLOBAL_HEADER;
31
32     int ret = avcodec_open2(codec_context_, codec, nullptr);
33     if(ret != 0){
34         return false;
35     }
36
37     video_stream_ = avformat_new_stream(format_context_, codec);
38     if(video_stream_ == nullptr){
39         return false;
40     }
41
42     ret = avcodec_parameters_from_context(video_stream_->codecpar, codec_context_);
43     if(ret != 0){
44         return false;
45     }
46
47     ret = avio_open(&format_context_->pb, file_path.c_str(), AVIO_FLAG_WRITE);
48     if(ret != 0){
49         return false;
50     }
51
52     ret = avformat_write_header(format_context_, nullptr);
53     if(ret != 0){
54         return false;
55     }
注意,有些编码器只支持一些固定的帧率,对于这样的编码器,AVCodecContext中的time_base是不能随便设置的,当写文件头失败时,可以检查一下这一点
初始化完成后,就可以进行视频编码录制了,跟初始化相比,编码录制的过程要简单的多,核心函数就三个:
avcodec_send_frame进行视频编码
avcodec_receive_packet用于获取编码后的数据
av_write_frame用于将编码后的数据写入文件
以下代码供参考:
 1 av_image_fill_arrays(src_frame_->data, src_frame_->linesize, data,
 2                          AV_PIX_FMT_RGB24, src_frame_->width, src_frame_->height, 1);
 3
 4     sws_scale(sws_context_, src_frame_->data, src_frame_->linesize, 0, src_frame_->height,
 5               dst_frame_->data, dst_frame_->linesize);
 6
 7     auto now_time = std::chrono::steady_clock::now();
 8     dst_frame_->pts = std::chrono::duration_cast<std::chrono::milliseconds>(now_time - start_time_point_).count();
 9
10     int ret = avcodec_send_frame(codec_context_, dst_frame_);
11     if(ret == 0){
12         AVPacket packet;
13         av_init_packet(&packet);
14         ret = avcodec_receive_packet(codec_context_, &packet);
15         if(ret == 0){
16             av_packet_rescale_ts(&packet, codec_context_->time_base, video_stream_->time_base);
17             av_write_frame(format_context_, &packet);
18         }
19         av_packet_unref(&packet);
20     }
这里的第16行注意一下,将编码后的数据写入文件之前,一定要进行时间转换,否则播放视频时会出现视频播放速度太快的问题
最后就是结束录制了,这个过程就不用多说了,看代码:
 1 if(format_context_ != nullptr){
 2         av_write_trailer(format_context_);
 3     }
 4
 5     if(sws_context_ != nullptr){
 6         sws_freeContext(sws_context_);
 7         sws_context_ = nullptr;
 8     }
 9
10     if(codec_context_ != nullptr){
11         avcodec_close(codec_context_);
12         avcodec_free_context(&codec_context_);
13     }
14
15     if(format_context_ != nullptr){
16         avio_close(format_context_->pb);
17
18         avformat_free_context(format_context_);
19         format_context_ = nullptr;
20     }
(注意:以上所有代码都是仅供参考,并不是完整代码)


