Ansible入门
社区文档
| Ansible 自动管理远程系统并控制其所需状态。 |
| |
| 一个基本的 Ansible 环境包含三个主要组件: |
| 控制节点 |
| 安装了Ansible的系统。您可在控制节点上运行Ansible命令,例如ansible或。ansible-inventory |
| 被控节点 |
| 就是Ansible控制的远程系统或主机 |
| Inventory |
| 逻辑组织的受管节点列表。您在控制节点上创建一个清单以向Ansible描述主机部署 |
| |
| |
| |
| |
| |
| # 控制节点 |
| 运行Ansible CLI工具(ansible-playbook、ansible、ansible-vault等)的机器 |
| |
| # 托管节点(被控节点) |
| 也称为“主机”,它们是您打算使用 Ansible 管理的目标设备(服务器、网络设备或任何计算机) |
| |
| # Inventory |
| 由一个或多个“Inventory来源”提供的受管节点列表。 |
| 可单独指定IP,也可进行分组,它们都允许在播放和批量变量分配中选择节点 |
| |
| # Playbooks |
| Playbooks包含 Play(play是Ansible执行的基本单元)。 |
| 这既是一个“执行概念”,也是我们如何描述 ansible-playbook运行的文件的方式。Playbooks是用 YAML 格式编写 |
| |
| # Plays |
| Ansible 执行的主要上下文,playbook将被控节点映射到任务。 Play包含变量、角色和有序的任务列表且可重复运行(幂等性)。它基本上由映射主机和任务的隐式循环(implicit-loop)组成,并定义了如何迭代它们。 |
| https://softwareengineering.stackexchange.com/questions/368512/what-is-the-difference-between-an-implicit-loop-and-an-explicit-loop |
| 显式循环: |
| for i in {1..4}; do echo "Welcome $i";done |
| 隐式循环: |
| printf 'Welcome %d\n' {1..4} |
| |
| 两者区别: |
| 显示循环使用了一个迭代变量(这里是i),就是用一个我给你生成一个,不用则不生成 |
| 隐式循环不使用迭代器变量,就是一次性把值都生成好,这样会预先占用内存空间 |
| 如迭代的次数少效果还不明显,如果迭代十万次或更多时,那省下的内存空间就可想而知了 |
| |
| # Roles |
| 在Play内部使用的可重用ansible内容(tasks、handlers、variables、plugins、templates、files)的有限分发。要使用任何Role资源必须将Role本身导入Play |
| 董事长(Roles)--> 整个公司 |
| |
| # Tasks |
| 要应用于托管主机的"操作"的定义。任务必须始终直接或间接包含在 Play 中(role或imported/included的任务列表文件)。可使用临时命令ansible或ansible-console执行单个任务。 |
| |
| # Handlers |
| 任务的特殊形式,仅在前一个任务通知导致"changed"状态时执行。 |
| |
| # Plugins |
| 扩展 Ansible 核心功能的代码片段,它们可控制您如何连接到受管节点(连接插件),操作数据(过滤器插件),甚至控制控制台中显示的内容(回调插件)。 |
| |
| # Collections(原意是收藏品,理解成集合) |
| 集合是 Ansible 内容的分发格式,可以包括剧本、角色、模块和插件。 您可以通过Ansible Galaxy安装和使用集合。 |
| |
| Gathering facts:事实代表关于系统的已发现变量。您可以使用事实来实现任务的条件执行,但也可以仅用于获取有关系统的临时信息 |
ansible安装
pip方式安装(最新版)
| 本文档共用3台机器,配置分别如下: |
| node1.lab.example.com/192.168.1.10/控制节点 |
| node2.lab.example.com/192.168.1.11/被控节点 |
| node3.lab.example.com/192.168.1.12/被控节点 |
| |
| 所有节点的防火墙、selinux都已关闭 |
| |
| # 控制节点上操作 |
| # 安装ansible |
| [root@node1 ~]# yum -y install epel-release |
| [root@node1 ~]# yum -y install wget gcc gcc-c++ zlib zlib-devel openssl openssl-devel libffi-devel sklearn |
| [root@node1 ~]# wget https://www.python.org/ftp/python/3.9.10/Python-3.9.10.tgz |
| [root@node1 ~]# tar xvf Python-3.9.10.tgz && cd Python-3.9.10 |
| [root@node1 Python-3.9.10]# ./configure --enable-optimizations |
| [root@node1 Python-3.9.10]# make altinstall |
| [root@node1 Python-3.9.10]# ln -s /usr/local/bin/python3.9 /usr/local/bin/python3 |
| [root@node1 Python-3.9.10]# ln -s /usr/local/bin/pip3.9 /usr/local/bin/pip3 |
| [root@node1 Python-3.9.10]# python3 --version |
| [root@node1 Python-3.9.10]# pip3 --version |
| |
| # 升级 pip |
| /usr/local/bin/python3.9 -m pip install --upgrade pip |
| |
| [root@node1 Python-3.9.10]# cd |
| [root@node1 ~]# mkdir -p ~/.pip |
| [root@node1 ~]# vim ~/.pip/pip.conf |
| [global] |
| index-url=http://mirrors.aliyun.com/pypi/simple/ |
| |
| [install] |
| trusted-host=mirrors.aliyun.com |
| |
| |
| [root@node1 ~]# python3 -m pip install --user ansible |
| [root@node1 ~]# /root/.local/bin/ansible --version |
| ansible [core 2.13.1] |
| config file = None |
| configured module search path = ['/root/.ansible/plugins/modules', '/usr/share/ansible/plugins/modules'] |
| ansible python module location = /root/.local/lib/python3.9/site-packages/ansible |
| ansible collection location = /root/.ansible/collections:/usr/share/ansible/collections |
| executable location = /root/.local/bin/ansible |
| python version = 3.9.10 (main, Jul 6 2022, 10:11:34) [GCC 4.8.5 20150623 (Red Hat 4.8.5-44)] |
| jinja version = 3.1.2 |
| libyaml = True |
| |
| |
| [root@node1 ~]# cp /root/.local/bin/* /usr/local/bin/ |
| [root@node1 ~]# ansible --version |
| |
| # 检查ansible已安装的软件包的版本 |
| [root@node1 ~]# python3 -m pip show ansible |
| Name: ansible |
| Version: 6.0.0 |
| Summary: Radically simple IT automation |
| Home-page: https://ansible.com/ |
| Author: Ansible, Inc. |
| Author-email: info@ansible.com |
| License: GPLv3+ |
| Location: /root/.local/lib/python3.9/site-packages |
| Requires: ansible-core |
| Required-by: |
| |
| |
| # 添加 Ansible 命令 shell 补全 |
| [root@node1 ~]# python3 -m pip install --user argcomplete |
| [root@node1 ~]# cp /root/.local/bin/activate-global-python-argcomplete /usr/local/bin/ |
| [root@node1 ~]# activate-global-python-argcomplete |
| Installing bash completion script /etc/bash_completion.d/python-argcomplete ==> 这是回显 |
| |
| [root@node1 ~]# source /etc/bash_completion.d/python-argcomplete |
| [root@node1 ~]# ansible ==> 按2次回车即可补全,ansible+1个空格再按2次回车即可补全子项 |
yum安装
本次使用该方式安装
| [root@node1 ~]# yum -y install epel-release && yum -y install ansible |
环境变量
上述的环境变量可在 /etc/ansible/hosts 中使用
| Tips: |
| ansible.cfg示例文件可手动生成 |
| 生成一个完全注释掉的示例ansible.cfg文件: |
| $ ansible-config view > ansible.cfg |
| |
| |
| 1、配置文件读取顺序 |
| ANSIBLE_CONFIG (一个环境变量) |
| ansible.cfg (位于当前目录中) |
| .ansible.cfg (位于家目录中) |
| /etc/ansible/ansible.cfg |
| 注:Ansible将处理上述列表并使用找到的第一个文件,所有其他文件都将被忽略 |
| |
| # 1.5版本之前的读取顺序: |
| ansible.cfg (位于当前目录) |
| ANSIBLE_CONFIG (一个环境变量) |
| .ansible.cfg (位于家目录下) |
| /etc/ansible/ansible.cfg |
| |
| |
| |
| [root@node1 ~]# vim /etc/hosts |
| 192.168.1.10 node1.lab.example.com node1 |
| 192.168.1.11 node2.lab.example.com node2 |
| 192.168.1.12 node3.lab.example.com node3 |
| |
| [root@node1 ~]# for i in 1 2;do scp /etc/hosts root@192.168.1.1$i:/etc;done |
| |
| |
| # 做免密认证 |
| [root@node1 ~]# ssh-keygen -t rsa -P '' |
| [root@node1 ~]# for i in {1..3};do ssh-copy-id node$i;done |
inventory定义的几种方法
建立inventory(ini格式)
| 1、inventory文件可以是INI或YAML格式,先介绍INI格式 |
| [root@node1 ~]# vim /etc/ansible/hosts |
| [node1] |
| 192.168.1.10 |
| [other] |
| 192.168.1.1[1:2] |
| [node11] ===> 连接变量作为主机变量工作 给每台机器分配几个变量 |
| jumper http_port=80 ansible_host=192.0.2.50 maxRequestsPerChild=808 ==> jumper是别名 |
| web http_port=303 ansible_host=192.0.2.54 maxRequestsPerChild=909 ==> web是别名 |
| |
| |
| [root@node1 ~]# ansible other -m ping |
| 验证清单中的主机 |
| [root@node1 ~]# ansible all --list-hosts |
| hosts (3): |
| 192.168.1.10 |
| 192.168.1.11 |
| 192.168.1.12 |
yaml格式的inventory
| [root@node1 ~]# cat inventory.yaml |
| virtualmachines: ==> 该行可自定义 |
| hosts: ==> 该行是固定格式 |
| vm01: ==> 该行是别名 |
| ansible_host: 192.168.1.10 ==> ansible_host字段指定每个受控节点的IP地址或完全限定域名 (FQDN) |
| vm02: ==> 该行是别名 |
| ansible_host: 192.168.1.11 |
| vm03: ==> 该行是别名 |
| ansible_host: 192.168.1.12 |
| |
| [root@node1 ~]# ansible-inventory -i inventory.yaml --list |
| [root@node1 ~]# ansible virtualmachines -i inventory.yaml -m ping |
使用元组创建inventory
| 以下清单说明了数据中心的基本结构。 此示例清单包含一个包含所有网络设备的网络元组和一个包含网络组和所有Web服务器的数据中心元组。 |
| [root@node1 ~]# cat inventory.yaml |
| leafs: |
| hosts: |
| leaf01: |
| ansible_host: 192.168.1.10 |
| |
| spines: |
| hosts: |
| spine01: |
| ansible_host: 192.168.1.11 |
| spine02: |
| ansible_host: 192.168.1.12 |
| |
| network: |
| children: |
| leafs: |
| spines: |
| |
| |
| [root@node1 ~]# ansible {leafs | spines} -i inventory.yaml -m ping |
创建变量
变量为托管节点设置值,例如 IP 地址、FQDN、操作系统和 SSH 用户,因此您在运行 Ansible 命令时不需要传递它们
应用于特定的主机变量
| [root@node1 ~]# cat inventory.yaml |
| spines: |
| hosts: |
| spine01: |
| ansible_host: 192.168.1.11 |
| http_port: 80 ===> 将变量分配给一台机器 |
| spine02: |
| ansible_host: 192.168.1.12 |
| http_port: 443 |
应用于主机组中的变量
| [root@node1 ~] |
| spines: |
| hosts: |
| spine01: |
| ansible_host: 192.168.1.11:5309 ===> 指定非标准SSH端口,仅限于openssh,paramiko模块则不会 |
| http_port: 80 |
| maxRequestsPerChild: 808 ===> 将变量分配给一台机器,每个Child的最大请求数 |
| spine02: |
| ansible_host: 192.168.1.12 |
| http_port: 443 |
| vars: ===> 主机组中的变量 |
| ansible_user: my_server_user |
将变量分配给多台机器(分组变量)
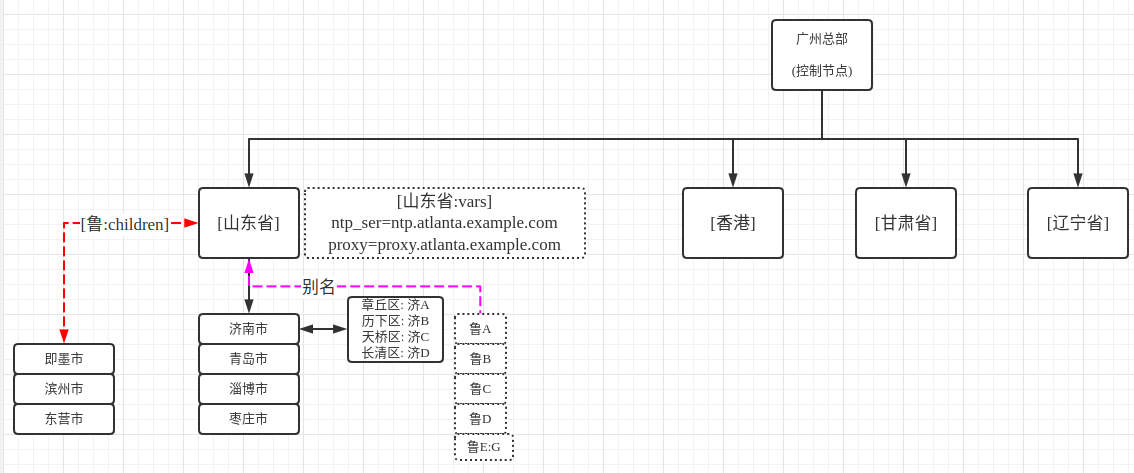
| (1)如组中的所有主机共享一个变量值,则可一次将该变量应用于整个组。在INI中 |
| [root@node1 ~]# vim /etc/ansible/hosts |
| [atlanta] |
| host1 |
| host2 |
| |
| [atlanta:vars] |
| ntp_server=ntp.atlanta.example.com |
| proxy=proxy.atlanta.example.com |
| |
| [southeast:children] ==> 继承 |
| atlanta |
| raleigh |
| |
| [southeast:vars] |
| some_server=foo.southeast.example.com |
| halon_system_timeout=30 |
| self_destruct_countdown=60 |
| escape_pods=2 |
| |
| [usa:children] |
| southeast |
| northeast ==> 后3个是说明,是示例 |
| southwest |
| northwest |
| |
| |
| (2)如组中的所有主机共享一个变量值,则可一次将该变量应用于整个组。在yml中 |
| [root@node1 ~]# vim /etc/ansible/hosts |
| atlanta: |
| hosts: |
| host1: |
| host2: |
| vars: |
| ntp_server: ntp.atlanta.example.com |
| proxy: proxy.atlanta.example.com |
继承
| all: |
| children: |
| usa: |
| children: |
| southeast: |
| children: |
| atlanta: |
| hosts: |
| host1: |
| host2: |
| raleigh: |
| hosts: |
| host2: |
| host3: |
| vars: |
| some_server: foo.southeast.example.com |
| halon_system_timeout: 30 |
| self_destruct_countdown: 60 |
| escape_pods: 2 |
| northeast: ==> 后3个是说明,是示例 |
| northwest: |
| southwest: |
| |
| 注:子组的变量将具有更高的优先级(覆盖)父组的变量 |
组织主机和组变量
| 如您按数据中心对清单中的主机进行分组,并且每个数据中心使用自己的 NTP 服务器和数据库服务器,可创建一个名为/etc/ansible/group_vars/raleigh的文件来存储raleigh组的变量: |
| vim /etc/ansible/group_vars/raleigh |
| --- |
| ntp_server: acme.example.org |
| database_server: storage.example.org |
| |
| |
| |
| |
ad-doc命令行方式将尽可能减少讲解,这里主要讲解playbook
ad-doc官方示例
官方playbook示例
异步操作和轮询
| 查看所有事实: |
| $ ansible localhost -m setup |
| |
| |
| # 异步剧本任务,避免连接超时:poll > 0 |
| 为playbook中的某个任务设置更长的超时限制,async设置最多等待时间,poll设置每多少秒轮询一次 |
| Ansible仍会阻止playbook中的下一个任务,等待异步任务完成、失败或超时。 |
| 但只有在超过您使用async参数设置的超时限制时,该任务才会超时。 |
| 默认轮询值由DEFAULT_POLL_INTERVAL设置。异步时间限制没有默认值。如果你不使用 'async' 关键字,任务会同步运行,这是 Ansible 的默认设置。 |
| [root@node1 ~]# vim opop.yml |
| --- |
| - hosts: all |
| remote_user: root |
| tasks: |
| - name: 模拟长时间运行的操作(15秒),最多等待45秒,每5秒轮询一次 |
| command: /usr/bin/echo 123 |
| async: 45 |
| poll: 5 |
| |
| [root@node1 ~]# ansible-playbook opop.yml |
| |
| |
| |
| # 剧本执行格式 |
| [root@node1 ~]# ansible-playbook -i /path/to/my_inventory_file -u zhangsan -k /path/to/my_ssh_key -f 3 -T 30 -t my_tag -m /path/to/my_modules -b -K my_playbook.yml |
| |
| 各选项释义: |
| -i - 在为inventory提供的路径中使用 my_inventory_file 以匹配模式 |
| -u - 以zhangsan用户身份通过SSH连接 |
| -k - 在为SSH用户身份验证提供的路径中使用 my_ssh_key(如不指定my_ssh_key则会询问连接密码) |
| -f - 指定要使用的并行进程数,默认为5 |
| -T - 设置 30 秒超时 |
| -t - 仅运行标有标签 my_tag 的任务 |
| -m - 从 /path/to/my/modules 加载本地模块 |
| -b - 以提升的权限执行(使用成为) |
| -K - 提示用户输入提权的密码 |
| |
ansible变量
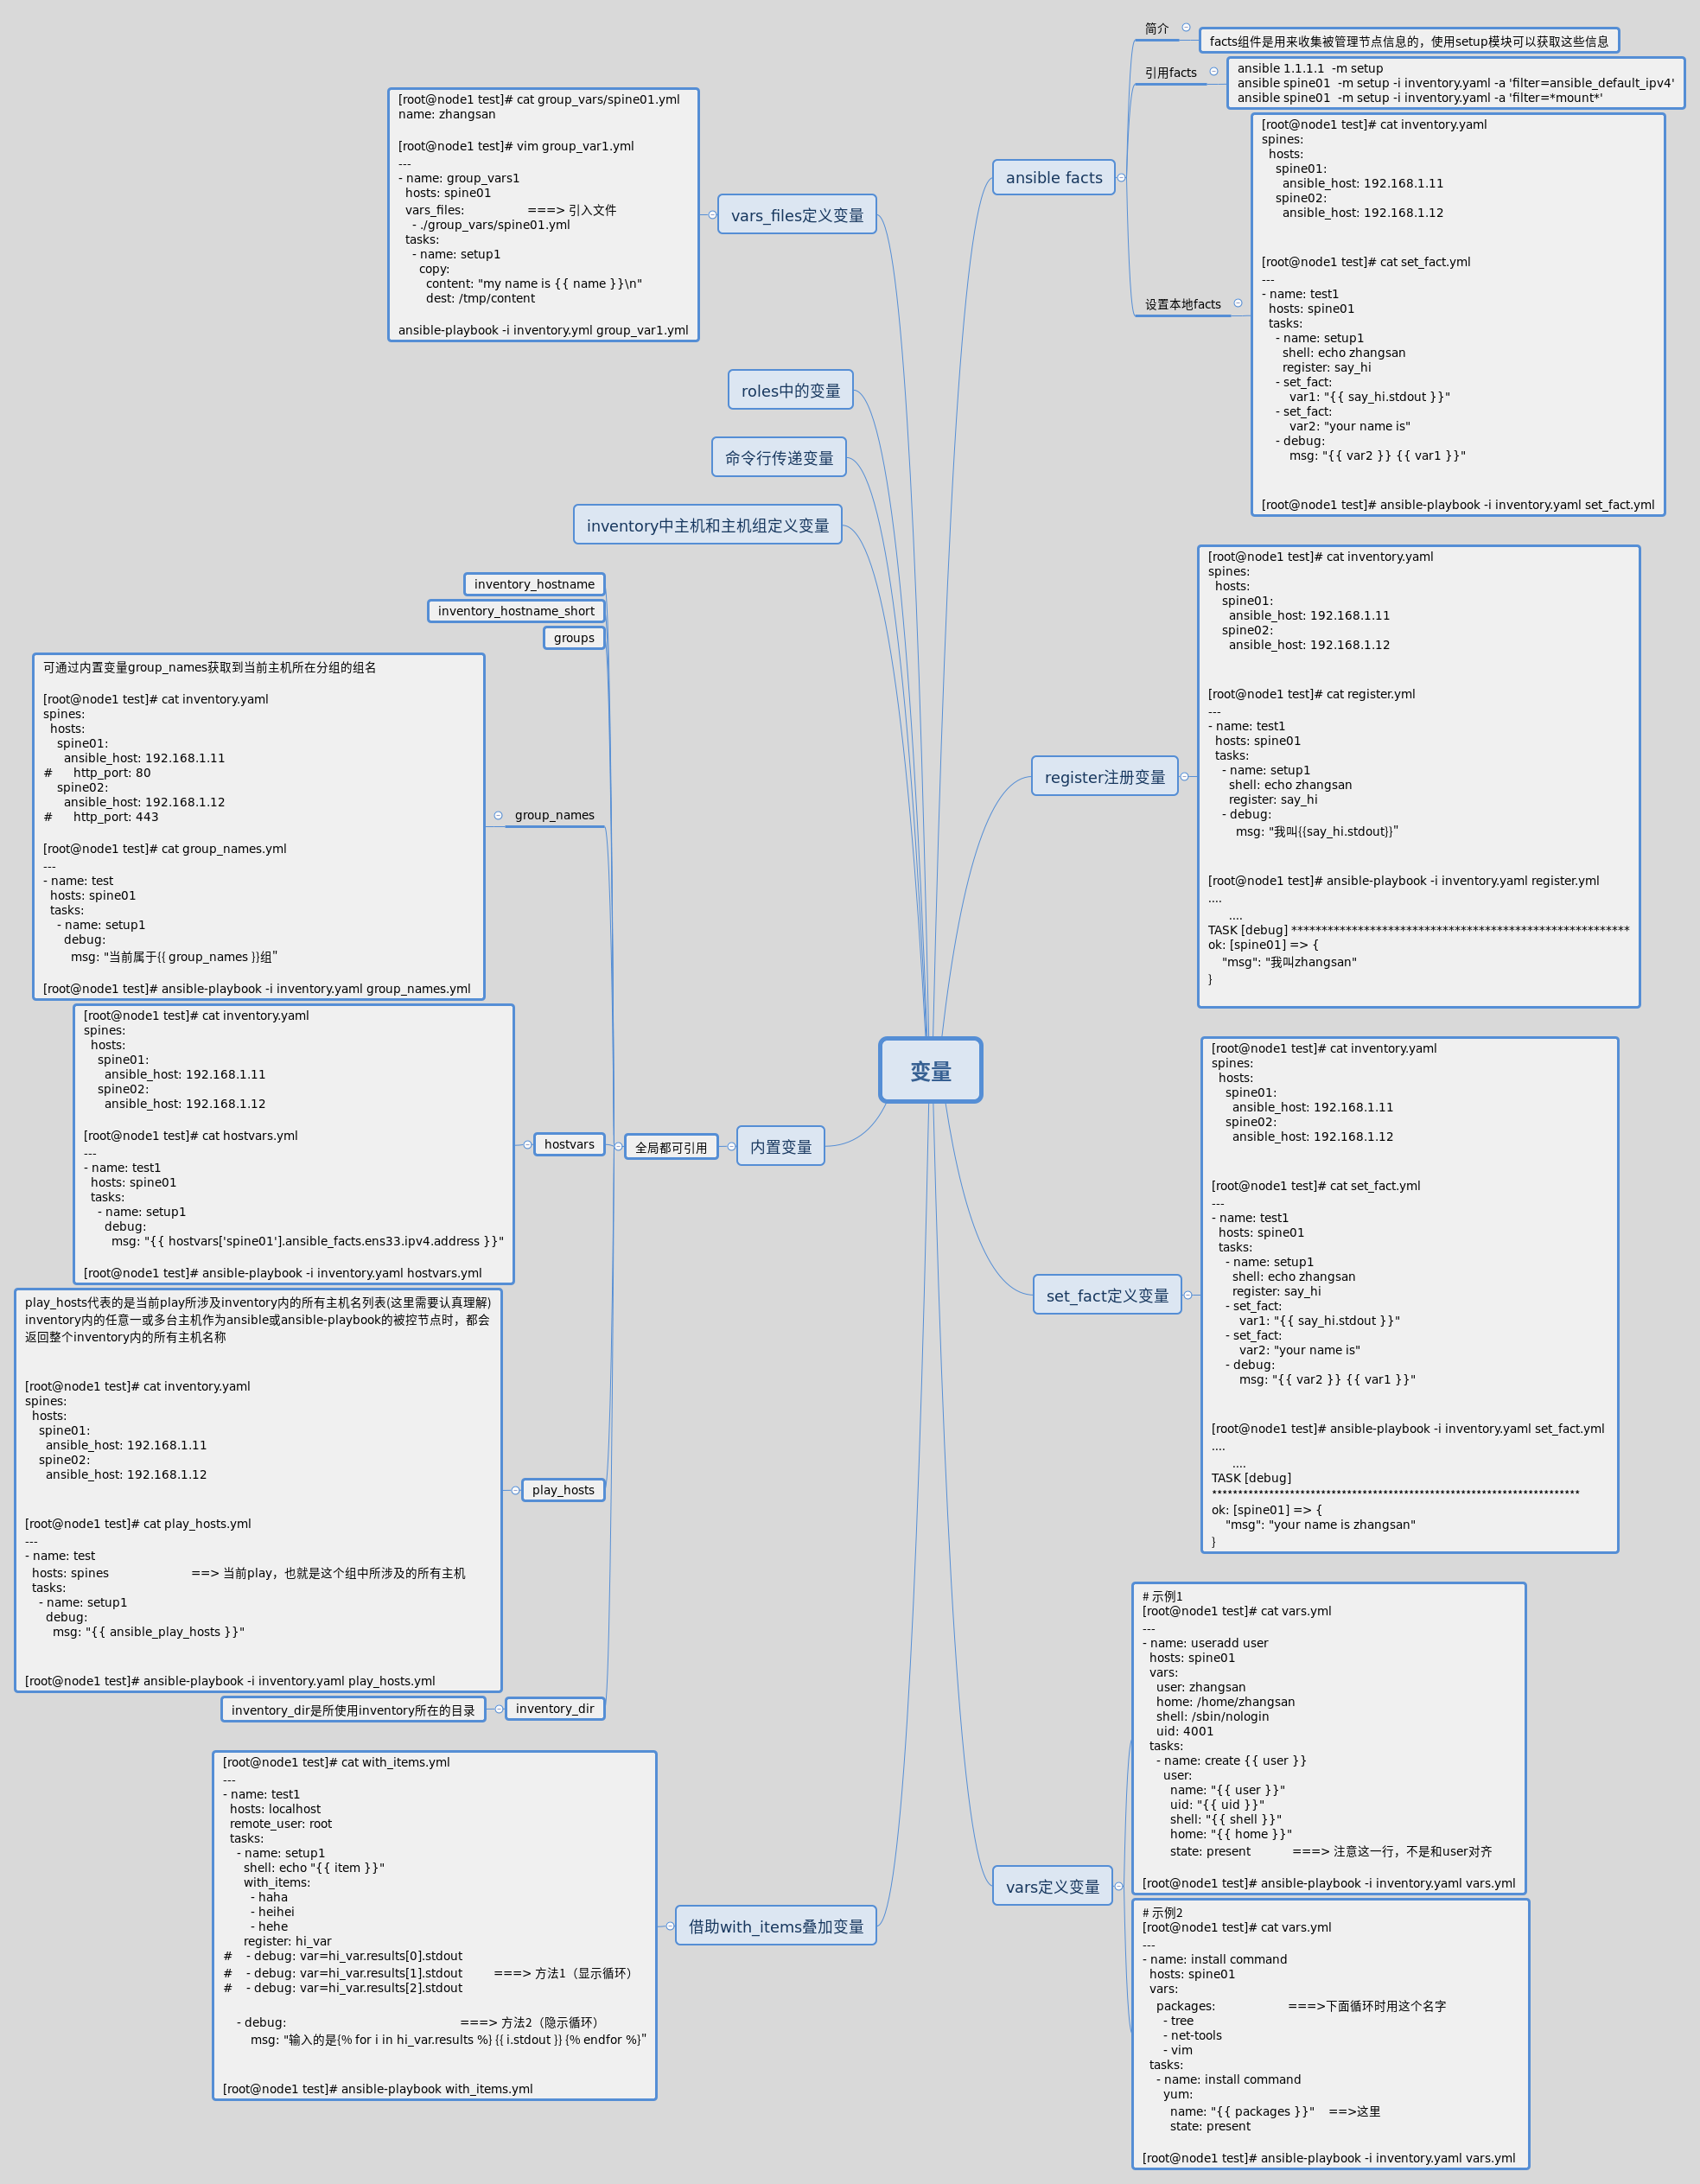
待续未完,有时间就写点


【推荐】国内首个AI IDE,深度理解中文开发场景,立即下载体验Trae
【推荐】编程新体验,更懂你的AI,立即体验豆包MarsCode编程助手
【推荐】抖音旗下AI助手豆包,你的智能百科全书,全免费不限次数
【推荐】轻量又高性能的 SSH 工具 IShell:AI 加持,快人一步
· winform 绘制太阳,地球,月球 运作规律
· AI与.NET技术实操系列(五):向量存储与相似性搜索在 .NET 中的实现
· 超详细:普通电脑也行Windows部署deepseek R1训练数据并当服务器共享给他人
· 上周热点回顾(3.3-3.9)
· AI 智能体引爆开源社区「GitHub 热点速览」