

nps 内网穿透
如该文章有没有讲明的地方,需自行查看查看 官网
nps简介
背景
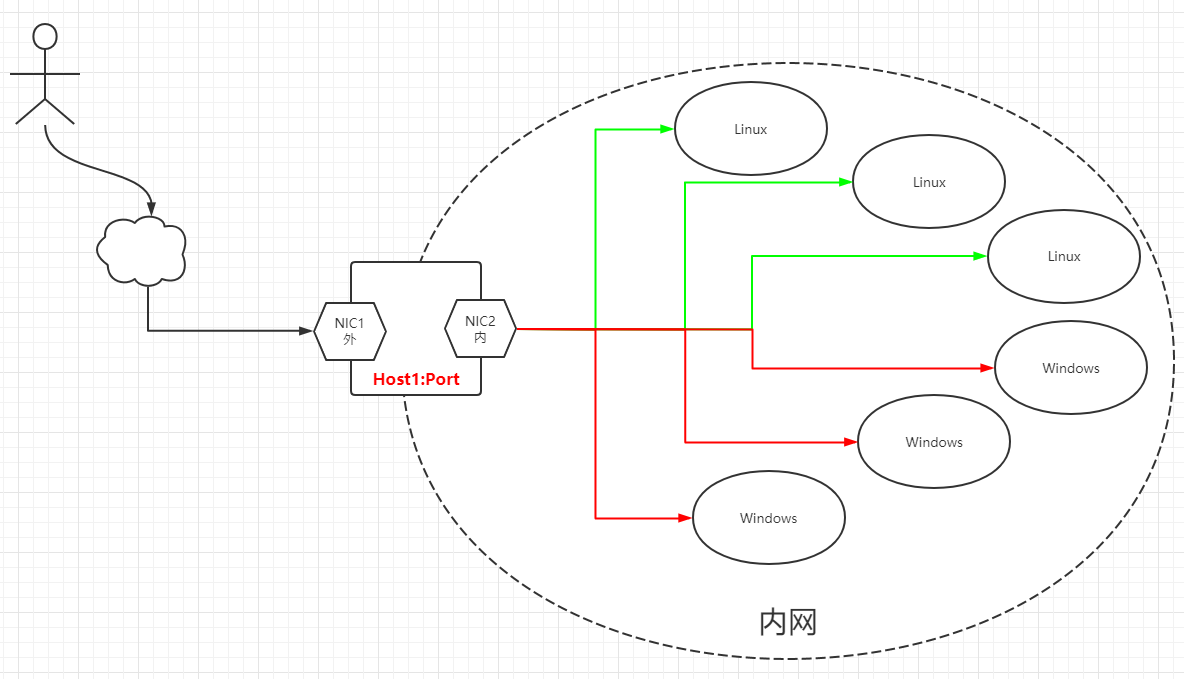
nps是一款轻量级、高性能、功能强大的内网穿透代理服务器。目前支持tcp、udp流量转发,可支持任何tcp、udp上层协议(访问内网网站、本地支付接口调试、ssh访问、远程桌面,内网dns解析等等……),此外还支持内网http代理、内网socks5代理、p2p等,并带有功能强大的web管理端。 1、做微信公众号开发、小程序开发等----> 域名代理模式 2、想在外网通过ssh连接内网的机器,做云服务器到内网服务器端口的映射,----> tcp代理模式 3、在非内网环境下使用内网dns,或者需要通过udp访问内网机器等----> udp代理模式 4、在外网使用HTTP代理访问内网站点----> http代理模式 5、搭建一个内网穿透ss,在外网如同使用内网vpn一样访问内网资源或者设备----> socks5代理模式
端口、密码和IP说明
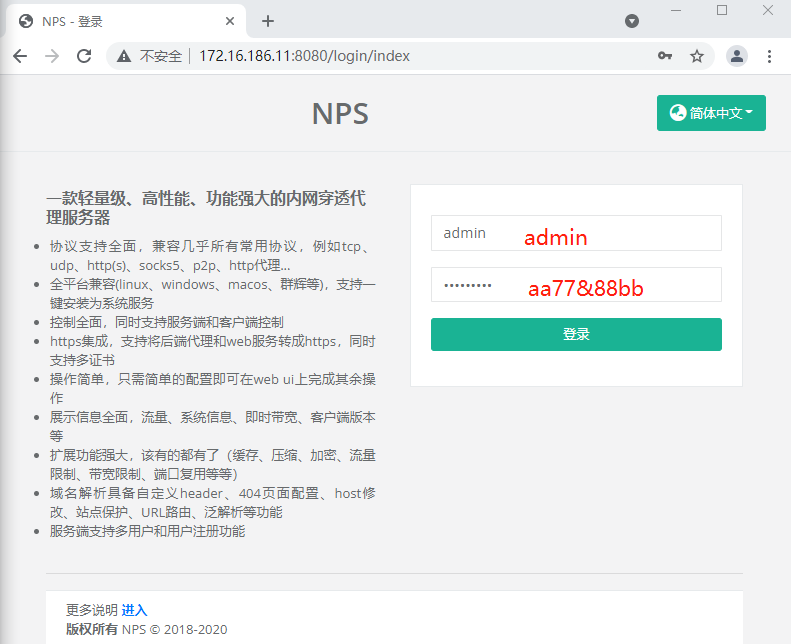
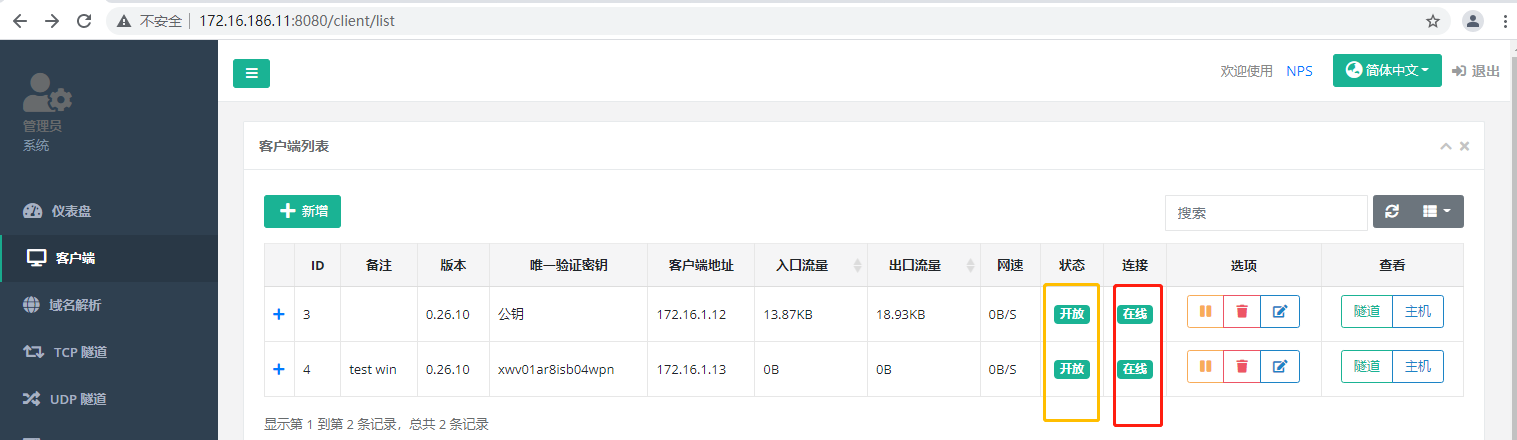
假设公网服务器ip为172.16.186.11 nps默认配置文件使用80,443,8080,8024端口 80和443端口用于主机模式默认端口 8080为web管理访问端口,web登陆账密默认为admin/nps.conf中的web_password项定义 8024为网桥端口,用于服务器和客户端之间的通信 服务端IP 172.16.186.11/24(外)/node1 172.16.1.11/24(内)/node1 Linux客户端IP 172.16.1.12/24/nod2 Win客户端IP 172.16.1.13/24
服务端前期配置
1、关闭防火墙、SELinux [root@node1 ~]# systemctl stop firewalld && systemctl disable firewalld [root@node1 ~]# sed -i "s/SELINUX=enforcing/SELINUX=disabled/" /etc/selinux/config [root@node1 ~]# setenforce 0 2、时间同步 [root@node1 ~]# vim /etc/chrony.conf #server 0.centos.pool.ntp.org iburst #server 1.centos.pool.ntp.org iburst #server 2.centos.pool.ntp.org iburst #server 3.centos.pool.ntp.org iburst server ntp.aliyun.com iburst [root@node1 ~]# systemctl restart chronyd && systemctl enable chronyd [root@node1 ~]# chronyc sources 3、配置IP [root@node1 ~]# cd /etc/sysconfig/network-scripts/ # 配置外网IP [root@node1 network-scripts]# vim ifcfg-ens33 TYPE="Ethernet" BOOTPROTO="none" NAME="ens33" DEVICE="ens33" ONBOOT="yes" IPADDR="172.16.186.11" ===> 外网IP PREFIX="24" GATEWAY="172.16.186.2" DNS1="172.16.186.2" # 配置内网IP [root@node1 network-scripts]# cp ifcfg-ens33 ifcfg-ens36 [root@node1 network-scripts]# vim ifcfg-ens36 TYPE="Ethernet" BOOTPROTO="static" NAME="ens36" DEVICE="ens36" ONBOOT="yes" IPADDR="172.16.1.11" ===> 内网地址 PREFIX="24" [root@node1 network-scripts]# systemctl stop NetworkManager && systemctl disable NetworkManager [root@node1 network-scripts]# systemctl restart network [root@node1 network-scripts]# ip a
服务端搭建
如下载时出现访问异常,可在有互联网的机器上打开https://www.ipaddress.com、然后输入github.com,找到对应的IP,将其写到hosts文件中
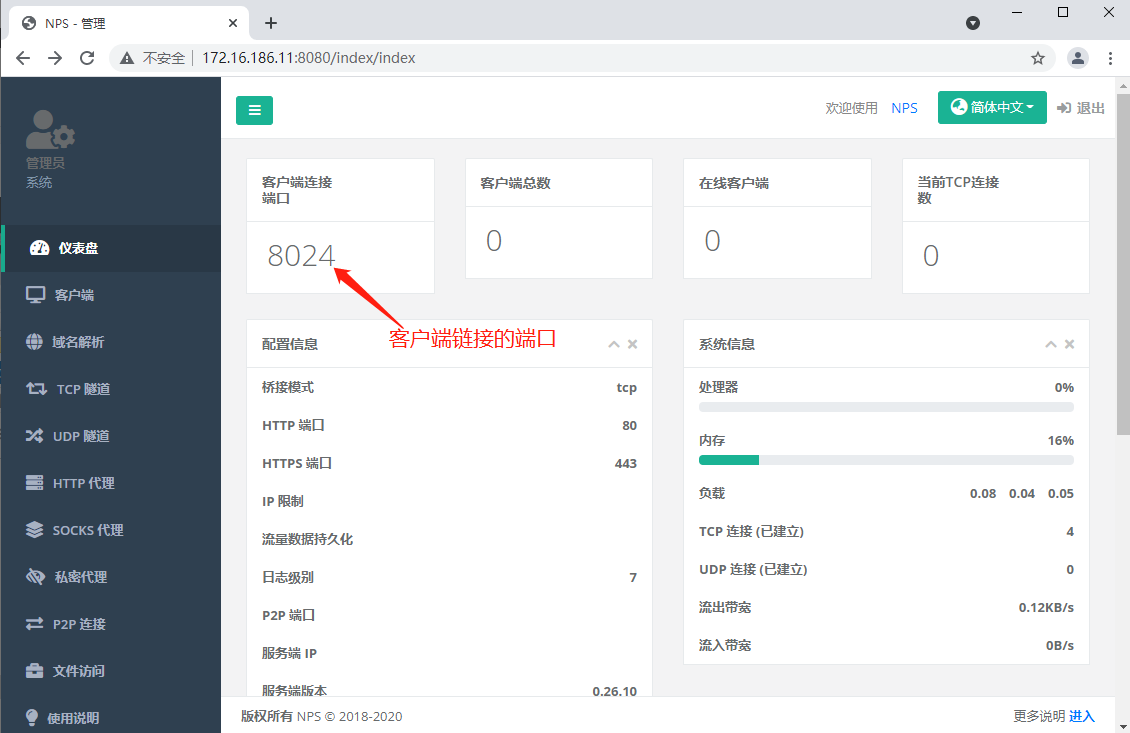
[root@node1 ~]# mkdir nps && cd nps [root@node1 nps]# wget https://github.com/ehang-io/nps/releases/download/v0.26.10/linux_amd64_server.tar.gz [root@node1 np]# tar -zxvf linux_amd64_server.tar.gz [root@node1 np]# vim conf/nps.conf appname = nps #Boot mode(dev|pro) runmode = dev #HTTP(S) proxy port, no startup if empty http_proxy_ip=0.0.0.0 http_proxy_port=80 ===> 80、443用于主机模式默认端口 https_proxy_port=443 https_just_proxy=true #default https certificate setting https_default_cert_file=conf/server.pem https_default_key_file=conf/server.key ##bridge bridge_type=tcp ===> 服务端类型 bridge_port=8024 ===> 8024为网桥端口,用于服务端和客户端之间的通信链接端口 bridge_ip=0.0.0.0 public_vkey=8rehr93fwurfj04j ===> 客户端连接服务端认证使用,是客户端连接服务端的密钥 log_level=7 web_host=a.o.com ===> 服务端web的地址/域名 web_username=admin ===> 服务端web的登陆名 web_password=aa77&88bb ===> 服务端web的登陆密码 web_port = 8080 ===> 8080是web管理访问端口 web_ip=0.0.0.0 web_base_url= ===> 可设置web路径,eg:web_base_url=/nps web_open_ssl=false ===> 服务端是否开启https web_cert_file=conf/server.pem web_key_file=conf/server.key auth_crypt_key =1234567812345678 ===> web api认证ip密钥,可改但必须16位 #allow_ports=9001-9009,10001,11000-12000 ===> 字面意思 #Web management multi-user login allow_user_login=false allow_user_register=false allow_user_change_username=false #extension allow_flow_limit=false allow_rate_limit=false allow_tunnel_num_limit=false allow_local_proxy=false allow_connection_num_limit=false allow_multi_ip=false system_info_display=false #cache http_cache=false http_cache_length=100 #get origin ip http_add_origin_header=true ===> 默认为false #pprof debug options #pprof_ip=0.0.0.0 #pprof_port=9999 #client disconnect timeout(客户端断开超时时间) disconnect_timeout=60 安装并启动 执行完下述命令后会把当前的配置文件和web静态文件拷贝到/etc/nps下,以后修改配置文件直接修改 /etc/nps/conf/nps.conf [root@node1 nps]# ./nps install 2021/08/03 21:41:13 copy file ::/root/nps/conf/clients.json to /etc/nps/conf/clients.json 2021/08/03 21:41:13 copy file ::/root/nps/conf/hosts.json to /etc/nps/conf/hosts.json 2021/08/03 21:41:13 copy file ::/root/nps/conf/nps.conf to /etc/nps/conf/nps.conf 2021/08/03 21:41:13 copy file ::/root/nps/conf/server.key to /etc/nps/conf/server.key 2021/08/03 21:41:13 copy file ::/root/nps/conf/server.pem to /etc/nps/conf/server.pem 2021/08/03 21:41:13 copy file ::/root/nps/conf/tasks.json to /etc/nps/conf/tasks.json 2021/08/03 21:41:13 copy file ::/root/nps/web/views/client/add.html to /etc/nps/web/views/client/add.html 2021/08/03 21:41:13 mkdir:/etc/nps/web/views/client/ 2021/08/03 21:41:13 copy file ::/root/nps/web/views/client/edit.html to /etc/nps/web/views/client/edit.html 2021/08/03 21:41:13 copy file ::/root/nps/web/views/client/list.html to /etc/nps/web/views/client/list.html 2021/08/03 21:41:13 copy file ::/root/nps/web/views/index/add.html to /etc/nps/web/views/index/add.html 2021/08/03 21:41:13 mkdir:/etc/nps/web/views/index/ 2021/08/03 21:41:13 copy file ::/root/nps/web/views/index/edit.html to /etc/nps/web/views/index/edit.html 2021/08/03 21:41:13 copy file ::/root/nps/web/views/index/hadd.html to /etc/nps/web/views/index/hadd.html 2021/08/03 21:41:13 copy file ::/root/nps/web/views/index/hedit.html to /etc/nps/web/views/index/hedit.html 2021/08/03 21:41:13 copy file ::/root/nps/web/views/index/help.html to /etc/nps/web/views/index/help.html 2021/08/03 21:41:13 copy file ::/root/nps/web/views/index/hlist.html to /etc/nps/web/views/index/hlist.html 2021/08/03 21:41:13 copy file ::/root/nps/web/views/index/index.html to /etc/nps/web/views/index/index.html 2021/08/03 21:41:13 copy file ::/root/nps/web/views/index/list.html to /etc/nps/web/views/index/list.html 2021/08/03 21:41:13 copy file ::/root/nps/web/views/login/index.html to /etc/nps/web/views/login/index.html 2021/08/03 21:41:13 mkdir:/etc/nps/web/views/login/ 2021/08/03 21:41:13 copy file ::/root/nps/web/views/login/register.html to /etc/nps/web/views/login/register.html 2021/08/03 21:41:13 copy file ::/root/nps/web/views/public/error.html to /etc/nps/web/views/public/error.html 2021/08/03 21:41:13 mkdir:/etc/nps/web/views/public/ 2021/08/03 21:41:13 copy file ::/root/nps/web/views/public/layout.html to /etc/nps/web/views/public/layout.html 2021/08/03 21:41:13 copy file ::/root/nps/web/static/css/bootstrap-table.min.css to /etc/nps/web/static/css/bootstrap-table.min.css 2021/08/03 21:41:13 mkdir:/etc/nps/web/static/css/ 2021/08/03 21:41:13 copy file ::/root/nps/web/static/css/bootstrap.min.css to /etc/nps/web/static/css/bootstrap.min.css 2021/08/03 21:41:13 copy file ::/root/nps/web/static/css/datatables.css to /etc/nps/web/static/css/datatables.css 2021/08/03 21:41:13 copy file ::/root/nps/web/static/css/fontawesome.min.css to /etc/nps/web/static/css/fontawesome.min.css 2021/08/03 21:41:13 copy file ::/root/nps/web/static/css/regular.min.css to /etc/nps/web/static/css/regular.min.css 2021/08/03 21:41:13 copy file ::/root/nps/web/static/css/solid.min.css to /etc/nps/web/static/css/solid.min.css 2021/08/03 21:41:13 copy file ::/root/nps/web/static/css/style.css to /etc/nps/web/static/css/style.css 2021/08/03 21:41:13 copy file ::/root/nps/web/static/img/flag/en-US.png to /etc/nps/web/static/img/flag/en-US.png 2021/08/03 21:41:13 mkdir:/etc/nps/web/static/img/ 2021/08/03 21:41:13 mkdir:/etc/nps/web/static/img/flag/ 2021/08/03 21:41:13 copy file ::/root/nps/web/static/img/flag/zh-CN.png to /etc/nps/web/static/img/flag/zh-CN.png 2021/08/03 21:41:13 copy file ::/root/nps/web/static/js/bootstrap-table-locale-all.min.js to /etc/nps/web/static/js/bootstrap-table-locale-all.min.js 2021/08/03 21:41:13 mkdir:/etc/nps/web/static/js/ 2021/08/03 21:41:13 copy file ::/root/nps/web/static/js/bootstrap-table.min.js to /etc/nps/web/static/js/bootstrap-table.min.js 2021/08/03 21:41:13 copy file ::/root/nps/web/static/js/bootstrap.min.js to /etc/nps/web/static/js/bootstrap.min.js 2021/08/03 21:41:13 copy file ::/root/nps/web/static/js/echarts.min.js to /etc/nps/web/static/js/echarts.min.js 2021/08/03 21:41:13 copy file ::/root/nps/web/static/js/fontawesome.min.js to /etc/nps/web/static/js/fontawesome.min.js 2021/08/03 21:41:13 copy file ::/root/nps/web/static/js/inspinia.js to /etc/nps/web/static/js/inspinia.js 2021/08/03 21:41:13 copy file ::/root/nps/web/static/js/jquery-3.4.1.min.js to /etc/nps/web/static/js/jquery-3.4.1.min.js 2021/08/03 21:41:13 copy file ::/root/nps/web/static/js/language.js to /etc/nps/web/static/js/language.js 2021/08/03 21:41:13 copy file ::/root/nps/web/static/js/popper.min.js to /etc/nps/web/static/js/popper.min.js 2021/08/03 21:41:13 copy file ::/root/nps/web/static/page/error.html to /etc/nps/web/static/page/error.html 2021/08/03 21:41:13 mkdir:/etc/nps/web/static/page/ 2021/08/03 21:41:13 copy file ::/root/nps/web/static/page/languages.xml to /etc/nps/web/static/page/languages.xml 2021/08/03 21:41:13 copy file ::/root/nps/web/static/webfonts/fa-solid-900.eot to /etc/nps/web/static/webfonts/fa-solid-900.eot 2021/08/03 21:41:13 mkdir:/etc/nps/web/static/webfonts/ 2021/08/03 21:41:13 copy file ::/root/nps/web/static/webfonts/fa-solid-900.svg to /etc/nps/web/static/webfonts/fa-solid-900.svg 2021/08/03 21:41:13 copy file ::/root/nps/web/static/webfonts/fa-solid-900.ttf to /etc/nps/web/static/webfonts/fa-solid-900.ttf 2021/08/03 21:41:13 copy file ::/root/nps/web/static/webfonts/fa-solid-900.woff to /etc/nps/web/static/webfonts/fa-solid-900.woff 2021/08/03 21:41:13 copy file ::/root/nps/web/static/webfonts/fa-solid-900.woff2 to /etc/nps/web/static/webfonts/fa-solid-900.woff2 2021/08/03 21:41:13 install ok! 2021/08/03 21:41:13 Static files and configuration files in the current directory will be useless 2021/08/03 21:41:13 The new configuration file is located in /etc/nps you can edit them 2021/08/03 21:41:13 You can start with: nps start|stop|restart|uninstall|update or nps-update update anywhere! 启动nps服务端服务 [root@node1 nps]# ./nps start [root@node1 nps]# netstat -anpt | egrep '(8080|8024)' tcp6 0 0 :::8080 :::* LISTEN 11369/nps tcp6 0 0 :::8024 :::* LISTEN 11369/nps
浏览器登陆
客户端(Linux)配置并启动
这里在服务端上把Linux端的安装包下载下来,然后发送到Linux客户端
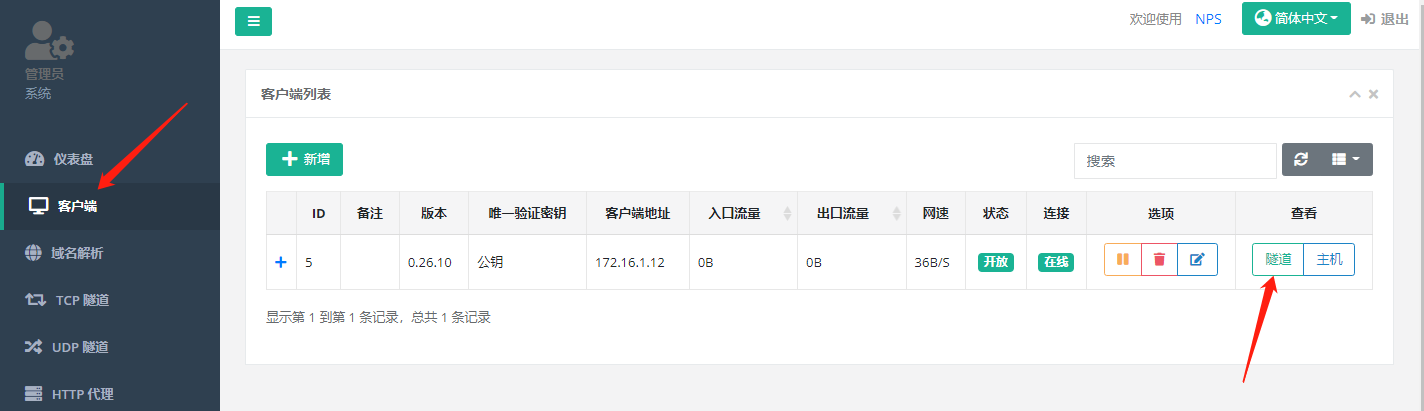
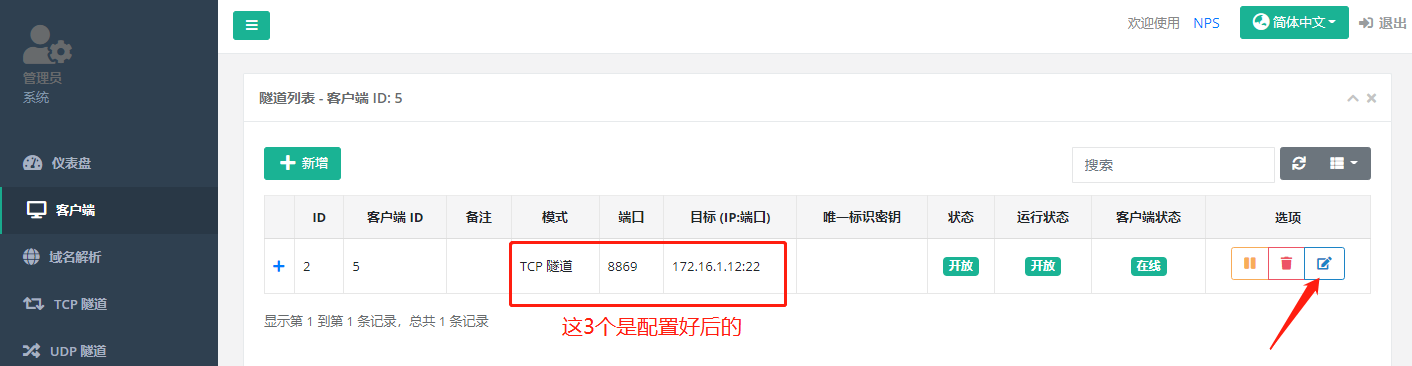
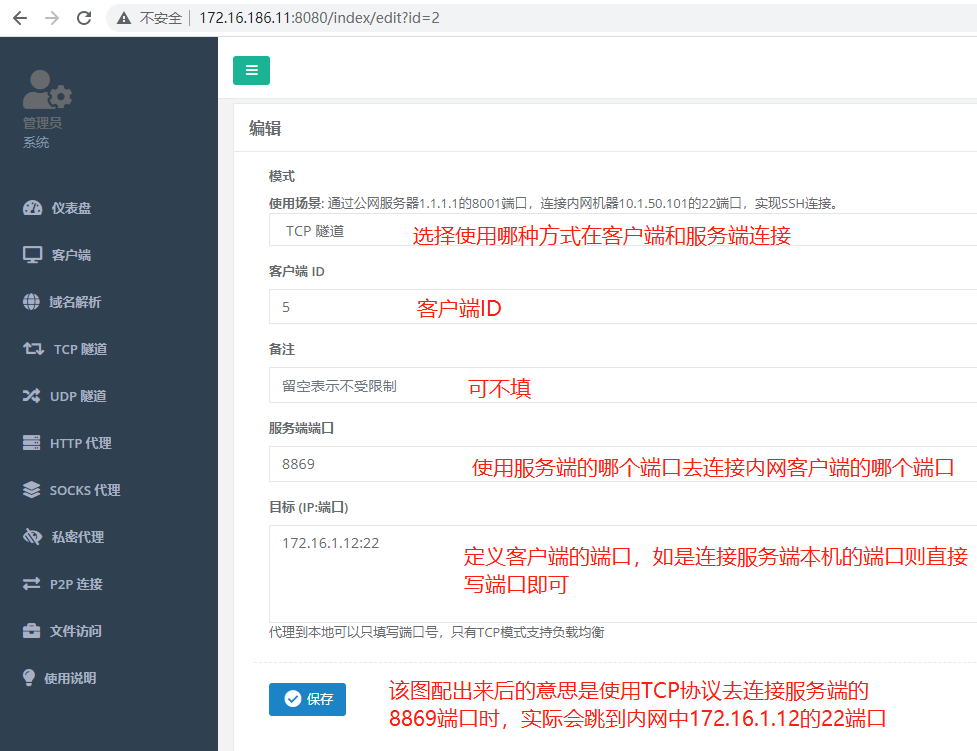
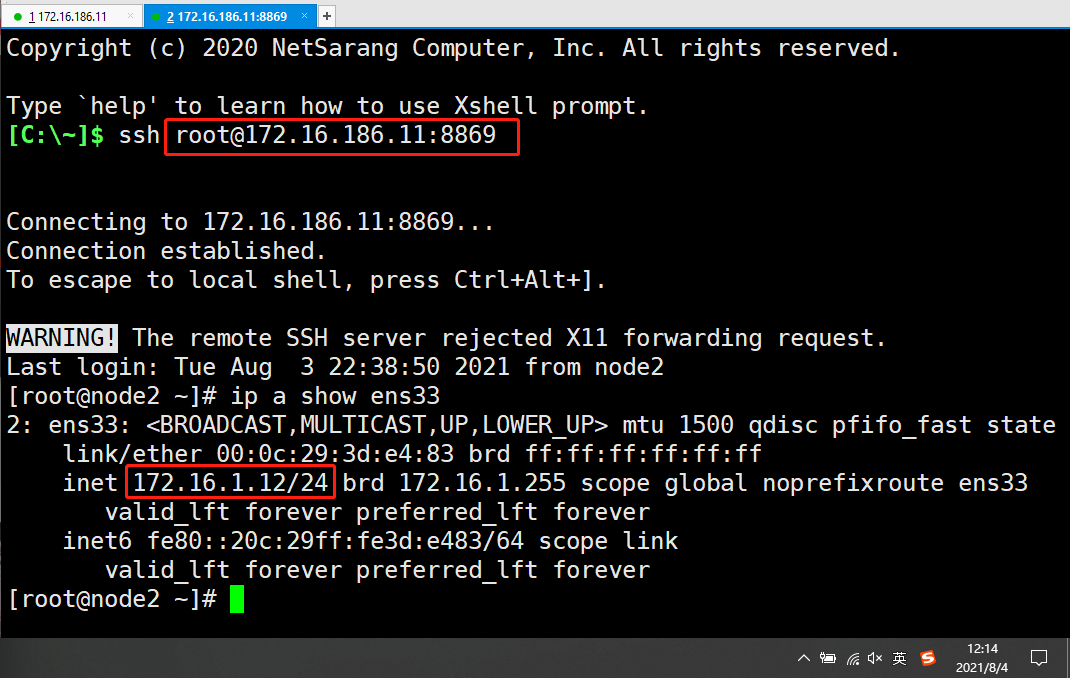
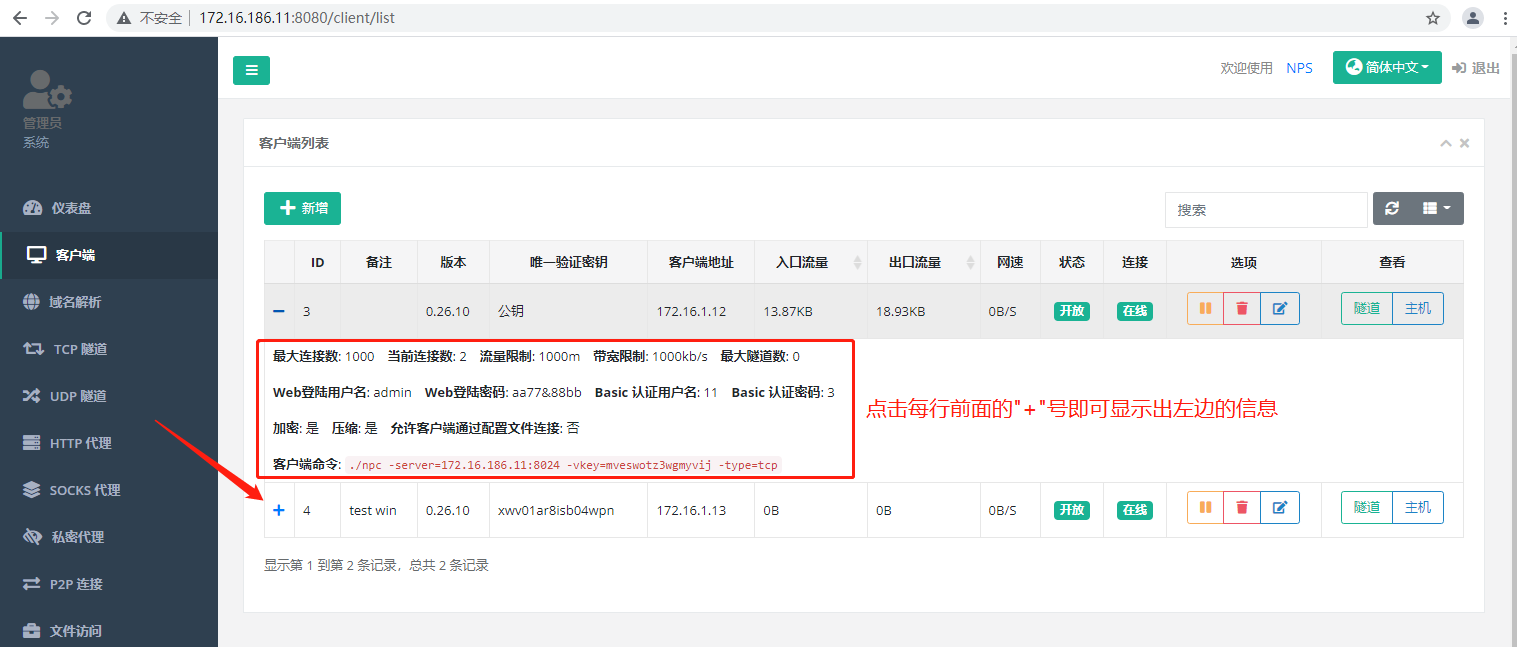
# 服务端下载客户端安装包 [root@node1 nps]# wget https://github.com/ehang-io/nps/releases/download/v0.26.10/linux_amd64_client.tar.gz win:https://github.com/ehang-io/nps/releases/download/v0.26.10/windows_amd64_client.tar.gz [root@node1 nps]# scp linux_amd64_client.tar.gz root@172.16.1.12:~ # 来到客户端进行安装 [root@node2 ~]# tar -zxvf linux_amd64_client.tar.gz [root@node2 ~]# cp conf/npc.conf{,.bak} [root@node2 ~]# vim conf/npc.conf [common] server_addr=172.16.1.11:8024 ===> 8024为网桥端口(供服务器和客户端间通信) conn_type=tcp ===> 服务器和客户端间通信使用的协议 vkey=8rehr93fwurfj04j ===> 和服务端nps.conf中public_vkey项对应 auto_reconnection=true ===> 断开后是否重新连接 max_conn=1000 ===> 最大连接数 flow_limit=1000 ===> 流量限制 rate_limit=1000 ===> 速率限制 basic_username=11 ===> server配置的basic用户名和web_username,用于http、socks5代理认证 basic_password=3 web_username=admin ===> 关于web的这两项要和服务端中nps.conf中对应 web_password=aa77&88bb crypt=true ===> 是否加密传输 compress=true ===> 是否压缩传输 disconnect_timeout=120 ===> 断开连接超时时间 # 注:其他的都删除,只留 [common] 段里面的项 客户端启动nps [root@node2 ~]# ./npc 或者 nohup ./npc >> nps.log & 2021/08/03 22:29:55.352 [I] [npc.go:231] the version of client is 0.26.10, the core version of client is 0.26.0 2021/08/03 22:29:55.352 [I] [control.go:97] Loading configuration file conf/npc.conf successfully 2021/08/03 22:29:55.358 [N] [control.go:176] web access login username:admin password:aa77&88bb 2021/08/03 22:29:55.360 [I] [client.go:72] Successful connection with server 172.16.1.11:8024 [root@node2 ~]# netstat -anpt | egrep '(sshd | *npc)' tcp 0 0 0.0.0.0:22 0.0.0.0:* LISTEN 964/sshd tcp 0 0 172.16.1.12:42590 172.16.1.11:8024 ESTABLISHED 2341/./npc tcp 0 0 172.16.1.12:58046 172.16.1.12:22 ESTABLISHED 2341/./npc tcp 0 0 172.16.1.12:42588 172.16.1.11:8024 ESTABLISHED 2341/./npc tcp 0 0 172.16.1.12:58044 172.16.1.12:22 ESTABLISHED 2341/./npc tcp6 0 0 :::22 :::* LISTEN 964/sshd [root@node2 ~]# ll /proc/2341/exe lrwxrwxrwx. 1 root root 0 Aug 3 22:31 /proc/2341/exe -> /root/npc 在web页面上能看到node2连接的情况,但是现在仅限于在客户端和服务端建立了一个连接,但是你想通过服务端的哪个端口连接客户端的哪个端口等这些都未定义,下面进行定义
客户端(Windows)配置并启动
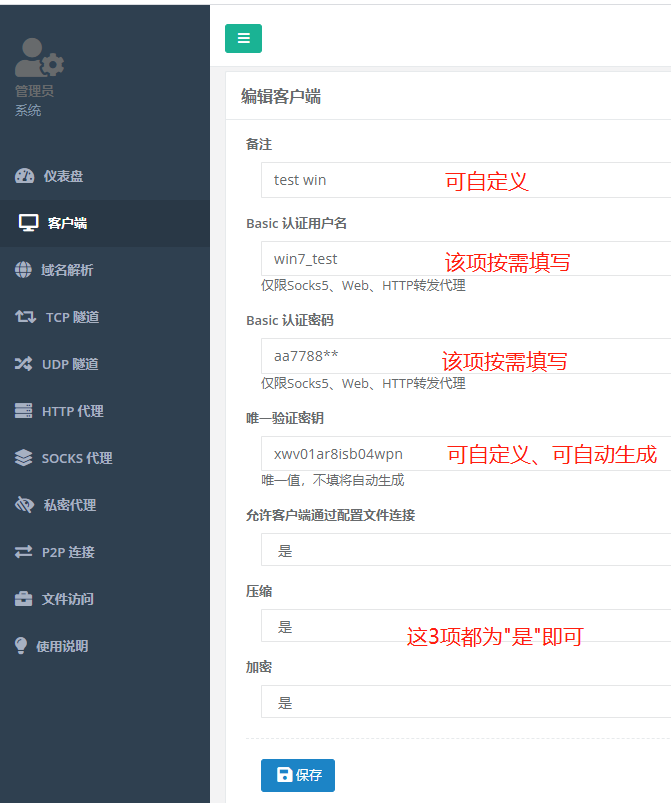
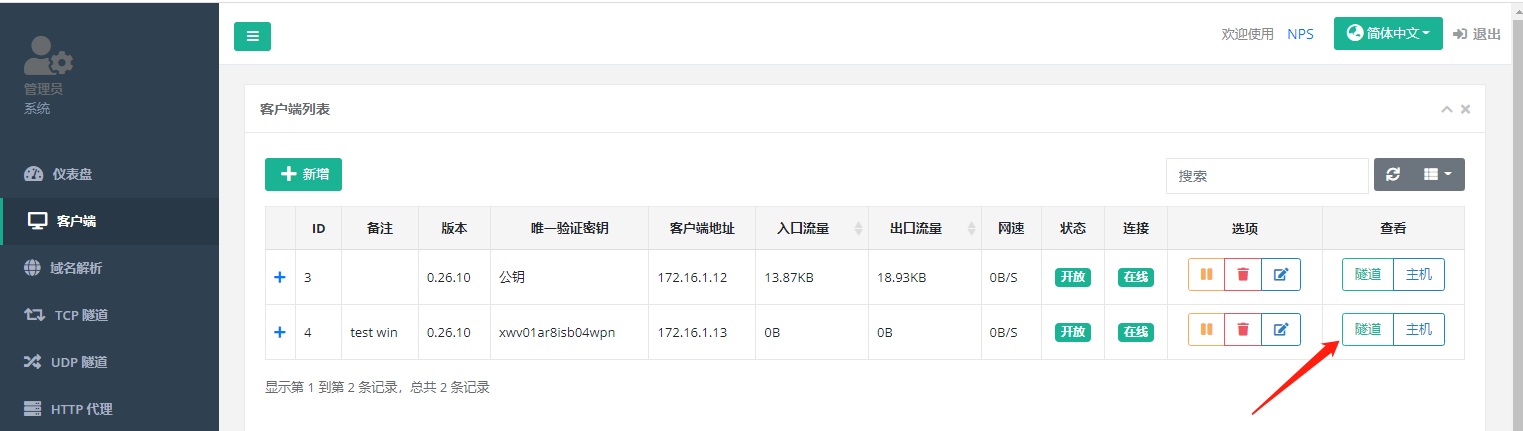
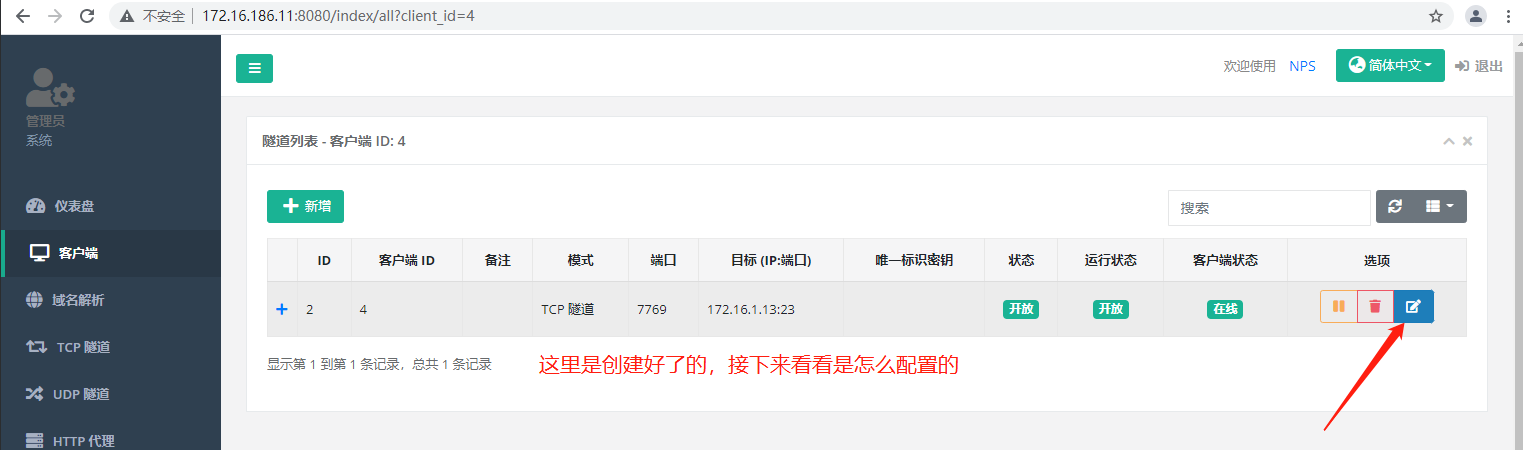
在web页面上创建第二台主机的配置,如下图

下图为上图中test win这台机的编辑 (垃圾桶右边的选项) 项打开后的画面
接下来在服务端上把Win端的安装包下载下来,然后使用http来供Win端下载
[root@node1 ~]# wget https://github.com/ehang-io/nps/releases/download/v0.26.10/windows_amd64_client.tar.gz 安装httpd [root@node1 ~]# yum -y install httpd 注:因为npc占用了80端口,所以需要改下httpd的端口后才能进行启动httpd [root@node1 ~]# systemctl status httpd .... .... Aug 04 00:16:20 node1 httpd[12726]: (98)Address already in use: AH00072: make_sock: could not bind to address [::]:80 Aug 04 00:16:20 node1 httpd[12726]: (98)Address already in use: AH00072: make_sock: could not bind to address 0.0.0.0:80 Aug 04 00:16:20 node1 httpd[12726]: no listening sockets available, shutting down [root@node1 ~]# netstat -anpt|grep -w :80 tcp6 0 0 :::80 :::* LISTEN 2549/nps 修改httpd端口 [root@node1 ~]# sed -i "s/Listen 80/Listen 808/" /etc/httpd/conf/httpd.conf 启动httpd [root@node1 ~]# systemctl restart httpd [root@node1 ~]# mv windows_amd64_client.tar.gz /var/www/html/ 在win客户端上从服务端上下载安装包 http://172.16.1.11/windows_amd64_client.tar.gz
在win端打开cmd输入下列命令
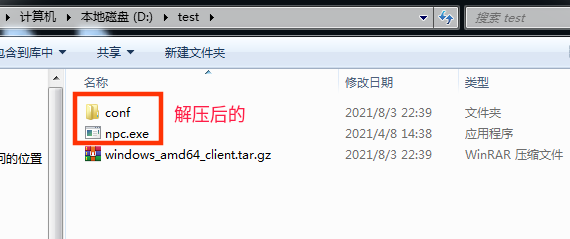
C:\Users\rambo>cd /d d:\test 使用Sublime Text打开npr.conf文件并进行修改,修改如下 [common] server_addr=172.16.1.11:8024 ===> 8024为网桥端口(供服务器和客户端间通信) conn_type=tcp ===> 服务器和客户端间通信使用的协议 vkey=xwv01ar8isb04wpn ===> 和web页面上创建主机时的"唯一验证秘钥"对应 auto_reconnection=true ===> 断开后是否重新连接 max_conn=1000 ===> 最大连接数 flow_limit=1000 ===> 流量限制 rate_limit=1000 ===> 速率限制 basic_username=11 ===> server配置的basic用户名和web_username,用于http、socks5代理认证 basic_password=3 web_username=admin ===> 关于web的这两项要和服务端中nps.conf中对应 web_password=aa77&88bb crypt=true ===> 是否加密传输 compress=true ===> 是否压缩传输 disconnect_timeout=120 ===> 断开连接超时时间 # 注:其他的都删除,只留 [common] 段里面的项 启动nps(方法1) 使用管理员运行cmd # cmd下进入d盘的test目录中 cd /d d:\test # 安装nps npc.exe install npc.exe start 方法2见下图
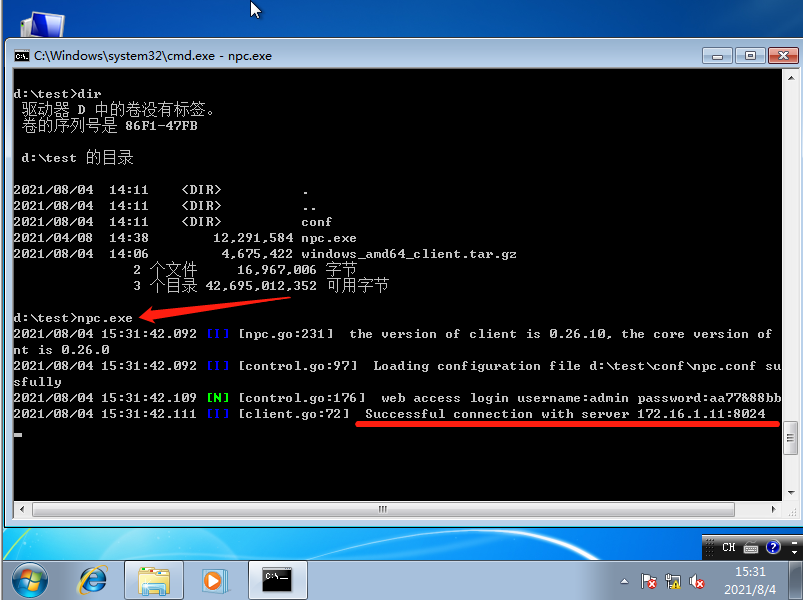
启动npc(方法3) d:\test>npc.exe -server=172.16.1.11:8024 -vkey=8rehr93fwurfj04j -type=tcp 注: 上面命令中的IP是服务端 IP 端口是服务端 nps.conf 中#bridge设置的桥接端口 -vkey有两种,一种是自动生成,一种是在服务端 nps.conf 中 public_vkey项自定义 该方法不使用文件进行启动
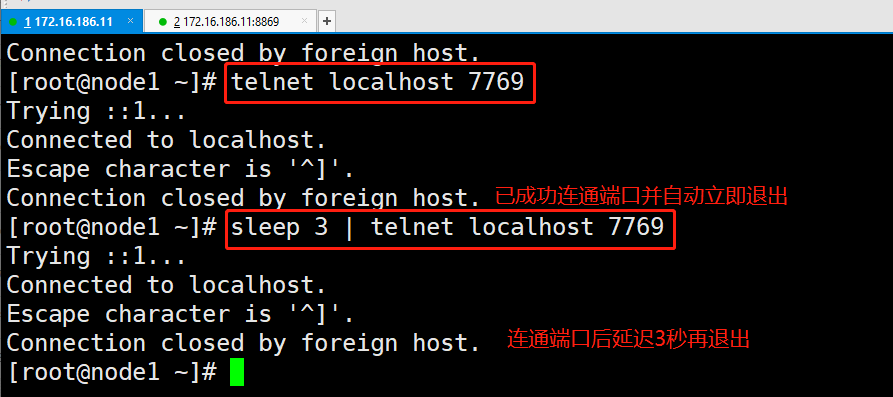
测试和服务端和win客户端间的连接

如不知道怎么在客户端启动可看下图
.
.
.
.
游走在各发行版间老司机QQ群:905201396
不要嫌啰嗦的新手QQ群:756805267
Debian适应QQ群:912567610


【推荐】国内首个AI IDE,深度理解中文开发场景,立即下载体验Trae
【推荐】编程新体验,更懂你的AI,立即体验豆包MarsCode编程助手
【推荐】抖音旗下AI助手豆包,你的智能百科全书,全免费不限次数
【推荐】轻量又高性能的 SSH 工具 IShell:AI 加持,快人一步
· 从 HTTP 原因短语缺失研究 HTTP/2 和 HTTP/3 的设计差异
· AI与.NET技术实操系列:向量存储与相似性搜索在 .NET 中的实现
· 基于Microsoft.Extensions.AI核心库实现RAG应用
· Linux系列:如何用heaptrack跟踪.NET程序的非托管内存泄露
· 开发者必知的日志记录最佳实践
· winform 绘制太阳,地球,月球 运作规律
· AI与.NET技术实操系列(五):向量存储与相似性搜索在 .NET 中的实现
· 超详细:普通电脑也行Windows部署deepseek R1训练数据并当服务器共享给他人
· 上周热点回顾(3.3-3.9)
· AI 智能体引爆开源社区「GitHub 热点速览」