webvirtmgr搭建及详解
#虚拟机版本
vmware workstation 15.5.0 pro (也就是linux版)
注:宿机需提前装好vnc
cat /etc/redhat-release
CentOS Linux release 7.4.1708 (Core)
uname -r
3.10.0-693.el7.x86_64
该文章讲解的是kvm和virtmgr在不同的服务器上部署,而非2个服务在同一台服务器上
|
|
IP |
网关 |
网络 |
主机名 |
CPU |
内存 |
硬盘 |
服务 |
镜像位置 |
|
Node |
192.168.1.133/24 |
192.168.1.1/24 |
桥接 |
node |
4核 |
6G |
100G |
kvm |
|
|
Master |
192.168.1.128/24 |
master |
2核 |
4G |
100G |
webvirtmgr |
/opop/CentOS-7-x86_64-DVD-1708.iso |
#检查是否支持虚拟机(node端执行)
egrep '(vmx|svm)' --color=always /proc/cpuinfo
lsmod |grep kvm
如无开启cpu支持vmx或svm,实体机需在bios中开启,虚拟机开启方法见下图:

右下角打上对号后开机即可
#关闭防火墙和SELinux(两端执行)
iptables -F && iptables-save
systemctl stop firewalld && systemctl disable firewalld
sed -i 's/SELINUX=enforcing/SELINUX=disabled/g' /etc/selinux/config
setenforce 0
systemctl disable NetworkManager
#安装kvm(node端执行)
yum -y install wget
mv /etc/yum.repos.d/CentOS-Base.repo{,.backup}
wget -O /CentOS-Base.repo http://mirrors.aliyun.com/repo/Centos-7.repo
cd /etc/yum.repos.d/; for i in `ls`;do mv $i{,.bak};done
mv /CentOS-Base.repo /etc/yum.repos.d/
yum -y install epel-release && yum clean all && yum makecache
yum -y install qemu-kvm qemu-img virt-manager libvirt libvirt-python libvirt-client virt-install virt-viewer
systemctl start libvirtd && systemctl enable libvirtd
# 查看libvitd服务的状态和开机启动
systemctl status libvirtd && systemctl is-enabled libvirtd
#配置桥接网络br0(node端执行)
vim /etc/sysconfig/network-scripts/ifcfg-br0 #新建该文件
DEVICE=br0
ONBOOT=yes
BOOTPROTO=none
IPADDR=192.168.1.133
GATEWAY=192.168.1.1
NETMASK=255.255.255.0
DNS1=192.168.1.1
NBOOT="yes"
TYPE="Bridge"
vim /etc/sysconfig/network-scripts/ifcfg-ens33
TYPE="Ethernet"
NAME="ens33"
DEVICE="ens33"
ONBOOT="yes"
BRIDGE=br0
ZONE=public
#开启转发功能并修改ulimit参数(Node端执行)
echo 1 > /proc/sys/net/ipv4/ip_forward
echo -e "*\tsoft\tnproc\t65500" >>/etc/security/limits.conf
echo -e "*\thard\tnproc\t65500" >>/etc/security/limits.conf
echo -e "*\tsoft\tnofile\t65500" >>/etc/security/limits.conf
echo -e "*\thard\tnofile\t65500" >>/etc/security/limits.conf
#重启服务器使网卡配置生效(重启网卡有时候不管用)
reboot
注:这里有一个误区,如果单独只是重启网卡的话ssh会断开且会有其他问题,所以这里我reboot一下
#重启libvirt(node端执行)
systemctl restart libvirtd && systemctl status libvirtd
#测试
virsh -c qemu:///system list
#查看virsh版本
virsh --version
#做个软连接
ln -s /usr/libexec/qemu-kvm /usr/bin/qemu-kvm
lsmod |grep kvm
#查看网桥
brctl show
#设置权限
sed -i "s/#spice_listen/spice_listen/" /etc/libvirt/qemu.conf
sed -i "s/#spice_tls = 1/spice_tls = 1/" /etc/libvirt/qemu.conf
sed -i "s/#vnc_listen/vnc_listen/" /etc/libvirt/qemu.conf
sed -i "s/#user = \"root\"/user = \"root\"/" /etc/libvirt/qemu.conf
sed -i "s/#group = \"root\"/group = \"root\"/" /etc/libvirt/qemu.conf
sed -i "s/#dynamic_ownership = 1/dynamic_ownership = 1/" /etc/libvirt/qemu.conf
systemctl restart libvirtd
注:如需单独安装kvm虚拟机,请看我另一篇文章
部署webvirtmgr(master端执行)
这里使用脚本安装前期少量的部分
#!/usr/bin/env bash
. /etc/init.d/functions
yum -y install wget
wget -O /CentOS-Base.repo http://mirrors.aliyun.com/repo/Centos-7.repo
cd /etc/yum.repos.d/; for i in `ls`;do mv $i{,.bak};done
mv /CentOS-Base.repo /etc/yum.repos.d/
yum -y install epel-release && yum clean all && yum makecache
yum -y install https://dl.fedoraproject.org/pub/epel/7/x86_64/Packages/e/epel-release-7-12.noarch.rpm
yum -y install git python-pip libvirt-python libxml2-python python-websockify supervisor nginx gcc gcc-c++ python-devel
git clone --depth=1 git@github.com:retspen/webvirtmgr.git
if [ $? -ne 0 ];then
action "git clone" /bin/false
fi
cd webvirtmgr && pip install -i https://mirrors.aliyun.com/pypi/simple/ -r requirements.txt
#脚本完
===============================================================================================
[root@master webvirtmgr]# python
>>> import sqlite3
>>> exit()
#初始化账号
./manage.py syncdb
yes-->回车-->输入自己的邮箱-->输入自定义密码-->确认自定义密码
./manage.py collectstatic #配置数据库的账号
输入yes
创建一个超级用户(配置webvirtmgr 登录账号)
./manage.py createsuperuser
自定义用户名(这里我用的admin)-->自己的邮箱-->密码-->密码确认
拷贝web到 相关目录
cd .. && mkdir -p /var/www
cp -R webvirtmgr /var/www/webvirtmgr
配置nginx(master端执行)
sed -i "s/ access_log/# access_log/" /etc/nginx/nginx.conf
sed -i "s/80 default_server;/80; #default_server;/" /etc/nginx/nginx.conf
sed -i "s/ server_name _;/ server_name localhost;/" /etc/nginx/nginx.conf
sed -i '/location \/ {/a\ root html;' /etc/nginx/nginx.conf
sed -i '/ root html;/a\ index index.html index.htm;' /etc/nginx/nginx.conf
#添加 /etc/nginx/conf.d/webvirtmgr.conf 配置文件
vim /etc/nginx/conf.d/webvirtmgr.conf #新建该文件
server {
listen 80 default_server;
server_name $hostname;
location /static/ {
root /var/www/webvirtmgr/webvirtmgr;
expires max;
}
location / {
proxy_pass http://127.0.0.1:8000;
proxy_set_header X-Real-IP $remote_addr;
proxy_set_header X-Forwarded-for $proxy_add_x_forwarded_for;
proxy_set_header Host $host:$server_port;
proxy_set_header X-Forwarded-Proto $scheme;
proxy_connect_timeout 600;
proxy_read_timeout 600;
proxy_send_timeout 600;
client_max_body_size 1024M; # Set higher depending on your needs
}
}
#检查nginx配置文件是否正常且重启nginx
nginx -t
systemctl restart nginx
#配置 Supervisor
#注:该部分会有坑,就是因为字符编码问题,如你在复制时有异常需自行排错,排错命令见下面附命令
echo '
[program:webvirtmgr]
command=/usr/bin/python /var/www/webvirtmgr/manage.py run_gunicorn -c /var/www/webvirtmgr/conf/gunicorn.conf.py
directory=/var/www/webvirtmgr
autostart=true
autorestart=true
logfile=/var/log/supervisor/webvirtmgr.log
log_stderr=true
user=nginx
[program:webvirtmgr-console]
command=/usr/bin/python /var/www/webvirtmgr/console/webvirtmgr-console
directory=/var/www/webvirtmgr
autostart=true
autorestart=true
stdout_logfile=/var/log/supervisor/webvirtmgr-console.log
redirect_stderr=true
user=nginx'>>/etc/supervisord.conf
#检查
vim /var/www/webvirtmgr/conf/gunicorn.conf.py
#确保下面bind绑定的是本机的8000端口,这个在nginx配置中定义了,被代理的端口
bind = '127.0.0.1:8000'
#重启supervisord(下图属正常,如不是显示的下图则需排错)
systemctl restart supervisord && systemctl enable supervisord && systemctl status supervisord
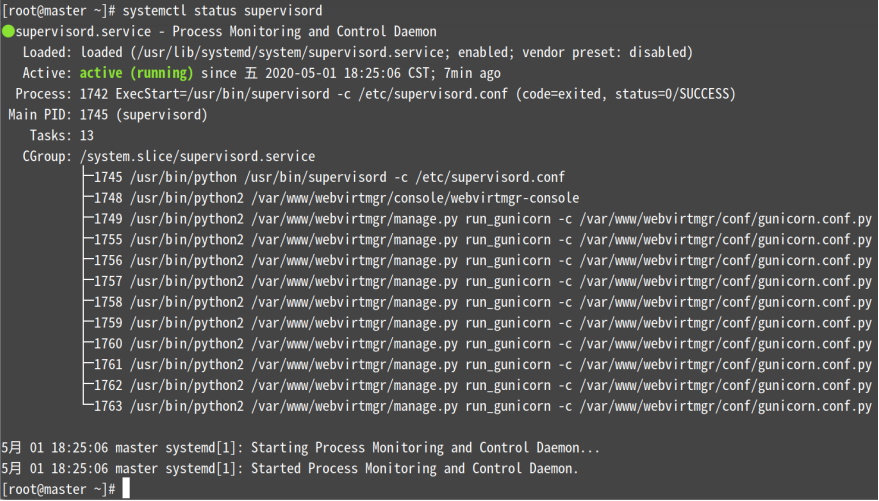
ps -ef|grep super
#确保8000和6080端口已经启动
netstat -anpt|grep -E '(:8000|:6080)'
--------到这里webvirtmgr配置完成-----
附:
program的名字是:webvirtmgr、webvirtmgr-console
查看单个program的错误信息:supervisorctl tail <program_name> stderr
重新启动配置中的所有程序:supervisorctl reload
更新新的配置到supervisord:supervisorctl update
启动某个进程(program_name=你配置中写的程序名称): supervisorctl start <program_name>
停止全部进程: supervisorctl stop all
supervisorctl -c /etc/supervisord.conf #查看进程中的任务
webvirtmgr服务器(master端)与kvm服务器(node端)连接配置
(webvirtmgr与kvm之间使用ssh方式连接管理)
1、在kvm(node端)服务器上配置webvirt用户
useradd webvirtmgr && echo "123456" | passwd --stdin webvirtmgr
usermod -G libvirt -a webvirtmgr
2、在webvirtmgr服务器上执行:(该目录为所有镜像存放的地方,生产中请按需取名)
mkdir /opop && chown nginx.nginx /opop && chmod 700 -R /opop
su - nginx -s /bin/bash
ssh-keygen
touch ~/.ssh/config && echo -e "StrictHostKeyChecking=no\nUserKnownHostsFile=/dev/null" >> ~/.ssh/config
chmod 0600 ~/.ssh/config
#将ssh-key上传到kvm服务器上
ssh-copy-id webvirtmgr@192.168.1.133
3、在kvm(node端)服务器上配置 libvirt ssh授权
vim /etc/polkit-1/localauthority/50-local.d/50-libvirt-remote-access.pkla #新建该文件
[Remote libvirt SSH access]
Identity=unix-user:webvirtmgr
Action=org.libvirt.unix.manage
ResultAny=yes
ResultInactive=yes
ResultActive=yes
#修改权限并重启
chown -R webvirtmgr.webvirtmgr /etc/polkit-1/localauthority/50-local.d/50-libvirt-remote-access.pkla
service libvirtd restart 或者 systemctl restart libvirtd
webvirtmgr与kvm之间使用tcp方式连接管理(Node端执行)
1)Libvirtd服务监听配置
修改/etc/sysconfig/libvirtd文件,去掉下面一行的注释,使Libvirt服务处于监听状态
sed -i "s/^#LIBVIRTD_ARGS/LIBVIRTD_ARGS/" /etc/sysconfig/libvirtd
2)配置Libvirt服务
sed -i "s/^#listen_tls/listen_tls/" /etc/libvirt/libvirtd.conf
sed -i "s/^#listen_tcp/listen_tcp/" /etc/libvirt/libvirtd.conf #允许tcp监听
sed -i "s/^#tcp_port/tcp_port/" /etc/libvirt/libvirtd.conf #开放tcp端口
sed -i "s/#listen_addr = \"192.168.0.1\"/listen_addr = \"0.0.0.0\"/" /etc/libvirt/libvirtd.conf #监听地址修改为0.0.0.0
sed -i "s/^#auth_tcp/auth_tcp/" /etc/libvirt/libvirtd.conf #配置tcp通过sasl认证
3)创建libvirt管理用户
saslpasswd2 -a libvirt admin
#这里输入自定义密码
#使用浏览器登录
#登录账号和密码为系统的登录账密
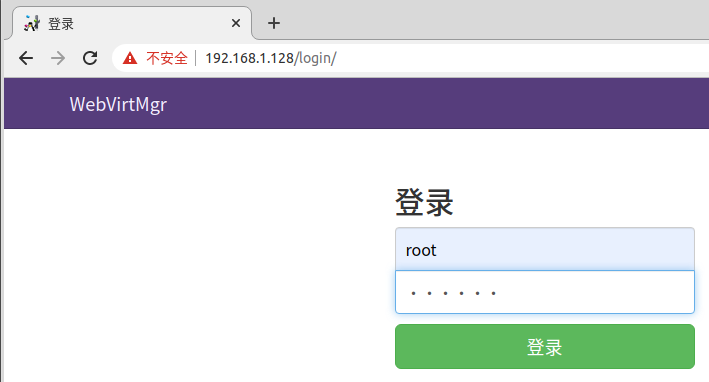
点击Add Connection

注:Label要和IP相同,用户不是root
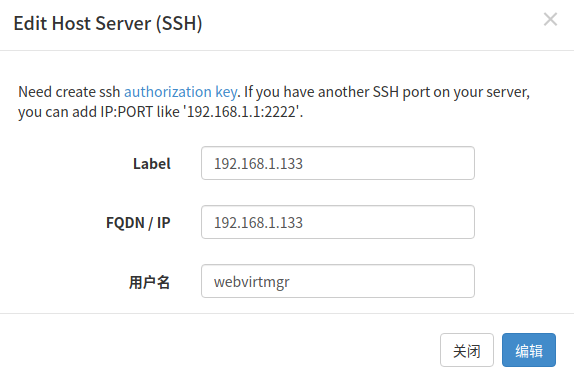
点击下图中铅笔前面的133地址进入配置:
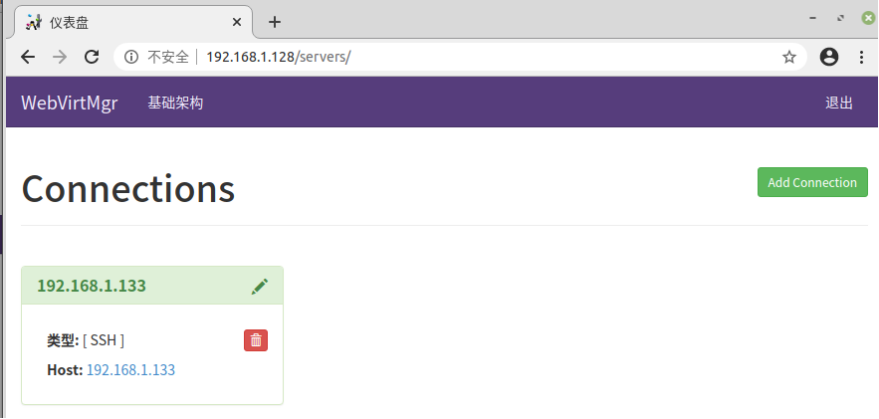
点击 "存储池" ---New Storage(即创建磁盘镜像存放的位置)
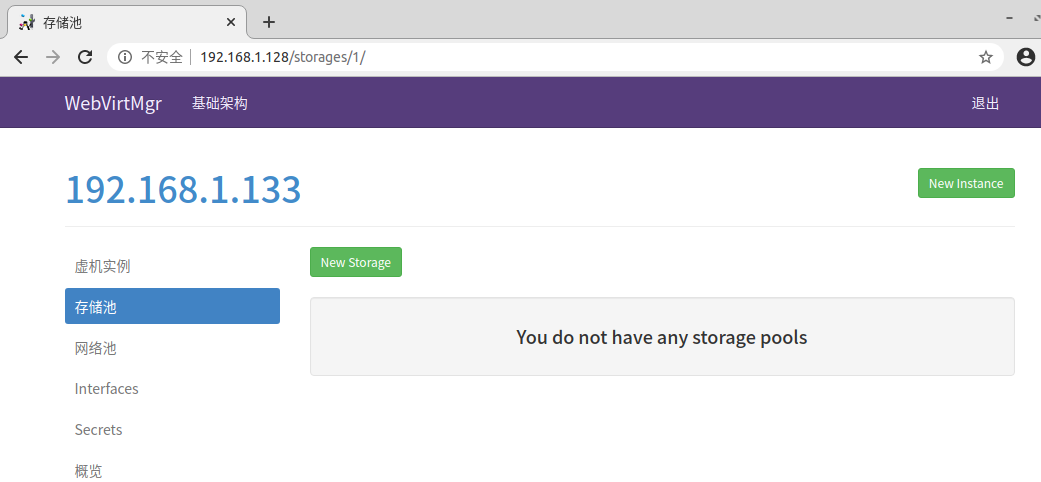
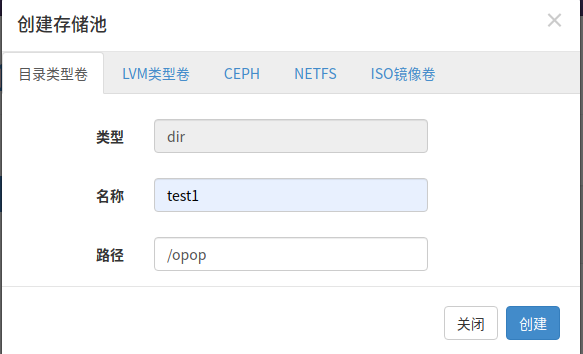
在下图选择 "路径" 选项时需提前在Node节点上创建好该目录,opop的目录即所有的镜像都应该放到该目录中,必须!!!

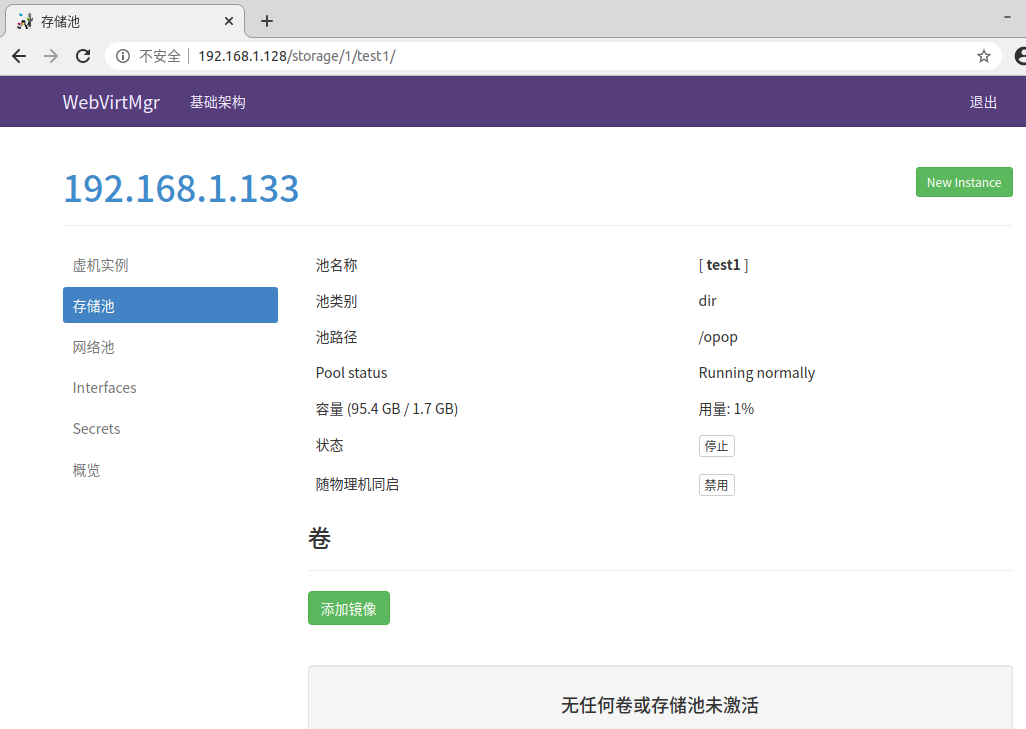
点击添加镜像
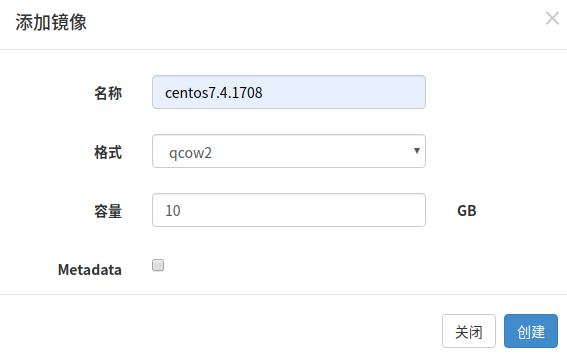
镜像名称、容量可自定义,镜像格式选择qcow2,Metadata后面的勾默认是打着的,要去掉
删除存储池:
查看所有存储池:virsh pool-list --all
取消存储池的激活: virsh pool-destroy <存储池名称>
然后在webvirtmgr界面在“存储池”里找到要删除的存储池先停止,再删除
宿主机网卡的桥接模式设置
选择“Interfaces”---New Interface
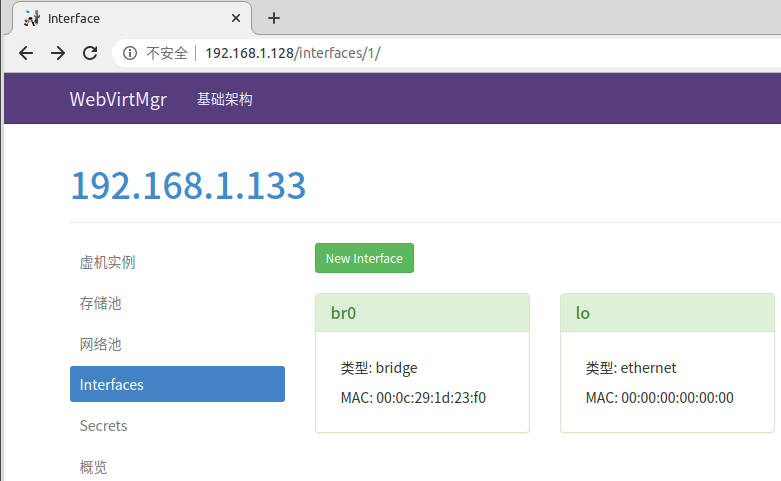
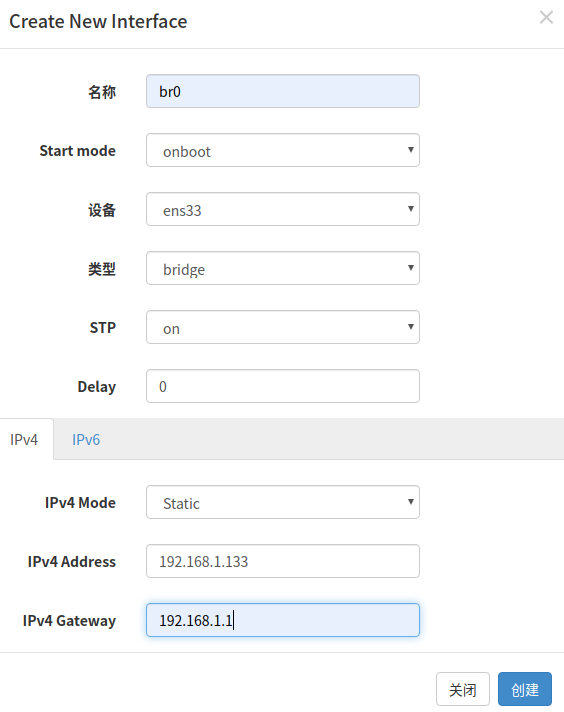
注:注意下面的“设备”一项要填写桥接的物理网卡(即br0对应的那个网卡)
名称可自定义,start mode是开机自启动,类型选桥接,STP类似思科的生成树协议
IPV4写br0的IP地址和网关
创建网络池
选择“网络池”---“New Network”
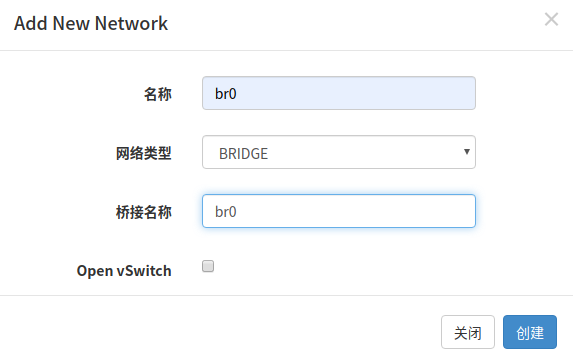
再点击左边的 "网络池"----点击br0,再进行下一步的操作

点击下图中New Instance

点击Custom Instance进行配置虚拟机
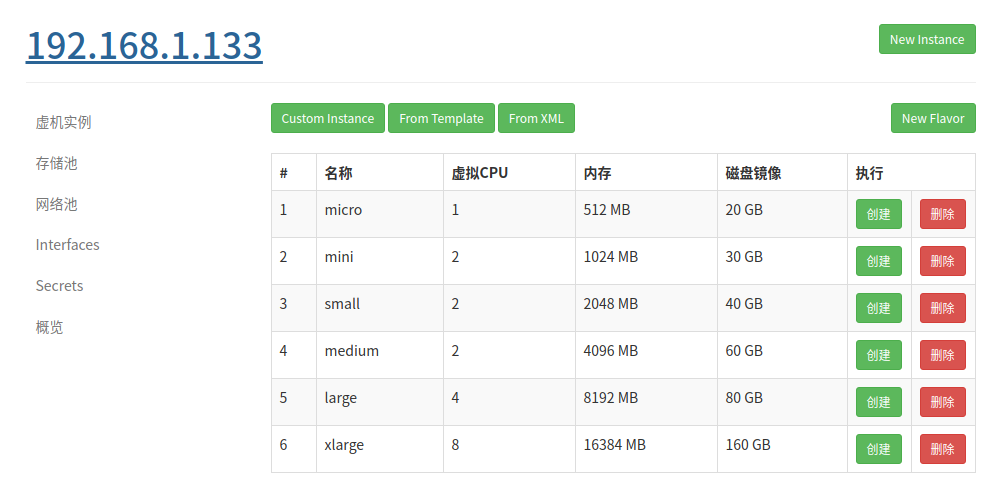
名称自定义,磁盘镜像选择上面创建的centos7.4.1708.img,网络池选择刚部署的br0,内存按需,其他不变,如下图

点击 设置---Media ,选择要使用的镜像---点击连接
注:所有镜像都必须放到/opop/目录下(上面已定义好了),如果下载了各种镜像版本放到里面,那么就可以在这里选择你想安装的版本!
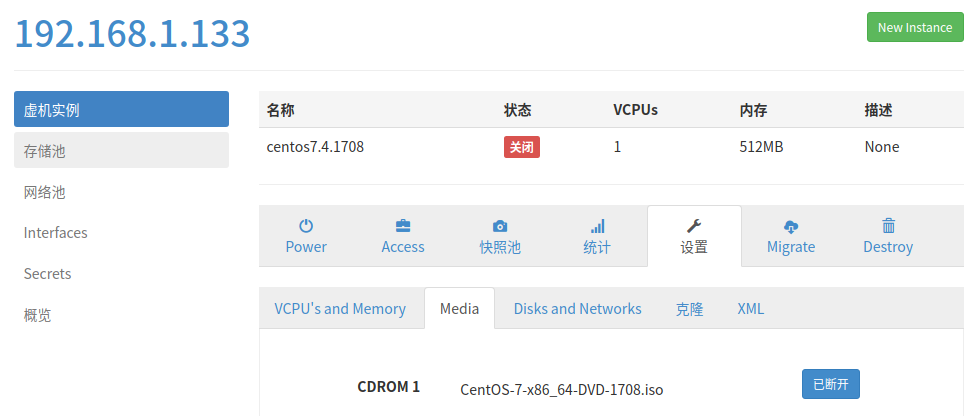
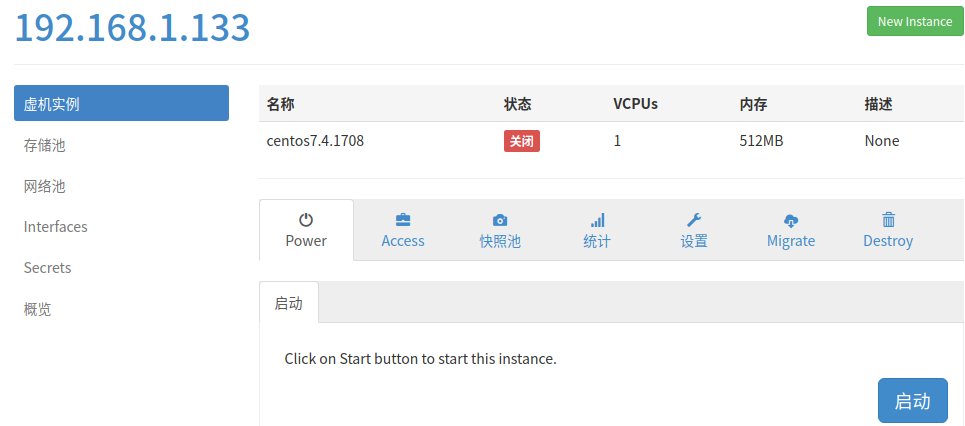
点击Power---启动
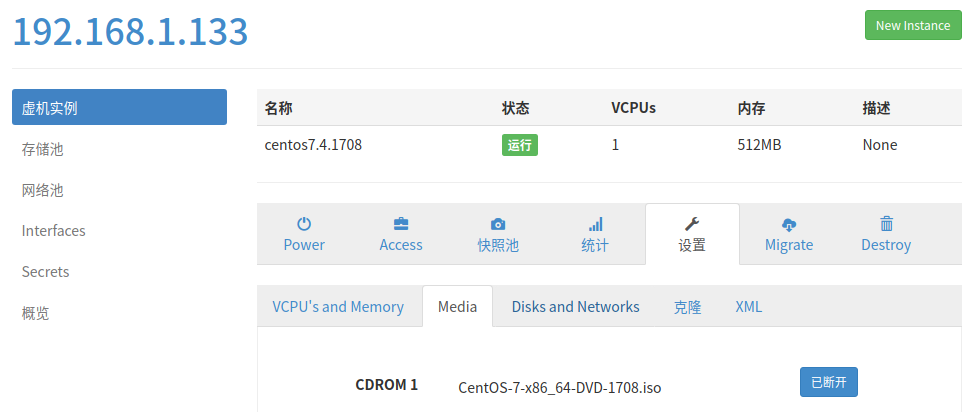
启动后的画面,如下图
点击Access----控制台---控制台,进行连接到虚拟机中
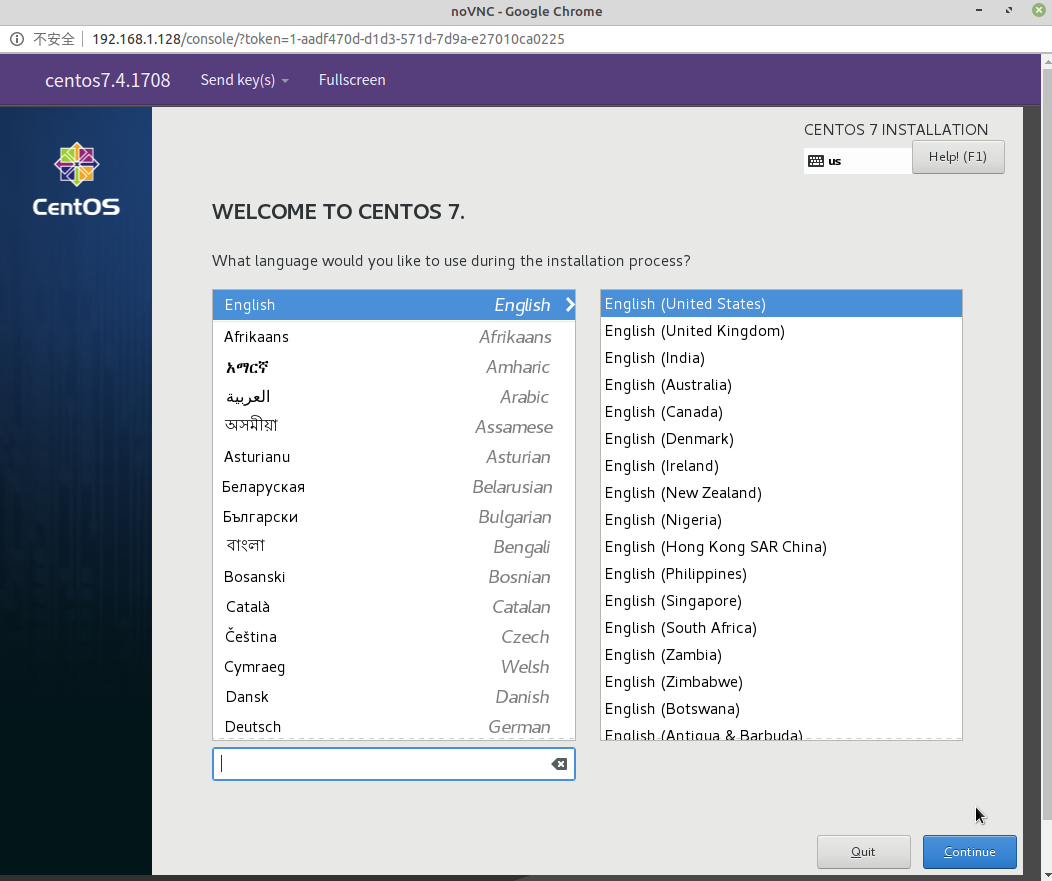
往下的安装和正常的一样,此处略过去部分安装过程..........
安装完毕并成功登录进来
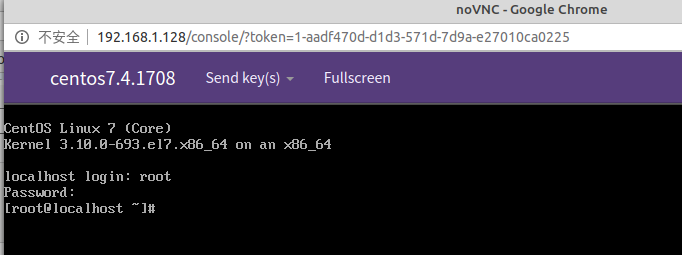
注:这里因为我是在虚拟机中做到,网络方面层次会有点多,按以上教程做出来后会连接不到互联网,待我这边有了真机后再做相对应的教程


【推荐】国内首个AI IDE,深度理解中文开发场景,立即下载体验Trae
【推荐】编程新体验,更懂你的AI,立即体验豆包MarsCode编程助手
【推荐】抖音旗下AI助手豆包,你的智能百科全书,全免费不限次数
【推荐】轻量又高性能的 SSH 工具 IShell:AI 加持,快人一步
· 从 HTTP 原因短语缺失研究 HTTP/2 和 HTTP/3 的设计差异
· AI与.NET技术实操系列:向量存储与相似性搜索在 .NET 中的实现
· 基于Microsoft.Extensions.AI核心库实现RAG应用
· Linux系列:如何用heaptrack跟踪.NET程序的非托管内存泄露
· 开发者必知的日志记录最佳实践
· winform 绘制太阳,地球,月球 运作规律
· AI与.NET技术实操系列(五):向量存储与相似性搜索在 .NET 中的实现
· 超详细:普通电脑也行Windows部署deepseek R1训练数据并当服务器共享给他人
· 上周热点回顾(3.3-3.9)
· AI 智能体引爆开源社区「GitHub 热点速览」
2018-05-02 Centos 7 KVM安装win10