记录--vue3中使用Swiper组件
🧑💻 写在开头
点赞 + 收藏 === 学会🤣🤣🤣
一,安装
npm i swiper
二,使用
swiper/vue 导出 2 个组件:Swiper 和 SwiperSlide
<template>
  <swiper
    :slides-per-view="3"
    :space-between="50"
    @swiper="onSwiper"
    @slideChange="onSlideChange"
  >
    <swiper-slide>Slide 1</swiper-slide>
    <swiper-slide>Slide 2</swiper-slide>
    <swiper-slide>Slide 3</swiper-slide>
    ...
  </swiper>
</template>
<script lang="ts" setup>
  // Import Swiper Vue.js components
  import { Swiper, SwiperSlide } from 'swiper/vue';
  // Import Swiper styles
  import 'swiper/css';

   const onSwiper = (swiper) => {
        console.log(swiper);
      };

  const onSlideChange = () => {
    console.log('slide change');
  };
</script>
默认情况下,Swiper Vue 使用 Swiper 的核心版本(没有任何附加模块)。如果要使用Navigation、Pagination等模块,必须先安装它们.
三,Swiper相关扩展模块
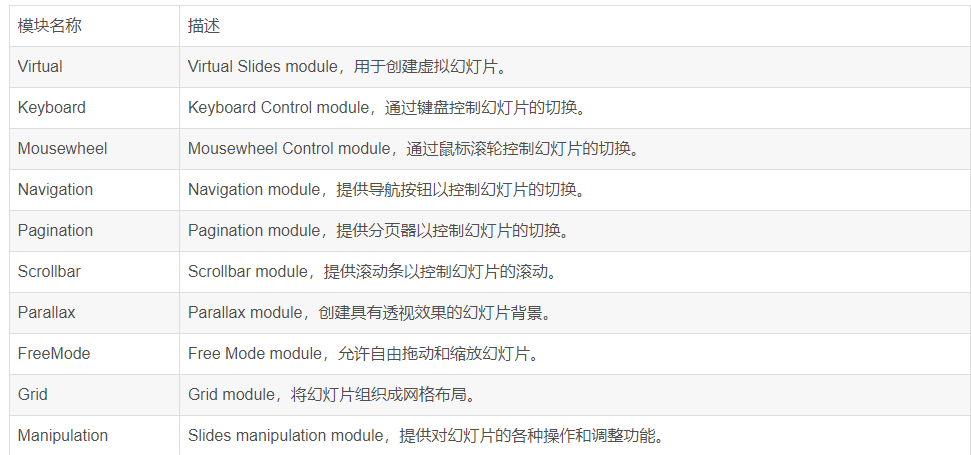
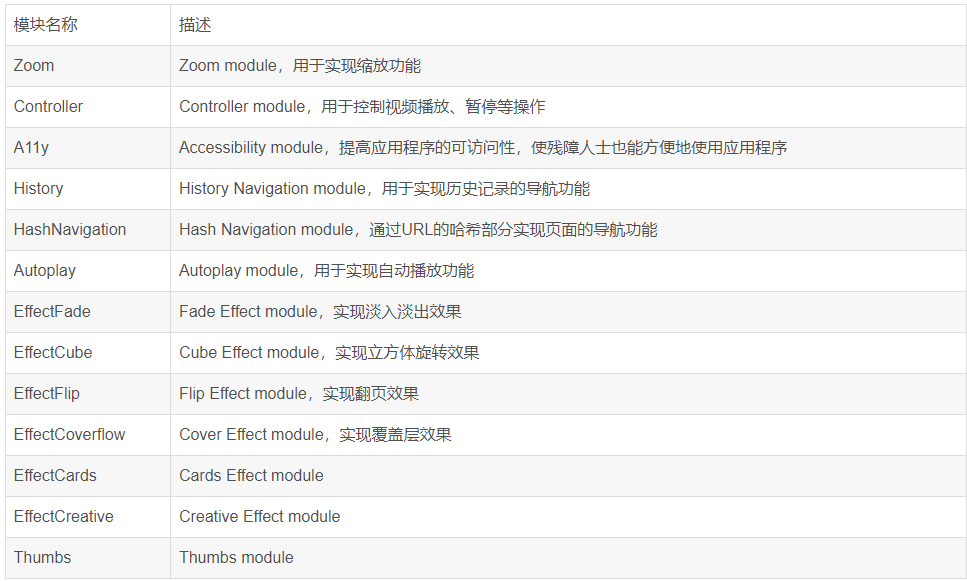
使用扩展模块
<template>
  <swiper
    :modules="modules"
    :slides-per-view="3"
    :space-between="50"
    navigation
    :pagination="{ clickable: true }"
    :scrollbar="{ draggable: true }"
    @swiper="onSwiper"
    @slideChange="onSlideChange"
  >
    <swiper-slide>Slide 1</swiper-slide>
    <swiper-slide>Slide 2</swiper-slide>
    <swiper-slide>Slide 3</swiper-slide>
    ...
  </swiper>
</template>
<script>
  // import Swiper core and required modules
  import { Navigation, Pagination, Scrollbar, A11y } from 'swiper/modules';

  // Import Swiper Vue.js components
  import { Swiper, SwiperSlide } from 'swiper/vue';

  // Import Swiper styles
  import 'swiper/css';
  import 'swiper/css/navigation';
  import 'swiper/css/pagination';
  import 'swiper/css/scrollbar';

   const onSwiper = (swiper) => {
        console.log(swiper);
      };

  const onSlideChange = () => {
    console.log('slide change');
  };

  const modules = [Navigation, Pagination, Scrollbar, A11y];

</script>
请注意,如果您传递这些参数而不指定其元素(例如,没有 navigation.nextEl、pagination.el 等),Swiper Vue 组件将为导航、分页和滚动条创建所需的元素。
四,样式
Swiper包包含不同的CSS、Less和SCSS样式集。
swiper/css - 仅核心 Swiper 样式
swiper/css/bundle - 所有 Swiper 样式,包括所有模块样式(如导航、分页等)
模块样式(如果您已经导入了包样式则不需要)
swiper/css/a11y
swiper/css/autoplay
swiper/css/controller
swiper/css/effect-cards
swiper/css/effect-coverflow
swiper/css/effect-creative
swiper/css/effect-cube
swiper/css/effect-fade
swiper/css/effect-flip
swiper/css/free-mode
swiper/css/grid
swiper/css/hash-navigation
swiper/css/history
swiper/css/keyboard
swiper/css/manipulation
swiper/css/mousewheel
swiper/css/navigation
swiper/css/pagination
swiper/css/parallax
swiper/css/scrollbar
swiper/css/thumbs
swiper/css/virtual
swiper/css/zoom
对于 SCSS 样式,将导入路径中的 css 替换为 scss,例如:
import 'swiper/scss';
import 'swiper/scss/navigation';
import 'swiper/scss/pagination';
五,效果
swiper 可以使用以下效果:
- Fade
- Cube
- Coverflow
- Flip
- Cards
- Creative
要使用效果,您必须首先导入并安装它们(与所有其他模块一样)。
<template>
  <swiper :modules="[EffectFade]" effect="fade">
    <swiper-slide>Slide 1</swiper-slide>
    <swiper-slide>Slide 2</swiper-slide>
    <swiper-slide>Slide 3</swiper-slide>
    ...
  </swiper>
</template>
<script lang="ts" setup>
  import { EffectFade } from 'swiper/modules';
  import { Swiper, SwiperSlide } from 'swiper/vue';
  import 'swiper/css';
  import 'swiper/css/effect-fade';
</script>
六、使用分页Pagination
<template>
  <swiper :pagination="pagination" :modules="modules" class="mySwiper">
    <swiper-slide>Slide 1</swiper-slide>
    <swiper-slide>Slide 2</swiper-slide><swiper-slide>Slide 3</swiper-slide>
    <swiper-slide>Slide 4</swiper-slide><swiper-slide>Slide 5</swiper-slide>
    <swiper-slide>Slide 6</swiper-slide><swiper-slide>Slide 7</swiper-slide>
    <swiper-slide>Slide 8</swiper-slide><swiper-slide>Slide 9</swiper-slide>
  </swiper>
</template>
<script>
  // Import Swiper Vue.js components
  import { Swiper, SwiperSlide } from 'swiper/vue';

  // 引入swiper样式,对应css 如果使用less或者css只需要把scss改为对应的即可
import 'swiper/css';
import 'swiper/css/bundle';
import 'swiper/css/navigation';
import 'swiper/css/pagination';
import 'swiper/css/effect-fade';

  // import required modules
  import { Pagination } from 'swiper/modules';

  export default {
    components: {
      Swiper,
      SwiperSlide,
    },
    setup() {
      return {
        pagination: {
          clickable: true,
          renderBullet: function (index, className) {
            return '<span class="' + className + '">' + (index + 1) + '</span>';
          },
        },
        modules: [Pagination],
      };
    },
  };
</script>
样式效果如下:

本文转载于:https://blog.csdn.net/blue_121/article/details/135474908
如果对您有所帮助,欢迎您点个关注,我会定时更新技术文档,大家一起讨论学习,一起进步。


 浙公网安备 33010602011771号